
By following the guidelines discussed in this chapter, you will acquire knowledge on how to set up new agent pools for TFS and VSTS, configure TFS agents for different scenarios, and use extensions from Visual Studio Marketplace to enhance features of TFS/VSTS.
Lesson 2.01 – Set Up Agent Pools and Queues
The aim of this lesson is to provide a step-by-step guide to creating new agent pools and queues in TFS/VSTS. Also, this lesson contains instructions for setting required permissions for agent pools and queues.
Prerequisites: You should have a VS Team Services account, created by following the instructions found at https://www.visualstudio.com/en-us/docs/setup-admin/team-services/sign-up-for-visual-studio-team-service , or have a TFS2017 server. Ensure you have been granted Manage permission for all pools. For more information on agent pool permissions, see Chapter 1.
Create a new team project called “Project X” by following the instructions at https://www.visualstudio.com/en-us/docs/setup-admin/create-team-project . We will use this project in the lessons in this chapter.
2.01.1 Set Up Agent Pool
The agent pool specifies the security context and runtime environment for agents. An agent pool can be defined to group agents to be used for the same purpose (for example, all agents doing builds can be assigned to an agent pool called “BuildAgentPool ”) or to group agents based on projects that they are used for.
In Team Foundation Home, click on Settings, then select Agentpools and then New pool. This creates the new pool. See Figure 2-1.
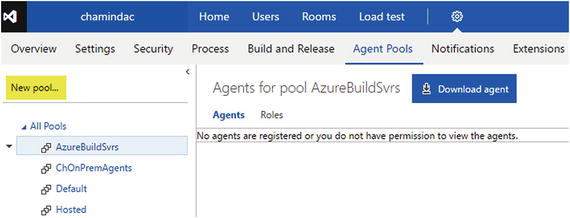
Figure 2-1. New agent pool
Provide a name (“ProjectX Release Pool”) for the agent pool in the popup window. You can uncheck “Auto-Provision Queues in all Projects” to prevent provisioning a queue for each existing project. If you choose not to select this option, you can still create a queue for an existing pool in any team project at a later time. See Figure 2-2.

Figure 2-2. Creating an agent pool
If you see the error message shown in Figure 2-3, that means you do not have the Administrator role (this role provides Manage permissions) for All Pools.

Figure 2-3. Agent pool Manage permission error
Ask your TFS administrator/VSTS Account Owner to promote you to an Administrator to All Pools to continue with the lesson. (Or you could use your own VSTS account to continue with the lesson.) See Figure 2-4.
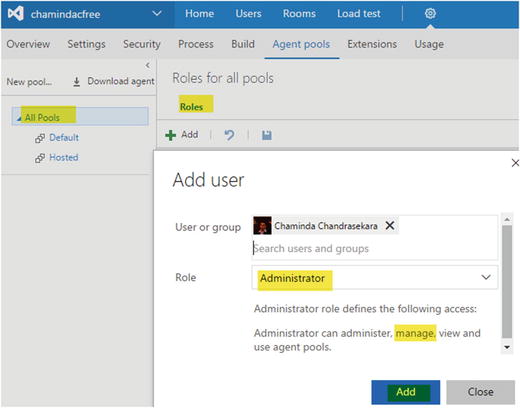
Figure 2-4. Assign administrator role for all pools
You can create a new pool after being assigned Manage permission for All Pools. For this pool, uncheck “Auto-Provision Queues in all Projects.” Name the pool “Project X Release Pool.” See Figure 2-5.
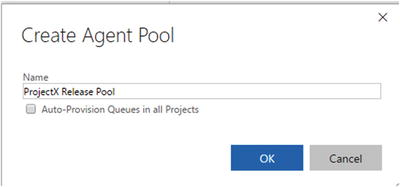
Figure 2-5. Creating a pool without provisioning queues
You will be assigned to the Administrator role of the pool automatically once it is created. See Figure 2-6.
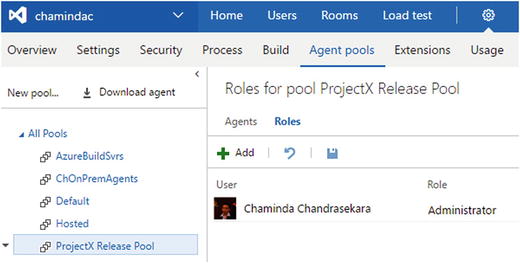
Figure 2-6. Creator of the pool is added as the administrator to the pool
Create another pool with “Auto-Provision Queues in all Projects” option checked. See Figure 2-7.

Figure 2-7. Creating a pool with provisioning queues
You will be able to see the queue in each project for the pool created with “Auto-Provision Queues in all Projects” checked, but not for the pool created without “Auto-Provision Queues in all Projects” checked. See Figure 2-8.

Figure 2-8. All team projects provisioned with a queue
In the preceding steps, we created two agent pools. One pool is provisioned with a queue in each team project. The other pool is not provisioned with a queue for any team projects.
2.01.2 Set Up Agent Queue
Since we have unchecked “Auto-Provision Queues in all Projects” while setting up the agent pool “ProjectX Release Pool,” no queues are created for the pool. To provision a queue for a team project, follow the steps given here.
In the team project “Project X,” click on Settings ➤ Agent Queues and then click New queue. See Figure 2-9.
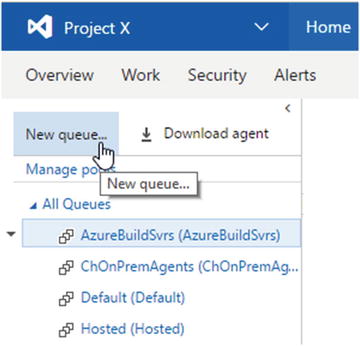
Figure 2-9. New queue
Select the existing pool created earlier. Please note that the other pools cannot be selected since they are already provisioned. See Figure 2-10.
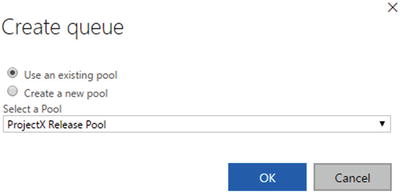
Figure 2-10. Creating a queue with an existing pool
You will be assigned with the Administrator role for the created queue. The project administrators and build administrators also have the administrator role for the queue. See Figure 2-11.

Figure 2-11. Creator assigned to administrator role in queue
You can create a new queue directly from the team project with a new pool. If you do this, “Auto-Provision Queues in all Projects” is not applied to that pool, and other team projects will not be provisioned with the queue. To understand that scenario, follow the steps given next.
In a team project, go to Settings ➤ Select Agent Queues, then click New queue. See Figure 2-12.

Figure 2-12. Creating a new pool while creating a queue
This will create a pool and then provision the queue in the team project. See Figure 2-13.

Figure 2-13. Queue provisioned in the team project, and a pool created
Go to Account Setting ➤ Agent Pools. Click on the pool that was created while creating the queue in the preceding steps. You will notice that the pool does not have “Auto-Provision Queues” checked. See Figure 2-14.

Figure 2-14. Pool created from project while creating a queue
We have looked at steps to provision an agent queue using an existing pool as well as at creating a new agent pool while provisioning the queue.
2.01.3 Auto-Provision Queues for Existing Pools
Even if you select “Auto-Provision Queues” from the popup menu of the pool, it will not affect any existing team projects. You will have to provision the queue for each team project manually, if required. Follow these steps to understand how it works:
Click on the popup menu for “Pool from ProjectX” in the Agent Pools tab of the account settings. Then, select “Auto-Provision Queues.” See Figure 2-15.

Figure 2-15. Selecting auto-provision in an existing pool
Open another team project and navigate to Settings, Agent Queue tab. You can see that the preceding step did not provision the queue for the pool in other team projects. In Figure 2-16, you can see that Project X (the team project you used to create the new queue while creating a new pool) is provisioned with a queue, while other team projects are not provisioned with the queue (one other team project, EventBooking, is shown in the figure).

Figure 2-16. Queue not getting provisioned for other existing team projects
If required, you can provision the queue for other existing team projects by selecting the existing pool. See Figure 2-17.

Figure 2-17. Selecting existing pool and provisioning a queue
If you create a new team project, all pools marked with “Auto-Provision Queues” will be provisioned for that new team project. Right now, all pools except ProjectX Release Pool are checked with “Auto-Provision Queues.” See Figure 2-18.

Figure 2-18. ProjectX Release Pool not set for auto-provision
Create a new team project called “ProjectY” to verify what we just discussed. Do so by going through the following steps. (You need to have Team Project Collection administrator permission to create a new team project.) Go to the Project Collection administration page and click on New Team Project. See Figure 2-19.

Figure 2-19. Creating new team project VSTS
You can see in the figure a VSTS account projects overview page. On-premises TFS collection administration pages will look something like what you see in Figure 2-20.

Figure 2-20. Creating a new team project in TFS 2017
Provide the team project name and select your preferred version control. Click the Create project button to create the new team project. See Figure 2-21.
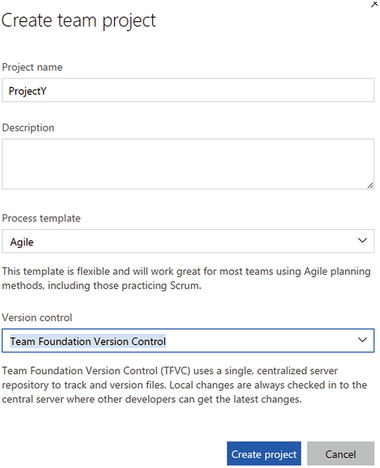
Figure 2-21. New team project
In ProjectY, created in the previous step, queues are provisioned for all pools except for the Project X Release Pool , which does not have “Auto-Provision Queues” selected. See Figure 2-22.
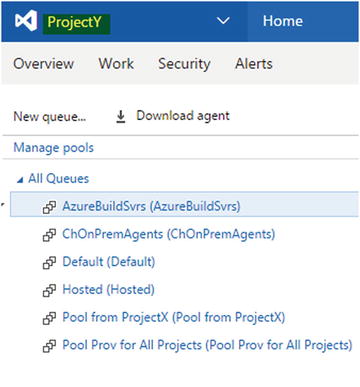
Figure 2-22. Queues provisioned for pools specified with auto-provision
In this lesson, you have discovered the ways to provision queues for existing team projects, as well as how the “Auto-Provision Queues” option in an agent pool behaves, both when selected and when unselected.
2.01.4 Assign Permissions for Agent Pools and Queues
There are a few different roles in agent pools and queues, which were explained in Chapter 1. You can assign individuals or a group of users to each of these roles.
Select the pool or queue and click Roles, then add the relevant user or group to the preferred role. See Figure 2-23.

Figure 2-23. Adding user to roles in agent queue
By default, Project Collection Administrators, Project Administrators, and Build Administrators are granted the Administrator role for a queue in TFS2017. See Figure 2-24.

Figure 2-24. Agent queue default permissions
Permissions in agent pools and queues can be specified as describe in above steps. To learn more details on agent pool and queue roles refer to Chapter 1.
2.01.5 Create Agent Pool for Build Farm
Let’s create a new agent pool called “BuildFarm” to be used in the lessons to follow in this chapter.
Create an agent pool in TFS called “BuildFarm” by selecting Agent pools from the main page and then clicking New pool (let’s use it as build server pool), with the option checked to auto-provision agent for all projects. See Figure 2-25.
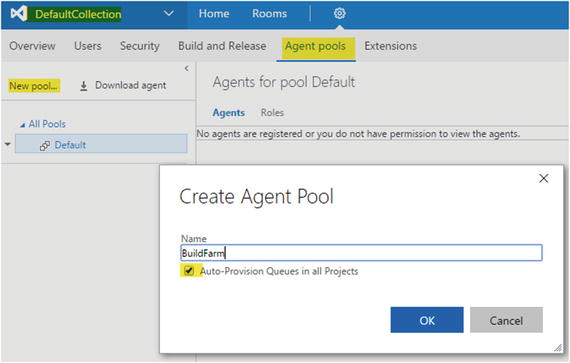
Figure 2-25. Creating a pool as build farm
When you create a pool in one project collection, it is available to other project collections in the TFS, and all projects are provisioned with a queue.
In this lesson, you created agent pools and queues in a few different ways. You allowed some agent pools to be accessible to all team projects and some agent pools to only be accessible to a given project. Limiting access to a pool for a given team project will be required when setting up deployment agents to be used with release management for a given project. Such agents could even reside in the client’s production environment and be assigned specific permissions for users who are using roles available for agent pools and queues.
Link VS Team Services Account to Azure Subscription for Billing Purposes
You can link the VS Team Services Account to an Azure subscription in order to purchase build/release pipelines in addition to the provided free pipeline. It is not mandatory to link VSTS to an Azure subscription to complete the lessons to follow, since they can be performed with the available free pipeline. Chapter 1 contains more information on agents, pipelines and the difference of them in on-premises TFS and VSTS.
To link a Team Services account to an Azure subscription, you need a VS Team Services account for which you are the account owner. You should have an Azure subscription with at least co-administrator permissions, and the subscription should not be one of the following:
Azure Free Trial ( https://azure.microsoft.com/en-us/offers/ms-azr-0044p/ )
Free Azure AD Subscription ( https://technet.microsoft.com/library/dn832618.aspx )
From Cloud Solution Provider Program ( https://partner.microsoft.com/en-US/Solutions/cloud-reseller-overview )
Changing the owner of a Team Services account is possible in the Settings tab, as shown in Figure 2-26.
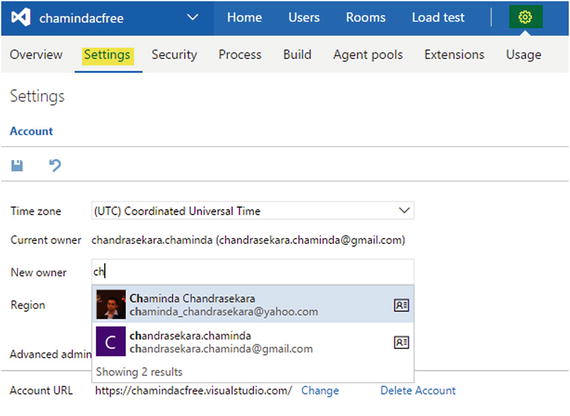
Figure 2-26. Changing VSTS account owner
You need to remove the spending limit of the Azure subscription indefinitely and link your credit card, even for Azure subscriptions that come with your VS subscription. VS subscription–granted free credits cannot be used as payment for Team Services features or users.
You can link your VS Team Services account in the Azure portal. Detailed instructions can be found here: https://www.visualstudio.com/en-us/docs/setup-admin/team-services/set-up-billing-for-your-account-vs .
Once the billing for VSTS is set up as per the instructions, you can purchase more hosted/private pipelines via Azure portal, which will take you to relevant VS Marketplace purchase pipeline page. See Figure 2-27.
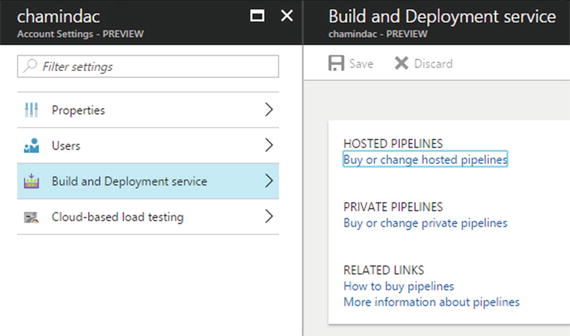
Figure 2-27. Purchasing pipelines via Azure portal for VSTS
To calculate the pricing for agents and other VS Team Services users, use the pricing calculator available here: https://azure.microsoft.com/en-us/pricing/calculator/?service=visual-studio-team-services .
Lesson 2.02 – Set Up Build/Release Agent
In this lesson, you will learn how to set up a build/release agent in the same domain as TFS. This will give you the knowledge required to set up your own build farm in your domain, set up agents for your QA environment deployments, and so on.
Prerequisites: You should have Manage permission for the pool that you are setting up the agent for, or you should have followed Lesson 2.01.5 and created a pool with name BuildFarm. You need to have PowerShell 3.0 or later available in the agent machine in which you are going to set up a build/release agent for TFS.
There are no known prerequisites for agents set up with Windows 10. Windows 7, 8.1, and Server 2012 R2 require the C Runtime update ( https://support.microsoft.com/en-us/kb/2999226 ).
2.02.1 Set Up Build/Release Agent for On-Premises TFS—Interactive Mode
Running a build agent in interactive mode is required if you want to run UI tests with your builds (test automation is discussed in Chapter 9).
In the machine you are setting up the a gent, open TFS/VSTS web portal in a browser. Go to Agent pools tab of the project collection administration page and click Download agent. See Figure 2-28.
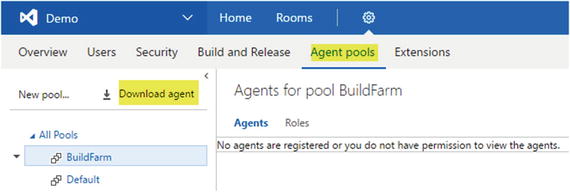
Figure 2-28. Download agent from Agent pools tab
Or, in the Agent Queues tab of the team project administration page, click Download agent. See Figure 2-29.
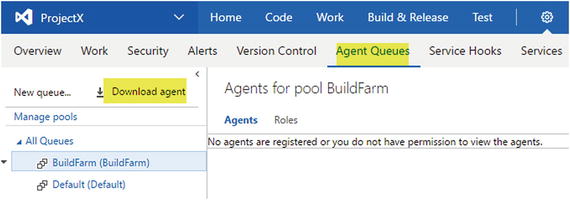
Figure 2-29. Download agent from Agent Queues tab
Download the Windows agent by clicking the Download option on the popup page. See Figure 2-30.

Figure 2-30. Downloading Windows agent
Extract the downloaded .zip file to a directory on your hard drive. See Figure 2-31.

Figure 2-31. Extracted agent files
Using the command prompt, run config.cmd and provide a team foundation server URL, such as http://youttfsserver:8080/tfs.
For authentication, use default type Integrated. This will use your current, logged-in user to make the connection to TFS when configuring the agent. The user needs to have Manage permission to the agent pool. More information on authentication types is provided at the end of this lesson.
Provide the agent pool name and a name for the agent. Use default values for the working folder. Select N by pressing Enter to say No for the “run as service” question, since we want to run the agent in interactive mode. See Figure 2-32.

Figure 2-32. Configuring agent in interactive mode
With this, agent will be set up in the pool but will be offline. See Figure 2-33.
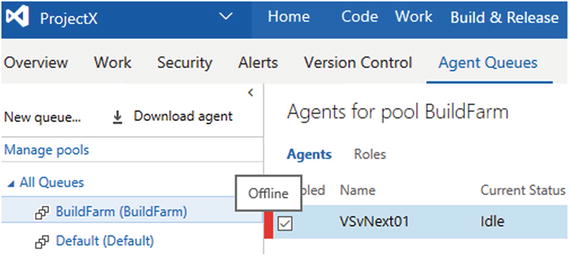
Figure 2-33. Agent configured but offline
To bring the agent online, execute run.cmd. See Figure 2-34.
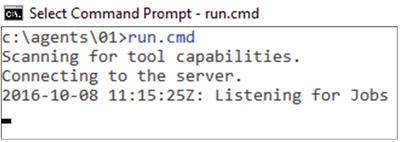
Figure 2-34. Bringing agent online
This will start to run the agent in interactive mode, with the current logged-on user being used for the agent machine. The agent will be shown as online if you view it in the Agent Queues tab or Agent Pools tab. See Figure 3-35.
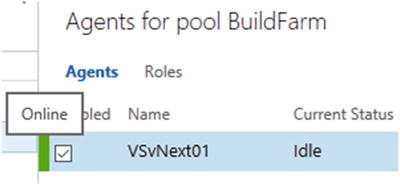
Figure 2-35. Agent is online
Running an agent in interactive mode is not as stable as running an agent as a Windows service. If the agent is stopped because of an issue, it must be started again manually. Getting an interactive mode agent to start automatically is described at http://donovanbrown.com/post/auto-start-build-agent-in-interactive-mode .
We can use an online agent to perform build or deployment tasks. If you want to remove an agent because it is no longer in use, you can do so by taking it offline before removing. The removal of an agent from a pool is described in the next lesson.
2.02.2 Remove Windows Build/Release Agent
You can remove an agent from a pool if it is no longer in use. The following steps describe how to remove an agent.
Open command prompt and change directory to the agent folder.
Run config.cmd with the remove argument. See Figure 2-36.
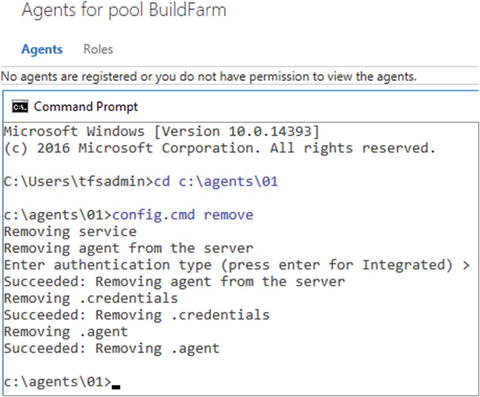
Figure 2-36. Removing an agent
When an agent is removed, it will be fully unconfigured and will no longer be visible in the agent pool.
2.02.3 Set Up Build/Release Agent for On-Premises TFS and Run as Windows Service
Let’s configure an agent to run as a Windows service. This allows the agent to be stable and recover automatically in a failure, like other Windows services.
Open command prompt with Administrator privileges. Running the command prompt as an administrator is required in order to configure the agent as a service.
Run config.cmd and provide the TFS URL.
This time, use Negotiate as the authentication type. This will prompt for a username and password in order to connect to the server to configure the agent. Provide the user credentials that have Manage permission for the agent pool.
Provide the agent pool name and agent name.
Provide the work folder path or use default _work folder.
Choose to run agent as a service.
Provide your domain or local user credentials to run the agent. See Figure 2-37.
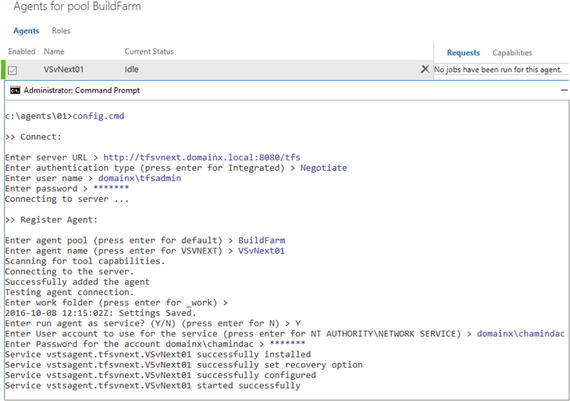
Figure 2-37. Configure agent as a service
After the Agent is configured and online, as shown in Figure 2-37, you can see a windows service is running in the services window of the agent machine. See Figure 2-38.
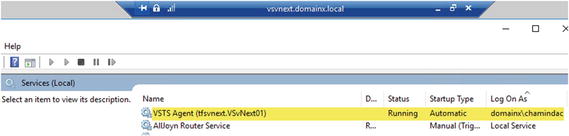
Figure 2-38. Agent running as a Windows service
The preceding steps guided you in setting up an agent as a service. An agent that is set up as a Windows service is sufficient to perform most of the code-building and deployment tasks in the Windows platform.
2.02.4 Set Up Build/Release Agent in an Untrusted Domain for VS Team Services or On-Premises TFS
Prerequisites: If you are using on-premises TFS, it should be available securely and publicly in order to set up agents in untrusted domains. In other words, your TFS server should have a public URL set up with SSL and should be accessible publicly via https to the untrusted domain or workgroup machine you are using to set up the agent. If you are using VS Team Services, it is available publicly via https. Refer to https://www.visualstudio.com/da-dk/docs/setup-admin/websitesettings for more details.
Create a PAT (Personal Access Token), with the user having Manage permissions for the agent pool. This PAT will be used to configure agent in untrusted domain/workgroup machine for VSTS or TFS. Click on your profile picture and click Security. See Figure 2-39.

Figure 2-39. Access Security tab with a user having Manage pool permissions
In the opened Security window of your profile, select Personal access tokens tab and click Add. See Figure 2-40.

Figure 2-40. Creating personal access token
Then, select Agent Pools (read, manage) scope and, finally, hit the Create Token button on the bottom left corner of the screen. See Figure 2-41.
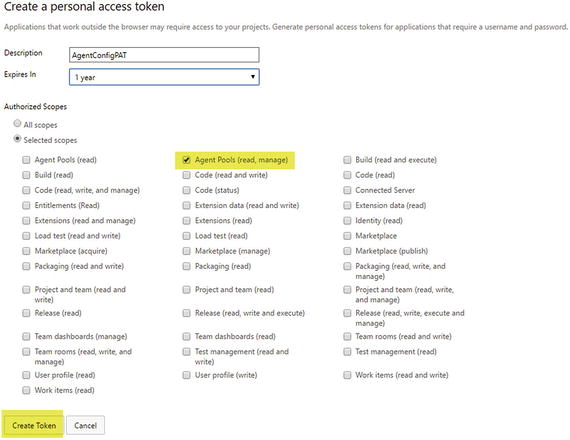
Figure 2-41. Define scope and create token
Once the PAT is created, it will be displayed only once for you to copy. Copy it and keep it in a secure location. See Figure 2-42.
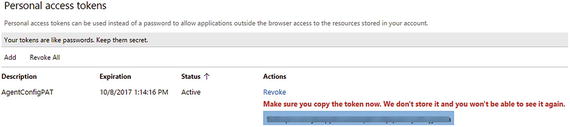
Figure 2-42. Generated PAT only available once
Download the VS Team Services or on-premises TFS Windows build/release agent.zip file from the Agent Pools tab or Agent Queues tab. Extract the zip file content to a directory on the agent machine. (Refer to 2.02.1, steps 1, 2, and 3.)
Open a command prompt (or PowerShell) as administrator and change directory to the extracted agent folder.
Run config.cmd and provide a TFS secure URL.
Enter authentication type as PAT and enter the PAT created.
Provide agent pool name.
Enter the build agent run as user, or use the default network service user. You can even use a domain user in the agent machine domain. If a local user in the agent machine is provided, do not provide as .username; just provide the username for a local user. If .username is provided, you might get an error saying the user cannot be granted Log on as service permission. See Figure 2-43.
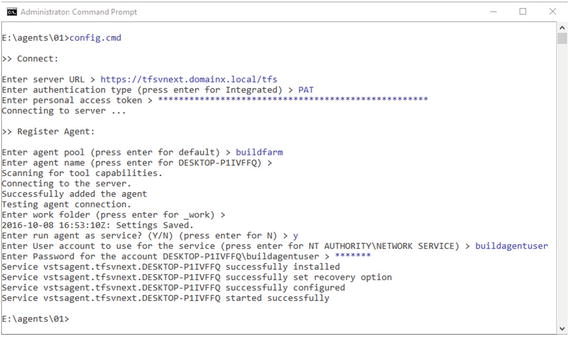
Figure 2-43. Configure agent in untrusted domain
With the preceding details, agent gets configured and comes online. See Figure 2-44.
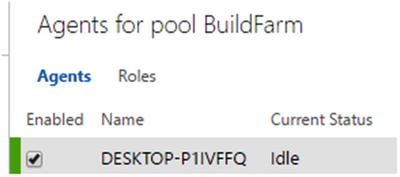
Figure 2-44. Untrusted domain agent running online
You can follow the preceding steps to set up an agent in a different domain than your TFS server domain or in a workgroup. The same steps can be used to create an on-premises agent for VS Team Services. If your TFS is available via Internet (making TFS on-premises available via Internet is described at https://www.visualstudio.com/en-us/docs/setup-admin/tfs/admin/setup-secure-sockets-layer ), you can set up a deployment agent in any machine that has an Internet connection, which allows you to access your TFS URL via internet.
2.02.5 Set Up Build/Release Agent in Ubuntu Linux
Prerequisites: You have an Ubuntu16.04LTS available to you, and you should have admin access on the machine. Based on the instructions from the previous lesson, you have created a PAT in your TFS or VS Team Services. You have the option of using credentials, instead of PAT, to configure an agent by using Negotiate, if you are using on-premises TFS.
Download the Linux agent for Ubuntu 16.04 from agent download popup. See Figure 2-45.

Figure 2-45. Download agent for Ubuntu Linux
Run Ubuntu terminal and execute the following commands to create a directory and extract the downloaded file to it. See Figure 2-46.
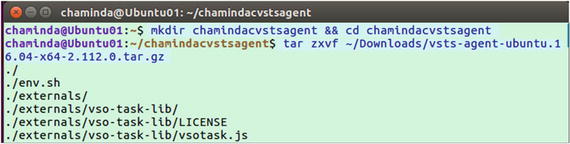
Figure 2-46. Extracting downloaded agent
mkdirmyagent && cd myagenttar zxvf ∼/Downloads/ downloadedAgentFileName .tar.gzExecute ./config.sh to configure the agent. Provide the Team Services or TFS URL and provide PAT. (Negotiate credentials for on-premises TFS can be used instead of PAT. Read more details on credentials at the end of this lesson.) See Figure 2-47.
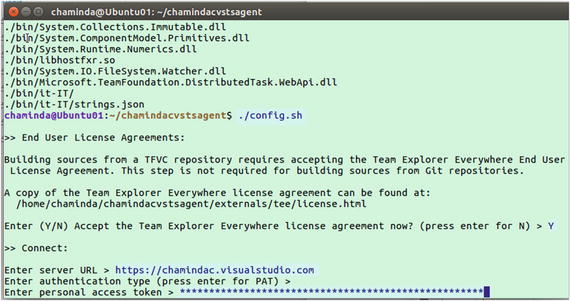
Figure 2-47. Executing ./config.sh to configure agent
Enter agent pool to add the agent and specify an agent name. See Figure 2-48.

Figure 2-48. Configuring agent for provided agent pool
Agent is configured but will be offline. See Figure 2-49.
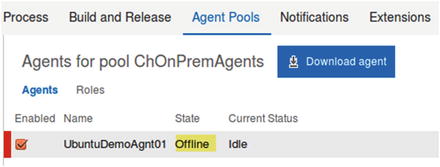
Figure 2-49. Agent on Ubuntu is configured and offline
Once the agent is configured, execute ./run.sh to bring the agent online. See Figure 2-50.

Figure 2-50. Executing ./run.sh brings the agent online
But if you close the terminal or press Ctrl+C, the agent will go offline. See Figure 2-51.
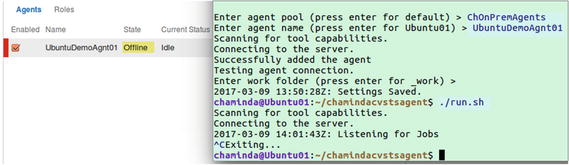
Figure 2-51. Agent goes offline if terminal is closed or Ctrl+C is pressed
To install the agent as a service in Linux, execute the following command from the agent folder. See Figure 2-52.

Figure 2-52. Install the agent as a service in Ubuntu. Agent is still offline.
sudo ./svc.sh installTo run the agent as a service, execute the following command. After executing the command, the agent will come online. You can press Ctrl+C or close the terminal. The agent will remain running since it has been configured as a service. See Figure 2-53.
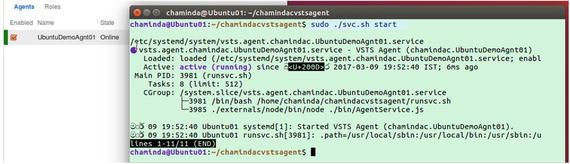
Figure 2-53. Agent online as a service in Ubuntu
sudo ./svc.sh startIn a new terminal, you can test the service status by executing the following command. See Figure 2-54.
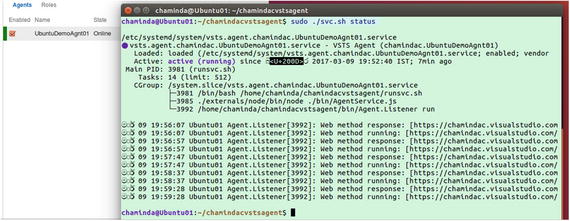
Figure 2-54. Check agent service status
sudo ./svc.sh statusTo stop service, execute the following:
sudo ./svc.sh stopTo uninstall, first stop the service and then execute the following:
sudo ./svc.sh uninstall
In this lesson, you have learned how to set up a Windows build/release agent in the same domain as TFS and for untrusted domains. Setting up agents in an untrusted domain helps to set up the required agents for production deployment scenarios. PAT (Personal Access Token) helps to set up agents in untrusted domains for on-premises TFS as well as set up private agents for VS Team Services. There are three types of authentications for configuring agents, and it is expected that users involved with all three types will have agent pool Manage (Administrator) permission:
Integrated – uses logged-on user to connect and configure agent
Negotiate – allows user to enter user credentials
PAT – uses personal access token
The preceding authentication is used only for registering the agent. Once configured, an OAuth token (for more information on OAuth tokens and TFS/VSTS visit https://www.visualstudio.com/en-us/docs/integrate/get-started/auth/oauth) is downloaded and will be used by the agent to listen to incoming jobs from TFS or VSTS. When a build is running, another OAuth token is used depending on the scope defined in the build definition. This will be further discussed in the build definition lessons in Chapter 3.
Lesson 2.03 – Install and Manage Extensions from Marketplace
In this lesson, you will learn how to install extensions from Visual Studio Marketplace ( https://marketplace.visualstudio.com/vsts ) to enhance the functionality of TFS and VS Team Services. Many of these extensions are free, and some are paid.
Prerequisites: You should have administrator permissions for the TFS project collection.
2.03.1 Install Extension from Marketplace
You can install extensions from Visual Studio Marketplace ( https://marketplace.visualstudio.com/vsts ) to Team Services or TFS to enhance the functionality.
Click on Browse Marketplace in the top-right corner of the TFS web portal and select the marketplace component you want to install. Click on it. See Figure 2-55.

Figure 2-55. Browsing the marketplace
In the marketplace component window, click on the Install button. This will take you to the installation page after downloading the extension to your team project collection. See Figure 2-56.
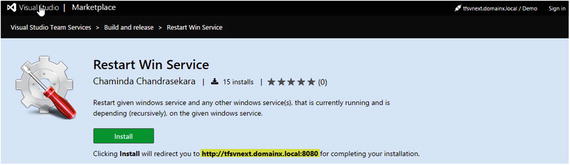
Figure 2-56. Installing an extension
Select the project collection and click Confirm to install. See Figure 2-57.
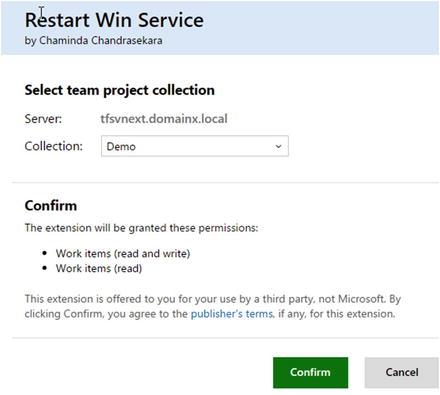
Figure 2-57. Confirming the installation of extension
This will allow you use the installed extension. You will be doing this often while you go through the rest of the chapters.
2.03.2 Manage Extension
The Manage Extensions page allows you to manage the extensions already installed from Marketplace.
To manage extensions, click Manage extensions in the top-right corner of the TFS web portal while you are on a team project home page. See Figure 2-58.

Figure 2-58. Navigate to Manage extensions
You can disable or uninstall an extension from the project collection by clicking the respective option on the page. See Figure 2-59.
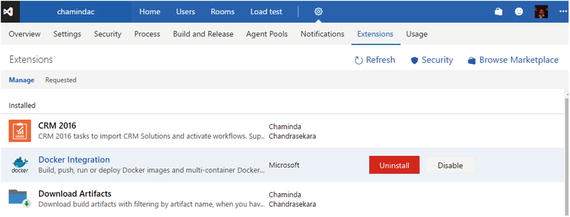
Figure 2-59. Managing extensions
Uninstalling or disabling an extension might affect the build/release definitions already using them. If it is an extension providing additional functionality to any other area of TFS/VSTS, that functionality will revert to the default behavior, once the extension is unintalled or disabled. Make sure to analyze the impact before you uninstall or disable an extension that is already in use.
2.03.3 Request an Extension
If you do not have Project Collection Administrator permissions as a TFS user, you can request an extension by following these steps:
Click on Browse Marketplace in the top-right corner of the TFS web portal and go to your preferred extension page, then click Install.
This will prompt you to provide a reason for requesting the extension and allow you to submit the request. See Figure 2-60.
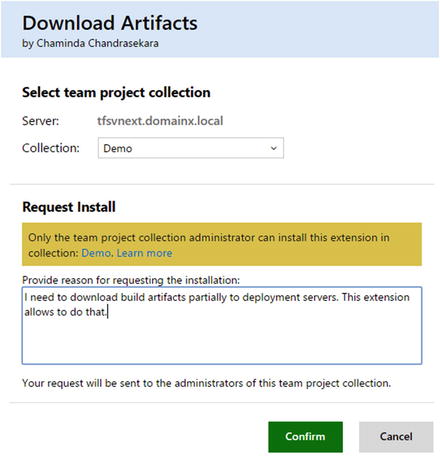
Figure 2-60. Requesting extension
Once the request is confirmed, your team project collection administrators will be notified via email about the request for the extension. The TFS project collection administrator is then able to install the requested extension by clicking Manage Extension and navigating to the Requested tab. Your team project collection administrator can either approve and install the extension or decline it. See Figure 2-61.

Figure 2-61. Approving extension installation request
Clicking the “5 months ago” link will show the reason for the request. See Figure 2-62.
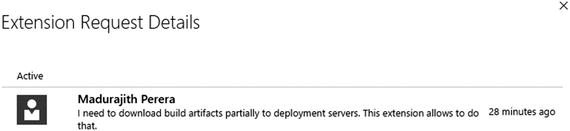
Figure 2-62. View reason for the request of extension
If declining the extension, the administrator should provide a reason and reject the request for extension install. See Figure 2-63.

Figure 2-63. Declining extension installation request
You have learned how to request that an extension be installed for TFS/VSTS. The options available to the TFS/Project collection administrator regarding approving or declining the request, are also described.
2.03.4 Download Extensions for Installation
You have learned in previous lessons how to install an extension directly to TFS/VSTS by browsing Marketplace via the TFS/VSTS web portal. If you want to download an extension to install it in offline mode, follow these instructions:
You have the option of downloading the extension by directly browsing to https://marketplace.visualstudio.com/vsts . Click on the extension you prefer and click download (use a private/incognito browsing window if you do not see the download button on the component page). See Figure 2-64.
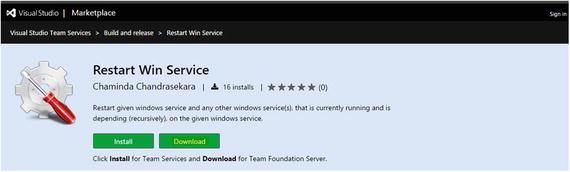
Figure 2-64. Downloading an extension
Uploading a downloaded extension is described in the next lesson.
2.03.5 Browse and Manage Local Extensions—On-Premises TFS
On-premises TFS allows you to manage any extensions installed in TFS on the Browse local extensions page .
Click Manage Extensions at the top-right corner of the TFS web portal.
On the Manage Extensions page, click on Browse local extensions. This is not available for VS Team Services. See Figure 2-65.

Figure 2-65. Browse local extensions
You can view the installed extensions and, by clicking on them, you will be allowed to install them to any other team project collection as well. At the bottom of the page, you can find the Manage extensions button. Click on it to go to the team foundation server’s installed extension gallery. See Figure 2-66.

Figure 2-66. Options available on manage extensions page
Here, you have the option of uploading extensions that were downloaded from Marketplace or the extensions you have developed (developing an extension is discussed in Chapter 13). You can download updates for the extensions that are already installed. To install an extension to another team project collection, you can click on Install. See Figure 2-67.

Figure 2-67. Upload new extensions or manage existing local extensions
In this short lesson, you learned how to install and manage TFS extensions form Marketplace. Extensions will be useful in achieving various build and release tasks. There are extensions that will enhance the other functionalities of TFS and VSTS as well. Creating your own build release extensions is described in Chapter 13.
Summary
Looking back at what you have learned throughout this chapter, you now know how to set up build and release agent pools, agent queues, and agents, and how to install extensions from Marketplace. This will allow you to set up build server farms and connect release environments to TFS or VSTS so as to automate deployments. Installing the TFS agent is not sufficient for a server/machine to work as a build server. The machine working as a build server should have Visual Studio versions and any other software that is required to build your application.
In the next chapter, we will take a closer look at builds and deployments of web applications to Azure platform and IIS.