
This chapter will include hands-on lessons on managing Azure SQL databases with TFS/VSTS release management tasks. By the end, you will be able to create database projects with Visual Studio, you will build them with TFS build and deploy via TFS release management to Azure.
Lesson 5.01 – Create SQL Project with Visual Studio
Let’s create an SQL project to get the database schema development under source control.
Create a Visual Studio solution by clicking File ➤ New ➤ Project in Visual Studio.
Select Other Project Types ➤ Visual Studio Solutions and create a blank solution in your team project local path, say TeamProjectXMain. Name the solution “DBDemo” and check the “Add to Source Control” option. This adds the solution as a pending change to source control. See Figure 5-1.

Figure 5-1. Creating a Visual Studio solution
In the solution DBDemo, right click and go to Add ➤ New Project and select SQL Server ➤ SQL Server Database Project. Name the project as “AzDB” and click OK. This will add an SQL database development project to the solution. See Figure 5-2.

Figure 5-2. Adding an SQL Server database project
Right click on the AzDB project and choose Properties. In Project Settings, change the Target Platform to Microsoft Azure SQL Database V12 and save the project by clicking the Save button in Visual Studio. See Figure 5-3.

Figure 5-3. Setting DB to Azure SQL Database V12
Add folder named dbo to the AzDB project. In the dbo folder, add another folder named Tables. Then, right click on the Tables folder, click Add Table, and create a table called “Customer.” Add ID and Name fields to the Customer table and save using Visual Studio. See Figure 5-4.
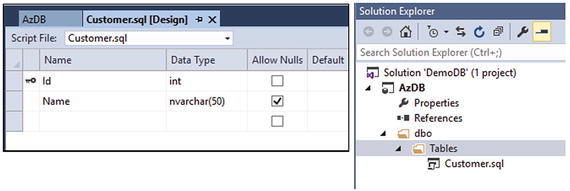
Figure 5-4. Creating a database table in database project in VS
Right click on the solution in Solution Explorer and click Rebuild to build the solution. This should build the database project successfully in Visual Studio. In the Pending Changes window of Team Explorer, check-in/submit the solution, including database project and all its content, to the Source Control repository.
In this lesson, you have created a database project in Visual Studio and added a table to it. You have added the database project to the Source Control repository. When an SQL server database project is built in Visual Studio, it generates a .dacpac file, which contains the current schema of the database. In a future lesson in this chapter, this .dacpac file will be used to compare schema changes with an existing database or with a blank database that you will create later, and apply changes to it via release management.
Lesson 5.02 – Build SQL Project with Team Foundation Build
Prerequisites: You have followed the Chapter 3 lessons and are familiar with build definition creation .
Let’s create a build definition with which to build the database project created in the previous lesson.
Create a new build definition with the empty template and name it “DB.Rel.”
In the Repository tab, set the server path to $/Project X/Main/DemoDB. See Figure 5-5.
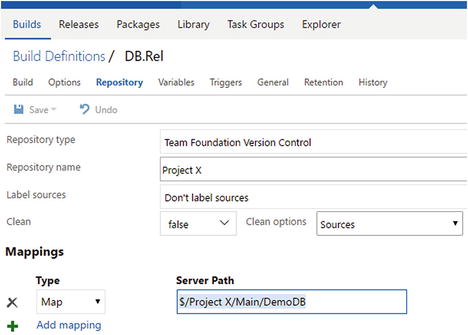
Figure 5-5. Setting repository
Add a demand for SqlPackage in the General tab so as to enable .dacpac creation and building of the database project with the TFS build. VS 2015 availability on the build server will provide the necessary SSDT (SQL Server Data Tools). The latest versions of SSDT can be obtained for VS 2015 from https://msdn.microsoft.com/en-us/mt186501.aspx . If you are using VS 2017 you should install “Data Storage and Processing” workload to allow using SQL projects. Even workloads such as Azure, ASP.Net and Web Development, and .Net Core Cross Platform Development also enable SQL Projects for VS 2017. See Figure 5-6.
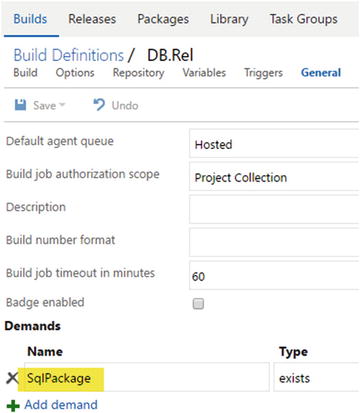
Figure 5-6. Add demand for SqlPackage
Define BuildConfiguration and BuildPlatform variables with values of release and any cpu, respectively. See Figure 5-7.

Figure 5-7. Setting build configuration and platform
Add the Visual Studio Build step and specify the database solution ($/Project X/Main/DemoDB/DemoDB.sln) to build. Provide the configuration and platform using the variables defined in the previous step. See Figure 5-8.

Figure 5-8. Build the solution
Add the Copy & Publish Artifacts build step and set the Contents field to **/*.dacpac. Set Artifact Name to drop and Artifact Type to Server. See Figure 5-9.

Figure 5-9. Copy & publish .dacpac
Queue a build and check the Artifacts explorer of the build to verify that .dacpac is available as build output. See Figure 5-10.
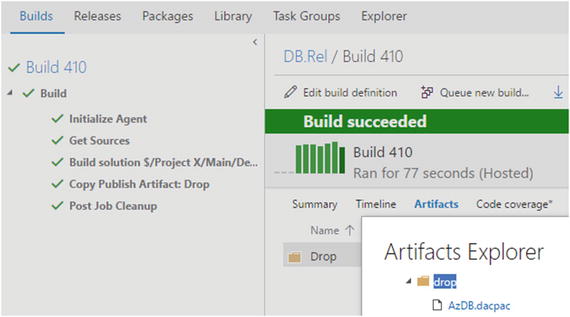
Figure 5-10. .dacpac file available as build artifact
You have created a build definition that can package an SQL database project into a .dacpac file. This .dacpac file can be used in release management to deploy database schema changes to a target Azure SQL database.
Lesson 5.03 – Deploy .dacpac to Azure SQL using TFS Release Management
Prerequisites: You have Azure subscription access and are familiar with working in Azure portal. You have followed Chapter 3 and are familiar with release definition and environment creation. You have created an Azure RM Service Endpoint as explained in Chapter 3.
Let’s create an Azure SQL database and deploy the .dacpac built with Team Foundation build in the previous lesson to it using Team Foundation release management.
Go to Azure portal and click on SQL Servers. Click Add to create a new SQL Server. See Figure 5-11.
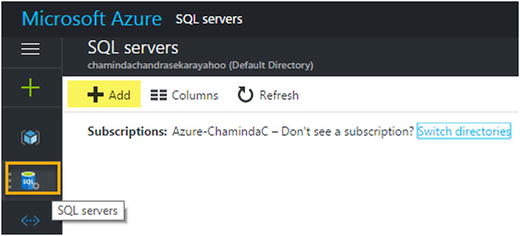
Figure 5-11. Adding SQL Server in Azure
In the tab that appears, provide a server name and credentials for Azure SQL Server. Select your subscription and select an existing resource group, or opt to create a new resource group (if new resource group, provide a name). Select Location and check the option to allow Azure services to access the server (this will allow the SQL server to be accessed from the Azure app service and so on. This is not mandatory, as we are not going to connect a web app with the databases in the server created in this chapter). See Figure 5-12.
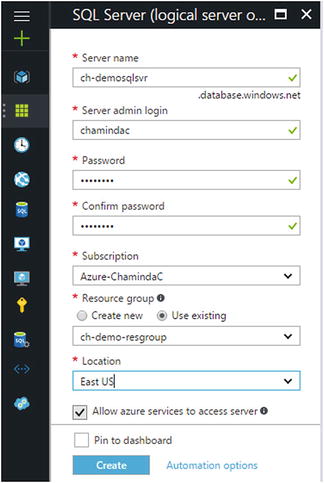
Figure 5-12. Creating SQL Server in Azure
Go to SQL databases in Azure portal and click Add to create a new Azure SQL database. See Figure 5-13.

Figure 5-13. Add Azure SQL database
In the tab that appears, provide a name for the database. Use the resource group of the SQL server created in the previous step as the resource group here. Select the created SQL server. Select “Blank database” from the Select source dropdown to create an empty database. Select “Basic pricing tier” if you want to reduce the cost. Fill in other information as shown in Figure 5-14 and click the Create button.

Figure 5-14. Creating Azure SQL database
Now you have an empty SQL database in Azure. Let’s get it deployed with the database schema in the .dacpac that you built in the previous lesson. We will do so using Team Foundation release management. Create a release definition using the linked artifact from the DB.Rel build created in the previous lesson. Set the default added first environment agent, to demand for both sqlpackage and Azure PowerShell. Both of these demands are required in order to deploy .dacpac to the target Azure SQL database. See Figure 5-15.
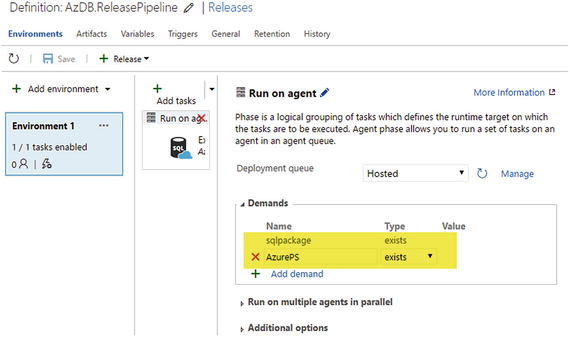
Figure 5-15. Demands for sqlpackage and AzurePS
Check the Artifacts tab to see if the DB.Rel build created in the previous lesson is linked to the release definition. If not, add it by clicking “Link an artifact source” and selecting the build definition in the popup window. Once added, it should appear as shown in Figure 5-16.

Figure 5-16. Verify the artifacts from DB.Rel build are linked
Add the release task Azure SQL Database Deployment from the Task Catalog to Environment1 in the release definition. In the Azure Connection Type dropdown select the service endpoint created for the Azure RM subscription (linking Azure RM subscription as a service endpoint to a team project is described in Chapter 3). Provide the Azure SQL Server name and the database name. Server Admin Login is the login specified when the database server was created in Azure. Store this password in a variable in the release definition or environment, and use the variable in the task. For the Type field in the Deployment Package section, select “SQL DACPAC File.” Then select the artifact path for the .dacpac. Set the Firewall settings to AutoDetect and remove the rule after the task ends. See Figure 5-17.

Figure 5-17. Azure SQL database deployment task
Create a release, and then you can verify successful database deployment to Azure as shown in Figure 5-18.
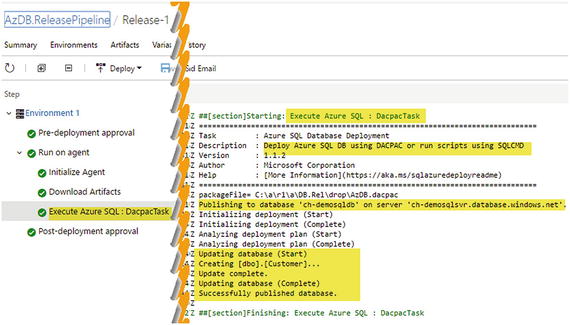
Figure 5-18. Deploying to Azure SQL database
Connect to the Azure SQL database in Visual Studio Server Explorer to check whether the database has been updated with the schema. You may encounter an issue here, as shown in Figure 5-19, resulting from firewall restrictions in Azure SQL Server.
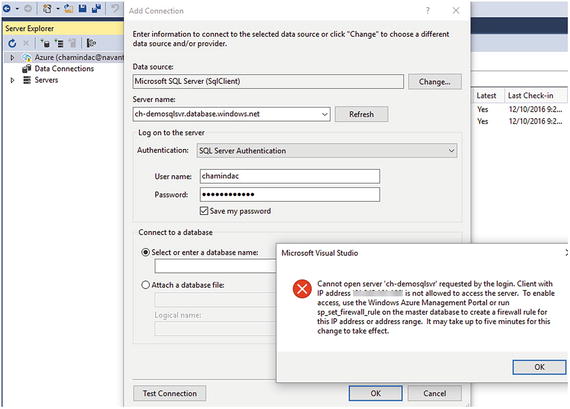
Figure 5-19. Connecting Azure SQL is prevented by firewall
If the Azure firewall prevents access to the server when trying to access the selected database, as shown in Figure 5-19, set the firewall rule for the Azure SQL database server for the IP address shown in the error message. Do this by clicking on Azure SQL Server in the Azure portal, then clicking on Firewall. You then can add the IP shown in the error message as Start IP and End IP, give it a Rule Name, and save. See Figure 5-20.
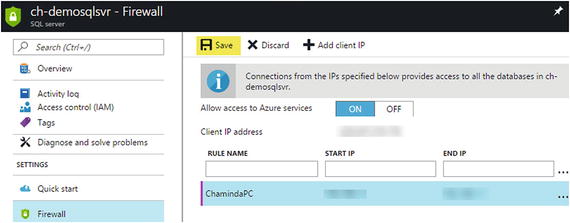
Figure 5-20. Add firewall rule to Azure SQL server
This connects your Azure SQL database as a data connection in Server Explorer, and you can view the schema changes applied with the deployment via VS Team Services/TFS release using .dacpac. To view the Azure SQL database in SQL Server Object Explorer in Visual Studio, right click on the database in Server Explorer and select Open in SQL Server Object Explorer. See Figure 5-21.

Figure 5-21. View Azure SQL database in Server Explorer
In the popup window, almost all of the information will be auto-filled. You must provide the password for the Azure SQL Server user and click on Connect to open the Azure SQL database in SQL Server Object Explorer. See Figure 5-22.
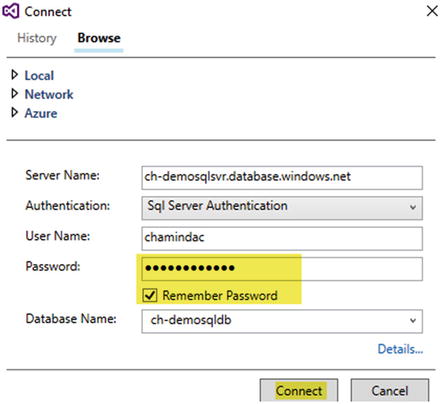
Figure 5-22. Opening Azure SQL database in SQL Server Object Explorer
SQL Server Object Explorer allows you to view the database schema and data. You can directly modify the database from here. However, this is not good practice, since your changes will be directly applied to the database and not source controlled. See Figure 5-23.

Figure 5-23. Azure SQL database opened in SQL Server Object Explorer
In this lesson, you created a release definition with which you successfully deployed a .dacpac file built with TFS build to a target Azure SQL server database.
Summary
You have learned how to use TFS builds to build an Azure SQL project that was created in Visual Studio, and to get the .dacpac file as output. Then, you used the Azure SQL Deployment task in TFS/VSTS release management to deploy the database schema to the target Azure database. As further experiments, you can make modifications to the database schema of the SQL project in Visual Studio and deploy the project to the target Azure SQL database using the build and release definitions created in this chapter.
In the next chapter, you will learn how to develop micro-services applications and build and deploy them to Azure Service Fabric using TFS/VSTS builds and release management.