In this chapter, you will learn what a task group is and how to create and use them. Using the history and the comments provided by updaters of the definitions, you will be able to identify changes made to the build or the release definitions. You will also get to learn about grouping build or release definitions using folders and the use of tags.
What Is a Task Group?
A sequence of tasks can be encapsulated into a reusable task in the Task Catalog using a task group. This allows a task group to be added to a build or release definition like a normal task. You have the option to abstract the task information while extracting the required parameters from the encapsulated tasks. Task groups are scoped at the team-project level and are not visible to other team projects.
Lesson 7.01 – Create a Task Group
Let’s use a few PowerShell tasks to show what can be done with task groups. You can use any of the available tasks in a task group, but PowerShell tasks are used here to make the concept easy to understand.
Create a new build definition with an empty template. Add three PowerShell tasks from the Task Catalog and add the following PowerShell as an inline script to all three tasks (see Figure 7-1):

Figure 7-1. Build definition with three PowerShell tasks
parame$CommonParam,$TaskParam1,$TaskParam2)write-host "Task 1 CommonParam Value:" $CommonParamwrite-host "Task 1 TaskParam1 Value:" $TaskParam1write-host "Task 1 TaskParam2 Value:" $TaskParam2For the first, second, and third tasks, provide the arguments as specified here (see Figure 7-2):
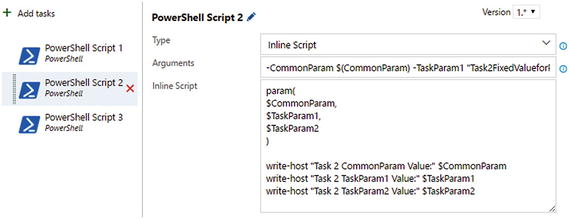
Figure 7-2. PowerShell task two
First Task Arguments:
-CommonParam $(CommonParam) -TaskParam1 $(Task1Param1) -TaskParam2 "Task1FixedValueforParam2"Second Task Arguments:
-CommonParam $(CommonParam) -TaskParam1 "Task2FixedValueforParam1" -TaskParam2 "Task2FixedValueforParam2"Third Task Arguments (see Figure 7-3 ):

Figure 7-3. PowerShell task three
-CommonParam $(CommonParam) -TaskParam1 "Task3FixedValueforParam1" -TaskParam2 $(Task3Param2)Select all three PowerShell tasks and right click; select “Create task group” from the dropdown. See Figure 7-4.
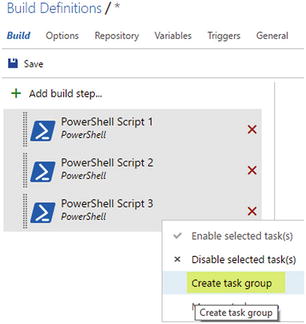
Figure 7-4. Grouping tasks
In the popup window , define the default values and descriptions (not mandatory) for parameters. Provide a description and select Utility for the Task Catalog category. You can select Build, Deploy, Package, Utility, or Test as the category of the task group so that it appears in the appropriate tab of the Task Catalog. See Figure 7-5.
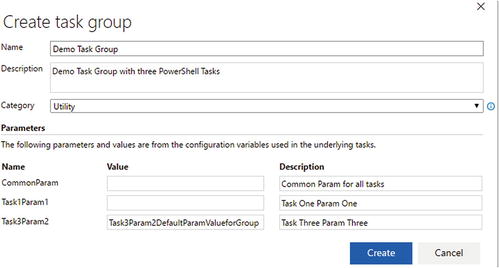
Figure 7-5. Creating a task group
This will instantly convert the tasks in the build definition to the task group. You can see the default values specified appear, and the parameters defined are ready for values to be entered. The description entered can be viewed when the mouse hovers over the information icon. See Figure 7-6.

Figure 7-6. Build definition tasks converted to task group
Provide values for the parameters CommonParam and Task1Param1. Make sure to enable the task execution by selecting “Enabled” in the Control Options section. See Figure 7-7.
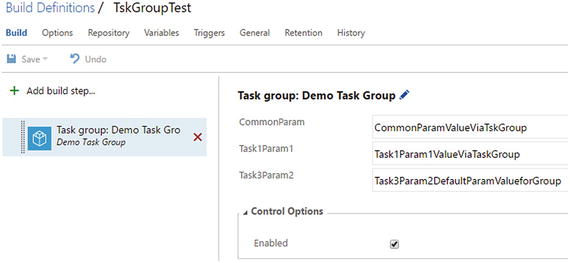
Figure 7-7. Using task group in build definition
Save the build definition, giving it the name “TskGroupTest,” and queue a new build. You will see all of the values (values specified in encapsulated tasks and values provided as parameters in the task group) appear in the log. This way you can expose required parameters from the task group while hiding any private values inside the task group you create. See Figure 7-8.
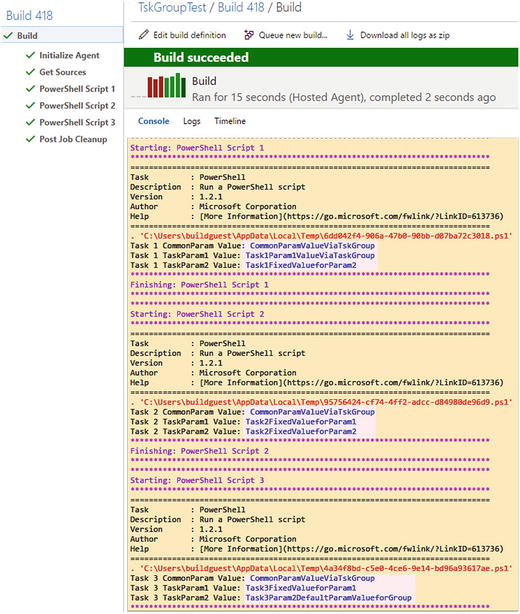
Figure 7-8. Values in task group and parameters provided to task group shown in log
Change a default value, and you will see the effects when a new build is queued. See Figure 7-9.
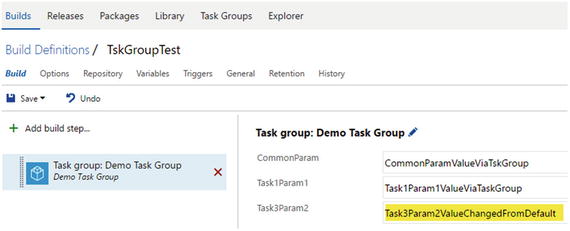
Figure 7-9. Change Task3Param2
When saving the build definition , make sure to provide a comment. This will be useful when the history of the build definition is inspected. See Figure 7-10.
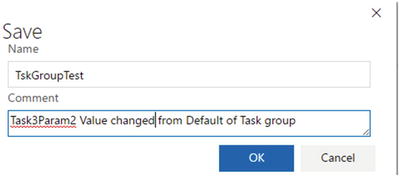
Figure 7-10. Saving build definition
Queue a new build, and it shows the changed value in PowerShell task three. See Figure 7-11.

Figure 7-11. Task3Param2 shown when build is running
In this lesson, you learned how to easily create a task group using existing tasks in a build definition. In the same way, you can create a task group using a set of tasks in a release definition.
Lesson 7.02 – Use a Task Group
You can use a task group you created in a different build or release definition within the team project.
Open an existing build definition or create another build definition in the same team project you created the task group in during the previous lesson. Then, open up Task Catalog and go to the Utility tab to find the task group. See Figure 7-12.

Figure 7-12. Task group available as a task in Task Catalog in a build definition
The same thing can be done with a release definition. See Figure 7-13.
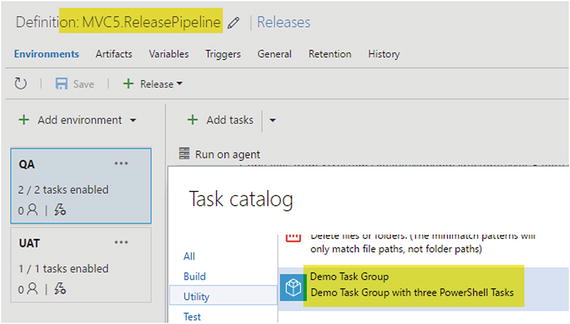
Figure 7-13. Task group available as a task in Task Catalog in a release definition
You can create your own task groups using the existing tasks in your build or release definition and reuse them in other build/release definitions you are creating in the same team project. This allows you to avoid duplication of the same set of tasks in different build/release definitions and increases the maintainability of the definitions.
Lesson 7.03 – Manage Task Groups
To manage existing task groups , you can use the Task Groups tab.
In the Build & Release menu, click on Task Groups. See Figure 7-14.
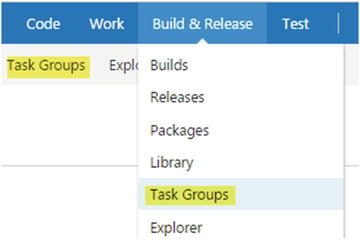
Figure 7-14. Task groups
You can edit the parameters’ default values and other information, such as where the task group’s tasks appear in the Task Catalog. See Figure 7-15.
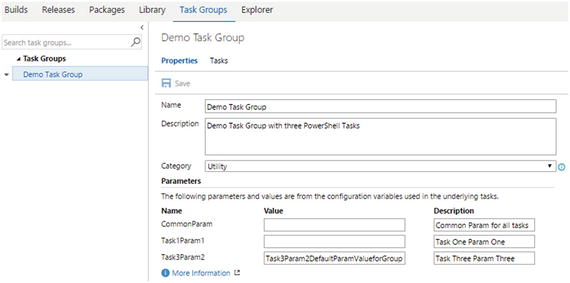
Figure 7-15. Editing a task group
Click on Tasks to view the steps in the task group. You can edit the individual tasks in a task group and add new tasks from the Task Catalog to the task group by clicking on Add tasks. See Figure 7-16.

Figure 7-16. Editing task group tasks
Add another PowerShell task and use the same inline script. Pass arguments as given below (see Figure 7-17):
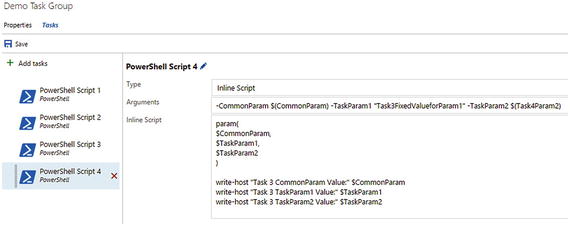
Figure 7-17. Adding a new task to task group
-CommonParam $(CommonParam) -TaskParam1 "Task3FixedValueforParam1" -TaskParam2 $(Task4Param2)You can see a new parameter getting added to the task group since you specified $(Task4Param2) as a parameter for the fourth task, which was added in the previous step. Do not provide a default value for the new parameter. See Figure 7-18.

Figure 7-18. New parameter in task group
Save the task group and open the build definition that is using the task group so the definition can be edited. The build definition now has another mandatory parameter for the task (task group task from catalog). See Figure 7-19.
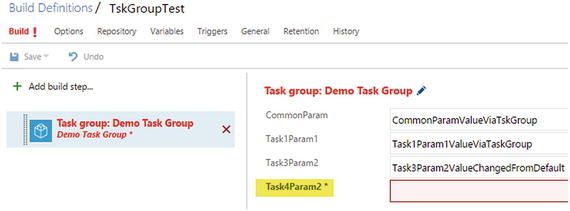
Figure 7-19. New parameter in task group is required in the build definition that is using the task group
Provide the value Task4Param2ValueviaBuild in the build definition, save, and queue a build to verify. See Figure 7-20.
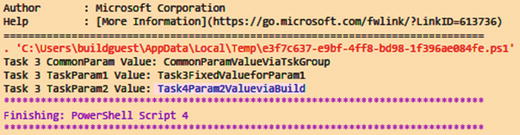
Figure 7-20. New parameter value shown in build log
You learned how to manage an existing task group in this lesson. Do further experiments by modifying the task group in order to understand more about them.
Lesson 7.04 – Organize Folders to Group Builds
When you have multiple build definitions in a team project, you might find at times it is not easy to locate a given build definition. To group or categorize your build definitions, you can use folders, as shown in the following steps.
In the Builds tab, go to All Definitions and click Manage Folders. See Figure 7-21.

Figure 7-21. Manage folders for grouping build definitions
Click on Create new folder, provide a name, and click OK. See Figure 7-22.
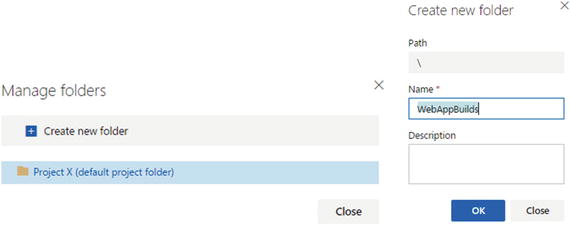
Figure 7-22. Creating new folder
Then, click on the menu link for a build and choose Move definition. See Figure 7-23.

Figure 7-23. Move build definition to a folder
Select the folder and click OK, as shown in Figure 7-24.

Figure 7-24. Selecting a folder for build definition
This way, you can group your build definitions into folders to organize them properly. See Figure 7-25.

Figure 7-25. Build definition moved to folder
You can use folders to group your build definitions in order to keep them organized and categorized in your team project.
Lesson 7.05 – Track Build/Release Definition History
Build and release definitions are stored as json files in TFS. You can view the history of updates and compare changes to get an idea of what has been changed in a definition. You can roll back to a previous version of the build definition. But, for release definitions, rollback is not available.
Go to the build definition named TskGroupTest, created in Lesson 7.01, and edit it. Go to the History tab. You can see the comments provided while saving and see the change history. See Figure 7-26.

Figure 7-26. Build definition history
You can view the differences by selecting two versions and clicking on Diff, as shown in Figure 7-27.
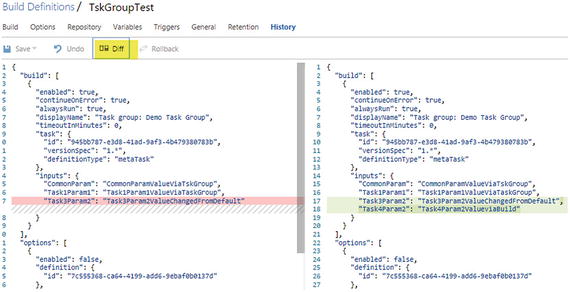
Figure 7-27. Build definition version comparison
In the build definition history, you can select a version and click on Rollback to go back to that version of the build. See Figure 7-28.
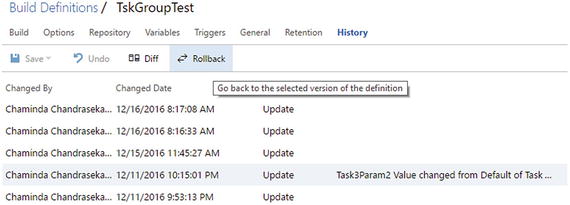
Figure 7-28. Rollback build definition
In the new build editor layout (explained in Chapter 1), you can see the rollback option and comparison of definitions via a menu link. Rollback is available as Revert Definition, and Diff is available as Compare difference. See Figure 7-29.
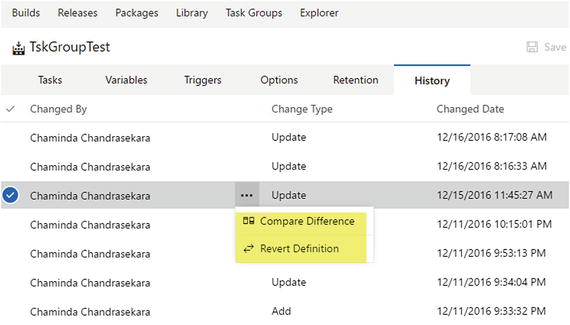
Figure 7-29. Rollback and Diff in new build definition layout
In this lesson, you learned how to use the build/release definition History tab.
Summary
In this chapter, you learned about task groups. These help you group a common set of tasks into a single unit of functionality, which could be shared between multiple build definitions or release definitions while parameterizing as required. This provides higher maintainability in build/release definitions.
Organizing builds using folders allows you to maintain a proper structure and to categorize your builds. This is useful if you are using a large team project with multiple teams, or applications with multiple builds.
The build and release history allows you to track changes made to a definition. Rollback of build definitions lets you go back to the previous versions easily if you made any mistakes in an update. This would be a really nice feature to have for release definitions as well, and will eventually be available in the future.
In the next chapter, you will learn how to build source code in external repositories using Team Services build.