As suggested in the previous discussion, we will code a class called Engine that will control and bind together the different parts of the Thomas Was Late game.
The first thing we will do is make the TextureHolder class from the previous project available in this one.
The TextureHolder class that we discussed and coded for the Zombie Arena game will also be useful in this project. While it is possible to add the files (TextureHolder.h and TextureHolder.cpp) directly from the previous project without recoding them or recreating the files, I don't want to make the assumption that you haven't jumped straight to this project. What follows is very brief instructions, along with the complete code listing to create the TextureHolder class. If you want the class or the code explained, please see Chapter 8, Pointers, Standard Template Library, and Texture Management.
Tip
If you did complete the previous project and you do want to add the class from the Zombie Arena project, simply do the following: in the Solution Explorer window, right-click Header Files and select Add | Existing Item.... Browse to TextureHolder.h from the previous project and select it. In the Solution Explorer window, right-click on Source Files and select Add | Existing Item.... Browse to TextureHolder.cpp from the previous project and select it. You can now use the TextureHolder class in this project. Note that the files are shared between projects and any changes will take effect in both projects.
To create the TextureHolder class from scratch, right-click Header Files in the Solution Explorer and select Add | New Item.... In the Add New Item window, highlight (by left-clicking) Header File (.h) and then in the Name field, type TextureHolder.h. Finally, click the Add button.
Add the following code to TextureHolder.h:
#pragma once
#ifndef TEXTURE_HOLDER_H
#define TEXTURE_HOLDER_H

#include <SFML/Graphics.hpp>
#include <map>

class TextureHolder
{
private:
   // A map container from the STL,
   // that holds related pairs of String and Texture
   std::map<std::string, sf::Texture> m_Textures;

   // A pointer of the same type as the class itself
   // the one and only instance
   static TextureHolder* m_s_Instance;

public:
   TextureHolder();
   static sf::Texture& GetTexture(std::string const& filename);

};

#endif
Right-click Source Files in the Solution Explorer and select Add | New Item.... In the Add New Item window, highlight (by left-clicking) C++ File (
.cpp
) and then, in the Name field, type TextureHolder.cpp. Finally, click the Add button.
Add the following code to TextureHolder.cpp:
#include "stdafx.h"
#include "TextureHolder.h"
#include <assert.h>

using namespace sf;
using namespace std;

TextureHolder* TextureHolder::m_s_Instance = nullptr;

TextureHolder::TextureHolder()
{
   assert(m_s_Instance == nullptr);
   m_s_Instance = this;
}

sf::Texture& TextureHolder::GetTexture(std::string const& filename)
{
   // Get a reference to m_Textures using m_S_Instance
   auto& m = m_s_Instance->m_Textures;
   // auto is the equivalent of map<string, Texture>

   // Create an iterator to hold a key-value-pair (kvp)
   // and search for the required kvp
   // using the passed in file name
   auto keyValuePair = m.find(filename);
   // auto is equivalent of map<string, Texture>::iterator


   // Did we find a match?
   if (keyValuePair != m.end())
   {
      // Yes
      // Return the texture,
      // the second part of the kvp, the texture
      return keyValuePair->second;
   }
   else
   {
      // File name not found
      // Create a new key value pair using the filename
      auto& texture = m[filename];
      // Load the texture from file in the usual way
      texture.loadFromFile(filename);

      // Return the texture to the calling code
      return texture;
   }
}
We can now get on with our new Engine class.
As usual, we will start with the header file, which holds the function declarations and member variables. Note that we will revisit this file throughout the project to add more functions and member variables. For now, we will add just the code that is necessary at this stage.
Right-click Header Files in the Solution Explorer and select Add | New Item.... In the Add New Item window, highlight (by left-clicking) Header File (
.h
) and then in the Name field, type Engine.h. Finally, click the Add button. We are now ready to code the header file for the Engine class.
Add the following member variables as well as the function declarations. Many of them we have seen before in the other projects, and some of them we discussed in the Structuring the Thomas Was Late code section. Take note of the function and variable names, as well as whether they are private or public. Add the following code to the Engine.h file, and then we will talk about it:
#pragma once
#include <SFML/Graphics.hpp>
#include "TextureHolder.h"

using namespace sf;

class Engine
{
private:
   // The texture holder
   TextureHolder th;

   const int TILE_SIZE = 50;
   const int VERTS_IN_QUAD = 4;

   // The force pushing the characters down
   const int GRAVITY = 300;

   // A regular RenderWindow
   RenderWindow m_Window;

   // The main Views
   View m_MainView;
   View m_LeftView;
   View m_RightView;

   // Three views for the background
   View m_BGMainView;
   View m_BGLeftView;
   View m_BGRightView;

   View m_HudView;

   // Declare a sprite and a Texture
   // for the background
   Sprite m_BackgroundSprite;
   Texture m_BackgroundTexture;

   // Is the game currently playing?
   bool m_Playing = false;

   // Is character 1 or 2 the current focus?
   bool m_Character1 = true;

   // Start in fullscreen mode
   bool m_SplitScreen = false;

   // How much time is left in the current level
   float m_TimeRemaining = 10;
   Time m_GameTimeTotal;

   // Is it time for a new/first level?
   bool m_NewLevelRequired = true;

   // Private functions for internal use only
   void input();
   void update(float dtAsSeconds);
   void draw();

public:
   // The Engine constructor
   Engine();

   // Run will call all the private functions
   void run();

};
Here is a complete run-down of all the private variables and functions. Where appropriate, I spend a little longer on the explanation:
TextureHolder th: The one and only instance of theTextureHolderclass.TILE_SIZE: A useful constant to remind us that each tile in the sprite sheet is fifty pixels wide and fifty pixels high.VERTS_IN_QUAD: A useful constant to make our manipulation of aVertexArrayless error prone. There are, in fact, four vertices in a quad. Now we can't forget it.GRAVITY: A constantintvalue representing the number of pixels by which the game characters will be pushed downward each second. This is quite a fun value to play with once the game is done. We initialize it to300, as this works well for our initial level designs.m_Window: The usualRenderWindowobject, like we have had in all our projects.- The SFML
Viewobjects,m_MainView,m_LeftView,m_RightView,m_BGMainView,m_BGLeftView,m_BGRightView, andm_HudView: The first threeViewobjects are for the fullscreen view, and left and right split screen views of the game. We also have a separate SFMLViewobject for each of those three, which will draw the background behind. The lastViewobject,m_HudView, will be drawn on top of the appropriate combination of the other six views to display the score, the remaining time, and any messages to the players. Having seven differentViewobjects might imply complexity, but when you see how we deal with them as the chapter progresses, you will see they are quite straightforward. We will have the whole split screen/fullscreen conundrum sorted out by the end of this chapter. Sprite m_BackgroundSpriteandTexture m_BackgroundTexture: Somewhat predictably, this combination of SFMLSpriteandTexturewill be for showing and holding the background graphic from the graphics assets folder.m_Playing: This Boolean will keep the game engine informed about whether the level has started yet (by pressing the Enter key). The player does not have the option to pause the game once they have started it.m_Character1: When the screen is fullscreen, should it center on Thomas (m_Character1 = true), or Bob (m_Character1 = false)? Initially, it is initialized to true, to center on Thomas.m_SplitScreen: Is the game currently being played in split screen mode or not? We will use this variable to decide how exactly to use all the View objects we declared a few steps ago.m_TimeRemainingvariable: Thisfloatvariable holds how much time is remaining to get to the goal of the current level. In the previous code, it is set to10for the purposes of testing, until we actually get to set a specific time for each level.m_GameTimeTotalvariable: This variable is an SFML Time object. It keeps track of how long the game has been played for.m_NewLevelRequiredBoolean variable: This variable keeps a check on whether the player has just completed or failed a level. We can then use it to trigger the loading of the next level or the restarting of the current level.- The
inputfunction: This function will handle all of the player's input, which in this game is entirely from the keyboard. At first glance, it would appear that it handles all the keyboard input directly. In this game, however, we will be handling keyboard input that directly affects Thomas or Bob within theThomasandBobclasses directly. We will call theinputfunction, and this function will directly handle keyboard inputs such as quitting, switching to split screen, and any other keyboard input. - The
updatefunction: This function will do all the work that we previously did in the update section of themainfunction. We will also call some other functions from theupdatefunction in order to keep the code organized. If you look back at the code, you will see that it receives afloatparameter, which will hold the fraction of a second that has passed since the previous frame. This, of course, is just what we need to update all our game objects. - The
drawfunction: This function will hold all the code that used to go in the drawing section of the main function in previous projects. We will, however, have some drawing code that is not kept in this function when we look at other ways to draw with SFML. We will see this new code when we learn about particle systems in Chapter 16, Extending SFML Classes, Particle Systems, and Shaders.
Now let's run through all the public functions:
- The
Engineconstructor function: As we have come to expect, this function will be called when we first declare an instance ofEngine. It will do all the setup and initialization of the class. We will see exactly what when we code theEngine.cppfile shortly. - The
runfunction: This is the only public function that we need to call. It will trigger the execution of input, update, and draw, which will do all the work.
Next, we will see the definition of all these functions and some of the variables in action.
In all our previous classes, we have put all the function definitions into the .cpp file, prefixed with the class name. As our aim for this project is to make the code more manageable, we are doing things a little differently.
In the Engine.cpp file, we will put the constructor (Engine) and the public run function. All the rest of the functions will go in their own .cpp file, with a name that makes it clear what function goes where. This will not be a problem for the compiler as long as we add the appropriate include directive (#include "Engine.h") at the top of all the files that contain function definitions from the Engine class.
Let's get started by coding Engine and run it in Engine.cpp. Right-click Source Files in the Solution Explorer and select Add | New Item.... In the Add New Item window, highlight (by left-clicking) C++ File (.cpp) and then in the Name field, type Engine.cpp. Finally, click the Add button. We are now ready to code the .cpp file for the Engine class.
The code for this function will go in the Engine.cpp file we have recently created.
Add the following code and then we can discuss it:
#include "stdafx.h"
#include "Engine.h"

Engine::Engine()
{
   // Get the screen resolution
   // and create an SFML window and View
   Vector2f resolution;
   resolution.x = VideoMode::getDesktopMode().width;
   resolution.y = VideoMode::getDesktopMode().height;

   m_Window.create(VideoMode(resolution.x, resolution.y),
      "Thomas was late",
      Style::Fullscreen);

   // Initialize the fullscreen view
   m_MainView.setSize(resolution);
   m_HudView.reset(
      FloatRect(0, 0, resolution.x, resolution.y));

   // Inititialize the split screen Views
   m_LeftView.setViewport(
      FloatRect(0.001f, 0.001f, 0.498f, 0.998f));

   m_RightView.setViewport(
      FloatRect(0.5f, 0.001f, 0.499f, 0.998f));

   m_BGLeftView.setViewport(
      FloatRect(0.001f, 0.001f, 0.498f, 0.998f));

   m_BGRightView.setViewport(
      FloatRect(0.5f, 0.001f, 0.499f, 0.998f));

   m_BackgroundTexture = TextureHolder::GetTexture(
      "graphics/background.png");

   // Associate the sprite with the texture
   m_BackgroundSprite.setTexture(m_BackgroundTexture);

}
Much of the code we have seen before. For example, there are the usual lines of code to get the screen resolution as well as to create a RenderWindow. At the end of the previous code we use the now familiar code to load a texture and assign it to a Sprite. In this case we are loading the background.png texture and assigning it to m_BackgroundSprite.
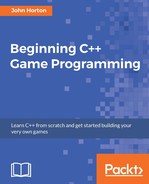
It is the code in between, the four calls to the setViewport function, that needs some explanation. The setViewport function assigns a portion of the screen to an SFML View object. It doesn't work using pixel coordinates, however. It works using a ratio. Where "1" is the entire screen (width or height), the first two values in each call to setViewport are the starting position (horizontally, then vertically) and the last two are the ending position.
Notice that the m_LeftView and m_BGLeftView are placed in exactly the same place, starting at virtually the far left (0.001) of the screen, and ending two 1,000ths from the center (0.498).
The m_RightView and m_BGRightView are also in exactly the same position, starting just left of the previous two View objects (0.5) and extending to almost the far right-hand side (0.998) of the screen.
Furthermore, all the views leave a tiny sliver of a gap at the top and bottom of the screen. When we draw these View objects on the screen on top of a white background, it will have the effect of splitting the screen with a thin white line between the two sides of the screen, as well as a thin white border around the edges.
I have tried to represent this effect in the following diagram:
The best way to understand it is to finish this chapter, run the code, and see it in action.
The code for this function will go in the Engine.cpp file we have recently created.
Add the following code immediately after the previous constructor code:
void Engine::run()
{
   // Timing
   Clock clock;

   while (m_Window.isOpen())
   {
      Time dt = clock.restart();
      // Update the total game time
      m_GameTimeTotal += dt;
      // Make a decimal fraction from the delta time
      float dtAsSeconds = dt.asSeconds();

      // Call each part of the game loop in turn
      input();
      update(dtAsSeconds);
      draw();
   }
}
The run function is the center of our engine—it initiates all the other parts. First, we declare a Clock object. Next, we have the familiar while(window.isOpen()) loop, which creates the game loop. Inside this while loop, we do the following:
- Restart
clockand save the time that the previous loop took indt. - Keep track of the total time elapsed in
m_GameTimeTotal. - Declare and initialize a
floatto represent the fraction of a second that elapsed during the previous frame. - Call
input. - Call
updatepassing in the elapsed time (dtAsSeconds). - Call
draw.
All of this should look very familiar. What is new is that it is wrapped in the run function.
As explained previously, the code for this function will go in its own file because it is more extensive than the constructor or the run function. We will use #include "Engine.h" and prefix the function signature with Engine:: to make sure the compiler is aware of our intentions.
Right-click Source Files in the Solution Explorer and select Add | New Item.... In the Add New Item window, highlight (by left-clicking) C++ File (
.cpp
) and then in the Name field, type Input.cpp. Finally, click the Add button. We are now ready to code the input function.
Add the following code:
void Engine::input()
{
   Event event;
   while (m_Window.pollEvent(event))
   {
      if (event.type == Event::KeyPressed)
      {
         // Handle the player quitting
         if (Keyboard::isKeyPressed(Keyboard::Escape))
         {
            m_Window.close();
         }

         // Handle the player starting the game
         if (Keyboard::isKeyPressed(Keyboard::Return))
         {
            m_Playing = true;
         }

         // Switch between Thomas and Bob
         if (Keyboard::isKeyPressed(Keyboard::Q))
         {
            m_Character1 = !m_Character1;
         }

         // Switch between full and split screen
         if (Keyboard::isKeyPressed(Keyboard::E))
         {
            m_SplitScreen = !m_SplitScreen;
         }
      }
   }
}
As with both of the previous projects, we check the RenderWindow event queue each frame. Also, as we have done before, we detect specific keyboard keys using if (Keyboard::isKeyPressed(Keyboard::E)). What is most relevant in the code we just added is what the keys actually do:
- As usual, the Esc key closes the window and the game will quit.
- The
Enter
key sets
m_Playingto true, and eventually, this will have the effect of starting the level. - The
Q
key alternates the value of
m_Character1betweentrueandfalse. This key only has an effect in fullscreen mode. It will switch between Thomas and Bob being the center of the mainView. - The
E
key switches
m_SplitScreenbetweentrueandfalse. This will have the effect of switching between fullscreen and split screen views.
The majority of this keyboard functionality will be fully working by the end of the chapter. We are getting close to being able to run our game engine. Next, let's code the update function.
As explained previously, the code for this function will go in its own file because it is more extensive than the constructor or the run function. We will use #include "Engine.h" and prefix the function signature with Engine:: to make sure the compiler is aware of our intentions.
Right-click Source Files in the Solution Explorer and select Add | New Item.... In the Add New Item window, highlight (by left-clicking) C++ File (
.cpp
) and then in the Name field, type Update.cpp. Finally, click the Add button. We are now ready to write some code for the update function.
Add the following code to the Update.cpp file to implement the update function:
#include "stdafx.h"
#include "Engine.h"
#include <SFML/Graphics.hpp>
#include <sstream>

using namespace sf;

void Engine::update(float dtAsSeconds)
{

   if (m_Playing)
   {
      // Count down the time the player has left
      m_TimeRemaining -= dtAsSeconds;

      // Have Thomas and Bob run out of time?
      if (m_TimeRemaining <= 0)
      {
         m_NewLevelRequired = true;
      }

   }// End if playing

}
First of all, notice that the update function receives the time the previous frame took as a parameter. This, of course, will be essential for the update function to fulfill its role.
The preceding code doesn't achieve anything visible at this stage. It does put in the structure that we will require for future chapters. It subtracts the time the previous frame took from m_TimeRemaining. It checks whether time has run out, and if it has, it sets m_NewLevelRequired to true. All this code is wrapped in an if statement that only executes when m_Playing is true. The reason for this is because, as with the previous projects, we don't want time advancing and objects updating when the game has not started.
We will build on this code as the project continues.
As explained previously, the code for this function will go in its own file, because it is more extensive than the constructor or the run function. We will use #include "Engine.h" and prefix the function signature with Engine:: to make sure the compiler is aware of our intentions.
Right-click Source Files in the Solution Explorer and select Add | New Item.... In the Add New Item window, highlight (by left-clicking) C++ File (
.cpp
) and then in the Name field, type Draw.cpp. Finally, click the Add button. We are now ready to add some code to the draw function.
Add the following code to the Draw.cpp file to implement the draw function:
#include "stdafx.h"
#include "Engine.h"

void Engine::draw()
{
   // Rub out the last frame
   m_Window.clear(Color::White);

   if (!m_SplitScreen)
   {
      // Switch to background view
      m_Window.setView(m_BGMainView);
      // Draw the background
      m_Window.draw(m_BackgroundSprite);
      // Switch to m_MainView
      m_Window.setView(m_MainView);
   }
   else
   {
      // Split screen view is active

      // First draw Thomas' side of the screen

      // Switch to background view
      m_Window.setView(m_BGLeftView);
      // Draw the background
      m_Window.draw(m_BackgroundSprite);
      // Switch to m_LeftView
      m_Window.setView(m_LeftView);

      // Now draw Bob's side of the screen

      // Switch to background view
      m_Window.setView(m_BGRightView);
      // Draw the background
      m_Window.draw(m_BackgroundSprite);
      // Switch to m_RightView
      m_Window.setView(m_RightView);

   }

   // Draw the HUD
   // Switch to m_HudView
   m_Window.setView(m_HudView);


   // Show everything we have just drawn
   m_Window.display();
}
In the preceding code, there is nothing we haven't seen before. The code starts, as usual, by clearing the screen. In this project, we clear the screen with white. What is new is the way the different drawing options are separated by a condition, which checks whether the screen is currently split or full:
if (!m_SplitScreen)
{
}
else
{
}
If the screen is not split, we draw the background sprite in the background View (m_BGView) and then switch to the main fullscreen View (m_MainView). Note that at the moment, we don't actually do any drawing in m_MainView.
If, on the other hand, the screen is split, the code in the else block is executed and we draw m_BGLeftView with the background sprite on the left of the screen, followed by switching to m_LeftView.
Then, still in the else block, we draw m_BGRightView with the background sprite on the right of the screen, followed by switching to m_RightView.
Outside of the if…else structure just described, we switch to m_HUDView. At this stage, we are not actually drawing anything in m_HUDView.
As with the other two (input, update) of the three most significant functions, we will be back here at the draw function often. We will add new elements of our game that need to be drawn. You will notice that each time we do, we will add code into each of the main, left, and right sections.
Let's quickly recap the Engine class and then we can fire it up.
What we have achieved is the abstraction of all the code that used to be in the main function into the input, update, and draw functions. The continuous looping of these functions, as well as the timing, is handled by the run function.
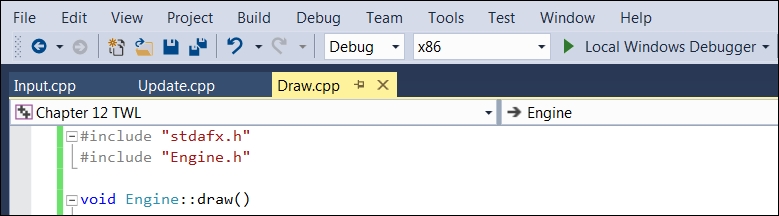
Consider leaving the Input.cpp, Update.cpp, and Draw.cpp tabs open in Visual Studio, perhaps organized in order, as shown in the following screenshot:
We will revisit each of these functions throughout the course of the project to add more code. Now that we have the basic structure and functionality of the Engine class, we can create an instance of it in the main function and see it in action.