Now we know enough about strings, SFML Text, and SFML Font to go about implementing the HUD.
The next thing we need to do is to add another #include directive to the top of the code file. As we have learned, the sstream class adds some really useful functionality for combining strings, and other variable types, together into a string.
Add the following line of highlighted code:
#include "stdafx.h"
#include <sstream>
#include <SFML/Graphics.hpp>

using namespace sf;

int main()
{
Next we will set up our SFML Text objects. One will hold a message that we will vary to suit the state of the game, and the other will hold the score and needs to be regularly updated.
The next code that declares the Text and Font objects loads the font, assigns the font to the Text objects, and then adds the string messages, color, and size. This should look familiar from our discussion in the previous section. In addition, we add a new int variable called score which we can manipulate to hold the player's score.
Tip
Remember that if you chose a different font from KOMIKAP_.ttf, back in Chapter 1: C++, SFML, Visual Studio, and Starting the First Game, you will need to change that part of the code to match the .ttf file that you have in the Visual Studio Stuff/Projects/Timber/Timber/fonts folder.
Add the highlighted code and we will be ready to move on to updating the HUD:
// Track whether the game is running
bool paused = true;

// Draw some text
int score = 0;

sf::Text messageText;
sf::Text scoreText;

// We need to choose a font
Font font;
font.loadFromFile("fonts/KOMIKAP_.ttf");

// Set the font to our message
messageText.setFont(font);
scoreText.setFont(font);

// Assign the actual message
messageText.setString("Press Enter to start!");
scoreText.setString("Score = 0");

// Make it really big
messageText.setCharacterSize(75);
scoreText.setCharacterSize(100);

// Choose a color
messageText.setFillColor(Color::White);
scoreText.setFillColor(Color::White);

while (window.isOpen())
{

   /*
   ****************************************
   Handle the players input
   ****************************************
   */
The next code might look a little convoluted, even complex. It is, however, really straightforward when you break it down a bit. Examine and add the new code, then we will go through it:
// Choose a color
messageText.setFillColor(Color::White);
scoreText.setFillColor(Color::White);

// Position the text
FloatRect textRect = messageText.getLocalBounds();

messageText.setOrigin(textRect.left +
  textRect.width / 2.0f,
  textRect.top +
  textRect.height / 2.0f);

messageText.setPosition(1920 / 2.0f, 1080 / 2.0f);

scoreText.setPosition(20, 20);

while (window.isOpen())
{

   /*
   ****************************************
   Handle the players input
   ****************************************
   */
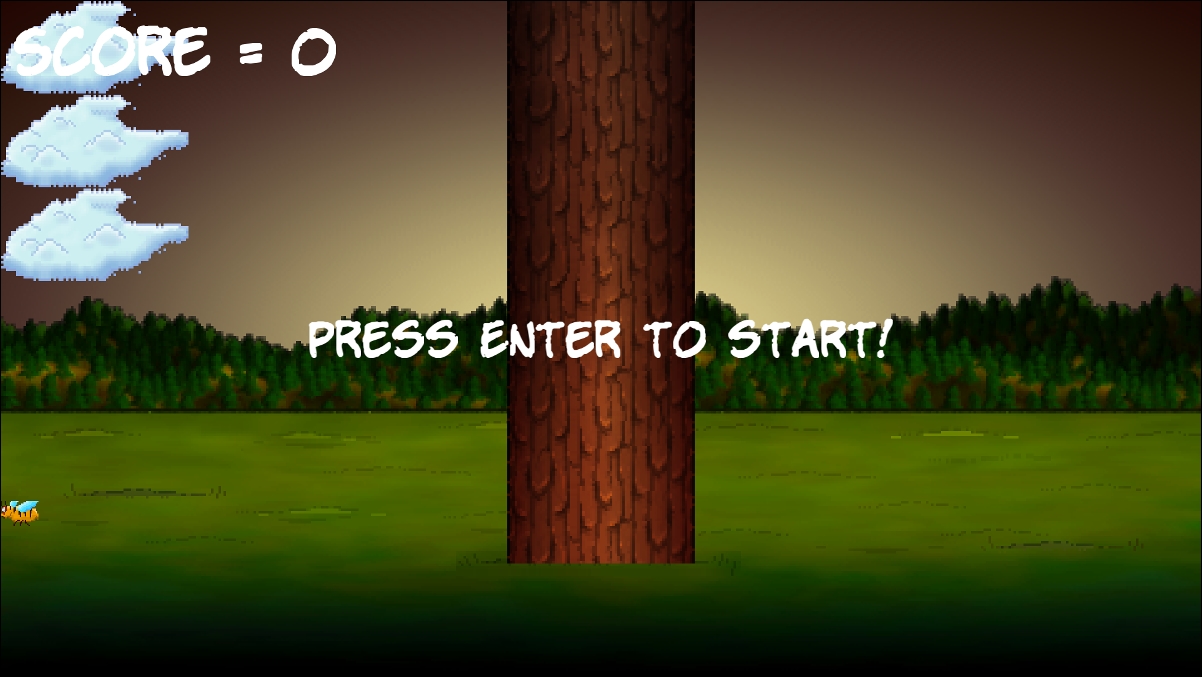
We have two objects of the type Text that we will display on the screen. We want to position scoreText on the top left with a little bit of padding. This is not a challenge; we simply use scoreText.setPosition(20, 20) and that positions it in the top left with 20 pixels of horizontal and vertical padding.
Positioning messageText, however, was not so easy. We want to position it in the exact center of the screen. Initially this might not seem like a problem, but then we remember that the origin of everything we draw is the top left-hand corner. So, if we simply divide the screen width and height by two and use the results in mesageText.setPosition..., then the top left of the text will be in the center of the screen and it will spread out untidily to the right.
What we need is a way to be able to set the center of messageText to the center of the screen. The rather nasty looking bit of code that you just added repositions the origin of messageText to the center of itself. Here is the code under current discussion again for convenience:
// Position the text
FloatRect textRect = messageText.getLocalBounds();

messageText.setOrigin(textRect.left +
   textRect.width / 2.0f,
   textRect.top +
   textRect.height / 2.0f);
First, in this code, we declare a new object of type FloatRect, called textRect. A FloatRect object, as the name suggests, holds a rectangle with floating point coordinates.
The code then uses the messageText.getLocalBounds function to initialize textRect with the coordinates of the rectangle that wraps messageText.
The next line of code, spread over four lines as it is quite long, uses the messageText.setOrigin function to change the origin (the point at which we draw) to the center of textRect. Of course, textRect holds a rectangle, which exactly matches the coordinates that wrap messageText. Then, this next line of code executes:
messageText.setPosition(1920 / 2.0f, 1080 / 2.0f);
Now, messageText will be neatly positioned in the exact center of the screen. We will use this exact same code each time we change the text of messageText, because changing the message changes the size of messageText, so its origin will need recalculating.
Next we declare an object of type stringstream called ss. Note that we use the full name including the namespace std::stringstream. We could avoid this syntax by adding using namespace std to the top of our code file. We don't, however, because we use it infrequently. Take a look at the code and add it to the game, then we can go through it in more detail. As we only want this code to execute when the game is not paused, be sure to add it with the other code, inside the if(!paused) block, as shown:
else
   {

      spriteCloud3.setPosition(
         spriteCloud3.getPosition().x +
         (cloud3Speed * dt.asSeconds()),
         spriteCloud3.getPosition().y);

      // Has the cloud reached the right hand edge of the screen?
      if (spriteCloud3.getPosition().x > 1920)
      {
         // Set it up ready to be a whole new cloud next frame
         cloud3Active = false;
      }
   }

   // Update the score text
   std::stringstream ss;
   ss << "Score = " << score;
   scoreText.setString(ss.str());

}// End if(!paused)

/*
****************************************
Draw the scene
****************************************
*/
We use ss and the special functionality provided by the << operator, which concatenates variables into a stringstream. So the code, ss << "Score = " << score, has the effect of creating a string with "Score = " and whatever the value of score is, it is concatenated together. For example, when the game first starts, score is equal to zero, so ss will hold the value "Score = 0". If score ever changes, ss will adapt each frame.
The next line of code simply displays/sets the string contained in ss to scoreText.
scoreText.setString(ss.str());
It is now ready to be drawn onto the screen.
This next code draws both Text objects (scoreText and messageText), but notice that the code that draws messageText is wrapped in an if statement. This if statement causes messageText only to be drawn when the game is paused.
Add the highlighted code shown next:
// Now draw the insect
window.draw(spriteBee);

// Draw the score
window.draw(scoreText);
if (paused)
{
  // Draw our message
  window.draw(messageText);
}

// Show everything we just drew
window.display();
We can now run the game and see our HUD drawn on the screen. You will see the SCORE = 0 and PRESS ENTER TO START! messages. The latter will disappear when you press Enter .
If you want to see the score updating, add a temporary line of code, score ++; anywhere in the while(window.isOpen) loop. If you add this temporary line you will see the score go up fast, very fast!

If you added the temporary code score ++;, be sure to delete it before continuing.