© Wei-Meng Lee 2019
W.-M. LeeBeginning Ethereum Smart Contracts Programminghttps://doi.org/10.1007/978-1-4842-5086-0_9

9. Smart Contract Events

Wei-Meng Lee1 
(1)
Ang Mo Kio, Singapore
 
In the previous chapter, you saw how to use web3.js to interact with your deployed Smart Contract. Using web3.js, you were able to connect to an Ethereum node (through MetaMask, or directly to an Ethereum node such as Ganache running locally on your computer). Using the document notarizer example, you were able to
  • Send a string to the Smart Contract through the web front end for storing its hash on the blockchain

  • Send Ethers to the Smart Contract to pay for the notarization service

  • Verify if a string’s hash has been previously stored on the blockchain

However, there are a number of important features that have been missing:
  • We need to inform the user if the string they are trying to notarize has already been saved in the blockchain.

  • We need to inform the user after the string has been successfully saved in the blockchain.

  • We also need to inform the user if the amount of Ether they sent to the contract is not of the correct amount.

So in this case, it is clear that there must be a communication mechanism to feed back to the user of the Smart Contract when certain events occur. And this is the focus of this chapter.

What Are Events in Solidity?

In Solidity, your Smart Contract can emit events so that whoever is interested in handling them can listen for it. To define an event, you give a name to the event and prefix it with the event keyword, like this:
  //---an event in Solidity---
  event DocumentNotarized(
    address from,
    string text,
    bytes32 hash
  );

Tip

You are free to define the parameters of your event.

In the preceding example, DocumentNotarized is an event in Solidity. The parameters in the event – from, text, and hash – allow the Smart Contract to pass data back to the event listener.

To fire an event, use the emit keyword , followed by the event name, and the arguments to pass to the event, for example:
    emit DocumentNotarized(msg.sender, document,
        proofFor(document));

Adding Events to the ProofOfExistence Contract

Using the ProofOfExistence contract that we have been using for the previous two chapters, let’s now add some events to the contract and see how we can make use of events to make our Smart Contract smarter :
pragma solidity ^0.5.1;
contract ProofOfExistence {
  mapping (bytes32 => bool) private proofs;
  //---events---
  event DocumentNotarized(
    address from,
    string text,
    bytes32 hash
  );
  event NotarizationError(
    address from,
    string text,
    string reason
  );
  // store a proof of existence in the contract state
  function storeProof(bytes32 proof) private {
    proofs[proof] = true;
  }
  // calculate and store the proof for a document
  function notarize(string memory document) public payable {
    //---check if string was previously stored---
    if (proofs[proofFor(document)]) {
        //---fire the event---
        emit NotarizationError(msg.sender, document,
            "String was stored previously");
        //---refund back to the sender---
        msg.sender.transfer(msg.value);
        //---exit the function---
        return;
    }
    if (msg.value != 1 ether) {
        //---fire the event---
        emit NotarizationError(msg.sender, document,
            "Incorrect amount of Ether paid");
        //---refund back to the sender---
        msg.sender.transfer(msg.value);
        //---exit the function---
        return;
    }
    //---store the hash of the string---
    storeProof(proofFor(document));
    //---fire the event---
    emit DocumentNotarized(msg.sender, document,
        proofFor(document));
  }
  // helper function to get a document's sha256
  function proofFor(string memory document) private
  pure returns (bytes32) {
    return sha256(bytes(document));
  }
  // check if a document has been notarized
  function checkDocument(string memory document) public
  view returns (bool) {
    return proofs[proofFor(document)];
  }
}
In the preceding modifications, we did the following:
  • Added two events – DocumentNotarized and NotarizationError.

  • Before a document (string) can be notarized, it is first checked to see if the hash of the document already exists on the blockchain. If it does, the document cannot be notarized. In this case, you will fire the NotarizationError event to inform the user of this error. In this case, you also need to refund the user the Ether that was sent along this transaction, since the notarization was not successful . You do so using the msg.sender.transfer() function. The msg.value property contains the amount of Ether sent by the user.

  • The next check you need to perform is to ensure that the user sends exactly 1 Ether. If the user does not send the exact amount, the transaction is also rejected and you will fire the NotarizationError event to inform the user of the reason. Likewise, you will need to refund the user of the amount sent.

  • The DocumentNotarized event will be fired when a document has been successfully notarized.

Observe that in both events – NotarizationError and DocumentNotarized, we have the from parameter. This is because when an event is fired, it is sent to all event handlers listening for the event. The from parameter provides a way for event handlers to know if events raised are relevant to them. You will see its use in the next section.

Deploying the Contract

With the modified Smart Contract, deploy it using the Remix IDE. Once it is deployed, take note of its address (see Figure 9-1).
../images/471881_1_En_9_Chapter/471881_1_En_9_Fig1_HTML.jpg
Figure 9-1

Deploying the modified contract in Remix IDE

For this example, the new contract address is 0x6910022c777ff4c35aabb5e2aba65f2ffe4b31dd. Also, since we have added events to the Smart Contract, we need to get the new ABI of the contract so that you can use it in your front end in the next section. The new ABI for this contract is
[ { "constant": true, "inputs": [ { "name": "document", "type": "string" } ], "name": "checkDocument", "outputs": [ { "name": "", "type": "bool" } ], "payable": false, "stateMutability": "view", "type": "function" }, { "constant": false, "inputs": [ { "name": "document", "type": "string" } ], "name": "notarize", "outputs": [], "payable": true, "stateMutability": "payable", "type": "function" }, { "anonymous": false, "inputs": [ { "indexed": false, "name": "from", "type": "address" }, { "indexed": false, "name": "text", "type": "string" }, { "indexed": false, "name": "hash", "type": "bytes32" } ], "name": "DocumentNotarized", "type": "event" }, { "anonymous": false, "inputs": [ { "indexed": false, "name": "from", "type": "address" }, { "indexed": false, "name": "text", "type": "string" }, { "indexed": false, "name": "reason", "type": "string" } ], "name": "NotarizationError", "type": "event" } ]

Handling Events Using web3.js

With the events defined in the Smart Contract, we can now learn how to handle events in our front end using web3.js. To handle an event, first create an instance of the event, like this:
        var documentNotarizedEvent =
            notarizer.DocumentNotarized();
Then, use the watch() function with a callback to listen for events:
        documentNotarizedEvent.watch(function(error, result) {
            if (!error){
               if (result.args.from ==
                   web3.eth.defaultAccount){
                   $("#result").html("Document: " +
                       result.args.text +
                       " notarized as: " + result.args.hash);
               }
            }
        });

The result argument in the callback function will contain a property named args, which in turn contains the parameters defined in your event. In the DocumentNotarized event, it will contain a reference to from, text, and hash. As mentioned earlier, when an event is fired, all clients listening to the events will be invoked. Hence it is important that you handle events only relevant to yourself. In this case, we checked the from argument and update the UI only if the value of the from argument is the same as the current account address.

Let’s now modify the DocumentNotarizer.html file with the following statements in bold and save it as DocumentNotarizerEvents.html (save it in the web3projects folder):
<!DOCTYPE html>
<html lang="en">
<head>
    <title>Document Notarizer</title>
    <link rel="stylesheet" type="text/css" href="main.css">
    <script src="./node_modules/web3/dist/web3.min.js">
    </script>
</head>
<body>
    <div class="container">
        <h1>Document Notarizer</h1>
        <label class="col-lg-2 control-label">
        Document to notarize</label>
        <input id="document1" type="text">
        <button id="btnNotarize">Notarize</button>
        <label class="col-lg-2 control-label">
        Check Document</label>
        <input id="document2" type="text">
        <button id="btnCheck">Check</button>
        <label class="col-lg-2 control-label">Status</label>
        <h2 id="result"></h2>
    </div>
    <script src="https://code.jquery.com/jquery-3.2.1.slim.min.js"></script>
    <script>
        if (typeof web3 !== 'undefined') {
            // this statement is executed if you are using
            // MetaMask
            async function enableAccounts() {
                await ethereum.enable();
            }
            enableAccounts();
        } else {
            // set the provider you want from Web3.providers
            web3 = new Web3(
                new Web3.providers.HttpProvider(
                    "http://localhost:8545"));
        }
        let abi = [ { "constant": true, "inputs": [ { "name": "document", "type": "string" } ], "name": "checkDocument", "outputs": [ { "name": "", "type": "bool" } ], "payable": false, "stateMutability": "view", "type": "function" }, { "constant": false, "inputs": [ { "name": "document", "type": "string" } ], "name": "notarize", "outputs": [], "payable": true, "stateMutability": "payable", "type": "function" }, { "anonymous": false, "inputs": [ { "indexed": false, "name": "from", "type": "address" }, { "indexed": false, "name": "text", "type": "string" }, { "indexed": false, "name": "hash", "type": "bytes32" } ], "name": "DocumentNotarized", "type": "event" }, { "anonymous": false, "inputs": [ { "indexed": false, "name": "from", "type": "address" }, { "indexed": false, "name": "text", "type": "string" }, { "indexed": false, "name": "reason", "type": "string" } ], "name": "NotarizationError", "type": "event" } ];
        var contract = web3.eth.contract(abi);
        var notarizer = contract.at(
            '0x6910022c777ff4c35aabb5e2aba65f2ffe4b31dd');
        var documentNotarizedEvent =
            notarizer.DocumentNotarized();
        documentNotarizedEvent.watch(function(error, result) {
            if (!error){
               if (result.args.from ==
                   web3.eth.defaultAccount){
                   $("#result").html("Document: " +
                       result.args.text +
                       " notarized as: " + result.args.hash);
               }
            }
        });
        var notarizationErrorEvent =
            notarizer.NotarizationError();
        notarizationErrorEvent.watch(function(error, result) {
            if (!error){
               if (result.args.from ==
                   web3.eth.defaultAccount){
                   $("#result").html(
                       "Error. <br/> Document: " +
                       result.args.text +
                       "<br/> Reason: " + result.args.reason);
               }
            }
        });
        $("#btnNotarize").click(function() {
            notarizer.notarize($("#document1").val(),
            {
              gas: 300000,
              from: web3.eth.accounts[0],
              value: 1000000000000000000
            },
            (error, result) => {
                $("#result").html(
                    "Notarization pending confirmation...");
            });
        });
        $("#btnCheck").click(function() {
            notarizer.checkDocument($("#document2").val(),
            (error, result) => {
                if(!error) {
                    $("#result").html(result.toString());
                } else
                    console.error(error);
            });
        });
    </script>
</body>
</html>

Testing the Front End

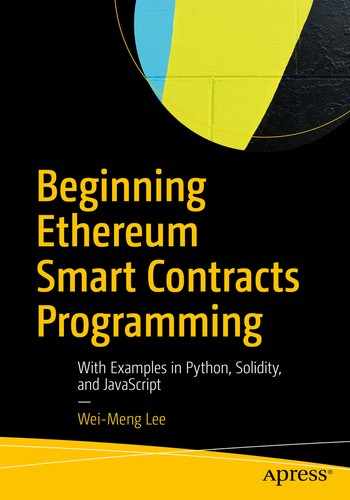
To test the front end, load Chrome with the following URL: http://localhost:5000/DocumentNotarizerEvents.html.

Caution

Ensure that the serve command is running in the web3projects folder.

Enter a string to notarize and click the Notarize button. You will see the pop-up from MetaMask (see Figure 9-2).
../images/471881_1_En_9_Chapter/471881_1_En_9_Fig2_HTML.jpg
Figure 9-2

Notarizing a string

Click CONFIRM to confirm the transaction. You will immediately see the message displayed in the label on the bottom of the page (see Figure 9-3).
../images/471881_1_En_9_Chapter/471881_1_En_9_Fig3_HTML.jpg
Figure 9-3

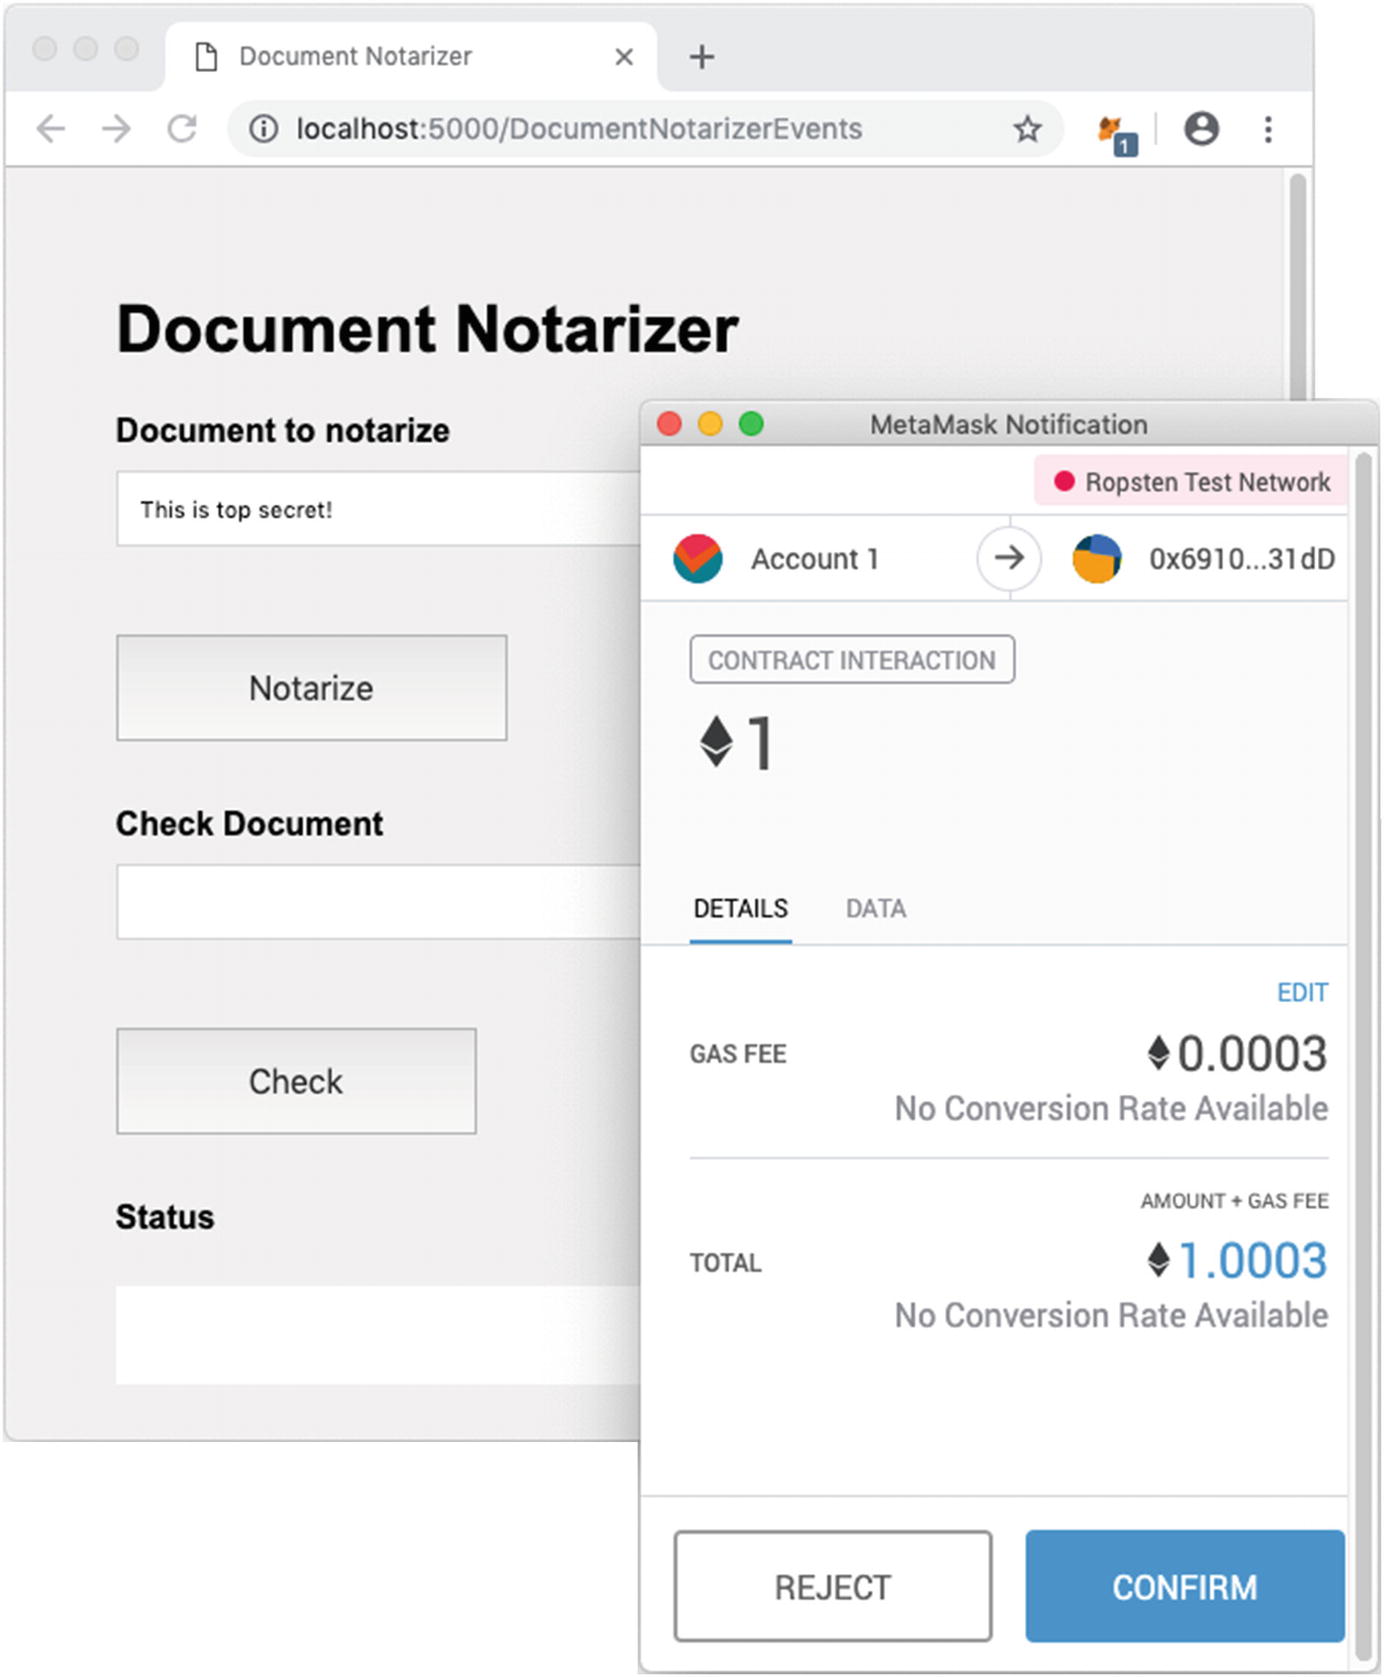
The transaction (notarization) is pending confirmation

When block containing the transaction is mined, the DocumentNotarized event will be fired, and you will see the message displayed as shown in Figure 9-4.
../images/471881_1_En_9_Chapter/471881_1_En_9_Fig4_HTML.jpg
Figure 9-4

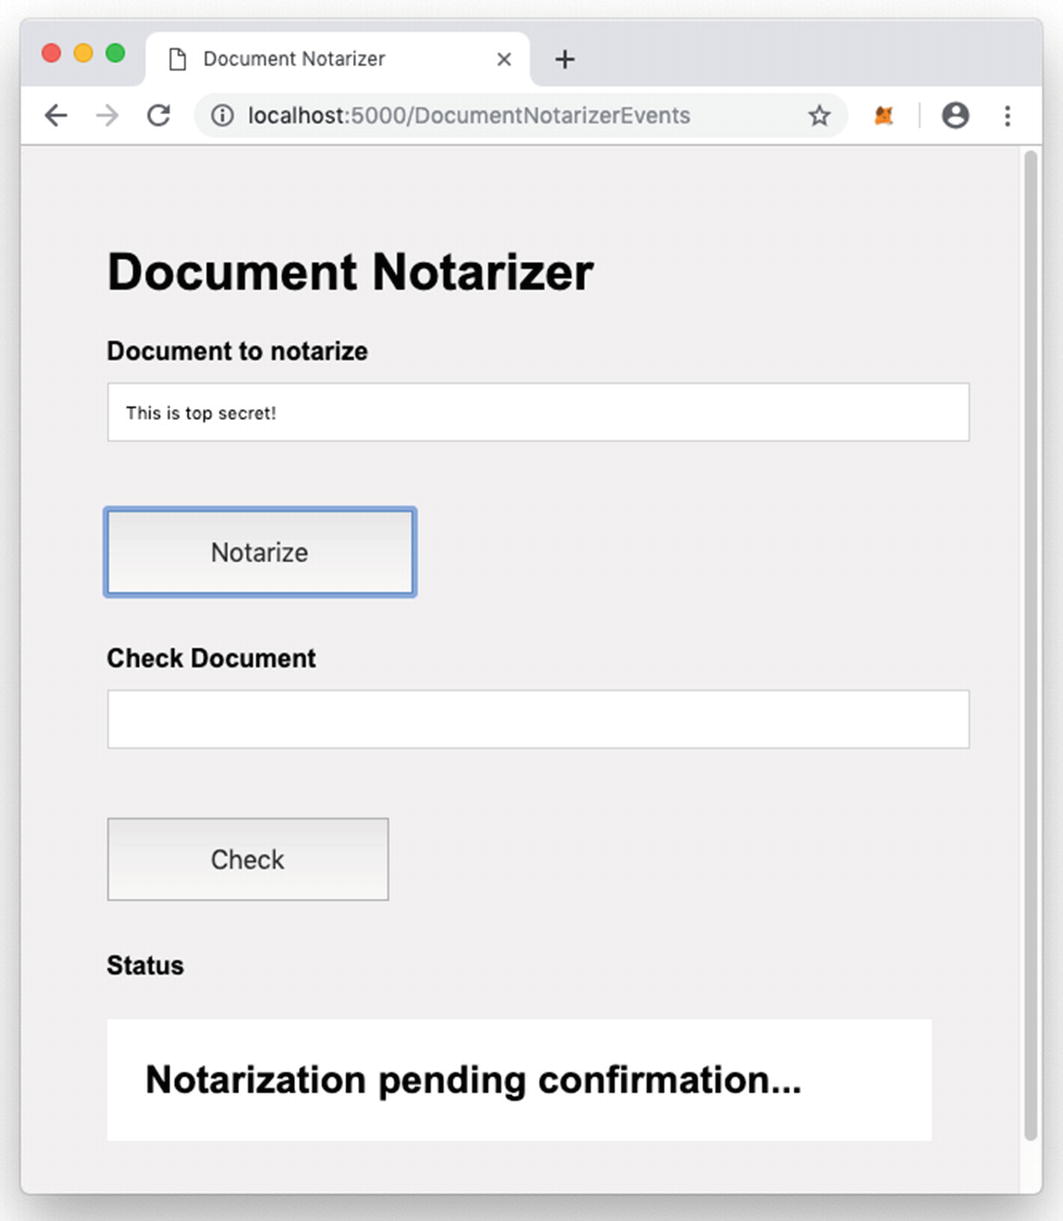
The document is notarized and its hash is returned via the event

In the https://ropsten.etherscan.io page, locate the page for the contract (which in this example is 0x6910022c777ff4c35aabb5e2aba65f2ffe4b31dd), and click the latest transaction hash (TxHash). Click the Event Logs tab and you should be able to see the event that was fired (see Figure 9-5).
../images/471881_1_En_9_Chapter/471881_1_En_9_Fig5_HTML.jpg
Figure 9-5

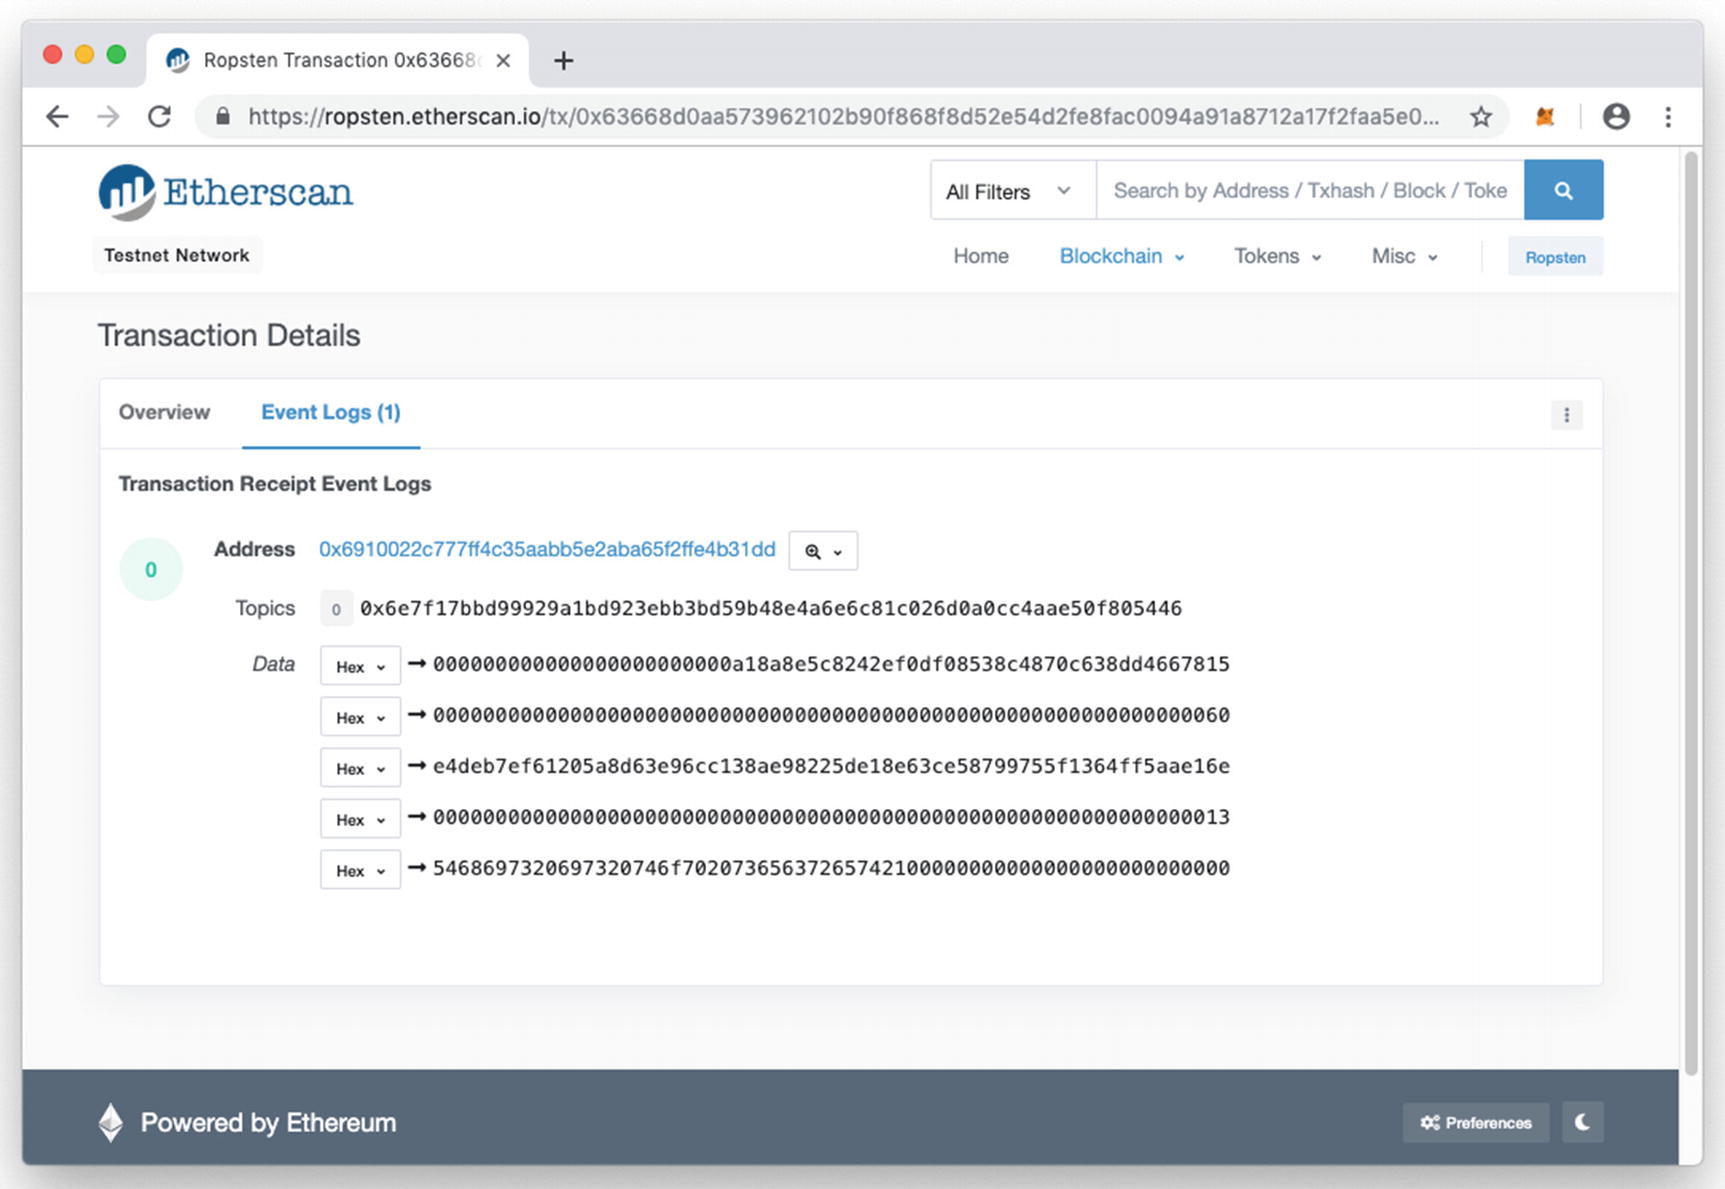
Locating the event fired by the Smart Contract

The Data section contains the data that is logged together with the event. By default all the data is displayed in hexadecimal (Hex) format, but you can change to display as number, text, or address. Figure 9-6 shows the relevant parts of the Data section displayed in the different formats.
../images/471881_1_En_9_Chapter/471881_1_En_9_Fig6_HTML.jpg
Figure 9-6

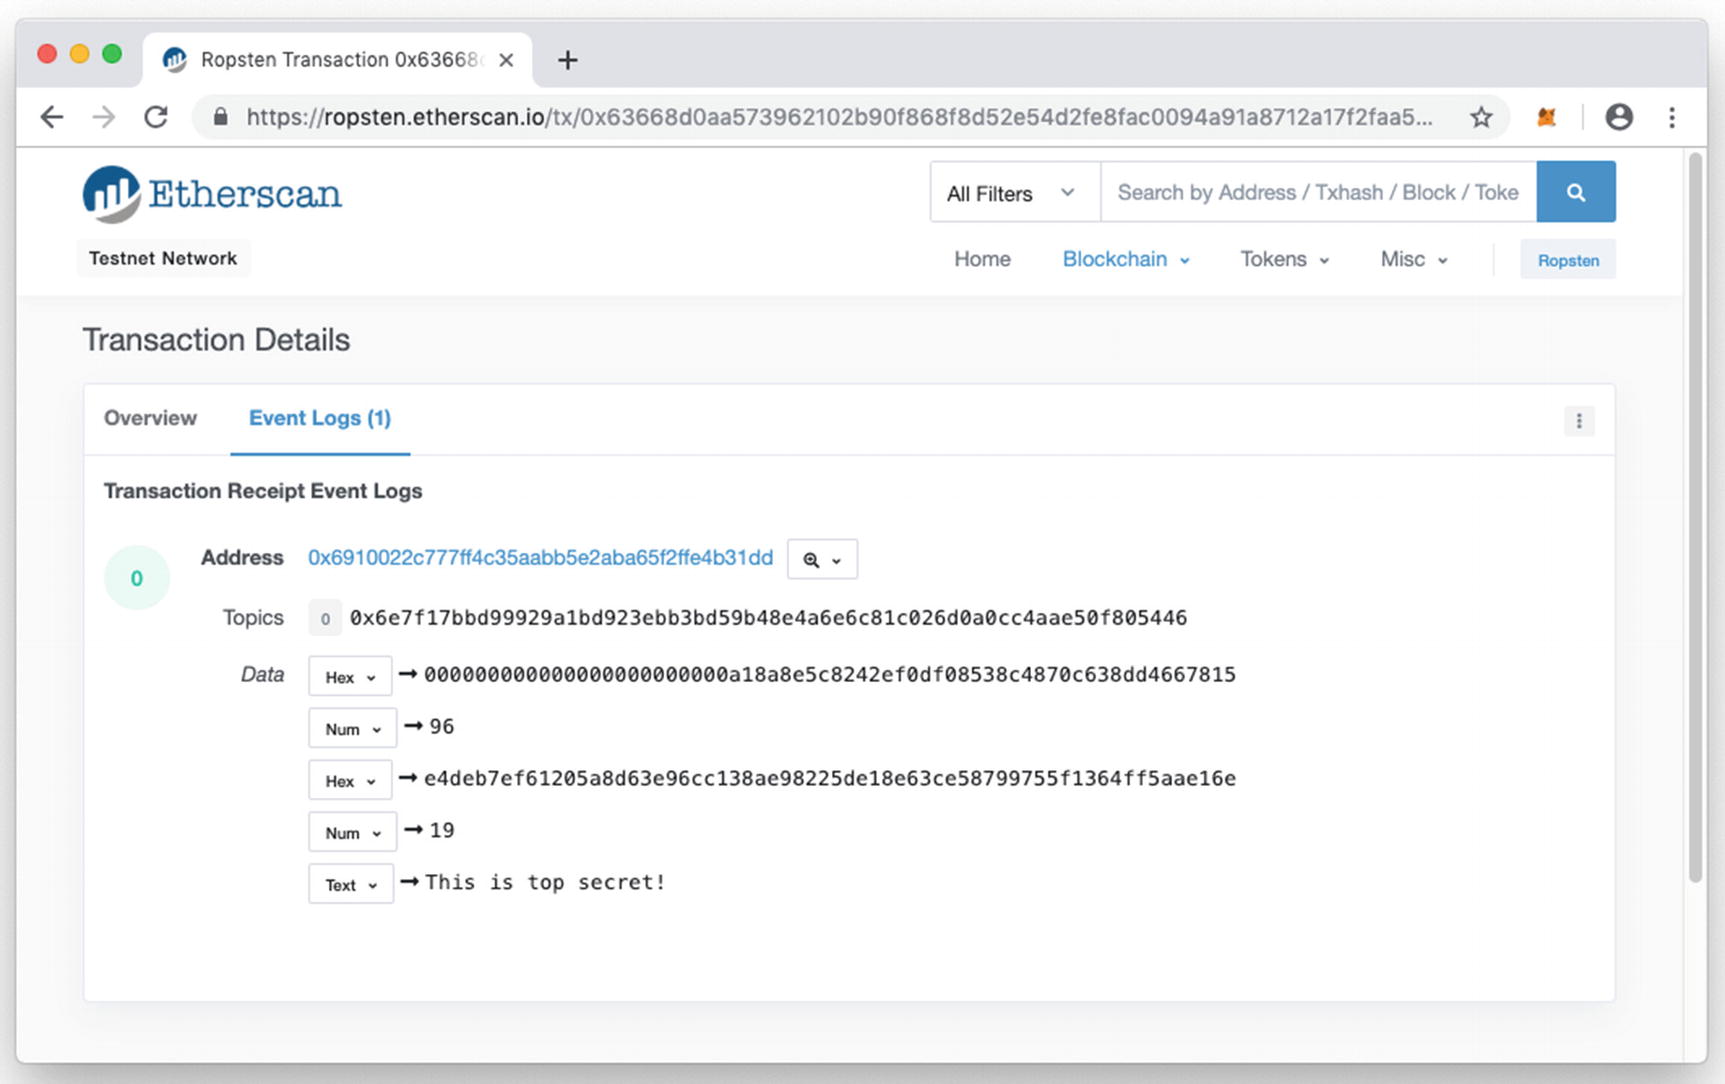
Viewing the data for the event displayed in the different format

Tip

You don’t really need to understand the data logged in the Data section. The web3.js will encapsulate all the arguments in the event.

Notarizing the Same Document Twice

If you click the Notarize button one more time to notarize the same string again, you will now get the error as shown in Figure 9-7 (after the block containing the transaction has been mined).
../images/471881_1_En_9_Chapter/471881_1_En_9_Fig7_HTML.jpg
Figure 9-7

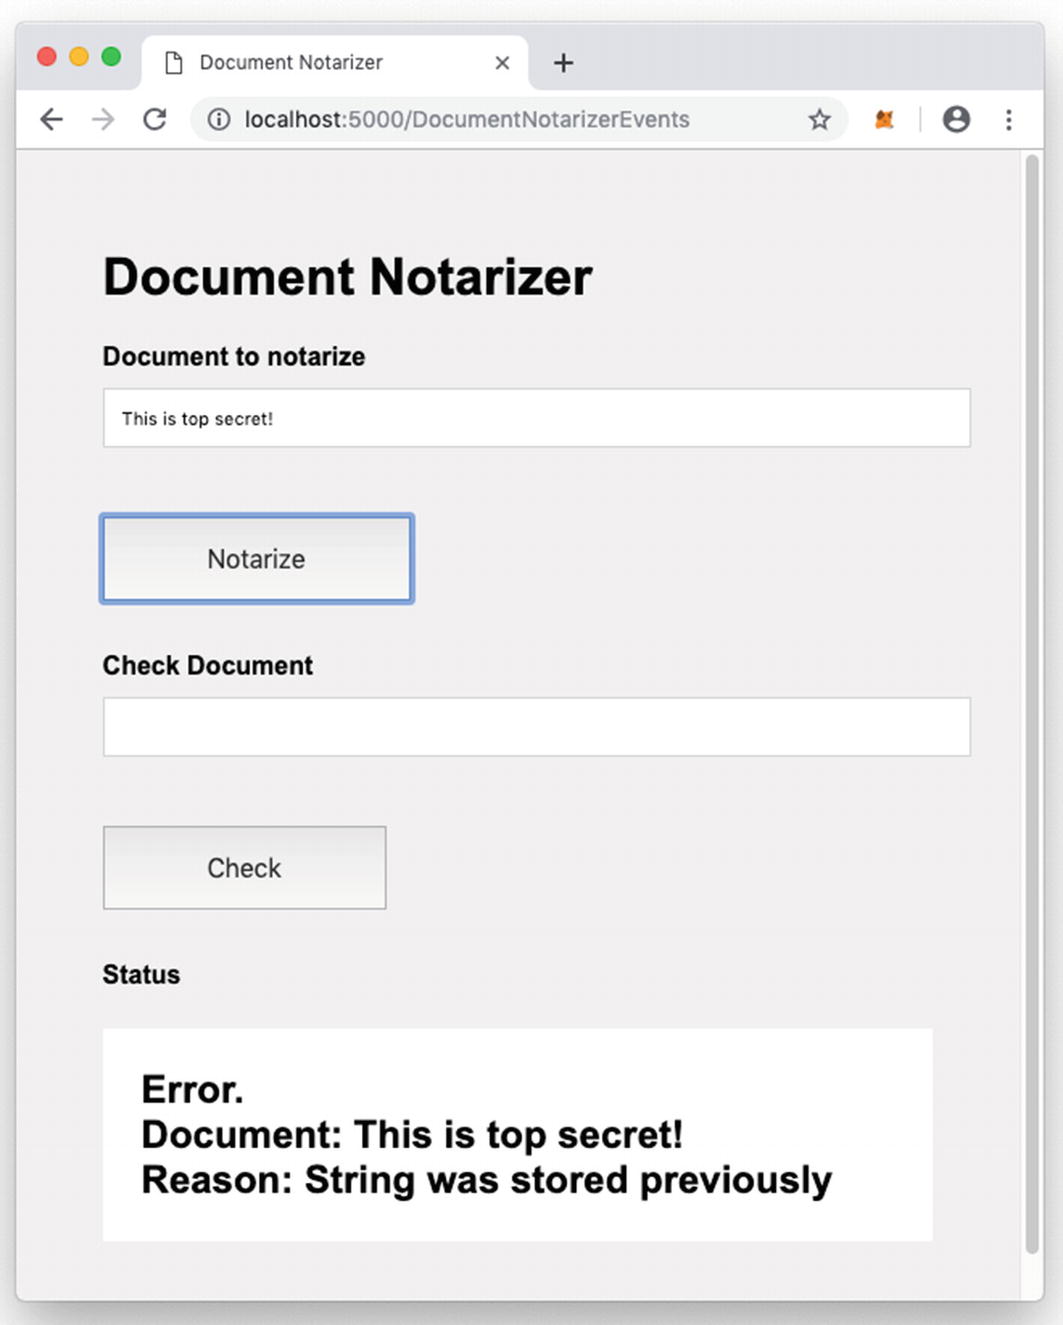
The notarization failed because it was previously notarized

This is because the hash of the string already exists on the blockchain, and hence the NotarizationError event was fired:
    //---check if string was previously stored---
    if (proofs[proofFor(document)]) {
        //---fire the event---
        emit NotarizationError(msg.sender, document,
            "String was stored previously");
        //---refund back to the sender---
        msg.sender.transfer(msg.value);
        //---exit the function---
        return;
    }

Observe that besides firing the NotarizationError event, the contract also calls the msg.sender.transfer() function to refund the amount (msg.value) back to the user (msg.sender). In the next section, you will see the proof that the amount was indeed refunded back to the user.

Sending Incorrect Amount of Ether

The last scenario that we want to try out is when the wrong amount of Ether is sent to the contract. To do so, we modify the DocumentNotarizerEvents.html file and send 0.9 Ether (instead of 1 Ether) to the contract:
        $("#btnNotarize").click(function() {
            notarizer.notarize($("#document1").val(),
            {
              gas: 300000,
              from: web3.eth.accounts[0],
              value: 900000000000000000
            },
            (error, result) => {
                $("#result").html(
                    "Notarization pending confirmation...");
            });
        });
To test this, load the Chrome browser with the following URL: http://localhost:5000/DocumentNotarizerEvents.html, and enter a string to notarize. Click the Notarize button, and you should see MetaMask displaying a pop-up (see Figure 9-8).
../images/471881_1_En_9_Chapter/471881_1_En_9_Fig8_HTML.jpg
Figure 9-8

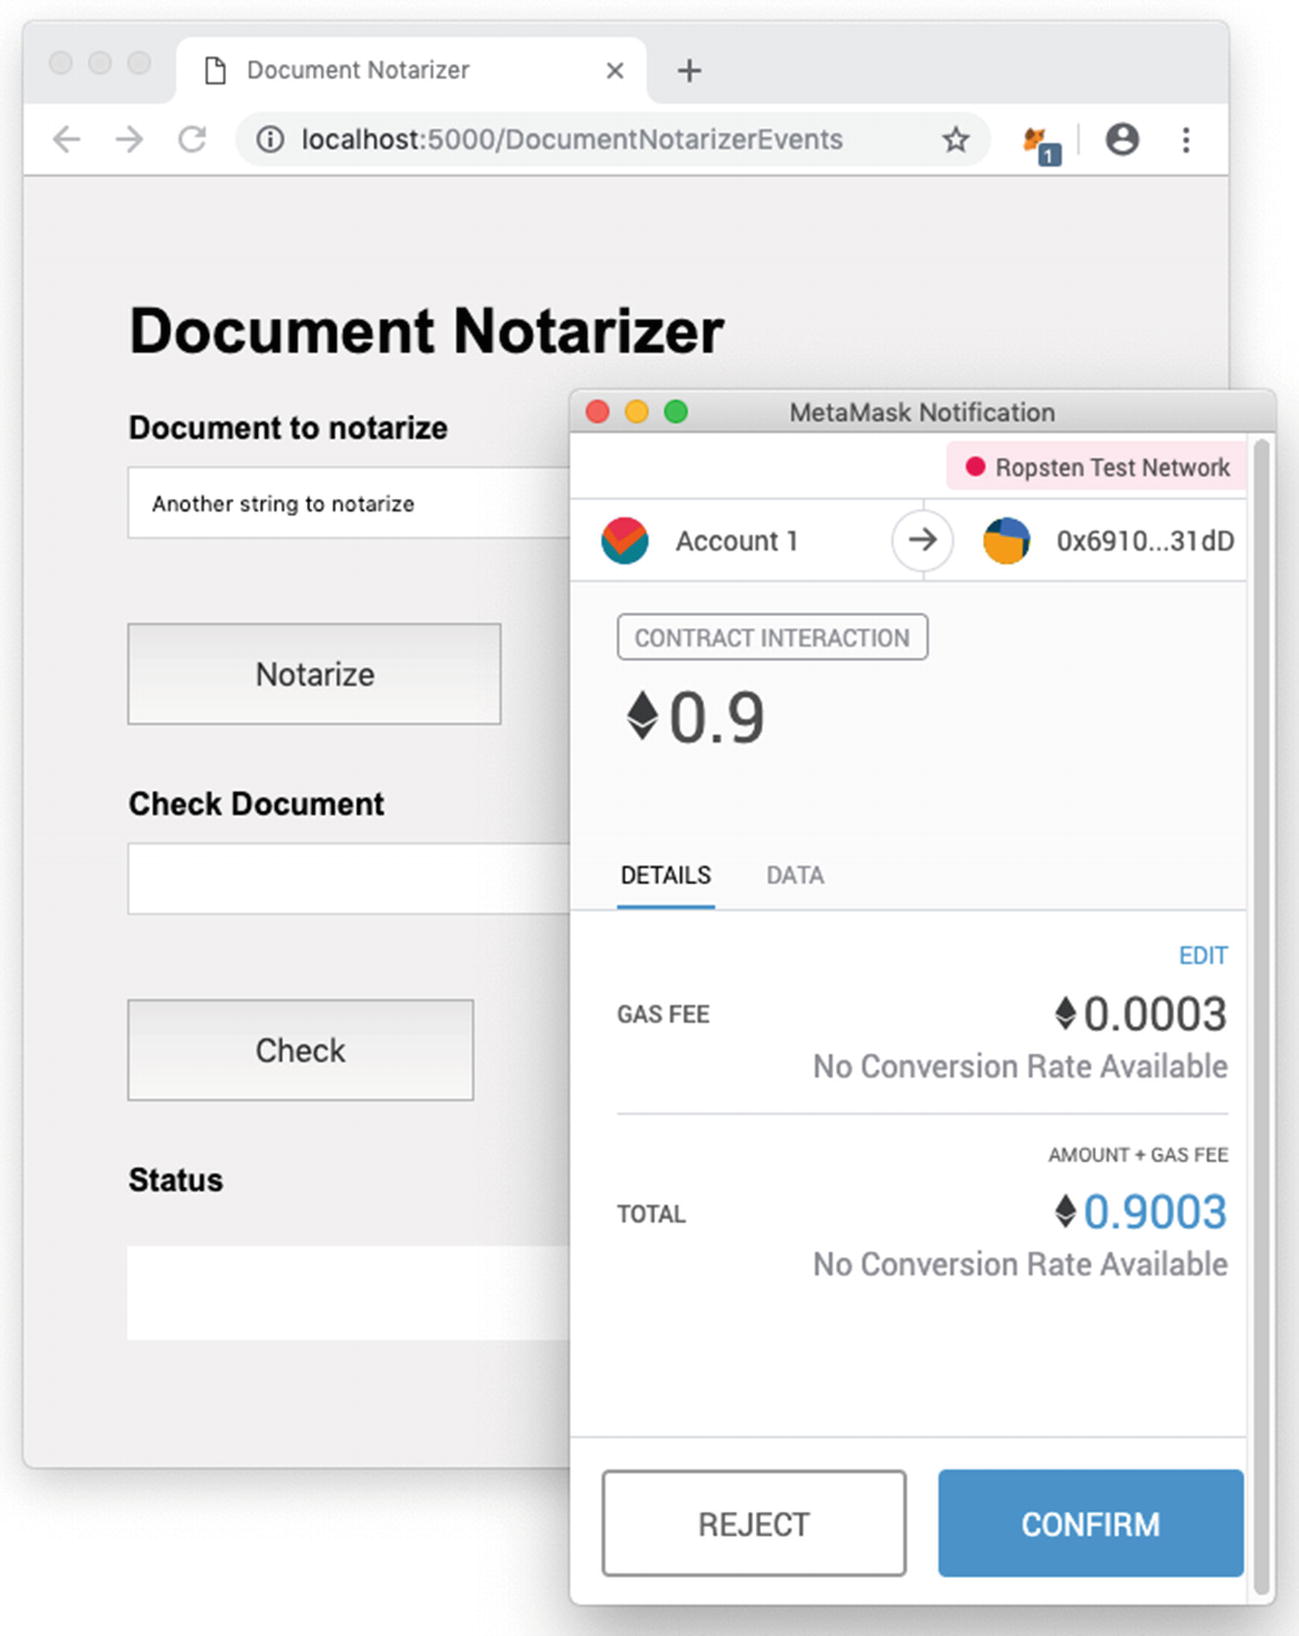
Sending insufficient amount of Ether to a Smart Contract

Observe that you will be sending 0.9 Ether over to the contract. Click CONFIRM. When the block containing the transaction is mined, you should see the error message as shown in Figure 9-9.
../images/471881_1_En_9_Chapter/471881_1_En_9_Fig9_HTML.jpg
Figure 9-9

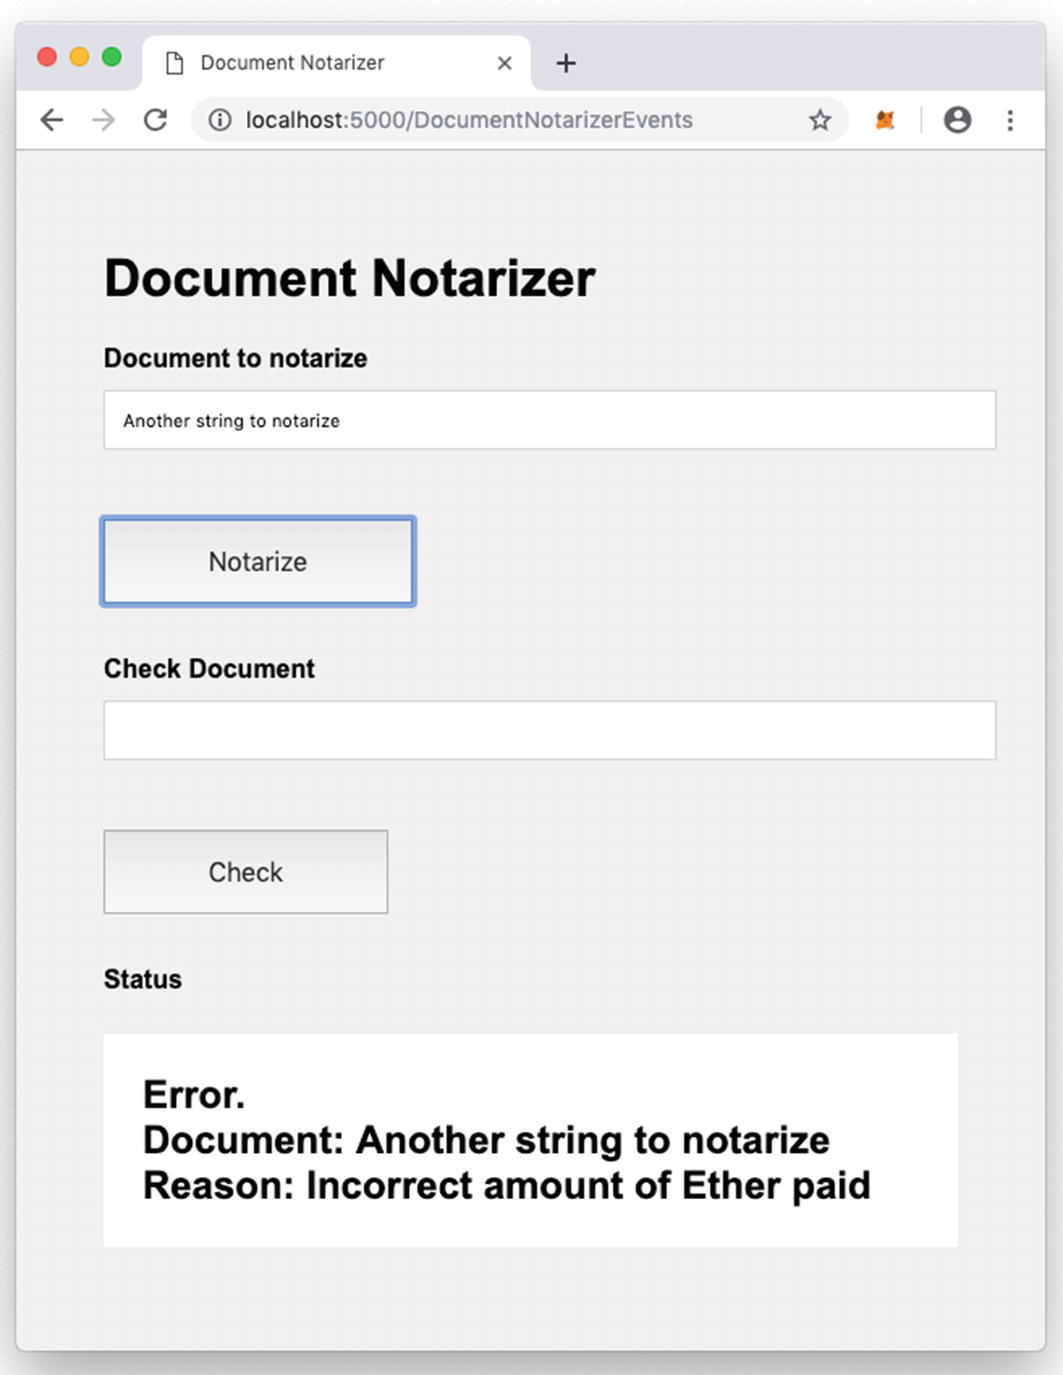
The event fired to reflect the insufficient amount of Ether sent

What happened to the 0.9 Ether that was sent to the contract? To find out, go to MetaMask and click the arrow icon showing the latest transaction (see Figure 9-10).
../images/471881_1_En_9_Chapter/471881_1_En_9_Fig10_HTML.jpg
Figure 9-10

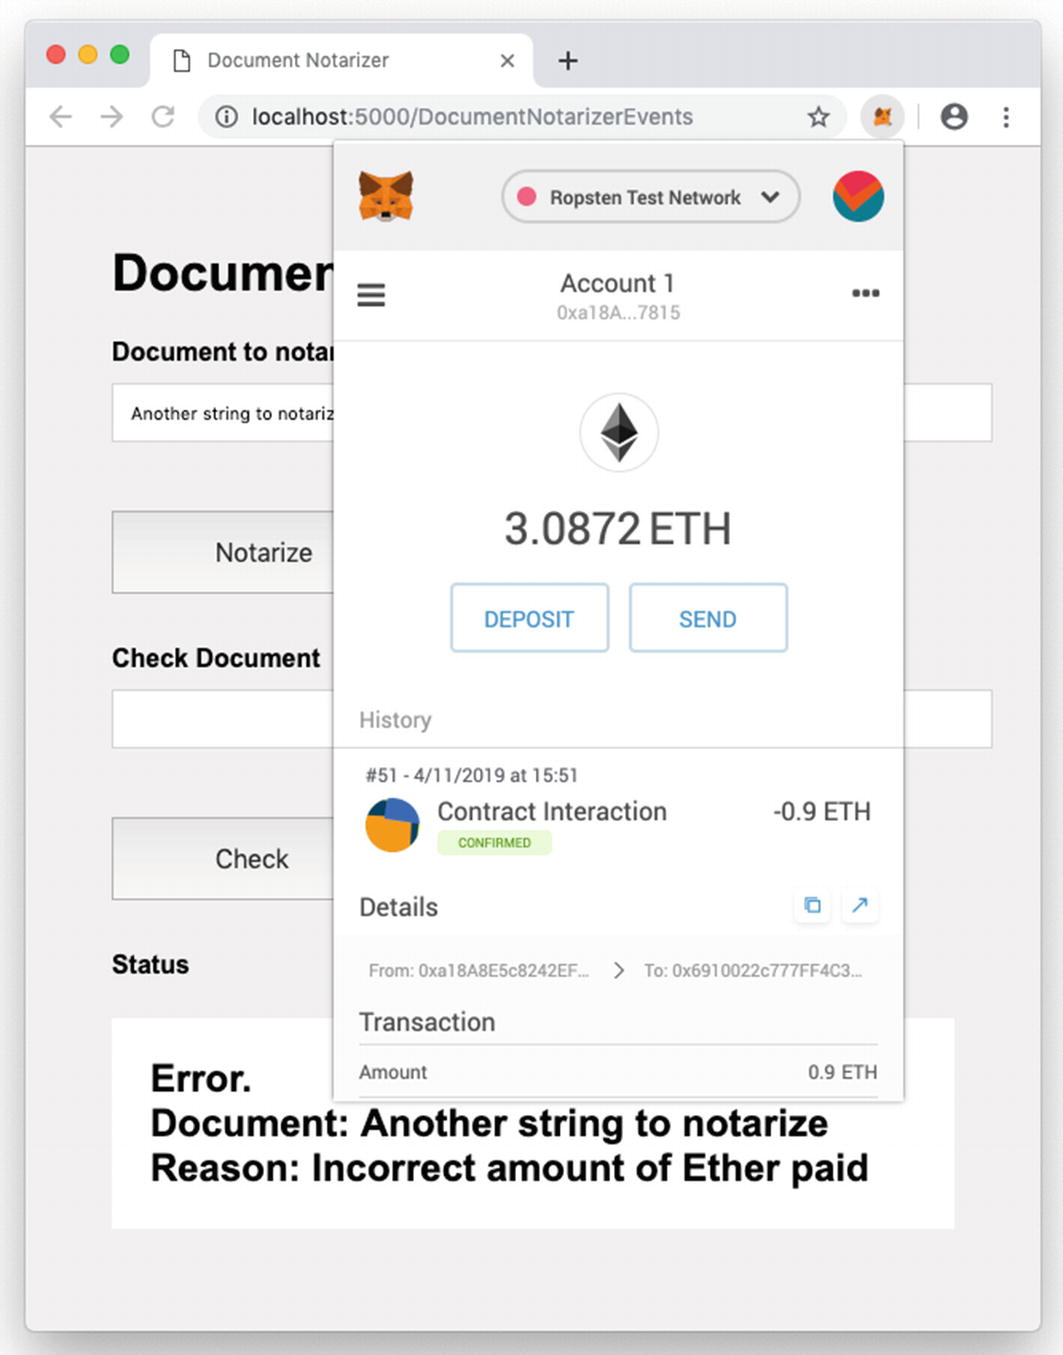
Examining the details of the transaction

This will bring up the Etherscan page . In particular, focus on the section labeled To: (see Figure 9-11).
../images/471881_1_En_9_Chapter/471881_1_En_9_Fig11_HTML.jpg
Figure 9-11

The internal transfer made within the Smart Contract for the refund

Observe that there is an internal transfer of 0.9 Ether from the contract back to the account which sent the Ether. This is the refund that is performed by the contract:
    if (msg.value != 1 ether) {
        //---fire the event---
        emit NotarizationError(msg.sender, document,
            "Incorrect amount of Ether paid");
        //---refund back to the sender---
        msg.sender.transfer(msg.value);
        //---exit the function---
        return;
    }

Summary

In this chapter, you learned how Smart Contracts can fire events so that front-end applications that are interacting with them can handle them. Using events, you have made your document notarizer Smart Contract must more usable. In the next chapter, we will put all that we have learned about Smart Contract to build a lottery application.

..................Content has been hidden....................

You can't read the all page of ebook, please click here login for view all page.
Reset
3.143.231.26