If you take a broad view of penetration testing, the first step is information gathering, and after that, every step is closely related to the next one. In fact, all the steps fall into one broad category: exploitation. Vulnerability analysis is one aspect of exploitation; you can also use the tools in the Web Application Analysis category of Kali Linux to test for vulnerabilities. There are many other related tools, and you have already learned about a few of them, so in this chapter, you will learn about the tools in the Vulnerability Analysis category and the Web Application Analysis category.
You can hunt for the vulnerabilities in a system manually by writing your own Python scripts using built-in modules to do scanning. Or you can use an already available scanner. A scanner is especially valuable because it can help you to make an assessment quickly.
Overview of Vulnerability Analysis Tools
If you open the Kali Linux Applications list, you will find that there are four subcategories under Vulnerability Analysis: Cisco Tools, Fuzzing Tools, Stress Testing, and VOIP tools. However, one major tool is missing there: OpenVas. In the next section, you will install OpenVas and see how it works.
How to Use OpenVas
OpenVas is a complete vulnerabilities scanning and management solution. You don’t get OpenVas by default in Kali Linux, so you need to install it.
//code to install OpenVas
apt-get update && apt-get install -y openvas
It will take some time to install OpenVas.
//output on the terminal
• openvas-manager.service - Open Vulnerability Assessment System Manager Daemon
May 29 05:38:55 kali systemd[1]: Started Open Vulnerability Assessment System Manager Daemon.
May 29 05:50:44 kali systemd[1]: Stopping Open Vulnerability Assessment System Manager Daemon...
May 29 05:50:44 kali systemd[1]: openvas-manager.service: Killing process 7399 (gpg-agent) with signal SIGKILL.
May 29 05:50:44 kali systemd[1]: Stopped Open Vulnerability Assessment System Manager Daemon.
May 29 05:56:57 kali systemd[1]: Starting Open Vulnerability Assessment System Manager Daemon...
May 29 05:56:57 kali systemd[1]: openvas-manager.service: PID file /var/run/openvasmd.pid not readable (yet?) after start: No such file or directory
May 29 05:56:58 kali systemd[1]: Started Open Vulnerability Assessment System Manager Daemon.
May 29 06:19:26 kali systemd[1]: Stopping Open Vulnerability Assessment System Manager Daemon...
May 29 06:19:26 kali systemd[1]: openvas-manager.service: Killing process 9117 (openvasmd) with signal SIGKILL.
May 29 06:19:26 kali systemd[1]: Stopped Open Vulnerability Assessment System Manager Daemon.
[>] Starting openvassd
[>] Migrating openvassd
[>] Rebuilding openvassd
Once this code has been executed on the terminal, OpenVas will open in your Kali Firefox browser. It will ask for security certification; just accept the self-signed SSL certificate and enter the credentials for the admin user (Figure 10-2).
Figure 10-2
Opening the OpenVas login page in the web browser
Enter the password admin and log in to the Dashboard of OpenVas, where you can start scanning the vulnerabilities of any target (Figure 10-3).
Figure 10-3
Opening the Vas Dashboard
The Dashboard shows many categories in the top menu. Click the Scan link to open the Scan page. In the top-left section of the Scan page you will find three small colorful buttons. Click the middle one, which is violet.
This will open a new window and ask for the target address (Figure 10-4).
Figure 10-4
OpenVas asks for the target address to start scanning
Don’t provide any live system’s IP address unless you have the proper permission to do this. It is better to provide the host machine’s IP address or your Kali Linux virtual machine’s IP address here so you can get an immediate scan report (Figure 10-5).
Otherwise, this takes a long time to process.
Figure 10-5
The result of an immediate scan
It usually takes two to three hours to scan a local IP address. In the case of a remote address, it might take even longer to finish the job (Figure 10-6).
Figure 10-6
Only 1 percent of the scanning has been done
If you close the scanning process midway through, you can still go back and restart the scanning. There is another good option to watch how OpenVas is working in your terminal. Use this code:
//code to know active internet connections
root@kali:~# netstat -antp
This will give you a detailed report of all the active and open connections.
//output will be something like this depending on your connections
Active Internet connections (servers and established)
Proto Recv-Q Send-Q Local Address Foreign Address State PID/Program name
You can start OpenVas at any time just by typing this:
//code to start OpenVas again
root@kali:~# openvas-start
Starting OpenVas Services
Starting Greenbone Security Assistant: gsad.
Starting OpenVAS Scanner: openvassd.
Starting OpenVAS Manager: openvasmd.
You do not need to point your browser to https://127.0.0.1:9392; it will automatically detect the system after a proper installation. It will open in your Kali Linux Firefox browser, and you can hunt for information that is vulnerable. You can use this tool mainly for gathering knowledge about system vulnerabilities that you can then later rectify.
How to Use Nikto
For detecting vulnerabilities in any web application, a simple yet great tool is Nikto. It comes installed by default, so you will find it in the Web Application Analysis category. Just click the Nikto link, and Nikto will open in your terminal.
By reading the help section, you can learn about several functionalities. To do a quick scan, you type this command:
//code to strat Nikto scanning
root@kali:~# nikto -h 192.168.2.2
This IP address is my host machine’s; you can try your own and see what you get as the scanning result. This command has given me some nice output, which has a lot of important information.
+ The anti-clickjacking X-Frame-Options header is not present.
+ The X-XSS-Protection header is not defined. This header can hint to the user agent to protect against some forms of XSS
+ The X-Content-Type-Options header is not set. This could allow the user agent to render the content of the site in a different fashion to the MIME type
+ No CGI Directories found (use '-C all' to force check all possible dirs)
+ Apache/2.4.7 appears to be outdated (current is at least Apache/2.4.12). Apache 2.0.65 (final release) and 2.2.29 are also current.
+ Web Server returns a valid response with junk HTTP methods, this may cause false positives.
+ OSVDB-561: /server-status: This reveals Apache information. Comment out appropriate line in the Apache conf file or restrict access to allowed sources.
+ /info.php: Output from the phpinfo() function was found.
+ OSVDB-3233: /info.php: PHP is installed, and a test script which runs phpinfo() was found. This gives a lot of system information.
+ Server leaks inodes via ETags, header found with file /icons/README, fields: 0x13f4 0x438c034968a80
+ /info.php?file=http://cirt.net/rfiinc.txt?: Output from the phpinfo() function was found.
+ OSVDB-5292: /info.php?file=http://cirt.net/rfiinc.txt?: RFI from RSnake's list (http://ha.ckers.org/weird/rfi-locations.dat) or from http://osvdb.org/
+ /server-status: Apache server-status interface found (pass protected)
+ 7517 requests: 0 error(s) and 13 item(s) reported on remote host
+ End Time: 2018-05-29 07:38:48 (GMT5.5) (10 seconds)
There are many things to cover here. The first three lines are very important.
//understanding Nikto
+ Server: Apache/2.4.7 (Ubuntu)
+ The anti-clickjacking X-Frame-Options header is not present.
+ The X-XSS-Protection header is not defined. This header can hint to the user agent to protect against some forms of XSS
These lines state the server status and how it has vulnerabilities since the “anti-clickjacking X-Frame-Options header is not present” and the “X-XSS-Protection header is not defined.” This means on a live network, some form of XSS attacks could happen.
I have a few more vulnerabilities because I have kept a PHP file called info.php on my localhost server, and it uses the phpinfo() function.
Nikto has recognized this, as shown here:
+ /info.php: Output from the phpinfo() function was found.
+ OSVDB-3233: /info.php: PHP is installed, and a test script which runs phpinfo() was found. This gives a lot of system information.
Nikto is actually suggesting that I remove the info.php file. OSVDB-3233 is a signal for that. This is one of the information-leaking pages, which should not reside where it is now.
How to Use Vega
Another great tool for vulnerability analysis is Vega. It is a free and open source scanner and testing platform that test the security of any web application. The advantage of Vega is that it is GUI based and platform independent. It runs on Linux as well as on Windows. It can help you detect all the vulnerabilities present in any web application whether it is SQL injection or XSS cross-site scripting.
The installation process is simple. Open your Kali Linux terminal and type this command:
//code for installing vega
apt-get update && apt-get -y install vega
Once the installation is complete, Vega shows up in the Web Application Analysis category in the Kali Linux virtual machine (Figure 10-7).
Figure 10-7
Vega showing up in the Applications menu
Click the link to open Vega.
Once it opens, you will notice a red button in the top-left corner. Click it and you will be asked for the scan target. You need to enter the base URI of any target (Figure 10-8).
Figure 10-8
Entering a base URI for scanning
I have already installed the DVWA web application in the DVWA-master folder, so I enter the URI and click the Next button. The tool will ask for the selection of any modules, and I have chosen for the injection module (Figure 10-9).
Figure 10-9
Selecting the injection module
Now Vega will start scanning the target (Figure 10-10).
Figure 10-10
Vega scanning the target
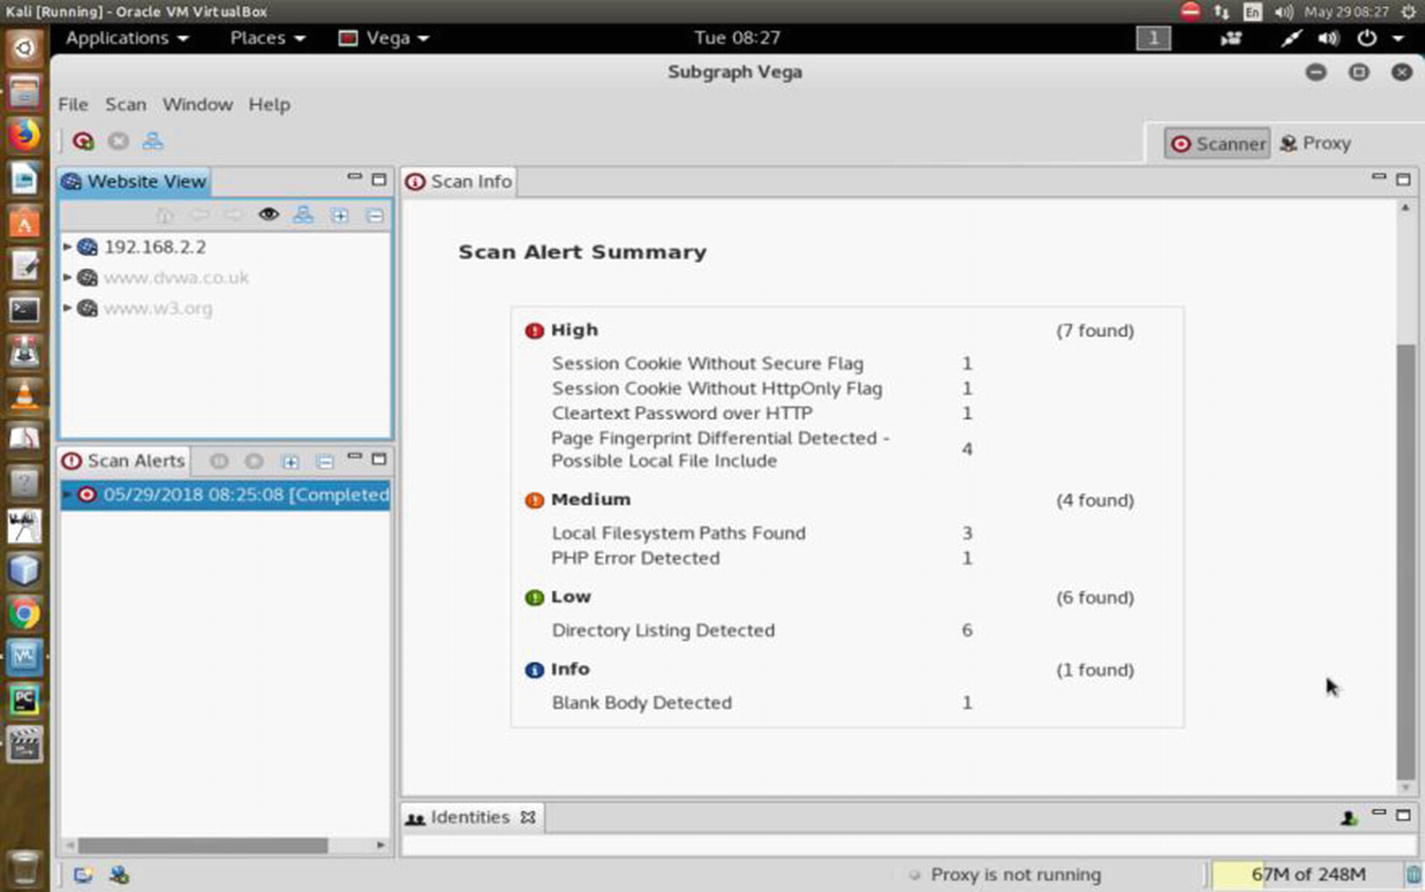
After the initial scan is complete (Figure 10-11), Vega normally gives you a lot of significant information, such that it has found a session cookie without a flag, or has detected a directory listing, a blank body, PHP error, etc.
Figure 10-11
The scan alert summary in Vega
On the left side of the Scan Alerts panel, if you click the High button, the tool shows seven alerts, and they are serious enough to invite trouble (Figure 10-12). The vulnerability analysis by Vega tells you that it detected a form with a password input field that submits to an insecure HTTP target.
Figure 10-12
Showing the high-risk components
It also says that the password can be seen by a network sniffer quite easily. In fact, in the next section, by using Burp Suite, you will be able to see that.
Vega is nice because it has an automated crawler and vulnerability scanner, it has a consistent user interface, it can intercept the proxy, and the content analysis tool is strong. You have not yet set the proxy so that all the web traffic can go through Vega.
Therefore, in the next section, you will set up the proxy of the web browser so that all the traffic can go through the Burp Suite vulnerabilities and web application analysis tool.
How to Use Burp Suite
Security professionals use Burp Suite to intercept HTTP and HTTPS traffic; however, a penetration tester can use it for various other functions. It is an integrated platform for performing security testing of vulnerabilities and web application analysis. It has many tools incorporated into one application so that they can work in synchronization to support the entire process. It can do the initial mapping, and after that, it can analyze the application’s attack surface. Once the basic tasks are done, it can find and exploit all the security vulnerabilities.
As you can guess, Burp Suite is an extremely powerful tool that can do many things in one go. Security consultants usually use the professional version, which is more feature rich, although the free community edition is powerful too. It comes with Kali Linux, and it allows you to combine innovative manual techniques with state-of-the-art automation.
Burp Suite in Kali lets you use a spider to crawl an application. In the free version, you don’t get the vulnerability scanner, but you get the intruder tool.
I already have an application ready for testing. Before the testing starts, you need to configure proxies to access the Internet. You will do this manually (Figure 10-14). Go to the preference section of the Firefox web browser and open the network settings. Set the “Manual proxy configuration” as an HTTP proxy to 127.0.0.1, and choose 8080 as the port. From now on, all traffic you request through the Firefox web browser will go through Burp Suite.
Figure 10-14
Manual proxy configuration
Now you can start testing. Let’s open http://192.168.2.2/DVWA-master in the Firefox browser. Burp Suite starts crawling the web application (Figure 10-15).
Figure 10-15
Burp Suite crawling the target web application
Once you have logged in to your application, Burp Suite starts giving you signals; now you can watch the requests you have made in your web browser (Figure 10-16).
Figure 10-16
Burp Suite reading the login information of the target
If you double-click the login.php file of your application, you will see all the features that the free version of Burp Suite provides (Figure 10-17).
Figure 10-17
Burp Suite free version features
You can send a URI to the intruder and see the result. The tool shows everything such as the username, the password, and even the hidden token the form has used (Figure 10-18).
Figure 10-18
Burp Suite spitting out secret information
You can create your own web application and try to make it as secure as possible so that you can use Burp Suite on it and find all the vulnerabilities. The same thing applies for your client; you can enhance the security level according to the Burp Suite report.