
The information-gathering phase of penetration testing has one specific goal. It’s when a good penetration tester must learn as much about the client as possible. There are always many unanswered questions regarding the client. Their system must be running some software. What type of software are they using? They must comply with strict regulations regarding the usage of ports. Sometimes, the Internet-facing system listens to more ports than it should. Suppose a company is going to hire you to do some internal penetration tests. In such cases, you need to know the IP address of the domain controller.
Information gathering (also called intelligence gathering or reconnaissance) is the first step of the kill chain when conducting a penetration test against a data target.
Note
I have already discussed a few steps of information gathering in previous chapters, but this time you will see it in a more structured and detailed way, building on what you already know with plenty of examples.
Penetration testing starts with manual and automated testing. The next steps include network-focused testing, application-focused testing, and physical testing. The last part includes social engineering. This is more or less an overview of penetration testing.
Python is present at every stage of pen testing. You can even create a virtual environment for Python so that you can add special packages that don’t affect the main Python repository in your main or virtual Kali Linux. In that sense, you can increase the layers of your virtual environments.
In this chapter, you will learn how to create a virtual environment for Python; you will also learn how to build an echo server using the Socket library of Python. This server will not only listen to several clients, taking the information, but will also echo the messages to the client.
Python Virtual Environment
Knowing about network security programming is extremely important if you want to dig deep into penetration testing. To do network security programming, you need to install a virtual environment for Python; then if you stay at the virtual environment, you can install whatever packages you want and they will not affect the main Kali Linux Python repository.
Let’s open the terminal of Kali Linux in VirtualBox.
After the installation is complete, you will see the version when issuing the command shown earlier.
As you can see, there is a bin folder. Whatever new package you install in this folder, it will not affect the main Kali Linux Python repository.
Next, you will build an echo server using the Socket library available in Python. It will help you echo data on the UDP port; in addition, tools like Nmap will find the open ports easily, so you can use it to make your system more secure.
You have already learned that a network socket is an endpoint within a node on a computer network. It is mainly used for sending or receiving data. It is a representation in the protocol stack, and it is also a form of system resource. That is why, in the previous code, I have sometimes used the System library.
The code is not verbose. Python never uses or contains more syntax than needed. Network security programming involves two parties: a client and a server. TCP and UDP sockets are regular sockets. There are raw sockets that are used for sniffing and injection purposes. Understanding sockets is important for this reason only; they handle communication, and communication is one of the main components of penetration testing.
Fundamentally, a socket offers a service. The client uses that service. A server uses a certain port (2323 in this example) to send and receive data. The first objective is to create a socket object or instance. To do that, you pass two parameters that define the TCP services. Next, you bind that socket to a certain port.
Before binding the socket object to a port, you could have taken a major step so that the port can be reusable. Usually, when you run a port, you cannot use it immediately until it has been closed.

The Socket server is echoing the client data
An echo server is a handy little tool that will help you understand traceroute in the next section.
Reconnaissance Tools
Blogs, newsgroups, and press releases are good sources for obtaining information about any organization, company, or employee. Corporate job postings may provide information about the servers or infrastructure gadgets a company uses in its network. Other important information may include Internet technologies used by the company, active IP addresses, and operating systems and hardware being used by the company. All this information helps you find out more information about your target.
For reconnaissance tools, one of the major purposes of them is e-mail tracking. E-mail can easily be tracked. You can do it using devices that are readily available over the Internet. You can track whether the recipient opens the e-mail, whether they forward it, or whether they delete it. Most e-mail tracker software adds a domain name with the recipient’s e-mail like this: emailaddress.readnotify.com.
As strange as it might sound, a single-pixel graphic file is actually added to the recipient’s e-mail. That file is not visible in the file. There are many tools available in the market. A few of them are free, and a few are built for professional ethical hackers. Besides www.readnotify.com , you can check out www.emailtrackerpro.com/ and www.mailtracking.com/ .
Senders are notified of every action performed on the recipient’s mail, which includes opening, sending, deleting, and obviously responding. A few e-mail tracking tools also notify you about the receiver’s location.
E-mail trackers, as well as the web spiders, are common tools in ethical hacking. In fact, reconnaissance or information gathering is incomplete without these tools.
Understanding web spiders is also important. Web spiders are programs that use the @ symbol to gather information about any web site directories and files including e-mails. By keeping a robots.txt file in the root directory, you can stop web spiders from crawling your directories or files. Many search engines also use web spiders to make an index of files.
You learned about packets when I discussed networking. Packet tracking is another major concept in reconnaissance or information gathering. Tools like NeoTrace, VisualLookout, and VisualTrace track the travel path of packets and map them in a graphical interface while pointing to the location of routers and other devices through internetworking.
Traceroute is another important packet-tracking tool. How does it operate? It sends an Internet Control Message Protocol (ICMP) echo to each “hop” until it reaches the destination. A hop means every router or gateway that appears along the way to its destination. Here the number of hops is important. Each hop takes some time. Calculating the time that each echo takes when coming back from a router is called time to live (TTL). Hackers can count TTL and calculate how many routers or gateways fall between the paths. Many hacking tools like Spam Spade use versions of traceroute. The Windows operating system uses tracert to trace the hostname.
Know the Domain and Hostname
A good pen tester needs to know how a web site works. You need to have basic information about a domain and hostname.
A Uniform Resource Locator (URL) like www.xyz.com gives you a few basic facts about the owner. The owner of that web site selects the domain name xyz.com. This means the web site may be about a commercial organization since it has a .com TLD. It’s not mandatory that a commercial organization should always have a .com extension. However, it’s been a practice that has been followed since domain names were first introduced. Generally, government organizations take .gov extensions. In a country like India, this may change to .gov.in.
You might also consider DNSStuff.com. At DNSStuff.com there are lots of tools on hand. You may check the Whois tool by entering any URL and checking the output. Now you can compare information, contact address, e-mail address, and so on, having one from DNSStuff.com and another from your target’s web site.
The American Registry for Internet Numbers (ARIN) is another great tool available online. Please read the Whois terms of use before proceeding. You’ll learn many things about your purpose as an ethical hacker. The do’s and don’ts of Whois searching are important just like when you’re doing other reconnaissance stuff.
ARIN is the Internet registry for North America only. Geographical locations outside North American have their own Internet registries. If you are from the Asia Pacific region, the Asia Pacific Network Information Center (APNIC) is your solution. Parts of central Asia and the Middle East are covered along with Europe in RIPE NCC, and finally, LACNIC stands for Latin American and Caribbean Internet Registry.
You’ll find good ideas for using a Whois search from the Internet.
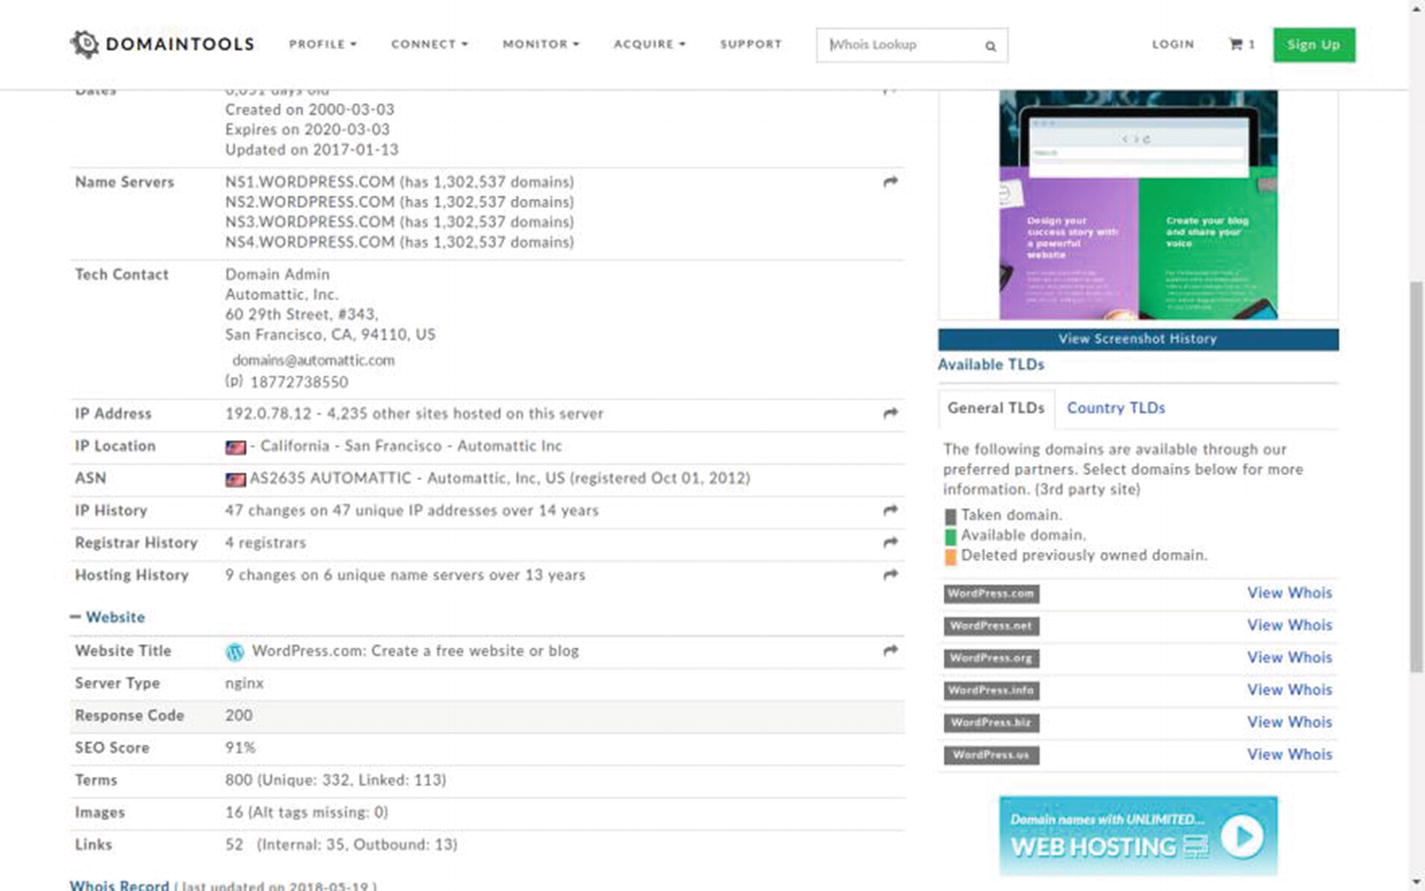
Result in Domaintools
E-mail Tracking Made Easy
E-mail tracking is part of reconnaissance. It’s part of information gathering when you decide to track a target’s e-mail by using the simple tools available online.
You can sign up for a 15-day trial of www.readnotify.com (the limit extends to 25 e-mails) to track your own e-mail by sending messages.
Figure 8-3 shows that I’m sending an e-mail to my own e-mail address. In other words, I’m sending e-mail from my [email protected] account. While sending the e-mail, I just typed the address like this: [email protected], adding the readnotify.com extension at the end of the recipient’s e-mail address. The recipient will never see that someone added an extension at the end of his e-mail address. It remains invisible.
The ReadNotify tool tracks the recipient’s e-mail while keeping you informed with alerts. Certainly, it’ll not give you the exact locations always; at the same time, it sometimes finds the exact position of the recipient.

ReadNotify message in inbox
Another good tool is www.netcraft.com . This site basically provides Internet security for its clients. Nevertheless, for passive information gathering, this site is extremely handy. You can learn many things when you search through Netcraft, and that includes a number of subdomains, operating systems used for running the servers, and so on.

Searching about Netcraft inside Netcraft
Searching the Internet Archive
You have probably heard about the Internet Archive, which is a place that often keeps lots of useful information about a web site. The most interesting part of the archive is it includes the old looks of web sites.

Google.com in the month of May 2018
Do you want to see the first look of the Google web site? Well, let’s go to https://archive.org/index.php and search Google first. What you see is really fun!
You can get an immediate history of how many times the home pages have been saved between any given dates. Consider a range between November 11, 1998, and January 30, 2017. It says, “Saved 58,328 times between November 11, 1998, and January 30, 2017.” Not only that, you may get the picture of the first day!
There are clickable links, arranged chronologically. Therefore, it’s not difficult to find out what sites looks like in the past.
However, you are not at all interested in the aesthetic look; it’s quite the opposite. You are interested in information. Many organizations publish lots of important data on their first web sites by mistake (Figure 8-6), and they usually rectify this later. This passive information may help you in your search.
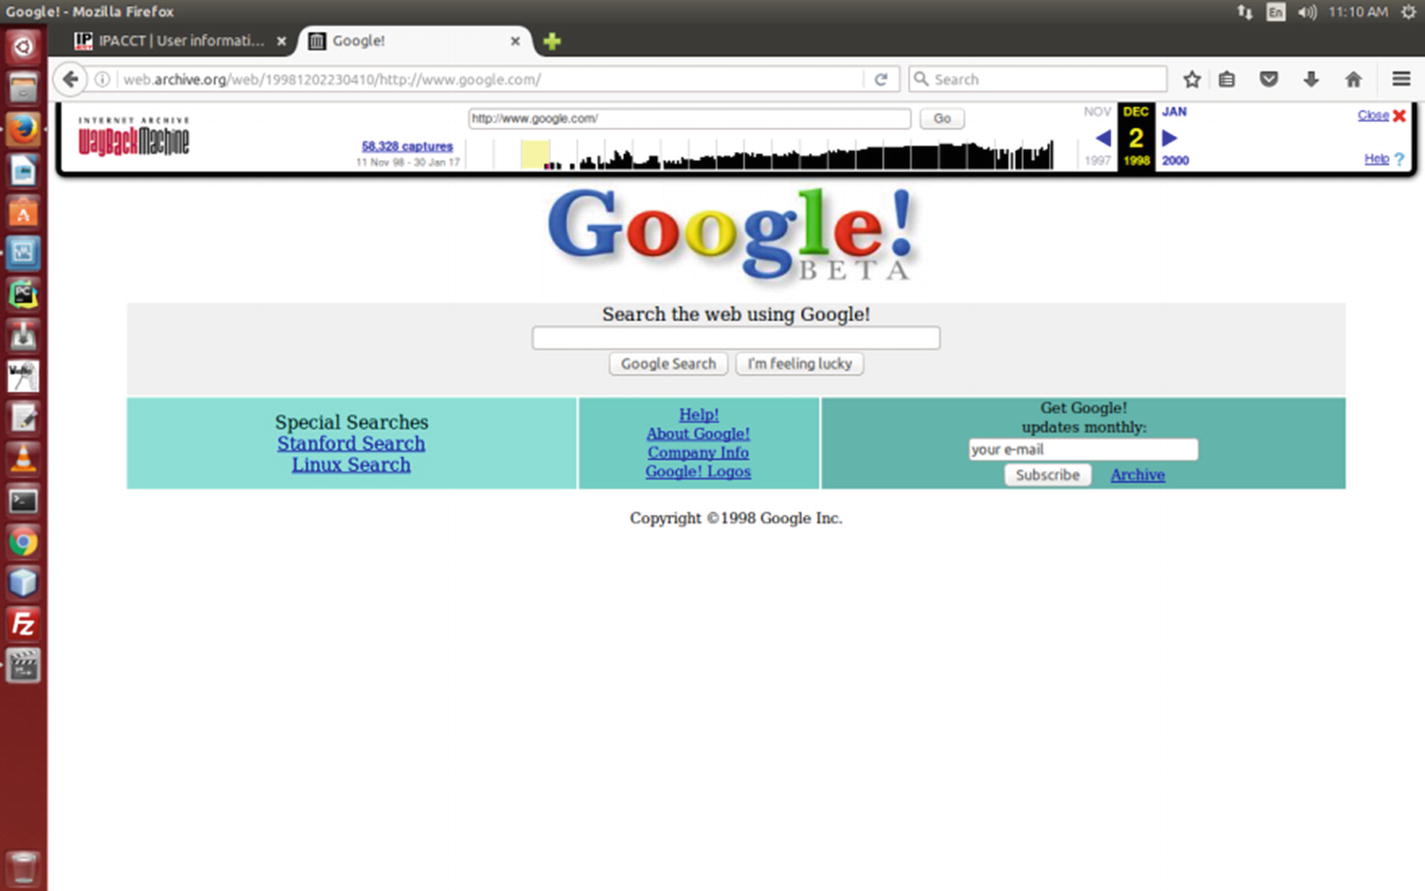
The first look of Google
You can check for any site this way. This is not illegal. You may compare the previous looks with the present ones and have fun.
Passive Information
So far, you’ve seen some techniques of gathering passive information. But there are still many left that are simply mind-boggling! They are simple, they are sometimes free, and sometimes they cost a few dollars; overall, they are extremely helpful to get information about your target.
One such passive information-gathering tool is of course Google. Besides Google, there are other social media sites that might come in handy. It’s my general assumption that organizations usually take care while posting messages or news on social media. On the contrary, individuals often remain lackadaisical in posting important information without taking any proper security measures.
You might know one, two, or three prominent names in a company, but besides them, there are plenty of medium or small social media sites. You need to be diligent while searching for someone, particularly while keeping these facts in mind.
Suppose you’d like to find people using Microsoft’s e-mail service Outlook. In that case, you may start your searching in Google with @outlook.com. The thing is, collecting passive information is a kind of painstaking research. The job of a cybersecurity expert involves lots of research and knowledge of how to collect passive information. Narrowing down your searches is important. To do that, you can add a specific file type with any name like this: “Sanjib Sinha” filetype:xlsx. In this type of search, you will get plenty of spreadsheet files containing Sanjib Sinha.
More searching tools are available online. A good one is https://pipl.com where you can search by any name and location. www.zabasearch.com is also a good database of people maintained only for the U.S. citizens. These are all helpful for finding and collecting passive information about your targets.
Web Spiders Are Crawling
You may have heard about Census people or met someone who goes door to door to tally the number of people living in a country. You also might have seen the mail carrier who also travels door to door to deliver letters.
When someone moves from one door to another like this, they have the opportunity to collect information about the people living inside.
Web spiders do the same thing. Spammers are interested in collecting e-mail addresses and send web spiders door to door (or web site to web site) to collect data. They search words with the @ symbol, picking up e-mail addresses and dumping them into a database. Finally, these e-mails are sold and used to send unsolicited e-mails.
They don’t stop at collecting e-mails only; web spiders also do other things. Malicious users often try to find out the location of the target by using web spiders. They just automate the information-gathering process.
You can stop web crawling by putting a robots.txt file in the web root of your site. In that file, you must mention the directories that you don’t want to be crawled. There are lots of free web crawler tools available on the Internet. For example, Octoparse and Cyotec Web Copy are free and easy to use. They have good documentation, so just consult the instructions before using one of these tools.
More About Scanning
There are three types of scanning: port scanning, network scanning, and vulnerability scanning. Port scanning basically identifies open ports and services. When scanning determines IP addresses on a network or subnet, it’s known as network scanning . Finally, vulnerability scanning deals with the process that tries to discover weaknesses in a system.
Each service on a system is involved with a port. Port scanning identifies what ports are open. It discovers the available TCP/IP ports and promptly gives information regarding that system.
When data travels, there are two parties involved. One is the source, and the other is a destination. Data, while traveling, uses transport layer protocols. There are two known transport protocols: the Transmission Control Protocol (TCP) and the User Datagram Protocol (UDP). A protocol specifies the source and destination port numbers in their headers. The port number can range from 0 to 65535.
As a reminder, port numbers can be divided into three parts. You may associate them with a range. Ports 0 to 1023 are the well-known ports. Next come the registered ports, which range from 1024 to 49151. The third type are the dynamic ports, which range from 49152 to 65535.
As a penetration tester, you must know the well-known port numbers. This includes HTTP (80), FTP (21), SMTP (25), HTTPS (443), POP3 (110), TELNET (23), and many more.
Network scanning is the process of identifying the active hosts. On a network, once you’ve found the active hosts, you may either attack or do a security assessment. This is part of network scanning. You first want to gain the knowledge of living hosts, and next you try to find out their corresponding IP addresses.
Vulnerability scanning, on the other hand, proactively scans the weaknesses of a system. Initially, a vulnerability scanner tries to find out the operating system, version number, and services that may be installed. Hackers want to access the system after knowing the weaknesses.
You can compare the whole scenario with a real-life war strategy. In a war-like situation or in mock fighting, one country wants to know information about the enemy country. Keeping in mind that an enemy country may target or launch a missile, you must have adequate protection. What type of protection would you like? You must make your radar system strong. Why? You must be in a position to detect any incoming threats when they really strike.
Likewise, a computer network has an intrusion detection system (IDS). It usually detects all types of known incoming threats. This IDS can identify a probe. Be careful when you try to probe TCP/IP ports. The IDS can detect your probe any time.
Scanning without getting detected is a perfect challenge for a hacker. You must be able to beat the enemy radar system to strike the enemy target.
Imagine the opposite scenario. As a cybersecurity specialist, you must have sufficient knowledge to guard your system. Ethical hacking is not always about being on the attack. It actually is about self-defense. You know every possible procedure of attack for one and only reason: securing your system is your first priority.
- 1)
Check for the live system and open ports.
- 2)
Identify the services.
- 3)
Find out about the operating system by banner grabbing.
- 4)
Conduct vulnerability scanning.
- 5)
Draw a network diagrams.
- 6)
Make preparations and attack.
As you see, with vulnerability scanning, you have many things to do before going for a full-scale attack.
You can scan a web address by typing the URL or you can type an IP address. You may ask where you’ll get IP addresses. Well, you can get them online. Google is your friend in such situations. Just type ip blocks. There are lots of web sites that’ll provide lists of IP addresses. One of them is http://www.nirsoft.net/countryip/ , which has IP addresses arranged according to country.
Now you can click any link to get the major IP addresses of that country. If you click Panama, the range of IP addresses will open. It says: “In the following table, you can find all major IP addresses blocks allocated for Panama. Most of these IP blocks are assigned to Internet providers and hosting companies. You can click the column header in order to sort the list by another field.”
This is a handy web site that can help you in many ways.
Let’s see how it can help you regarding footprinting issues. Suppose you pick up an IP address from the country Panama. Put that IP address in a Whois search and you’ll find that most of the IP addresses lack minimum security requirements.
Most of the owners give full addresses, contact numbers, admin IDs, and lots of other important information that should not be disclosed in this way.
Obviously, the machine name will be changed as two terminals represent two different operating systems. The name and IP address of scanme.nmap.org are the same. But the DNS server name and addresses are different.
In the virtual machine Kali Linux, it does not show the original DNS server. It’s hidden and anonymous because I use open DNS. Because of that, it shows a different DNS server address. In my default operating system Ubuntu, I am not anonymous, so it gives the localhost address. The number in the second line (#53) denotes the port for a DNS server.
As I have told you, anonymity is quite a big factor in ethical hacking. You can use the Tor browser or you can change your system setup so that whenever you use any hacking tool you may remain anonymous.
The IP address of scanme.nmap.org has been displayed in reverse order.
The job of scanning is not over. In fact, in a few cases, if you go deep, you’ll find that some scanning may take days to complete. For the time being, you restrain your scanning to scanme.nmap.org again and try to find how many ports are open.
Look at the last part of the output. There is a list that shows how many ports are open and how many ports are closed. It says 991 closed ports. Many ports are open. You can get an idea of real scanning from this example.
You Can Find Location Too!
Another good option available with Nmap is the command curl . You can scan any IP address with this command. It gives you more information about this IP address, including location, organization name, city, and so on. It’s a kind of Whois search, but it’s definitely more fruitful. The only limitation is you can scan only 1,000 IP addresses per day. For a mass scan, you need a more powerful machine.
Suppose you want to know the location and other information about scanme.nmap.org.
At once, you have everything such as the city, region, postal, country, and organization name. As you can see, curl is a handy tool.
DMitry, Maltego, and Other Tools
Whether an organization is large or small, it is always under threat as long as it is digitally connected. As a penetration tester, you must have a clear picture of that environment. There are several tools that can help you achieve that goal. DMitry (which stands for Deepmagic Information Gathering Tool) and Maltego are two of them.
Although their working methods are different, you usually do the same thing with them: you gather as much information as possible through them.
Let’s first see how DMitry works. On the top-left menu of Kali Linux, you will get the long listing of information-gathering tools. You will find DMitry there. Clicking it will open the terminal.
This will save all the output in a text file called dmitry.txt.
Maltego , on the other hand, is more graphical and target-specific. You open the software at the same place in Kali Linux: by using the Applications listing. Maltego is also in the information-gathering category.
Suppose your victim is an organization and you want to know about its people. Maltego will come handy in such cases. It helps you track down all the people in that organization including their e-mail addresses, their Skype IDs, and other social media account details.

The Maltego opening page after registration

Maltego graphical tools

Maltego is working on a target
On the right you’ll find the Properties tools; you can change the name and keep on searching.
Maltego is multilayered. It offers you an unprecedented information about your target.
In the Infrastructure category, you can get all the domains, DNS names, netblocks, IP addresses, affiliations, and so on. For passive information, Maltego is unique. Since it uses Java, it can easily run on any operating system. The best part of Maltego is that by using the GUI you can easily see the relationships, which are instant and accurate.
There are several other tools in the information-gathering category. Many of them are command-based. In that sense, Maltego is unique, and it is really powerful as long as information gathering is concerned.
In the coming chapters, you will see how this information, which you gather by using reconnaissance tools, helps you when you use other hacking tools like Wireshark or Metasploit.
Summarizing the Five Phases of Penetration
You have seen many examples involving information gathering. You need to gather as much information as possible about your target so that you can plan a proper penetration test.
Building a threat model: This involves the identification of risks.
Creating a test plan: This is the road map that you will follow in your penetration testing effort. This phase is important as you gather information as well as organize other resources.
Executing: There are so many things to do depending on what type of information you have gathered, from finding vulnerabilities to implementing security.
Creating the problem report: This report includes what you found and the types of solutions you can provide.
Having a post-mortem of the penetration testing effort: You can analyze the malware that you have caught and other loopholes in the system.