
Network configuration is managed by Network Manager. Network configuration differs, depending on the kind of connection you have, such as a wired connection (Ethernet), a DSL modem, or a wireless connection. The GNOME Settings Wi-Fi and Network tabs are the primary network configuration tools for Fedora, which can be used to configure all your network connections manually. You can configure a variety of network connections, including wired settings, DSL, and WiFi, for the IPv4 and IPv6 protocols. Table 14-1 lists several different network configuration tools.
Network Information : Dynamic and Static
Fedora Network Configuration Tools
Network Configuration App | Description |
|---|---|
Network Manager | Automatically configures wireless and wired network connections. Can also manually edit them. |
GNOME Settings WiFi | GNOME Settings WiFi configuration tab (Settings ➤ Wi-Fi). |
GNOME Settings Network | GNOME Settings Network configuration tab, used for wired, VPN, and Proxy connections (Settings ➤ Network). |
nm-connection-editor | Network Connections: the older Network Manager configuration utility. |
kde-plasma-networkmanagement | KDE version of Network Manager. |
firewall-config | Sets up a network firewall using FirewallD server. |
system-config-firewall | Sets up a network firewall using IPtables. |
wvdial | PPP modem connection, enter on a command line. |
wconfig | Wireless connection, enter on a command line. |
If you have a static connection (no DHCP or IPv6 support), you have to provide connection information such as your IP address and DNS servers. If you are using a DSL dynamic, ISDN, or modem connection, you will also have to supply provider, login, and password information, whether your system is dynamic or static. You may also have to supply specialized information, such as DSL or modem compression methods or a dial-up number. You can obtain most of your static network information from your network administrator or ISP (Internet service provider).
User and System-Wide Network Configuration: Network Manager
Network Manager will automatically detect your network connections , both wired and wireless. It is the default method for managing your network connections. Network Manager uses the automatic device detection capabilities of udev to configure your connections. Should you instead have to configure your network connections manually, you would use the GNOME Settings Wi-Fi and Network tabs.
Network Manager is user specific. When a user logs in, it selects the network connection preferred by that user. For wireless connections, the user can choose from a list of current possible connections. For wired connections, a connection can be started automatically, when the system starts up. Initial settings will be supplied from the system-wide configuration.
Configurations can also be applied system-wide to all users. When editing or adding a network connection, the edit or add dialog displays an Available to All Users check box in the lower-left corner. Click this check box and then click the Apply button to make the connection configuration system-wide. A PolicyKit authentication dialog will first prompt you to enter your root password.
Network Manager can configure any network connection . This includes wired, wireless, and all manual connections. Network Interface Connection (NIC cards) hardware is detected using udev. udev is the userspace device manager that manages your devices, both fixed and removable. Information provided by Network Manager is available to other applications over D-Bus.
With multiple wireless access points for Internet connections, a system could have several different network connections to choose from, instead of a single-line connection such as DSL or cable. This is particularly true for notebook computers that access different wireless connections at different locations. Instead of manually configuring a new connection each time one is encountered, the Network Manager tool can automatically configure and select a connection to use.
By default, an Ethernet connection will be preferred, if available. For wireless connections, you will have to choose the one you want.
Network Manager is designed to work in the background, providing status information for your connection and switching from one configured connection to another, as needed. For initial configuration, it detects as much information as possible about the new connection.
Network Manager operates as a daemon with the name NetworkManager. If no Ethernet connection is available, Network Manager will scan for wireless connections, checking for Extended Service Set Identifiers (ESSIDs). If an ESSID identifies a previously used connection, then it is automatically selected. If several are found, then the most recently used one is chosen. If only a new connection is available, the Network Manager waits for the user to choose one. A connection is selected only if the user is logged in. If an Ethernet connection is later made, the Network Manager will switch to it from wireless.
Network Manager Manual Configuration Using GNOME Network
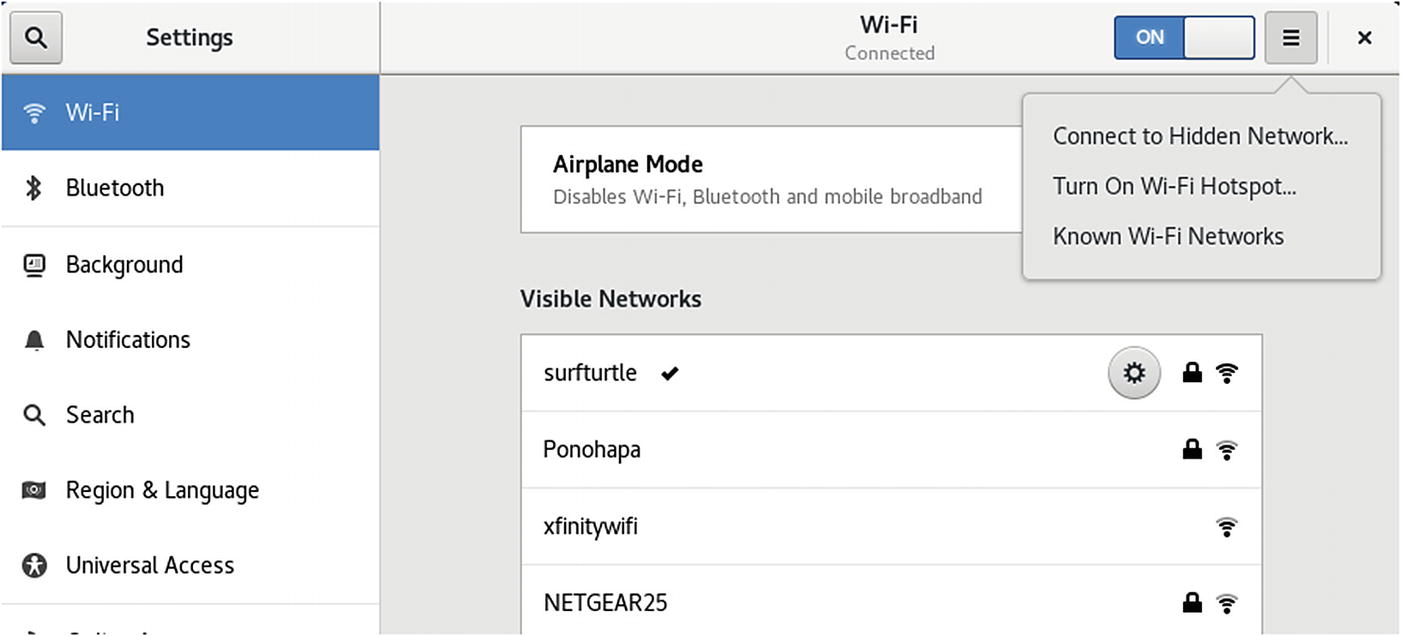
WiFi (GNOME settings)
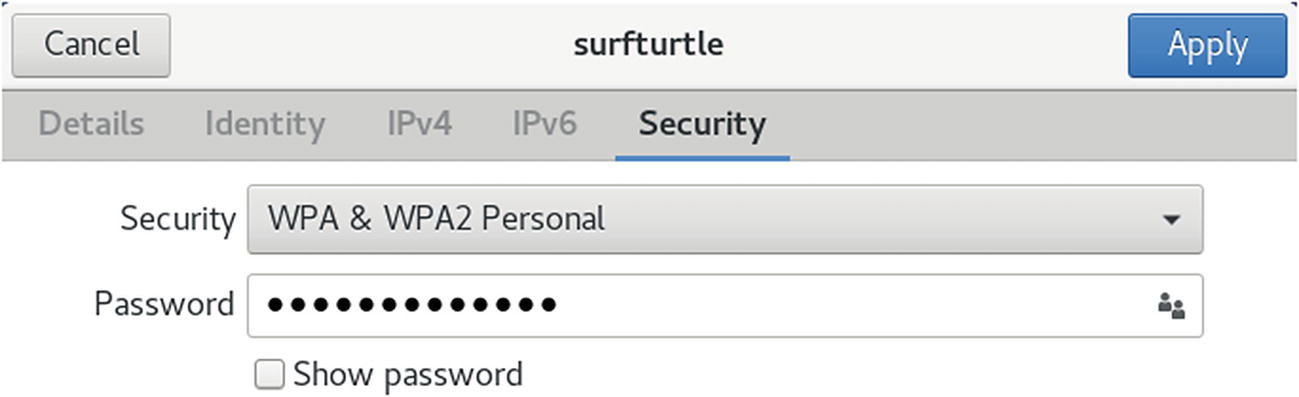
WiFi (GNOME settings): Security tab
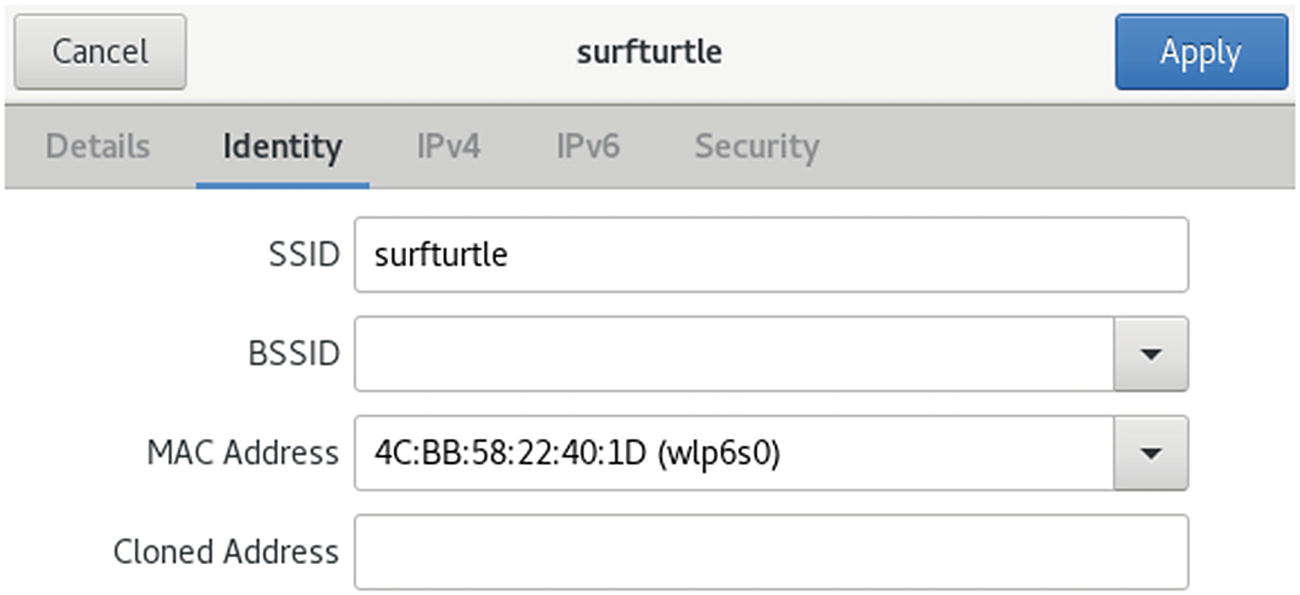
WiFi (GNOME settings): Identity tab
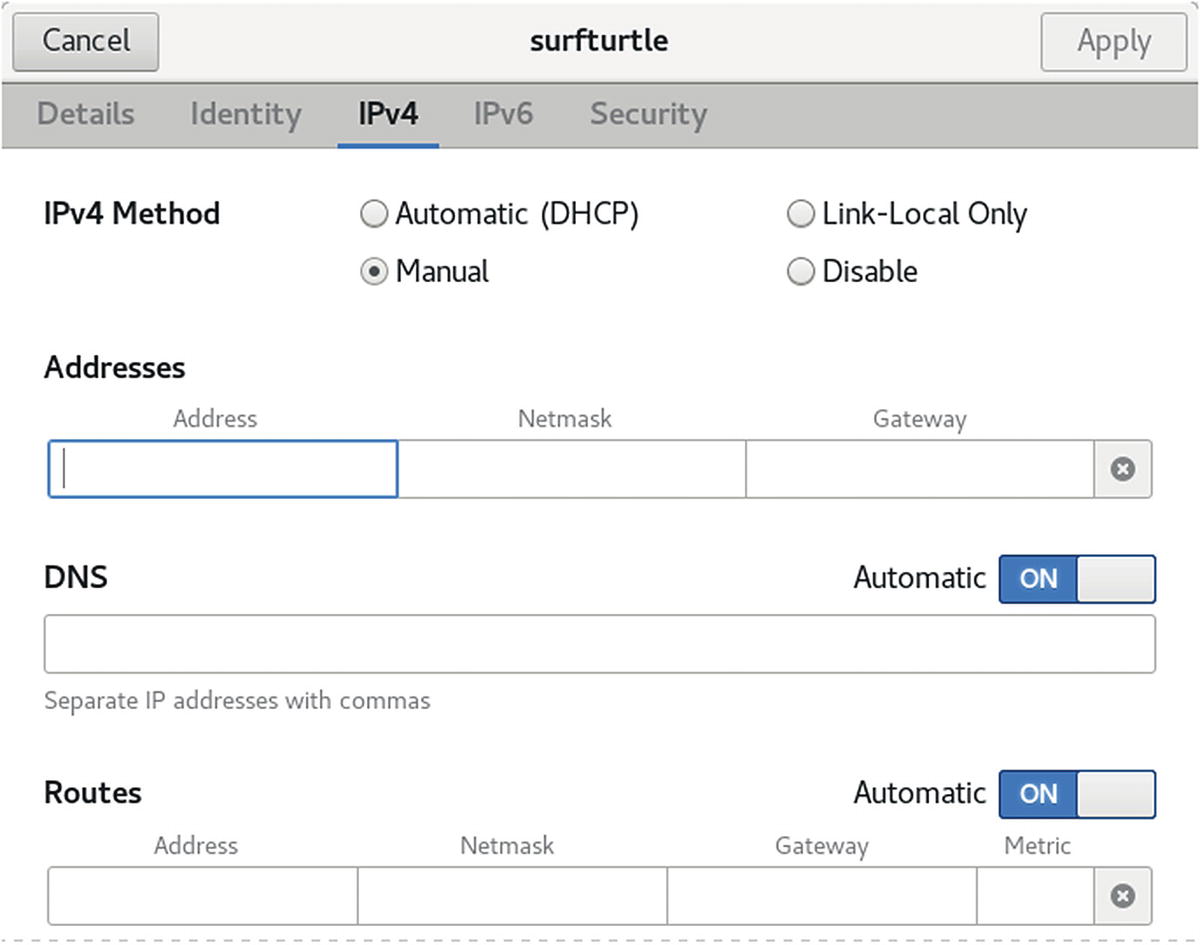
WiFi (GNOME settings): IPv4 tab, manual
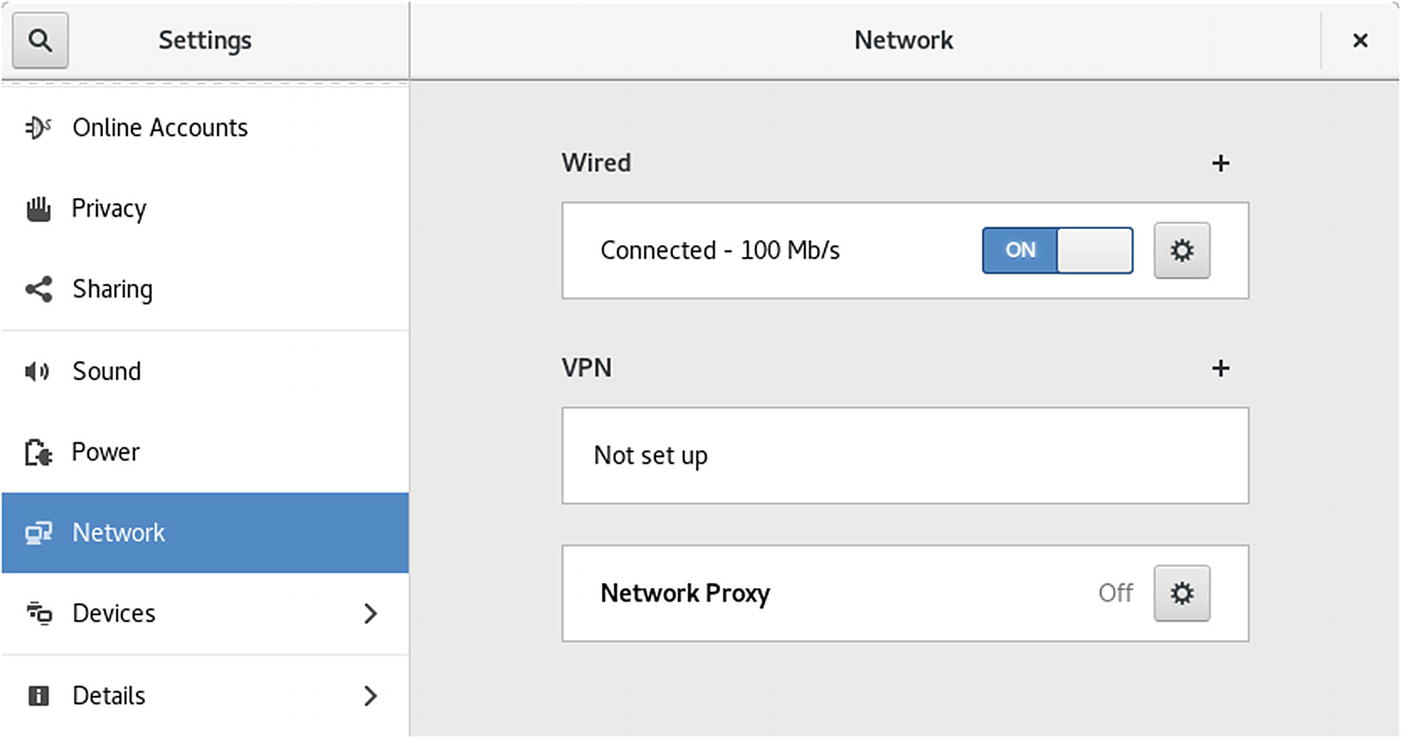
Network (GNOME settings)
Network (GNOME settings)
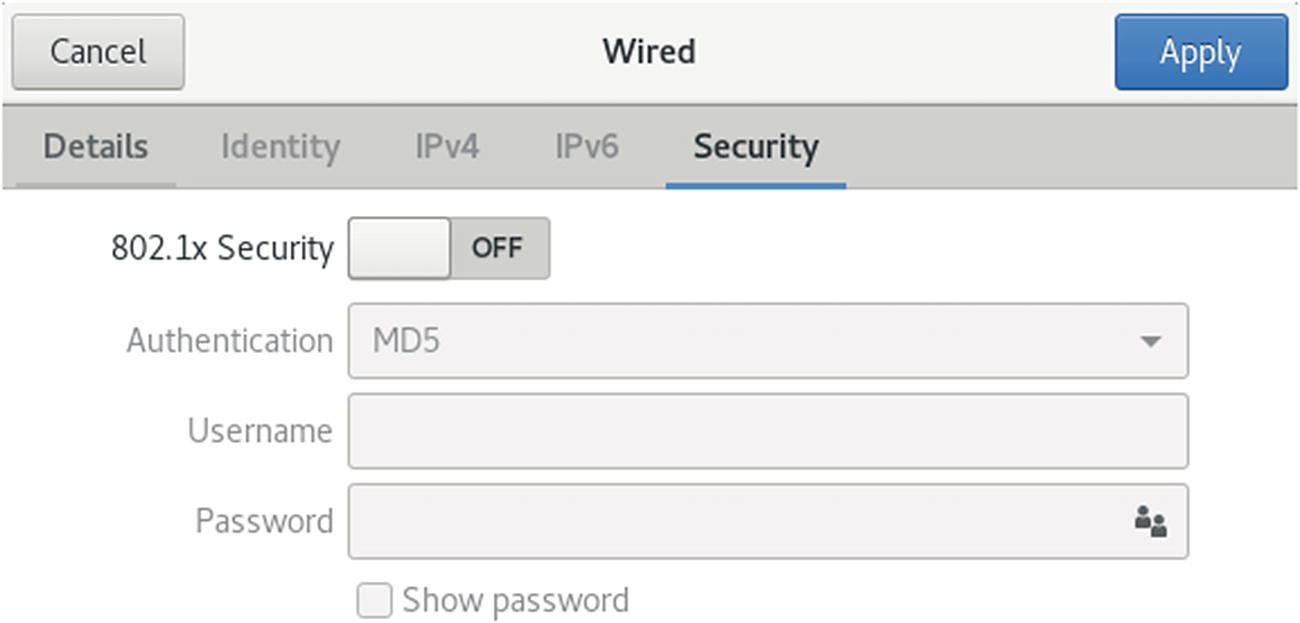
Network (GNOME settings): Security tab
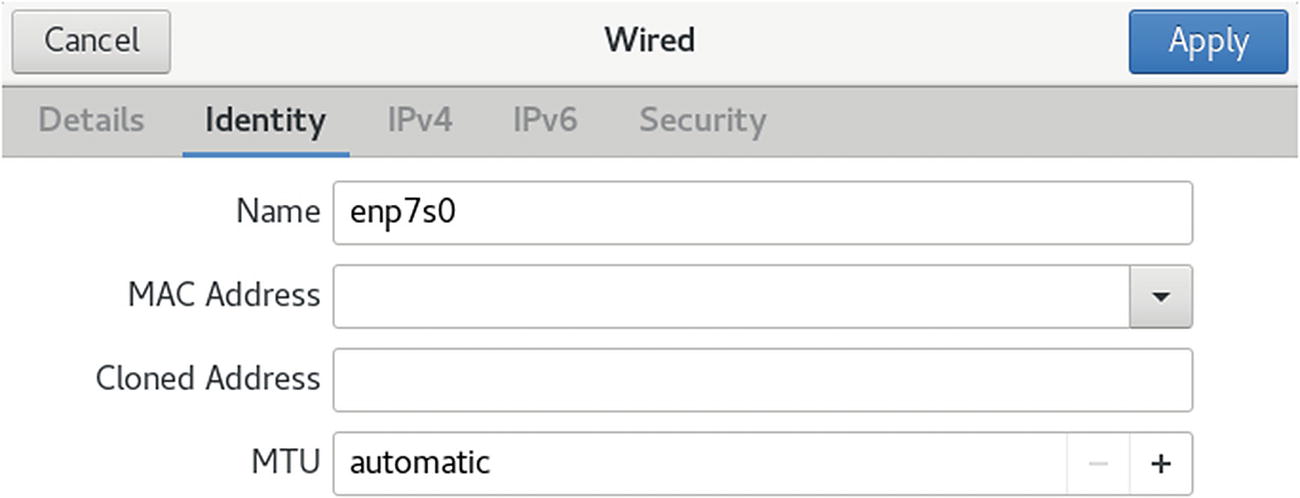
Network (GNOME settings): Identity tab
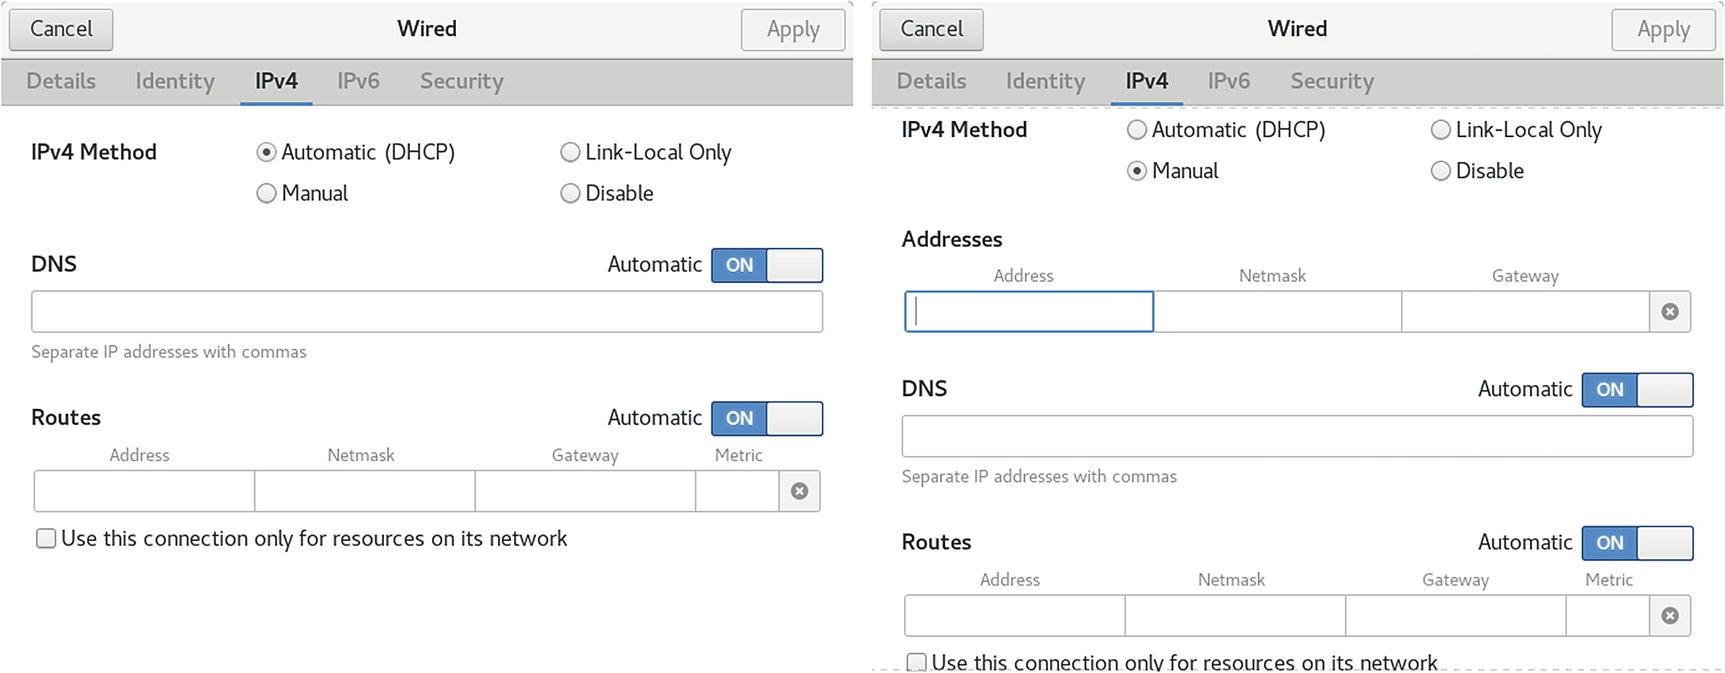
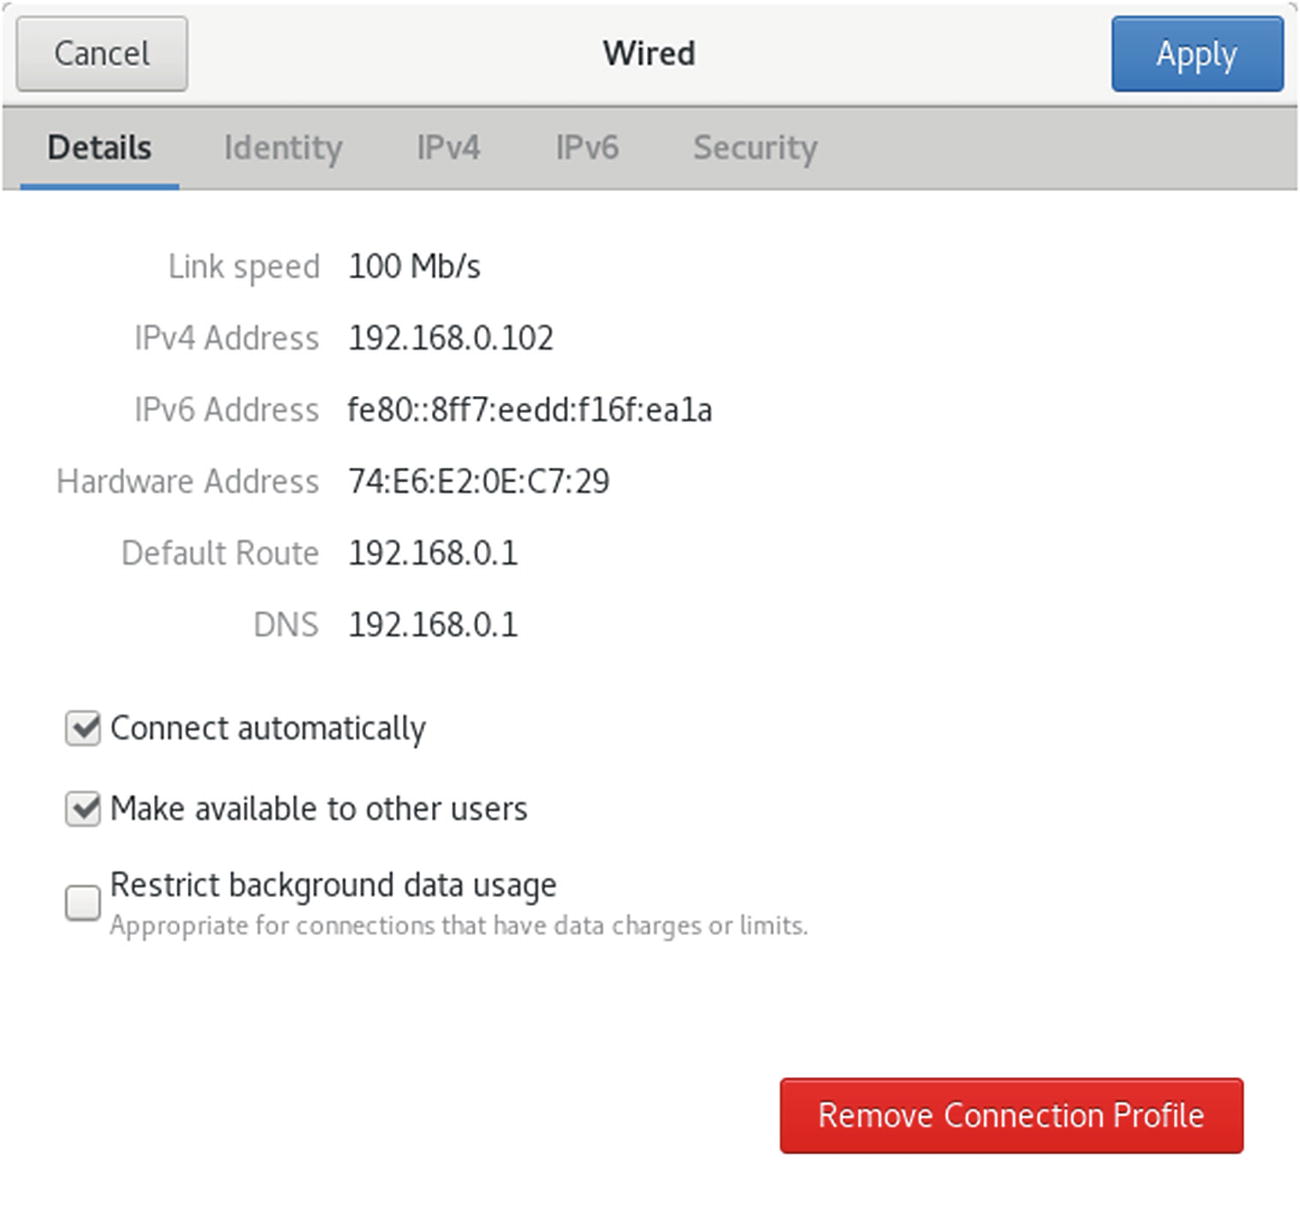
Network (GNOME settings): IPv4 tab

Network (GNOME settings): new connections and VPN connections
You can then configure the VPN connections from the Add VPN dialog, which shows three tabs: Identity, IPv4, and IPv6 (see Figure 14-11). The IP tabs are the same as for wireless and wired configuration dialogs. On the Identity tab, you can enter the name, gateway, and authentication information. Click the Advanced button for detailed connection configuration.
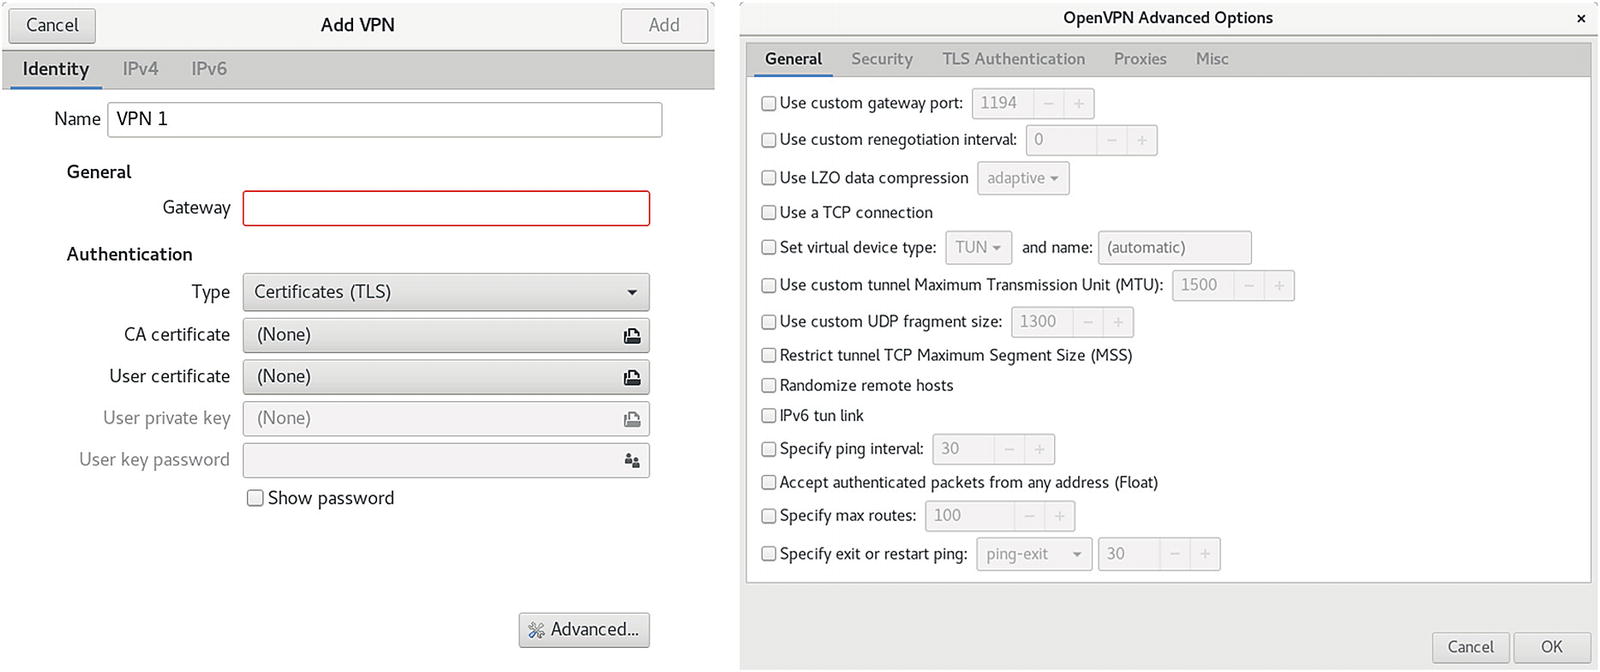
Network (GNOME settings): OpenVPN connection
Managing Network Connections with nmcli
The nmcli command is NetworkManager command-line interface command. Most network configuration tasks can be performed by nmcli . The nmcli command manages NetworkManager through a set of objects: general (g), networking (n), radio (r), connection (c), device (d), and agent (a). Each can be referenced using the full name or a unique prefix, such as con for connection or dev for device. The unique prefix can be as short as a single character, such as g for general, c for connections, or d for device. See Table 14-2 for a list of the objects and commonly used options. The nmcli man page provides a complete listing with examples.
The nmcli Objects
Object | Description |
|---|---|
general | NetworkManager status and enabled devices. Use the terse (-t) and field (-f) options to limit the information displayed. |
networking | Manage networking, use on and off to turn networking on or off, and connectivity for the connection state. |
radio | Turns on or off the wireless networking (on or off). Can turn on or off specific kinds of wireless: wifi, wwan (mobile broadband), and wimax. The all option turns on or off all wireless. |
connection | Manage network connections. show List connection profiles. With --active showing only active connections. up Activate a connection. down Deactivate a connection. add Add a new connection, specifying type, ifname, con-name (profile). modify Edit an existing connection; use + and - to add new values to properties. edit Add a new connection or edit an existing one using the interactive editor. delete Delete a configured connection (profile). reload Reload all connection profiles. load Reload or load a specific profile. |
device | Manage network interfaces (devices). status Display device status. show Display device information. connect Connect the device . disconnect Disconnect the device. delete Delete a software device, such as a bridge. wifi Display a list of available WiFi access points. wifi rescan Rescan for and display access points. wifi connect Connect to a WiFi network; specify password, wep-key-type, ifname, bssid, and name (profile name). wimax List available WiMAX networks. |
agent | Run as a Network Manager secret agent or polkit agent. secret As a secret agent, nmcli listens for secret requests. polkit As a polkit agent, it listens for all authorization requests. |
nmcli Wired Connections
In most cases, the type is Ethernet (wired) or WiFi (wireless). Check the nmcli man page for a list of other types, such as gsm, InfiniBand, VPN, VLAN, WiMAX, and Bridge.
You are then placed in the interactive editor with an nmcli> prompt and the settings you can change are listed. The help command lists available commands. Use the describe command to show property descriptions.
The connection edit command can also reference a profile using the id option. The Name field in the connection profile information is the same as the ID. Also, each profile is given a unique system UUID, which can also be used to reference the profile.
Once you are finished editing the connection , enter the quit command to leave the editor.
nmcli Wireless Connections
Network Manager Manual Configuration Using Network Connections
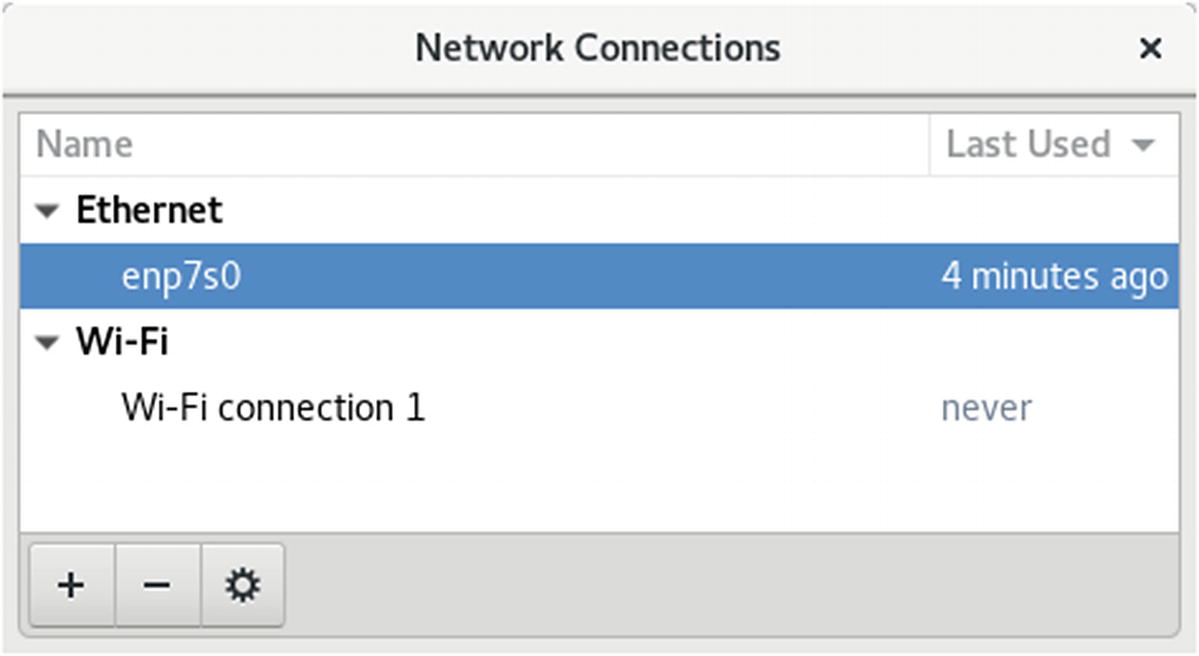
Network configuration (nm-connection-editor)
When you add a connection, you can choose its type from a drop-down menu. The menu organizes connection types into three categories: Hardware, Virtual, and VPN. Hardware connections cover both wired (Ethernet, DSL, and InfiniBand) and wireless (WiFi, WiMAX, and Mobile Broadband) connections. VPN lists the supported VPN types, such as OpenVPN, PPTP, and Cisco. You can also import a previously configured connection. Virtual supports VLAN and Bond virtual connections.
Configuration editing dialogs display a General tab from which you can make your configuration available to all users and automatically connect when the network connection is available. You can also choose to use a VPN connection and specify a firewall zone.
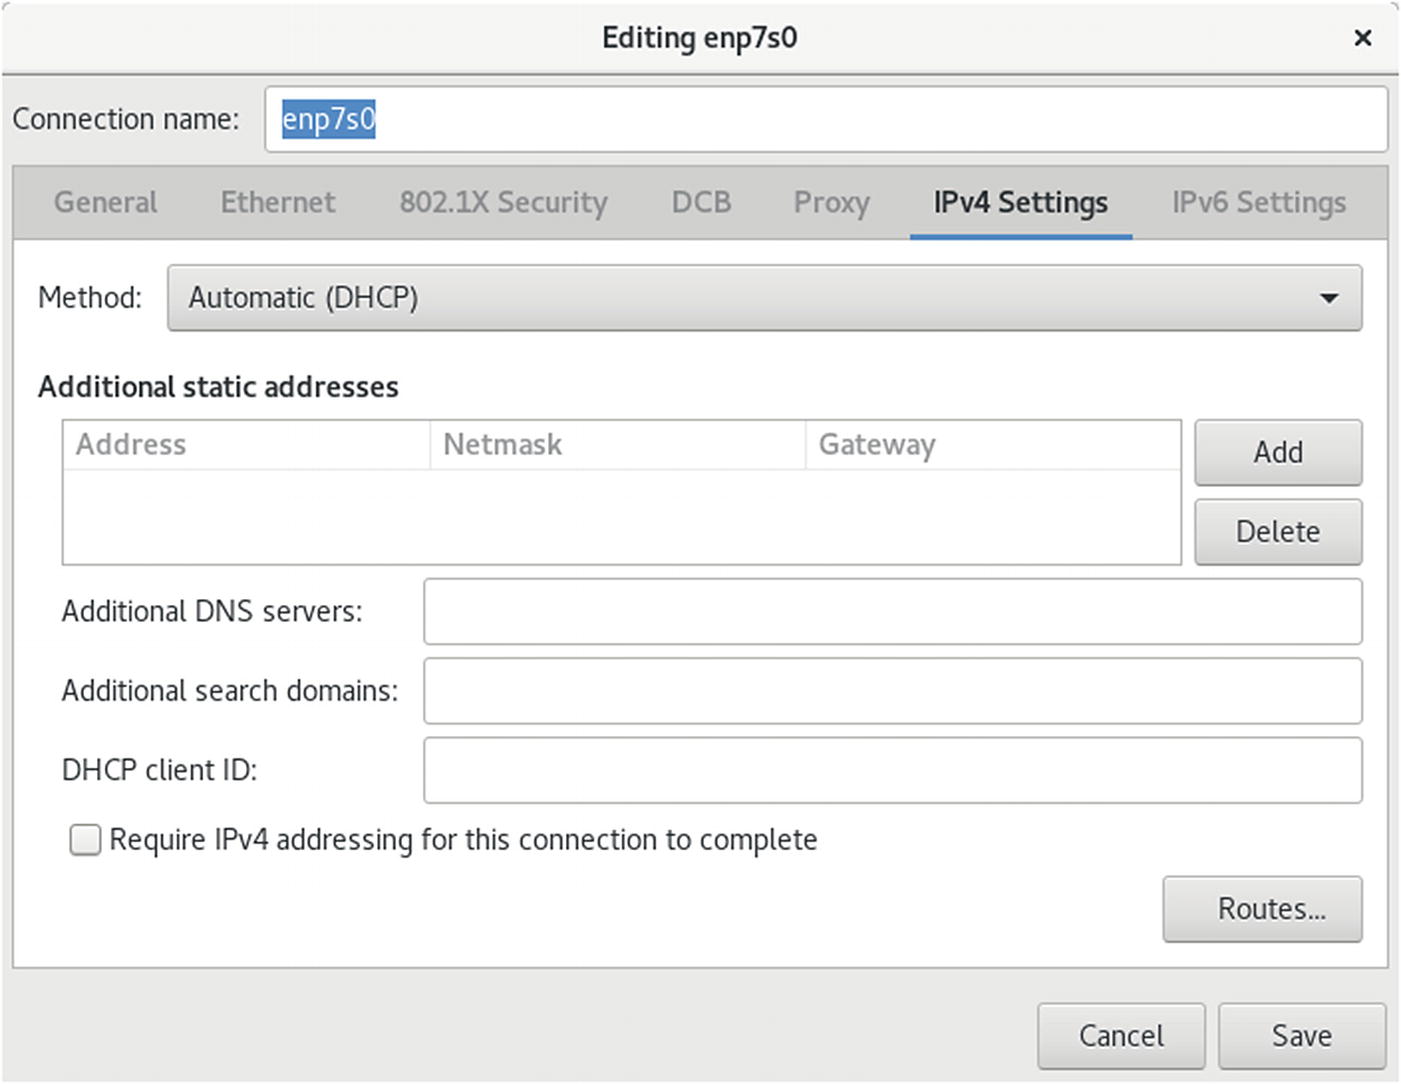
IPv4 wired configuration (nm-connection-editor)

Wireless configuration (nm-connection-editor)
On the Wi-Fi Security tab, you enter your wireless connection security method. The commonly used method, WEP, is supported, along with WPA personal. The WPA personal method only requires a password. More secure connections, such as Dynamic WEP and Enterprise WPA, are also supported. These will require much more configuration information, such as authentication methods, certificates, and keys.
For a new broadband connection, choose the Mobile Broadband entry in the connection type menu. A 3G wizard starts up to help you set up the appropriate configuration for your particular 3G service. Configuration steps are listed on the left pane. If your device is connected, you can select it from the drop-down menu on the right pane.
Once a service is selected, you can further edit the configuration by clicking its entry in the Mobile Broadband tab and clicking the Edit button. The Editing window opens with tabs for Mobile Broadband, PPP, IPv4, and IPv6 settings. On the Mobile Broadband tab, you can enter your number, username, and password. Advanced options include the APN, Network, and PIN. The APN should already be entered.
On the Network Manager panel applet menu , the VPN Connection entry submenu will list configured VPN connections for easy access. The Configure VPN entry will open the Network Connections window to the VPN section, from which you can then add, edit, or delete VPN connections. The Disconnect VPN entry will end the current active VPN connection. To add a VPN connection, choose a VPN connection type from the connection type menu.
The Editing VPN Connection dialog opens with two tabs: VPN and IPv4 Settings. On the VPN tab, you enter VPN connection information, such as the gateway address and any additional VPN information that may be required. For an OpenVPN connection, you will have to provide the authentication type, certificates, and keys . Clicking the Advanced button opens the Advanced Options dialog. An OpenVPN connection will have tabs for General, Security, and TLS Authentication. On the Security tab, you can specify the cipher to use.
Networks are configured and managed with the lower-level tools: ifconfig, route, and netstat. The ifconfig tool operates from your root user desktop and enables you to configure your network interfaces fully, adding new ones and modifying others. The ifconfig and route utilities are lower-level programs that require more specific knowledge of your network to use effectively. The netstat tool provides you with information about the status of your network connections.
Command-Line PPP Access: wvdial
From the command-line interface , you can use the wvdial dialer to set up PPP connections for dial-up modems. The wvdial program loads its configuration from the /etc/wvdial.conf file. You can edit this file and enter modem and account information, including modem speed and serial device, as well as ISP phone number, username, and password. The wvdial.conf file is organized into sections, beginning with a section label enclosed in brackets. A section holds variables for different parameters that are assigned values, such as username = chris. The default section holds default values inherited by other sections, so you needn’t repeat them.
Setting Up Your Firewall: firewall-config
You can run your firewall on a standalone system directly connected to the Internet or on a gateway system that connects a local network to the Internet. Most networks now use dedicated routers for Internet access, which have their own firewalls. If, instead, you decide to use a Linux system as a gateway, it will have at least two network connections, one for the local network and an Internet connection device for the Internet.
FirewallD
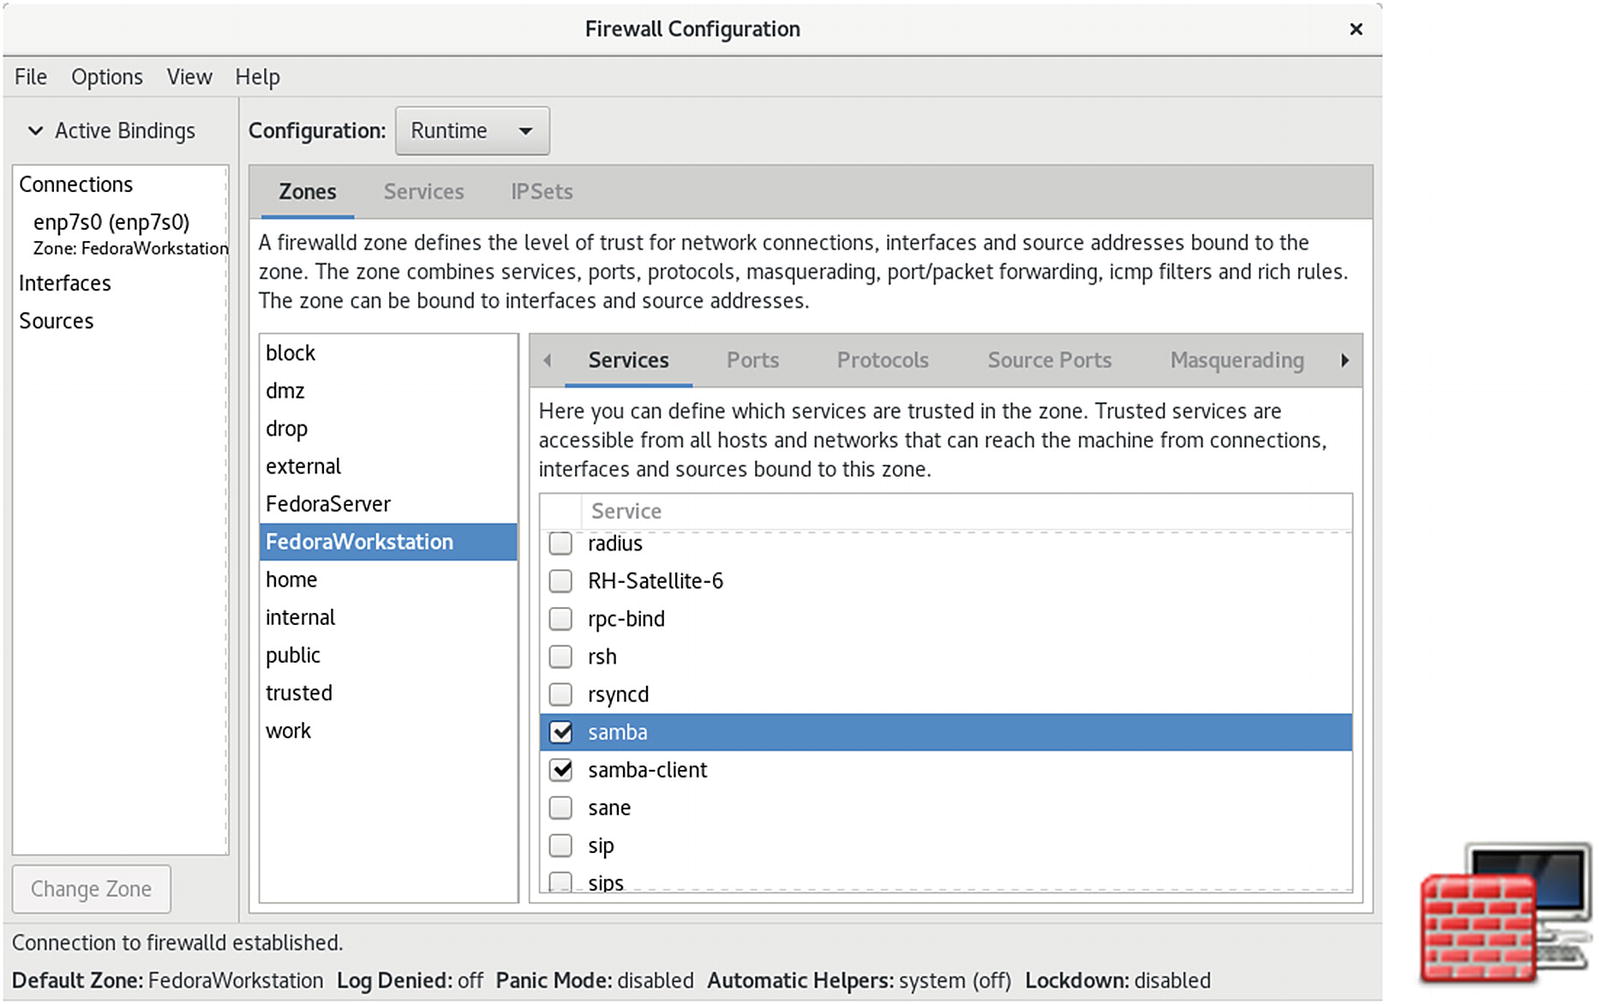
Fedora27 uses the FirewallD firewall daemon, instead of the older static system-config-firewall. To configure FirewallD, you can use the firewalld-config graphical interface. You can also use firewalld-cmd command from the command line. To set up your firewall, run firewall-config (Sundry ➤ Firewall; see Figure 14-15). The firewall is configured using zones displayed on the Zones tab. To configure a particular service, use the Services tab.
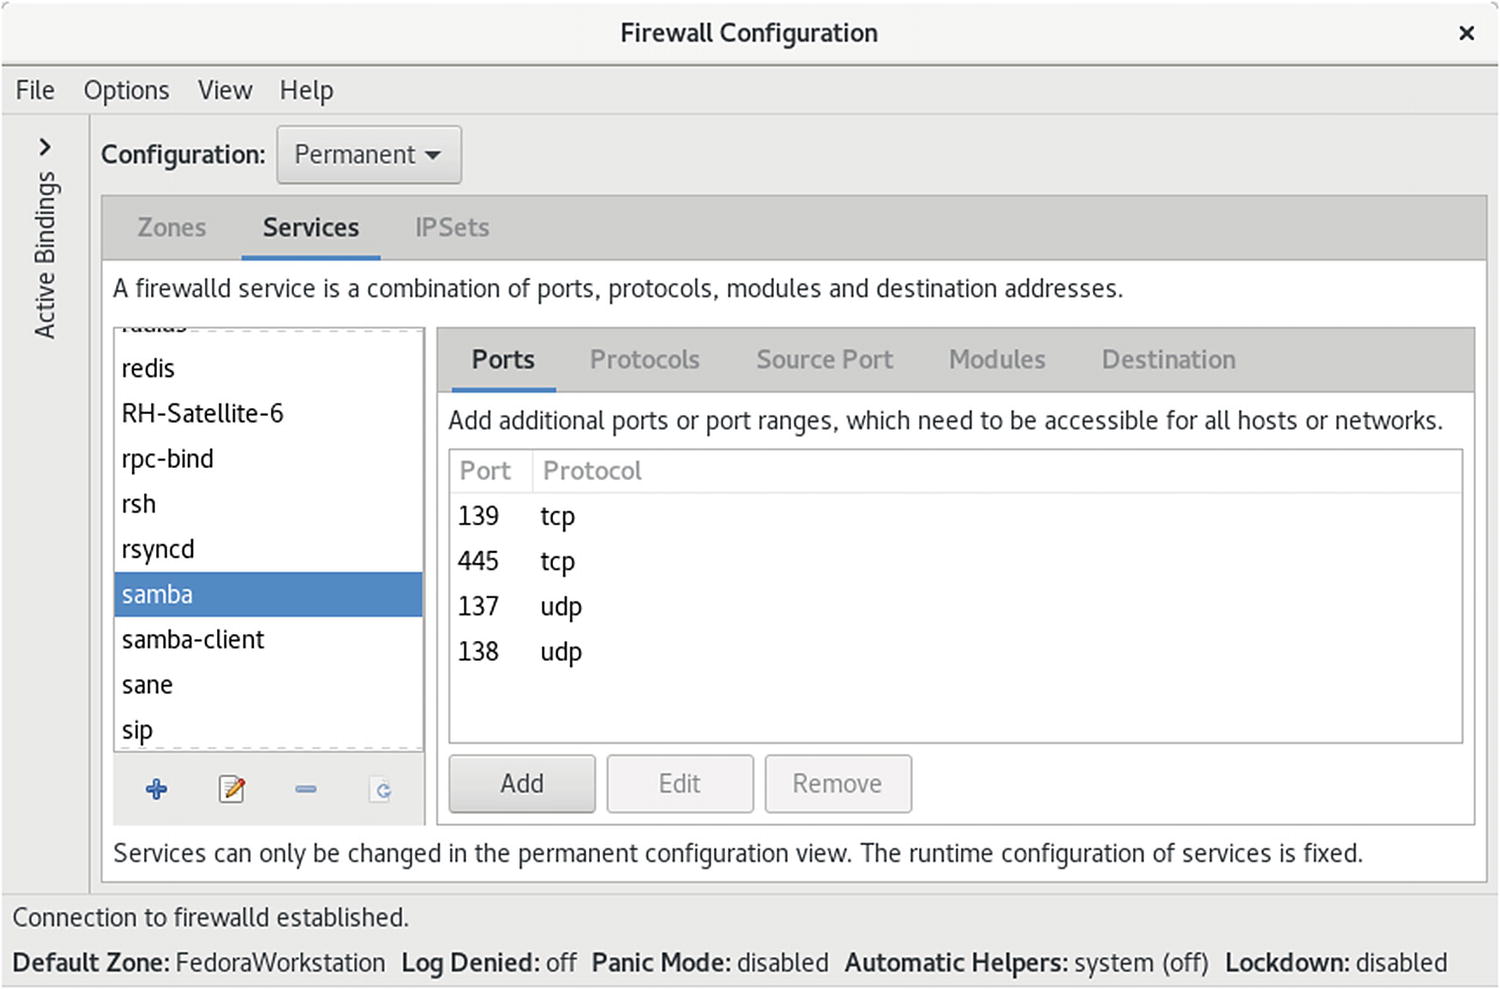
With firewall-config you can configure either a Runtime configuration or Permanent configuration. Select one from the Configuration drop-down menu. The Runtime configuration shows your current runtime setup, whereas a Permanent configuration does not take effect until you reload or restart. If you want to edit your zones and services, you need to choose the Permanent configuration. This view displays a zone toolbar for editing the zone, at the bottom of the zones scroll box, and edit, add, and remove buttons on the Services tab for managing service protocols, ports, and destination addresses.
firewall-config: runtime configuration

firewall-config: permanent configuration
If you choose Permanent Configuration from the Configuration menu, a toolbar for zones is displayed below the Zones scroll box, as shown in Figure 14-16. The + button lets you add a zone; the – button removes a zone. The pencil/page button lets you edit a zone. The add and edit buttons open the Base Zone Settings dialog , in which you enter or edit the zone name, version, description, and the target. The default target is ACCEPT. Other options are REJECT and DROP. The Load Zone Defaults button (yellow arrow) loads default settings, removing any you have made.
Each zone, in turn, can have one or more network connections. From the Options menu, choose Change Zones of Connections to open the Network Connections dialog, from which you can add a network connection.
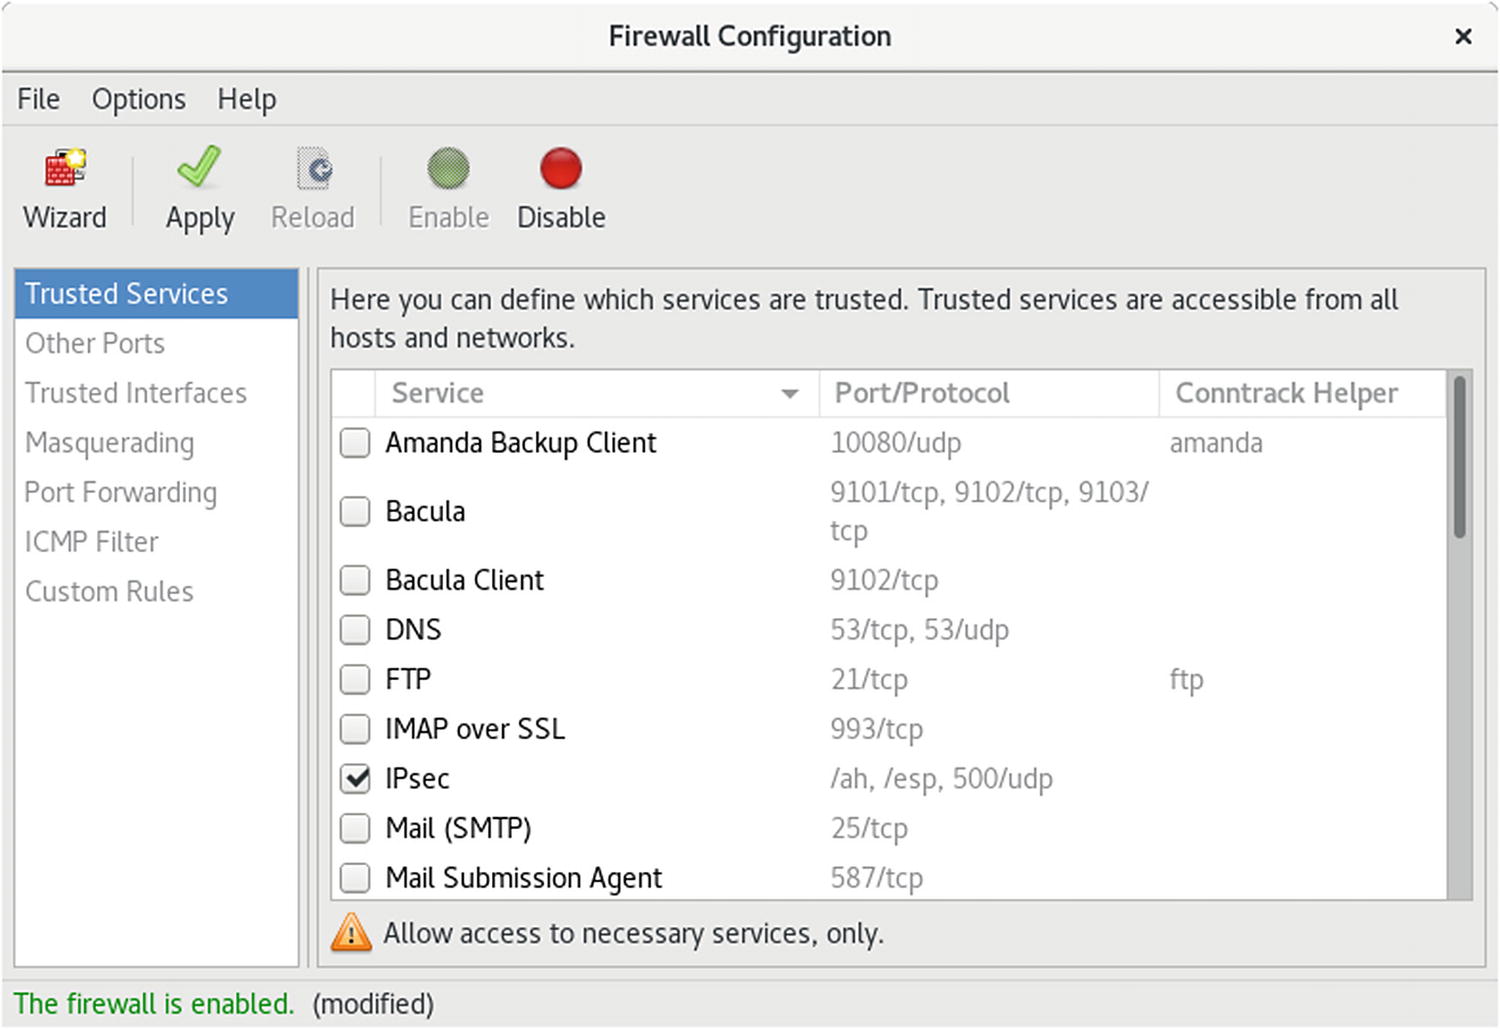
For a given zone, you can configure services, ports, masquerading, port forwarding, interfaces, rich rules, sources, and ICMP filter. The features many users want to change are the services . A Linux system is often used to run servers for a network. If you are creating a strong firewall but still want to run a service such as a web server, an FTP server, or SSH encrypted connections, you must specify it in the Services tab.
Firewall Configuration dialog: Services tab
The Ports tab lets you specify ports that you may want opened for certain services, such as BitTorrent. Click the Add button to open a dialog in which you can select the port number, along with the protocol to control (TCP or UDP), or enter a specific port number or range.
If your system is being used as gateway to the Internet for your local network, you can implement masquerading to hide your local hosts from outside access from the Internet. This also requires IP forwarding, which is automatically enabled when you choose masquerading. Local hosts will still be able to access the Internet, but they will masquerade as your gateway system. You would select for masquerading the interface that is connected to the Internet. Masquerading is available only for IPv4 networks, not IPv6 networks.
The Port Forwarding tab lets you set up port forwarding, channeling transmissions from one port to another, or to a different port on another system. Click the Add button to add a port, specifying its protocol and destination.
The ICMP Filters tab allows you to block ICMP messages. By default, all ICMP messages are allowed. Blocking ICMP messages makes for a more secure system. Certain types of ICMP messages are often blocked, as they can be used to infiltrate or overload a system, such as the ping and pong ICMP messages.
If you have specific firewall rules to add, use the Direct Configuration tab (displayed from the View ➤ Direct Configuration menu ).
IPtables Firewall
If you wish, you can still use IPtables instead of FirewallD to manage firewalls. Older customized firewall configurations may still want to use the older IPtables static firewall. IPtables systemd unit files manage static IPtables rules, much like System V scripts did in previous releases. The iptables command keeps firewall rules in /etc/sysconfig/iptables, which is checked for (ConditionPathExists). The iptables operation runs an iptables.init script to start and stop the firewall. The script reads runtime configuration from /etc/sysconfig/iptables-config.
system-config-firewall (IPtables )
Setting Up Windows Network Access: Samba
Most local and home networks include some systems working on Microsoft Windows and others on Linux. You may be required to let a Windows computer access a Linux system or vice versa. If you want to allow other Windows users to access folders on your Fedora desktop, you will have to install and configure the Samba server.
Note
See the section in Chapter 3 called “Shared Network Access for Windows Samba: (Samba)” to learn how you can access shared folders from GNOME and from Windows. With the transition from SMB1 to SMB3 (Server Message Block), the file manager desktop browsing no longer works. You have to set up access to shared folders directly.
Be sure that Samba is installed and enabled. Open Packages and click the Server entry or search for samba. Install the samba and samba-client packages. Selecting samba for installation will automatically select any needed dependent packages.
Be sure that the firewall on your Windows system is not blocking Samba. Run firewall-config (Sundry ➤ Firewall). Make sure that the Samba service and Samba client entries are checked, allowing Samba to operate on your system (see Figure 14-16). Click Apply to make the changes. To enable access immediately, restart your firewall .
Network Analysis Tools
Network Tools
Network Information Tool | Description |
|---|---|
ping | Detects whether a system is connected to the network. |
finger | Obtains information about users on the network. |
who | Checks which users are currently online. |
whois | Obtains domain information. |
host | Obtains network address information about a remote host. |
traceroute | Tracks the sequence of computer networks and hosts your message passes through. |
wireshark | Protocol analyzer to examine network traffic. |
netstat | Real-time network status monitor. |
tcpdump | Captures and saves network packets. |
nmap | Network Mapper, network discovery and security. |
Predictable and Unpredictable Network Device Names
Network devices now use a predictable naming method that differs from the older naming method . Names are generated based on the specific device referencing the network device type, its hardware connection and slot, and even its function. The traditional network device names used the eth prefix with the number of the device for an Ethernet network device . The name eth0 referred to the first Ethernet connection on your computer. This naming method was considered unpredictable as it did not accurately reference the actual Ethernet device. The old system relied on probing the network driver at boot, and if your system had several Ethernet connections, the names could end up being switched, depending on how the startup proceeded. With the current version of systemd udev, the naming uses a predictable method that specifies a particular device. The predictable method references the actual hardware connection on your system.
The name used to reference predictable network device names has a prefix for the type of device followed by several qualifiers, such as the type of hardware, the slot used, and the function number. Instead of the older unpredictable name like eth0, the first Ethernet device is referenced by a name like enp7s0. The interface name enp7s0 references an Ethernet (en) connection, at PCI slot 7 (p7), with the hotplug slot index number 0 (s0). wlp6s0 is a wireless (wl) connection, at PCI slot 6 (p6), with the hotplug slot index number 0 (s0). virvb0 is a virtual (vir) bridge (vb) network interface. Table 14-4 lists predictable naming prefixes.
Unlike the older unpredictable name, the predictable name will most likely be different for each computer. Predictable network names, along with alternatives, are discussed at:
https://www.freedesktop.org/wiki/Software/systemd/PredictableNetworkInterfaceNames/
Network Interface Device Naming
Name | Description |
|---|---|
en | Ethernet |
sl | Serial line IP (slip) |
wl | wlan, wireless local area network |
ww | wwan, wireless wide area network (mobile broadband) |
p | PCI geographical location (pci-e slot) |
s | Hotplug slot index number |
o | Onboard cards |
f | Function (used for cards with more than one port) |
u | USB port |
i | USB port interface |