To start using Fedora, you must know how to access your Fedora system and, once you are on the system, how to use and configure the desktop. A set of desktop GNOME Settings tools lets you easily configure such features as network access, desktop background, display resolution, and power usage. Access is supported through a graphical login. A simple screen appears with menus for selecting login options and your username.
GNOME Users
User access to the system is provided through accounts. To gain access to the system, you must have a user account set up for you. A system administrator creates the account, assigning a username and password for it. You then use your account to log in to and use the system. You can create other new user accounts, by using the system administration tool GNOME Users in GNOME Settings ➤ Details (accessible from the system-status-area menu). You can access these tools from any user account, provided you supply the administrative password. You had to provide a root user password when you installed your system. This is the administrative password required to access any administrative tool, such as the one for managing user accounts.
GRUB Start Menu and Boot Problems
When you boot up, the GRUB screen is displayed for a few seconds before the boot procedure begins. Should you want to start a different operating system or add options to your startup, you have to display the GRUB startup menu (see Figure 3-1). Do this by pressing any key on your keyboard. The GRUB menu will be displayed and will list Linux and other operating systems you specified, such as Windows. Your Linux system should be selected by default. If not, use the arrow keys to move to the Linux entry, if it is not already highlighted, and press Enter.
See the GRUB2 page at https://fedoraproject.org/wiki/GRUB_2 for more information.
When your Fedora Linux operating system starts up, an Fedora Linux logo appears. You can press the Esc key to see the startup messages instead. Fedora Linux uses Plymouth with its kernel-mode setting ability to display a startup animation. The Plymouth Fedora Linux logo theme is installed by default.
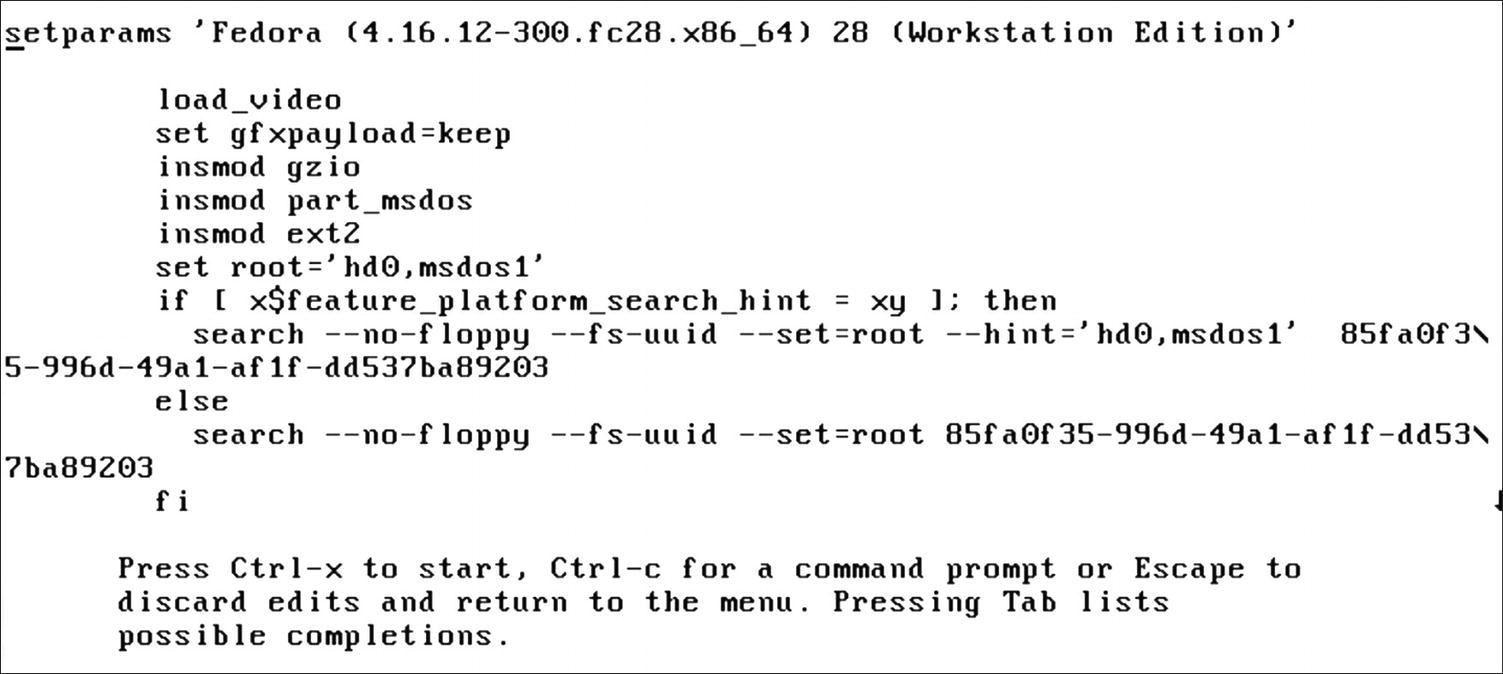
For graphical installations, some displays may have difficulty running the graphical startup display known as the Plymouth boot tool. This tool replaces the Red Hat Graphical Boot tool but still uses the command rhgb. If you have this problem, you can edit your Linux GRUB entry and remove the rhgb term from the Linux line. Press the e key to edit a Grub Linux entry (see Figure 3-2). Then move the cursor to the Linux line and perform your edit. Use the Backspace key to delete. Then press Ctrl+x to boot the edited GRUB entry.

GRUB menu
GRUB Edit window
Should you have difficulty displaying your graphical interface, you can instead choose to boot up the command-line interface. From the command-line interface, you can make any needed configuration changes. To boot to the command-line interface from GRUB, edit the Linux line of the Linux GRUB entries, and add a 3 to the end of the line. The 3 indicates the command-line interface. In previous versions of Fedora Linux, the 3 indicated a run level. Now it refers to a systemd target.
The Display Manager: GDM
The graphical login interface displays a login window with a box listing a menu of usernames. When you click a username, a login box replaces the listing of users, displaying the selected username and a text box in which you then enter your password. Upon clicking the Sign In button or pressing Enter, you log in to the selected account, and your desktop starts up.
Graphical logins are handled by the GNOME Display Manager (GDM). The GDM manages the login interface, in addition to authenticating a user password and username, and then starts up a selected desktop. From the GDM, you can shift to the command-line interface with Ctrl+Alt+F2, and then shift back to the GDM with Ctrl+Alt+F1 (from a desktop, you would use the same keys to shift to a command-line interface and to shift back). The keys F2 through F6 provide different command-line terminals, as in Ctrl+Alt+F3 for the second command-line terminal. These terminals are known as TTY devices (teletypewriter), devices that only accept typed commands on a keyboard.
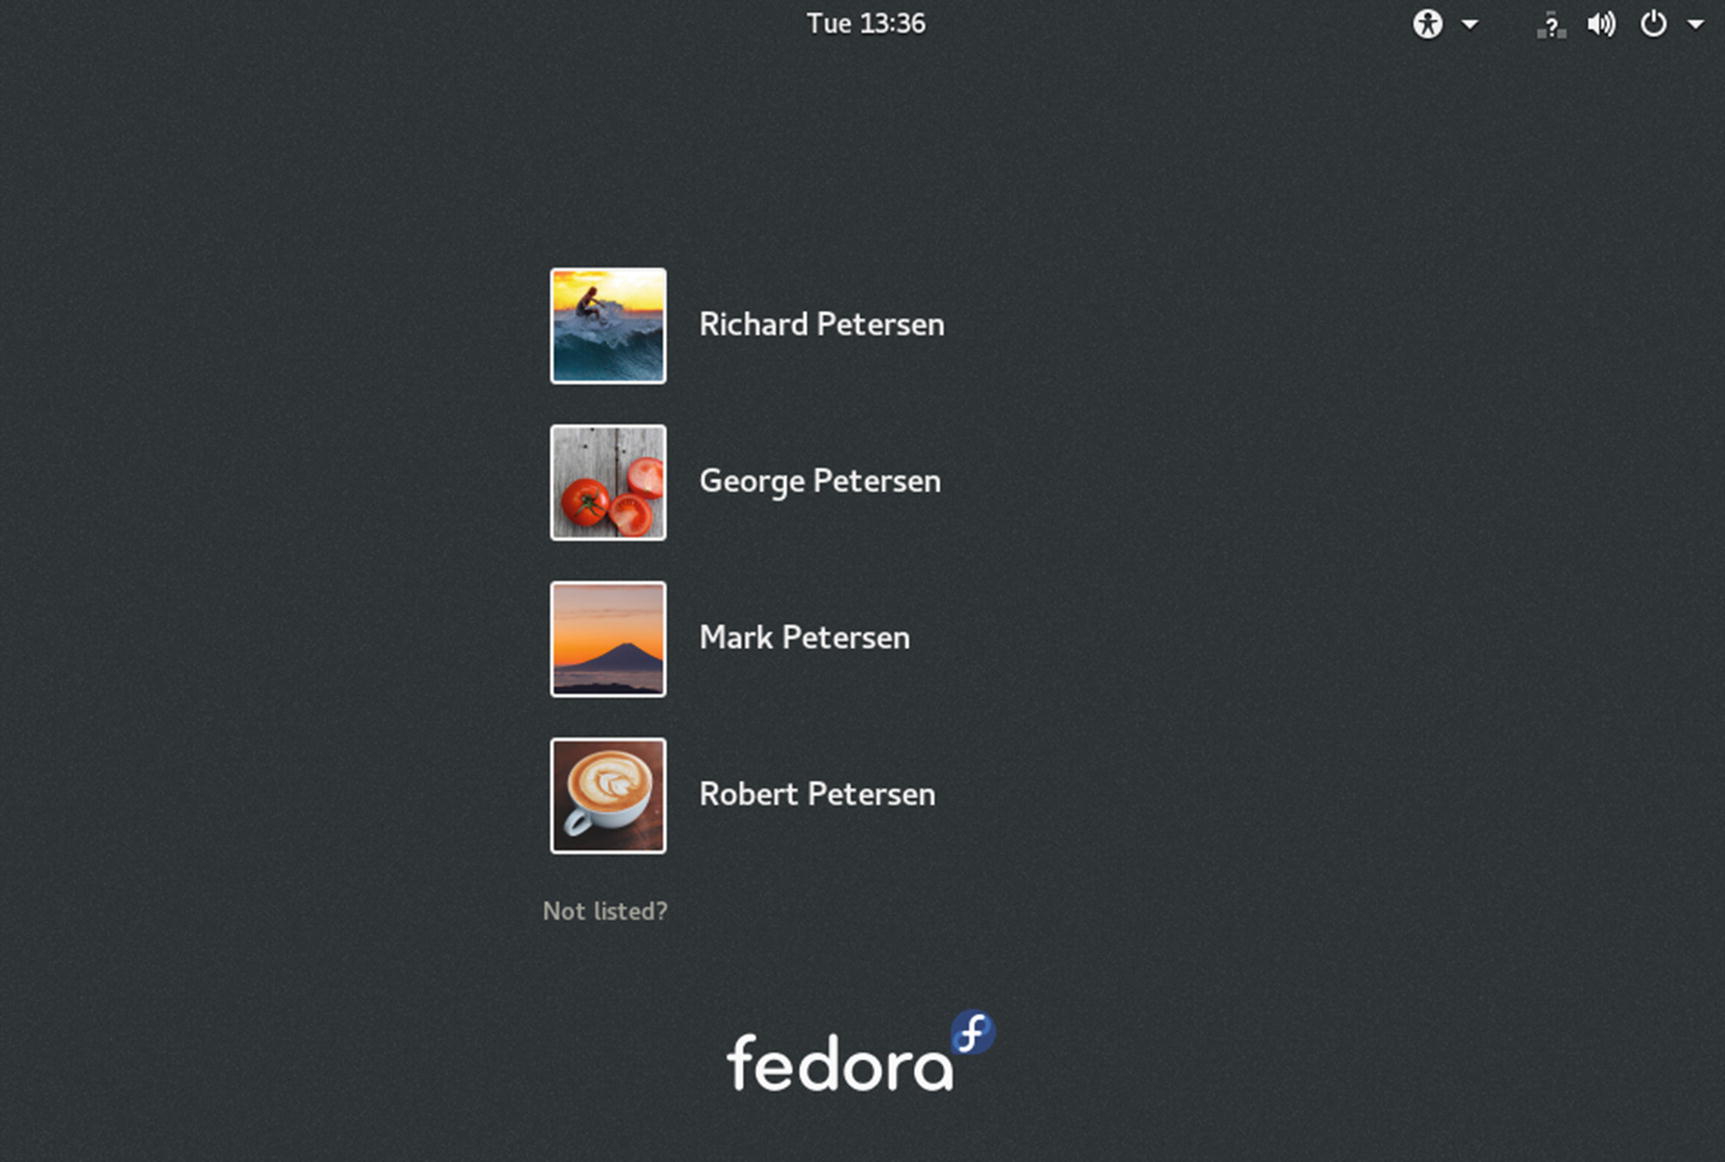
The Fedora Linux GDM user listing
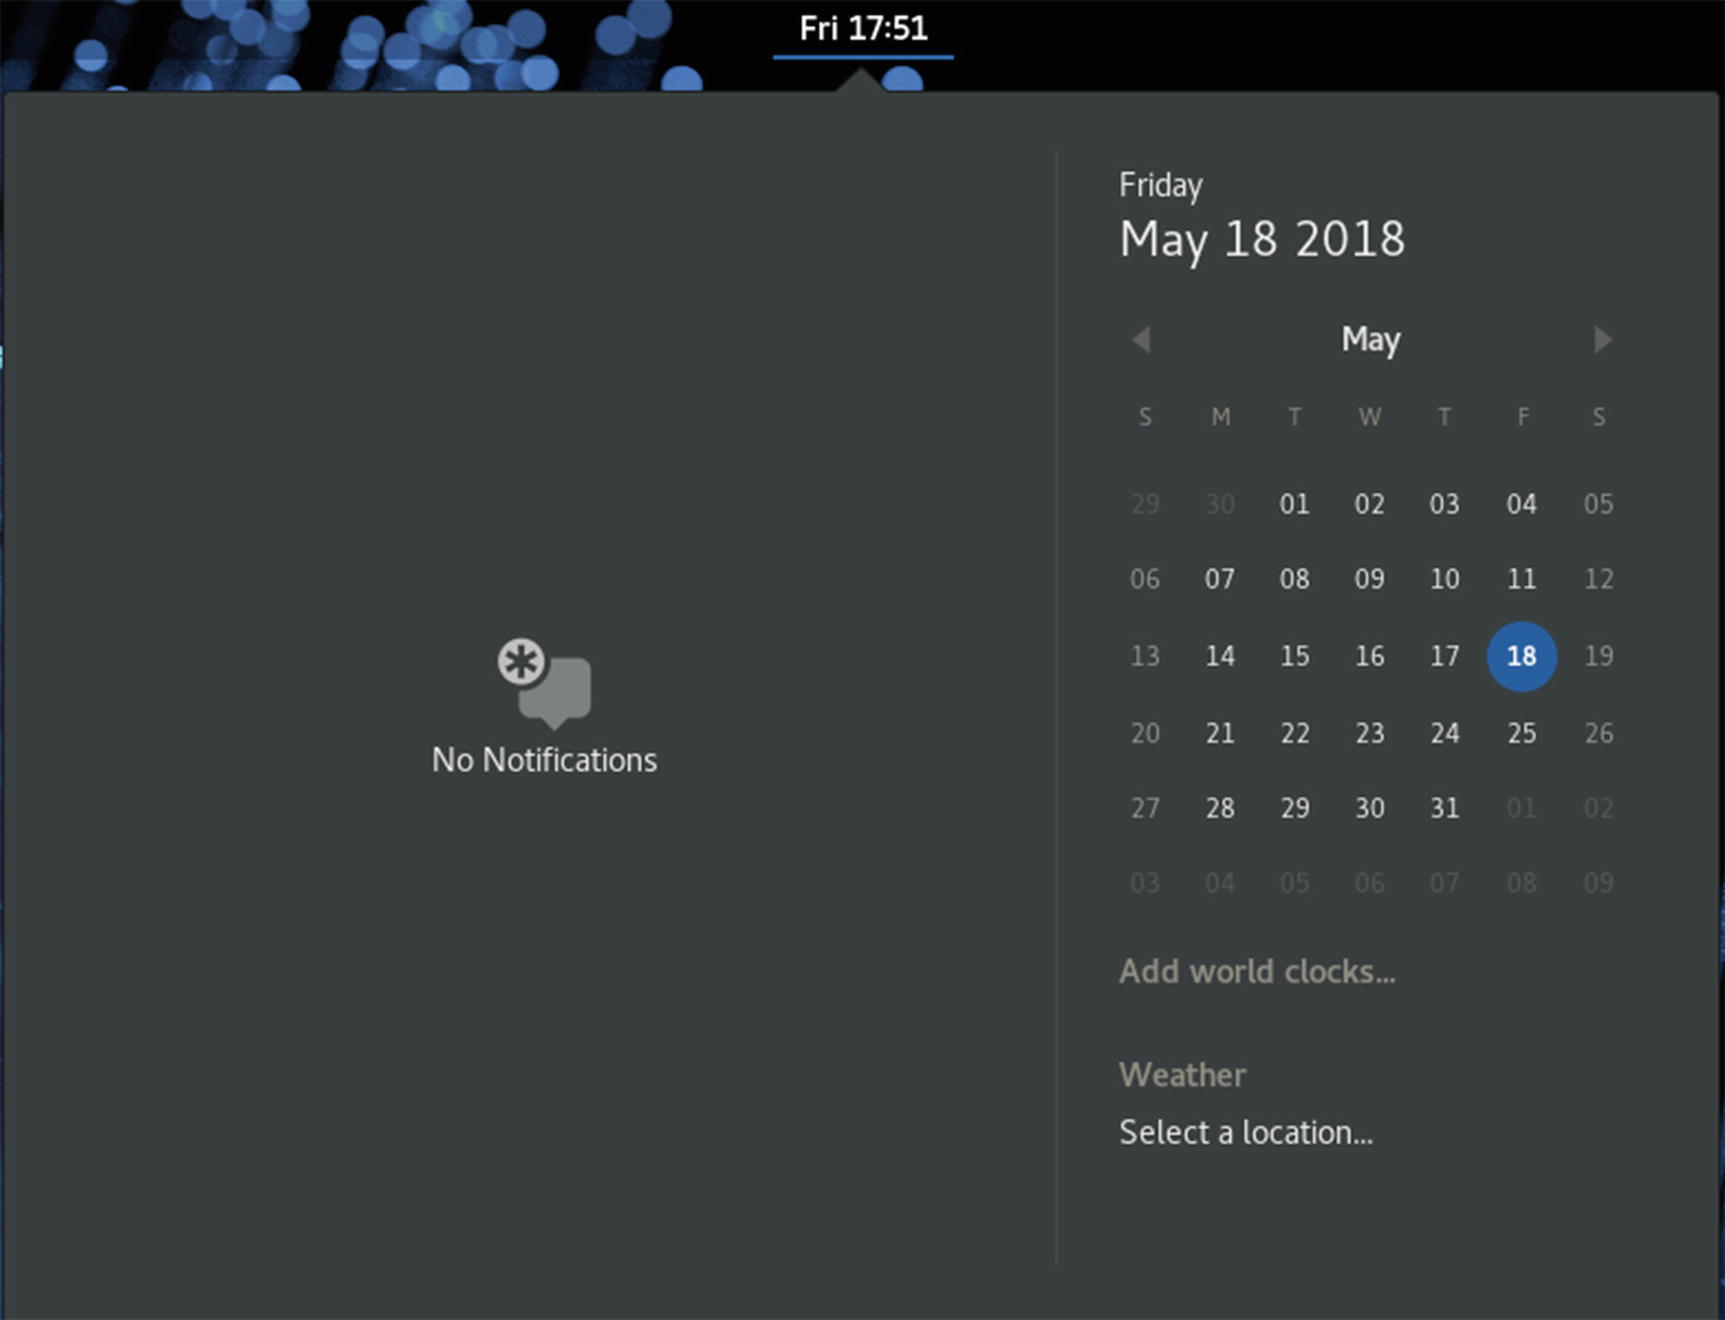
At the top center of the screen is the date (day of the week) and time. Clicking on the time displays the calendar with the full date specified, and the notifications menu.
Next to the System Status Area icons is a menu for accessibility, which displays a menu of switches that let you turn on accessibility tools and such features as the onscreen keyboard, enhanced contrast, and the screen magnifier.
To log in, click a username from the list of users. You are then prompted to enter the user’s password (see Figure 3-4). A new dialog replaces the user list, showing the username you selected and a Password text box in which you can enter the user’s password. Once you enter the password, click the Sign In button or press Enter. By default, the GNOME desktop starts up. If the name of a user you want to log in as is not listed, click the Not Listed entry at the end, to open a text box, which prompts you for a username, and then the password.
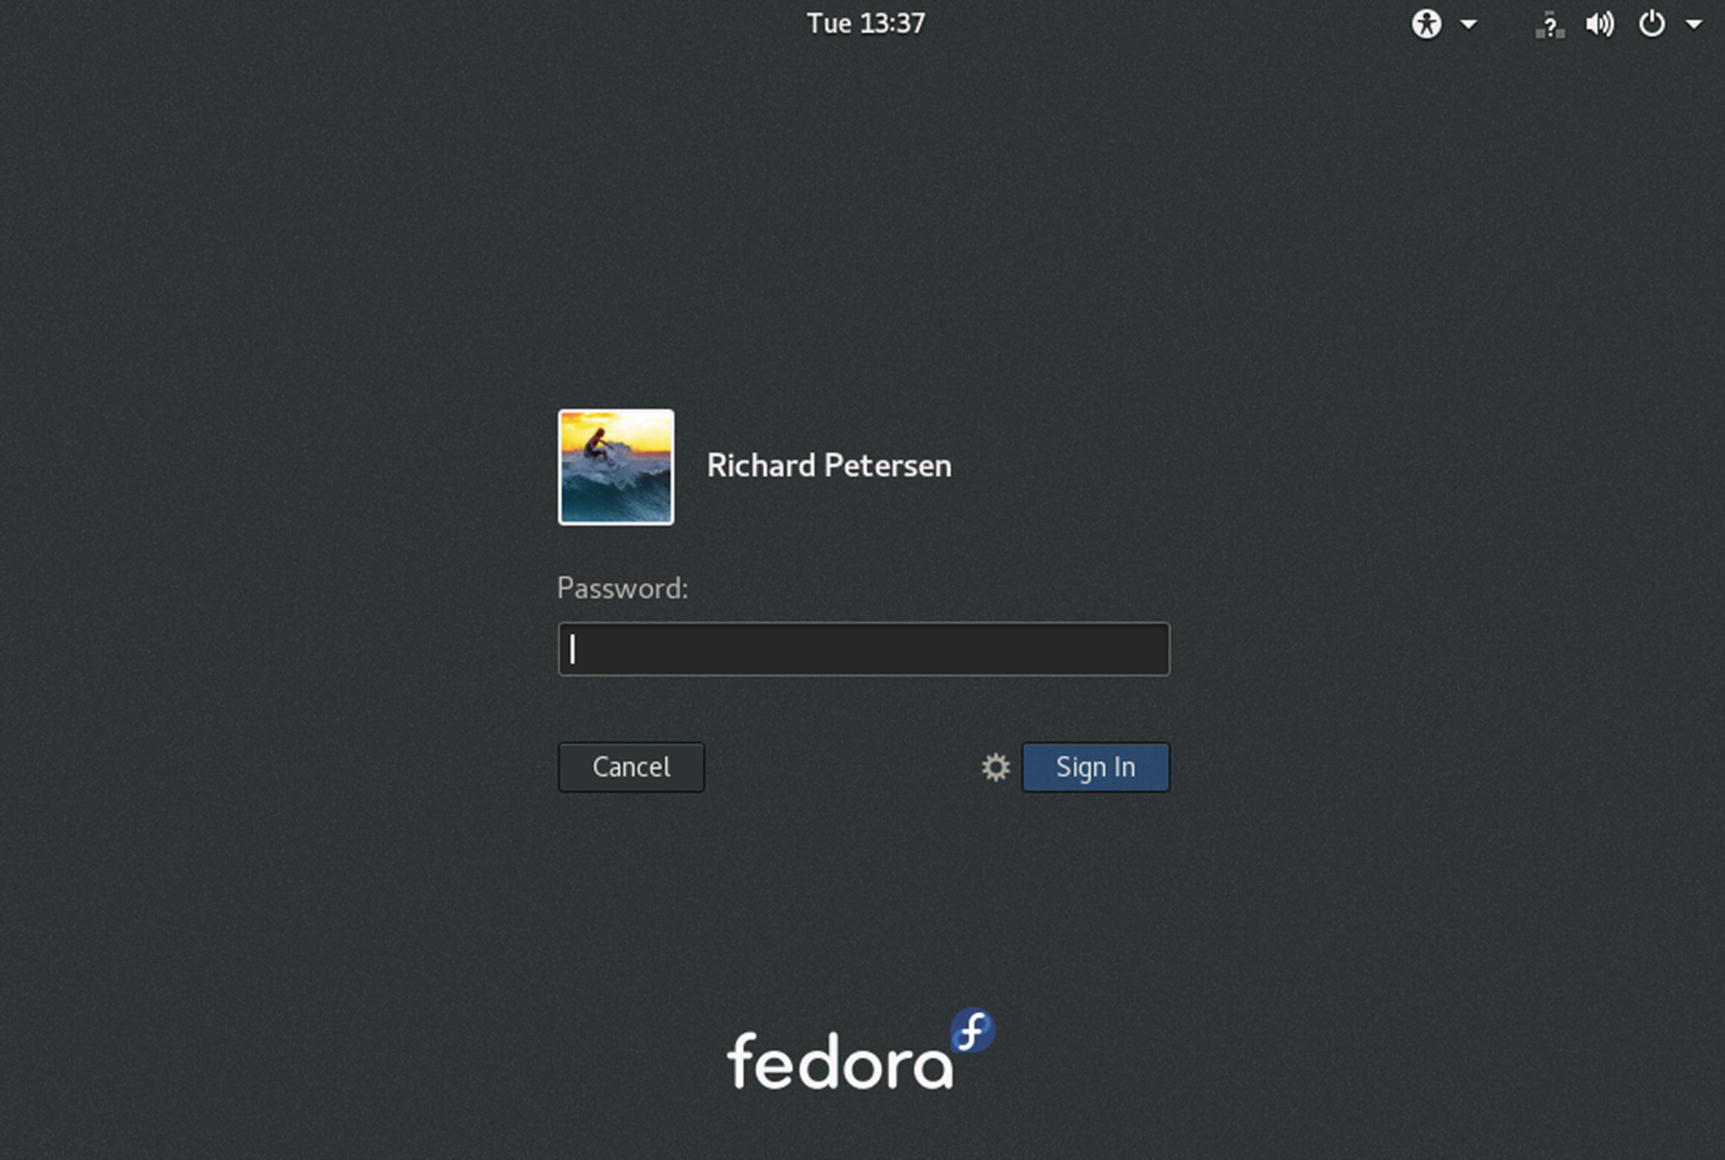
GDM login
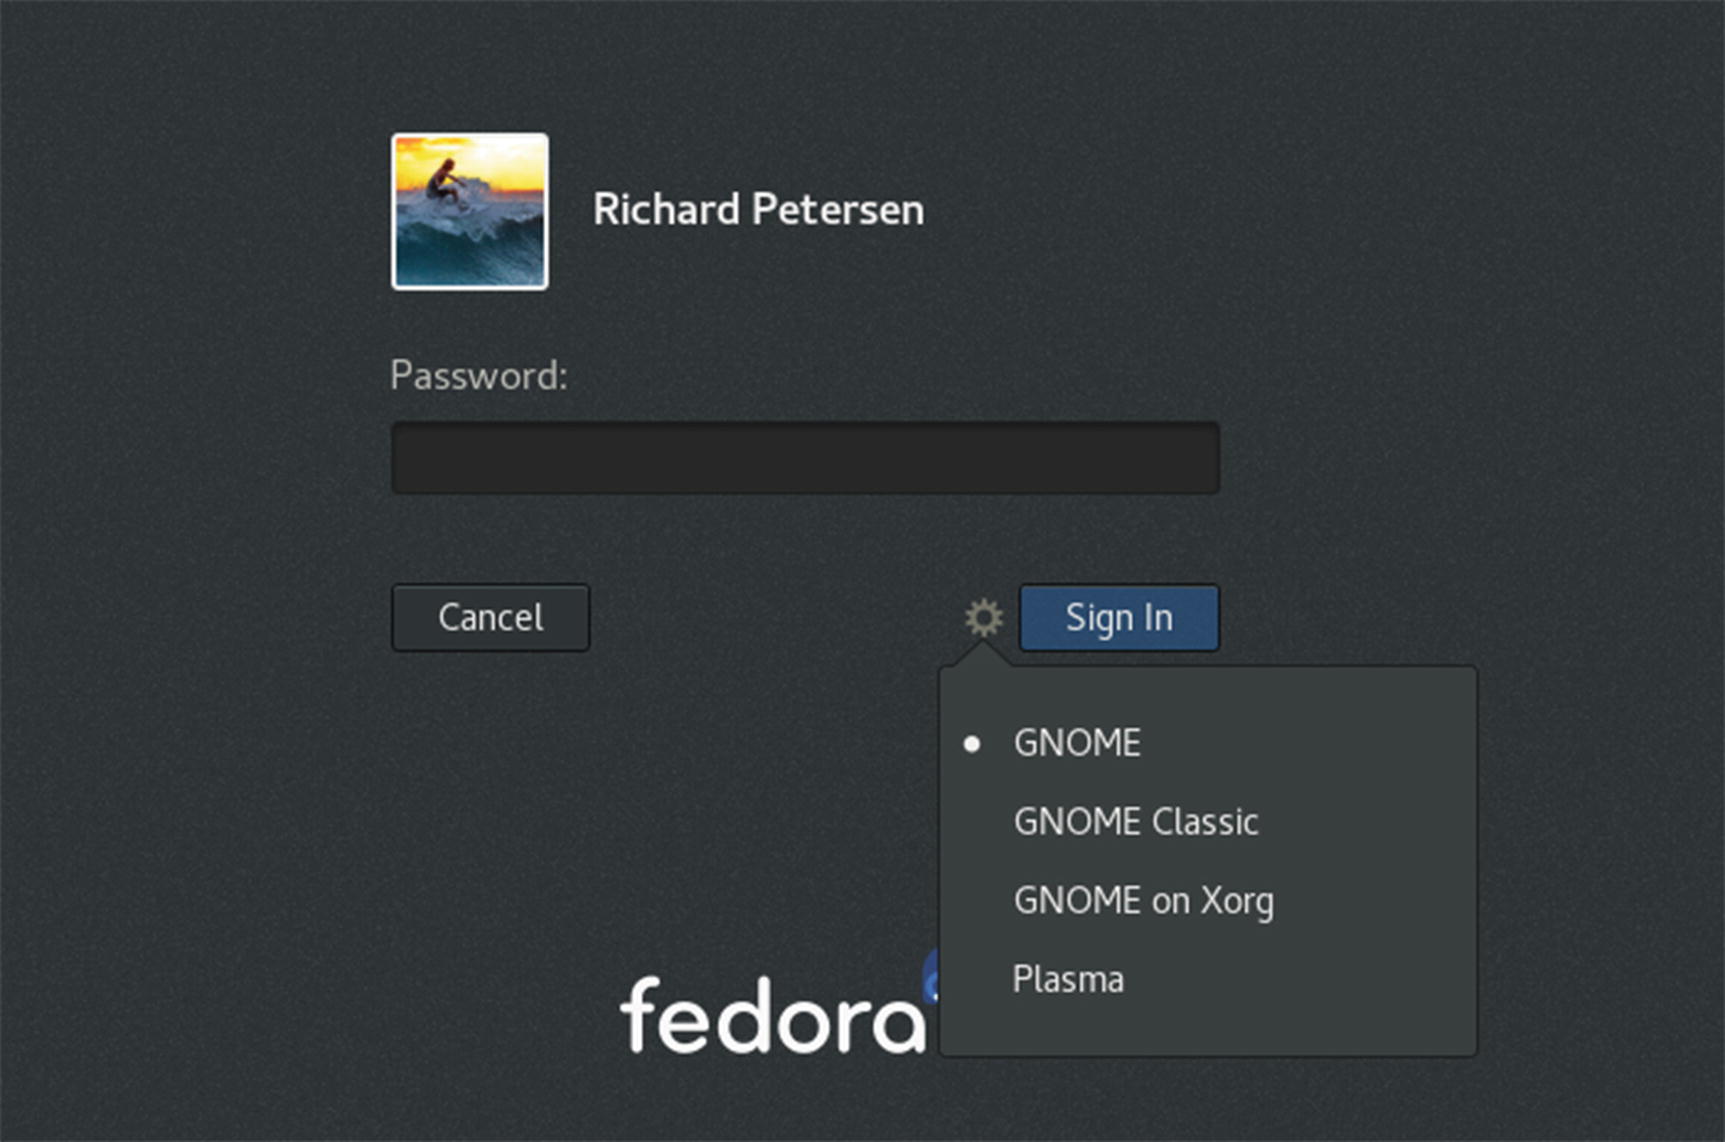
GDM Session menu
The System Status Area

System Status Area menu
On systems that are not laptops, there will be no brightness slider or battery entry on the System Status Area menu. If the system also has no wireless device, the WiFi entry will also be missing. A system of this kind will only have a sound slider and a current user entry.
To log out or switch to another user, you click the current user entry to expand the menu to show Switch User and Log Out entries. The Log Out entry returns you to the GDM login screen. The Switch User entry suspends the current user and returns you to the GDM login screen, where you can log in as another user. If only one user is defined, there is no user entry, and, so, no Log Out entry, as there are no other users to log in.
For network connections, Fedora Linux uses Network Manager. Network Manager will detect available network connections automatically (see “Network Connections,” later in this chapter).
Desktops
Several alternative desktop interfaces, such as GNOME and the K Desktop (KDE), can be installed on Fedora Linux. Each has its own style and appearance. It is important to keep in mind that the GNOME and KDE interfaces are two very different desktop interfaces, with separate tools for selecting preferences.
KDE
The K Desktop Environment (KDE) displays a panel at the bottom of the screen. The file manager operates much the same way as the GNOME file manager. There is a Settings entry in the main menu that opens the KDE Settings window, from which you can configure every aspect of the KDE environment, such as desktop effects, workspace appearance, and devices such as monitors and printers, and networking.
GNOME
Fedora Linux 28 uses the GNOME 3 desktop. It provides easy-to-use overviews and menus, along with a flexible file manager and desktop. GNOME 3 is based on the gnome-shell, which is a compositing window manager.
The screen displays a top bar, through which you access your applications, windows, and settings. Clicking the System Status Area button at the right side of the top bar displays the status user area menu, from which you can access buttons at the bottom to display the system setting dialog, lock the screen, and shut down the system (see Figure 3-7).
To access applications and windows, use the Activities overview mode. Click the Activities button at the left side of the top bar (or move the mouse to the left top corner, or press the Windows button). The overview mode consists of a dash listing your favorite and running applications, workspaces, and windows (see Figure 3-8). Large thumbnails of open windows are displayed on the Windows Overview (the desktop area). You can use the Search box at the top to locate an application quickly. Partially hidden thumbnails of your desktop workspaces are displayed on the right side. Initially, there are two. Moving your mouse to the right side displays the workspace thumbnails.
You can manually leave the overview at any time by pressing the Esc key or by clicking a window thumbnail.

The Fedora GNOME desktop
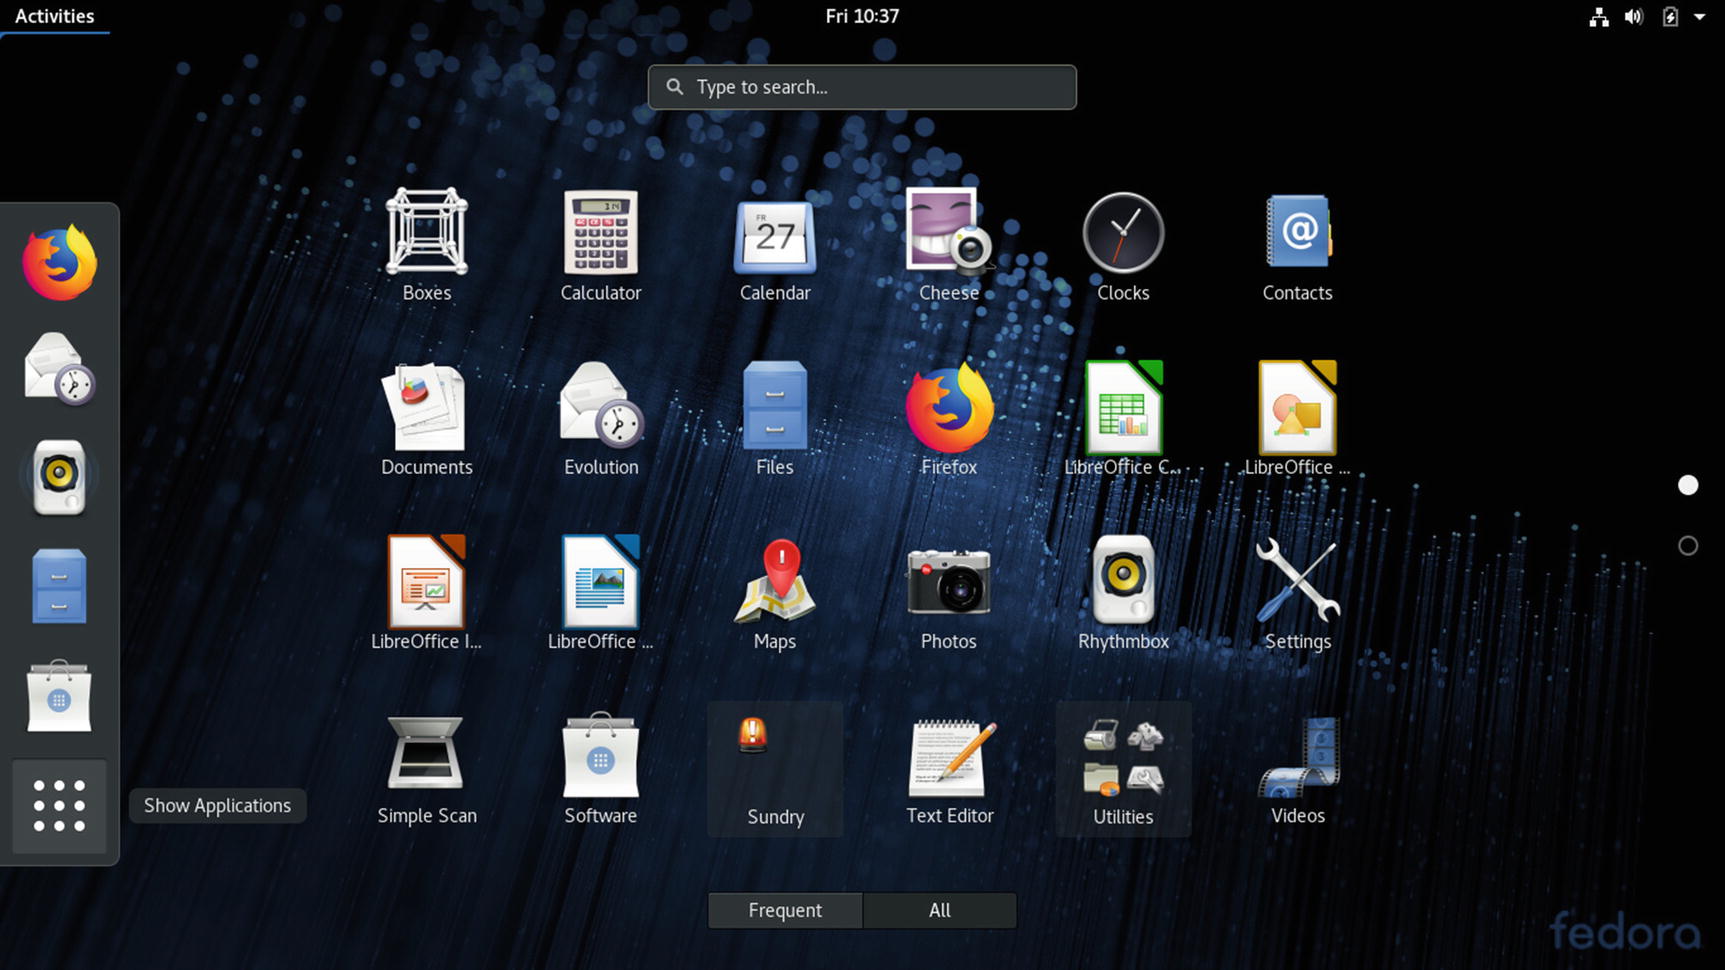
GNOME Activities overview mode for applications
You can access windows from the Windows Overview, which is displayed when you start Activities. The Windows Overview displays thumbnails of all your open windows. When you pass your mouse over a window thumbnail, a close box appears, at the upper-right corner, with which you can close the window. You can also move the window on the desktop to another workspace.
To move a window on the desktop, click and drag its title bar. To maximize a window, double-click its title bar or drag it to the top bar. To minimize, double-click the title bar again or drag it away from the top bar. To close a window, click its close box (upper right).
Two sub-folders are available on the applications overview: Utilities and Sundry. Utilities lists several tools, such as the text editor and system monitor, and Sundry lists additional administrative tools, such as system-config-printer and firewall-config. These sub-folders function like a submenu, overlaying the main overview with a sub-folder. You can use the GNOME Software Installed tab to create your own sub-folders and place application icons in them.
GNOME File Manager
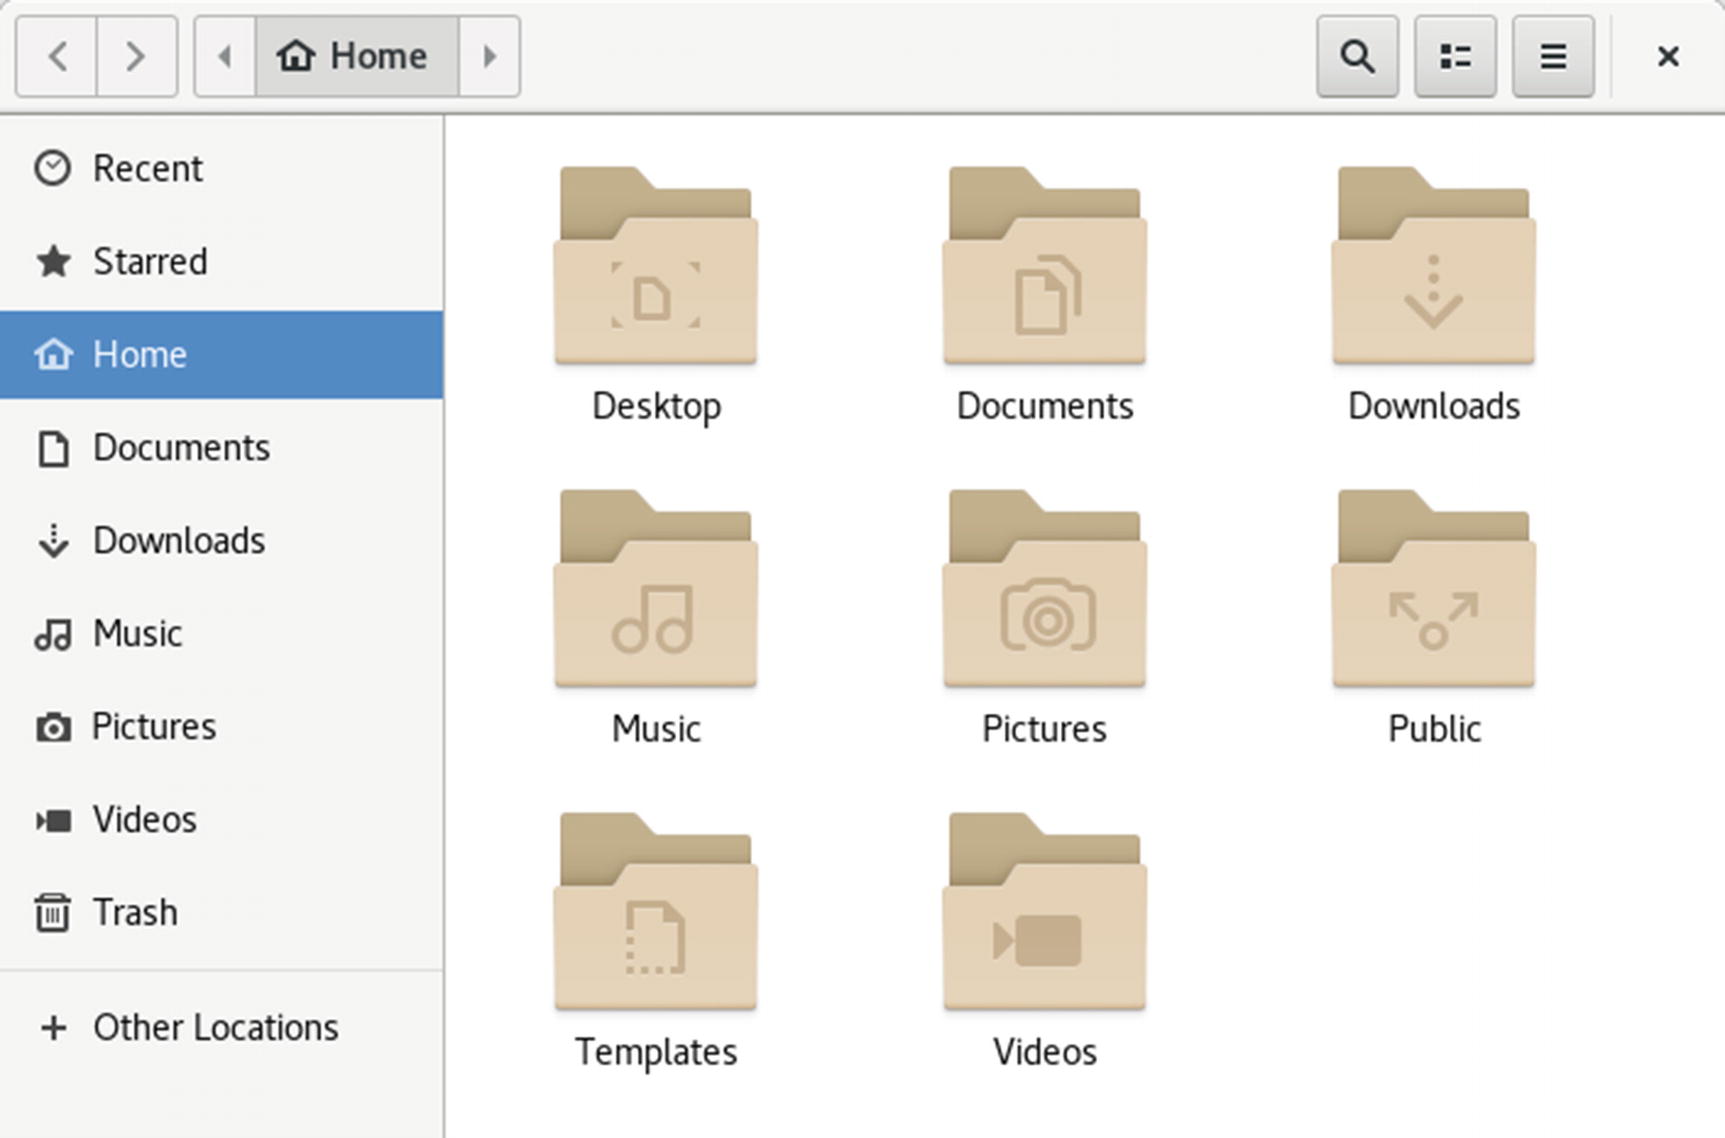
File manager for the Home folder
The file manager window displays several components, including a header bar, which combines the title bar and toolbar, and a sidebar. When you open a new directory, the same window is used to display it, and you can use the forward and back arrows to move through previously opened directories. The header bar displays navigation folder buttons that show your current folder and its parent folders. You can click a parent folder to move to it. The GNOME file manager also supports tabs. You can open several folders in the same file manager window. Click on the menu button on the right side of the title bar to display the file manager tools with buttons to add a new folder, tab, or bookmark, as well as zoom buttons for enlarging or reducing the size of the folder icons. You can also sort files and show hidden files.
GNOME Customization with the Tweak Tool: Themes, Fonts, Startup Applications, and Extensions
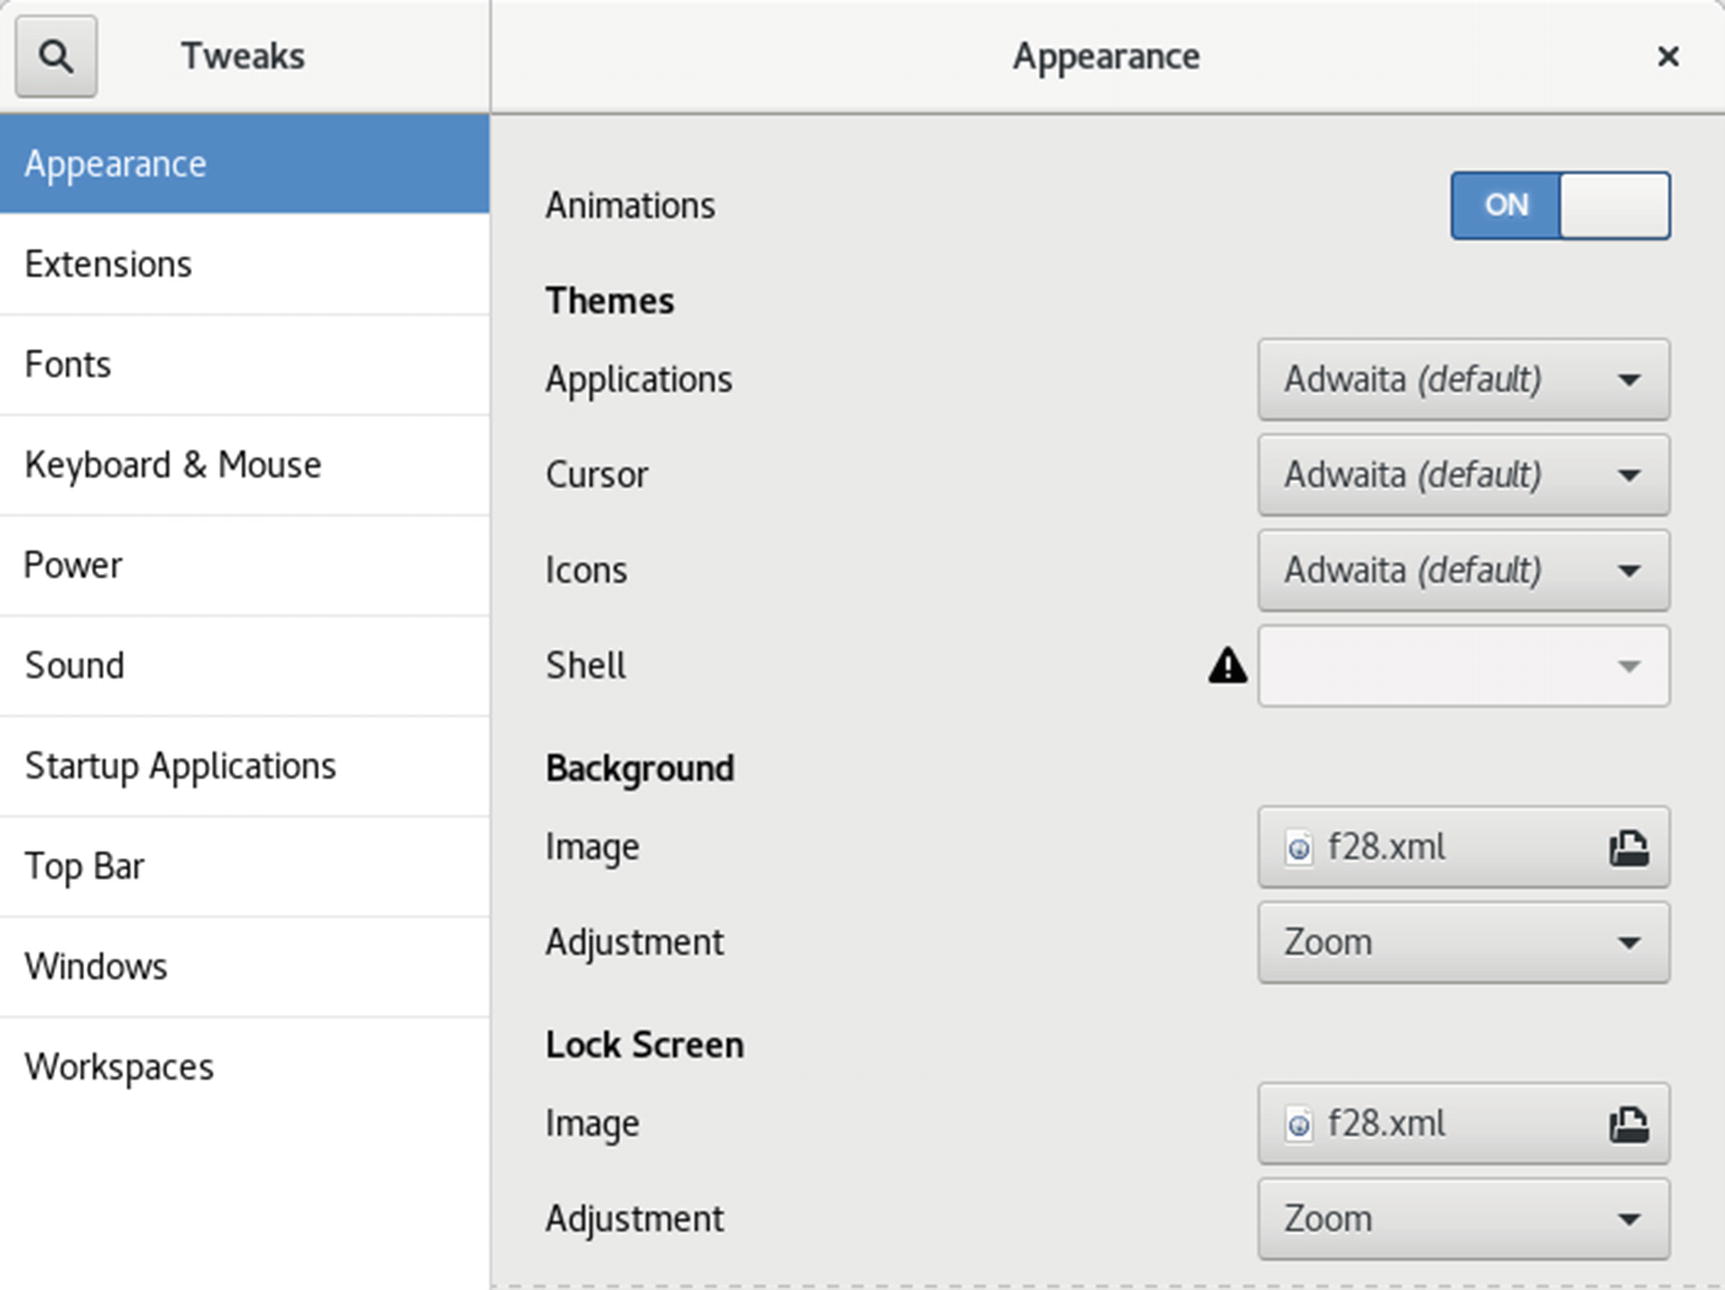
GNOME Tweak Tool, Appearance tab (themes)
The Appearance tab lets you set the theme for your windows, icons, and cursor. GNOME 3 uses the Adwaita Theme. This theme has a light and dark variant. The Global Light Theme is the default, but you can use the switch on the Appearance tab to enable the Global Dark Theme. The Global Dark Theme shades the background of windows to a dark gray, while text and button images appear in white.
As you add other desktops, such as Cinnamon, the available themes increase. There are many window themes to choose from, including Clearlooks, Mist, and Glider. For icons, you can choose among Oxygen (KDE), Mist (Cinnamon), and GNOME.
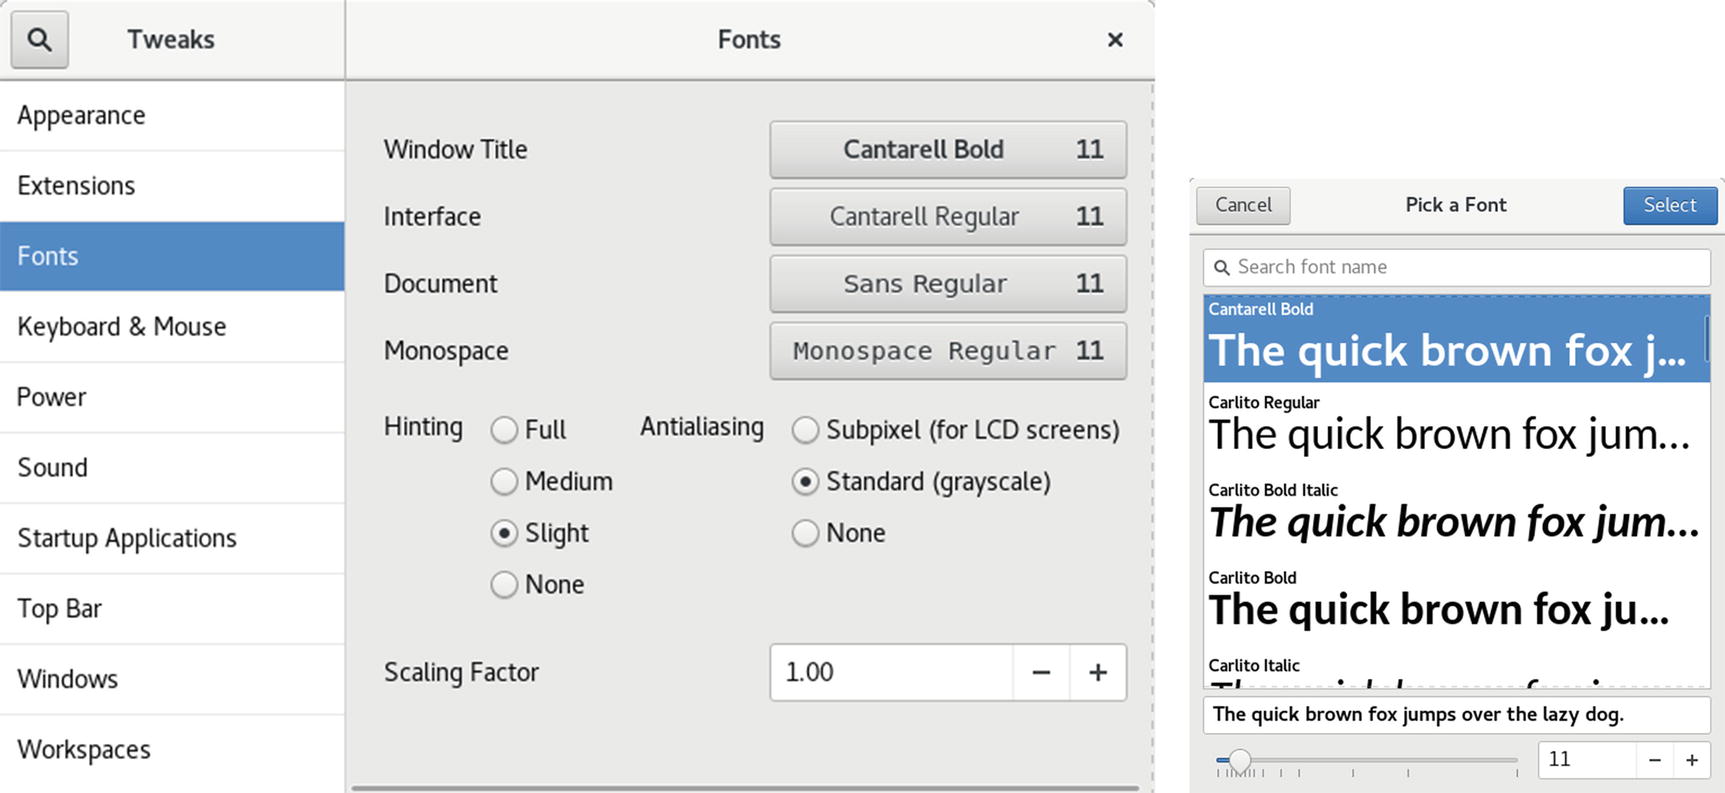
GNOME Tweak Tool, Fonts tab
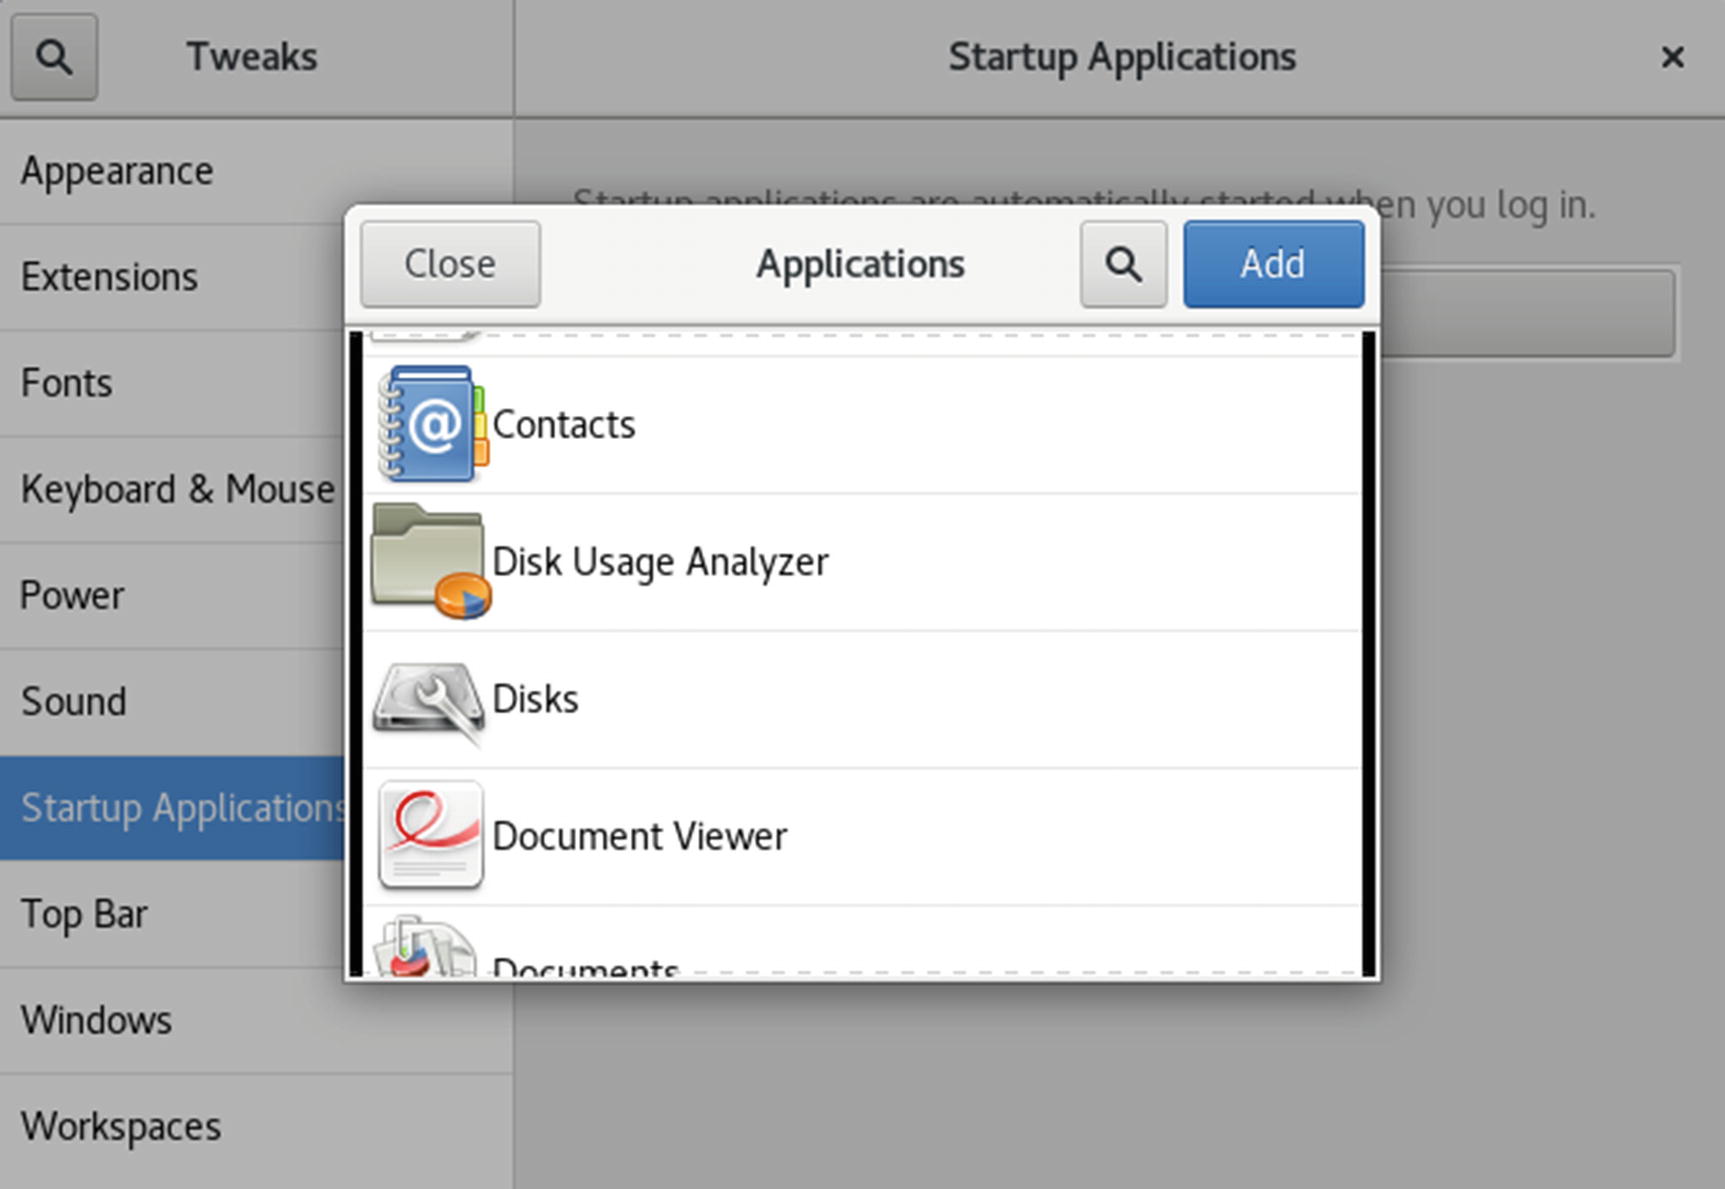
GNOME Tweak Tool, Startup Applications tab
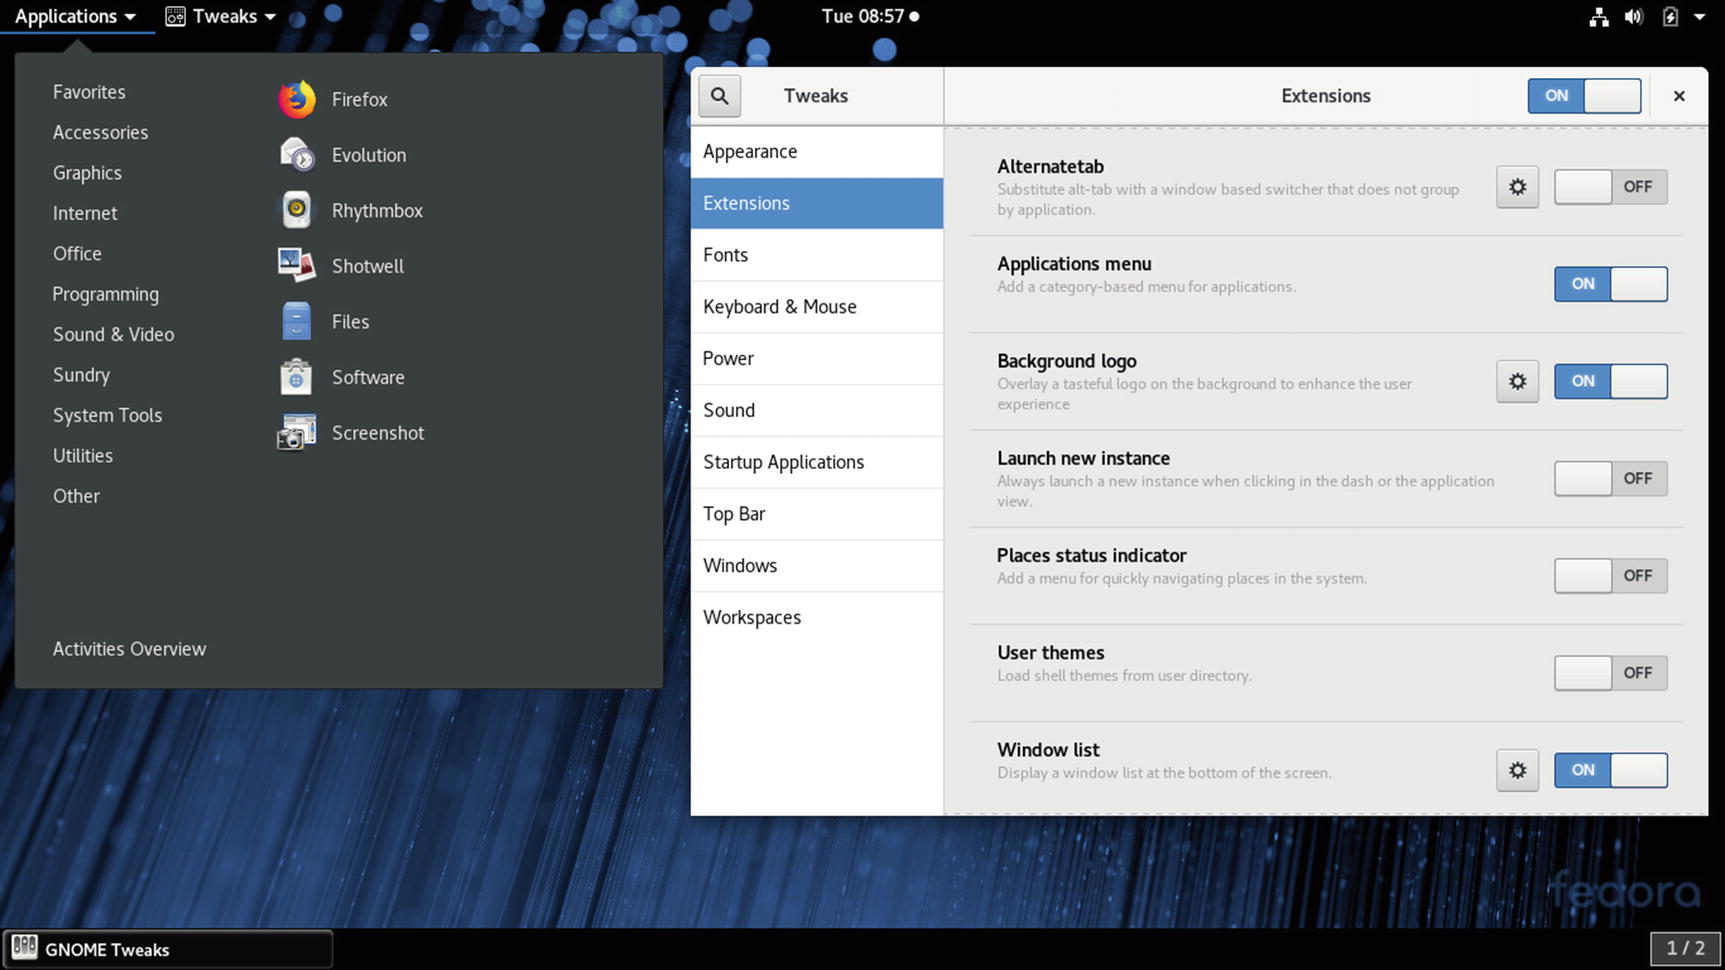
GNOME Tweak Tool, Extensions tab

GNOME Tweak Tool, Window list extension
Logging Out and Shutting Down GNOME
If you want to exit your desktop and return to the GDM login screen, or switch to a different user, you click the user entry in the System Status Area menu to expand to a menu with entries for Switch User and Log Out (see Figure 3-15). Click the Log Out entry to display a dialog that shows buttons for Cancel and Log Out. Click Log Out to log out of your account, exiting GNOME and returning to the login screen, where you can log in again as a different user or shut down the system. A countdown will commence in the dialog, showing how much time you have before it performs the logout automatically.
From the login screen, you can shut down the system: choose Power Off from the System Status Area menu on the lower right of the menu. This displays a power off dialog with options to restart or power off. A countdown will commence in the dialog, showing how much time you have before it performs the shutdown automatically.
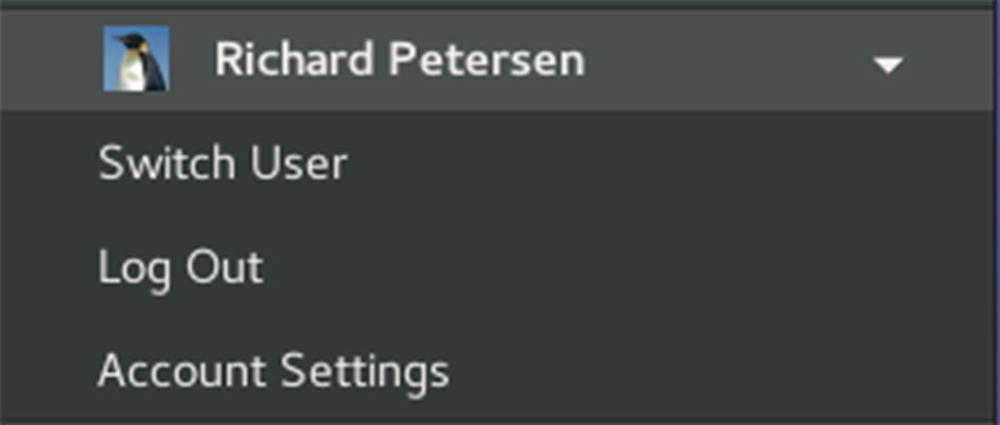
GNOME Log Out menu entry
Network Connections
Network connections will be set up for you by Network Manager, which will detect your network connections automatically, both wired and wireless. Network Manager provides status information for your connection and allows you to switch easily from one configured connection to another, as needed. For initial configuration, it detects as much information as possible about the new connection.
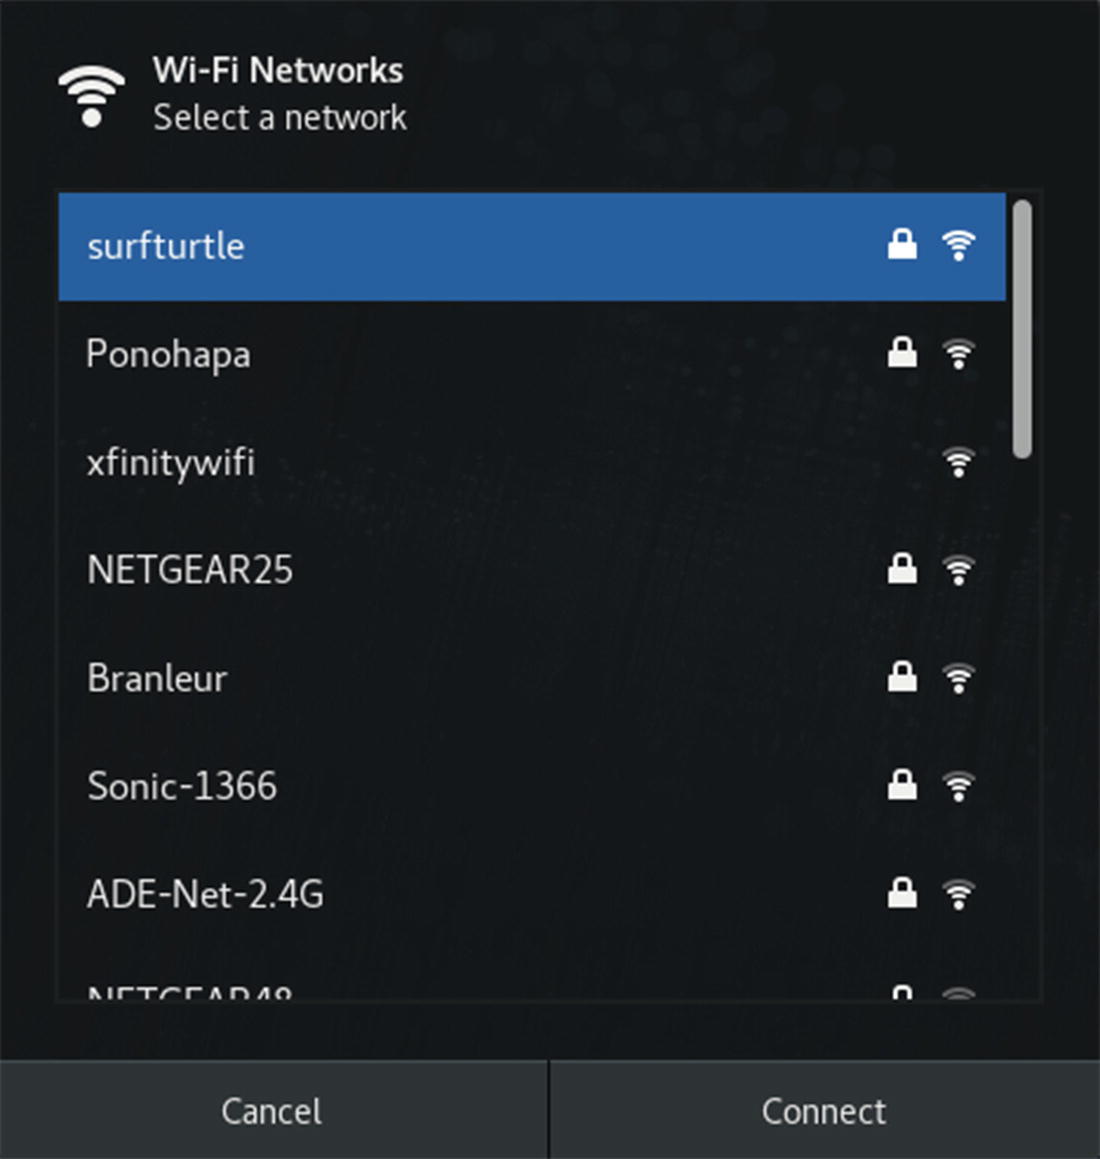
Network Manager is user specific. Wired connections will be started automatically. For wireless connections, when a user logs in, Network Manager selects the connection preferred by that user. From a menu of detected wireless networks, the user can select a wireless connection to use.
Network Manager, wireless
Network Manager Wired Connections
For computers connected to a wired network , such as an Ethernet connection, Network Manager automatically detects and establishes the network connection. Most networks use DHCP to provide such network information as an IP address and DNS server. With this kind of connection, Network Manager can connect automatically to your network whenever you start your system. Click the Wired entry in the System Status Area to expand the menu to show entries from which to connect or disconnect to wired networking and open the GNOME Network Settings dialog at the Wired tab (Wired Settings).
Network Manager Wireless Connections
With multiple wireless access points for Internet connections, a system could have several network connections to choose from. This is particularly true for notebook computers that access different wireless connections at different locations. Instead of manually configuring a new connection each time one is encountered, the Network Manager tool can configure and select a connection to use automatically.
Network Manager will scan for wireless connections, checking for Extended Service Set Identifiers (ESSIDs). If an ESSID identifies a previously used connection, it is selected. If several are found, the recently used one is chosen. If only new connections are available, Network Manager waits for the user to choose one. A connection is selected if the user is logged in.
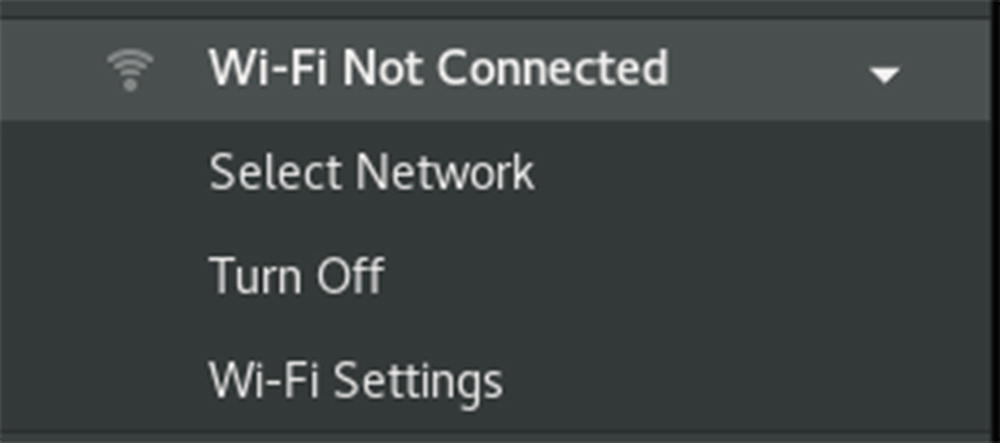
Network Manager connections menu, wireless
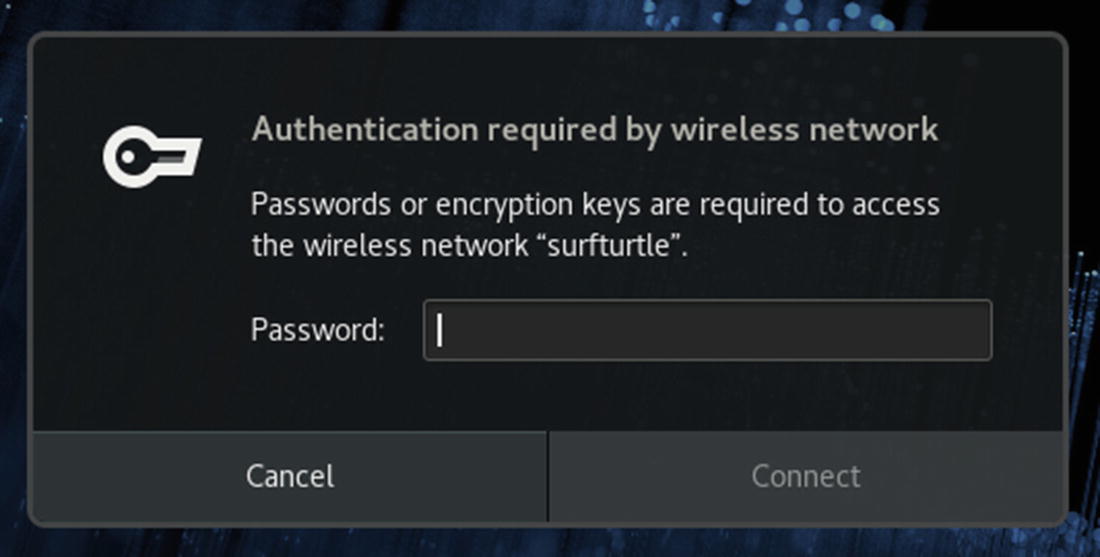
Network Manager wireless authentication
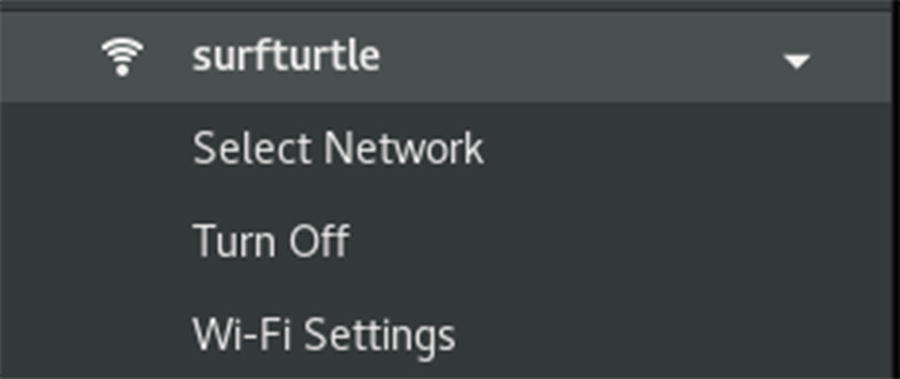
Network Manager wireless on and off
Settings WiFi and Network

Settings Network wireless connections
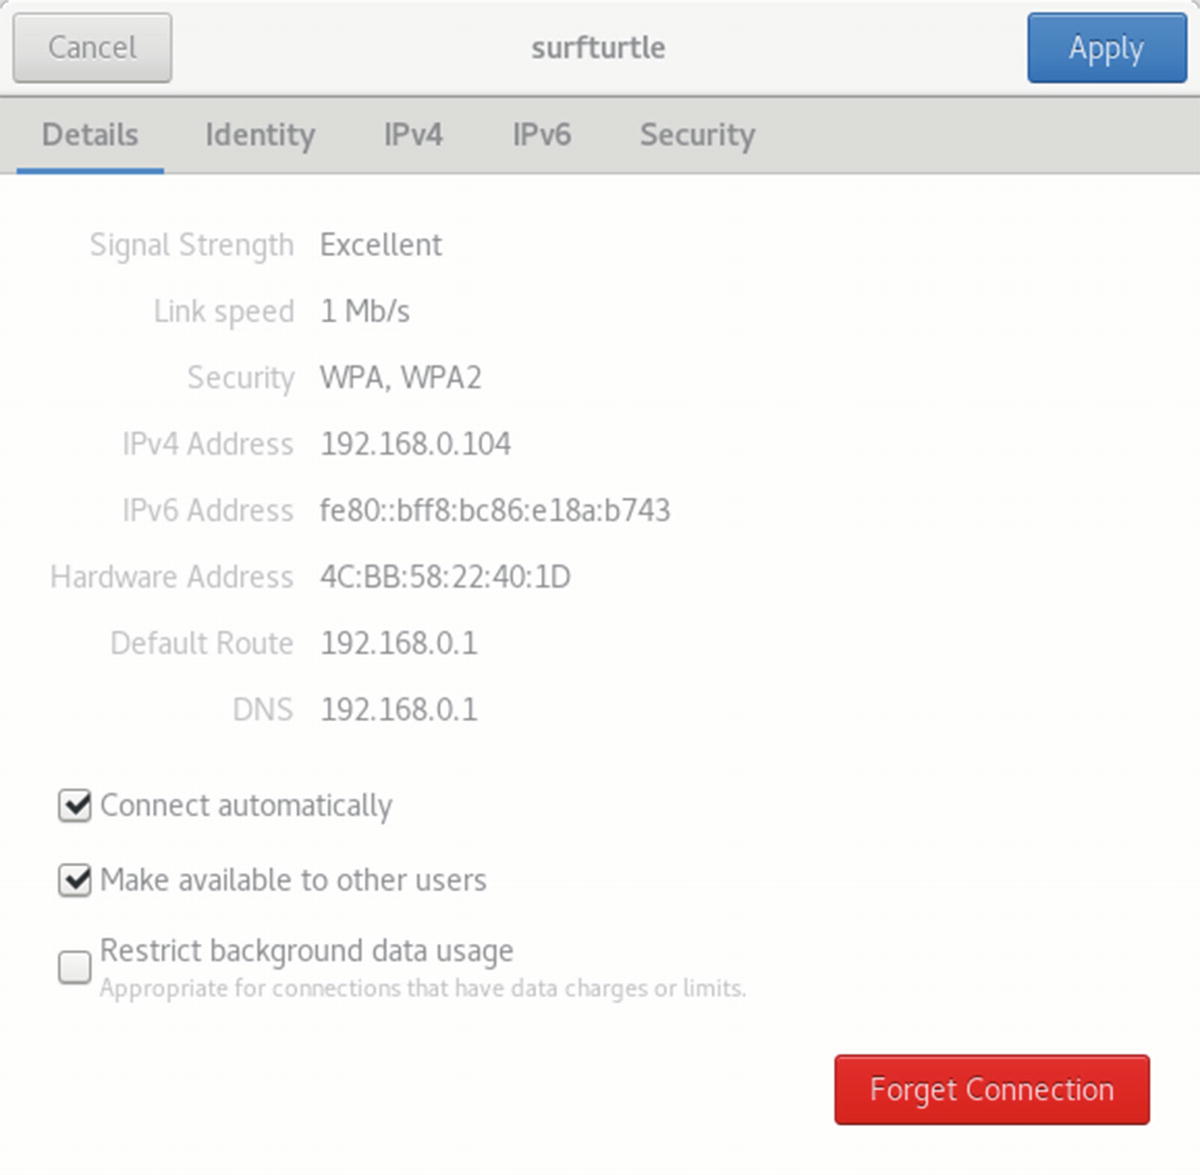
Settings Network wireless connection, Details tab
The Identity tab has options for connecting automatically and for providing availability to other users. These are set by default. Should you not want to connect to the wireless network automatically, be sure to uncheck this option.
The Turn on Wi-Fi Hotspot entry in the wireless menu opens a dialog letting you set up your computer as a wireless router that other computers can connect through.
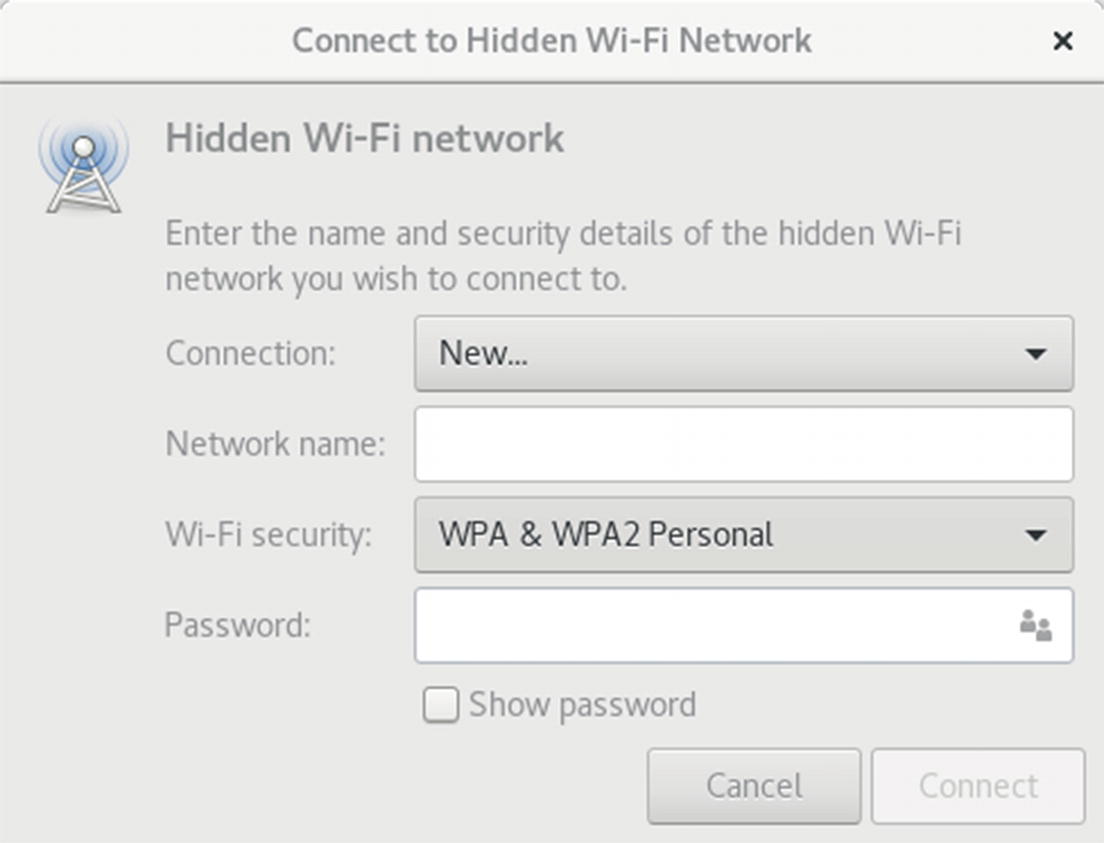
Connect to a Hidden WiFi Network
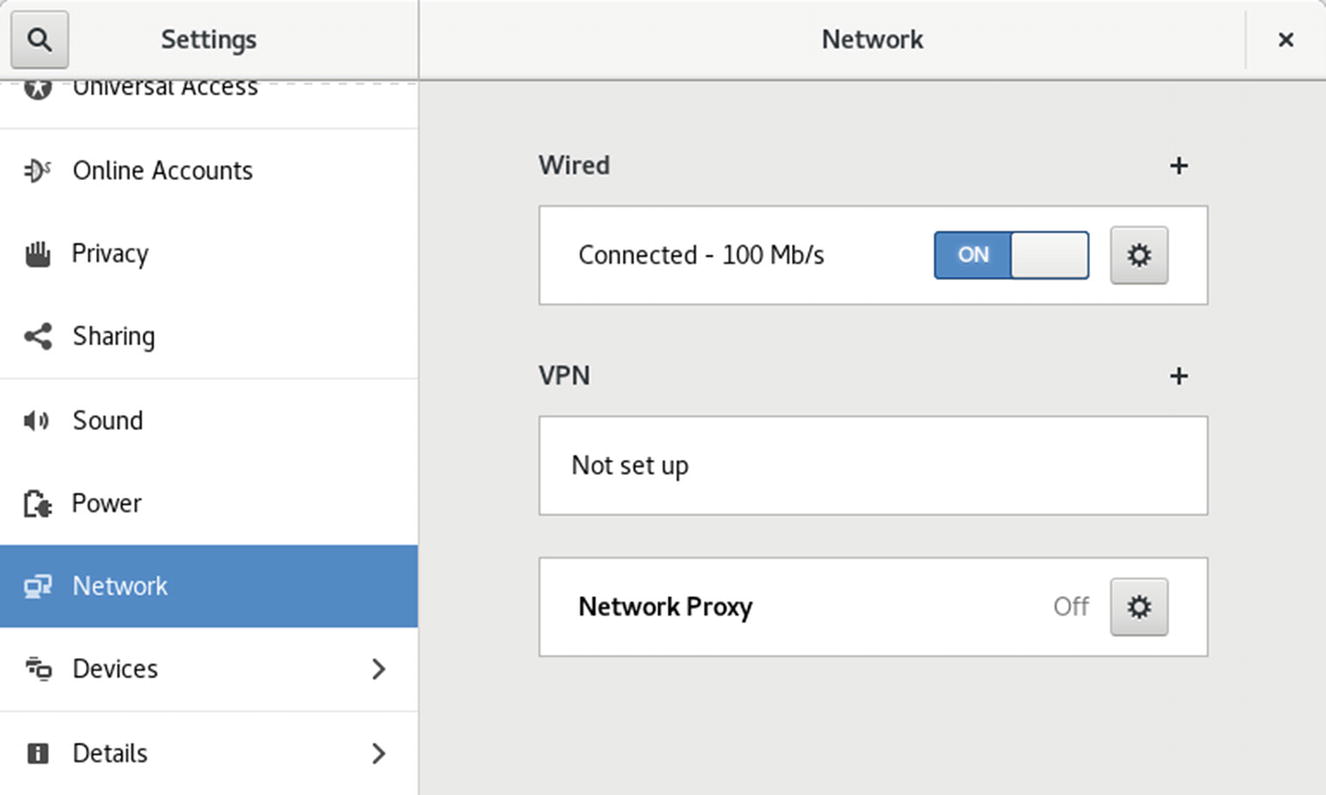
Settings Network wired connection

Network proxy settings (Settings Network)
To add a VPN connection, click the plus (+) button to the right of the VPN title to open Add VPN Dialog Network.
Settings
GNOME system tools (settings)
Settings
Setting | Description |
|---|---|
Personal | |
WiFi | Lets you configure and manage wireless networks. |
Bluetooth | Sets Bluetooth detection and configuration |
Background | Sets desktop and screen lock backgrounds (wallpaper, color, and image) |
Notifications | Turns on notifications for different applications |
Search | Specifies the resources and locations searched by the GNOME overview search box |
Region & Language | Chooses a language, region (formats), and keyboard layout |
Universal Access | Enables features such as accessible login and keyboard screen |
Online Accounts | Configures online accounts for use by email and browser applications |
Privacy | Turns on privacy features, such as screen lock and purging trash |
Sharing | Turns on sharing for media, remote login, and screen access |
Sound | Configures sound effects, output volume, input volume, and sound application settings |
Power | Sets the power options for laptop inactivity |
Network | Lets you turn wired networks on or off; allows access to an available wired networks and specifies proxy configuration, if needed |
Devices | |
Displays | Changes your screen resolution, refresh rate, and screen orientation |
Keyboard | Configures repeat key sensitivity and shortcut keys for special tasks, such as multimedia operations |
Mouse & Touchpad | Sets mouse and touchpad configuration; selects hand orientation, speed, and accessibility |
Printers | Turns printers on or off and accesses their print queues |
Removable Media | Default applications for removable media |
Wacom Tablet | Provides tablet options |
Color | Sets the color profile for a device |
Details | |
About | Sets the hostname of your computer, displays hardware information, and assigns default applications for certain basic tasks |
Date & Time | Sets the date, time, time zone, and network time |
Users | Manages accounts |
Default Applications | Default applications for different for user files |
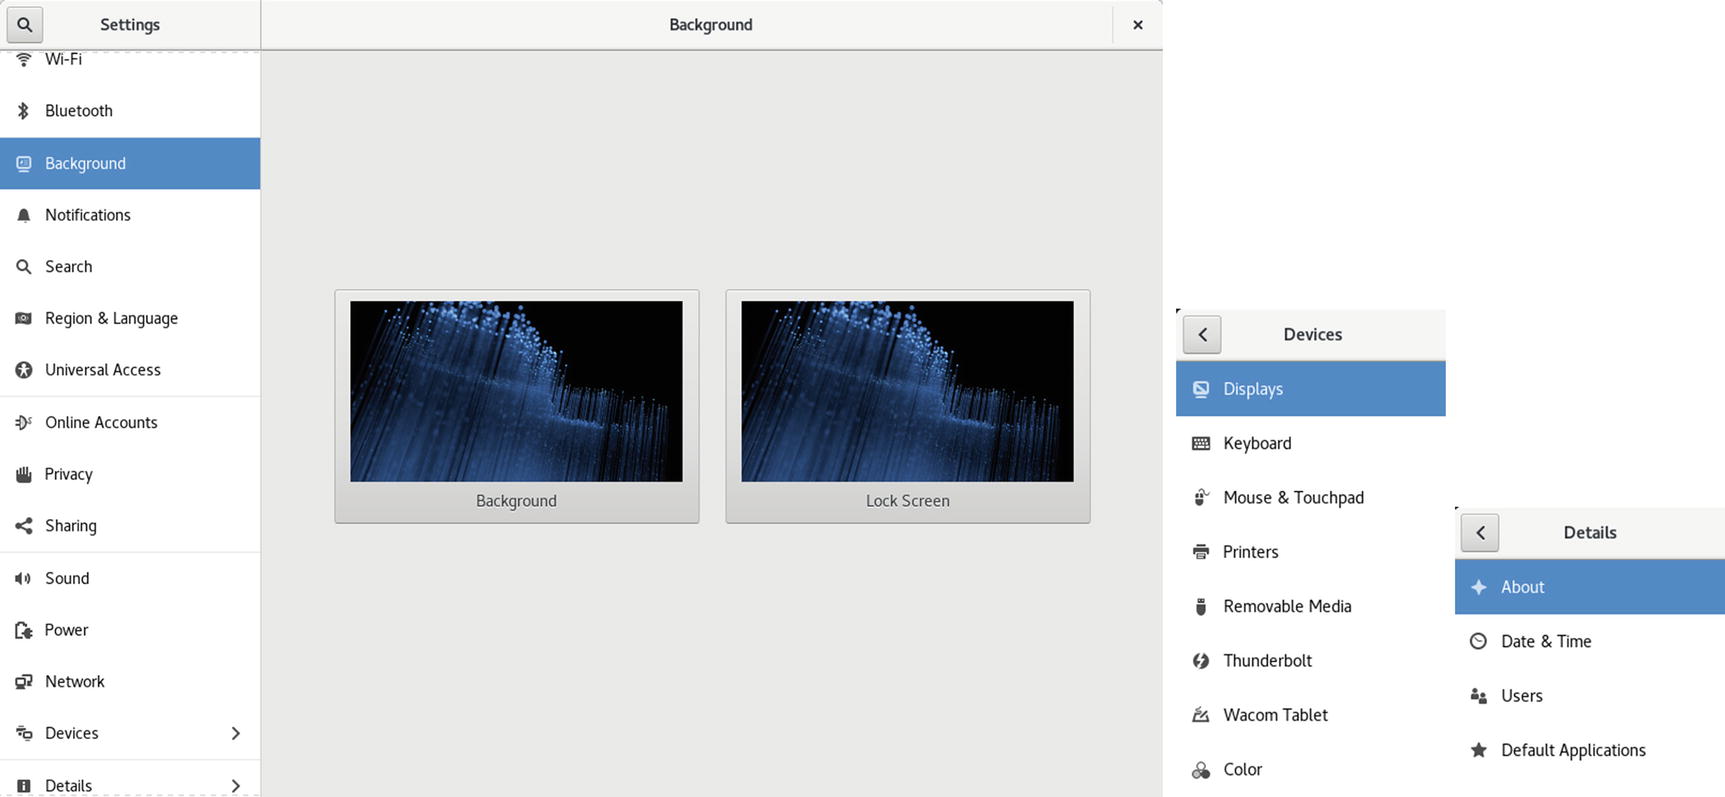
Background
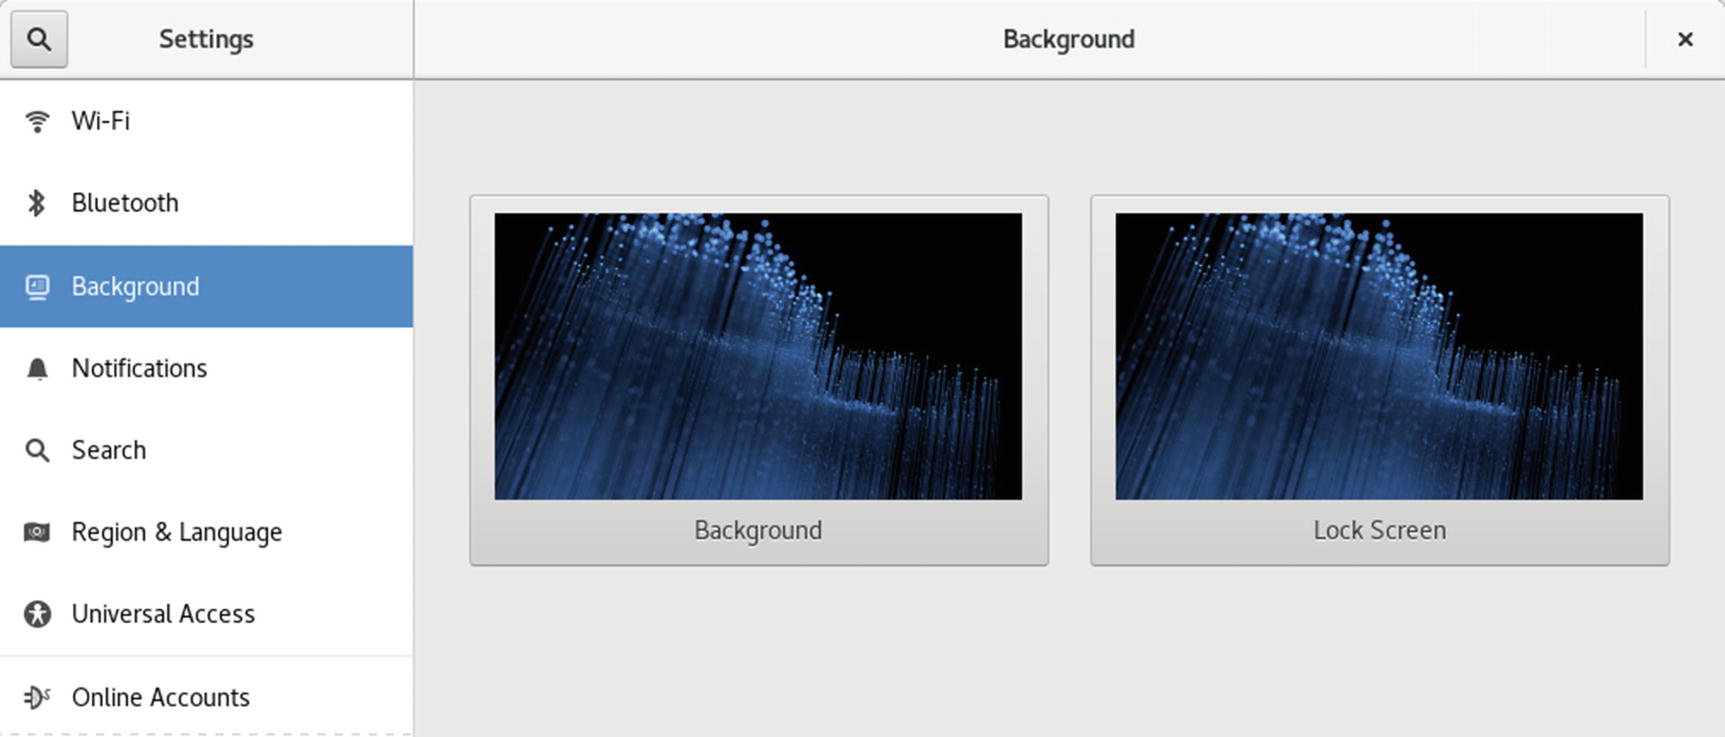
Background
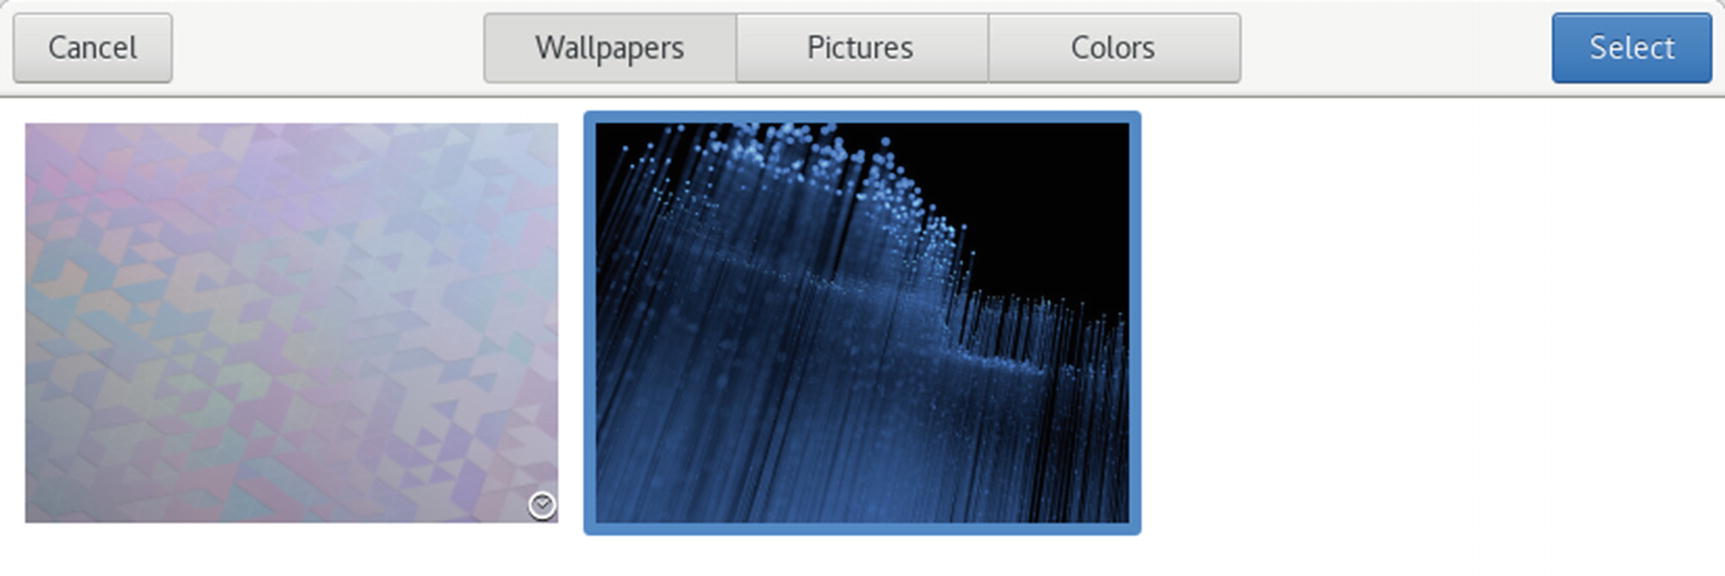
Select Background
Install the gnome-background-extra package to add a collection of GNOME backgrounds. You can download more GNOME backgrounds (wallpapers) from https://www.gnome-look.org/ .
Date & Time
Date & Time dialog
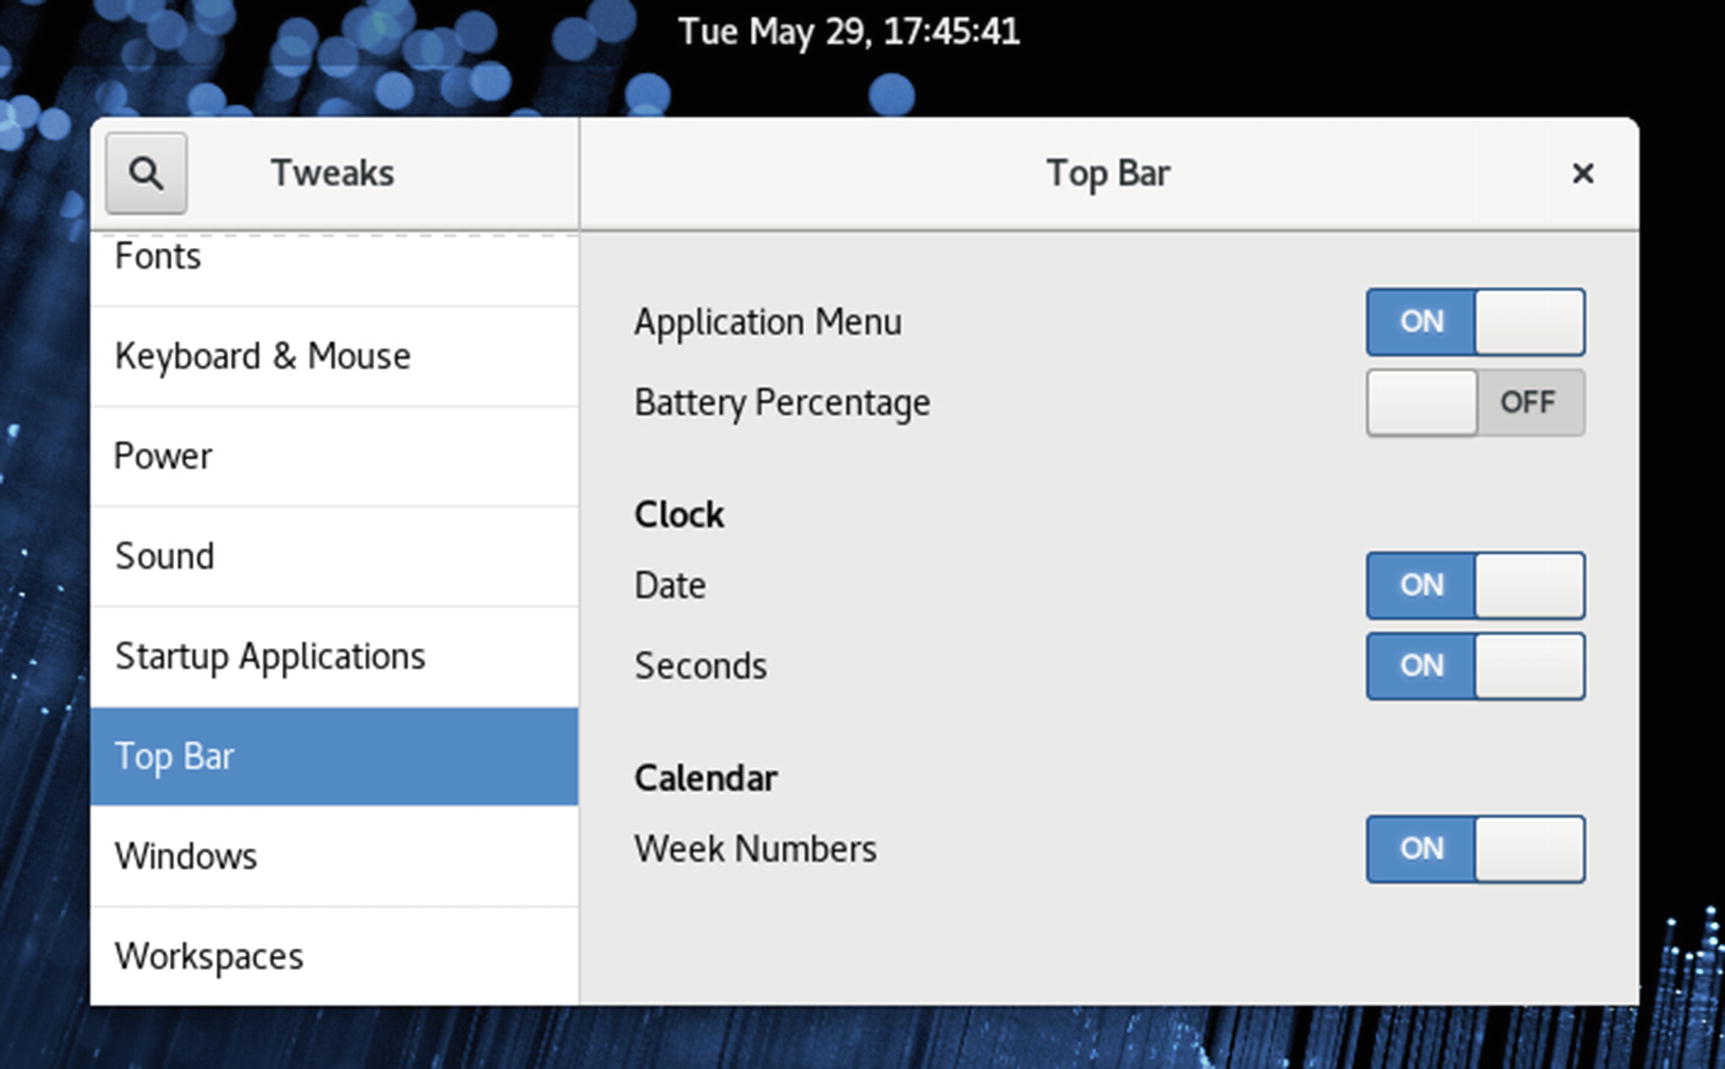
GNOME Tweak Tool’s Top Bar with clock options on

Date & Time Settings dialog with automatic settings turned on (top) and off (bottom)
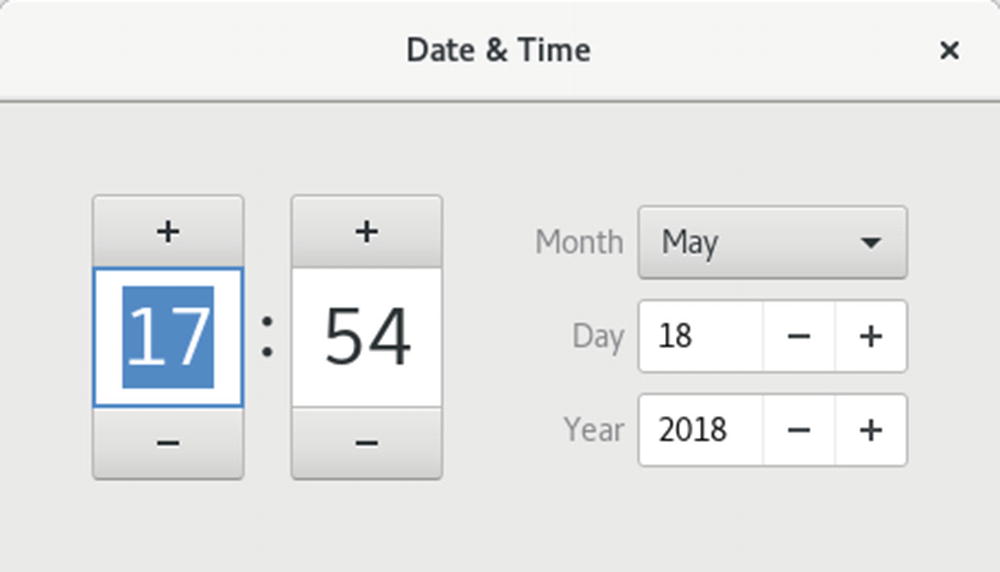
Date & Time manual settings
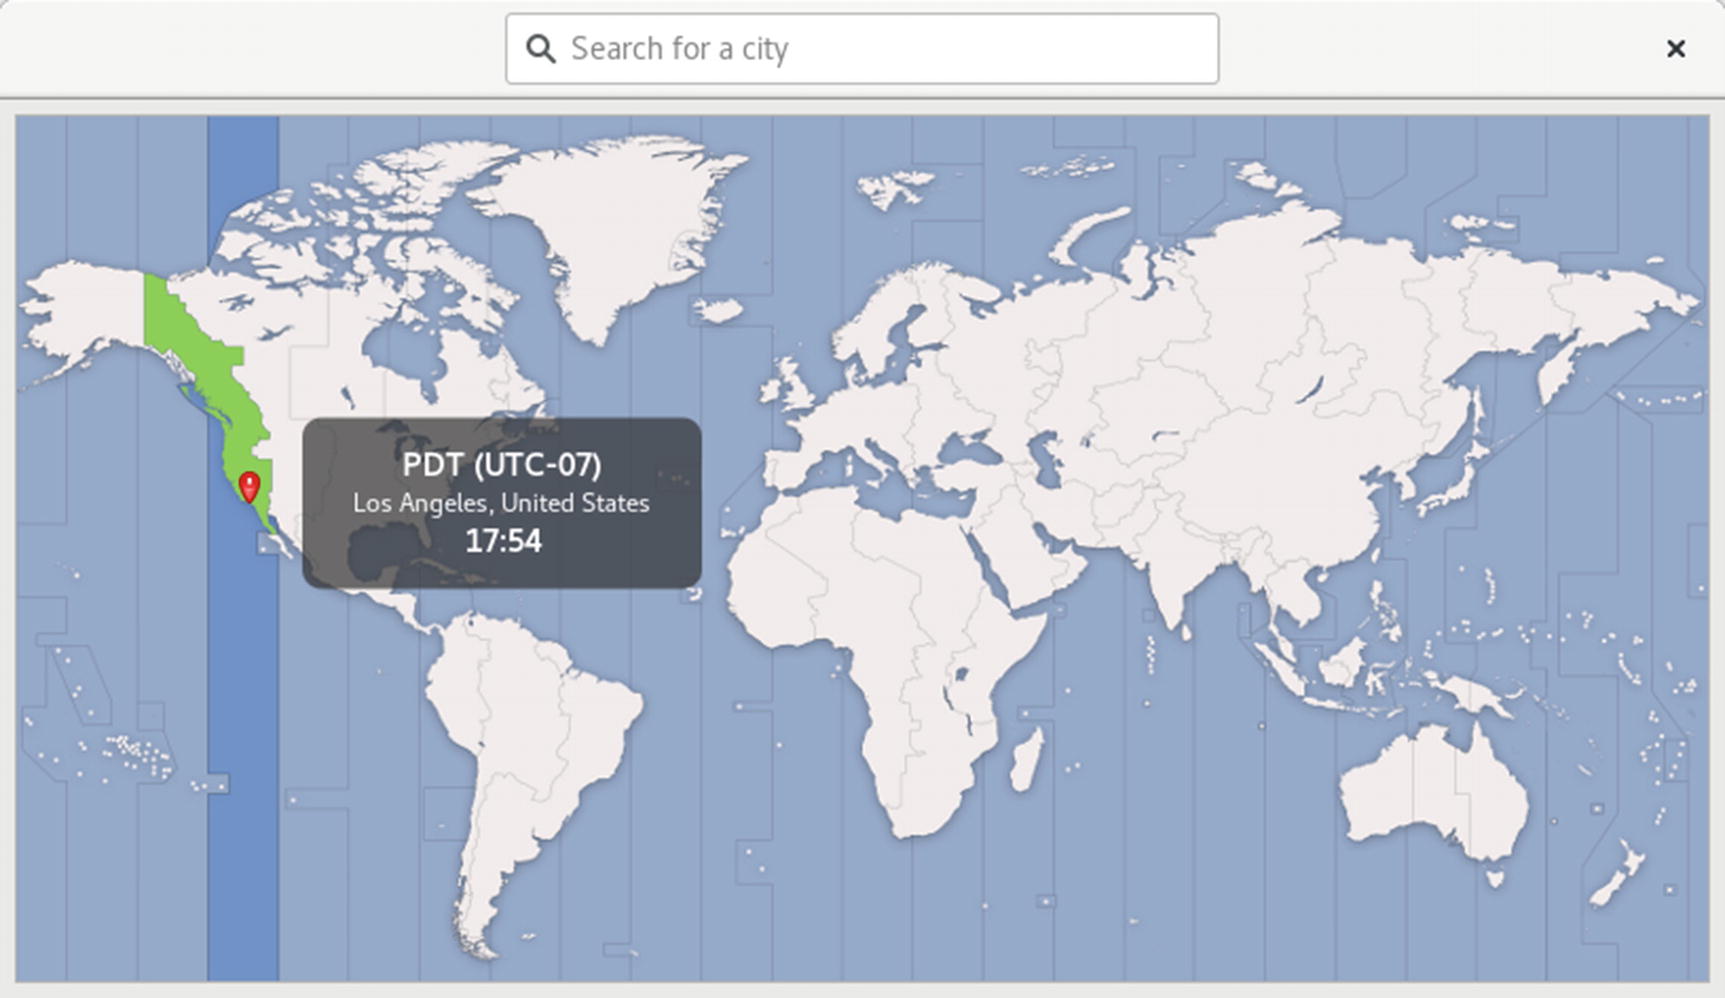
Time Zone dialog
The time zone was set when you installed your system. If you need to change it, you can copy a new time zone from the files in the /usr/share/zoneinfo subdirectories. They are arranged by location and city. Copy the new time zone to the /etc/localtime file.
Notifications
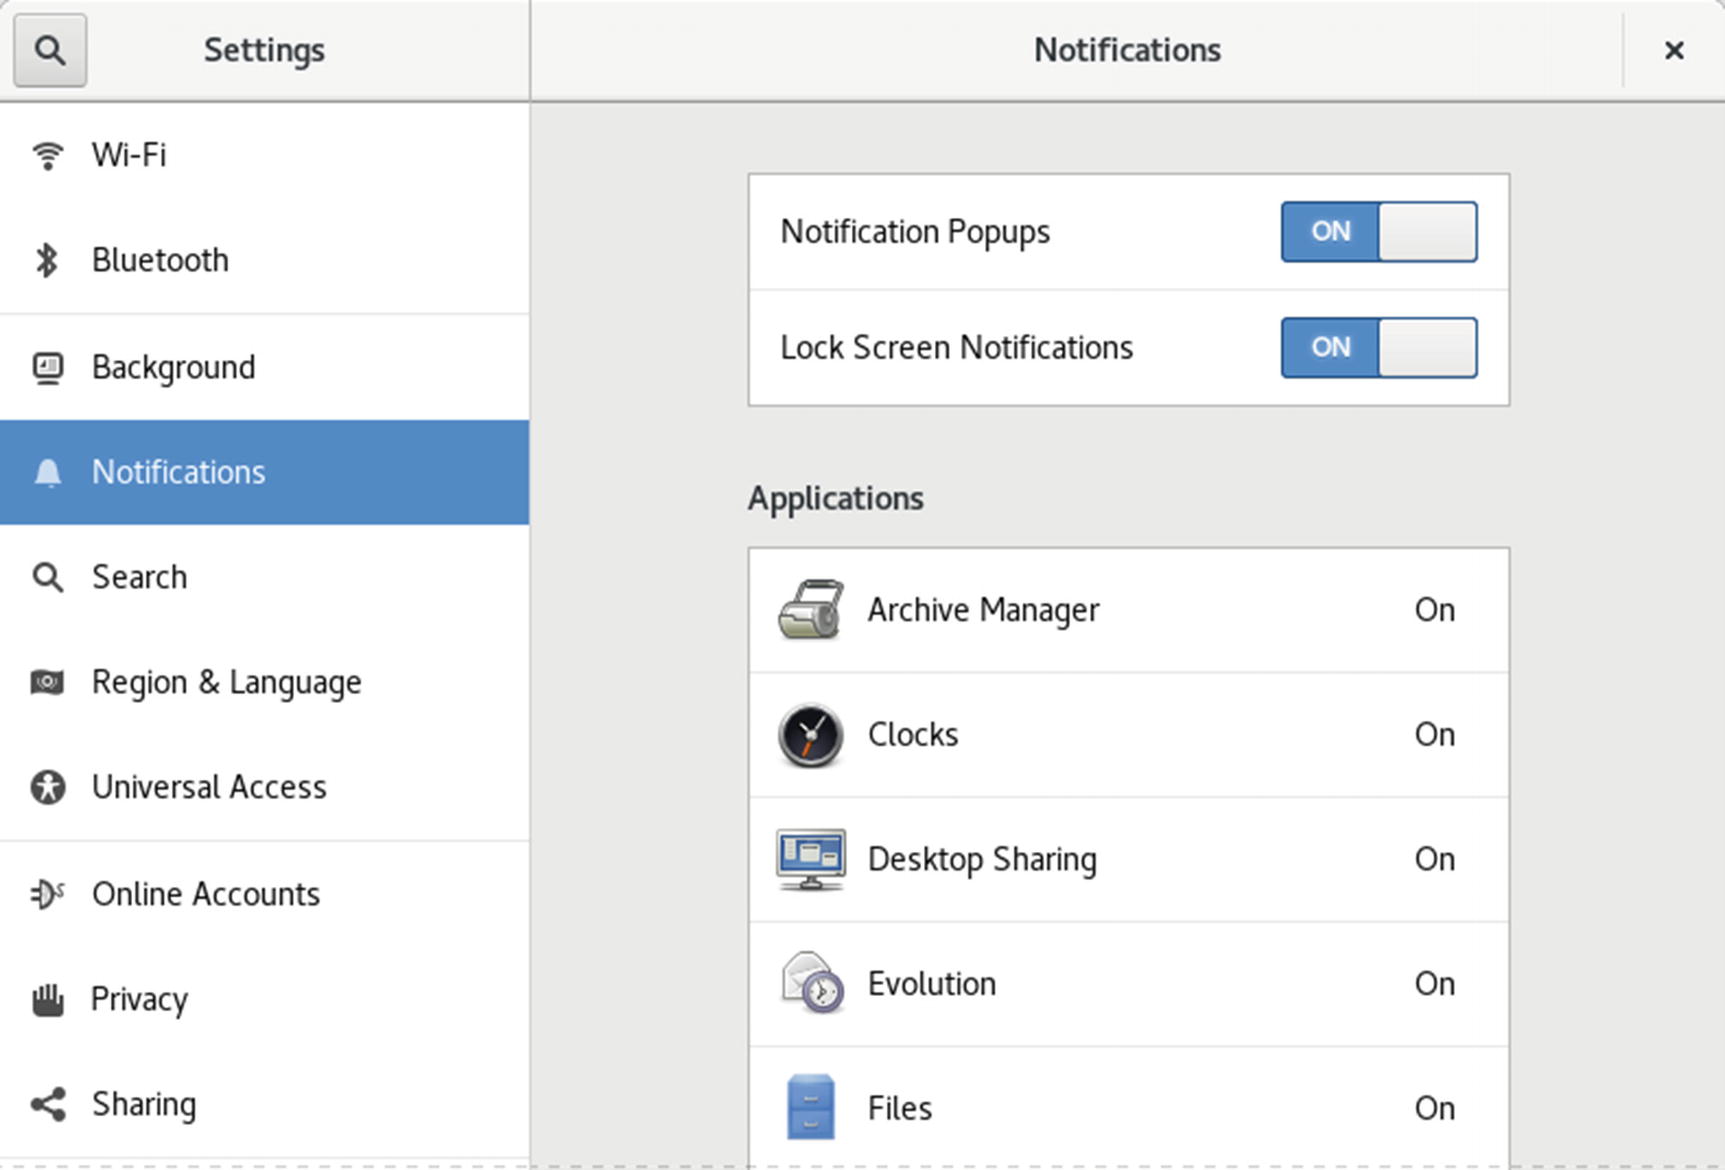
Notifications dialog
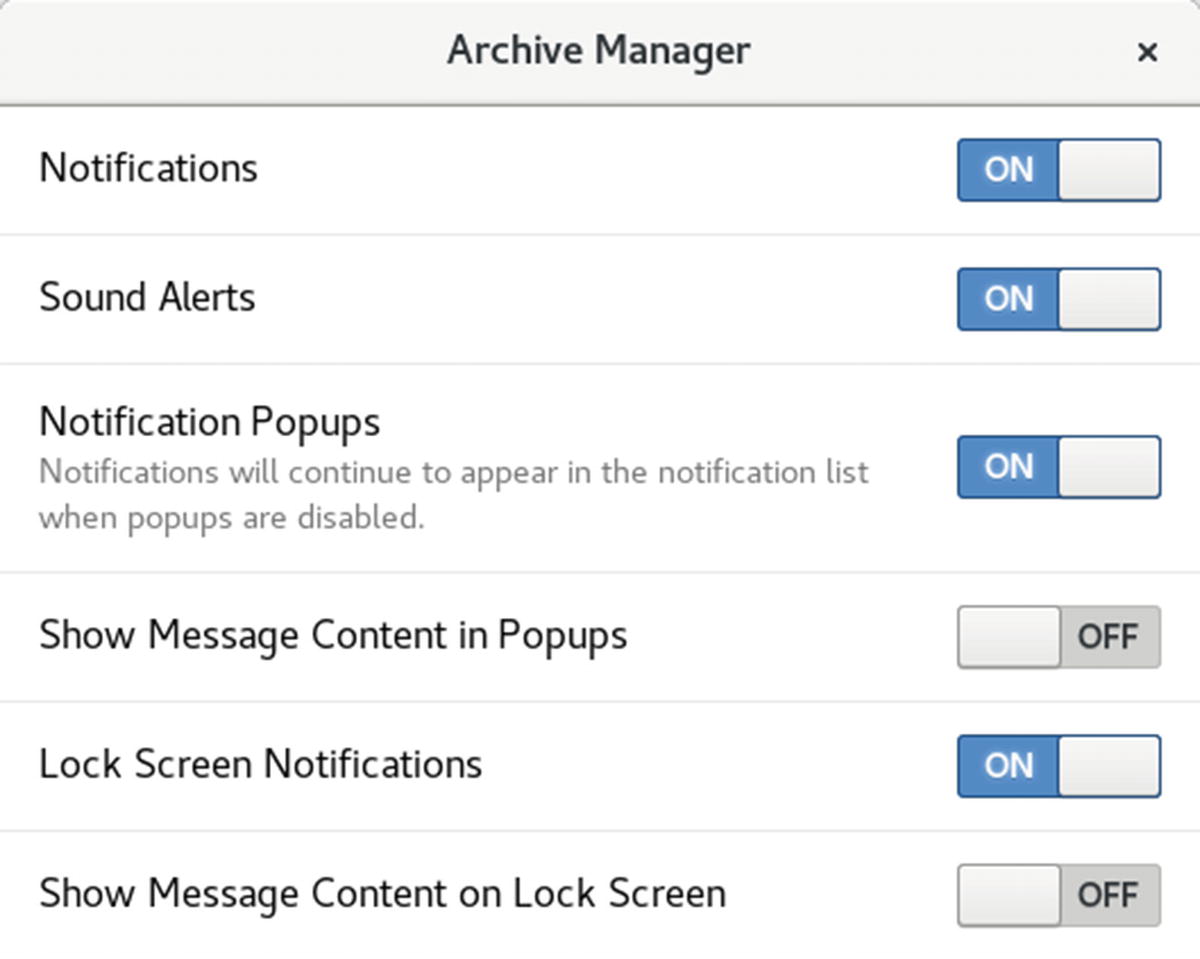
Notification settings for an application
Privacy
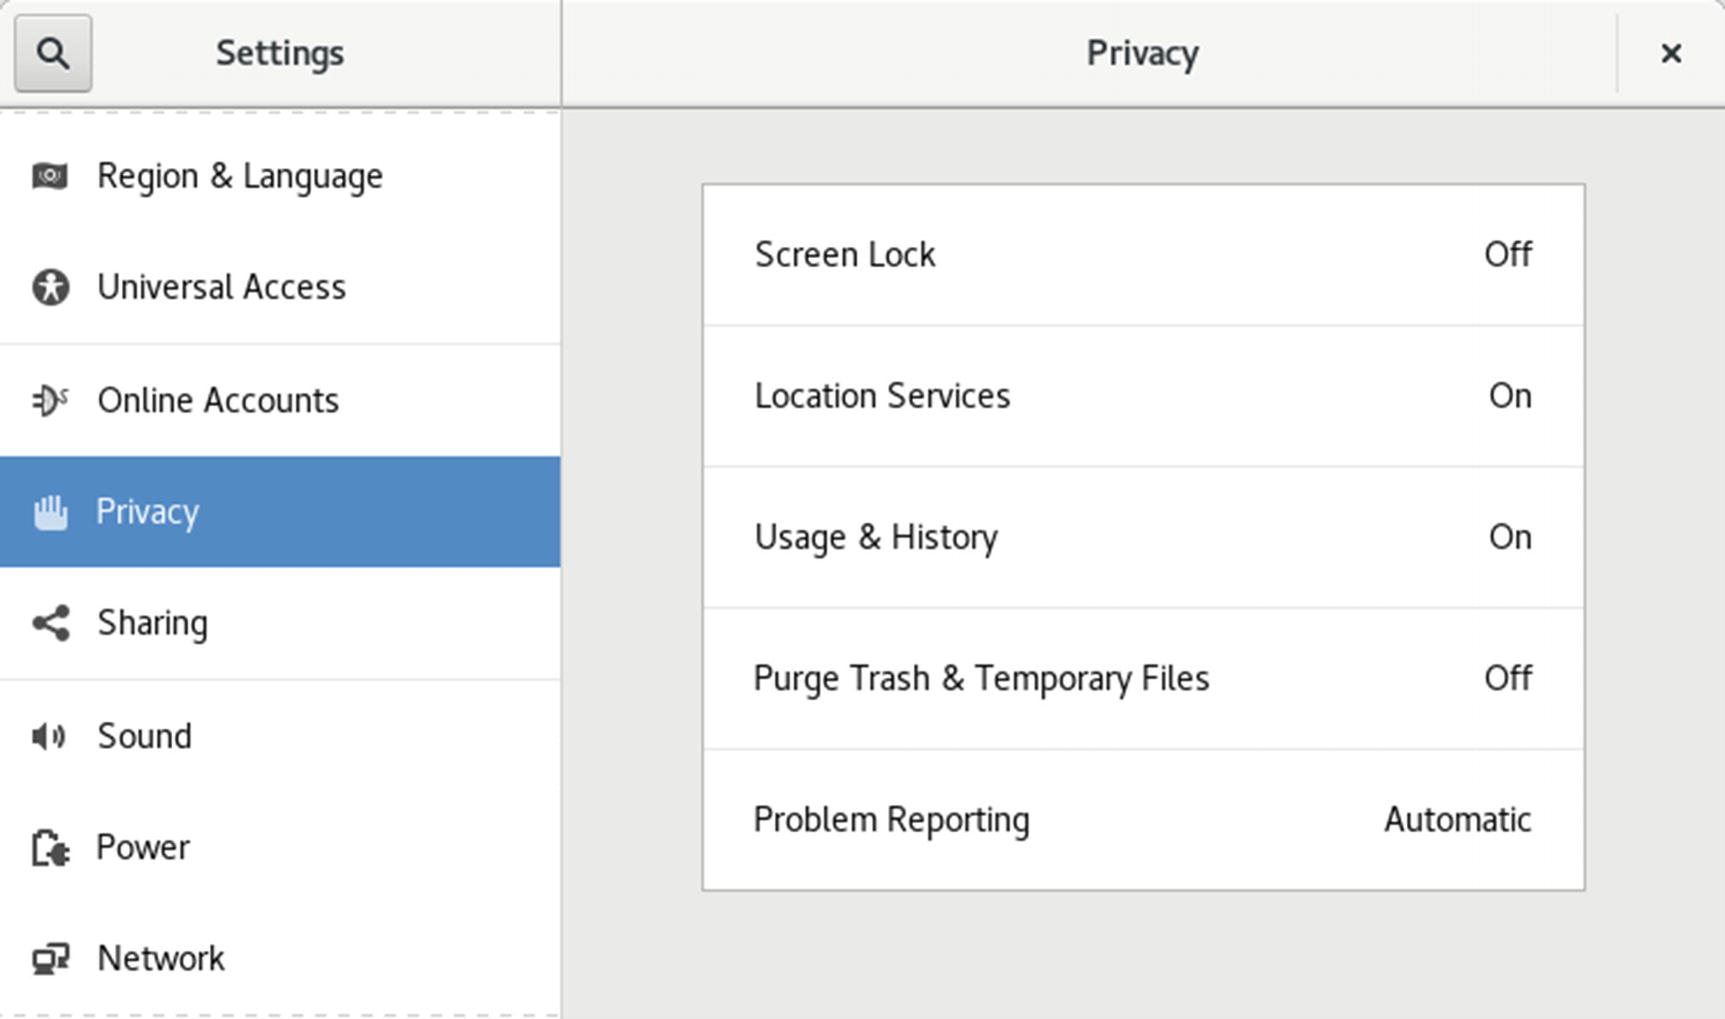
Privacy
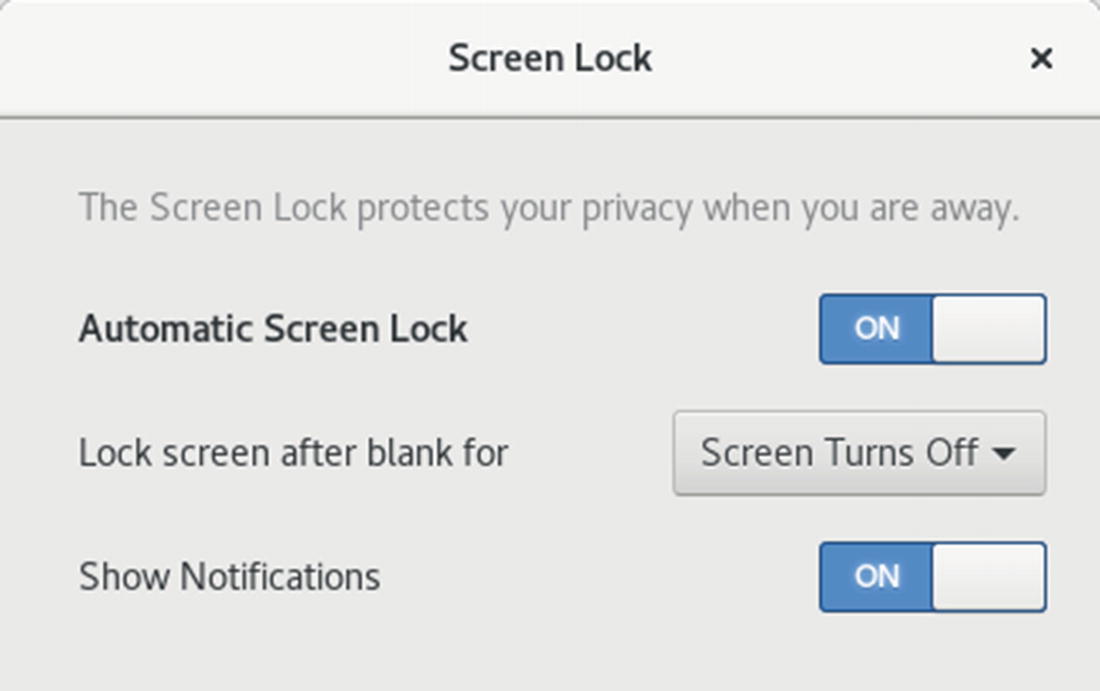
Privacy, Screen Lock configuration

Privacy, Usage & History configuration
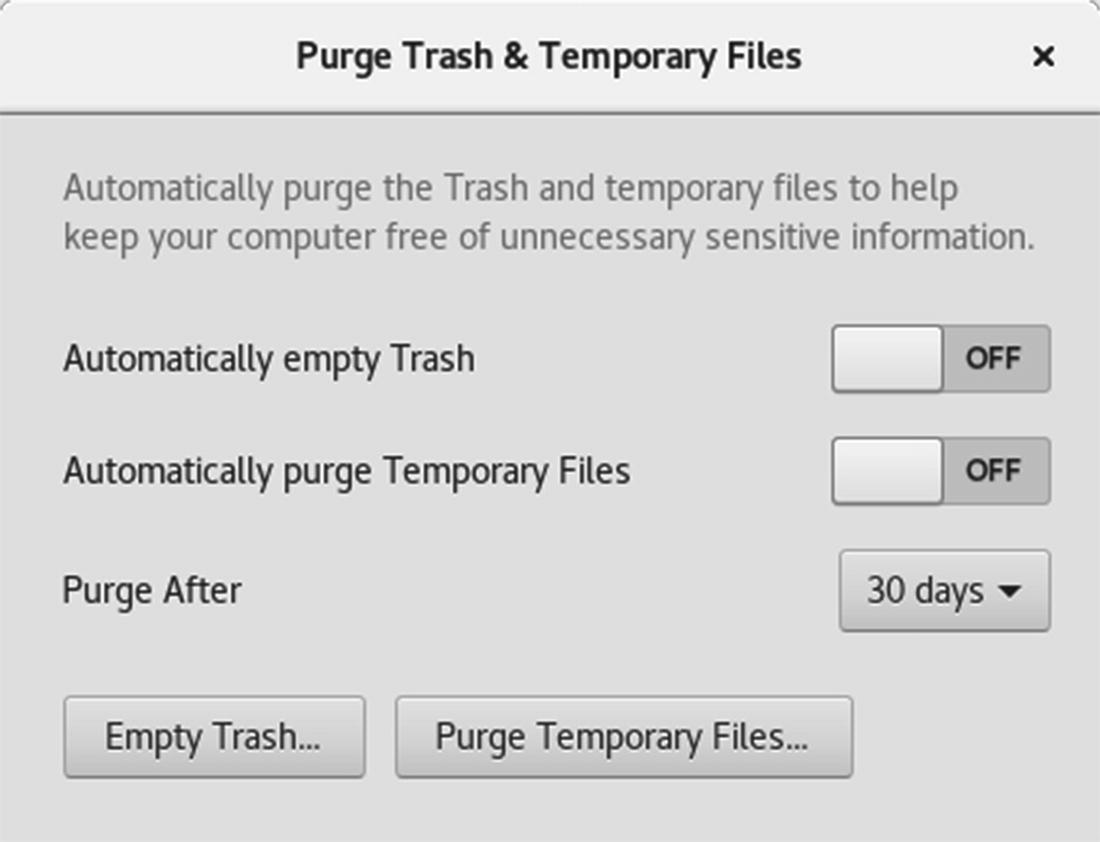
Privacy, Purge Trash & Temporary Files configuration
About (System Information)
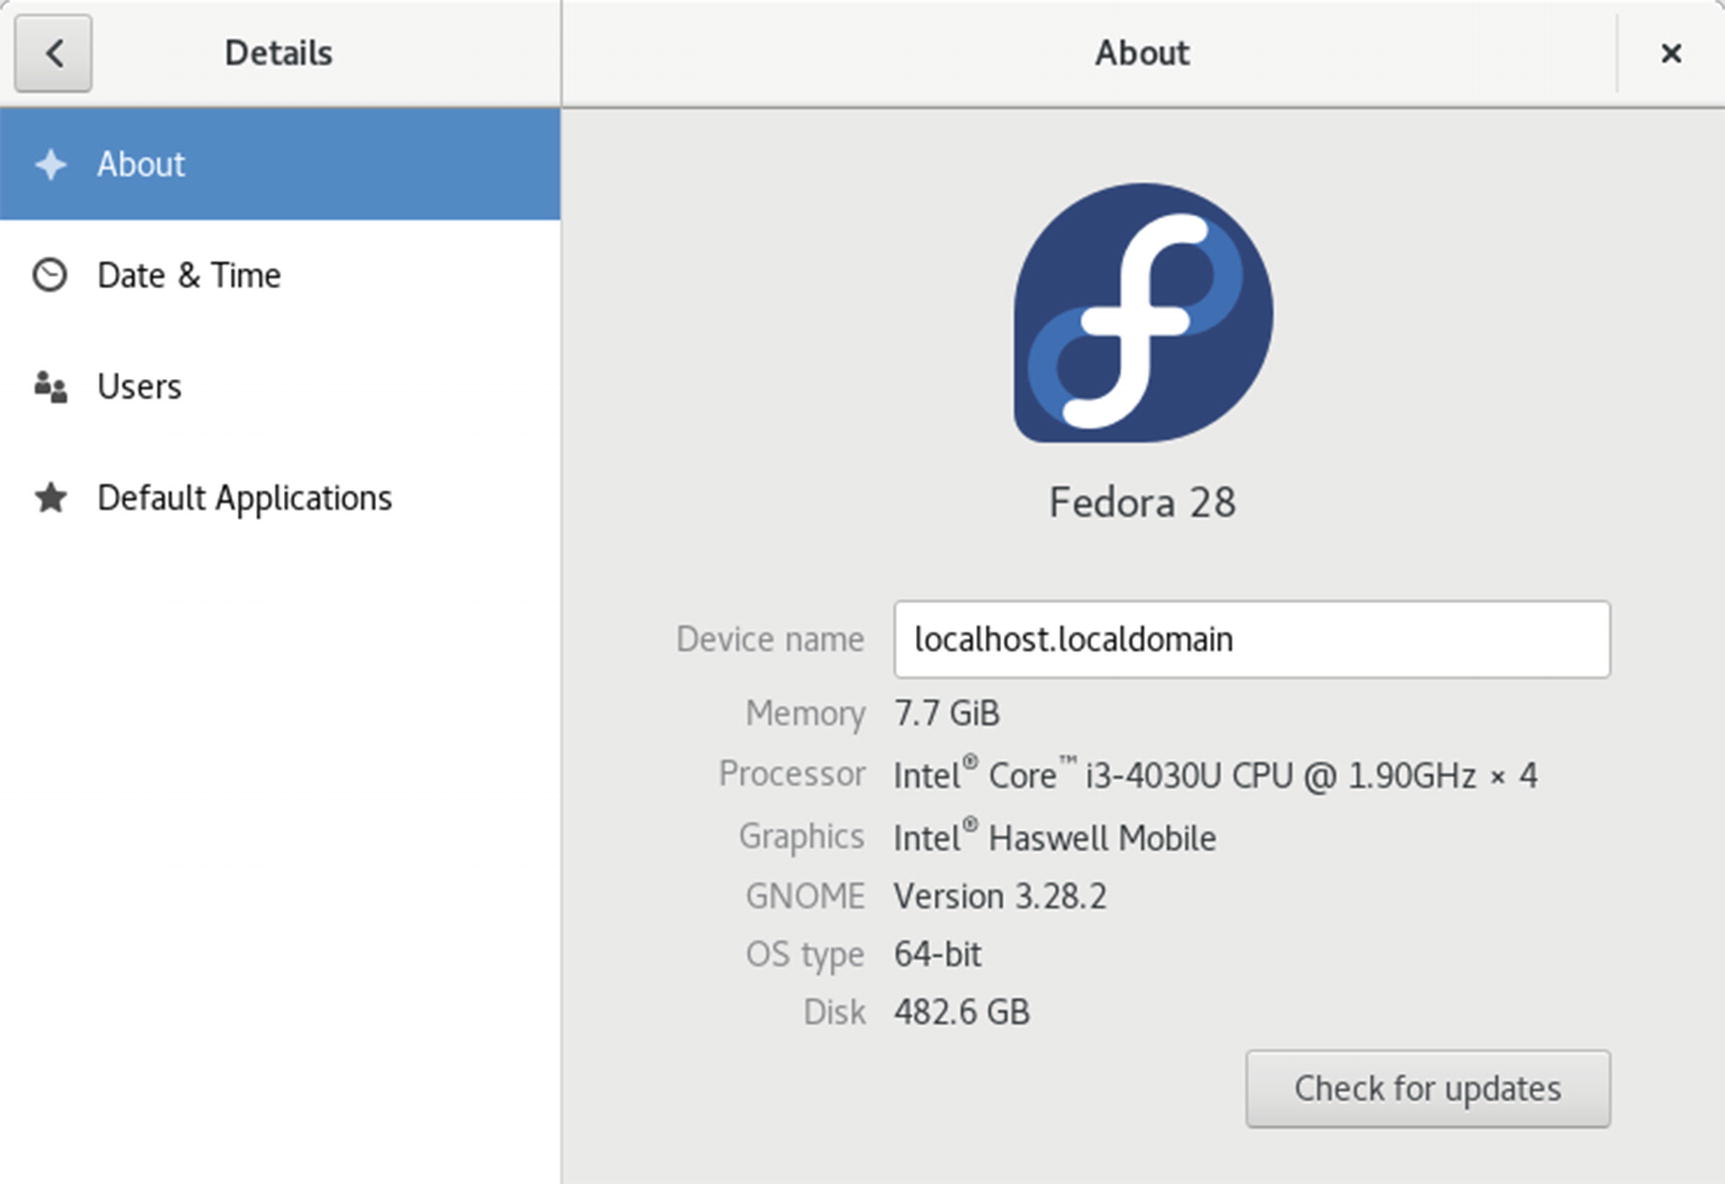
Details ➤ About
Just the hostnamectl command will display your hostname.
Default Applications
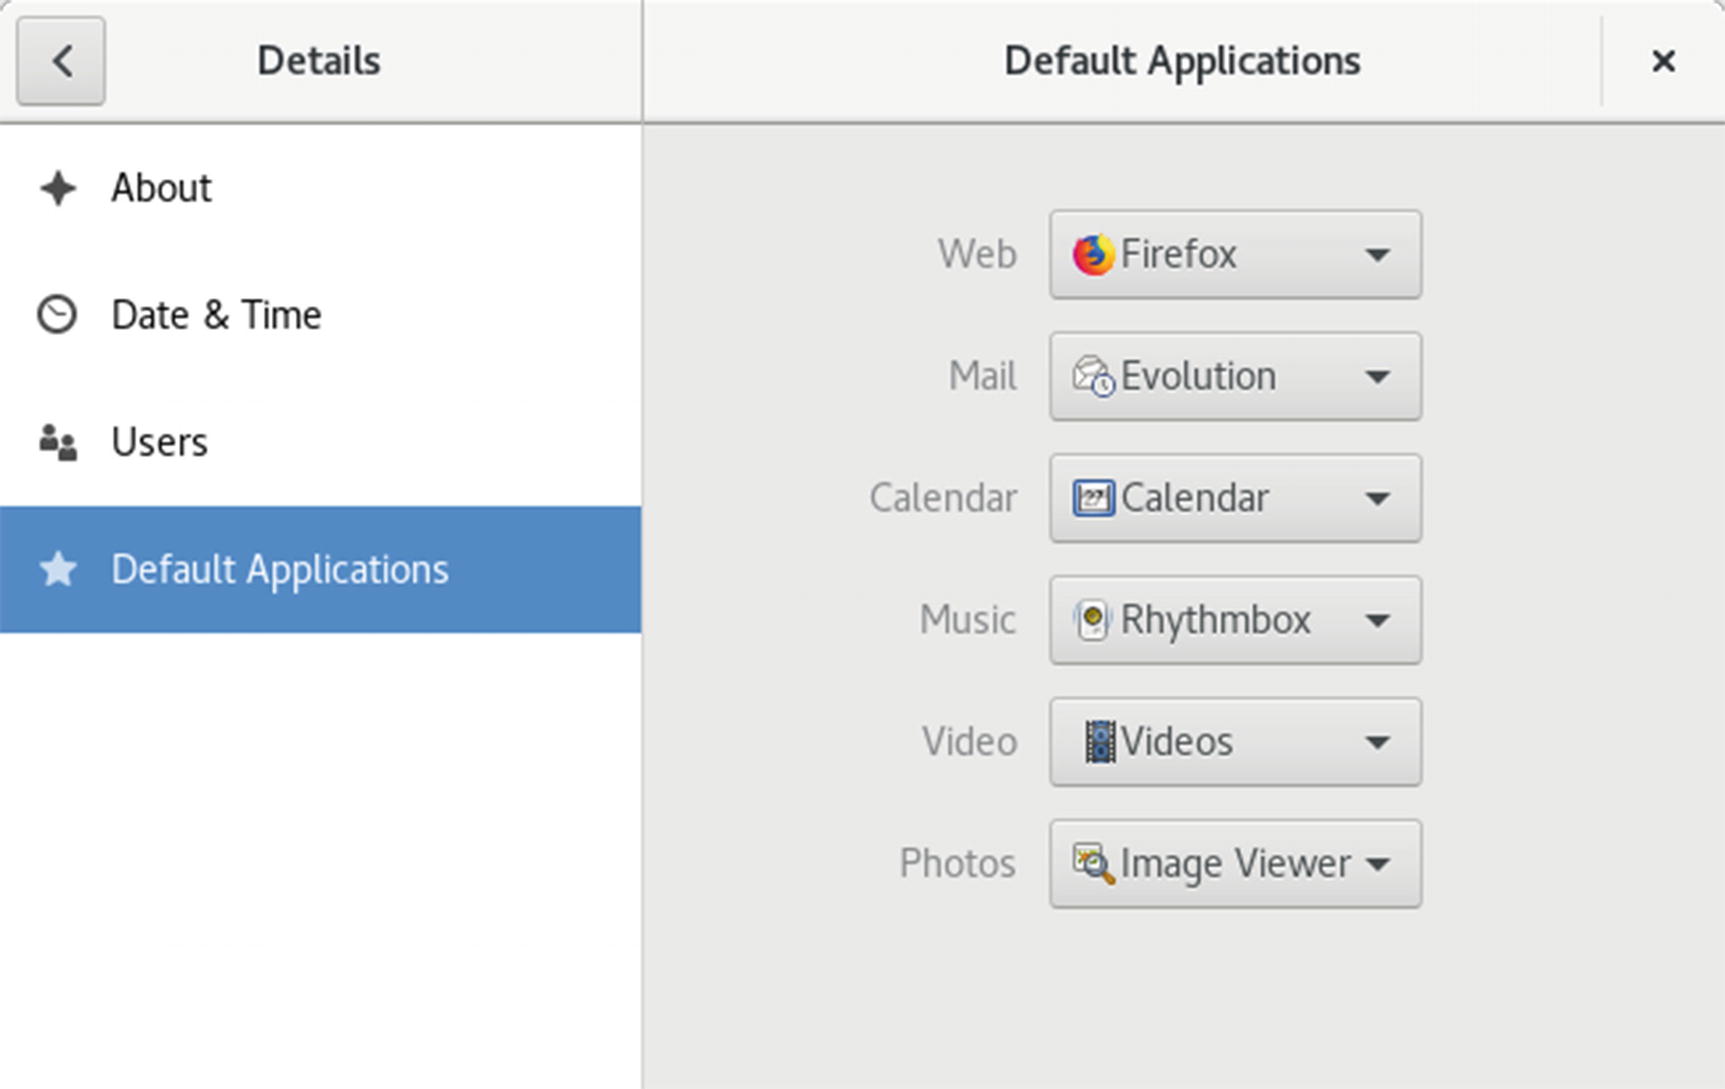
Details ➤ Default Applications
Using Removable Devices and Media
Fedora Linux supports removable devices and media, such as digital cameras, PDAs, card readers, and USB printers. These devices are handled automatically with device interfaces set up for them when needed. Removable media, such as CD and DVD discs, USB storage disks, and digital cameras, will be displayed as entries in the Removable Devices menu. On the Overview screen, when you click on the message number notice at the bottom of the screen, the Removable Devices icon is displayed. Clicking this icon displays a menu of all your removable devices, with an Eject button next to each entry. Click an entry to open the device in its associated applications, such as a file manager window for a USB drive. Be sure always to click the Eject button for device entry before removing a drive, such as a USB drive or removable disk drive. Removing the drive before clicking eject can result in incomplete write operations on the disk.
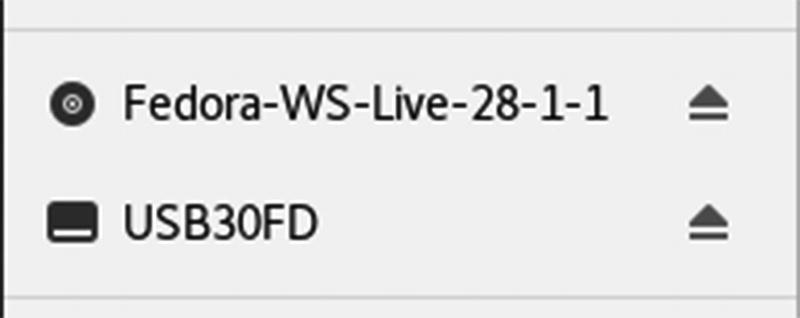
Removable storage devices and media will also appear in the file manager Devices sidebar with eject buttons that you can use instead of the message menu to eject the devices. For example, when you connect a USB drive to your system, it will be detected and can be displayed as a storage device with its own file system by the file manager.
Removable devices and media, such as USB drives and DVD/CD discs, can be ejected using Eject buttons in the Devices section of the file manager sidebar. The sidebar lists all your storage devices, including removable media. Removable devices and media will have an Eject button to the right. Just click the Eject button, and the media is ejected or unmounted. You can right-click the Device entry and, from a pop-up menu, choose the Eject entry.
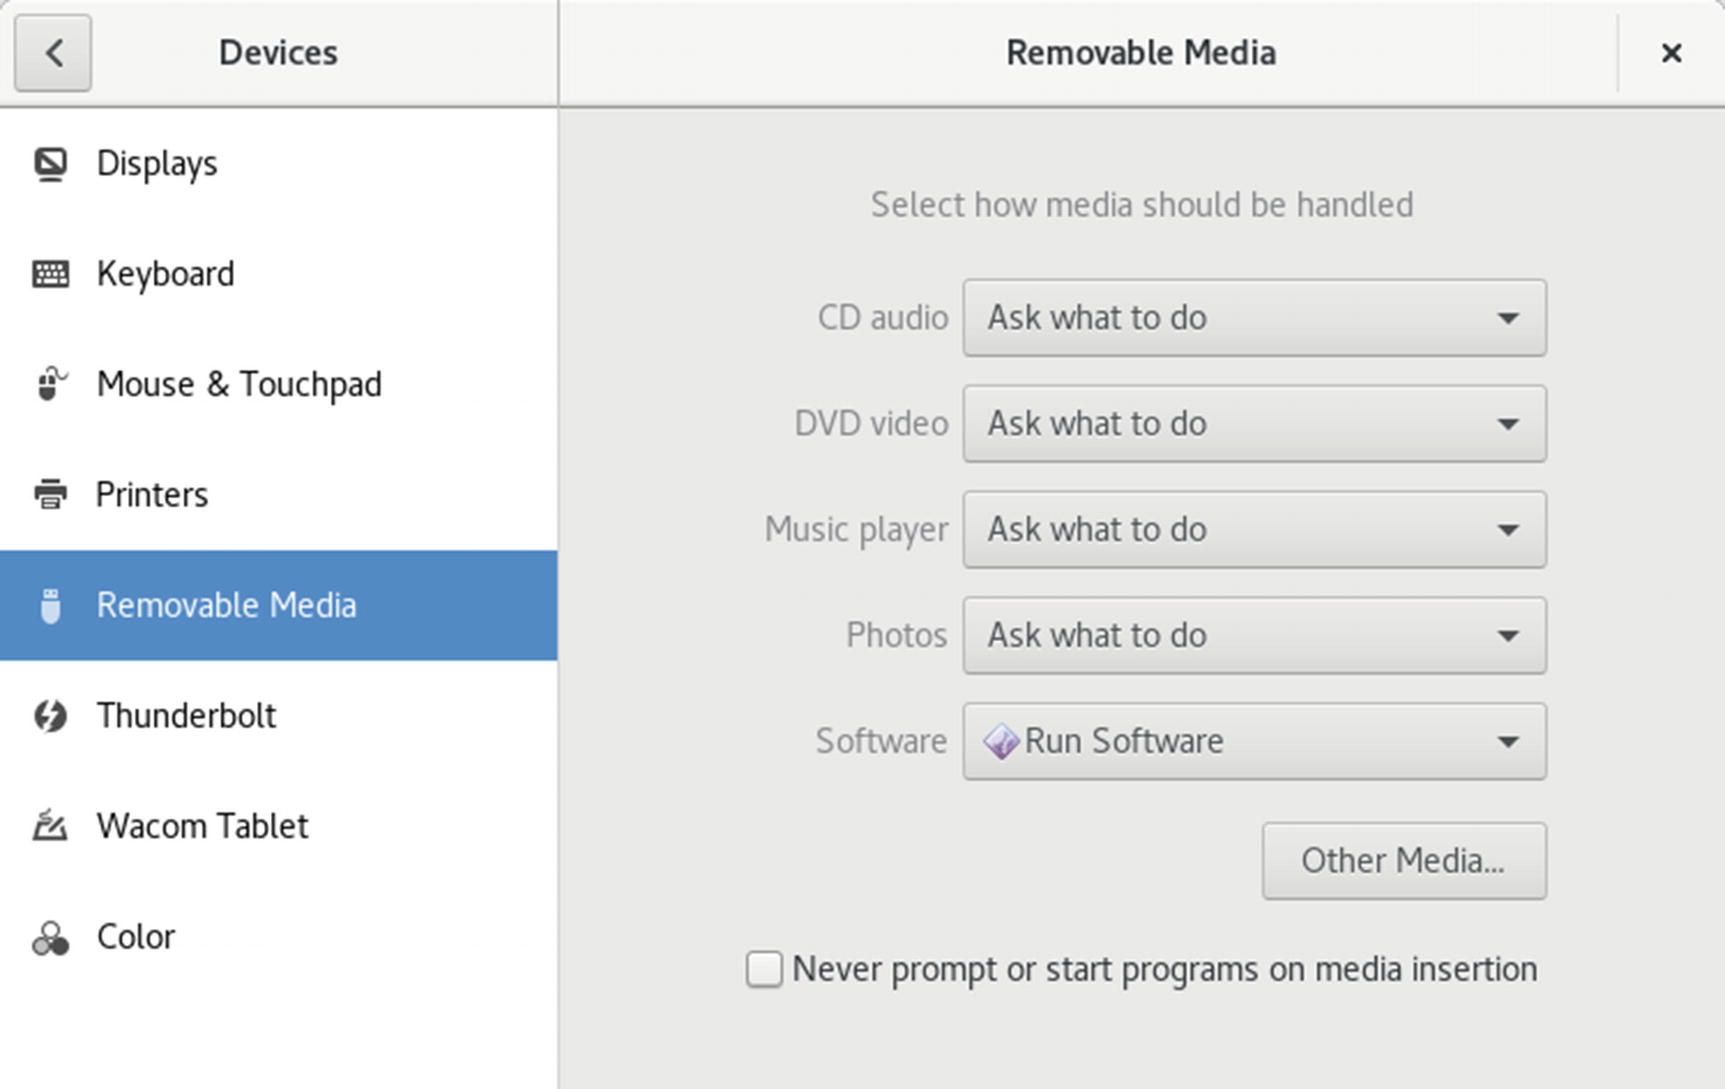
Details, Removable Media defaults
When you insert removable media, such as a CD audio disc, its associated application is automatically started, unless you change that preference. If you want to turn off this feature for a particular kind of media, you can select the Do Nothing entry from its application drop-down menu. If you want to be prompted for options, use the Ask What To Do entry. Then, when you insert a disc, a dialog with a drop-down menu for possible actions is displayed. From this menu, you can select another application or select the Do Nothing or Open Folder options.
You can turn the automatic startup off for all media by checking the box labeled Never Prompt or Start Programs on Media Insertion, which is at the bottom of the Removable Media tab.
Sharing

Sharing
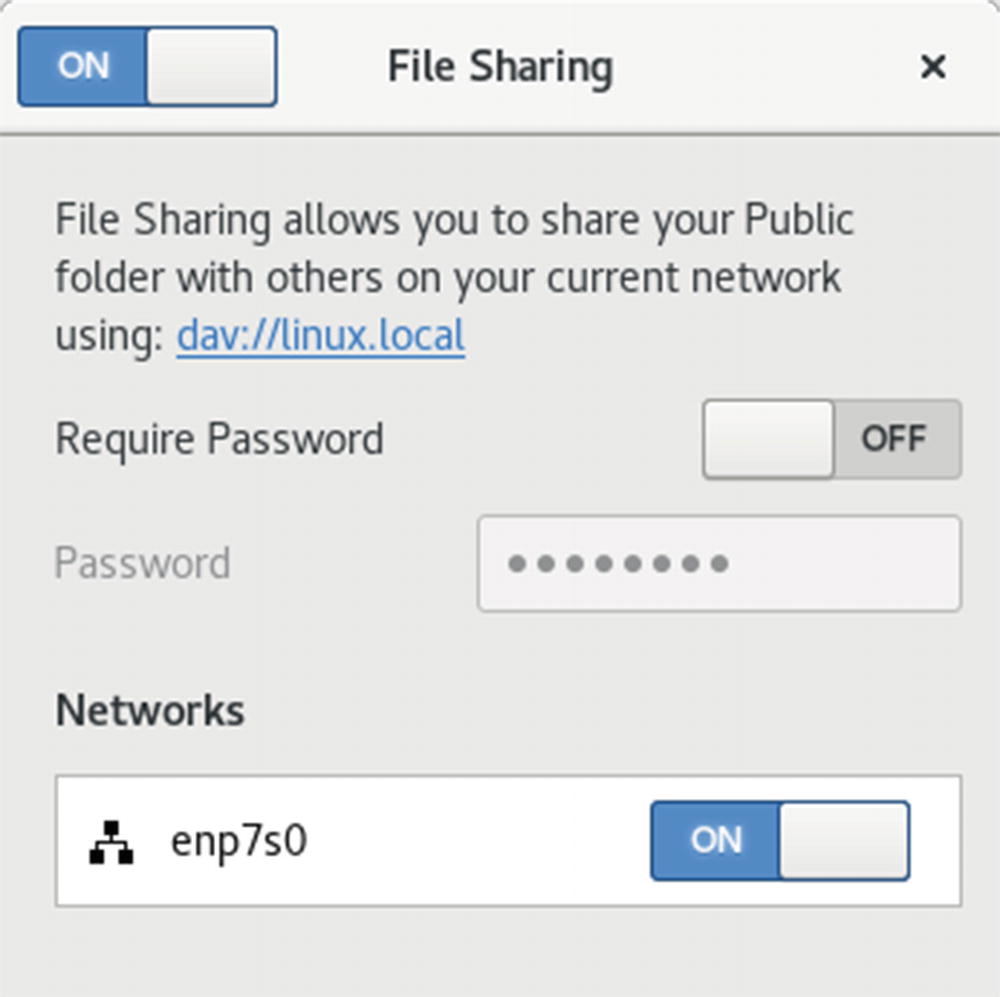
Sharing, File and Media access by other users
Power Management

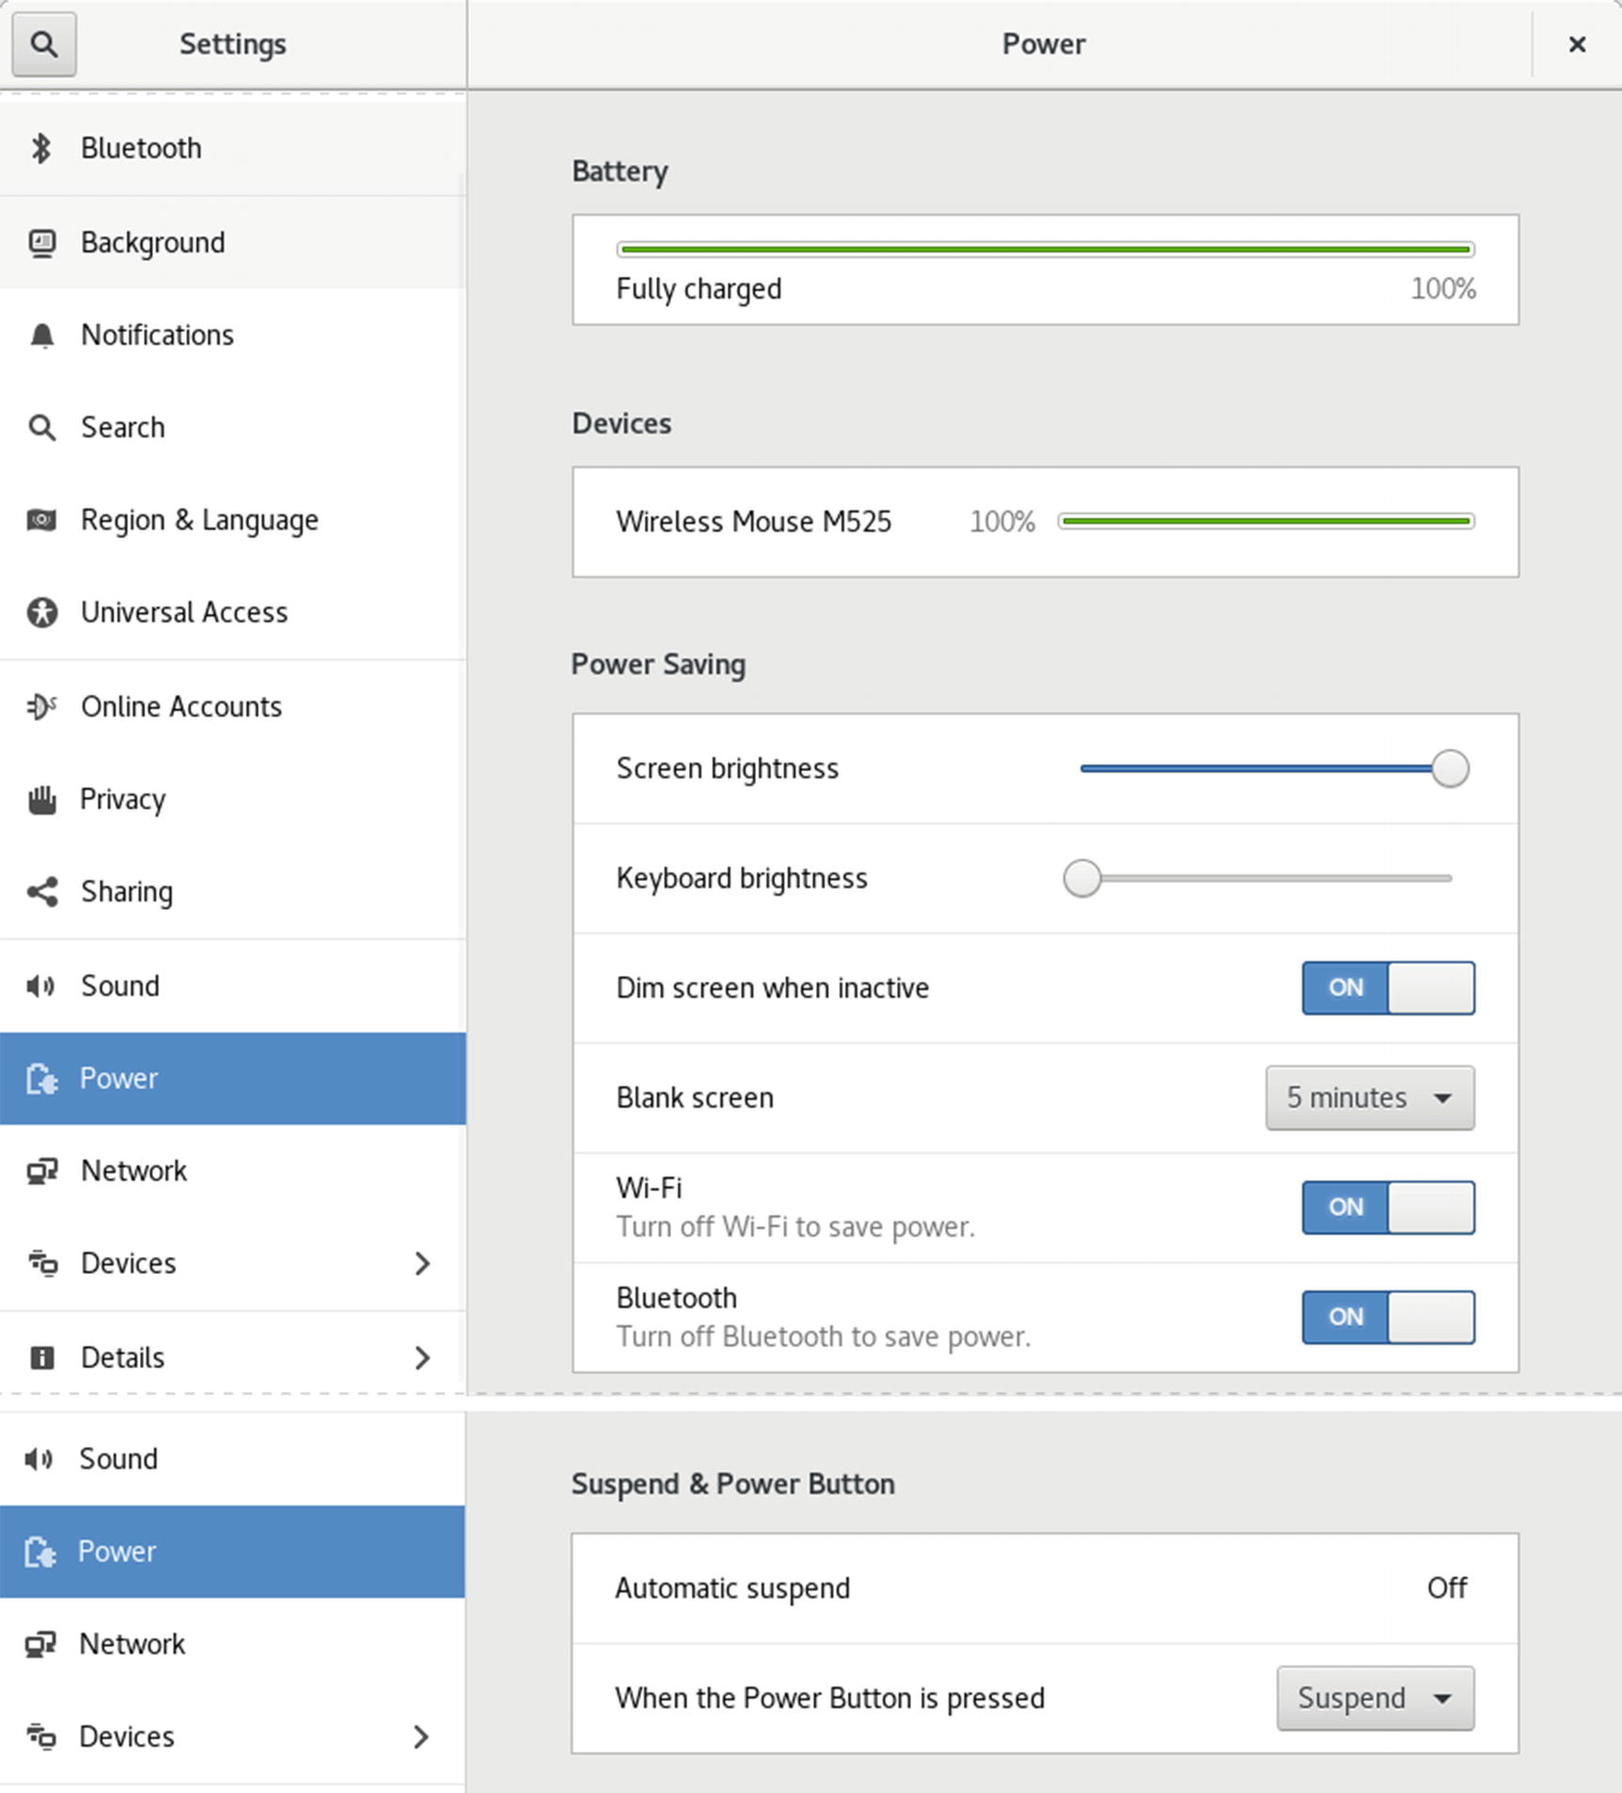
GNOME Power Manager menu
The GNOME Power manager is configured with the Power tab, accessible as Power from Settings (see Figure 3-45). The dialog is organized into four sections: Battery, Devices, Power Saving, and Suspend & Power Off. On laptops, the Battery section shows the battery charge. The Devices section shows the strength of any remote devices, such as a wireless mouse. In the Power Saving section, you can set power saving features for your monitor, wireless devices, and network connections. When it’s inactive for a period of time, you can choose to turn off the screen, as well as dim it whenever it is inactive. For laptops, you can also set the screen brightness. You can also choose to turn off Bluetooth, WiFi, and Mobile broadband. In the Suspend & Power Off section, you can turn on the automatic suspend for when a system remains inactive and when the power button is pressed.
GNOME Power manager
powertop, tuned, and BLTK
For automatic tuning of hard disk and network devices, you can use tuned (the tuned and tuned utils packages). The tuned daemon monitors your system and tunes the settings dynamically. You can use tuned's diskdevstat and netdevstat tools to monitor your hard disk and network devices.
Mouse and Touchpad
The Mouse & Touchpad tab is the primary tool for configuring your mouse and touchpad (see Figure 3-46). Mouse preferences allow you to choose the mouse’s speed, the primary button, and scrolling. A Test Your Settings button lets you check clicks, speed, and scrolling. For laptops, you can configure your touchpad, enabling touchpad clicks and disabling them when typing. You can turn the touchpad on or off.

GNOME system tools, mouse and touchpad
Display (Resolution and Rotation)
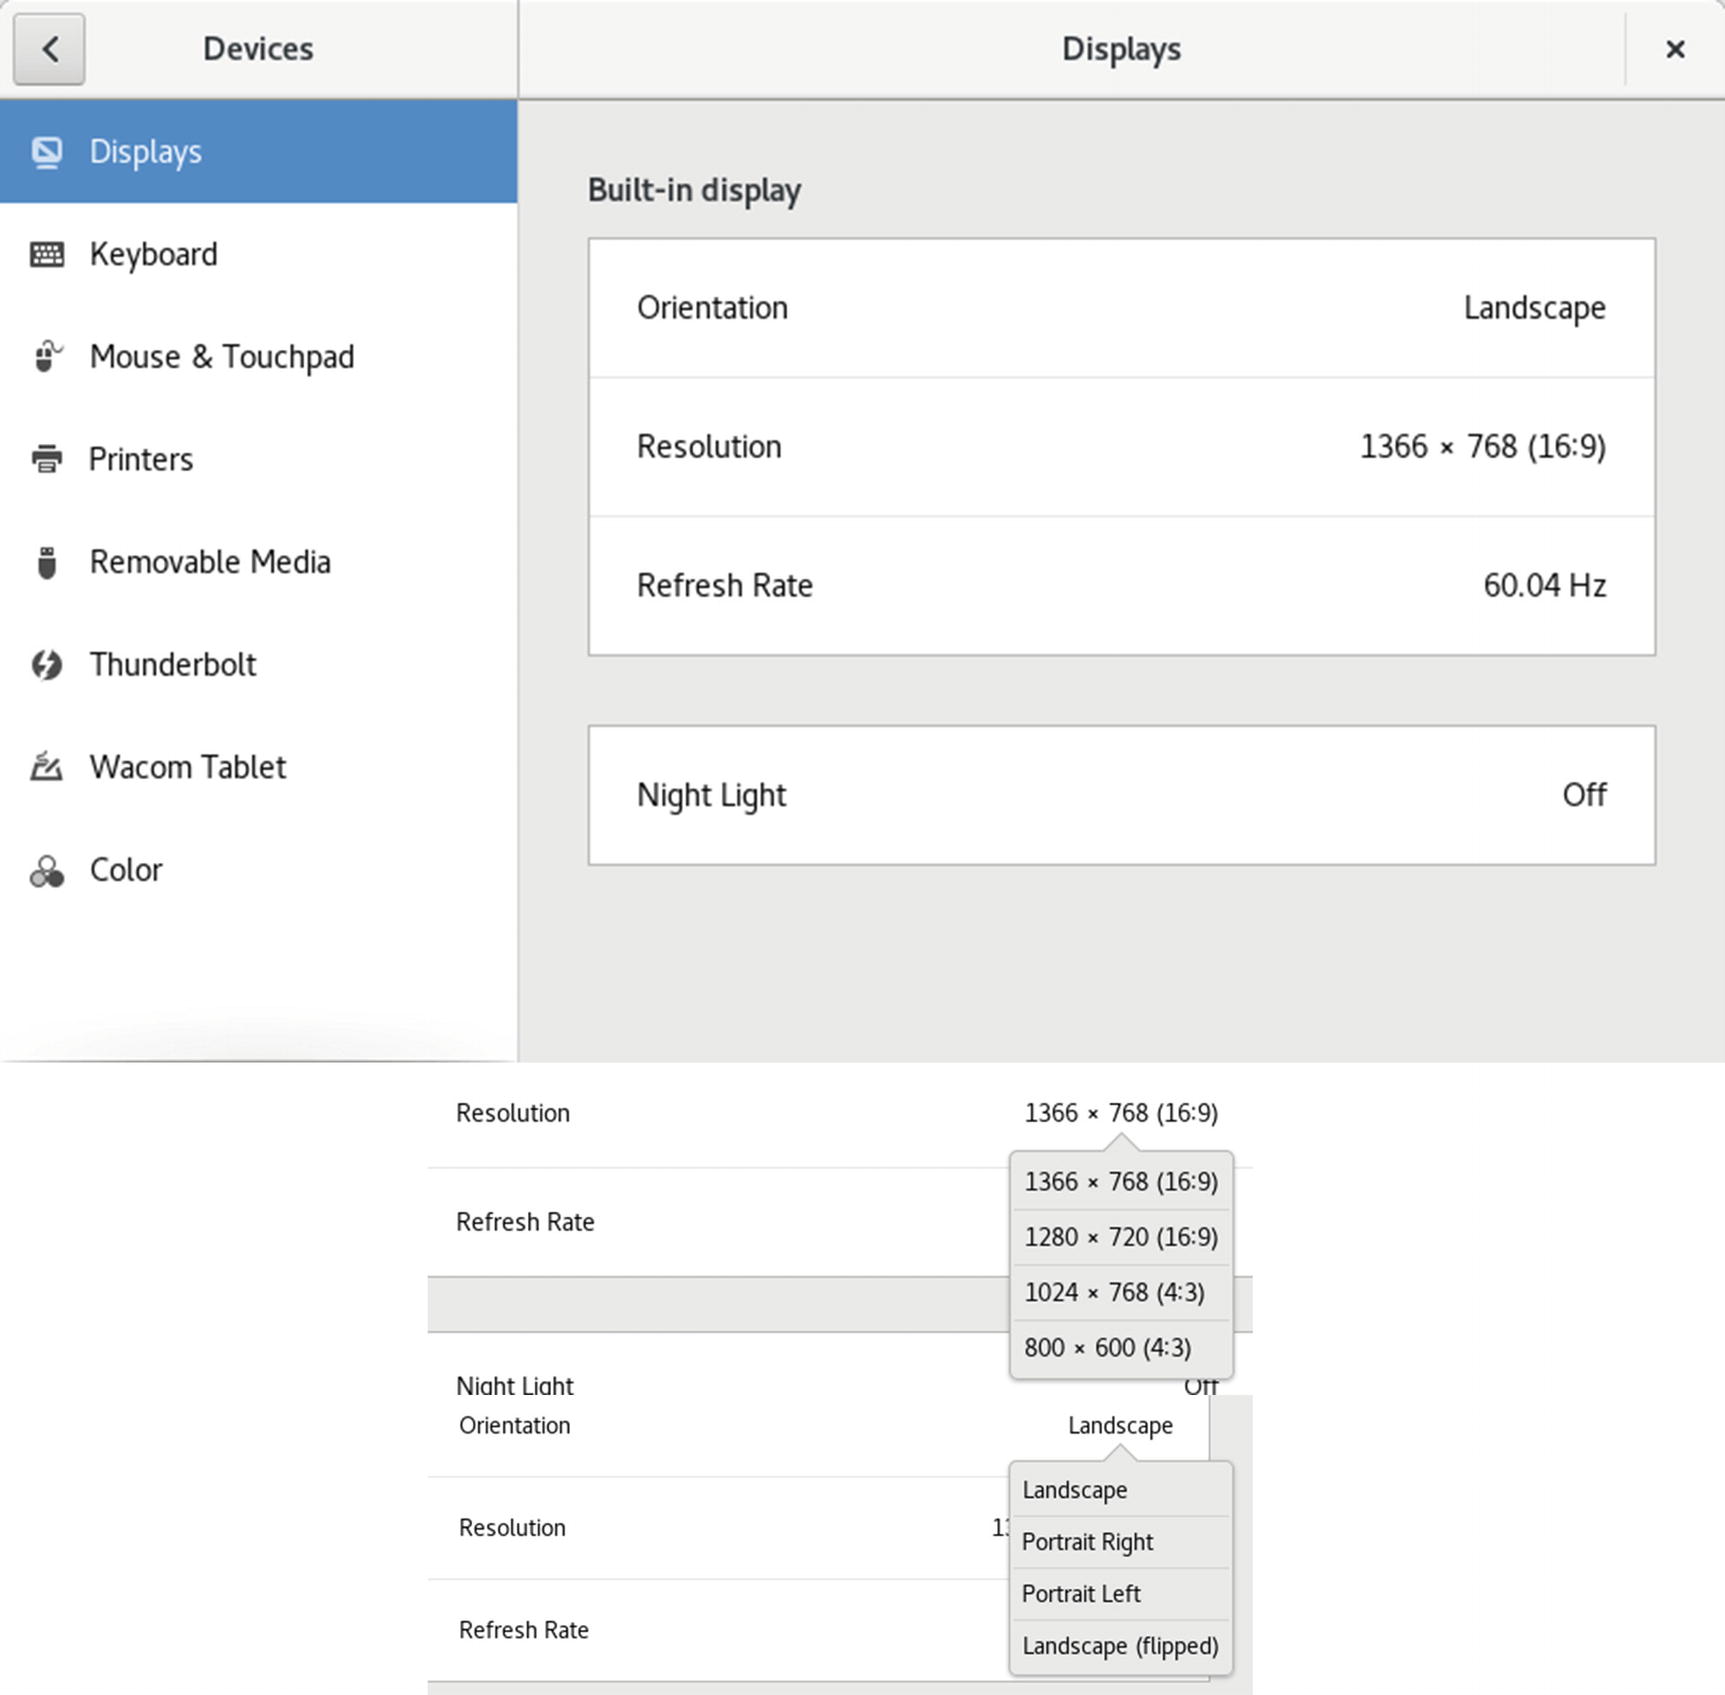
Displays
The graphics interface for your desktop display is implemented by the X Window System. The version used on Fedora Linux is X.org ( x.org ). X.org provides its own drivers for various graphics cards and monitors. You can find out more about X.org at www.x.org . X.org will automatically detect most hardware. The /etc/X11/xorg.conf file is no longer used for the open source drivers (nv and amd). Information such as the monitor used is determined automatically.
Universal Access
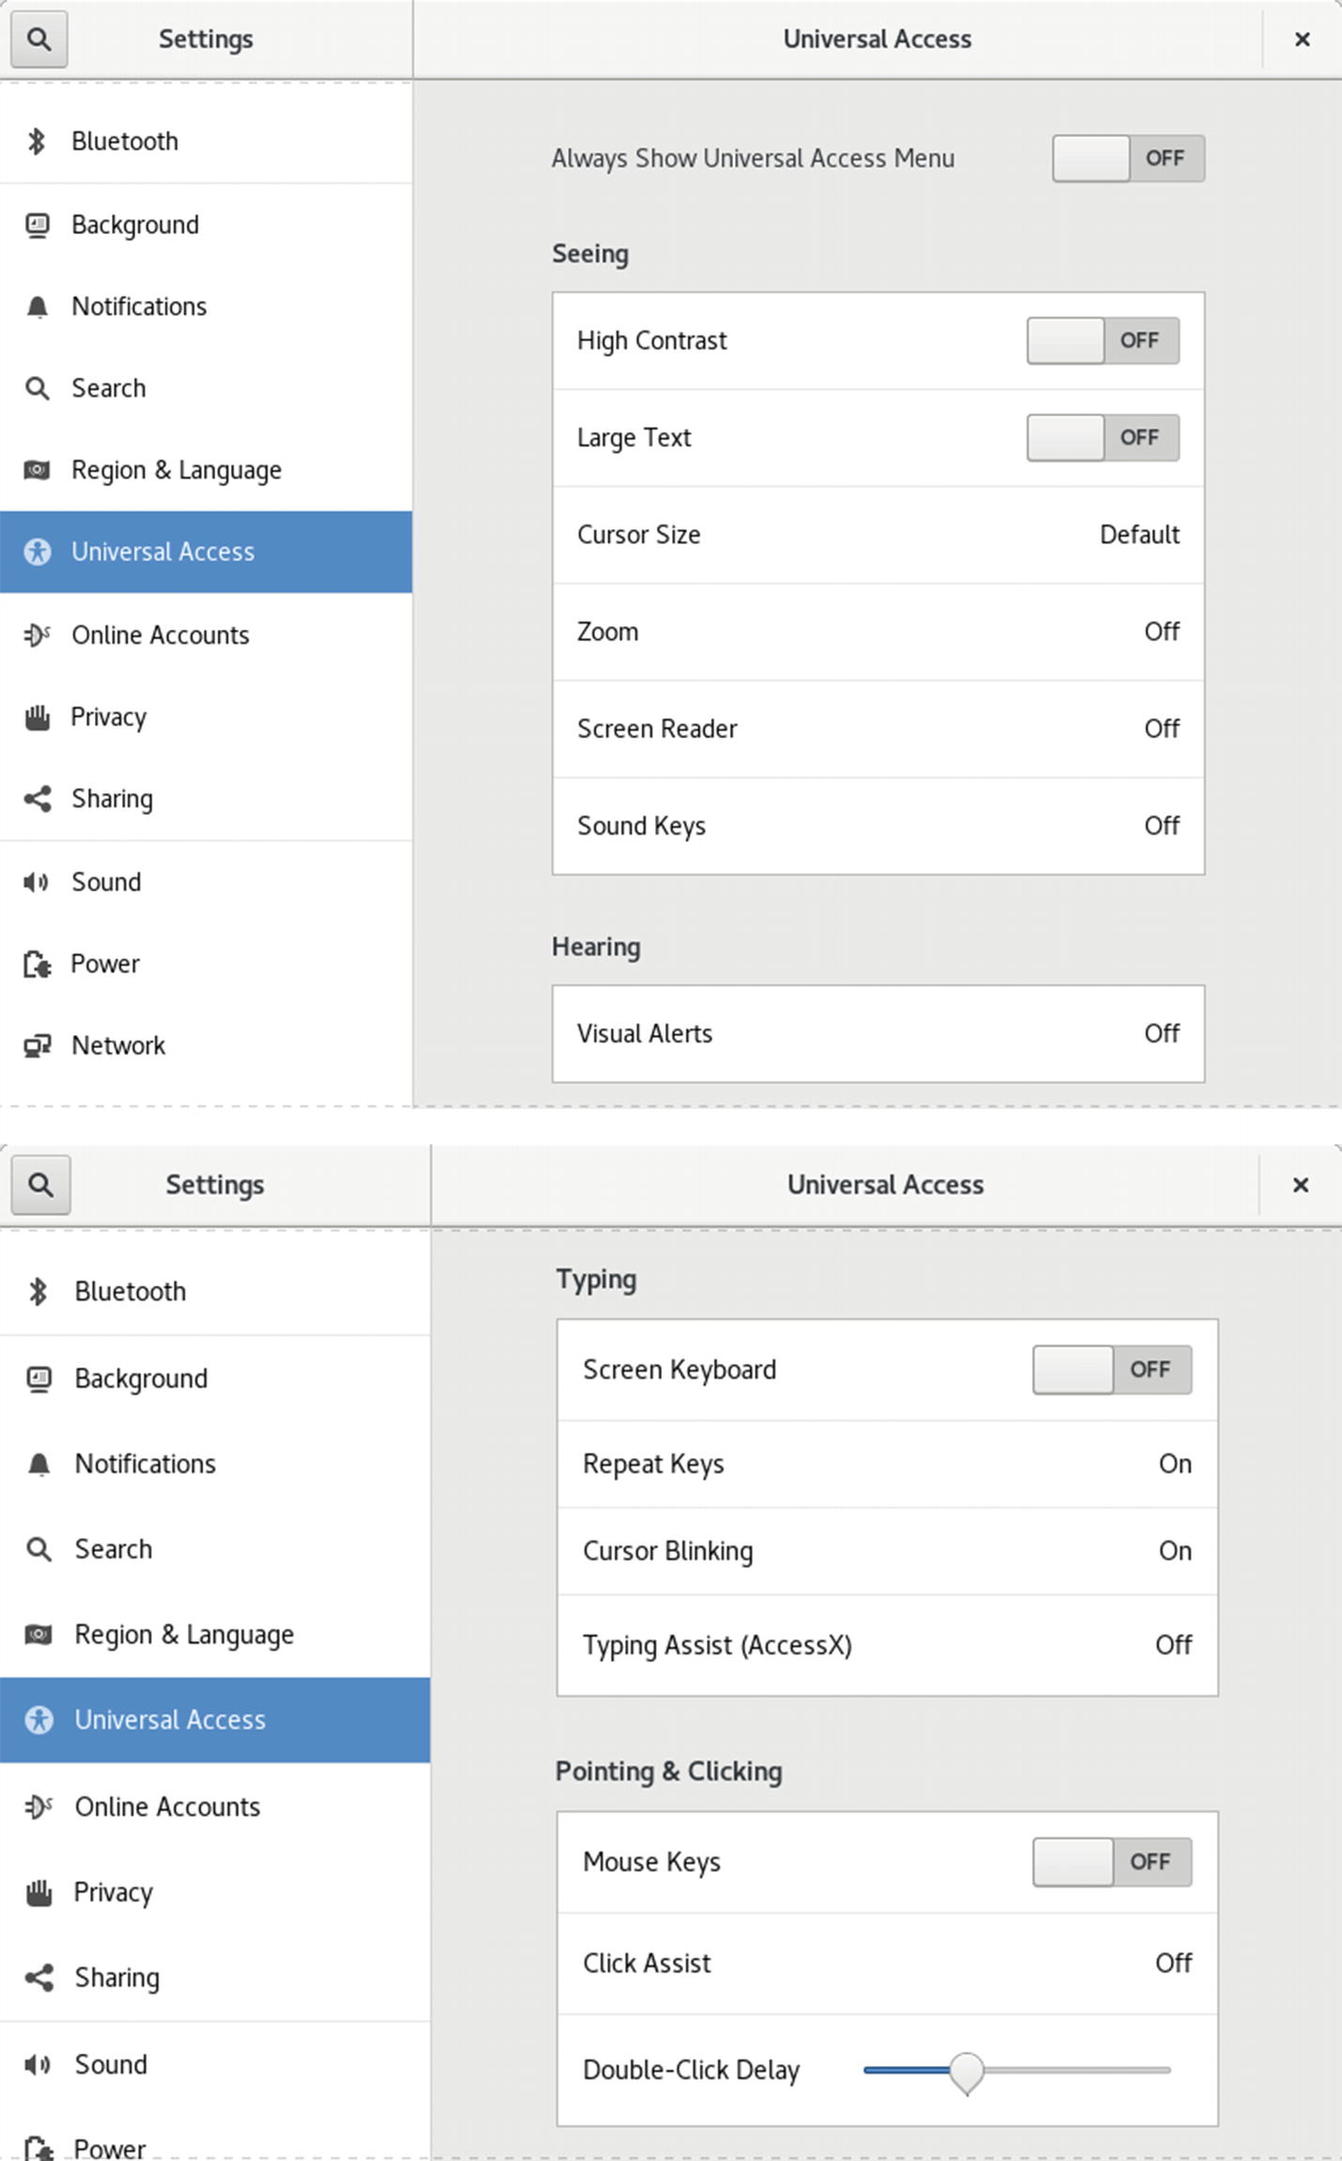
Universal Access
Keyboard and Language
The Settings Keyboard dialog shows tabs for shortcuts (see Figure 3-49). You can assign keys to perform such tasks as starting the web browser. The plus button at the bottom of the screen lets you create custom shortcuts. The Reset All button resets the shortcuts to their default values. Click on an entry to set the shortcut. When the Set Shortcut dialog appears, type the keys for the shortcut, usually three. The keys appear on the next dialog with a Set button in the upper-right corner. The changed entry then appears on the Keyboard dialog with a delete box you can click to remove your shortcut setting. The plus button opens an Add Custom Shortcut dialog where you enter the name and command before setting the shortcut.

Keyboard

Region & Language dialog with input sources
Color Profiles (GNOME Color Manager)

Color management dialog
Online Accounts
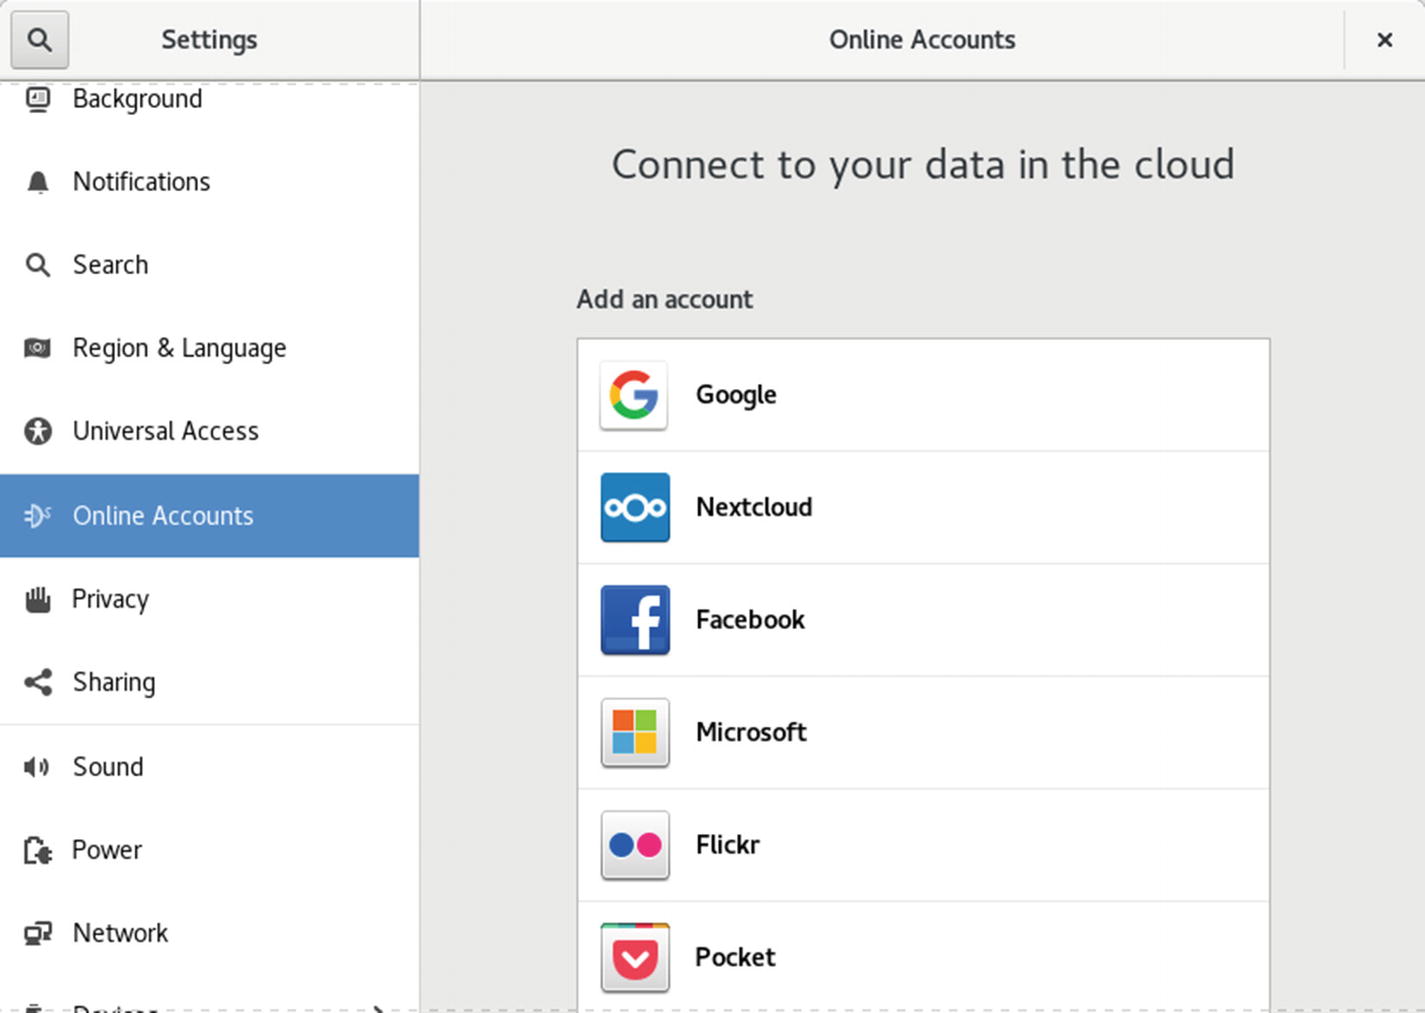
Online Accounts dialog
Accessing File Systems and Devices
When you attach an external storage device such as a USB, CD/DVD-ROM, or ESATA drive, it will be mounted automatically, and you will be prompted to open it in a file manager window. Be sure to unmount (eject) a drive before removing it, so that data will be written.
Devices sidebar in the file manager window
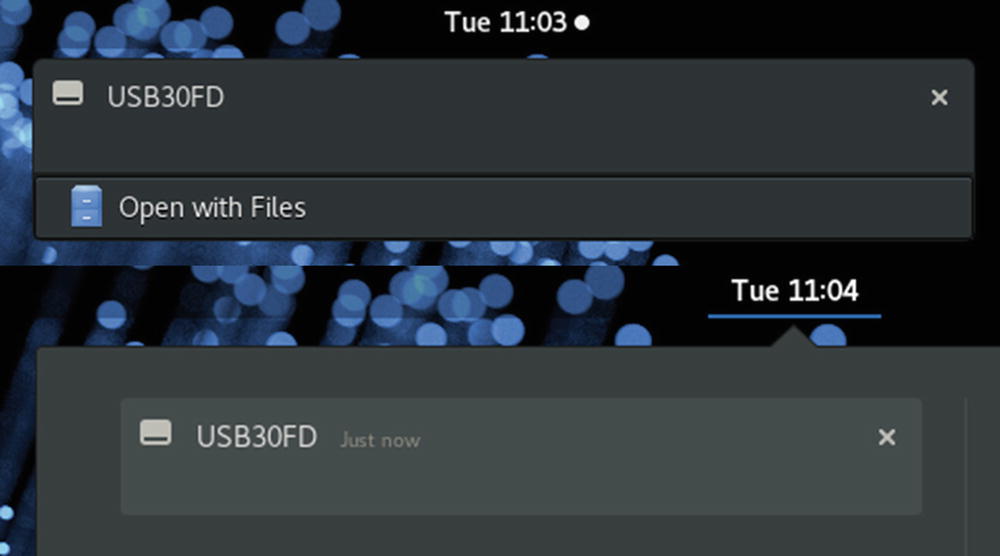
File systems on removable media will also appear automatically as entries directly on your desktop notifications dialog (see Figure 3-54). A notice briefly appears at the top of the screen that shows the name of the device. If you move your mouse to the notice, an Open with notice appears, which you can click to open the device. Should you not open the device at this time, you can later display it in the message tray. The message tray remains hidden, unless you access it manually by clicking the date button at the center of the top bar, or by pressing the Super key with the m key on the keyboard (Super+m, Super is the Windows key—see Figure 3-54). Clicking the device message opens it in a new file manager window.
Removable Devices notifications
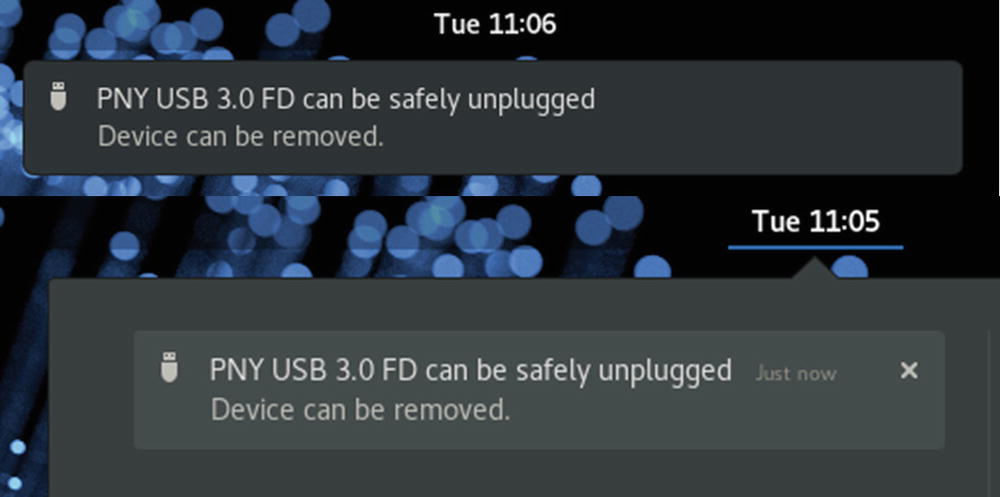
Removable Devices notifications, Eject
A DVD/CD-ROM is automatically mounted when you insert it into your DVD/CD-ROM drive, displaying an entry for it in the file manage sidebar. The same kind of access is also provided for card readers, digital cameras, USB drives, and external USB/ESATA hard drives (hot-plugged). When you attach an external USB/ESATA drive, it will be mounted automatically and opened in a file manager window. Be sure to unmount (eject) the USB and external USB/ESATA drives before removing them, so that data will be written.
If you have already configured associated applications for video and audio DVD/CDs, or disks with images, sound, or video files, the disk will be opened with the appropriate application, such as Shotwell for images, Rhythmbox for audio, and Movie Player for DVD/video. If you have not yet configured these associations, you will be prompted to specify which application you want to open it with.
To see network resources, click the Other Location entry in the file manager sidebar. The Networks section will list your connected network computers. Opening these networks displays the shares they provide, such as shared folders that you can have access to. Drag-and-drop operations are supported for all shared folders, letting you copy files and folders between a shared directory on another computer with a directory on your system. You first must configure your firewall to accept Samba connections before you can browse Windows systems on GNOME. Opening a network resource may require you to log in to access the resource.
Video Drivers
You can obtain the NVIDIA vendor graphics drivers from RPM Fusion (the nonfree repository). You can download and install them with DNF. RPM Fusion is the best repository for specialized kernel drivers and modules. Keep in mind, however, that due to open sourcing of some of the NVIDIA vendor driver software, the X.org open source versions are becoming almost as effective, especially for 2D display support. For normal usage, you might not need vendor driver support.
Installing the NVIDIA drivers can be a complex operation depending on what graphics card you have. The drivers are located on the RPM Fusion repository, not on Fedora. Check the RPM Fusion site for instructions on installing the NVIDIA drivers.
https://rpmfusion.org/Howto/Nvidia
You can then use the dnf install command to install the packages you need.
When you restart, your system reconfigures automatically to the originally installed Xorg drivers.
Multimedia Support: MP3, DVD Video, and DivX
Due to licensing and other restrictions, the Fedora distribution does not include MP3, DVD video, or DivX media support. You cannot play DVD video disks or DivX files after installing Fedora. RPM Fusion ( https://rpmfusion.org ) and Negativo17.org ( https://negativo17.org ) provide the needed libraries and support files for these media formats. These are RPM packages that you can install with dnf, after first downloading and installing their repository configuration files. Use one or the other, not both. Their packages may conflict.
The commercial DVD-Video codec (DVDCSS) is available from the the Livna repository, http://www.livna.org .
DivX support can be obtained using the open source version of DivX, called Xvid (xvid-core). It’s available on the RPM Fusion and Negativo17.or repositories and will play most DivX files.
Check https://fedoraproject.org/wiki/Multimedia for more information. There are many forbidden items that cannot be included with Fedora, due to licensing restrictions, including MP3 support, Adobe Reader, and NVIDIA vendor-provided drivers. Check https://fedoraproject.org/wiki/ForbiddenItems for details.
Terminal Window
The Terminal window allows you to enter Linux commands on a command line. It also provides you with a shell interface for using shell commands instead of your desktop. The command line is editable, allowing you to use the Backspace key to erase characters on the line. Pressing a key will insert that character. You can use the left and right arrow keys to move anywhere on the line, and then press keys to insert characters, or use backspace to delete characters (see Figure 3-56). Folders, files, and executable files are color-coded: black for files, blue for folders, green for executable files, and aqua for links. Shared folders are displayed with a green background.

Terminal window
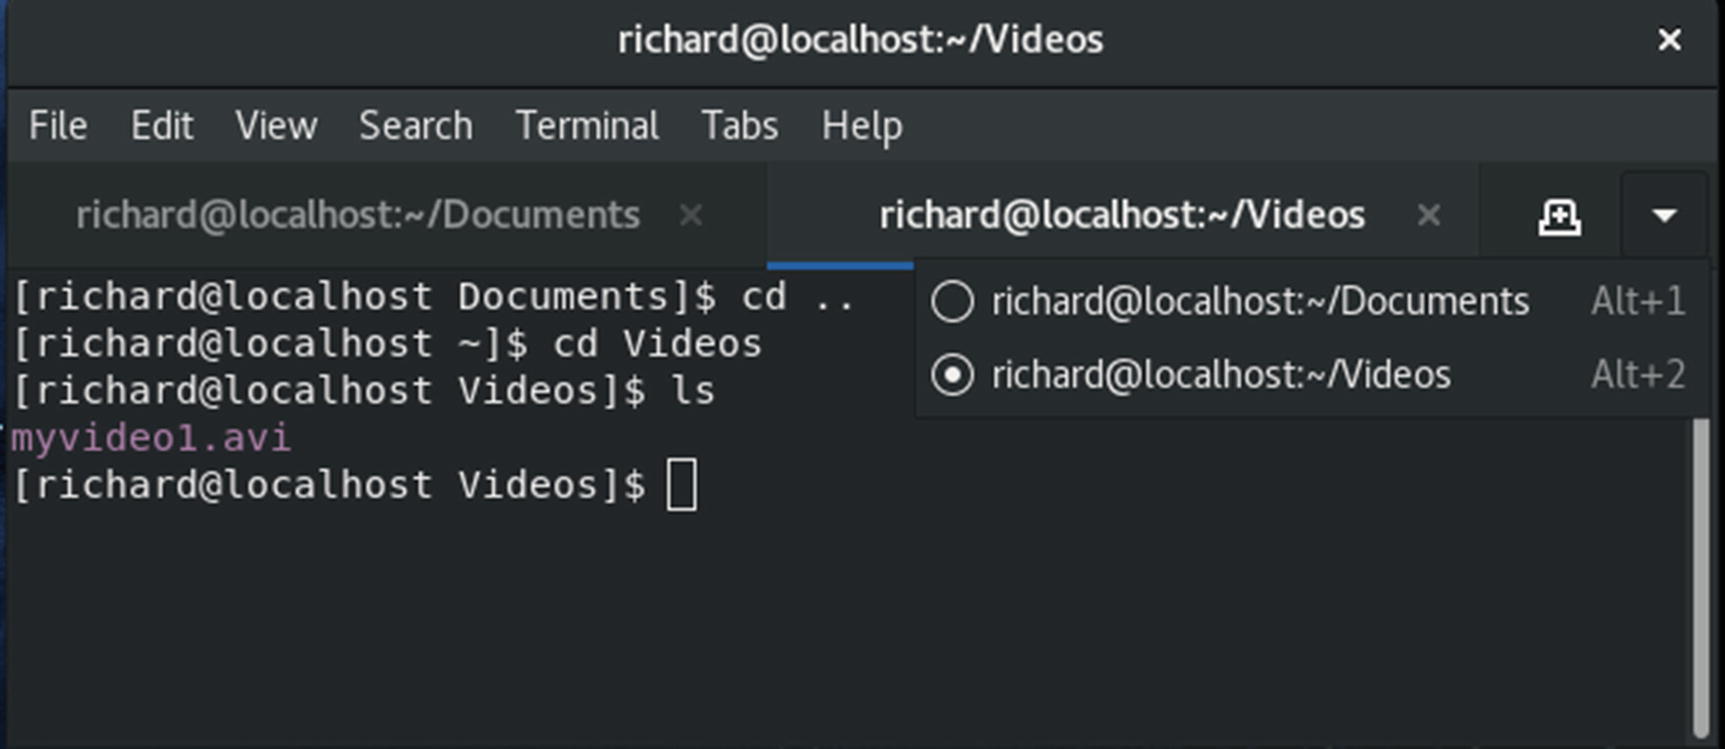
Terminal Window with tabs
The terminal window also supports desktop cut/copy and paste operations. You can copy a line from a web page and then paste it to the terminal window (you can use the Paste entry on the Terminal window's Edit menu or press Shift+Ctrl+v). The command will appear and then you can press Enter to execute the command. This is useful for command-line operations displayed on an instructional web page. Instead of typing in a complex command yourself, just select and copy from the web page directly and then paste to the Terminal window. You can also perform any edits on the command, if needed, before executing it. Should you want to copy a command on the terminal window, select the text with your mouse and then use Shift+Ctrl+c keys (or the Copy entry on the Terminal window's Edit menu) to copy the command. You can select part of a line or multiple lines, as long as they are shown on the terminal window.
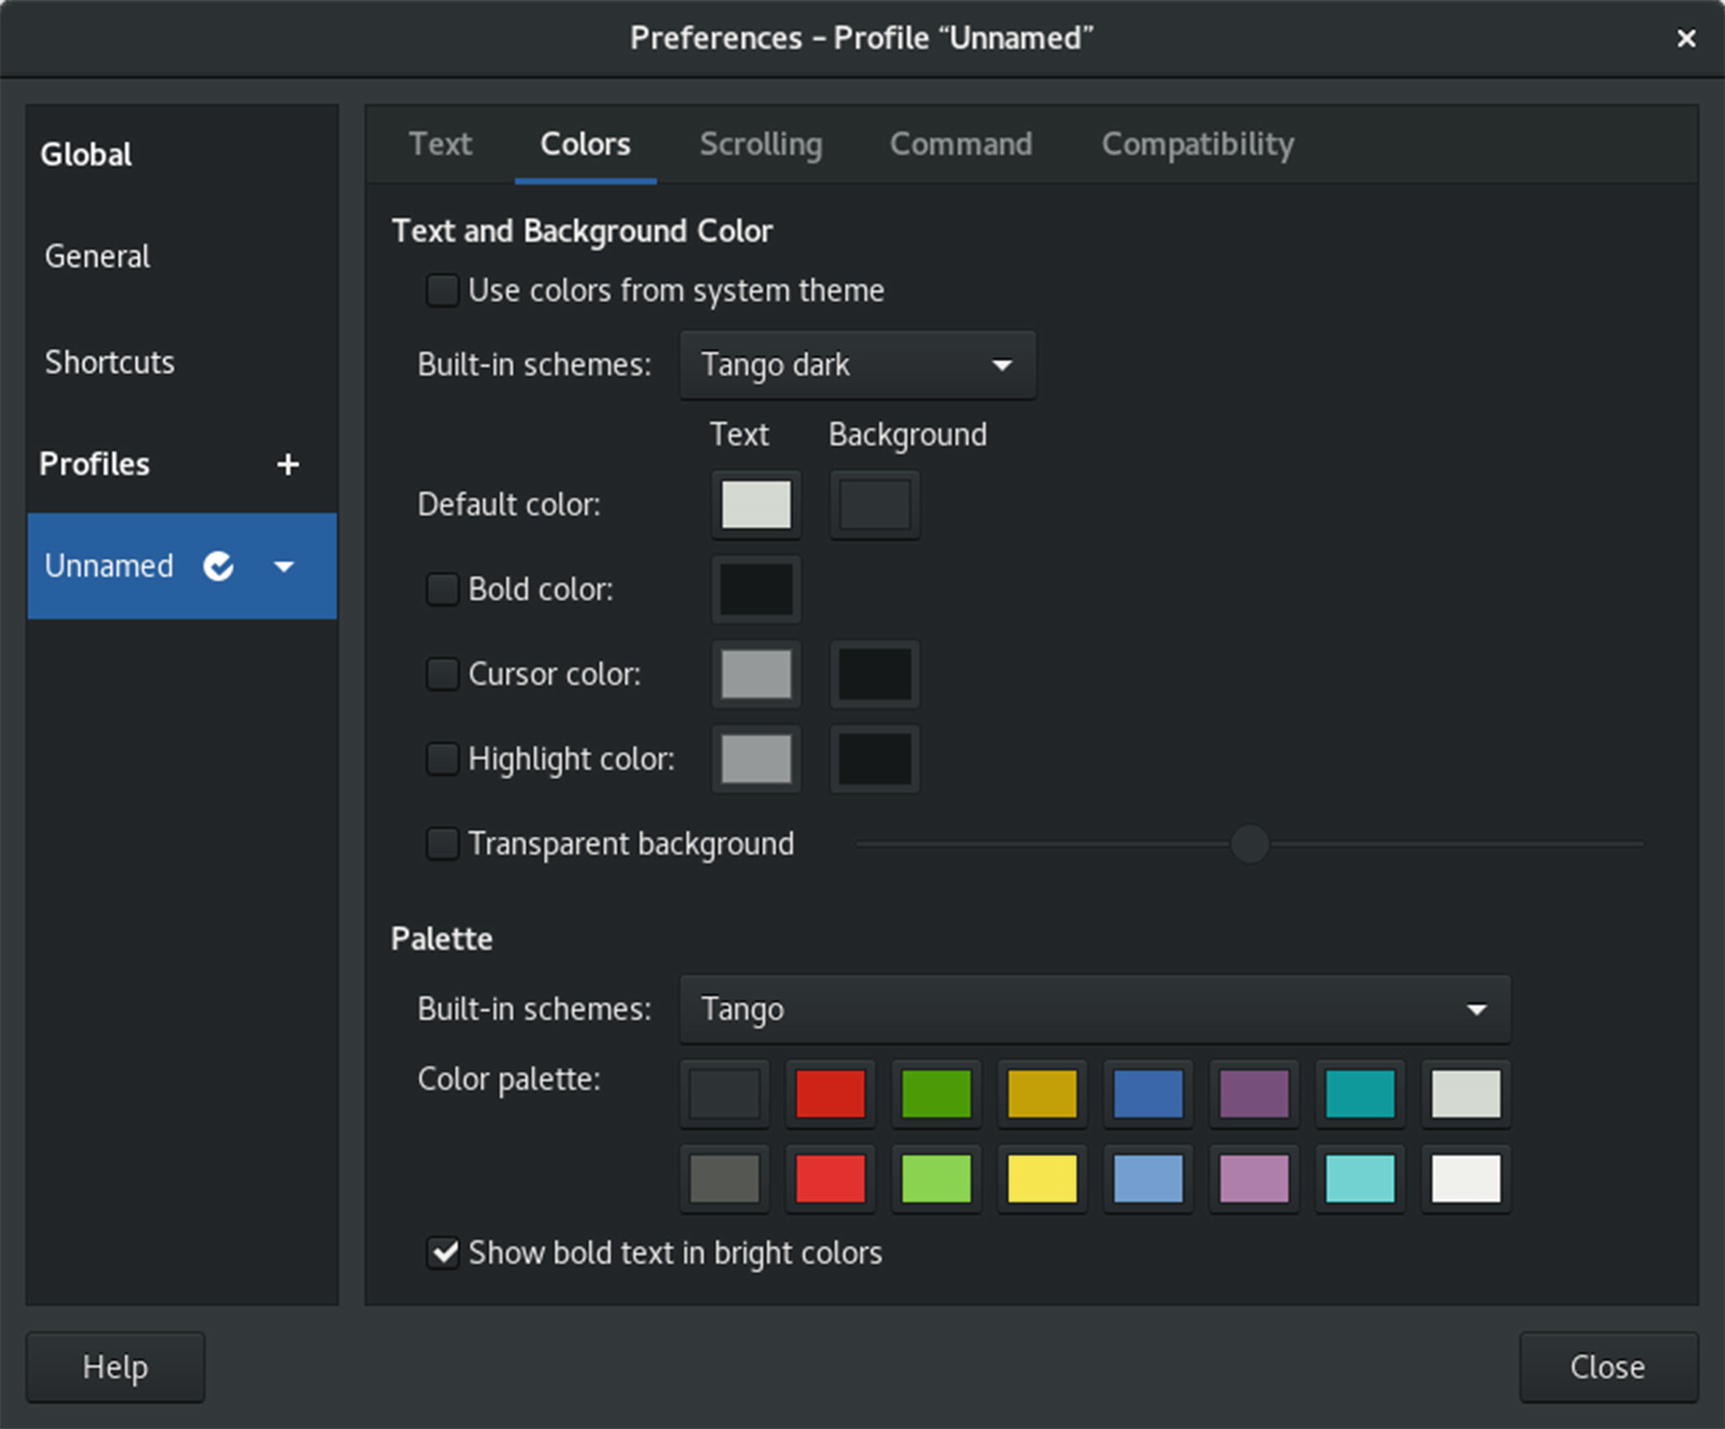
Terminal Window Profile configuration
Your terminal window will be set up to use a dark background with white text. To change this, you can edit the profile to change the background and text colors on the Colors tab. De-select the Use Colors from System Theme entry. This enables the Built-In Schemes menu from which you can select a Black on White display. Other color combinations are also listed, such as Black on Light Yellow and Green on Black. The Custom option lets you choose your own text and background colors. The colors on your open terminal window will change according to your selection, allowing you to see how the color choices will look. For a transparent background, choose the Use Transparent Background entry and then set the amount of shading (none is completely transparent and full shows no transparency).
The Scrolling tab specifies the number of command lines your terminal history will keep, as well as other scroll options such as the scroll speed and whether to display the scroll bar. These are the lines you can move back through and select to re-execute. You can unselect the Limit Scrollback option to set this to unlimited to keep all the commands.
You can create new profiles with customized preferences. To create a new profile, choose New Profile from the File menu to open the New Profile window where you can enter the profile name and select any profile to base it on. The default profile is chosen initially. Use the Change Profile submenu on the Terminal menu to change profiles.
To edit a particular profile , select Preferences from the Edit menu to open the Preferences window, and then click on the one you want in the Profiles section.
Command-Line Interface
When using the command-line interface, you are given a simple prompt into which you type a command. Even when you are using a desktop like GNOME, you sometimes need to execute commands on a command line. You can do so in a terminal window, which is accessed from the dash.
If you are uncertain what format and options a command uses, you can check the command syntax quickly by displaying its man page. Most commands have a man page. Just enter the man command with the command name as an argument.
The command line is actually a buffer of text you can edit. Before you press Enter to execute the command, you can edit the command on the command line. The editing capabilities provide a way to correct mistakes you make when typing a command and its options. The Backspace key lets you erase the character you just typed (the one to the left of the cursor), and the Del key lets you erase the character the cursor is on. With this character-erasing capability, you can backspace over the entire line if you want, erasing what you entered. Ctrl+u erases the whole command line and lets you start over again at the prompt.
You can use the Up Arrow key to redisplay your last executed command. You can then re-execute that command, or you can edit it and execute the modified command. This is helpful when you have to repeat certain operations, such as editing the same file. It is also helpful when you have already executed a command you entered incorrectly.
Running Windows Software on Linux: Wine
Wine is a Windows compatibility layer that allows you to run many Windows applications natively on Linux. The actual Windows operating system is not required. Windows applications will run as if they were Linux applications, and they can access the entire Linux file system and use Linux-connected devices. Applications that are heavily driver-dependent, such as graphic-intensive games, may not run. Others that do not rely on any specialized drivers may run very well, including Photoshop, Microsoft Office, and newsreaders like Newsbin. For some applications, you may also have to copy over specific Windows dynamic link libraries (DLLs) from a working Windows system to your Wine Windows System32 or System directory.
Once installed, Wine applications can be accessed from the Other overview. These applications include Wine configuration, the Wine software uninstaller, and the Wine file browser, as well as a Regedit registry editor, a notepad, and a Wine help tool.
To set up Wine, start the Wine Configuration tool. This opens a window with tabs for Applications, Libraries (DLL Selection), Audio (Sound Drivers), Drives, Desktop Integration, and Graphics. On the Applications tab, you can select the version of Windows an application is designed for. The Drives tab lists your detected partitions, as well as your Windows-emulated drives, such as drive C. The C drive is actually just a directory, .wine/drive_c, and not a partition of a fixed size. Your actual Linux file system will be listed as the Z drive.
Once configured, Wine will set up a .wine directory on the user’s home directory. (The directory is hidden, so Show Hidden Files must be enabled in the file manager View menu to display it.) Within that directory will be the drive_c directory, which functions as the C drive that holds your Windows system files and program files in the Windows and Program File subdirectories. The System and System32 directories are located in the Windows directory. This is where you place any needed DLL files. The Program Files directory holds your installed Windows programs, just as they would be installed on a Windows Program Files directory.
Icons for installed Windows software will appear on your Other overview. Just double-click an icon to start up the application. It will run normally within a Linux window, as would any Linux application.
Wine works on both .exe and .msi files installation files. You may have to make them executable by checking the file’s Execute check box (from the Permissions tab on the Properties dialog).
Tip
Alternatively, you can use Crossover Office, the commercial Windows compatibility layer. This is a commercial product tested to run certain applications such as Microsoft Office. Check https://www.codeweavers.com for more details. Crossover Office is based on Wine, which CodeWeavers supports directly.
Help Resources
Fedora Linux Help Resources
Resource | Description |
|---|---|
KDE Help Center | KDE Help tool, desktop interface for documentation on KDE desktop and applications, man pages, and info documents |
GNOME Help Browser | GNOME Help tool, desktop interface for accessing documentation for the GNOME desktop and applications |
/usr/share/doc | Location of application documentation |
man command | Linux man pages, detailed information on Linux commands, including syntax and options |
info application | GNU info pages, documentation on GNU applications |
Fedora Project site, with numerous documentation, FAQ, and help resources and links, with links to forums, newsgroups, and community websites | |
Online documentation, guides, HOWTOs, and FAQs for Fedora Linux | |
Red Hat Enterprise documentation, guides, HOWTOs, and FAQs; located under Support and Documentation; much of the Red Hat Linux documentation may be helpful | |
GNOME documentation site | |
End-user discussion support forum, endorsed by the Fedora Project; includes FAQs and news links | |
Solutions to common problems | |
Ask Fedora site, on which you can ask questions and search for previously answered questions |
GNOME and KDE Help
Both the GNOME and KDE desktops feature Help systems that use a browser-like interface to display help files (Utilities ➤ Help). To start the GNOME Help browser, search for help on the Applications overview (see Figure 3-59). It opens with the GNOME desktop guide, showing links for desktop tasks and topics such as video, GNOME Settings, networking, and universal access. The Go menu’s All Documents entry lists links for manuals for different applications, such as the Archive Manager, Empathy, Gedit, and the Totem movie player. The GNOME Help browser and the KDE Help Center also incorporate browser capabilities, including bookmarks and history lists for documents you view.
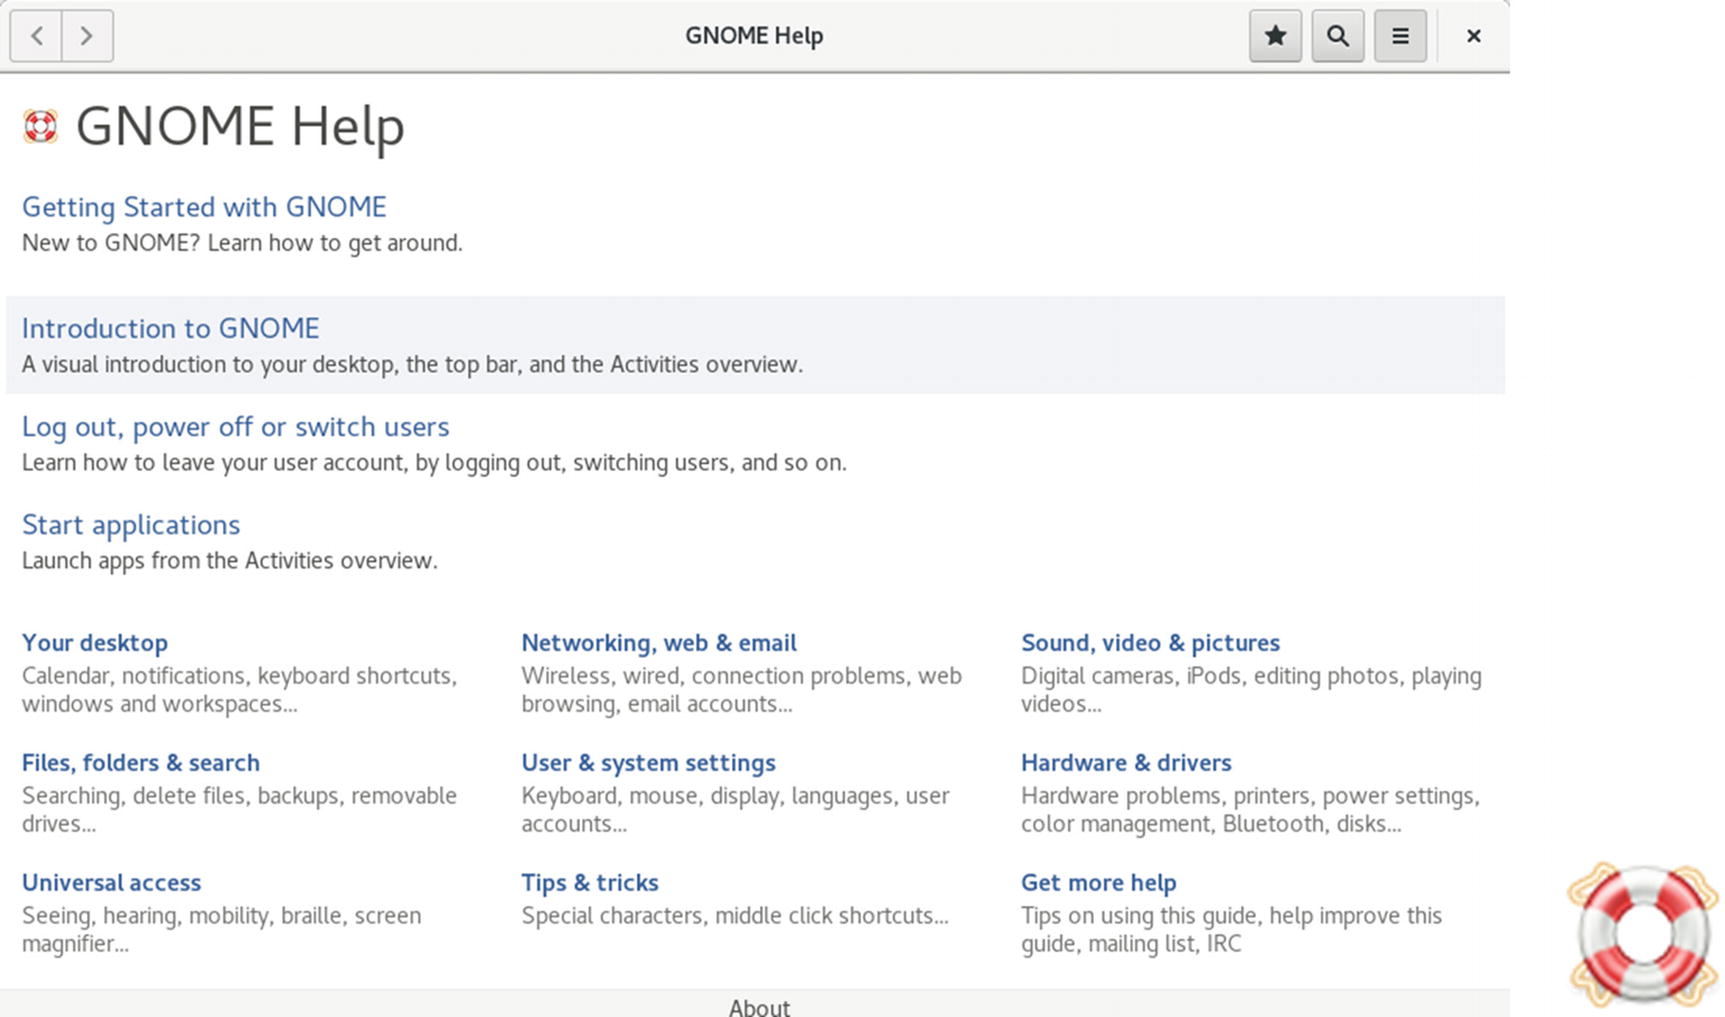
GNOME Help browser
Application Documentation
On your system, the /usr/share/doc directory contains documentation files installed by each application. Within each directory, you can usually find HOWTO, README, and INSTALL documents for that application.
The Man Pages
Use basic keyboard keys to navigate the page . Press the spacebar to display the next page. The b key moves you back a page. When you finish, press the q key to quit. To perform a search, press either the slash (/) or question mark (?). The / searches forward, and the ? searches backward. When you press the /, a line opens at the bottom of your screen on which you enter a word to search for. Press Enter to activate the search. You can repeat the same search by pressing the n key.
The Info Pages
Some applications also provide info page documentation. The info pages are similar to man pages but tend to be more detailed. You can also access this documentation by entering the info command, to display a listing of applications. The info interface has its own set of commands. You can learn more about it by entering info info. The m command lets you search for an application by using a search pattern.
Web Resources
You can obtain documentation on Fedora from the Fedora Project site at https://docs.fedoraproject.org and from the Fedora forum at https://fedoraforum.org . The Ask Fedora Project site at https://ask.fedoraproject.org displays answers to common questions and lets you ask your own.
Most Linux applications are covered by the Linux Documentation Project. It shows you how to use the desktop and takes you through a detailed explanation of Linux applications. The GNOME and KDE websites also contain extensive documentation.
Shared Network Access for Windows (Samba): Samba

Accessing Windows shared folders on GNOME
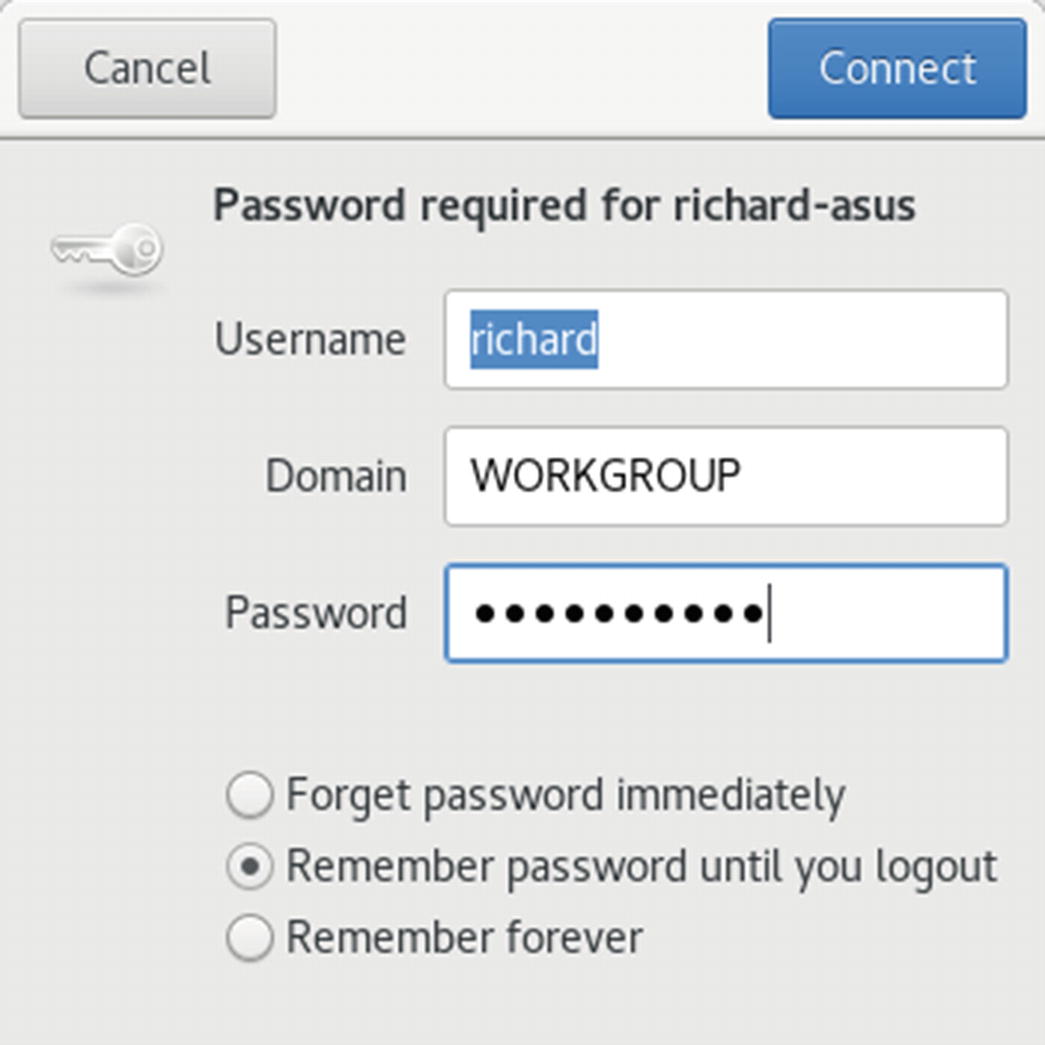
Password for Samba Windows access
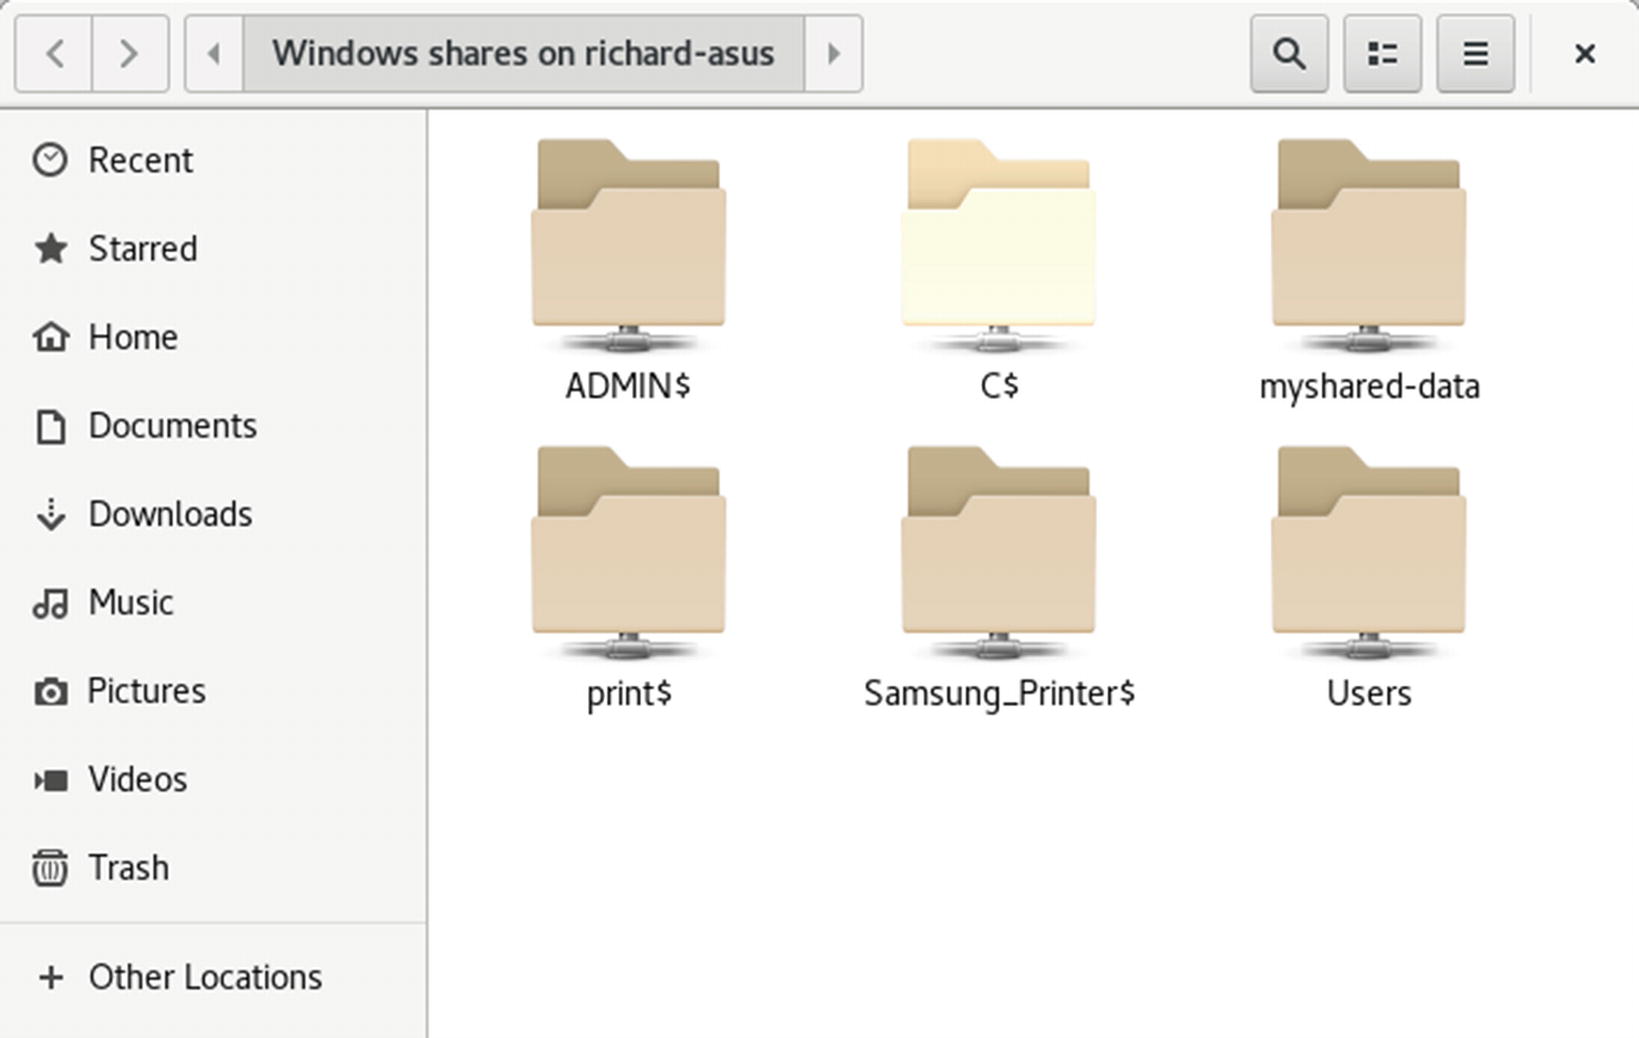
Windows shared folders, accessed from Fedora Linux
Once you have made your changes, run the testparm command to see if the entry was added correctly.
Accessing Samba shares from Windows is an issue for Windows 10. Upgrades to Windows 10 has disabled the SMBv1 network browsing capabilities of Windows, as it transitions to SMBv3 from SMBv1. You could try to manually re-enable SMBv1 browsing, but SMBv1 is being disabled due to security issues. It is not advisable to re-enable it. This means you cannot simply browse a Linux host currently, but you can still easily set up access to each Samba shared folder on that Linux host.
Once the locations for your shared folders are set up in Windows, you can access them again quickly from their shortcuts in the This PC folder.