
Glass User Interface
In this chapter, I’ll present a complete discussion of the Glass user interface (UI) supported by the GDK (starting with Android 4.4.2), with sample working code for all the major Glass UI elements, including the timeline, Glass-styled card, live card, immersion, menu items, and gestures.
Overview
https://developers.google.com/glass/design/ui has a good review on the timeline, immersions, menu items, and the relationship of static cards, live cards, and timeline. Here is a summary of the main UI elements that GDK supports:
- Timeline: The central Glass UI is a bunch of static and live cards of 640x360 pixels that you can swipe forward and backward to view information on a card or perform an action on the card. The OK Glass item is the home screen of Glass and located at the center of the timeline, showing the current time.
- Glass-styled cards: These are well-formed cards with main text, a left-aligned footer, and one or more images displayed on the left side of the card. (See Figure 3-1 in the next section for an example.) You can use a card wherever you can a view—in activities, in layouts, or in a CardScrollView. For more details, check out https://developers.google.com/glass/develop/gdk/ui-widgets#glass-styled_cards.
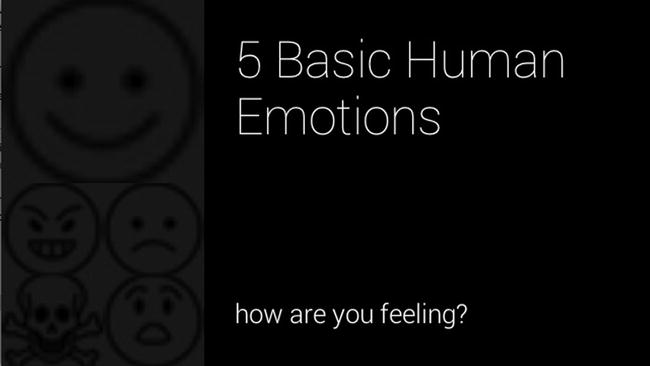
Figure 3-1. Inserted static card
- Live cards: These are located in the left (current) part of the timeline for summary information important to the user at present. Live cards can access low-level Glass hardware such as sensors and GPS and most Android APIs up to 4.4.2, and only the GDK can create live cards. There are two types of live cards: high-frequency live cards that render many times a second for rich 2D or 3D content and low-frequency live cards that render once every few seconds, mainly for text and image. Live cards cannot process swipe forward or backward gestures because they’re used by the timeline to navigate through the static and live cards.
- Immersions: These are for customized UI elements to temporarily take over the timeline to provide rich content and high user interaction. Immersions are just Android activities and can consume all user gestures. Like live cards, immersions can also access all low-level hardware and Android 4.4.2 or older APIs, but unlike live cards, immersions can consume swipe forward and backward gestures (swipe down takes you back to timeline) if your app needs to support high user interaction, giving the user total control of the Glass environment from within the app.
Note If you’re familiar with the psychology theory of flow, the word immersion probably would remind you of flow: “a single-minded immersion, in which a person performing an activity is fully immersed in a feeling of energized focus, full involvement, and enjoyment in the process of the activity.” How appropriate it is to have immersion implemented as an Android activity in Glass. You may want to at least check out http://en.wikipedia.org/wiki/Flow_(psychology) when you develop Glass immersion, or want to be happier, or both.
- Menus: Static cards, live cards, and immersions can all have menu items for the user to tap to select actions to perform. You saw menus in the GDK Timer sample and the HelloGlass app.
- Voice input: Glass can accept voice commands to launch an app and contextual voice commands on specific cards after an app is launched. Free-form speech input is also supported from within an app.
- Gestures: Glass supports both touch gestures (one-finger, two-finger, and three-finger tap and swipe) and head gestures (head panning, look up, and nudge).
Note As of GDK Preview, released on April 15, 2014, static cards in the GDK API support only text and image content, but not menu content. Static cards in the Mirror API can support audio and video, in addition to text and image, and the user can choose in a menu to share, delete, reply, read aloud, or perform many other actions. But you’ll soon see that live cards and immersions provided by the GDK API offer much more.
In the following sections, I’ll show you step-by-step instructions and sample code of how to create the following:
- Glass-styled card
- Low-frequency live card
- High-frequency live card that inflates the layout using standard controls
- High-frequency live card that uses 2D canvas drawing
- Immersion that uses 2D canvas drawing or standard Android views
- Immersion that uses 3D OpenGL 1.0/2.0 drawing
Menu and gestures will also be discussed in more detail along the way.
My goal is to show you the potential of GDK apps and how to get the template app up and running so you can appropriately and quickly set up your projects and plan for your next big app. I’ll add the code for each of the app type previously based on the Glassware template in Chapter 2. You can follow the steps there on how the HelloGlass project was built to create a new project for the sample code in this chapter. For your convenience, here is a summary of the steps:
- In ADT, select File
 New Android Application Project, enter GlassUIElements for Application Name (Project Name will be filled in automatically), and change Package Name to com.morkout.glassuielements.
 - Set both Minimum Required SDK and Target SDK to API 19, Compile With to Glass Development Kit Preview, and Theme to None.
- Click Next three times, uncheck Create Activity, and then click Finish.
- Right-click the newly created project GlassUIElements’s src folder, select New Package, and enter com.morkout.glassuielements or another package name; then click Finish.
- Copy the four files in GlasswareTemplate’s src folder to GlassUIElements’s src folder. Copy the drawable, menu, and xml folders from GlasswareTemplate’s res folder to GlassUIElements’s res folder. Copy start.xml from GlasswareTemplate’s res/layout folder to GlassUIElements’s res/layout folder, and finally copy strings.xml from GlasswareTemplate’s res/values folder and overwrite strings.xml in GlassUIElements’s res/values folder.
- Copy the <application...></application> element from GlasswareTemplate’s AndroidManifest.xml file to the <application...></application> element of GlassUIElements’s AndroidManifest.xml file, and change glasswaretemplate in the android:name element of activity and service to glassuielements.
The whole process seems long, but with a few more tries, you can create a new project within a minute. Now you’re ready for exploring the details of all the UI elements in GDK Glassware.
Note To be accurate, now that you have a better understanding of cards and immersions, the template app GlasswareTemplate and the app created based on it, GlassUIElements, are actually high-frequency live card apps. You’ll see shortly how to extend the template and app to support low-frequency live cards, high-frequency live cards, and immersions that use different content-rendering mechanisms and, of course, static cards.
https://developers.google.com/glass/develop/gdk/reference/com/google/android/glass/app/Card is the GDK reference for the Card class, and you should definitely check it out. In XE 12, static cards can be created using the Card class and then inserted to the timeline (and updated, deleted, or queried after that) using another class called TimelineManager. Starting XE 16, the TimelineManager class and support of operating static cards in the timeline have been completely removed; you should use only the Mirror API to create static cards and use the GDK to create Glass-styled Card objects and then use Card’s getView() method to convert the card to a view and use it where a view is expected. For example, you can add cards to CardScrollView, a class that allows you to create swipeable cards by converting each card to an Android view with the getView() method.
Figure 3-1 shows a Glass-styled card with “5 Basic Human Emotions” as the main body text, five images positioned on the left, and “how are you feeling?” as the footnote.
To test the code on your Glass, first add a new class called GlassStyledCardActivity derived from Activity to your project, as shown in Listing 3-1 (you can find the PNG files for joy, anger, sadness, fear, and surprise in the source code of Chapter 3).
Listing 3-1. Creating a Glass-Styled Card
public class GlassStyledCardActivity extends Activity {
   @Override
   protected void onCreate(Bundle savedInstanceState) {
      super.onCreate(savedInstanceState);

      Card card = new Card(this);
      card.setText("5 Basic Human Emotions");
      card.setFootnote("how are you feeling?");
      card.addImage(R.drawable.joy);
      card.addImage(R.drawable.anger);
      card.addImage(R.drawable.sadness);
      card.addImage(R.drawable.fear);
      card.addImage(R.drawable.surprise);
      card.setImageLayout(Card.ImageLayout.LEFT);

      setContentView(card.getView());
   }
}
Then in AppService.java, add a new method called createGlassStyledCard() and replace the AppService’s onStartCommand implementation with the code in Listing 3-2.
Listing 3-2. Launching Activity That Creates Glass-Styled Card
private void createGlassStyledCard() {
   Intent intent = new Intent(this, GlassStyledCardActivity.class);
   intent.addFlags(Intent.FLAG_ACTIVITY_NEW_TASK);
   startActivity(intent);
}
public int onStartCommand(Intent intent, int flags, int startId) {
   createGlassStyledCard();
   return START_STICKY;
}
Finally, specify the GlassStyledCardActivity in AndroidManifest.xml. Connect your Glass, run and install the app, and launch the app by saying “OK Glass” and then “Chapter 3,” which is defined as <string name="say_glasswaretemplate">chapter three</string> in the strings.xml file in the res/values folder. You’ll see a Glass-styled card, as shown in Figure 3-1.
Later in the chapter, you’ll see how Card objects are used in CardScrollView.
If you’re already familiar with Glass as an end user, you should have noticed that a menu is available for most cards on the timeline. For example, tap a Gmail message card, and you’ll see Read more, Reply, Archive, Read Aloud, Star, and Delete menu options. Tap a CNN news card, and you’ll see Play, Read more, and Read aloud options. And you’ve seen the menu options Love, Smile, Laugh, Surprise, Frown, and Comment for a new item shared by your Path friends. Naturally you’d probably love to do the same thing on the cards you create in your GDK app.
Unfortunately, it’s not possible as of XE 17 for the GDK to create menu items for static (or more accurately, Glass-Styled) cards; only the Mirror API can do so. But Google will likely fix this in a future update of the GDK. Even if that doesn’t happen anytime soon, you’ll be happy to know that you can easily create menus for live cards and immersions, which are the real strengths of GDK, using standard Android menu APIs. So, let’s enter the more exciting world of live cards and immersions. Later in the book, I’ll also discuss the Mirror API in great detail.
Live Cards
You can create live cards in two ways: by inflating a layout resource, called low-frequency live cards, or by rendering directly onto the app’s drawing surface, called high-frequency live cards. Which way to use to create a live card depends on how frequently you need to update the card content and if you are primarily rendering widgets for status and information updates or free-form graphics using 2D canvas or 3D OpenGL.
You create low-frequency live cards by inflating a layout of standard widgets using the Android RemoteViews class. The timeline runs in a different process from your app, so in order for the timeline to render a layout in your app, you need to use RemoteViews, which supports layouts and views documented at https://developers.google.com/glass/develop/gdk/ui/live-cards.
Listing 3-3 shows some sample code with comments to create a low-frequency live card.
Listing 3-3. Creating Low-Frequency Live Card
private RemoteViews mRemoteViews; // add this before AppService's constructor

// add the following two methods method in AppService.java
private void createLowFrequencyLiveCard() {
    mLiveCard = new LiveCard(this, LIVE_CARD_ID)
    mRemoteViews = new RemoteViews(this.getPackageName(), R.layout.start);
    mRemoteViews.setTextViewText(R.id.hello_view, (new Date()).toString());
    mRemoteViews.setViewVisibility(R.id.ex_progress_bar, View.INVISIBLE);
    mLiveCard.setViews(mRemoteViews);

    addMenuToLiveCard();
}

private void addMenuToLiveCard() {
    Intent menuIntent = new Intent(this, MenuActivity.class);
    mLiveCard.setAction(PendingIntent.getActivity(this, 0, menuIntent, 0));

    mLiveCard.publish(PublishMode.REVEAL);
}

// change onStartCommand in AppService to create the low-frequency live card
public int onStartCommand(Intent intent, int flags, int startId) {
    if (mLiveCard == null)
        createLowFrequencyLiveCard();

    return START_STICKY;
}
Run and launch the app (using the same ‘OK Glass” and then “Chapter 3” voice command), and you’ll see on your Glass the current date and time information, something like Figure 3-2.
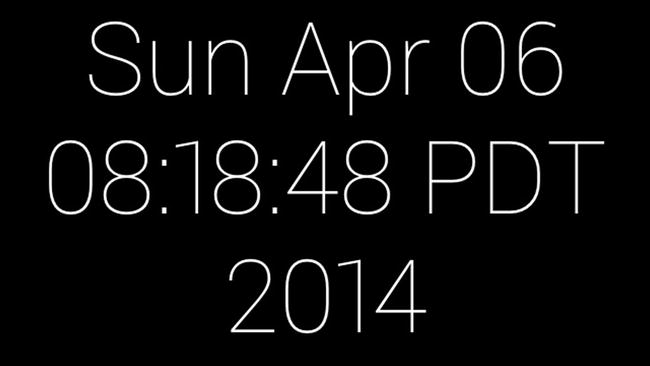
Figure 3-2. Created low-frequency live card
Navigate the timeline, and you’ll notice the card is located on the left side of the timeline, unlike static cards, which are normally located on the right side of the timeline.
Note All live cards, low-frequency or high-frequency, must have a Stop-like menu item to dismiss the card. This is why the addMenuToLiveCard method is created and why mLiveCard.publish(PublishMode.REVEAL), which obviously is also required for creating a live card, is added there. If you comment out the first two lines of the addMenuToLiveCard method, you won’t see the live card after the voice command, but just the “Chapter 3” screen.
Tap the live card, and you’ll see the menu options, as in the HelloGlass app of Chapter 2.
To update the content of a created low-frequency live card, you can call RemoteViews’ set methods corresponding to the widget’s set methods. For example, to update the TextView shown earlier, you can call the two lines of code in Listing 3-4 from one of your menu options.
Listing 3-4. Updating Low-Frequency Live Card
mRemoteViews.setTextViewText(R.id.hello_view, (new Date()).toString());
mLiveCard.setViews(mRemoteViews);
Note that the live card’s setViews method has to be called; otherwise, the content won’t be updated. To make it more interesting, follow these steps to use a progress bar and keep updating it:
- Update your start.xml layout file and add a ProgressBar element after the TextView element.
<ProgressBar android:id="@+id/ex_progress_bar"
      style="@android:style/Widget.ProgressBar.Horizontal"
      android:layout_width="640px"
      android:layout_height="10px"
      android:layout_marginTop="300px"
      android:background = "#0000FF"
      android:progress="0"
android:secondaryProgress="0" />
- You also need to add android:background="@color/black" at the end of your FrameLayout element in start.xml. Otherwise, when you update the TextView, the previous values may not be cleared, causing both new values and old values to be shown at the same time. So, make your Framelayout look like this:
<FrameLayout xmlns:android="http://schemas.android.com/apk/res/android "
    android:layout_width="match_parent"
    android:layout_height="match_parent"
android:background="@color/black"> - Add the code in Listing 3-5 to the AppService class.
Listing 3-5. Showing Changed Text and Progress Bar in Low-Frequency Live Card
private final Handler mHandler = new Handler();
private final Runnable mUpdateProgressRunnable = new Runnable() {
   @Override
   public void run() {
      if (++percent_done > 100) {
         mRemoteViews.setTextViewText(R.id.hello_view, "DONE!");
         mRemoteViews.setViewVisibility(R.id.ex_progress_bar, View.INVISIBLE);
         mLiveCard.setViews(mRemoteViews);
         return;
      }
      updateLowFrequencyLiveCard();
      mHandler.postDelayed(mUpdateProgressRunnable, 100);
   }
};

public void updateProgress() {
   mRemoteViews.setViewVisibility(R.id.ex_progress_bar, View.VISIBLE);
   mHandler.postDelayed(mUpdateProgressRunnable, 4000);
}

public void updateLowFrequencyLiveCard() {
   mRemoteViews.setTextViewText(R.id.hello_view, ""+percent_done + "%");
   mRemoteViews.setProgressBar(R.id.ex_progress_bar, 100, percent_done, false);
   if (mLiveCard != null) mLiveCard.setViews(mRemoteViews);
} - Call updateProgress(); at the end of the createLowFrequencyLiveCard method implementation.
- Run the app, and you’ll see Figure 3-2 first, with the progress bar set to invisible. Because of the animation effect in XE 16 and 17, it’ll take about two seconds to see the home screen of a launched app. So, after Figure 3-2, it’ll take another two seconds or so before the progress bar gets changed to visible and both the text view showing the completed percentage and the progress bar showing the updated progress get updated about ten times per second. After it reaches 100 percent, the progress bar is reset to invisible, and the text view gets changed to DONE! Figure 3-3 shows two screenshots of this.
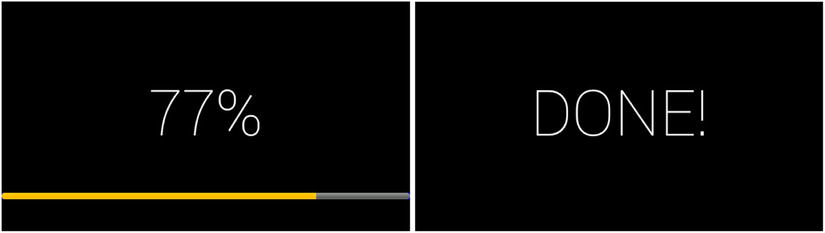
Figure 3-3. Updating low-frequency live card
Now you should be able to quickly try other layouts and views supported by Glass for creating low-frequency live cards, which are documented, as mentioned earlier, at https://developers.google.com/glass/develop/gdk/ui/live-cards.
High-frequency live cards are created using a background service, and its content gets rendered with the surfaceCreated method, defined in the SurfaceHolder.Callback interface. If this looks familiar to you, it could be that the HelloGlass or GlasswareTemplate app actually creates a high-frequency live card from the onStartCommand method of AppService when the service is launched. Now let’s see how to create high-frequency live cards in two different ways.
To create a high-frequency live card by inflating a layout, simply add the method createHighFrequencyLiveCardForLayoutInflating and make some changes to onStartCommand in AppService.java, as shown in Listing 3-6.
Listing 3-6. Creating a High-Frequency Live Card by Inflating Layout
private void createHighFrequencyLiveCardForLayoutInflating() {
       mLiveCard = new LiveCard(this, LIVE_CARD_ID);
       mCallback = new AppDrawer(this);
       mLiveCard.setDirectRenderingEnabled(true).getSurfaceHolder().addCallback(mCallback);
       addMenuToLiveCard();
}

public int onStartCommand(Intent intent, int flags, int startId) {
   if (mLiveCard == null)
      createHighFrequencyLiveCardForLayoutInflating();

      return START_STICKY;
}
You can keep the same AppDrawer.java and AppViewer.java files shown in the previous chapter. Run the app, and you’ll see the text “App Template” displayed on Glass, along with a progress bar.
Again, to make the app more interesting, you can show the progress bar by changing the AppDrawer constructor to set an AppViewer listener and updating both the text view and the progress bar as shown in Listing 3-7.
Listing 3-7. Showing Changed Text and Progress Bar in High-Frequency Live Card
// in AppDrawer.java:
public AppDrawer(Context context) {
   mView = new AppViewer(context);

   mView.setListener(new AppViewer.ChangeListener() {
      @Override
      public void onChange() {
         if (mHolder != null) {
            draw(mView);
         }
      }}
   );
}

// in AppViewer.java

// add this before the AppViewer constructor:
    private static ProgressBar m_progressBar; //UI reference
    int percent_done = 0;
private ChangeListener mChangeListener;
public interface ChangeListener {
   public void onChange();
}

public void setListener(ChangeListener listener) {
   mChangeListener = listener;
}

// add this at the end of public AppViewer(Context context, AttributeSet attrs, int style)
m_progressBar = (ProgressBar) findViewById(R.id.ex_progress_bar);
percent_done = 0;
m_progressBar.setProgress(percent_done);

// add updateProgress(); inside the start method and add the following code:
private final Handler mHandler = new Handler();
private final Runnable mUpdateTextRunnable = new Runnable() {
    public void run() {
       if (++percent_done > 100) {
         mTextView.setText("DONE!");

         m_progressBar.setVisibility(View.INVISIBLE);
         if (mChangeListener != null) {
            mChangeListener.onChange();
         }
         return;
       }


       mTextView.setText(""+percent_done + "%");
       m_progressBar.setProgress(percent_done);

       if (mChangeListener != null) {
          mChangeListener.onChange();
       }
       mHandler.postDelayed(mUpdateTextRunnable, 100);
    }
};


    public void start() {
       updateProgress();
    }


    public void updateProgress() {
       mHandler.post(mUpdateTextRunnable);
    }
Now run the app, and you should see the same content as in Figure 3-3.
You can see that what’s used for the low-frequency live card rendering (inflating a layout) can also be used for high-frequency live card rendering. But not vice versa: Frequent 2D canvas or 3D drawing is available only for high-frequency live card rendering.
The second way to create a high-frequency live card is to use a class that implements the GDK DirectRenderingCallback interface, which just adds another callback called renderingPaused to the Android SurfaceHolder.Callback interface.
Note The renderingPaused method is used to save resources on Glass; it’s called when the surface is not visible to the user, so there’s no need to update the surface. In the previous sample, you use SurfaceHolder.Callback instead of the DirectRenderingCallback in AppDrawer, so if the Glass screen turns off while the progress bar gets updated, the update continues. In this example, as shown in Listing 3-5, you use DirectRenderingCallback so you can call updateRendering, which stops the rendering thread to save Glass resources (and restarts the thread if needed), from the renderingPaused callback. Normally, you should implement the DirectRenderingCallback interface for high-frequency live card update.
The class LiveCardRenderer in Listing 3-8 is based on the GDK developer site’s sample for creating live-frequency cards at https://developers.google.com/glass/develop/gdk/ui/live-cards, but it has a bug fixed and a bouncing-ball canvas drawing code added, and it is also integrated with the tested app for you to try right away.
Listing 3-8. Creating a High-Frequency Live Card with Canvas Drawing
// add in AppService.java
      private void createHighFrequencyLiveCardForCanvasDrawing() {
          mLiveCard = new LiveCard(this, LIVE_CARD_ID);
          mCallbackCanvas = new LiveCard2DRenderer();
          mLiveCard.setDirectRenderingEnabled(true).getSurfaceHolder().addCallback(mCallbackCanvas);
          addMenuToLiveCard();
       }
   // change the onStartCommand calling code
        public int onStartCommand(Intent intent, int flags, int startId) {
      if (mLiveCard == null)
         createHighFrequencyLiveCardForCanvasDrawing();

          return START_STICKY;
        }


   // create a new LiveCard2DRenderer class with the following code:
        public class LiveCard2DRenderer implements DirectRenderingCallback {
   private static final String TAG = "LiveCardRenderer";

   private static final long FRAME_TIME_MILLIS = 33; // about 30 FPS

   private SurfaceHolder mHolder;
   private boolean mPaused;
   private RenderThread mRenderThread;

   private int canvasWidth;
   private int canvasHeight;
   private int diffX = 25;
   private int incY = 1;

   private float bouncingX;
   private float bouncingY;
   private double angle;
   private Paint paint;
   private Path path;

   @Override
   public void surfaceChanged(SurfaceHolder holder, int format, int width, int height) {
      canvasWidth = width;
      canvasHeight = height;
      bouncingX = canvasWidth / 2;
      bouncingY = canvasHeight / 2;
      angle = - Math.PI/4.0; //(2.0 * Math.PI) * (double) (Math.random() * 360) / 360.0;

      paint = new Paint(Paint.ANTI_ALIAS_FLAG);
      paint.setColor(Color.BLUE);
      paint.setStyle(Style.FILL);
      paint.setStyle(Style.STROKE);

      path = new Path();

      mHolder = holder;
      updateRendering();
   }

   @Override
   public void surfaceCreated(SurfaceHolder holder) {
   }

   @Override
   public void surfaceDestroyed(SurfaceHolder holder) {
      mHolder = null;
      updateRendering();
   }

   @Override
   public void renderingPaused(SurfaceHolder holder, boolean paused) {
      mPaused = paused;
      updateRendering();
   }

   /**
    * Start or stop rendering according to the timeline state.
    */
   private synchronized void updateRendering() {
      boolean shouldRender = (mHolder != null) && !mPaused;
      boolean rendering = mRenderThread != null;

      if (shouldRender != rendering) {
         if (shouldRender) {
            mRenderThread = new RenderThread(this);
            mRenderThread.start();
         } else {
            mRenderThread.quit();
            mRenderThread = null;
         }
      }
   }

   /**
    * Draws the view in the SurfaceHolder's canvas.
    */
   public void drawInCanvas(View view) {
      Canvas canvas;

      try {
         canvas = mHolder.lockCanvas();
      } catch (Exception e) {
         return;
      }
      if (canvas != null) {
         // just a little math to calculate the new position of the bouncing ball
         bouncingX += diffX;
         bouncingY += diffX * Math.tan(angle);
         bouncingY *= incY;

         canvas.drawColor(Color.BLACK);
         canvas.drawCircle(bouncingX, bouncingY, 20, paint);

         // change the direction and/or angle if out of bounds
         if (bouncingX > canvasWidth || bouncingX < 0) {
            diffX = -diffX;
            angle = -angle;
         }
         else if (bouncingY > canvasHeight || bouncingY < 0) {
            angle = -angle;
         }

         float mid = canvasWidth / 2;
         float min = canvasHeight;
         float half = min / 2;
         mid -= half;

         paint.setStrokeWidth(min / 10);
         paint.setStyle(Paint.Style.STROKE);
         path.reset();
         paint.setStyle(Paint.Style.FILL);

         path.moveTo(mid + half * 0.5f, half * 0.84f);
         path.lineTo(mid + half * 1.5f, half * 0.84f);
         path.lineTo(mid + half * 0.68f, half * 1.45f);
         path.lineTo(mid + half * 1.0f, half * 0.5f);
         path.lineTo(mid + half * 1.32f, half * 1.45f);
         path.lineTo(mid + half * 0.5f, half * 0.84f);

         path.close();
         canvas.drawPath(path, paint);

         mHolder.unlockCanvasAndPost(canvas);

      }
   }

   /**
    * Redraws in the background.
    */
   private class RenderThread extends Thread {
      private boolean mShouldRun;
      LiveCard2DRenderer mRenderer;

      /**
       * Initializes the background rendering thread.
       */
      public RenderThread(LiveCard2DRenderer renderer) {
         mShouldRun = true;
         mRenderer = renderer;
      }

      /**
       * Returns true if the rendering thread should continue to run.
       *
       * @return true if the rendering thread should continue to run
       */
      private synchronized boolean shouldRun() {
         return mShouldRun;
      }

      /**
       * Requests that the rendering thread exit at the next opportunity.
       */
      public synchronized void quit() {
         mShouldRun = false;
      }

      @Override
      public void run() {
         while (shouldRun()) {
            mRenderer.drawInCanvas(null);
            SystemClock.sleep(FRAME_TIME_MILLIS);
         }
      }
   }
}
Run the app, and you’ll see a bouncing blue ball on a screen with a centered blue star, as shown in Figure 3-4.
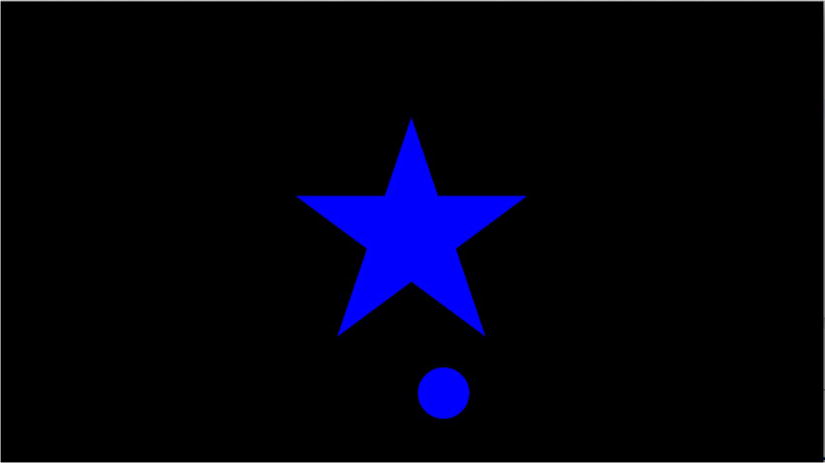
Figure 3-4. Canvas drawing on a live card
Note According to Google’s documentation at https://developers.google.com/glass/design/ui/live-cards, high-frequency live cards can also show “rich 3D content.” I’ll show you how to render 3D content in the “Immersion” section, but I’ll leave how to do it in a live card as an exercise for you.
Menu
A menu with at least one Stop menu item to remove the live card from the timeline is required for live card, or Glass won’t even show the live card. To display a menu, you create an activity, set it as the live card’s action, and handle user menu selection in the activity. GlasswareTemplate already has a menu implemented for the live card. To recap, here’s what it takes to add a menu to a live card, whether low-frequency or high-frequency:
- Create a menu XML file in the res/menu folder (for example, main.xml in the GlasswareTemplate app).
- Create an activity (MenuActivity.java in the sample) that inflates the menu layout file main.xml in the onCreateOptionsMenu method and handles user selection—this is where you can launch an immersion if desired—in the onOptionsItemSelected method.
- In the service file (AppService.java) that creates a live card, call the live card’s setAction method with the menu activity.
Intent menuIntent = new Intent(this, MenuActivity.class);
mLiveCard.setAction(PendingIntent.getActivity(this, 0, menuIntent, 0));
You create immersions using standard Android activities, meaning they’re both simple and powerful. In the activity, you should use GestureDetector to detect the gestures that your app needs to support user interaction. Remember that for immersions, you cannot swipe forward and backward to navigate the timeline because an immersion replaces the timeline. You have to swipe down or use a Stop-like menu item to close the immersion to go back to the timeline. It is the capability of capturing all kinds of user gestures that gives immersions the unique power to accomplish more advanced features than live cards.
The following is a working sample to create an immersion with canvas drawing that shows a new star; it’s not that beautiful but is colorful whenever you tap Glass. Gesture capture is used here but will be discussed in detail in a later section. A menu is also used with a single Stop menu item, although unlike in live cards, it’s not required in immersions.
// add in AppService.java:
private void createImmersionFor2DDrawing() {
   Intent intent = new Intent(this, Immersion2DActivity.class);
   intent.addFlags(Intent.FLAG_ACTIVITY_NEW_TASK);
   startActivity(intent);
}


// change the onStartCommand calling code
public int onStartCommand(Intent intent, int flags, int startId) {
        createImmersionFor2DDrawing();
       return START_STICKY;
}
Note Without the second line of intent.addFlags(Intent.FLAG_ACTIVITY_NEW_TASK); in createImmersionFor2DDrawing(), the app would crash because the activity starts outside any activity. To fix the crash, the FLAG_ACTIVITY_NEW_TASK flag has to be set on the intent. If, however, you start the immersion from a menu activity, you don’t need the addFlags line.
Listing 3-9 shows how to create an immersion that does 2D canvas drawing when you tap Glass. Also, a menu appears when you long press the touchpad of Glass.
Listing 3-9. Creating an Immersion with Canvas Drawing
// create a new menu file juststop.xml with a single Stop menu item
<?xml version="1.0" encoding="utf-8"?>

<menu xmlns:android="http://schemas.android.com/apk/res/android ">
    <item
        android:id="@+id/stop"
        android:title="@string/stop"
        android:icon="@drawable/ic_stop" />
</menu>

// create a View subclass to do the actual Canvas drawing
public class DrawView extends View {
   List<Point> points = new ArrayList<Point>();
   List<Paint> paints = new ArrayList<Paint>();

   public DrawView(Context context) {
      super(context);
      setFocusable(true);
      setFocusableInTouchMode(true);
      invalidate();
   }

   public void onDraw(Canvas canvas) {
      int i=0;
      for (Point point : points) {
         canvas.drawCircle(point.x, point.y, 5, paints.get(i++));
      }
   }
}

class Point {
   float x, y;
}

// create a new activity named Immersion2DActivity
public class Immersion2DActivity extends Activity {
   private static final String TAG = "Immersion2DActivity";

   TextView mTextView;
   DrawView mDrawView; // 2D
   private GestureDetector mGestureDetector;

   /** Called when the activity is first created. */
   @Override
   public void onCreate(Bundle savedInstanceState) {
      super.onCreate(savedInstanceState);

      // 2D Canvas-based drawing
      mDrawView = new DrawView(this);
      setContentView(mDrawView);
      mDrawView.requestFocus();
      mGestureDetector = new GestureDetector(this);

      // Called when the following gestures happen: TAP, LONG_PRESS SWIPE_UP,
      // SWIPE_LEFT, SWIPE_RIGHT, SWIPE_DOWN
      // see the subsection "Gestures and Listeners" for more explanation
      mGestureDetector.setBaseListener(new GestureDetector.BaseListener() {
         @Override
         public boolean onGesture(Gesture gesture) {
            if (gesture == Gesture.TAP) {
               // do something on tap
               Log.v(TAG, "TAP");
               Point point = new Point();
               point.x = (int )(Math.random() * 640 + 1);
               point.y = (int )(Math.random() * 360 + 1);
               Paint paint = new Paint();
               paint.setARGB(255, (int )(Math.random() * 255), (int )(Math.random() * 255), (int )(Math.random() * 255));
               paint.setAntiAlias(true);
               mDrawView.points.add(point);
               mDrawView.paints.add(paint);
               mDrawView.invalidate();
               return true;
            } else if (gesture == Gesture.TWO_TAP) {
               Log.v(TAG, "TWO_TAP");
               return true;
            } else if (gesture == Gesture.SWIPE_RIGHT) {
               Log.v(TAG, "SWIPE_RIGHT");
               return true;
            } else if (gesture == Gesture.SWIPE_LEFT) {
               return true;
            } else if (gesture == Gesture.LONG_PRESS) {
               Log.v(TAG, "LONG_PRESS");
               openOptionsMenu();
               return true;
            } else if (gesture == Gesture.SWIPE_DOWN) {
               Log.v(TAG, "SWIPE_DOWN");
               return false;
            } else if (gesture == Gesture.SWIPE_UP) {
               Log.v(TAG, "SWIPE_UP");
               return true;
            } else if (gesture == Gesture.THREE_LONG_PRESS) {
               Log.v(TAG, "THREE_LONG_PRESS");
               return true;
            } else if (gesture == Gesture.THREE_TAP) {
               Log.v(TAG, "THREE_TAP");
               return true;
            } else if (gesture == Gesture.TWO_LONG_PRESS) {
               Log.v(TAG, "TWO_LONG_PRESS");
               return true;
            } else if (gesture == Gesture.TWO_SWIPE_DOWN) {
               Log.v(TAG, "TWO_SWIPE_DOWN");
               return false;
            } else if (gesture == Gesture.TWO_SWIPE_LEFT) {
               Log.v(TAG, "TWO_SWIPE_LEFT");
               return true;
            } else if (gesture == Gesture.TWO_SWIPE_RIGHT) {
               Log.v(TAG, "TWO_SWIPE_RIGHT");
               return true;
            } else if (gesture == Gesture.TWO_SWIPE_UP) {
               Log.v(TAG, "TWO_SWIPE_UP");
               return true;
            }

            return false;
         }
      });

      // Called when the finger count changes on the touch pad
      mGestureDetector.setFingerListener(new GestureDetector.FingerListener() {
         @Override
         public void onFingerCountChanged (int previousCount, int currentCount) {

            Log.v(TAG, "onFingerCountChanged:" + previousCount + "," + currentCount);
         }
      });

      // Called while the user is scrolling after initial horizontal scroll with one finger
      mGestureDetector.setScrollListener(new GestureDetector.ScrollListener() {
         @Override
         public boolean onScroll(float displacement, float delta,
               float velocity) {
            // do something on scrolling
            Log.v(TAG, "onScroll");
            return true;
         }
      });


      // Called while the user is scrolling with two fingers
      mGestureDetector.setTwoFingerScrollListener(new GestureDetector.TwoFingerScrollListener() {

         @Override
         // displacement: average distance between scroll state entering x value
         // delta: average delta between two consecutive x motion events
         // velocity: sverage velocity of current x motion event
         // return: true if the events were handled
         public boolean onTwoFingerScroll(float displacement, float delta, float velocity) {
            Log.v(TAG, "onTwoFingerScroll");
            return false;
         }
      });
   }

   // Send generic motion events to the gesture detector
   @Override
   public boolean onGenericMotionEvent(MotionEvent event) {
      if (mGestureDetector != null) {
         return mGestureDetector.onMotionEvent(event);
      }
      return false;
   }

   @Override
   public boolean onCreateOptionsMenu(Menu menu) {
      MenuInflater inflater = getMenuInflater();
      inflater.inflate(R.menu.juststop, menu);

      MenuItem item2 = menu.add(0, R.id.stop+1, 0, R.string.headoff);
      MenuItem item3 = menu.add(0, R.id.stop+2, 0, R.string.headon);

      MenuUtils.setDescription(item2, R.string.headoffDesc);
      MenuUtils.setDescription(item3, R.string.headonDesc);
      MenuUtils.setInitialMenuItem(menu, item2);

      getWindow().addFlags(WindowUtils.FLAG_DISABLE_HEAD_GESTURES);
      return true;
   }

   @Override
   public boolean onOptionsItemSelected(MenuItem item) {
      switch (item.getItemId()) {
      case R.id.stop:
         finish();
         return true;

      // see the the subection "Menu and Head Gesture" for further explanation
      case R.id.stop+1:
         getWindow().addFlags(WindowUtils.FLAG_DISABLE_HEAD_GESTURES);
      return true;

      case R.id.stop+2:
         getWindow().clearFlags(WindowUtils.FLAG_DISABLE_HEAD_GESTURES);
      return true;

      default:
         return super.onOptionsItemSelected(item);
      }
   }
}
Run the app and keep tapping Glass, and you’ll see some nice stars in a night sky—or at least to some kids, as shown in Figure 3-5.
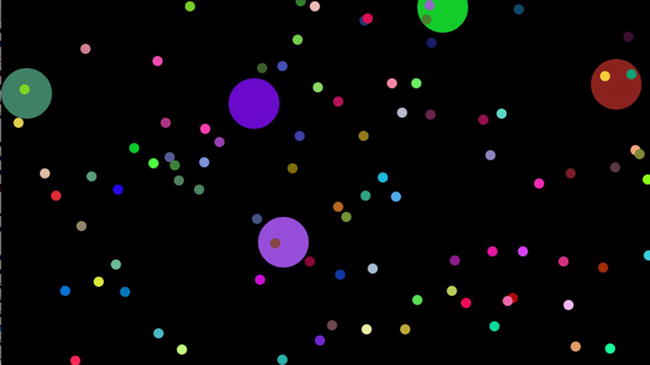
Figure 3-5. Immersion drawing canvas graphics
Long press Glass, and you’ll see a menu with the options Stop, HeadOff, and HeadOn (more on the latter two in the next section). A menu in an immersion is created just like in a typical Android activity. Tap Stop to call finish() to stop the immersion activity. A more detailed discussion of menus in immersions is available at Glass’s developer site at https://developers.google.com/glass/develop/gdk/ui/immersion-menus, but by looking at the integrated code here and trying it in your own app, you’ll understand how to use it in no time.
If you just need to detect simple Glass gestures such as tapping the touchpad or swiping down, you can use Android’s KeyEvent.Callback interface’s onKeyDown and onKeyUp methods on immersion activities and check for their keycode values. For example, tapping the touchpad sets the keycode to KeyEvent.KEYCODE_DPAD_CENTER, and swiping down sets the keycode to KeyEvent.KEYCODE_BACK.
A better and more readable way for any nontrivial app to capture all possible Glass gestures is to use GestureDetector in the GDK. In the Immersion2DActivity class implementation shown earlier, a GestureDetector variable called mGestureDetector is instantiated, and the generic motion event is sent to it from the onGenericMotionEvent method. The four available gesture listeners (BaseListener, FingerListener, ScrollListener, and TwoFingerScrollListener) are added to mGestureDetector. Gestures that can be captured for each listener are self-explanatory in the code and comments.
Launch the app again, and this time pay close attention to ADT’s LogCat’s verbose output (LogCat is an Android feature that allows you to view logs output by your Android apps. See http://developer.android.com/tools/debugging/debugging-projects.html for more information.). Enter tag:Imm in the LogCat “Search for message” filter box and then tap once on Glass’s touchpad. You’ll see three lines as follows:
onFingerCountChanged:0,1
TAP
onFingerCountChanged:1,0
Two-finger tap, and you’ll see five lines of output.
onFingerCountChanged:0,1
onFingerCountChanged:1,2
onFingerCountChanged:2,1
TWO_TAP
onFingerCountChanged:1,0
It’s interesting to note that onFingerCountChanged logs all the discrete changes from the beginning to the end of the gesture.
One-finger swipe right will output several onScroll messages followed by SWIPE_RIGHT, enclosed by onFingerCountChanged:0,1 and onFingerCountChanged:1,0. Similarly, two-finger swipe left will print a bunch of onTwoFingerScroll followed by TWO_SWIPE_LEFT, enclosed between a few onFingerCountChanged messages. Figure 3-6 shows the logs for the four gestures. You may want to try other gestures listed in BaseListener to see what and how many events are invoked for each gesture.
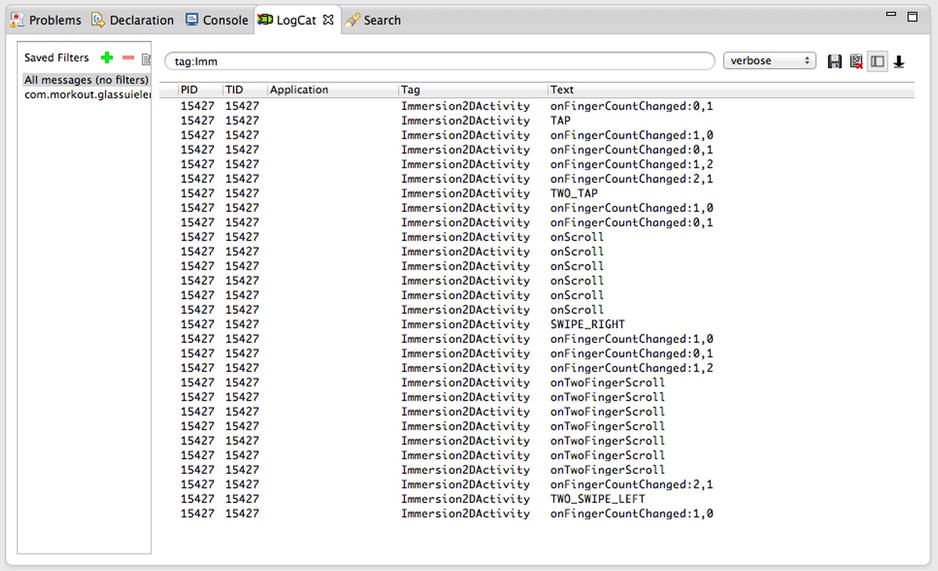
Figure 3-6. Gesture event logs: tap, two-finger tap, swipe right, two-finger swipe left
A menu in immersion is created using the standard Android Menu API and/or menu inflating. In the onCreateOptionsMenu method in Listing 3-7, both methods are used: A Stop menu item is inflated from the menu resource, and then two other menu items, HeadOff and HeadOn, are created using the menu’s add method. GDK also offers a setDescription method to let you set, of course, the description of a menu item; in this code, this is Turn Off Head Gesture for HeadOff, and Turn On Head Gesture for HeadOn. Another GDK menu-related API is setInitialMenuItem, which shows the specified item when the menu appears, instead of the default first item. Long press the touchpad, and you’ll see the menu item HeadOff first; swipe left and right to see the other two items, as shown in Figure 3-7.

Figure 3-7. Menu description and initial menu item
Tap HeadOff or HeadOn uses another GDK feature called WindowUtils.FLAG_DISABLE_HEAD_GESTURES:
getWindow().addFlags(WindowUtils.FLAG_DISABLE_HEAD_GESTURES) disables head gesture, and getWindow().clearFlags(WindowUtils.FLAG_DISABLE_HEAD_GESTURES) reenables head gesture. Head gesture, meaning quickly nodding your head up, is used to turn your Glass display off. In an immersion, you may need to turn off head gesture so the Glass display won’t be accidentally turned off. This is what the word immersion is meant to be: You are fully immersed in an activity with no distractions; your Glass screen suddenly going off would certainly be one extreme distraction.
If you have developed some OpenGL 3D app, especially on the Android platform, or if you wonder how well Glass supports OpenGL rendering, you’ll be glad to know Glass has full support of OpenGL rendering—both OpenGL ES 1.0 and 2.0. I won’t cover in detail how to develop OpenGL ES for Android; there are plenty of books on the topic. But I’ll show you quickly some working sample code so you can get the idea. You have the app template to use when deciding to develop your own 3D app for Glass.
Listing 3-10 shows how to create an immersion that renders a shaking 3D tetrahedron in OpenGL ES 1.0.
Listing 3-10. Creating an Immersion with OpenGL ES 1.0 Rendering
// add in AppService.java:
private void createImmersionFor3DDrawing1() {
   Intent intent = new Intent(this, Immersion3DActivity.class);
   intent.addFlags(Intent.FLAG_ACTIVITY_NEW_TASK);
   startActivity(intent);
}

// change the onStartCommand calling code
public int onStartCommand(Intent intent, int flags, int startId) {
   createImmersionFor3DDrawing1();
       return START_STICKY;
}

// create an activity called Immersion3DActivity, and make its onCreate look like this:
public void onCreate(Bundle savedInstanceState) {
       super.onCreate(savedInstanceState);

   GLSurfaceView view = new GLSurfaceView(this);
       view.setRenderer(new TetrahedronRenderer(true));
       setContentView(view);
}
// create a class Tetrahedron as follows
class Tetrahedron {
   private FloatBuffer mFVertexBuffer;
   private ByteBuffer  mColorBuffer;
   private ByteBuffer  mIndexBuffer;

   public Tetrahedron() {
      byte ff = (byte)255;

      // four unique vertices for the tetrahedron
      float vertices[] = {
            -1.0f, 0.0f, 0.0f,
            1.0f, 0.0f, 0.0f,
            0.0f,  2.0f, 0.0f,
            0.0f, 0.6f, 0.5f
      };

      // color for each vertex
      byte colors[] = {
            ff, ff, 0, ff,
            0, ff, ff, ff,
            ff, 0, ff, ff,
            0, 0, ff, ff
      };

      // how to draw triangles based on the four unique vertices - 0 means the first 3 values in vertices array
      byte indices[] = {
            0, 2, 1,
            0, 2, 3,
            0, 3, 1,
            3, 2, 1
      };

      ByteBuffer vbb = ByteBuffer.allocateDirect(vertices.length * 4);
      vbb.order(ByteOrder.nativeOrder());
      mFVertexBuffer = vbb.asFloatBuffer();
      mFVertexBuffer.put(vertices);
      mFVertexBuffer.position(0);

      mColorBuffer = ByteBuffer.allocateDirect(colors.length);
      mColorBuffer.put(colors);
      mColorBuffer.position(0);

      mIndexBuffer = ByteBuffer.allocateDirect(indices.length);
      mIndexBuffer.put(indices);
      mIndexBuffer.position(0);
   }

   public void draw(GL10 gl) {
      gl.glFrontFace(GL11.GL_CW);
      // 3 is for 3D, meaning each vertex consists of 3 values
      gl.glVertexPointer(3, GL11.GL_FLOAT, 0, mFVertexBuffer);
      gl.glColorPointer(4, GL11.GL_UNSIGNED_BYTE, 0, mColorBuffer);
      // 12 means there're 4 vertices, as each vertex has 3 values
      gl.glDrawElements(GL11.GL_TRIANGLES, 12, GL11.GL_UNSIGNED_BYTE, mIndexBuffer);

      gl.glFrontFace(GL11.GL_CCW);
   }
}
   // create one more class TetrahedronRenderer
   class TetrahedronRenderer implements GLSurfaceView.Renderer {
   private boolean mTranslucentBackground;
   private Tetrahedron mTetrahedron;
   private float mTransX;

   public TetrahedronRenderer(boolean useTranslucentBackground) {
      mTranslucentBackground = useTranslucentBackground;
      mTetrahedron = new Tetrahedron();
   }

   public void onSurfaceCreated(GL10 gl, EGLConfig config) {
      gl.glDisable(GL11.GL_DITHER);
      gl.glHint(GL11.GL_PERSPECTIVE_CORRECTION_HINT,GL11.GL_FASTEST);

      if (mTranslucentBackground)
         gl.glClearColor(0,0,0,0);
      else
         gl.glClearColor(1,1,1,1);

      gl.glEnable(GL11.GL_CULL_FACE);
      gl.glShadeModel(GL11.GL_SMOOTH);
      gl.glEnable(GL11.GL_DEPTH_TEST);
   }

   public void onSurfaceChanged(GL10 gl, int width, int height) {
      gl.glViewport(0, 0, width, height);

      float ratio = (float) width / height;
      gl.glMatrixMode(GL11.GL_PROJECTION);
      gl.glLoadIdentity();
      gl.glFrustumf(-ratio, ratio, -1, 1, 1, 10);
   }

   public void onDrawFrame(GL10 gl) {
      gl.glClear(GL10.GL_COLOR_BUFFER_BIT | GL10.GL_DEPTH_BUFFER_BIT);

      gl.glMatrixMode(GL10.GL_MODELVIEW);
      gl.glLoadIdentity();
      gl.glTranslatef((float)Math.sin(mTransX), -1.0f, -3.0f);

      gl.glEnableClientState(GL10.GL_VERTEX_ARRAY);
      gl.glEnableClientState(GL10.GL_COLOR_ARRAY);

      mTetrahedron.draw(gl);

      mTransX += .075f;
   }
}
Basically, the Android class GLSurfaceView and interface GLSurfaceView.Renderer are the building blocks you use to create OpenGL ES graphics. Here you are creating an instance of GLSurfaceView directly, but if you need to enable UI and capture Glass gestures, you should create a subclass of GLSurfaceView. The GLSurfaceView instance sets as its renderer a render object that implements the GLSurfaceView.Renderer interface, which has three required methods to be implemented: onSurfaceCreated, onSurfaceChanged, and onDrawFrame. The primary content rendering happens in the onDrawFrame method, which is called to draw the current frame.
Run the app, and you’ll see a 3D tetrahedron shaking left and right in the center of Glass, as shown in Figure 3-8. Remember, you use the swipe-down gesture to exit the immersion.
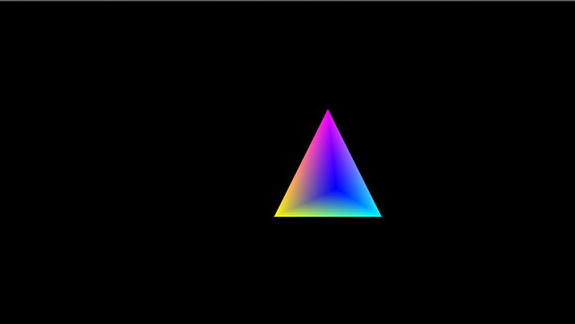
Figure 3-8. Immersion drawing OpenGL ES 1.0 graphics
There are some good OpenGLES Android samples at Android’s developer web site that you should try: http://developer.android.com/training/graphics/opengl/index.html. Download and unzip OpenGLES.zip there, and you’ll see two sample projects called HelloOpenGLES10 and HelloOpenGLES20. You can run them directly on your Android devices such as Nexus 7 tablet, and you should be able to port the HelloOpenGLES20 project to Glass with some minor changes. But there’s a simpler tutorial at www.learnopengles.com/android-lesson-one-getting-started/, and you can get the renderer class source code at https://github.com/learnopengles/Learn-OpenGLES-Tutorials/blob/master/android/AndroidOpenGLESLessons/src/com/learnopengles/android/lesson1/LessonOneRenderer.java. Follow the next simple step to see it running on your Glass. Replace the onCreate method implementation in Immersion3DActivity of Listing 3-10 with the following code:
public void onCreate(Bundle savedInstanceState) {
   super.onCreate(savedInstanceState);

   // Check if the system supports OpenGL ES 2.0.
   final ActivityManager activityManager = (ActivityManager) getSystemService(Context.ACTIVITY_SERVICE);
   final ConfigurationInfo configurationInfo = activityManager.getDeviceConfigurationInfo();

   if (configurationInfo.reqGlEsVersion >=0x20000)
   {
      view3D = new MyGLView(this);
      setContentView(view3D);
   }
   else // because Glass supports OpenGL ES 2.0, this won't run, unless you remove the test above and just want to write or port some OpenGL ES 1.0 code
   {
      GLSurfaceView view = new GLSurfaceView(this);
      view.setRenderer(new TetrahedronRenderer(true));
      setContentView(view);
   }
}

// create a GLSurfaceView subclass MyGLView
public class MyGLView extends GLSurfaceView {
   private final MyGL20Renderer renderer2;
   Context mContext;

   MyGLView(Context context) {
      super(context);

      setEGLContextClientVersion(2);
      renderer2 = new MyGL20Renderer();
      setRenderer(renderer2);

   }
}

// save LessonOneRenderer.java file above and rename it as well as the class name to MyGL20Renderer
// then add the file to your project
Note The line setEGLContextClientVersion(2) in the MyGLView constructor is important. Without it, your app will crash with several error messages such as “Called unimplemented OpenGL ES API” when it calls shader-related APIs such as GLES20.glShaderSource and GLES20.glCompileShader.
That’s all it takes to see an OpenGL ES 2.0 sample running in your Glass! Run the app, and say OK Glass” and then “Chapter 3” (yes, we’re still in Chapter 3!), and you’ll see, as shown in Figure 3-9, three triangles rotating nicely in 3D space.
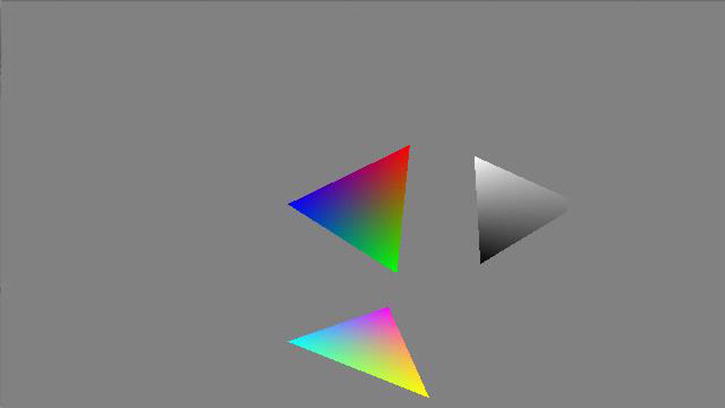
Figure 3-9. Immersion drawing OpenGL ES 2.0 graphics
When to Use Which
So, you’ve seen working samples of how Glass-styled cards, live cards, and immersions are created and what kind of content can be rendered on them. You may have some intuition about when to use which. While I’ll show you later in the book some real-world projects that are mainly based on live cards and immersions because they offer more user interaction and richer content, it’s helpful to present a summary on the three main UI elements.
- Live cards are always on the left side of the OK Glass home screen. Swiping forward or backward on a live card navigates the timeline. An immersion, however, replaces the timeline completely. You cannot swipe forward or backward on an immersion to navigate the timeline; you have to swipe down to exit the immersion first before you can navigate the timeline again.
- Strictly speaking, static cards created by the Mirror API can typically accept user input (tapping) to show the menu, but this feature is not available yet in the GDK as of June 2014. Live cards are required to have a menu, and tapping a live card will show the menu. Swiping left or right on a live card, while the menu is not showing, will go to the previous or next card in the timeline, but other gestures won’t be processed. Immersions can access a rich set of user gestures: tap, long press, swipe left and right, and multiple-finger versions of them. But both live cards and immersions can accept interesting sensor or location updates.
- You can use the Card API only to render a card’s content in a predefined way: You set the main body text, images in full or layout mode, and a footnote. But you can render any layout, including 2D and 3D content, on live cards and immersions.
- Because of the characteristics of Glass-styled cards, live cards, and immersions discussed earlier, the major uses for each type are self-explanatory. However, a hybrid app that uses all three types of UIs can make sense in some cases; for example, you want to display a summary or preview in a live card and let users launch an immersion activity from a menu option if they want to have more interaction with the app. It’s also easy to create cards from both live cards and immersions.
While developing real apps, you’ll also find that some features are available only for immersions but not live cards. Disabling head gesture using WindowUtils.FLAG_DISABLE_HEAD_GESTURES, for example, is available only for an immersion.
Glass developer’s site has a well-documented guide and samples at https://developers.google.com/glass/develop/gdk/ui/theme-widgets on how to create consistent and great Glass themes and cards and how to create scrolling or swipeable cards in an activity, which can offer great Glass user experiences because the scrolling simulates the Glass timeline and should make users feel right at home about it. A typical use case is to launch the detailed scrollable view of cards for more information after the user chooses to see details on a summary live card. You can test CardScrollView by following these steps:
- Create a new activity named CardScrollActivity and copy the sample code of CardScrollActivity from the previous Google URL; you can even add OpenGL views to the scrollable card view.
protected void onCreate(Bundle savedInstanceState) {
   super.onCreate(savedInstanceState);

   createCards();

   mCardScrollView = new CardScrollView(this);
   ExampleCardScrollAdapter adapter = new ExampleCardScrollAdapter();
   mCardScrollView.setAdapter(adapter);
   mCardScrollView.activate();
   setContentView(mCardScrollView);
}

private void createCards() {
   mCards = new ArrayList<View>();

   Card card;

   card = new Card(this);
   card.setText("This card has a footer.");
   card.setFootnote("I'm the footer!");
   mCards.add(card.getView());

   card = new Card(this);
   card.setText("This card has a puppy background image.");
   card.setFootnote("How can you resist?");
   card.setImageLayout(Card.ImageLayout.FULL);
   card.addImage(R.drawable.frown);
   mCards.add(card.getView());

   card = new Card(this);
   card.setText("This card has a mosaic of puppies.");
   card.setFootnote("Aren't they precious?");
   card.addImage(R.drawable.laugh);
   card.addImage(R.drawable.smile);
   card.addImage(R.drawable.surprise);
   mCards.add(card.getView());


   MyGLView v = new MyGLView(this);
   mCards.add(v);
   GLSurfaceView v2 = new GLSurfaceView(this);
   v2.setRenderer(new TetrahedronRenderer(true));
   mCards.add(v2);
   DrawView v3 = new DrawView(this);
   mCards.add(v3);

}

private class ExampleCardScrollAdapter extends CardScrollAdapter {
   @Override
   public int getPosition(Object item) {
      return mCards.indexOf(item);
   }

   @Override
   public int getCount() {
      return mCards.size();
   }

      @Override
   public Object getItem(int position) {
      return mCards.get(position);
   }

   @Override
   public View getView(int position, View convertView, ViewGroup parent) {
      return mCards.get(position);
   }
} - Add a new menu item in the main.xml in res/menu folder.
- Add to the onOptionsItemSelected method of MenuActivity.java a new case for the ID defined in step 2.
Intent intent = new Intent(this, CardScrollActivity.class);
startActivity(intent); - Either copy some of your drawable images and rename them to those used in CardScrollActivity or rename them in CardScrollActivity to use your existing images.
- Don’t forget to add an activity element in your AndroidManifest.xml file.
<activity
    android:name="com.morkout.glassuielements.CardScrollActivity "
    android:label="@string/app_name"
    android:enabled="true" >
</activity> - Define your AppService.java’s onStartCommand to use any of the three live card calling methods (they all have the menu attached).
createLowFrequencyLiveCard();
createHighFrequencyLiveCardForLayoutInflating();
createHighFrequencyLiveCardForCanvasDrawing();
Run the app, tap the live card, and choose the new menu item. You’ll see a scrolling view with three cards; they are created using the Card class, but because they’re added to the CardScrollView instead of the timeline (starting XE 16, you actually can’t add a card to the timeline), you won’t see them in the timeline. The activity that holds the scrollview behaves just like an immersion: You cannot navigate to the timeline; the scrollview replaces the timeline. Swipe down on it, and it will exit the activity and take you back to the live card, where you can navigate to the timeline or tap to see the menu (with a Stop menu option to exit the live card) again.
Note If you have created quite a few test apps, which you should do, and need to uninstall any app from your Glass, simply run the command adb uninstall <your_app_package_name>. If needed, you can see the whole list of installed app package names with the command adb shell 'pm list packages -f'.
Summary
In this chapter, you entered the exciting world of Glass and learned what kinds of UI elements can be built with GDK for a Glass app. The main Glass UI elements—the timeline, Glass-styled cards, live cards, immersions, menu items, and gestures—were discussed in detail with fully tested sample code that showed you how to render standard UI content, content from an XML layout, and content created using Android’s Canvas 2D and OpenGL ES 1.0 and 2.0. By now you should have a basic understanding of what kinds of apps you can build with GDK and when to use which or a combination of them. The journey has just started. In the following three chapters, I’ll first cover camera and image processing and then discuss video processing before moving on to voice and audio processing, among other exciting topics.