
Voice and Audio
You have already seen voice commands in action in all the sample projects discussed so far in the book, and the template app uses voice to launch Glass apps from the OK Glass menu. You have also seen text to speech and speech recognition activities supported in Glass. In this chapter, I’ll cover in detail the following solutions, which you can use as the foundation for your next amazing Glass voice apps:
- How to launch a service or activity in your Glassware using a voice trigger
- How to play specific Glass sound effects
- How to capture and play audio and how to further improve your karaoke app to record and play your voice when doing karaoke
- How to do pitch detection to recognize a musical note
- How to do touchtone detection to recognize each key you press on your phone
- How to identify music or a song you’re listening to
Sound exciting? Let’s dive in. To start, follow the same steps as in previous chapters to create a new project called VoiceAndAudio based on GlasswareTemplate. You can take a peek at the complete project source code for this chapter on the book’s site, but you may understand the topics better by starting from scratch, so it would be beneficial to start a new project of your own.
Google has pretty good documentation on how to use voice input to start Glassware and start the speech recognition activity at https://developers.google.com/glass/develop/gdk/starting-glassware. The GDK’s Sounds class, used to play Glass-specific sounds, is also described on the GDK’s Reference page. I’ll cover here how to apply, and modify when necessary, the code snippets in the documentation to launch both a service, which you have seen before, and an activity that plays different Glass sound effects.
But first, I will show you quickly how to use two voice triggers to launch two services in your app (you can copy AppService.java and rename it to AppServiceTwo.java). The content in AndroidManifest.xml, as shown in Listing 6-1, will create two entries in the OK Glass voice menu.
Listing 6-1. Adding Voice Commands to Multiple Services
<service
    android:name="com.morkout.smartcamera.AppService"
    android:enabled="true"
    android:exported="true"
    android:icon="@drawable/ic_app"
    android:label="@string/app_name" >
    <intent-filter>
        <action android:name="com.google.android.glass.action.VOICE_TRIGGER" />
    </intent-filter>

    <meta-data
        android:name="com.google.android.glass.VoiceTrigger"
        android:resource="@xml/voice_trigger_start" />
</service>
<service
    android:name="com.morkout.smartcamera.AppServiceTwo"
    android:enabled="true"
    android:exported="true"
    android:icon="@drawable/ic_app"
    android:label="@string/app_name_two" >
    <intent-filter>
        <action android:name="com.google.android.glass.action.VOICE_TRIGGER" />
    </intent-filter>

    <meta-data
        android:name="com.google.android.glass.VoiceTrigger"
        android:resource="@xml/voice_trigger_start2" />
</service>
The content for voice_trigger_start.xml, voice_trigger_start2.xml, and strings.xml is as follows:
<trigger keyword="@string/say_smartcamera" >
</trigger>

<trigger keyword="@string/say_smartcamera_two" >
</trigger>

<string name="say_smartcamera">Camera One</string>
<string name="say_smartcamera_two">Camera Two</string>
Note If you change the second service name, AppServiceTwo, in AndroidManifest.xml to AppService, hoping that both voice commands will trigger the service, you’ll find that only one entry, “Camera two” for voice_trigger_start2, will appear and that only one voice command, “Camera 2,” will launch the service.
You can also apply the VOICE_TRIGGER action to any activity declared in AndroidManifest.xml. For example, if you change the ZoomActivity in the Chapter 4 SmartCamera project’s AndroidManifest.xml file to look like Listing 6-2, then a voice command will show in the Glass voice menu. After you speak the command defined in the trigger keyword, the ZoomActivity will be launched directly, which is different from what you have seen so far, which is that a service is started by a voice command, then a live card gets created, and choosing a menu item associated with the live card launches an activity.
Listing 6-2. Adding Voice Commands to an Activity
<activity
    android:name="com.morkout.smartcamera.ZoomActivity"
    android:enabled="true"
    android:label="@string/app_name" >
    <intent-filter>
        <action android:name="com.google.android.glass.action.VOICE_TRIGGER" />
    </intent-filter>
    <meta-data
        android:name="com.google.android.glass.VoiceTrigger"
        android:resource="@xml/voice_trigger_start2" />
</activity>
Sound Effects
In the project VoiceAndAudio you created earlier in this chapter, follow these steps to add voice commands to both the service that launches the app and the activity that launches the Glass sound effect test:
- In the res/menu/main.xml file, add a new menu item.
<item
        android:id="@+id/soundeffect"
android:title="@string/soundeffect"/> - In res/menu, add a new XML file called soundeffect.xml.
<?xml version="1.0" encoding="utf-8"?>
<menu xmlns:android="http://schemas.android.com/apk/res/android " >

    <item
        android:id="@+id/disallowed"
        android:title="@string/disallowed"/>
    <item
        android:id="@+id/dismissed"
        android:title="@string/dismissed"/>
    <item
        android:id="@+id/error"
        android:title="@string/error"/>
    <item
        android:id="@+id/selected"
        android:title="@string/selected"/>
    <item
        android:id="@+id/success"
        android:title="@string/success"/>
    <item
        android:id="@+id/tap"
        android:title="@string/tap"/>
</menu> - Add a new XML file called voice_trigger_start2.xml in res/xml:
<?xml version="1.0" encoding="utf-8"?>
<trigger keyword="@string/sound_effect" >
    <input prompt="@string/glass_voice_prompt" />
</trigger> - Make your res/values/strings.xml file look like this:
<resources>
    <string name="app_name">Voice And Audio</string>
    <string name="say_glasswaretemplate">Voice and Audio</string>
    <string name="glass_voice_prompt">Which sound to hear?</string>
    <string name="soundeffect">Sound Effect</string>
    <string name="stop">STOP</string>
    <string name="disallowed">Disallowed</string>
    <string name="dismissed">Dismissed</string>
    <string name="error">Error</string>
    <string name="selected">Selected</string>
    <string name="success">Success</string>
    <string name="tap">Tap</string>
</resources> - In AndroidManifest.xml, add the following content:
<activity
    android:name="com.morkout.voiceandaudio.GlassSoundActivity"
    android:enabled="true"
    android:label="@string/app_name" >
    <intent-filter>
        <action android:name="com.google.android.glass.action.VOICE_TRIGGER" />
    </intent-filter>

    <meta-data
        android:name="com.google.android.glass.VoiceTrigger"
        android:resource="@xml/voice_trigger_start2" />
</activity> - In MenuActivity.java, add the following statement in the onOptionsItemSelected method:
case R.id.soundeffect:
    Intent intent2 = new Intent(this, GlassSoundActivity.class);
    startActivity(intent2);
return true; - Finally, create a new Activity subclass file called GlassSoundActivity.java, as shown in Listing 6-3.
Listing 6-3. Activity Playing Glass Sound Effects and Processing a Voice Prompt
public class GlassSoundActivity extends Activity {
    public final static String TAG = "GlassSoundActivity";

    @Override
    protected void onCreate(Bundle savedInstanceState) {
        super.onCreate(savedInstanceState);
        openOptionsMenu();
    }

    @Override
    public boolean onCreateOptionsMenu(Menu menu) {
        MenuInflater inflater = getMenuInflater();
        inflater.inflate(R.menu.soundeffect, menu);
        return true;
    }

    @Override
    public void onResume() {
        super.onResume();
        if (getIntent().getExtras() == null) return;
        ArrayList<String> voiceResults = getIntent().getExtras()
                .getStringArrayList(RecognizerIntent.EXTRA_RESULTS);
        if (voiceResults != null) {
            if (voiceResults.size() > 0) {
                AudioManager audio = (AudioManager) this.
                                     getSystemService(Context.AUDIO_SERVICE);

                // loop through the recognition results to see if
                // any of them mataches any Glass sound name
                for (String result: voiceResults) {
                    Toast.makeText(this, result,
                        Toast.LENGTH_SHORT).show();

           if (result.equalsIgnoreCase("disallowed")) {
               audio.playSoundEffect(Sounds.DISALLOWED);
               break;
           }
           else if (result.equalsIgnoreCase("dismissed")) {
                audio.playSoundEffect(Sounds.DISMISSED);
               break;
           }
           else if (result.equalsIgnoreCase("error")) {
               audio.playSoundEffect(Sounds.ERROR);
               break;
           }
           else if (result.equalsIgnoreCase("selected")) {
               audio.playSoundEffect(Sounds.SELECTED);
               break;
           }
           else if (result.equalsIgnoreCase("success")) {
               audio.playSoundEffect(Sounds.SUCCESS);
               break;
           }
           else if (result.equalsIgnoreCase("tap")) {
               audio.playSoundEffect (Sounds.TAP);
               break;
           }
       }}}}

    @Override
    public void onOptionsMenuClosed (Menu menu) {
        finish();
    }

    @Override
    public boolean onOptionsItemSelected(MenuItem item) {
        AudioManager audio = (AudioManager) this.
                      getSystemService(Context.AUDIO_SERVICE);

        switch (item.getItemId()) {
        case R.id.disallowed:
            audio.playSoundEffect(Sounds.DISALLOWED);
            Toast.makeText(this, "Disallowed",
                              Toast.LENGTH_SHORT).show();
            return true;

        case R.id.dismissed:
            audio.playSoundEffect(Sounds.DISMISSED);
            Toast.makeText(this, "Dismissed",
                              Toast.LENGTH_SHORT).show();
            return true;

        case R.id.error:
            audio.playSoundEffect(Sounds.ERROR);

            Toast.makeText(this, "Error", Toast.LENGTH_SHORT).show();
            return true;

        case R.id.selected:
            audio.playSoundEffect(Sounds.SELECTED);
            Toast.makeText(this, "Selected",
                Toast.LENGTH_SHORT).show();
            return true;

        case R.id.success:
            audio.playSoundEffect(Sounds.SUCCESS);
            Toast.makeText(this, "Success", Toast.LENGTH_SHORT).show();
            return true;

        case R.id.tap:
            audio.playSoundEffect(Sounds.TAP);
            Toast.makeText(this, "Tap", Toast.LENGTH_SHORT).show();
            return true;

        default:
            return super.onOptionsItemSelected(item);
        }
    }
}
Run the app and after saying “OK Glass,” you can try two different voice commands. Saying “Voice and audio” will launch the app service you’re used to, and tapping Glass will show the Glass sound effect menu. Saying “Sound effect” will launch the Glass sound effect activity directly, and because you have a voice prompt defined in step 3 in the previous exercise, you’ll see the prompt shown in Figure 6-1. After your voice input is recognized, for example you say “Dismissed” (also shown in Figure 6-1), the GlassSoundActivity, because of the description in AndroidManifest.xml, will be launched. Then you use getIntent().getExtras().getStringArrayList in onResume to retrieve the recognized result. In the sample, you test to see whether there’s a match between the result and one of Glass’s sound effects and play the sound if so.
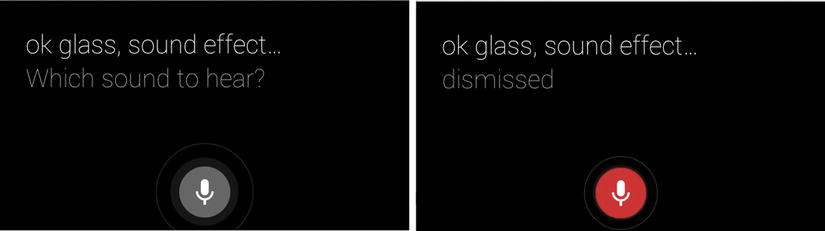
Figure 6-1. Voice input with prompt to launch an activity
For a voice prompt that launches a service, you can get the recognized test in the service’s onStartCommand method. This and other voice input–related details are well documented at Google’s Glass developer site (https://developers.google.com/glass/develop/gdk/starting-glassware), so I won’t repeat them here.
If you’re interested in a 100 percent hands-free app so you can still do karaoke while your hands are coding, debugging, or writing, you should check out the contextual voice command feature request discussion at https://code.google.com/p/google-glass-api/issues/detail?id=273. This is a commonly requested feature, and it’s likely to be improved in a future Glass update. Therefore, I won’t discuss it further since the text would probably be outdated by the time you read the book. Instead, let’s see how you can improve the karaoke feature in the video app by capturing your beautiful voice and playing it back.
Audio Capture and Play
Basically, there are two ways of capturing audio and playing back the recorded audio. The first method is to use the same MediaRecorder class you saw in Chapter 5 for custom video capture.
Using MediaRecorder and MediaPlayer
The following code is based on the Android developer site, but it has some important changes to make it work for Google Glass, mainly in the settings of the MediaRecorder object and to simplify the record/play process:
- Add a new menu entry in VoiceAndAudio’s res/menu/main.xml.
<item
        android:id="@+id/audiocapture"
android:title="@string/audiocapture"/> - Add the following in MenuActivity.java’s onOptionsItemSelected:
case R.id.audiocapture:
    Intent intent3 = new Intent(this, AudioCaptureActivity.class);
    startActivity(intent3);
return true; - Add <string name="audiocapture">Audio Capture</string> in strings.xml.
- Add the following in AndroidManifest.xml:
<uses-permission android:name="android.permission.RECORD_AUDIO" />
<uses-permission android:name="android.permission.WRITE_EXTERNAL_STORAGE" />

<activity
    android:name="com.morkout.voiceandaudio.AudioCaptureActivity"
    android:enabled="true"
    android:label="@string/app_name" >
</activity> - Create a new AudioCaptureActivity.java file, as shown in Listing 6-4.
Listing 6-4. Capturing and Playing Audio Using MediaRecorder and MediaPlayer
public class AudioCaptureActivity extends Activity {
    private static final String TAG = "AudioCaptureActivity";
    private static String mFileName = null;

    private RecordButton mRecordButton = null;
    private MediaRecorder mRecorder = null;

    private MediaPlayer   mPlayer = null;

    private void onRecord(boolean start) {
        if (start) {
            startRecording();
        } else {
            stopRecording();
        }
    }

    private void startPlaying() {
        mPlayer = new MediaPlayer();

        mPlayer.setOnCompletionListener(new MediaPlayer.
                      OnCompletionListener() {
            public void onCompletion(MediaPlayer mp) {
                mRecordButton.setText("Start recording");
                mPlayer.release();
                mPlayer = null;
            }
        });

        try {
            mPlayer.setDataSource(mFileName);
            mPlayer.prepare();
            mPlayer.start();
        } catch (IOException e) {
            Log.e(TAG, "prepare() failed");
        }
    }

    private void startRecording () {
        mRecorder = new MediaRecorder();
        // the settings below are important for the capture
        // and playback to work in Glass
        mRecorder.setAudioSource(MediaRecorder.AudioSource.DEFAULT);
        mRecorder.setOutputFormat(MediaRecorder.OutputFormat.DEFAULT);
        mRecorder.setAudioEncoder(MediaRecorder.AudioEncoder.AAC);
        mRecorder.setOutputFile(mFileName);

        try {
            mRecorder.prepare();
        } catch (IOException e) {
            Log.e(TAG, "prepare() failed");
        }
        mRecorder.start();
    }

    private void stopRecording() {
        mRecorder.stop();
        mRecorder.release();
        mRecorder = null;
    }

    class RecordButton extends Button {
        boolean mStartRecording = true;

        OnClickListener clicker = new OnClickListener() {
            public void onClick(View v) {
                onRecord(mStartRecording);
                if (mStartRecording) {
                    setText("Stop recording");
                } else {
                    setText("Playing...");
                    startPlaying();
                }
                mStartRecording = !mStartRecording;
            }
        };

        public RecordButton(Context ctx) {
            super(ctx);
            setText("Start recording");
            setOnClickListener(clicker);
        }
    }

    @Override
    public void onCreate(Bundle icicle) {
        super.onCreate(icicle);

        mFileName = Environment.getExternalStorageDirectory().
                      getAbsolutePath();
        mFileName += "/audiorecordtest.3gp";

        LinearLayout ll = new LinearLayout(this);
        mRecordButton = new RecordButton(this);
        ll.addView(mRecordButton,
                new LinearLayout.LayoutParams(
                        ViewGroup.LayoutParams.WRAP_CONTENT,
                        ViewGroup.LayoutParams.WRAP_CONTENT,
                        0));
        setContentView(ll);
    }

    @Override
    public void onPause() {
        super.onPause();
        if (mRecorder != null) {
            mRecorder.release();
            mRecorder = null;
        }

        if (mPlayer != null) {
            mPlayer.release();
            mPlayer = null;
        }
    }
}
Run the app and say “OK Glass” and then “Voice and audio.” Tap to show the menu, and swipe to select Audio Capture. You’ll see a button titled “Start recording.” Tap your Glass touchpad to start recording and then say something and tap again; you’ll hear your recorded voice being played back. You can repeat the record-play process as many times as you want.
MediaRecorder and MediaPlayer are powerful high-level Android APIs for both video and audio capture and playback. There is another set of Android APIs, AudioRecord and AudioTrack, that can be used for audio-specific capture and playback. For audio play (no capture) only, SoundPool is yet another API, which I won’t discuss here, but if you’re interested in knowing when you should use which API, you can check out this article: www.wiseandroid.com/post/2010/07/13/Intro-to-the-three-Android-Audio-APIs.aspx.
Using AudioRecord and AudioTrack
AudioRecord and AudioTrack are low-level APIs that deal directly with the audio raw data. So, AudioRecord is appropriate for audio processing, which can lead to many interesting applications like those that will be introduced in the following sections of this chapter.
To see how to use AudioRecord and AudioTrack to capture and play audio, follow these steps:
- Add another menu entry, audiocapture2, in main.xml. Add a new case statement in MenuActivity.java. Add <string name="audiocapture2">Audio Capture2</string> in strings.xml.
- Create a new audiorecorder.xml file in the layout folder.
<?xml version="1.0" encoding="utf-8"?>
<LinearLayout xmlns:android="http://schemas.android.com/apk/res/android "
    android:layout_width="fill_parent"
    android:layout_height="fill_parent"
    android:orientation="vertical" >

    <TextView
        android:layout_width="fill_parent"
        android:layout_height="wrap_content"
        android:text="HB-Record Audio" />
    <Button
        android:id="@+id/startrec"
        android:layout_width="fill_parent"
        android:layout_height="wrap_content"
        android:text="Start Recording" />
    <Button
        android:id="@+id/stoprec"
        android:layout_width="fill_parent"
        android:layout_height="wrap_content"
        android:text="Stop Recording" />

    <Button
        android:id="@+id/playback"
        android:layout_width="fill_parent"
        android:layout_height="wrap_content"
        android:text="Play Back" />
</LinearLayout> - Declare a new activity called AudioCapture2Activity in AndroidManifest.xml.
- Create a new class called AudioCapture2Activity, as in Listing 6-5.
Listing 6-5. Capturing and Playing Audio Using AudioRecord and AudioTrack
public class AudioCapture2Activity extends Activity {
    Button startRec, stopRec, playBack;
    Boolean recording;
    GestureDetector mGestureDetector;

    @Override
    public void onCreate(Bundle savedInstanceState) {
        super.onCreate(savedInstanceState);
        setContentView(R.layout.audiorecorder);

        startRec = (Button)findViewById(R.id.startrec);
        stopRec = (Button)findViewById(R.id.stoprec);
        playBack = (Button)findViewById(R.id.playback);

        startRec.setOnClickListener(startRecOnClickListener);
        stopRec.setOnClickListener(stopRecOnClickListener);
        playBack.setOnClickListener(playBackOnClickListener);

        stopRec.setEnabled(false);
        playBack.setEnabled(false);

        mGestureDetector = createGestureDetector(this);
    }

    // GestureDetector needed since XE16 to swipe to next/prev button
    private GestureDetector createGestureDetector(Context context) {
        GestureDetector gestureDetector = new GestureDetector(context);
        //Create a base listener for generic gestures
        gestureDetector.setBaseListener(new GestureDetector.BaseListener() {

            @Override
            public boolean onGesture(Gesture gesture) {
                if (gesture == Gesture.SWIPE_RIGHT) {
                    if (startRec.isEnabled()) {
                        startRec.setEnabled(false);
                        stopRec.setEnabled(true);
                        stopRec.requestFocus();
                        playBack.setEnabled(false);
                    }
                    else if (stopRec.isEnabled()) {
                        stopRec.setEnabled(false);
                        playBack.setEnabled(true);
                        playBack.requestFocus();
                        startRec.setEnabled(false);
                    }
                    else if (playBack.isEnabled()) {
                        playBack.setEnabled(false);
                        startRec.setEnabled(true);
                        startRec.requestFocus();
                        stopRec.setEnabled(false);
                    }
                    return true;
                } else if (gesture == Gesture.SWIPE_LEFT) {
                    if (startRec.isEnabled()) {
                        startRec.setEnabled(false);
                        playBack.setEnabled(true);
                        playBack.requestFocus();
                        stopRec.setEnabled(false);
                    }
                    else if (stopRec.isEnabled()) {
                        stopRec.setEnabled(false);
                        startRec.setEnabled(true);
                        startRec.requestFocus();
                        playBack.setEnabled(false);
                    }
                    else if (playBack.isEnabled()) {
                        playBack.setEnabled(false);
                        stopRec.setEnabled(true);
                        stopRec.requestFocus();
                        startRec.setEnabled(false);
                    }
                    return true;
                }
                return false;
            }
        });

        return gestureDetector;
    }

    public boolean onGenericMotionEvent(MotionEvent event) {
        if (mGestureDetector != null) {
            return mGestureDetector.onMotionEvent(event);
        }
        return false;
    }

    OnClickListener startRecOnClickListener = new OnClickListener() {
        @Override
        public void onClick(View arg0) {
            startRec.setEnabled(false);
            stopRec.setEnabled(true);
            stopRec.requestFocus();

            Thread recordThread = new Thread(new Runnable() {
                @Override
                public void run() {
                    recording = true;
                    startRecord();
                }
            });

            recordThread.start();
        }
    };

    OnClickListener stopRecOnClickListener = new OnClickListener() {
        @Override
        public void onClick(View arg0) {
            recording = false;
            startRec.setEnabled(false);
            stopRec.setEnabled(false);
            playBack.setEnabled(true);
            playBack.requestFocus();
        }
    };

    OnClickListener playBackOnClickListener   = new OnClickListener() {
        @Override
        public void onClick(View v) {
            startRec.setEnabled(true);
            stopRec.setEnabled(false);
            playBack.setEnabled(false);
            startRec.requestFocus();
            playRecord();
        }
    };

    private void startRecord() {
        File file = new File(Environment.getExternalStorageDirectory(),
                      " audiorecordtest.pcm");
        try {
            file.createNewFile();
            OutputStream outputStream = new FileOutputStream(file);
            BufferedOutputStream bufferedOutputStream = new
                              BufferedOutputStream(outputStream);
            DataOutputStream dataOutputStream = new
                              DataOutputStream(bufferedOutputStream);

            int minBufferSize = AudioRecord.getMinBufferSize(11025,
                AudioFormat.CHANNEL_IN_MONO,
                AudioFormat.ENCODING_PCM_16BIT);

            short[] audioData = new short[minBufferSize];

            AudioRecord audioRecord = new AudioRecord(
                MediaRecorder.AudioSource.MIC,
                11025,
                AudioFormat.CHANNEL_IN_MONO,
                AudioFormat.ENCODING_PCM_16BIT,
                minBufferSize);

            audioRecord.startRecording();

            while(recording) {
                int numberOfShort = audioRecord.read(audioData, 0,
                                     minBufferSize);
                for(int i = 0; i < numberOfShort; i++)
                    dataOutputStream.writeShort(audioData[i]);
            }
            audioRecord.stop();
            dataOutputStream.close();
        }
        catch (IOException e) {
            e.printStackTrace();
        }
    }

    void playRecord() {
        File file = new File(Environment.getExternalStorageDirectory (),
                       " audiorecordtest.pcm");
        int shortSizeInBytes = Short.SIZE/Byte.SIZE;

        int bufferSizeInBytes = (int)(file.length()/shortSizeInBytes);
        short[] audioData = new short[bufferSizeInBytes];

        try {
            InputStream inputStream = new FileInputStream(file);
            BufferedInputStream bufferedInputStream = new
                              BufferedInputStream(inputStream);
            DataInputStream dataInputStream = new
                              DataInputStream(bufferedInputStream);

            int i = 0;
            while(dataInputStream.available() > 0) {
                audioData[i] = dataInputStream.readShort();
                i++;
            }

            dataInputStream.close();

            AudioTrack audioTrack = new AudioTrack(
                AudioManager.STREAM_MUSIC,
                11025,
                AudioFormat.CHANNEL_CONFIGURATION_MONO,
                AudioFormat.ENCODING_PCM_16BIT,
                bufferSizeInBytes,
                AudioTrack.MODE_STREAM);

            audioTrack.play();
            audioTrack.write(audioData, 0, bufferSizeInBytes);
        } catch (FileNotFoundException e) {
            e.printStackTrace();
        } catch (IOException e) {
            e.printStackTrace();
        }
    }
}
The two most important methods here are startRecord and playRecord. Also, notice that startRecord needs to run in a non-UI thread to avoid the blocking of the main thread. Now run the app and select the Audio Capture2 menu item, and you’ll see three buttons (called Start Recording, Stop Recording, and Play Back) that allow you to test the audio capture and play.
If you use adb shell and look at the audio files recorded in the two methods, you may notice the file generated in the second method has a much larger size than the file generated in the first method, especially with longer recording. This is as expected because the raw audio data audiorecordtest.pcm takes more space than the compressed MediaRecorder-generated file audiorecordtest.3gp. Furthermore, if for test purposes you use adb pull to grab the two files, you can most likely play the audiorecordtest.3gp file but will probably need a tool such as open source Audacity (available for download at http://audacity.sourceforge.net/download/) to import the audiorecordtest.pcm file with the settings in Figure 6-2, which match the settings used in the new AudioRecord.

Figure 6-2. Using Audacity to import an audio file recorded using AudioRecord
Improving the Karaoke App
Now you’re ready to further improve your karaoke app by capturing your singing while playing the selected video and playing back the recorded audio after the video play is done. Make the following changes in MyVideoApps’ VideoSearchActivity.java file:
- Add the following code after public void launchVideo(String youtubeurl):
private static String mFileName = Environment.getExternalStorageDirectory().
    getAbsolutePath() + "/karaoke-recording.3gp";
private MediaRecorder mRecorder = null;
private MediaPlayer   mPlayer = null;
private Boolean mRecording;

private void startPlaying() {
    mPlayer = new MediaPlayer();
    try {
        mPlayer.setDataSource(mFileName);
        mPlayer.prepare();
        mPlayer.start();
    } catch (IOException e) {
        Log.e(TAG, "prepare() failed");
    }

}

private void stopPlaying() {
    if (mPlayer != null) {
        mPlayer.release();
        mPlayer = null;
    }
}

private void startRecording() {
    mRecorder = new MediaRecorder();
    mRecorder.setAudioSource(MediaRecorder.AudioSource.DEFAULT);
    mRecorder.setOutputFormat(MediaRecorder.OutputFormat.DEFAULT);
    mRecorder.setAudioEncoder(MediaRecorder.AudioEncoder.AAC);

    mRecorder.setOutputFile(mFileName);
    try {
        mRecorder.prepare();
    } catch (IOException e) {
        Log.e(TAG, "prepare() failed");
    }

    mRecorder.start();
}

private void stopRecording() {
    if (mRecorder != null) {
        mRecorder.stop();
        mRecorder.release();
        mRecorder = null;
    }
} - Add a new case statement in onActivityResult to handle the return from the video play activity. This will stop the audio recording and start playing the recorded audio.
protected void onActivityResult(int RequestCode,
           int ResultCode, Intent data) {
    switch(RequestCode) {
    case VIDEO_PLAY_ACTIVITY:
        stopRecording();
        startPlaying();
        break;
case VOICE_RECOGNIZER_REQUEST_CODE: - Add the following code at the end of public void launchVideo(String youtubeurl):
new Thread(new Runnable() {
       @Override
    public void run() {
        mRecording = true;
        startRecording();
    }
}).start(); - Add stopPlaying(); at the end of onPause.
You can also use the second method of capturing and playing audio here. Now you can sing all you can while listening to your favorite YouTube video and find out whether you should go to American Idol right away!
Pitch Detection
I just started learning how to play piano last year, and with months of effort, I’m now able to play, with both hands, only three songs. What I find even more challenging than playing with both hands is detecting whether I just played an incorrect note. Mark, my son, has been playing piano for years, and he can always easily tell me what note I just played, which simply amazes me. I’ll probably never be able to do that, but, hey, I’m a developer, so how about letting Glass do that for me? Call it cheating? I guess I can live with that.
After some research, I found a couple of useful web sites talking about how to use Fast Fourier Transform for pitch detection (www.codeproject.com/Articles/32172/FFT-Guitar-Tuner) and how to map note names to frequencies (www.phys.unsw.edu.au/jw/notes.html). There’s also an Android open source project called Android Tuner: https://code.google.com/p/androidtuner/source/browse/?r=134743f47bfb0a0842f3dc73a75fed52923c8917. They should be enough for you to integrate into the app.
First, download the ZIP file of the open source Android project from https://code.google.com/p/androidtuner/source/browse/?r=134743f47bfb0a0842f3dc73a75fed52923c8917. Unzip it, and you’ll see a folder called androidtuner-134743f47bfb. Then, import the project to Eclipse; a project called GuitarTunerActivity will show up in Eclipse’s Package Explorer. Run the app on an Android device such as Nexus 7 or Glass (with the help of the Launcher app) and play a note or make a sound. The message “frequency detected” will appear.
Now follow these steps to integrate the project and make the necessary changes:
- Copy the four source files from GuitarTunerActivity’s src/com.example.AndroidTuner to VoiceAndAudio’s src/com.morkout.voiceandaudio, and rename AndroidTunerActivity to PitchDetectionActivity.
- Create and initialize a new instance variable in DrawableView.java, after its constructor, with the frequency value for each key in a 88-key piano (the MIDI value starts as 21 for the first element in the array and then increases by 1 for each following element).
    private double frequencies[] = new double[] {27.50, 29.14, 30.87, // A0, A0#, B0
        32.70, 34.65, 36.71, 38.89, 41.20, 43.65, 46.25, 49.00, 51.91, 55.00, 58.27, 61.74, // C1 - B1
            // C, C#, D, D#, E, F, F#, G, G#, A, A#, B
        65.51, 69.30, 73.42, 77.78, 82.41, 87.31, 92.50, 98.00, 103.83, 110.00, 116.54, 123.47, // C2 - B2
        130.81, 138.59, 146.83, 155.56, 164.81, 174.61, 185.00, 196.00, 207.65, 220.00, 233.08, 246.94, // C3 - B3
        261.63, 277.18, 293.67, 311.13, 329.63, 349.23, 369.99, 392.00, 415.30, 440.00, 466.16, 493.88, // C4 - B4
        523.25, 554.37, 587.33, 622.25, 659.26, 698.46, 739.99, 783.99, 830.61, 880.00, 932.33, 987.77, // C5 - B5
        1046.5, 1108.7, 1174.7, 1244.5, 1318.5, 1396.9, 1480.0, 1568.0, 1661.2, 1760.0, 1864.7, 1975.5, // C6 - B6
        2093.0, 2217.5, 2349.3, 2489.0, 2637.0, 2793.0, 2960.0, 3136.0, 3322.4, 3520.0, 3729.3, 3951.1, // C7 - B7
4186.0}; // C8 - Also in DrawableView.java, at the end of the DrawCurrentFrequency method implementation, replace the line canvas.drawText(Math.round(representation_.pitch * 10) / 10.0 + " Hz", 20, 40, paint); with the following code to find the number closest to a note frequency and show the right note:
double freq = Math.round(representation_.pitch * 10) / 10.0;
int index = -1;
for (int i=0; i<frequencies.length-1; i++) {
    if (frequencies[i] <= freq && freq <= frequencies[i+1]) {
        if (freq-frequencies[i] <= frequencies[i+1]-freq)
            index = i;
        else
            index = i+1;
        break;
    }
}
if (index==-1) {
    if (freq<frequencies[0] && (frequencies[0]-freq<2.0))
        index = 0;
    else if (freq>frequencies[frequencies.length-1] && (freq-frequencies[frequencies.length-1]<100.0))
        index = frequencies.length - 1;
}
if (index==-1)
    canvas.drawText(Math.round(representation_.pitch * 10) / 10.0 +
                  " Hz", 20, 40, paint);
else {
    String noteString;
    if (index == 0) noteString = "A0";
    else if (index == 1) noteString = "A0 Sharp";
    else if (index == 2) noteString = "B0";
    else {
        int n = (int) ((index-3) / 12);
        int m = (int) ((index-3) % 12);
        String[] notes  = new String[] { "C", "C#", "D", "D#", "E", "F", "F#", "G", "G#", "A", "A#", "B"};
        noteString = notes[m];
        noteString = noteString.substring(0, 1) + (n+1) + (notes[m].length()==1?"":"#");
    }
    canvas.drawText(noteString + " - " + freq + " Hz", 20, 40, paint);
}
Note A slightly more accurate way to get the MIDI number from frequency, so you can find out which note is played, is to use the formula midi = 12*log2(fm/440hz) + 69. Or, in Java, use this:
Math.round((float)(12*Math.log(freq/440f)/Math.log(2))) + 69
Also, be aware that the AndroidTuner library used here may not reliably produce the correct frequencies for all notes and for all instruments, digital or not, but it works fine in most of these test cases. The example here is meant to be a good starting point for you to develop a full-blown pitch detection or tuner app on Glass.
- Copy the jni directory from GuitarTunerActivity to VoiceAndAudio and change in fft.cpp the line jniRegisterNativeMethods(env, "com/example/AndroidTuner/PitchDetector", gMethods, 1); to jniRegisterNativeMethods(env, "com/morkout/voiceandaudio/PitchDetector", gMethods, 1); then in your computer’s Terminal window, cd to the location of the VoiceAndAudio project and run ndk-build. You should see something like the following (and in Eclipse you’ll see a subfolder named armeabi with the file libfft-jni.so added under the libs folder):
$ ndk-build
[armeabi] Install : libfft-jni.so => libs/armeabi/libfft-jni.so - Finally, you know the drill—add a new menu option in menu’s main.xml, add Pitch Detection in strings.xml, and update MenuActivity.java and AndroidManifest.xml.
Run the app and select Pitch Detection from the menu. You’ll see a “Play a musical note” screen. Then, after playing, for example, the middle C note, you’ll see the detected note with its frequency, as shown in Figure 6-3.

Figure 6-3. Detecting a musical note
I won’t go into the details of the source code imported from the Android Tuner open source. You can look at it from either the integrated VoiceAndAudio project or the GuitarTunerActivity project to understand how Fast Fourier Transform and the math work, but you can see from the PitchDetector.java file how AudioRecord is used to record some audio to be processed later. This is similar to how touchtone is recorded for detection (which will be described in the next section) and most other audio-processing scenarios.
Touchtone Detection
Well, although Mark can recognize any musical note played, he cannot detect a touchtone sound entered on a phone. You may not know that each key, whether in a push-button telephone or a smartphone, generates two unique tones of specific frequencies (that’s why it’s called Dual-Tone Multi-Frequency, or DTMF) when pressed (see http://searchnetworking.techtarget.com/definition/DTMF for more information). But I have a friend who’s been working in computer telephony for years, and he can easily detect any touchtone (so people had better not enter some secret phone numbers around him!). So, how do you implement the touchtone detection in Glass? This problem may also be interesting to those of you who want to impress your friends or are just curious to see how Glass can decode the numbers entered on a phone. You’ll also see how AudioRecord is used to capture the raw audio data, which gets processed by the recognizer.
After some searching and testing, I found another open source project as a good candidate for being integrated to your project. The steps to add touchtone detection to the VoiceAndAudio project are as follows:
- Download the open source project at https://code.google.com/p/dtmf-decoder/source/browse/.
- Unzip the downloaded file and import it to Eclipse; you’ll see a project called recognizer in Eclipse.
- Comment the line Apphance.start(this, APP_KEY); in src/pam.recognizer’s MainActivity.java file to fix the project build error caused by the call to a testing service that is unrelated to the touchtone detection.
- Run the app to test it on Glass and use your phone, smart or dumb, to enter any of the ten digits or * and # keys. You need to put your phone close to Glass to see the detected key.
- Copy both the match and wpam.recognizer packages from recognizer to VocieAndAudio, and fix any possible errors in the copied files by importing com.morkout.voiceandaudio.R.
- Add a Touchtone Detection menu option in main.xml, strings.xml, and MenuActivity.java.
case R.id.touchtone:
    Intent intent5 = new Intent(this, MainActivity.class);
    startActivity(intent5);
return true; - In AndroidManifest.xml, add the following line:
<activity
    android:name="wpam.recognizer.MainActivity"
    android:enabled="true"
    android:label="@string/app_name" >
</activity> - Open the Controller.java file in the wpam.recognizer package and replace the following two lines (you should take a look at RecordTask.java and RecognizerTask.java to see how audio is captured and processed):
recordTask.execute();
recognizerTask.execute();
with the following:
recordTask.executeOnExecutor(AsyncTask.THREAD_POOL_EXECUTOR);
recognizerTask.executeOnExecutor(AsyncTask.THREAD_POOL_EXECUTOR);
This has to be done to make the app work on Glass because async tasks have been executed on a single thread since Android API Level 11, and if you want parallel execution of the two tasks (recordTask and recognizerTask), you need to call the executeOnExecutor method on the async tasks. Check out http://developer.android.com/reference/android/os/AsyncTask.html for more information.
Run the VoiceAndAudio app from Eclipse and say “OK Glass” and then “Voice and audio.” Tap to see the app menu and select the Touchtone Detection menu item; you’ll see the UI shown in Figure 6-4. Tap Start and enter the Glass support number 1800GLASSXE on your phone. Your Glass will know the number you’re calling, as shown in Figure 6-4.
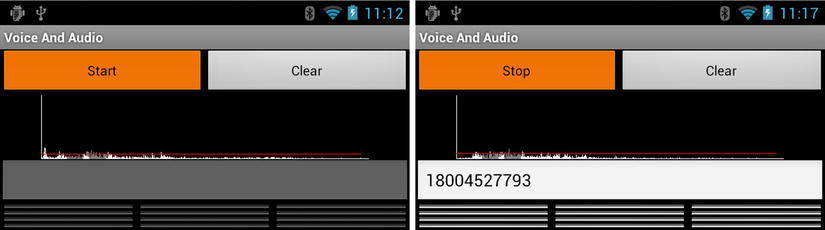
Figure 6-4. Detecting touchtone phone number
There’s some UI improvement that can be done for the app. The 12 tiny buttons in Figure 6-4 are supposed to show the 10 digits and * and #. I didn’t bother changing the open source project code because I just wanted to show you how the touchtone detection can work on Glass, which I hope will save you time if you consider building a related commercial app.
Song Identification
A more challenging task than musical note and touchtone detection is song identification. You have probably heard of apps like Shazam and Soundhound that recognize millions of songs. Can you let Glass accomplish the same task? If so, a server-based solution is more likely because of the necessity of processing a large amount of data. And research shows that Echoprint (http://echoprint.me) is the best open source music identification system; it works by fingerprinting audio and sending the audio to a server for identification. I have spent several days and nights of intense work on finding the best open source project and figuring out how to integrate it with the example app. I hope this will again save you time when building your own app. So, without further ado, the steps to add the song identification feature to the VoiceAndAudio app are as follows:
- Register at http://developer.echonest.com and get an API key. According to Echonest, each account is limited to 20 API calls per minute, and you need to contact Echonest if you need to increase the limit.
- Get the Android port of Echoprint at https://github.com/gvsumasl/EchoprintForAndroid by running the command git clone https://github.com/gvsumasl/EchoprintForAndroid.git.
- Import the two projects EchoprintLib and EchoprintTest in the EchoprintForAndroid folder to Eclipse.
- Select VoiceAndAudio’s properties, click Add in the Library section, and add EchoprintLib.
- In the EchoprintLib project’s AudioFingerprint.java file, replace <your server address here>/query?fp_code= in the line private final String SERVER_URL with "http://developer.echonest.com/api/v4/song/identify?api_key=AV6AWC8NL7IJPZ5QO&version=4.12&code=".
Note The example GET URL in the Echonest identify API’s documentation at http://developer.echonest.com/docs/v4/song.html#identify does not have an important version parameter, meaning it’s not for open source, free use. You have to use version 4.12 in the URL to make the fingerprint code generated in the library work with the open source Echonest server.
- Still in AudioFingerprint.java, after the line JSONObject jobj = new JSONObject(result);, use the correct parsing code:
if(jobj.has("songs")) {
    Hashtable<String, String> match = new Hashtable<String, String>();
    JSONArray songs = jobj.getJSONArray("songs");
    if (songs.length() == 0) didNotFindMatchForCode(code);
    else {
        JSONObject song = songs.getJSONObject(0);
        match.put(song.getString("title"), song.getString("artist_name"));
    }
        didFindMatchForCode(match, code);
}
else didFailWithException(new Exception("no match found")); - Copy the EchoprintTestActivity.java file from the EchoprintTest project to VoiceAndAudio’s com.morkout.voiceandaudio package and rename it to MusicRecognitionActivity.java.
- Copy the main.xml file from EchoprintTest’s res/layout folder to VoiceAndAudio’s res/layout and rename it to musicrecognition.xml.
- In VoiceAndAudio, add a new menu item called Music Recognition in menu’s main.xml and value’s strings.xml; then update MenuActivity.java and AndroidManifest.xml.
- Add in AndriodManifest.xml the following permissions because you need to access the Echonest server:
<uses-permission android:name="android.permission.INTERNET" />
<uses-permission android:name="android.permission.ACCESS_NETWORK_STATE" />
You’re all set! Run the app, select Music Recognition, tap the Start button to set your Glass in the listening mode, and play a YouTube song such as www.youtube.com/watch?v=wxSfojergh0. After about 10 seconds, you’ll see the matched result, as shown in Figure 6-5.

Figure 6-5. Recognizing a song
Note If you see an error like “java.lang.UnsatisfiedLinkError: Couldn’t load echoprint-jni: findLibrary returned null,” it means somehow the native library libechoprint-jni.so didn’t get saved into your Glass app’s lib directory at /data/data/com.morkout.voiceandaudio/lib. You can fix this by copying the file from EchoprintLib’s libs/armeabi folder to VoiceAndAudio’s libs/armeabi-v7a folder.
It’s possible you may not get a match for some songs, although the Echoprint database has about 1 million popular fingerprinted songs (http://echoprint-data.s3.amazonaws.com/list_of_songs.txt). If you do plan to build your own commercial-level song recognition app for Glass, you may want to look into how to build your own server at http://echoprint.me/server and add new songs to the current data at http://echoprint.me/data.
Summary
In this chapter, I covered a lot of voice- and audio-related topics, from the standard Glass voice input, both high-level and low-level audio capture and playback, to various audio-processing examples, including musical note detection, DTMF touchtone detection, and, finally, song identification. Voice and audio are essential parts of our communication with each other and with devices, so you can expect to see many innovative apps in this area, developed by people like you.