
Graphics, Animation, and Games
On April 15, 2014, Google released a major update of Glass, XE 16, and five cool Glass mini-games were introduced. If you haven’t tried them (https://developers.google.com/glass/samples/mini-games), you should definitely check them out. (Another nice Glass game released with GDK Sneak Peak in November 2013 is called Spellista, available to download at https://glass.google.com/u/0/glassware.) Here’s what Google has to say about the five games on the Mini Games page: “With tons of tiny sensors and a screen that you can always see, we think Google Glass is an exciting new place to play… We hope our experiments inspire you to take a closer look at the Glass platform and build awesome Glassware.” It’s exactly what you’ll do in this chapter: take a closer look at the Glass platform in the game context, do some reverse engineering, and explore common game techniques and engines.
There are already many books on Android graphics, animation, and game programming; what I’ll focus on here is to show you plenty of examples and popular game engines on Glass so you can get a feeling for game development on Glass. Here is what I’ll cover in this chapter:
- Graphics APIs and examples to be used in games
- Animation APIs and examples to be used in games
- How to port and use one of the most popular open source C++-based cross-platform game engines, Cocos2d-x, on Glass
- How to use another popular cross-platform game engine, libgdx, on Glass
- How to test an all Java-based Android game engine, AndEngine, on Glass
- How to port an existing Android game to Glass, with the added support of using head movement to play the game
By the end of the chapter, you’ll know some of the common building blocks for game apps, be familiar with setting up and running popular open source game engines on Glass, and understand how to use head movement, or a combination of it with touch events, to control game UI. Essentially, you’ll be ready to develop your own exciting Glass games.
If you’re an Android developer, you probably have checked out the ApiDemos sample project, which is full of examples of graphics and animation, among other things. If you haven’t, you can first install Samples for SDK from the Android SDK Manager. Then in Eclipse, go to File ![]() New
New ![]() Project
Project ![]() Android
Android ![]() Android Sample Project, and select legacy
Android Sample Project, and select legacy ![]() ApiDemos. After that, run it on an emulator or a non-Glass Android device if you own one. In this section, I’ll choose some typical graphics examples from the ApiDemos project and port them to Glass. Most of the code will simply work on Glass, but you’ll need to add some Glass-specific touch event handling code to make some examples work on XE 17 or newer.
ApiDemos. After that, run it on an emulator or a non-Glass Android device if you own one. In this section, I’ll choose some typical graphics examples from the ApiDemos project and port them to Glass. Most of the code will simply work on Glass, but you’ll need to add some Glass-specific touch event handling code to make some examples work on XE 17 or newer.
Note In XE 12, UI element touch and navigation for an Android app may just work fine when the app runs on Glass. But since XE 16, touch and swipe left and right gestures on an Android app running on Glass is most likely broken. You can’t select or navigate like you can on a non-Glass Android device, so you have to add specific code to make touch and swipe events work on Glass.
While going through the following examples, you should also check out the Android API Guides on Graphics at http://developer.android.com/guide/topics/graphics/2d-graphics.html and http://developer.android.com/guide/topics/graphics/opengl.html to get a deeper understanding of the Graphics API.
Let’s create a new project called GraphicsAnimationApp based on the GlasswareTemplate (you can also import the completed project from the book’s source code). Now copy the Arcs.java file from ApiDemos’s com.example.android.apis.graphics folder to the app, and change the following line:
public class Arcs extends GraphicsActivity
to the following:
public class Arcs extends Activity
Listing 9-1 shows the main code snippet.
Listing 9-1. Using the Canvas API to Draw Arcs and Rectangles
private void drawArcs(Canvas canvas, RectF oval, boolean useCenter,
                      Paint paint) {
    canvas.drawRect(oval, mFramePaint);
    canvas.drawArc(oval, mStart, mSweep, useCenter, paint);
}

@Override protected void onDraw(Canvas canvas) {
    canvas.drawColor(Color.WHITE);

    drawArcs(canvas, mBigOval, mUseCenters[mBigIndex],
             mPaints[mBigIndex]);

    for (int i = 0; i < 4; i++) {
        drawArcs(canvas, mOvals[i], mUseCenters[i], mPaints[i]);
    }

    mSweep += SWEEP_INC;
    if (mSweep > 360) {
        mSweep -= 360;
        mStart += START_INC;
        if (mStart >=360) {
            mStart -= 360;
        }
        mBigIndex = (mBigIndex + 1) % mOvals.length;
    }
    invalidate();
}
The invalidate() method in onDraw generates the animation effect by calling drawArcs with different mStart and mSweep parameters for Android Canvas class’s drawArc API call; the same animation effect is used in the Glass mini-game Matcher. The reference of the Canvas class is at http://developer.android.com/reference/android/graphics/Canvas.html.
Now update the GraphicsAnimationApp project’s menu/main.xml, strings.xml, MenuActivity.java, and AndroidManifest.xml files, as you’ve done many times in previous chapters. You may want to make the strings.xml file look like this:
<resources>
    <string name="app_name">GraphicsAnimatiom</string>
    <string name="say_glasswaretemplate">Graphics Animation</string>
    <string name="graphics_arcs">Graphics Arcs</string>
    <string name="graphics_shape">Graphics Shapes</string>
    <string name="graphics_paint">Graphics Paint</string>
    <string name="graphics_bitmap">Graphics Bitmap</string>
    <string name="opengles_cube">OpenGLES Cube</string>
    <string name="opengles_kube">OpenGLES Kube</string>
    <string name="opengles_rotate">OpenGLES Rotate</string>
    <string name="rotationvector">Rotation Vector</string>
    <string name="animation">Animation</string>
    <string name="stop">STOP</string>
</resources>
Install the app on Glass and run it by selecting Graphics Animation. Tap to reveal the menu and select Graphics Arcs; you’ll see rectangles and an animated arc drawing, as shown in Figure 9-1. Swipe down on the touchpad to exit the activity.
Figure 9-1. Canvas-based drawing
Another way to draw 2D graphics is by using a ShapeDrawable object, an extension of Drawable. This gives you the benefit of using a ShapeDrawable object anywhere a Drawable object is expected, such as a View’s background. The second example draws various primitive shapes based on the ShapeDrawable class (http://developer.android.com/reference/android/graphics/drawable/ShapeDrawable.html). Copy the ShapeDrawable1.java file from ApiDemos to GraphicsAnimationApp, change the base class from GraphicsActivity to Activity as you did in the previous example, update the menu’s XML file, update the MenuActivity.java file, and update the AndroidManifest .xml file. Listing 9-2 shows the main code snippet, and Figure 9-2 shows what you see after running on Glass and selecting Graphics Shapes.
Listing 9-2. Using the ShapeDrawable API to Draw Shapes
private static class MyShapeDrawable extends ShapeDrawable {
    private Paint mStrokePaint = new Paint(Paint.ANTI_ALIAS_FLAG);
    ...
    @Override
    protected void onDraw(Shape s, Canvas c, Paint p) {
        s.draw(c, p);
        s.draw(c, mStrokePaint);
    }
}


mDrawables = new ShapeDrawable[7];
mDrawables[0] = new ShapeDrawable(new RectShape());
mDrawables[1] = new ShapeDrawable(new OvalShape());
mDrawables[2] = new ShapeDrawable(new RoundRectShape(outerR, null, null));
mDrawables[3] = new ShapeDrawable(new RoundRectShape(outerR, inset, null));
mDrawables[4] = new ShapeDrawable(new RoundRectShape(outerR, inset, innerR));
mDrawables [5] = new ShapeDrawable(new PathShape(path, 100, 100));
mDrawables[6] = new MyShapeDrawable(new ArcShape(45, -270));

mDrawables[0].getPaint().setColor(0xFFFF0000);
...
mDrawables[5].getPaint().setShader(makeTiling());
mDrawables[6].getPaint().setColor(0x88FF8844);

PathEffect pe = new DiscretePathEffect(10, 4);
PathEffect pe2 = new CornerPathEffect(4);
mDrawables[3].getPaint().setPathEffect(
        new ComposePathEffect(pe2, pe));

MyShapeDrawable msd = (MyShapeDrawable)mDrawables[6];
msd.getStrokePaint().setStrokeWidth(4);
....

for (Drawable dr : mDrawables) {
    dr.setBounds(x, y, x + width, y + height);
    dr.draw (canvas);
    y += height + 5;
}

Figure 9-2. ShapeDrawable-based drawing
Let’s see an example that requires user interaction so you can learn what it takes to do it on Glass. This time, copy the FingerPaint.java file from the ApiDemos project, change the base class to Activity again, and then make the following changes:
- Add the following two lines in the FingerPaint class:
private GestureDetector mGestureDetector;
private MyView myView; - In onCreate, replace setContentView(new MyView(this)); with the following:
myView = new MyView(this);
setContentView(myView); - At the end of onCreate, add the following:
mGestureDetector = createGestureDetector(this);Toast.makeText(FingerPaint.this, "Two fingers tap to exit", Toast.LENGTH_LONG).show();
- Add the following code after onCreate:
private GestureDetector createGestureDetector(Context context) {
    GestureDetector gestureDetector = new GestureDetector(context);
    gestureDetector.setBaseListener( new GestureDetector.BaseListener() {
        @Override
        public boolean onGesture(Gesture gesture) {
            // disable the default swipe down exiting the activity
            if (gesture == Gesture.SWIPE_DOWN) return true;
            else return false;
        }
    });

    return gestureDetector;
}

public boolean onGenericMotionEvent(MotionEvent e) {
    // two-finger tap exits the activiity
    if ((e.getAction() & MotionEvent.ACTION_MASK) == MotionEvent.ACTION_POINTER_DOWN) {
        finish();
        return true;
    }

    // pass touch event to the view’s event handler!
    myView.onTouchEvent(e);

    if (mGestureDetector != null)
        return mGestureDetector.onMotionEvent(e);
    else return false;
}
Listing 9-3 shows the main code snippet that does the finger drawing, using the Canvas API again.
Listing 9-3. Using the Canvas API and Touch Event Handling to Do Finger Painting
protected void onDraw(Canvas canvas) {
    canvas.drawColor(0xFFAAAAAA);
    canvas.drawBitmap(mBitmap, 0, 0, mBitmapPaint);
    canvas.drawPath(mPath, mPaint);
}

private float mX, mY;
private static final float TOUCH_TOLERANCE = 4;

public void touch_start(float x, float y) {
    mPath.reset();
    mPath.moveTo(x, y);
    mX = x;
    mY = y;
}
public void touch_move(float x, float y) {
    float dx = Math.abs(x - mX);
    float dy = Math.abs(y - mY);
    if (dx >=TOUCH_TOLERANCE || dy >=TOUCH_TOLERANCE) {
        mPath.quadTo(mX, mY, (x + mX)/2, (y + mY)/2);
        mX = x;
        mY = y;
    }
}
public void touch_up() {
    mPath.lineTo(mX, mY);
    // commit the path to our offscreen
    mCanvas.drawPath(mPath, mPaint);
    // kill this so we don't double draw
    mPath.reset();
}

@Override
public boolean onTouchEvent(MotionEvent event) {
    float x = event.getX();
    float y = event.getY();

    switch (event.getAction()) {
    case MotionEvent.ACTION_DOWN:
        touch_start(x, y);
        invalidate();
        break;
    case MotionEvent.ACTION_MOVE:
        touch_move(x, y);
        invalidate();
        break;
    case MotionEvent.ACTION_UP:
        touch_up();
        invalidate();
        break;
    }
    return true;
}
Now run the app, select Graphics Paint, and draw something with your finger, as shown in Figure 9-3.
Figure 9-3. Freehand drawing
The original FingerPaint app also supports menus for color selection, erase, and other operations. You may want to improve the app to implement those features on Glass.
Manipulating bitmaps is a common task in image-related apps, and you’ll see in this section a simple example of modifying a bitmap with your finger movement on Glass. Let’s copy BitmapMesh.java to the project and, in BitmapMesh.java, replace beach.jpg with pet.jpg, which is contained in the book’s source code. Then add the following code in the class SampleView to enable a touch event on Glass:
public boolean onGenericMotionEvent(MotionEvent e) {
    if ((e.getAction() & MotionEvent.ACTION_MASK) == MotionEvent.ACTION_POINTER_DOWN) {
        ((BitmapMesh)mContext).finish();
        return true;
    }

    onTouchEvent(e);
    return true;
}
Now add private Context mContext; in the beginning of SampleView and add mContext = context; in the SampleView constructor. Listing 9-4 shows the main graphics-related code snippet.
Listing 9-4. Manipulating and Drawing a Bitmap
@Override protected void onDraw(Canvas canvas) {
    canvas.drawColor(0xFFCCCCCC);

    canvas.concat(mMatrix);
    canvas.drawBitmapMesh(mBitmap, WIDTH, HEIGHT, mVerts, 0,
                          null, 0, null);
}

private void warp(float cx, float cy) {
    final float K = 10000;
    float[] src = mOrig;
    float[] dst = mVerts;
    for (int i = 0; i < COUNT*2; i += 2) {
        float x = src[i+0];
        float y = src[i+1];
        float dx = cx - x;
        float dy = cy - y;
        float dd = dx*dx + dy*dy;
        float d = FloatMath.sqrt(dd);
        float pull = K / (dd + 0.000001f);

        pull /= (d + 0.000001f);
        if (pull >=1) {
            dst[i+0] = cx;
            dst[i+1] = cy;
        } else {
            dst[i+0] = x + dx * pull;
            dst[i+1] = y + dy * pull;
        }
    }
}

@Override public boolean onTouchEvent(MotionEvent event) {
    float[] pt = { event.getX(), event.getY() };
    mInverse.mapPoints(pt);

    int x = (int)pt[0];
    int y = (int)pt[1];
    if (mLastWarpX != x || mLastWarpY != y) {
        mLastWarpX = x;
        mLastWarpY = y;
        warp(pt[0], pt[1]);
        invalidate();
    }
    return true;
}
After other regular setup (update the menu XML file, MenuActivity.java, and AndroidManifest.xml), run the app, and select Graphics Bitmap; you can then move around the touchpad to see the bitmap mesh. Figure 9-4 shows the original and meshed bitmaps. Notice the change in the dog’s eye. Again, a two-finger tap will close the activity.
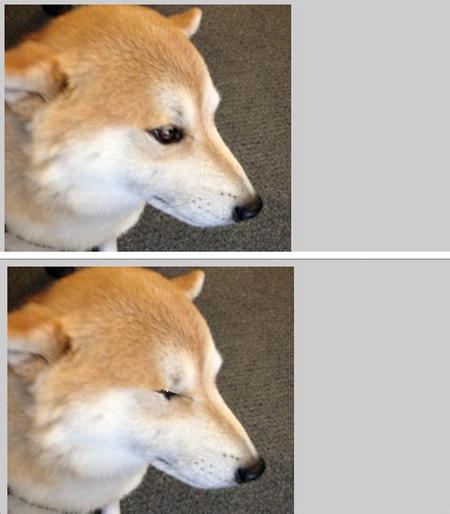
Figure 9-4. Original and meshed bitmaps
If you’re interested, you should explore the drawBitmapxxx methods yourself and see how to implement a Glass app with the image-filtering features like those in Instagram.
OpenGL ES is an amazing topic but beyond the scope of this book. However, let’s take a look at a few more examples of OpenGL ES rendering on Glass and how to interact with them using the Glass touchpad and the cool rotation vector sensor, which will be a key sensor to Glass game apps.
First, copy the CubeMapActivity.java file and the whole com.example.android.apis.graphics.kube folder from ApiDemos to the GraphicsAnimationApp project. Add two menu entries, OpenGLES Cube and OpenGLES Kube, to launch CubeMapActivity and Kube, respectively. Run your app and select the two menu items, and you’ll see the two nice 3D animated images, as shown in Figure 9-5.

Figure 9-5. OpenGL ES drawing
Finger and Head Movement Support
Now copy two other files, TouchRotateActivity.java and Cube.java, at the end of TouchRotateActivity class, and add this method:
public boolean onGenericMotionEvent(MotionEvent e) {
    // this allows two-finger tap to exit the activity
    if ((e.getAction() & MotionEvent.ACTION_MASK) == MotionEvent.ACTION_POINTER_DOWN) {
        finish();
        return true;
    }

    // this enables the surfaceview to handle touch event
    mGLSurfaceView.onTouchEvent(e);
    return true;
}
Add a new menu entry, OpenGLES Rotate, to launch the activity. Run GraphicsAnimationApp and select OpenGLES Rotate. Touch and move on the Glass touchpad, and you’ll see a cube rotating with your finger movement, as shown in Figure 9-6. (Again, to exit the activity, use a two-finger swipe down.)
Figure 9-6. Rotating a cube with finger movement on a touchpad or head movement
The next and final graphics example is even cooler. Copy the RotationVectorDemo.java file to your project. You should check out http://developer.android.com/guide/topics/graphics/opengl.html and get some OpenGL ES for Android books (for example, Pro OpenGL ES for Android by Mike Smithwick and Mayank Verma or OpenGL ES 2 for Android by Kevin Brothaler) to understand the OpenGL ES code in the example (and other examples in this section), but you’ve already seen the sensor-related code, shown in Listing 9-5, in the previous chapter, which will also be used later in the chapter.
Listing 9-5. Rotating Graphics with Glass Sensor
public class RotationVectorDemo extends Activity {
    private GLSurfaceView mGLSurfaceView;
    private SensorManager mSensorManager;
    private MyRenderer mRenderer;

    @Override
    protected void onCreate(Bundle savedInstanceState) {
        super.onCreate(savedInstanceState);

        mSensorManager = (SensorManager)getSystemService(SENSOR_SERVICE);

        mRenderer = new MyRenderer();
        mGLSurfaceView = new GLSurfaceView(this);
        mGLSurfaceView.setRenderer(mRenderer);
        setContentView(mGLSurfaceView);
    }

    class MyRenderer implements GLSurfaceView.Renderer, SensorEventListener {
        private Cube mCube;
        private Sensor mRotationVectorSensor;
        private final float[] mRotationMatrix = new float[16];

        public MyRenderer() {
            // find the rotation-vector sensor
            mRotationVectorSensor = mSensorManager.getDefaultSensor(Sensor.TYPE_ROTATION_VECTOR);

            mCube = new Cube();
            // initialize the rotation matrix to identity
            mRotationMatrix[ 0] = 1;
            mRotationMatrix[ 4] = 1;
            mRotationMatrix [ 8] = 1;
            mRotationMatrix [12] = 1;
        }

        public void start() {
            // enable our sensor when the activity is resumed, ask for
            // 10 ms updates.
            mSensorManager.registerListener(this, mRotationVectorSensor, 10000);
        }

        public void stop() {
            // make sure to turn our sensor off when the activity is paused
            mSensorManager.unregisterListener(this);
        }

        public void onSensorChanged(SensorEvent event) {
            if (event.sensor.getType() == Sensor.TYPE _ROTATION_VECTOR) {
                SensorManager .getRotationMatrixFromVector(mRotationMatrix , event.values);
            }
        }
        ...
    }
}
The rotation vector sensor is a composite (also known as software) sensor because it uses three base sensors (accelerometer, gyroscope, and magnetometer) to measure the orientation (yaw, pitch, and roll) of a device. For more information, you should check out Chapter 8 and additional Android resources at https://source.android.com/devices/sensors/composite_sensors.html and http://developer.android.com/guide/topics/sensors/sensors_overview.html. In a game example later in this chapter, you’ll see how to use the measurement of rotation vector to display a cursor that moves with your Glass movement. This is the basis of a Glass game like Spellista.
To get a feeling of how your head movement can control the rotation of the 3D cube, simply run your app and select the Rotation Vector menu item; then move your head, and you’ll see all six sides of a cube, just like Figure 9-5.
Animation is essential to game development. Google has a well-written API guide on the animation topic at http://developer.android.com/guide/topics/graphics/prop-animation.html, and ApiDemos has many animation examples. In the first example of the “Graphics” section, you already saw some animation in action, but the animation there was implemented using the invalidate() call inside onDraw.
In this section, I’ll show you how property animation, the recommended and much more powerful animation framework that allows you to easily animate any object property, works. If you’re not familiar with Android animation, you may want to take a quick look at the API guide link listed earlier before continuing. When you’re ready, follow the steps in the next section.
Animating Properties in XML and Programmatically
Create a new AndroidAnimation activity, with the following layout file, named as animation.xml:
<?xml version="1.0" encoding="utf-8"?>
<LinearLayout xmlns:android="http://schemas.android.com/apk/res/android "
    android:layout_width="fill_parent"
    android:layout_height="fill_parent"
    android:orientation="vertical" >

    <LinearLayout
        android:layout_width="wrap_content"
        android:layout_height="wrap_content"
        android:orientation="horizontal" >

        <ImageView
            android:id="@+id/image1"
            android:layout_width="wrap_content"
            android:layout_height="wrap_content"
            android:src="@drawable/icon"
            android:visibility="visible" />
        <ImageView
            android:id="@+id/image2"
            android:layout_width="wrap_content"
            android:layout_height="wrap_content"
            android:src="@drawable/icon"
            android:visibility="visible" />
        <ImageView
            android:id="@+id/image3"
            android:layout_width="wrap_content"
            android:layout_height="wrap_content"
            android:src="@drawable/icon"
            android:visibility="visible" />
        <TextView
            android:id="@+id/mytextview"
            android:layout_width="wrap_content"
            android:layout_height="wrap_content"
            android:text="@string/hello" />
    </LinearLayout>

    <ImageView
        android:id="@+id/image4"
        android:layout_width="fill_parent"
        android:layout_height="wrap_content"
        android:src="@drawable/icon"
        android:visibility="invisible" />
    <ImageView
        android:id="@+id/image5"
        android:layout_width="fill_parent"
        android:layout_height="wrap_content"
        android:src="@drawable/icon"
        android:visibility="invisible" />
    <ImageView
        android:id="@+id/image6"
        android:layout_width="fill_parent"
        android:layout_height="wrap_content"
        android:src="@drawable/icon"
        android:visibility="visible" />
</LinearLayout>
Then create a new folder called animatior inside res, and add a new file called property_animator_alpha.xml with the following content:
<?xml version="1.0" encoding="utf-8"?>
<set xmlns:android="http://schemas.android.com/apk/res/android " >
    <objectAnimator
        android:duration="3000"
        android:propertyName="alpha"
        android:repeatCount="-1"
        android:repeatMode="reverse"
        android:valueFrom="0.0"
        android:valueTo="1.0" />
</set>
Now make your class implementation look like this:
public class AndroidAnimationActivity extends Activity {
    ImageView mImage1, mImage2, mImage3, mImage4, mImage5, mImage6;

    @Override
    public void onCreate(Bundle savedInstanceState) {
        super.onCreate(savedInstanceState);
        setContentView(R.layout.animation);
        mImage1 = (ImageView)findViewById(R.id.image1);
        mImage2 = (ImageView)findViewById(R.id.image2);
        mImage3 = (ImageView)findViewById(R.id.image3);
        mImage4 = (ImageView)findViewById(R.id.image4);
        mImage5 = (ImageView)findViewById(R.id.image5);
        mImage6 = (ImageView)findViewById(R.id.image6);

        AnimatorSet set = (AnimatorSet) AnimatorInflater.loadAnimator(this,R.animator.property_animator_alpha);
        set.setTarget(mImage1);
        set.start();

        ValueAnimator testAnim = ObjectAnimator.ofFloat(image2, "alpha", 1.0f, 0.0f);
        testAnim.setDuration(3000); // in milliseconds
        testAnim.setRepeatCount(ValueAnimator.INFINITE);
        testAnim.setRepeatMode(ValueAnimator.REVERSE);
        testAnim.start();
}
}
Finally, add a new menu item called Animation for the activity and run the app. Select Animation, and you’ll see two animated images on the top-left corner (along with two other static images and one static text; you’ll animate them shortly). What happened here is that you implemented the animation on an ImageView’s alpha property in two ways: the XML way and the programmatic way. The key class here is ObjectAnimator (http://developer.android.com/reference/android/animation/ObjectAnimator.html), used to animate object properties, including x, y, alpha, rotation, translation, and so on. For a list of View properties, see http://android-developers.blogspot.co.il/2011/02/animation-in-honeycomb.html. ObjectAnimator’s superclass ValueAnimator is used to set timing-related properties for an animation, such as duration and repeat count. ValueAnimator’s superclass Animator is used to start or end an animation and add an event listener to get start, end, cancel, and repeat notifications from an animation, which you’ll see soon.
In the property_animator_alpha.xml file, you have android:valueFrom set as 0.0 and valueTo as 1.0; in the code you use ofFloat(image2, "alpha", 1.0f, 0.0f); to set the alpha value animated from 1.0 to 0.0. So, what you see is two images with the fade-in and out animation for the duration of three seconds. The animations auto-reverse and repeat infinitely, which is all defined easily in both the XML file and the code.
To see another example of simple animation, add the following code at the end of onCreate, and you’ll see rotation animation for the TextView:
myTextView = (TextView)findViewById(R.id.mytextview);
ValueAnimator colorAnim = ObjectAnimator.ofFloat(myTextView, "rotation", 180.0f, 360.0f);
colorAnim.setDuration(3000);
colorAnim.setRepeatCount(ValueAnimator.INFINITE);
colorAnim.setRepeatMode(ValueAnimator.REVERSE);
colorAnim.start();
Grouping Animation in XML and Programmatically
Sometimes you need to group multiple animations either sequentially or concurrently. Let’s see how you can do this. First, add a new XML file called property_animator_group.xml in the res/animator folder.
<?xml version="1.0" encoding="utf-8"?>
<set xmlns:android="http://schemas.android.com/apk/res/android "
    android:ordering="together" >

    <objectAnimator
        android:duration="3000"
        android:propertyName="rotation"
        android:repeatCount="-1"
        android:repeatMode="reverse"
        android:valueFrom="0.0"
        android:valueTo="180.0" />
    <objectAnimator
        android:duration="3000"
        android:propertyName="alpha"
        android:repeatCount="-1"
        android:repeatMode="reverse"
        android:valueFrom="0.0"
        android:valueTo="1.0" />
</set>
Then add the following code at the end of onCreate:
set = (AnimatorSet) AnimatorInflater.loadAnimator(this, R.animator.property_animator_group);
set.setTarget(image3);
set.start();

ObjectAnimator mover = ObjectAnimator.ofFloat(image6, "y", 0f, 360f);
mover.setDuration(3000);
ObjectAnimator rotation = ObjectAnimator.ofFloat(image6, "rotation", 0.0f, 360.0f);
rotation.setDuration(3000);
ObjectAnimator fade = ObjectAnimator.ofFloat(image6, "alpha", 0.0f, 1.0f);
fade.setDuration(3000);

ArrayList<Animator> animators = new ArrayList<Animator>();
animators.add(rotation);
animators.add(fade);
animators.add(mover);
mAnimSet = new AnimatorSet();
mAnimSet.setInterpolator(new DecelerateInterpolator());
mAnimSet.playTogether(animators);
mAnimSet.start();
Run the app, and you’ll see two new animations, consisting of two and three animations, respectively. The first group animation, implemented in XML, is on an ImageView located on the top center, rotating and fading in and out. The second group animation, which uses three ObjectAnimator instances and AnimatorSet to combine them, is an icon falling vertically across the center of screen while rotating and fading in. Three view properties (y, rotation, and alpha) are used to achieve this effect.
To make the animation more interesting, you’ll often need to know when the animation ends and add specific code when that happens. Add the following code after mAnimSet.start():
mAnimSet.addListener(new AnimatorListenerAdapter() {
    @Override
    public void onAnimationEnd(Animator animation) {
        ObjectAnimator rotation = ObjectAnimator.ofFloat(image6, "rotation", 0.0f, 360.0f);
        rotation.setDuration(3000);
        ObjectAnimator mover = ObjectAnimator.ofFloat(image6, "y", 0f, 360f);
        mover.setDuration(3000);
        ObjectAnimator fade = ObjectAnimator.ofFloat(image6, "alpha", 0.0f, 1.0f);
        fade.setDuration(3000);

        ArrayList<Animator> animators = new ArrayList<Animator>();
        animators.add(rotation);
        animators.add(fade);
        animators.add(mover);
        mAnimSet.playTogether(animators);
        mAnimSet.start();

    }
});
Run the app again, and you’ll see that the falling rotating and fading animation will repeat again and again. The key here is to use Animator’s addListener and AnimatorListenerAdapter, which provides empty implementations for AnimatorListener (you’ll see another example of using this next), so you don’t need to provide other methods of the listener interface if you want to implement only for onAnimationEnd.
Note that you can achieve the same effect using the setRepeatCount and setRepeatMode methods, but here in onAnimationEnd, you can perform any custom operation you want.
Let’s now see another example of using the animation listener. This time you’ll start a new animation after the first one ends and then alternate between the two animations. Add the following declarations first:
Animation mAnimationIn, mAnimationOut;
ImageView mCurImage;
Then add the following code at the end of onCreate:
mAnimationIn = AnimationUtils.loadAnimation(this, android.R.anim.slide_in_left);
mAnimationOut = AnimationUtils.loadAnimation(this, android.R.anim.slide_out_right);
mAnimationIn.setDuration(1000);
mAnimationOut.setDuration(1000);
mAnimationIn.setAnimationListener(animationSlideInLeftListener);
mAnimationOut.setAnimationListener(animationSlideOutRightListener);

mCurImage = mImage4;
mImage4.startAnimation(mAnimationIn);
mImage4.setVisibility(View.VISIBLE);
Finally, add the following code at the end of GraphicsAnimationApp:
AnimationListener animationSlideInLeftListener = new AnimationListener(){

    @Override
    public void onAnimationEnd(Animation animation) {
        if(mCurImage == mImage4){
            mImage4.startAnimation(mAnimationOut);
        }else if(mCurImage == mImage5){
            mImage5.startAnimation(mAnimationOut);
        }
    }

    @Override
    public void onAnimationRepeat(Animation animation) {
    }

    @Override
    public void onAnimationStart(Animation animation) {
    }
};

AnimationListener animationSlideOutRightListener = new AnimationListener(){
    @Override
    public void onAnimationEnd(Animation animation) {
        if(mCurImage == mImage4){
            mCurImage = mImage5;
            mImage5.startAnimation(mAnimationIn);
            mImage4.setVisibility(View.INVISIBLE);
            mImage5.setVisibility(View.VISIBLE);
        }else if(mCurImage == mImage5){
            mCurImage = mImage4;
            mImage4.startAnimation(mAnimationIn);
            mImage4.setVisibility(View.VISIBLE);
            mImage5.setVisibility(View.INVISIBLE);
        }
    }

    @Override
    public void onAnimationRepeat(Animation animation) {
    }

    @Override
    public void onAnimationStart(Animation animation) {
    }
};
You use AnimationUtils.loadAnimation this time to load the common built-in slide-in-left animation and then use the AnimationListener’s onAnimatonEnd to start a new animation after the current one ends.
Run the app now, and you’ll see a new animation of an icon sliding in from left to right and, after it reaches to the center, sliding out. After this animation is done, another icon starts the same type of animation. The two animations repeat themselves infinitely.
Figure 9-7 shows the completed activity with six animations happening at the same time.
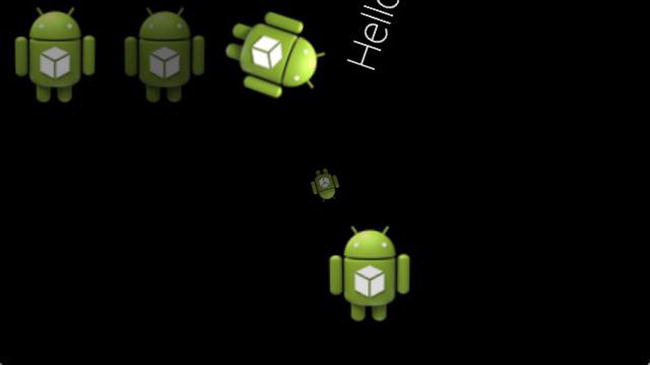
Figure 9-7. Basic and group animations with event listener in action
Game Engines on Glass
If you’ve developed any nontrivial Android games, chances are you’re familiar with some open source game engines, which offer powerful and easy-to-use support for advanced graphics, animations, and physics so you can build professional-level games quickly. In fact, lots of commercial Android games have been built with such game engines. Although the Canvas drawing APIs and the animation techniques discussed earlier are probably good enough for some trivial small Glass games, let’s take a deep look at how you can run three of the most popular open source game engines on Glass so you know what tools are available when you start porting or developing a commercial-level Glass game.
There’s a long list of Android game engines at http://mobilegameengines.com/android/game_engines. I picked three of the most popular open source engines from the list.
- Cocos2d-x is a cross-platform 2D game engine (www.cocos2d-x.org), and games built with it dominate the Top Grossing charts of Google Play and Apple App Store: www.cocos2d-x.org/games. Cocos2d-x is a port of the original Cocos2d game engine, and the initial developer of Cocos2d game engine, Ricardo Quesada, recently joined Chukong, the company behind Cocos2d-x, as its chief architect, so expect it to be even more popular among game developers.
- libGDX is also a cross-platform engine (http://libgdx.badlogicgames.com) with lots of games built with it (http://libgdx.badlogicgames.com/gallery.html). Some of the Glass mini-games (https://developers.google.com/glass/samples/mini-games) also use this engine.
- AndEngine (www.andengine.org) is a Java-based game engine that’s quite popular among Java developers. Glass mini-games also use this engine for rendering. I’ll cover how to port a game built with AndEngine to Glass later in this chapter.
Cocos2d-x has been around for a long time, and the 3.0 version was just released on April 23, 2014. There are some good online tutorials about developing games with Cocos2d-x 2.x and a book called Cocos2d-x by Example. Because 3.0 is a big improvement and highly recommended for new game development, I’ll focus on 3.0 here.
Porting and Running the Demo Cocos2d-x App on Glass
These are the steps to run the sample C++ demo app that comes with Cocos2d-x 3.0:
- Follow the how-to guide at www.cocos2d-x.org/wiki/How_to_run_cpp-tests_on_Android to get the sample app cpp-tests built.
Note You can skip the section “How to deploy it on your Android phone via command line” in the guide because you’ll import the project to Eclipse and install the app to Glass from Eclipse, but you may also want to test it on your other Android devices to get the feeling of how the demo runs. Also, you’ll need to cd <your-cocos2d-x-3.0>/build directory and run the command python android-build.py -p 19 cpp-tests instead of python android-build.py -p 10 cpp-tests as documented in the guide to build the app for Glass.
- Follow the steps at www.cocos2d-x.org/wiki/How_to_Build_an_Android_Project_with_Eclipse to import the cpp-tests project and the libcocos2dx project to Eclipse. After this, you’ll see something like Figure 9-8 in Eclipse.
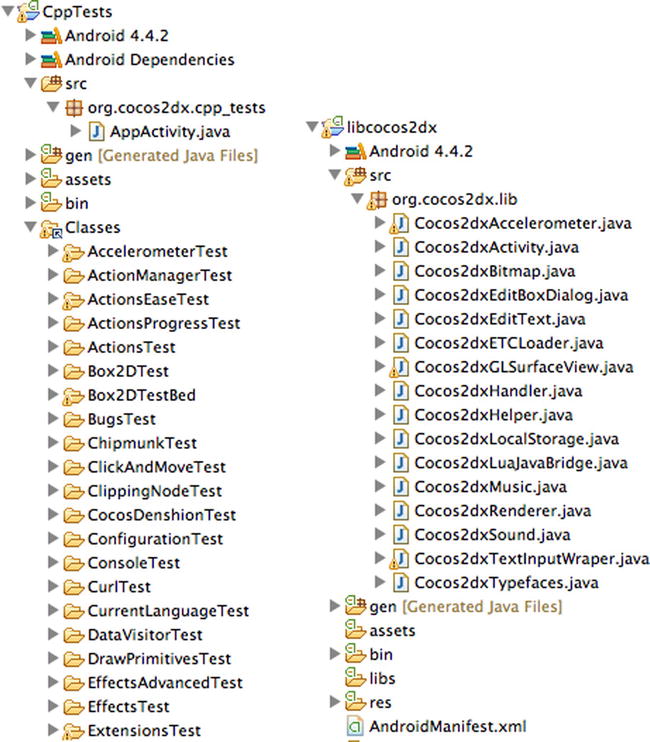
Figure 9-8. Importing the CppTests demo and the libcocos2dx library projects to Eclipse
- Select CppTests and run it as an Android application with your Glass connected and turned on; you’ll see something like Figure 9-9.
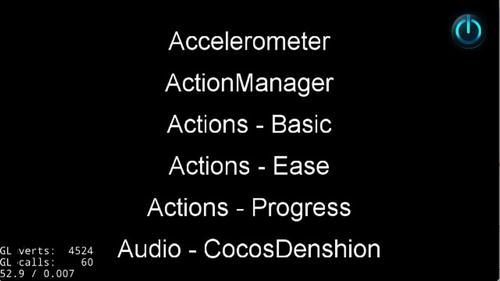
Figure 9-9. Cocos2d-x 3.0 test app on Glass
Unfortunately, tapping or swiping left or right won’t navigate the demo menu. And what makes it worse is if your Glass screen goes off, tapping it again would take you to the OK Glass home screen instead of this CppTests app. Although the purpose of running the app on Glass is to see what features of the game engine can run on Glass so you can make a better decision on whether to use the engine when developing your next Glass games, you should have the launchy app (https://github.com/kaze0/launchy) installed and use it to easily select the CppTests to run if your Glass goes off.
- To enable user interaction for CppTests on Glass, you need to first modify the class implementation in the AppActivity.java file shown in Figure 9-8, as shown in Listing 9-6.
Listing 9-6. Enabling and Passing a Touch Event to Cocos2d-x View on Glass
public class AppActivity extends Cocos2dxActivity {
    Cocos2dxGLSurfaceView glSurfaceView;

    public Cocos2dxGLSurfaceView onCreateView() {
        glSurfaceView = new Cocos2dxGLSurfaceView(this);
        glSurfaceView.setEGLConfigChooser(5, 6, 5, 0, 16, 8);
        return glSurfaceView;
    }

    public boolean onGenericMotionEvent(MotionEvent event) {
        if ((event.getAction() & MotionEvent.ACTION_MASK) == MotionEvent.ACTION_POINTER_DOWN) { // true if two-finger tap happens
            finish();
            return true;
        }

        glSurfaceView.onTouchEvent(event);
        return false;
    }
}
The changes are to make glSurfaceView, the view that shows each demo feature, an instance variable so in the GenericMotionEvent you can pass the touch event (except the double finger tap, which will finish the app) to the glSurfaceView.
- To develop C++ code directly from Eclipse, you need to link the C++ source files in the Classes directory shown in Figure 9-10 to CppTests’s Classes folder in Eclipse.
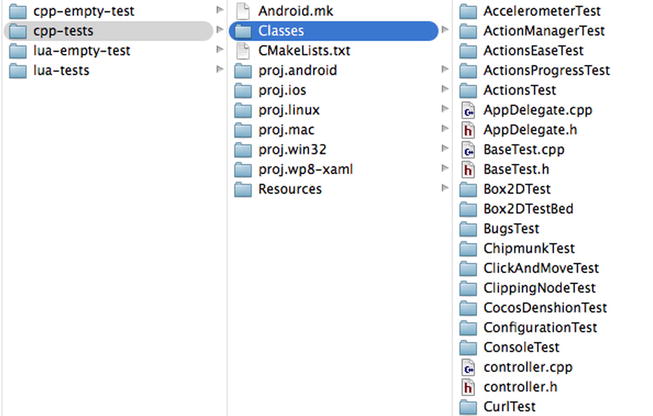
Figure 9-10. C++ source folder for the test project
To do this, open the project properties, select C/C++ General, and then select Paths and Symbols. You’ll see the message “This project is not a CDT project” (CDT stands for C/C++ Development Tools), as shown in Figure 9-11.
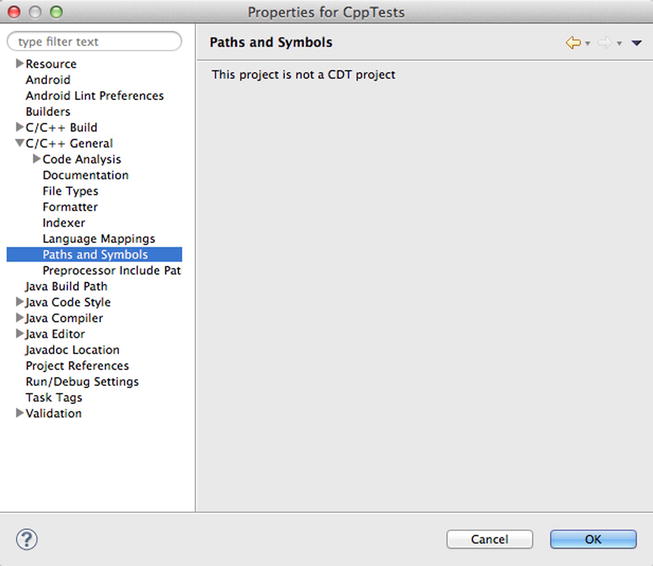
Figure 9-11. Showing Project Properties
To fix this, click Cancel in the Properties window. In Eclipse, select File
 New Project and then select C/C++ C++ Project. Enter a dummy project name and hit Finish. Now select the dummy project’s Properties Resource to find its location. On Terminal, copy the .cproject file from that location to your CppTests app’s proj.android directory (<path-to-cocos2d-x-3.0>/tests/cpp-tests/proj.android). You can delete the dummy project from both Eclipse and the project contents on disk now.
 - Go back to CppTests Properties C/C++ General Paths and Symbols Source Location, click Link Folder, check “Link to folder in the file system,” click Browse, and select the Classes folder of CppTests (Figure 9-12).
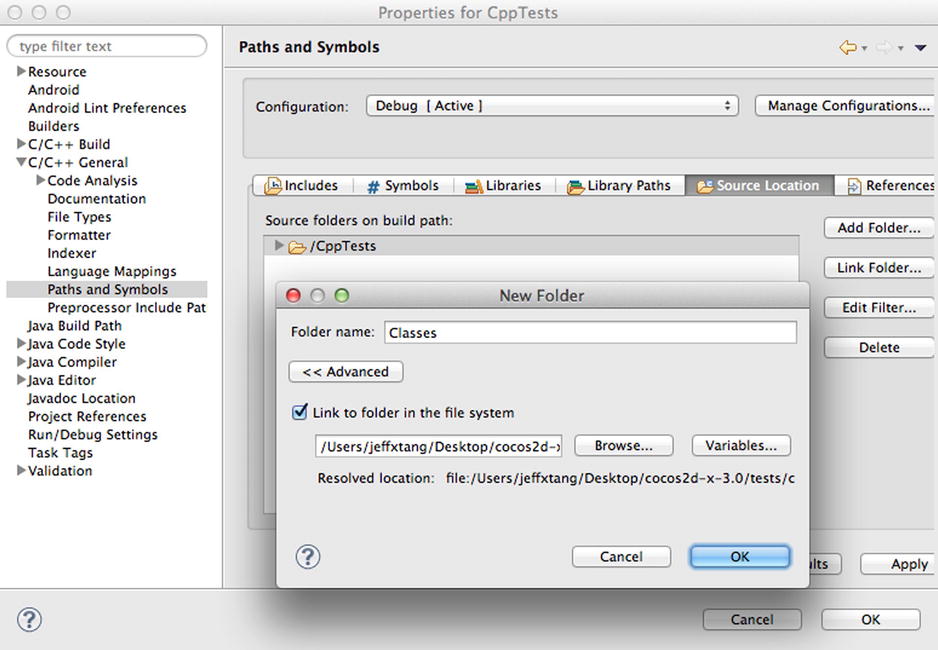
Figure 9-12. Linking C++ source folder to develop C++ code in Eclipse
Click OK, and you’ll see the dialog in Figure 9-13. Click OK again, and Eclipse will show all the source folders under Classes, as in Figure 9-14.
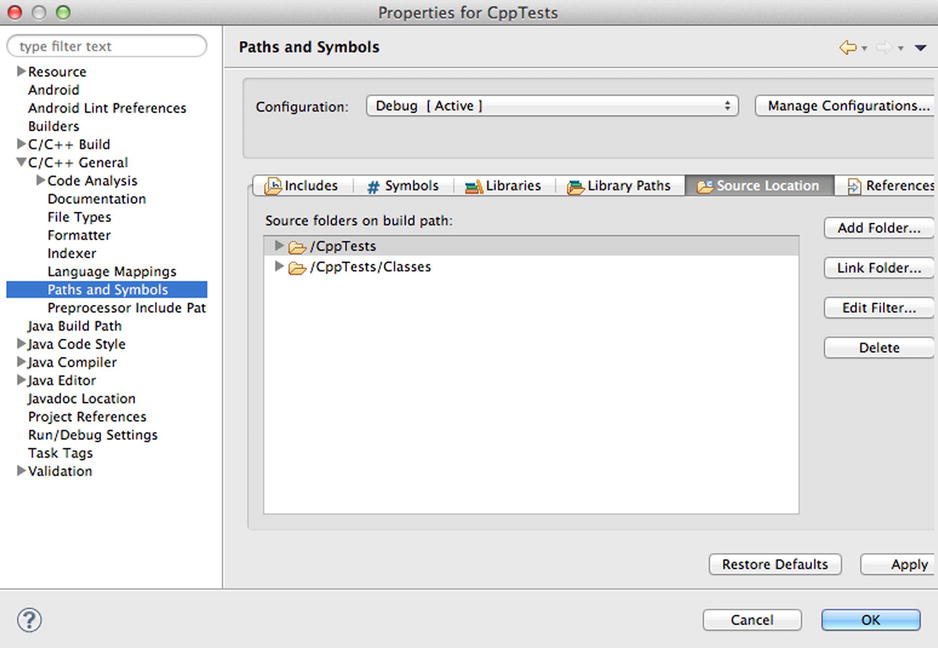
Figure 9-13. After Source Folder is Linked

Figure 9-14. C++ source folders in Eclipse
- Next, you need to modify the AppDelegate.cpp file in the Classes folder. But before you do this, you first need to fix the errors when you open the AppDelegate.cpp file. Eclipse, at least as of ADT version 22.6.2, incorrectly shows an error in the CppTests project and lots of errors in the AppDelegate.cpp file. If you try to build the CppTests application now (after you open the AppDelegate.cpp file), you’ll get the annoying “Your project contains error(s), please fix them before running your application.” error message. To fix this, open the CppTests’s Properties window, go to Code Analysis under C/C++ General, select “Use project settings,” and deselect Syntax and Semantic Errors, as shown in Figure9-15. This is important because otherwise you won’t be able to build the CppTests app from Eclipse after you make some C++ code change in Eclipse.
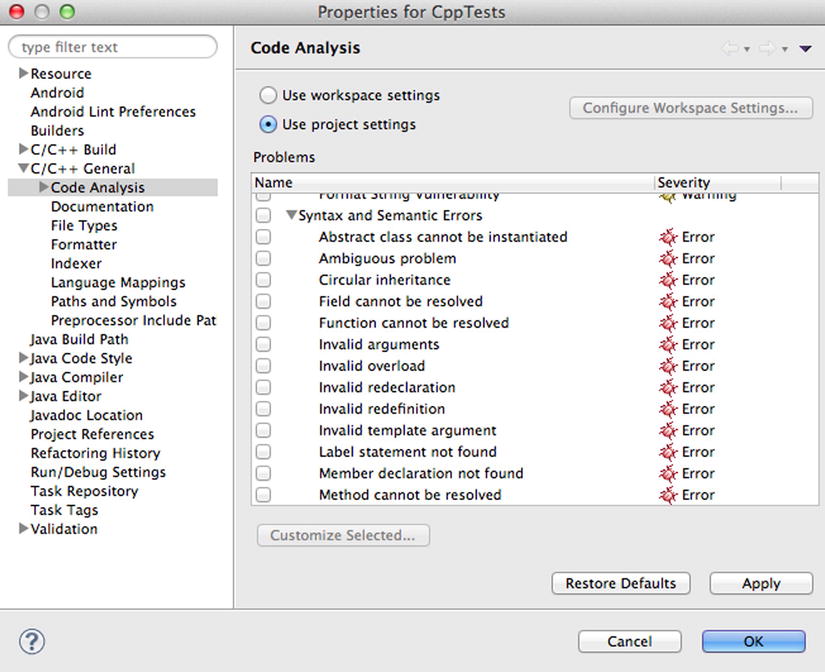
Figure 9-15. Deselecting incorrect code analysis to enable project build in Eclipse
- The changes you need to make to AppDelegate.cpp are pretty simple. In the applicationDidFinishLaunching method, before return true;, add the following two lines of code:
auto s = new Box2dTestBedScene();
s->runThisTest();
Then add #include "Box2DTestBed/Box2dView.h" in the beginning of AppDelegate.cpp. Now open a Terminal window, cd to the cocos2d-x-3.0 build directory, and run the native C++ library build command.
python android-build.py -p 19 cpp-testsAfter the “BUILD SUCCESSFUL” message, a new version of the CppTests library file, named libcpp_tests.so, will be available in the CppTests/libs/armeabi folder.
- Now run the CppTests app again from Eclipse, and you’ll see CppTests’s Box2D sample running on Glass, as shown in Figure 9-16. Move your finger on the Glass touchpad to see the box move on Glass.
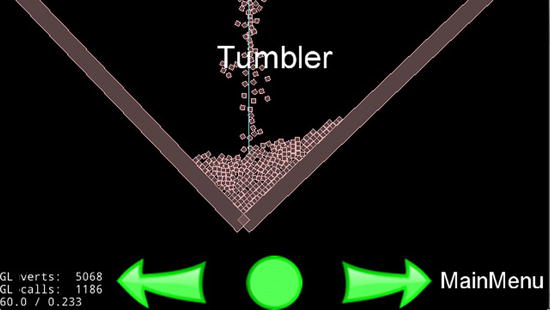
Figure 9-16. Running Cocos2d-x Box2d test code on Glass
Ideally, you would be able to use a gesture to go back to MainMenu and easily test all the other cool features of Cocos2d-x on Glass. This may be available by the time you read the book. If so, I’ll post the link to the updated tutorial on the book’s site. For now, you can use steps 6 and 7 to experiment with all the other features demonstrated in CppTests. For example, to check out how ParticleTest runs on Glass, replace auto s = new Box2dTestBedScene(); with auto s = new ParticleTestScene(); in AppDelegate.cpp, add #include "ParticleTest/ParticleTest.h", build the C++ library, and run the CppTests app from Eclipse. You’ll see something like Figure 9-17.
Figure 9-17. Running Cocos2d-x particle test code on Glass
After playing with CppTests, you should check out the Cocos2d-x wiki and API references at www.cocos2d-x.org for further information before you start using it to build your next Glass game. Before you move to the next game engine, let’s see how you can create a new Cocos2d-x app running on Glass.
Creating a New Cocos2d-x App on Glass
Follow these steps to create a Cocos2d-x app from scratch:
- Follow the how-to guide at www.cocos2d-x.org/wiki/How_to_Start_A_New_Cocos2D-X_Game. To summarize, the commands I ran on my Mac are as follows:
cd cocos2d-x-3.0
./setup.py
source ~/.bash_profile
cocos new MyGame -p com.myCompany.myGame -l cpp -d ./MyCompany
cocos run -s ./MyCompany/MyGame -p android - In Eclipse, import the Android project located at MyCompany/MyGame/proj.android. After importing, if you see errors in the MyGame project and AppActivity.java, you need to fix the reference to libcocos2dx. Open the project’s properties, go to Android’s Library section, click Add, and then select libcocos2dx there. After that, you should see something like Figure 9-18.
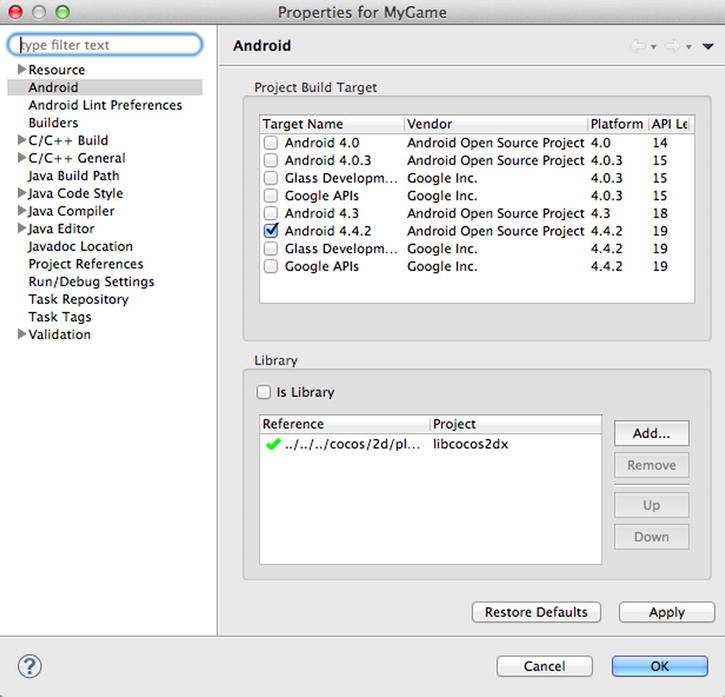
Figure 9-18. Adding the libcocos2dx library to a new app
- Run the MyGame app on your Glass, and you’ll see the Cocos2d-x version of Hello World on Glass, as shown in Figure 9-19.
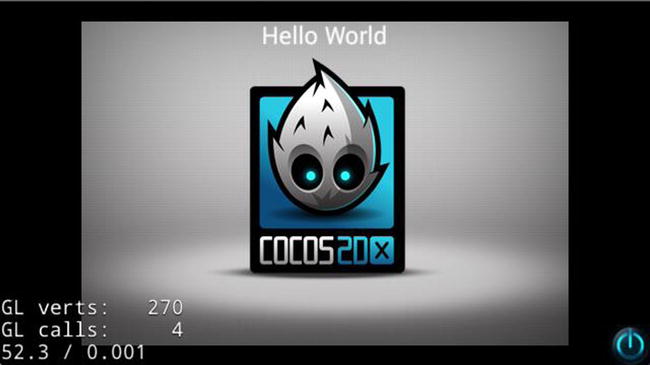
Figure 9-19. Running Cocos2d-x Hello World app on Glass
- If you click the Classes folder, which should contain all the C++ code for the game app, you’ll see it’s empty, but it’s located at MyCompany/MyGame, at the same level as the proj.android directory. You need to link the Classes directory to MyGame’s Classes folder in Eclipse, like you did in the previous section. To do this, simply follow step 5 in the previous section. Or, in Eclipse, select File New Project..., then select C/C++ C++ Project, enter a dummy project name, and hit Finish. Now open the dummy project’s Properties Resource to find its location. On Terminal, copy the .cproject file from that location to your new game app’s proj.android directory (MyCompany/MyGame/proj.android).
Now go back to MyGame’s Properties
C/C++ General Paths and Symbols Source Location, click Link Folder, check Link to folder in the file system, click Browse, select the Classes folder of MyGame, and click OK. - If you open the AppDelegate.cpp file in Classes, you’ll see lots of errors. To fix this, follow step 7 in the previous section, as shown in Figure 9-15.
- Open AppActivity.java and change its content to look like Listing 9-6.
- Open HelloWorldScene.cpp and add the following code, most of which is borrowed from www.cocos2d-x.org/wiki/EventDispatcher_Mechanism but with some fixes, to the end of the HelloWorld::init() method, before return true;, as shown in Listing 9-7.
Listing 9-7. Adding Sprites with a Touch Event Listener for Cocos2d-x 3.0
auto size = Director::getInstance()->getWinSize();

auto sprite1 = Sprite::create("CloseNormal.png");
sprite1->setPosition(origin+Point(size.width/2, size.height/2) + Point(-80, 80));
addChild(sprite1, 10);

auto sprite2 = Sprite::create("CloseNormal.png");
sprite2->setPosition(origin+Point(size.width/2, size.height/2));
addChild(sprite2, 20);

auto sprite3 = Sprite::create("HelloWorld.png");
sprite3->setPosition(Point(0, 0));
sprite2->addChild(sprite3, 1);

auto listener1 = EventListenerTouchOneByOne::create();
listener1->setSwallowTouches(true);

listener1->onTouchBegan = [](Touch* touch, Event* event){
    auto target = static_cast<Sprite*>(event->getCurrentTarget());

    //Get the position of the current point relative to the button
    Point locationInNode = target->convertToNodeSpace(touch->getLocation());
    Size s = target->getContentSize();
    Rect rect = Rect(0, 0, s.width, s.height);

    //Check the click area
    if (rect.containsPoint(locationInNode)) {
        target->setOpacity(180);
        return true;
    }
    return false;
};

//Trigger when moving touch
listener1->onTouchMoved = [](Touch* touch, Event* event){
    auto target = static_cast<Sprite*>(event->getCurrentTarget());
    //Move the position of current button sprite
    target->setPosition(target->getPosition() + touch->getDelta());
};

//Process the touch end event
listener1->onTouchEnded = [=](Touch* touch, Event* event){
    auto target = static_cast<Sprite*>(event->getCurrentTarget());
    target->setOpacity(255);
    //Reset zOrder and the display sequence will change
    if (target == sprite2)
        sprite1->setZOrder(100);
    else if(target == sprite1)
        sprite1->setZOrder(0);
};

_eventDispatcher ->addEventListenerWithSceneGraphPriority(listener1, sprite1);
_eventDispatcher->addEventListenerWithSceneGraphPriority(listener1->clone(), sprite2);
_eventDispatcher->addEventListenerWithSceneGraphPriority(listener1->clone(), sprite3); - Open a Terminal window, cd to MyGame’s proj.android directory, and run the python build_native.py command. You should see messages as follows:
[armeabi] Compile++ thumb: cocos2dcpp_shared <= HelloWorldScene.cpp
[armeabi] SharedLibrary  : libcocos2dcpp.so
[armeabi] Install : libcocos2dcpp.so => libs/armeabi/libcocos2dcpp.so - Return to Eclipse and run the MyGame app on Glass. This time, you can move around the image on the top of the Glass touchpad, as shown in Figure 9-20. Be aware that you have to drag on the right part of the touchpad to make the move work.
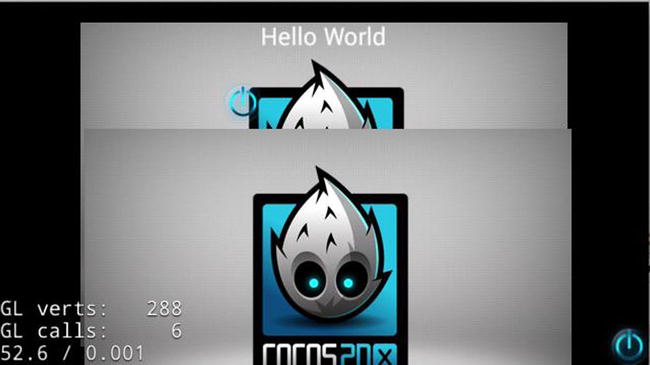
Figure 9-20. Moving Cocos2d-x sprite on Glass
If you have any Cocos2d game development background, or even if you don’t, you can come up to speed with Cocos2d-x quickly. It has well-documented online resources and examples. What I hope to offer here is to show you how to run the engine and samples on Glass and interact with the engine so you can see the potential of using the great engine for your next Glass game project. To get inspired, take another look at many great games developed with the engine at www.cocos2d-x.org/games.
libgdx is a popular cross-platform (but Java-based, unlike Cocos2d-x, which is C++-based) game engine. In this section, I’ll show you how to create and run a new libgdx app and how to run one cool libgdx demo on Glass and make some changes in the code so you can interact with the game on Glass.
Creating a New libgdx App on Glass
Follow these steps:
- Follow the document at https://github.com/libgdx/libgdx/wiki/Setting-up-your-Development-Environment-%28Eclipse%2C-Intellij-IDEA%2C-NetBeans%29 to set up Eclipse. Because you’ve been using Eclipse for your GDK development, chances are you need to install only JDK 7 (if you use JDK 6; you can find out by running java –version on Terminal). The last step of “Setting up Eclipse” is “Eclipse Integration Gradle.” Gradle (http://en.wikipedia.org/wiki/Gradle) is an automation build tool used by libgdx projects, and you also need to follow the steps at https://github.com/spring-projects/eclipse-integration-gradle, under “Installation instructions” and then “Installing Gradle Tooling from update site.”
- Download gdx-setup.jar at http://libgdx.badlogicgames.com/download.html.
- Double-click the gdx-setup.jar or run java -jar gdx-setup.jar in the Terminal or a command-line window to run the file, and in the libgdx Project Generator window, enter values for Name, Package, Game class, Destination, and Android SDK. Select Sub Projects and Extensions and click Generate, and you’ll see something like Figure 9-21.
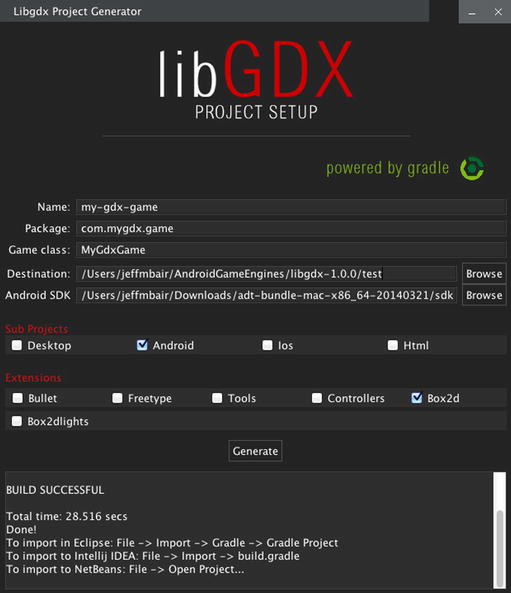
Figure 9-21. Setting up a new libgdx project
- In Eclipse, select File Import Gradle Gradle Project, as shown in Figure 9-22.
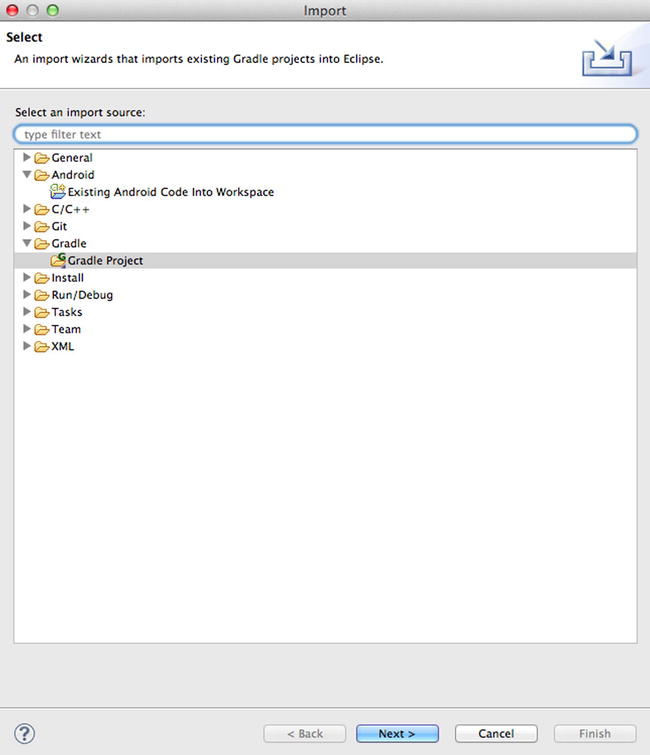
Figure 9-22. Importing a new Gradle project
- Click Browse and choose the destination entered in Figure 9-21 of step 3. Then click Build Model. If you see error saying “SDK location not found,” you can fix this by creating a new file called local .properties in the Destination directory and entering this single line:
sdk.dir=<your-path-to-adt>/sdkThen select Build Model again. You should see something like Figure 9-23.

Figure 9-23. Importing a new libgdx project
- Select the test project and click Finish; you’ll see two new projects in Eclipse: my-gdx-game-android and my-gdx-game-core.
- Connect your Glass, keep the Glass screen on, and run the app. You’ll see the default home screen, as shown in Figure 9-24.
Figure 9-24. Running the libgdx test app on Glass
Running and Playing libgdx Game on Glass
It’s great you’re able to run your first libgdx app on Glass, but it’d be more fun if you could play an actual libgdx game on Glass. Follow these steps to see how to do this:
- Get one of the libgdx demo apps, namely, Vector Pinball, at https://github.com/libgdx/libgdx-demo-vector-pinball. This is a 2D pinball simulation game using Box2D, a 2D physics engine.
- Follow steps 4 to 6 in the previous exercise to import the Vector Pinball project to Eclipse. Figure 9-25 shows the Import window.
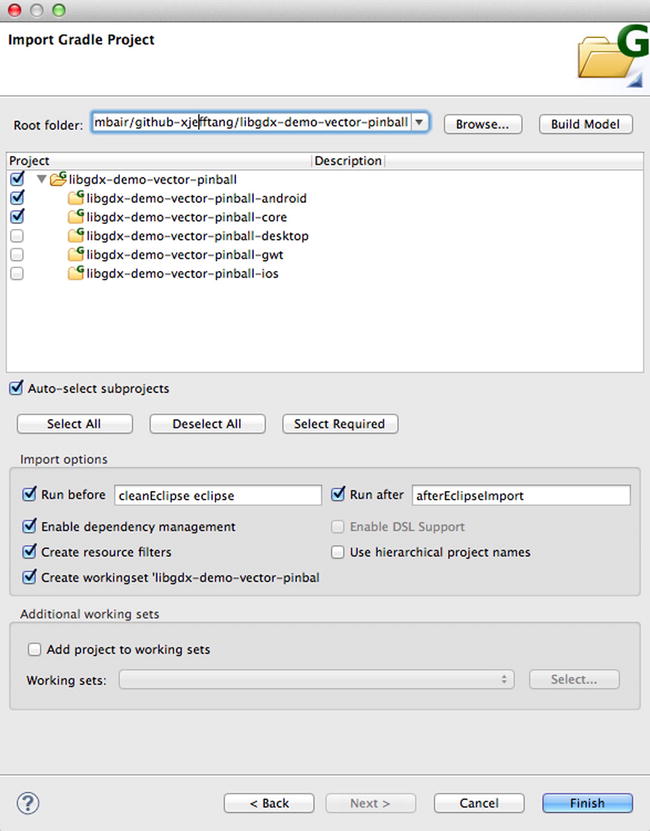
Figure 9-25. Importing the Vector Pinball libgdx game to Eclipse
- In Eclipse, run libgdx-demo-vector-pinball-android on Glass. You’ll see the game UI, as shown in Figure 9-26.

Figure 9-26. Running the Vector Pinball game on Glass
- Unfortunately, you can’t play the game at all. It’s the unbearable pain of not being able to have fun while fun seems so close. The problem is in the core game source code of libgdx-demo-vector-pinball-core or, to be more specific, the Bouncy.java file that handles the UI touch event. You have to let Glass pass the touch event to it, as you’ve done several times earlier in the chapter. In the libgdx-demo-vector-pinball-android project, there’s a single source file called AndroidLauncher.java, which calls this line to actually launch the game:
initialize(new Bouncy(), config);You need to replace the AndroidLauncher class implementation with the code in Listing 9-8.
Listing 9-8. Enabling UI interaction on Glass for libgdx Vector Pinball
public class AndroidLauncher extends AndroidApplication {
    Bouncy mBouncy;

    @Override
    protected void onCreate (Bundle savedInstanceState) {
        super.onCreate(savedInstanceState);
        AndroidApplicationConfiguration config = new AndroidApplicationConfiguration();
        mBouncy = new Bouncy();
        initialize(mBouncy, config);
    }

    public boolean onGenericMotionEvent(MotionEvent event) {
        switch (event.getActionMasked()) {
        case MotionEvent.ACTION_DOWN:
            mBouncy.touchDown(0, 0, 0, 0);
            break;
        case MotionEvent.ACTION_UP:
            mBouncy.touchUp(0, 0, 0, 0);
            break;
        case MotionEvent.ACTION_MOVE:
            mBouncy.touchDragged(0, 0, 0);
            break;
        }
        return true;
    }
}
You use an instance variable of mBouncy here so you can call its touchdown, touchup, and touchDragged event handlers defined in the core project’s Bouncy.java.
- Now run the app again, and you’ll be able to play the vector pinball game perfectly fine on Glass.
libgdx is well documented at http://libgdx.badlogicgames.com/documentation.html and has been used to build hundreds of cool games. Now that you know how to create a new app or port an existing one in libgdx to Glass, you’re well positioned to consider it when developing your next Glass game app.
The last open source game engine I’ll discuss is AndEngine, which is only for Android game development. AndEngine is easier to use and quicker for game development and should be good for most 2D Android game development, if you don’t plan on cross-platform support. Check out a nice tutorial on using it at www.raywenderlich.com/12065/how-to-create-a-simple-android-game.
In this section, I’ll show you how to run and interact with an AndEngine example app on Glass and how to import the AndEngine game in the previous tutorial, to which you’ll add the support of a Glass sensor in the next section to replace hand gestures when controlling the game UI.
Running and Testing AndEngine Examples on Glass
Follow these steps to add and use the AndEngine library and run examples in Eclipse:
- Get the AndEngine library at https://github.com/nicolasgramlich/AndEngine.
- Import the AndEngine library downloaded to Eclipse, and that’s it. You now have the AndEngine library you can use in your game app.
- Get the AndEngine examples project at https://github.com/nicolasgramlich/AndEngineExamples and most of the extensions listed at the Extensions section of the AndEngine GitHub location at https://github.com/nicolasgramlich/AndEngine (the extensions are needed to run the AndEngineExamples). After you import the examples project and all the extensions to Eclipse, you should see something like Figure 9-27 (you may need to add the AndEngine library to each of the extension projects if you get a library error on the extension’s properties).

Figure 9-27. Importing the AndEngine library, examples, and extensions to Eclipse
- Open the AndEngineExamples project’s properties, change Project Build Target to Glass Development Kit Preview, and then add the AndEngine library and all the extension libraries. Figure 9-28 shows what it looks like.
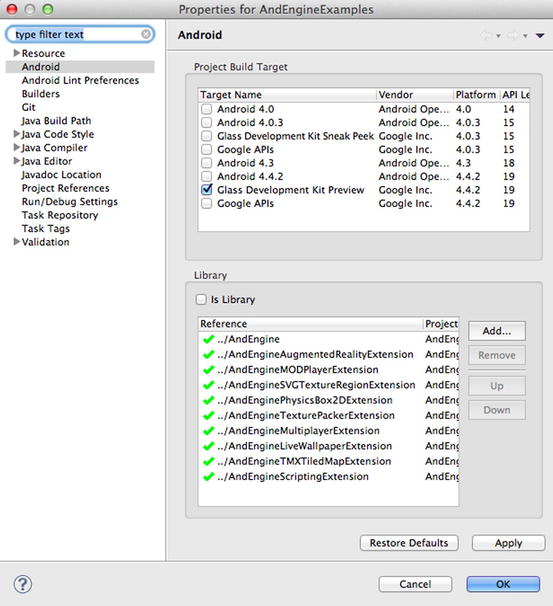
Figure 9-28. Adding the AndEngine and Extension libraries to the AndEngineExamples
- Now you can run AndEngineExamples on Glass and see the example UI as in Figure 9-29.
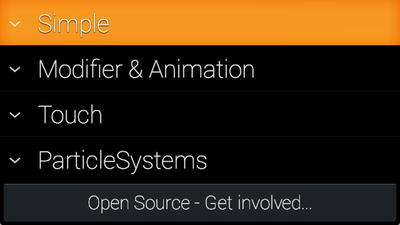
Figure 9-29. Showing AndEngineExamples UI on Glass
- Still, you can’t navigate the menu and see how all the examples work. To fix this, open ExampleLauncher.java in AndEngineExamples’s org.andengine.examples.launcher package. First add four instance variables before onCreate.
private GestureDetector mGestureDetector;
private ExpandableListActivity mList;
private int mGroupPosition = 0;
private int mChildPosition = 0;
Then add two lines of code at the end of onCreate.
mGestureDetector = createGestureDetector(this);
mList = this;
Finally, add the following two methods after onCreate.
private GestureDetector createGestureDetector(Context context) {
  GestureDetector gestureDetector = new GestureDetector(context);
  gestureDetector.setBaseListener( new GestureDetector.BaseListener() {
      @Override
      public boolean onGesture(Gesture gesture) {
          if (gesture == Gesture.TAP) {
              if (mList.getExpandableListView().isGroupExpanded(mGroupPosition)) {
                  if (mChildPosition >=0) {
                      final Example example = mExpandableExampleLauncherListAdapter.getChild(mGroupPosition, mChildPosition);
                      startActivity(new Intent(mList, example.CLASS));
                  }
              }
              else {
                  mList.getExpandableListView().expandGroup(mGroupPosition);
                  mChildPosition = 0;
                  mList.setSelectedChild(mGroupPosition, 0, true);
              }

              return true;
          } else if (gesture == Gesture.SWIPE_RIGHT) {
              if (mList.getExpandableListView().isGroupExpanded(mGroupPosition)) {
                  if (mExpandableExampleLauncherListAdapter. getChildrenCount(mGroupPosition) > mChildPosition+1)
                      mList.setSelectedChild(mGroupPosition, ++mChildPosition, true);
              }
              else if ( mExpandableExampleLauncherListAdapter .getGroupCount() > mGroupPosition+1 )
                  mList.setSelectedGroup(++mGroupPosition);
              return true;
          } else if (gesture == Gesture.SWIPE_LEFT) {
              if (mList .getExpandableListView().isGroupExpanded(mGroupPosition)) {
                  if (mChildPosition > 0)
                      mList.setSelectedChild(mGroupPosition, --mChildPosition, true);
                  else {
                      mList.getExpandableListView().collapseGroup(mGroupPosition);
                      mList.setSelectedGroup(mGroupPosition);
                  }
              }
              else if (mGroupPosition > 0) {
                  mList.setSelectedGroup(--mGroupPosition);
                  mChildPosition = 0;
              }

              return true;
          }
          return false;
      }
  });

  return gestureDetector;
}

public boolean onGenericMotionEvent(MotionEvent event) {
  if (mGestureDetector != null) {
      return mGestureDetector.onMotionEvent(event);
  }
  return false;
}
The previous code enables the navigation and selection of the expanded list of examples. Tapping an unexpanded group expands it and highlights the first item in the group; tapping a highlighted item runs the example associated with it. Swiping right on an unexpanded group highlights the next group, unless it’s the last group. Swiping right on a highlighted group item highlights the next item in the group, unless it’s the last item in the group. Swiping left on an unexpanded group highlights the previous group, unless it’s the first group. Swiping left on a highlighted group item goes to the previous item, but if it’s already the first item in the group, then swiping left uncollapses and highlights the group. Swiping down on an example goes back to the navigation list. This is all intuitive actually; maybe I just got inspired by the phrase “BAD Logic” in Figure 9-24 and decided to describe the good logic for navigation in detail.
- Now run the app again and try the examples. For example, if you choose A Cool ParticleSystem and A Nexus ParticleSystem (Figure 9-30) under ParticleSystems, you’ll see the effects shown in Figure 9-31.
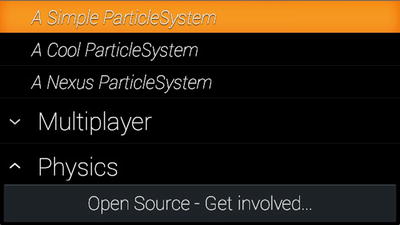
Figure 9-30. Navigating AndEngine example list on Glass

Figure 9-31. Showing AndEngine’s particle effects on Glass
If you choose an example that requires touch event handling, you still need to make some code change in the xxxExample.java file. For example, if you select the second item, Using Physics, under Physics, you’ll need to add code like the following in PhysicsExample.java of the org.andengine.examples package to make the touch work:
public boolean onGenericMotionEvent(MotionEvent event) {
    if (event.getActionMasked() == MotionEvent.ACTION_DOWN) {
        this.addFace(event.getX(), event.getY());
    }

    return false;
}
You’ve already seen examples of enabling touch in previous sections of this chapter, and you’re about to explore how to use a Glass sensor and head gesture, more fitting for Glass in some cases, to control the UI, so I’ll leave this to you to experiment with. Before I discuss how to enable head gesture for a game, let’s first quickly check out a game built with AndEngine. I’ll show you how to improve the game using a Glass sensor after that.
An AndEngine-based Tower of Hanoi Game
www.raywenderlich.com/12065/how-to-create-a-simple-android-game is a nice tutorial on how to use AndEngine to create a simple Android game. Download the project’s source code from the link at the end of the tutorial, unzip and import it to Eclipse, and fix the library issue if necessary by adding the AndEngine library project in the TowerOfHanor project’s properties.
If you run the app now in a non-Glass Android device or a virtual device, you can play the game. Run it on Glass, however, and you see only a static scene of the game. You can either use onGenericMotionEvent, as you’ve done in this chapter, to enable touch handling, or use the Glass sensor to create a hands-free experience, as I’ll describe in the next section.
Developing a Sensor-Based Game
If you have played the Glass game Spellista or Matcher (one of the Glass mini-games), available to install to your Glass at https://glass.google.com/myglass, you should be familiar with how the Glass sensor works perfectly in those cases to control the game. You can move your head around to make a selector or cursor on top of a target and then stay at the target for a certain amount of time to select it or tap to select the target.
In the description of the Matcher game at https://developers.google.com/glass/samples/mini-games, Google says that “the gyroscope and accelerometer team up to precisely follow the position of the player’s head.” You’ve seen how to read the gyroscope and accelerometer sensor data in Chapter 8, and you can try to use the sensor fusion to combine the two sensors and the magnetic field sensor to calculate the accurate head position. This article covers both theory and the Android implementation pretty well: www.thousand-thoughts.com/2012/03/android-sensor-fusion-tutorial/.
But there’s an easy solution, as you saw earlier in the chapter, by using the software rotation vector sensor, which already takes gyroscope, accelerometer, and magnetometer sensors into account to calculate the head position. Follow these steps to display a cursor that moves with your head movement to point to the targets (the three rings) to be selected for the Tower of Hanoi game:
- Make the class TowerOfHanoiActivity implement the SensorEventListener interface.
- Add the following instance variables to the class:
private SensorManager mSensorManager;
private Text mSelector;
private int mStartX = CAMERA_WIDTH / 2 - 5;
private int mStartY = CAMERA_HEIGHT / 2 - 5;
private Boolean mFirstTime = true; // used to save initially detected pitch and yaw (heading) values - Add the onCreate method with the following code:
public void onCreate(Bundle savedInstanceState) {
    super.onCreate(savedInstanceState);
    mSensorManager = (SensorManager) getSystemService
                   (Context.SENSOR_SERVICE);
} - At the end of the onCreateScene method, before return scene;, add the following:
final VertexBufferObjectManager vertexBufferObjectManager = this
        .getVertexBufferObjectManager();
BitmapTextureAtlas fontTexture = new BitmapTextureAtlas(
        this.getTextureManager(), 32, 32,
        TextureOptions.REPEATING_NEAREST);
final Font font = new Font(this.getFontManager(), fontTexture,
        Typeface.create(Typeface.DEFAULT, Typeface.NORMAL), 64, true,
        Color.MAGENTA);
font.load();
mSelector = new Text(mStartX, mStartY, font, buildSelector(),
        new TextOptions(HorizontalAlign.CENTER),
        vertexBufferObjectManager);
scene.attachChild(mSelector);
scene.setTouchAreaBindingOnActionDownEnabled(true);
And then after the onCreateScene method, add a new method.
private CharSequence buildSelector() {
    SpannableStringBuilder builder = new SpannableStringBuilder();
    builder.append('u25cb'),
    return builder;
}
The code here will add a circle-shaped red selector to the screen. Now you need to move it when you move your head.
- Add the following code to the class:
@Override
public final void onAccuracyChanged(Sensor sensor, int accuracy) {
}

@Override
public final void onSensorChanged(SensorEvent event) {
    if (event.sensor.getType() == Sensor.TYPE_ROTATION_VECTOR) {
        float pitchInDegree = (float) Math.toDegrees(
                           event.values[0]);
        float headingInDegree = (float) Math.toDegrees(
                           event.values[1]);

        if (mSelector != null) {
            int x = ((int) (mStartX + 20.0 * headingInDegree))
                                  % CAMERA_WIDTH;
            int y = ((int) (mStartY + 20.0 * pitchInDegree))
                                  % CAMERA_HEIGHT;

            if (x > CAMERA_WIDTH - 30)
                x = CAMERA_WIDTH - 30;
            else if (x < 2)
                x = 2;

            if (y > CAMERA_HEIGHT - 50)
                y = CAMERA_HEIGHT - 50;
            else if (y < 2)
                y = 2;

            mSelector.setPosition(x, y);
        }
    }
}

@Override
protected void onResume() {
    super.onResume();
    mSensorManager.registerListener(this,
        mSensorManager.getDefaultSensor
                           (Sensor.TYPE_ROTATION_VECTOR),
                           SensorManager.SENSOR_DELAY_NORMAL);
}

@Override
protected void onPause() {
    super.onPause();
    mSensorManager.unregisterListener(this);
}
In the onSensorChanged callback, event.values[0] is the pitch angle, and event.values[1] is the heading (yaw) angle, both in radians. You convert them to degrees, and because the values changed when moving a head are pretty small, you multiple them by 20 to make the selector movement obvious.
- Now run the app again, and this time you’ll see a red cycle on the screen that moves around with your head movement.
The algorithm is as follows to add a time-based control with the selector to play the Tower of Hanoi game with just head movement:
- If a ring that the selector stays on is at the top, then after the selector stays on the ring for a certain amount of time (for example, two seconds), the ring will be selected.
- After a ring is selected, moving your head will move the ring, and if the new position of the selector is around a different stack, also for a certain amount of time, the ring will be placed on the stack if there’s no smaller ring on the stack, or it will be returned to the stack from which it’s moved and become unselected.
- After a ring is selected, if the position of the selector remains on the same stack, also for a certain amount of time, the ring will be unselected.
I’ll leave the detailed implementation to you as an exercise but will also include it in the source code for you to download.
Note Artificial intelligence (AI) is always an exciting topic in the game development world. Entire books have been written about game AI. Simply search for game ai on Amazon and you’ll see what I mean. If you want to port your existing game AI code to Glass, it should be clear to you by now, if you follow the book closely, that it’s really the easy part because Glass is just another powerful Android device. If you’re interested but new to AI, you should check out other game AI books or many excellent online sites such as www.gameai.com and http://ai-depot.com.
Summary
In this chapter, I covered common graphics and animation APIs and showed many demos running on Glass, which you can use in your own simple Glass apps. Then I discussed in great detail how to set up and run three popular open source game engines (Cocos2d-x, libgdx, and AndEngine) on Glass. You learned how to run and interact with many examples for the three game engines, as well as how to create new apps using the engines. Finally, you learned how to use the Glass rotation vector sensor to control your game with head movement. I hope you’re well-armed with these powerful tools before you continue your own exciting game development journey.