
As we saw in the previous chapter, there's a real need to build more interactive, user-friendly web-based applications. We've introduced these rich Internet applications (RIA) and have shown you different approaches to developing them. From the available alternatives, we've concluded that GWT fits our needs best.
This chapter will introduce GWT and explain why we think GWT is the best choice, detail the basics of GWT, and show you the typical way you'll work with it. The chapter will also introduce the sample application that we'll build throughout the remainder of this book. Last, the chapter will introduce development tools that will come in handy when you start developing applications using GWT.
When comparing GWT to the alternative approaches in the previous chapter, we briefly pointed out how GWT compares to those alternatives. But let's take a closer look at why GWT is the framework we prefer to use to write RIAs.
As we discussed in the previous chapter, writing Ajax applications in the traditional manner is difficult and error-prone. Although many frameworks try to provide a great deal of abstraction, with most (if not all) of them you still end up having to write custom JavaScript. And as we discussed, writing and maintaining JavaScript applications is an entirely different discipline than working with Java. This is worsened by the fact that JavaScript tends to behave differently on different browsers. So in the end, you still end up spending a lot of valuable time having to code for browser differences instead of focusing on real application logic.
This is where GWT comes in, providing a real abstraction layer that hides the details of JavaScript and even the differences between specific browser environments. As we'll see in the remainder of this book, as a developer using GWT, you don't have to deal with JavaScript or browser differences. If you really want to (and we actually recommend avoiding it if possible) you can include "native" JavaScript as part of your application. This is only useful when you want to wrap existing JavaScript libraries. But again, these cases tend to be rare and should be avoided in our opinion.
Using GWT, you can continue to write your application in Java, leveraging existing best practices such as your favorite IDE, compile-time checking, unit testing, and even continuous integration. GWT will basically translate all your Java UI code to JavaScript, providing a strongly typed language to work with. GWT will also handle all browser-specific quirks for you, so you can focus on writing the code that actually does something.
Before we dive into the basics of GWT and explain how GWT allows you to focus on the important stuff, we first want to point out a couple considerations that you should be aware of before you start writing your first GWT application:
Not indexable by search engines—as discussed in the previous chapter, Ajax applications (and therefore also GWT applications) aren't indexed well by search engines. This is because search engine crawlers don't handle JavaScript (yet) and therefore just see the basic page that hosts the Ajax application; they're unable to "view" the dynamic elements that depend on JavaScript.
Not nicely degradable—closely related to the previous consideration is the fact that applications developed using GWT don't degrade well. This means that when users of the applications have disabled JavaScript, they'll just see the basic page and nothing more. This means that all we can do is tell the user that he should enable JavaScript in order to use the application. If that's acceptable, there's no problem, but if a requirement for the application is to support users who have JavaScript turned off, then GWT isn't the right choice. Using GWT when you have a requirement to support non-JavaScript users effectively means that you have to create and maintain a separate version of your application for those users. This is unlike some alternative frameworks for building Ajax applications that probably degrade much more gracefully, but are less user-friendly.
No clear separation between code and styling/layout—many frameworks provide good separation between the actual code written by developers and the HTML and styling that designers might deliver. GWT (as we'll see in the remainder of this book) doesn't provide this separation. Although the host page is plain HTML and can therefore be created by a designer, and GWT provides good support for styling using Cascading Style Sheets (CSS) as we'll see later, the rest of your GWT application is controlled by Java code. This effectively means that things such as layout and specific appearance are usually captured in the Java code. Therefore, GWT isn't suitable for designers, as they prefer using plain HTML with placeholders for inserting dynamic content (for example, Wicket). Of course, designers can come up with designs that developers then translate into Java.
Luckily for us, these considerations tend not to be a big problem for the type of application that we'll use GWT for. However, it's important to make sure they aren't going to be a problem before actually making the choice to use GWT.
Now that we've given you some more insight into why we think GWT is the best choice and also some considerations to keep in mind, let's look at the basics of GWT.
GWT can roughly be divided into three main parts, although the last one especially has many separate subdivisions:
Java to JavaScript compiler—basically, this is the heart of GWT, and its most impressive part. This is what makes GWT such a powerful tool for building RIAs. The compiler will make sure that all code that you write is eventually translated into JavaScript (even browser-specific versions, as we'll see later).
JRE Emulation library—as mentioned in the previous chapter, JavaScript is a very different language from Java. But GWT needs to compile the code you write in Java into JavaScript. In order for this to work, GWT has to provide an emulation of the core Java constructs and classes so they can be translated to code that works in JavaScript.
UI building library—this part of GWT consists of many subparts. This makes up almost the entire code base provided by GWT, including the actual UI components, RPC support, history management, and much more.
We'll go into more detail on each part in the next few sections.
The heart of GWT is the Java to JavaScript compiler. The story behind this is that Google started developing RIA applications themselves and ended up facing the issues we illustrated in the first chapter. Coming from a Java background, they asked themselves how to best develop these RIAs and came up with GWT, the main idea being to write their applications in Java. Obviously for this to work, they needed something that could turn their Java code into sensible JavaScript. And if that wasn't challenging enough, they also wanted to make sure that developers didn't need to worry about different browser quirks. So the compiler also had to somehow facilitate compiling different versions for different browsers. And that's exactly what they came up with.
The nice thing about the compiler is that it's just a Java program that you can start by running the class com.google.gwt.dev.GWTCompiler. Although this is a nice feature, you'll probably be running one of the command-line tools or run it from your favorite IDE or build tool. However, the important thing to note is that in contrast to the normal Java compiler, the GWT compiler will compile only the code that's actually used within your module. This is a good thing, as it avoids having to transfer to the client JavaScript code (or even entire libraries) that's never used. However, this principle doesn't allow for runtime loading of classes, as they aren't compiled to JavaScript. Therefore, all code must somehow be referenced so it can be included at compile time. This fits in with the fact that normal Java reflection is unavailable, as we'll see in the next section.
Note
Because the GWT compiler has to walk through your code in order to see what's used and therefore compiled to JavaScript, GWT compilation typically tends to take longer than normal Java compilation. Just keep in mind that this is necessary in order to create highly optimized JavaScript to send to the client.
One last thing we need to look at is the actual output of the compiler. The output of the GWT compiler (in this case, for the "Hello World" sample application we'll introduce later) will typically resemble the following structure for the resulting output:
065830997FFBD2DC13A986D8939F5704.cache.html
065830997FFBD2DC13A986D8939F5704.cache.js
065830997FFBD2DC13A986D8939F5704.cache.xml
0791B818FB6E04B9F03E69AE31715E7D.cache.html
0791B818FB6E04B9F03E69AE31715E7D.cache.js
0791B818FB6E04B9F03E69AE31715E7D.cache.xml
10B80E29ACBFA1FBEF8A475830840009.cache.html
10B80E29ACBFA1FBEF8A475830840009.cache.js
10B80E29ACBFA1FBEF8A475830840009.cache.xml
439FF78FFF7914AF6A60AD1111599BC0.cache.html
439FF78FFF7914AF6A60AD1111599BC0.cache.js
439FF78FFF7914AF6A60AD1111599BC0.cache.xml
B7B701C677F4C1BBA4B386753292D960.cache.html
B7B701C677F4C1BBA4B386753292D960.cache.js
B7B701C677F4C1BBA4B386753292D960.cache.xml
index.html
clear.cache.gif
com.apress.beginninggwt.HelloWorld-xs.nocache.js
com.apress.beginninggwt.HelloWorld.nocache.js
gwt.js
history.html
hosted.html
The main thing to note from this output is that the result of the compilation isn't just one JavaScript file, but several: one for each supported platform. The class com.apress.beginninggwt.HelloWorld.nocache.js takes care of loading the correct file for any specific platform. Because the compiler only generates one file per platform, the client (and any intermediate proxy servers) can cache the entire application optimally. Since the application code doesn't change between releases, the application can be cached for eternity. This will greatly reduce the load and bandwidth for the server.
In order to start and load the application, you just need to open the index.html file in a browser. This HTML file contains a reference to the nocache.js file.
So the GWT compiler allows us to write Java code and then have that translated into JavaScript. But for this to work, GWT has to provide a mapping of the Java Runtime Environment (JRE) onto JavaScript. This is exactly what the JRE Emulation library does. It has two parts. The first part deals with Java language support and the (mostly minor but important) differences between the GWT emulation and the real Java version. The second part deals with what classes are emulated by GWT and can therefore be used by you as a developer.
Language Support
You can use the full extent of the Java language when developing applications that will be compiled to JavaScript by the GWT compiler. But there are some differences that you should be aware of in order to avoid problems at a later stage. The following list below isn't exhaustive, but just lists the snags you're most likely to run into at some point:
Long support—as JavaScript doesn't have a long representation as part of its language specification, you can't pass a long from your Java code to JavaScript Native Interface (JSNI) methods. JSNI is discussed in detail in Chapter 8; meanwhile just remember that you can't pass
longto your native JavaScript methods. However, you can safely uselongtypes if they remain in the context of your Java code. GWT will make sure that they're translated into something that works in JavaScript.Exception handling—exceptions generally work the same as in normal Java code, apart from two special cases. First, the
getStackTrace()method doesn't return anything useful when running as JavaScript. Second, default exceptions such asNullPointerExceptionandOutOfMemoryErrorare never thrown in your code. You should therefore perform explicitnullchecks yourself.Single-threaded—as the JavaScript interpreters are single-threaded, your application becomes single-threaded as well. So all threading-related methods and keywords (such as
synchronized) have no effect and will be ignored by the GWT compiler.No reflection—as mentioned earlier, you can't use reflection to load classes dynamically. This is directly related to the fact that the GWT compiler needs to know about each class and method you use, in order to generate one optimized JavaScript file per platform. This would be impossible if you were allowed to load classes dynamically.
Warning
Before GWT version 1.5, the language support for JRE emulation worked only with pre–Java 1.5 syntax. That meant that things such as annotations, enumerations, and generics weren't supported. That's why older GWT code and projects might appear strange in terms of setup and language support.
Emulated Classes
As we've seen, you can use most of the Java language when developing GWT applications. But not everything is possible when developing code that needs to be translated to JavaScript and then run in a browser environment. You probably know that writing a file isn't really an option within a browser. Also, issuing a query to an SQL database isn't an option. So how do you know what you can and can't do? The answer is fairly simple: you can only use the classes that GWT provides an emulation for. And even for emulated classes, you can only use the methods that are actually emulated. The classes you can use are those in the java.lang and the java.util packages, along with a limited subset of the java.io and java.sql packages. Table 2-1 lists all classes that are emulated by GWT at the time of writing. Please note that for some of them, only a subset of methods is emulated.
Tip
In order to make sure that the code you write adheres to the requirements in terms of using emulated classes, make sure to compile your code often. Compiling and running your code in hosted mode (discussed later) gives warnings or errors if your code doesn't adhere to the requirements.
Differences in Classes
There are also two minor differences in the emulated classes that you should keep in mind when writing GWT application code:
Regular expressions—Java and JavaScript have different syntax for regular expressions. Although these differences are subtle, they tend to have dramatic results, so be careful when using regular expressions.
Serialization—Java serialization depends heavily on reflection, and is therefore unavailable in GWT. However, GWT provides its own mechanism for doing serialization as part of its RPC support, as explained in Chapter 6.
Convenient Classes
As you might have already noticed, some basic classes that developers tend to use a lot aren't available as part of the GWT emulated classes. However, GWT provides its own convenient classes to make up for this. The following classes come in handy when building real–world applications in GWT:
com.google.gwt.i18n.client.DateTimeFormat—replacement for thejava.util.DateTimeFormatclass in normal Java. Note that this replacement only supports a subset of the normal Java version.com.google.gwt.i18n.client.NumberFormat—the same kind of replacement, but then for thejava.util.NumberFormat, again providing only a subset of its features.com.google.gwt.user.client.Timer—a simplified, browser-safe timer class that can be used to mimic a threaded environment, and which allows you to schedule tasks and actions. It's a simplified version of thejava.util.Timerclass.
Table 2-1. The Emulated JRE Classes That Are Part of GWT
Package | Class |
|---|---|
|
|
|
|
|
|
|
|
|
|
Library Usage
Typically, if what you want is outside the listed classes, you probably can't use it. This also means that using external libraries such as log4j isn't permitted. The only libraries that you can use are the ones that are tailor-made for GWT. This is because those libraries only use classes that are allowed and emulated by GWT, and more importantly because they typically include the source code as part of the library. This is important because, as we've already seen, the GWT compiler needs to traverse the entire path through the source code in order to see what code is actually used. That also holds true for any library code that you include in your application.
So far we've looked at the language support provided by GWT and the emulation classes that you can use. It may seem that this is a very limited subset of the "real" Java and that you have to be well aware of this. But in reality, you will get used to it quickly and just take it for granted. In practice, you'll just start writing Java code and accept that it's going to run as JavaScript later.
So far we've looked at constraints on you as a developer when creating GWT applications. But now let's look at what GWT gives you to make your life easier. Please note that most if not all of the things we discuss in this chapter are discussed in more detail in the remainder of this book.
Basic Concepts
Before we can take a detailed look at the different features provided by GWT's UI library, we must first introduce some of GWT's basic concepts.
Modules
Modules are a basic concept in GWT. The configuration of each individual application is called a module. Typically this module configuration is provided in XML format. This module XML is described in more detail in a later section. For now, it's important to know that it details the configuration for an application and that it defines (among other things) the application startup class.
Host Page
As the GWT application has to be loaded and bootstrapped by a browser, it needs to be embedded in a normal HTML page. This page is the GWT application's host page. Note that this can be a static HTML page specifically created for your GWT application, but it can also be a dynamically generated page of an ordinary web application that happens to load a GWT application.
Cross-Browser Support
As mentioned earlier, a major problem when developing RIAs is that a lot of effort goes into working around browser quirks. This isn't something you want to do as a developer, but it's also a waste of time from a management perspective. You want developers to focus on the actual logic, not on environment specifics. Luckily, GWT takes this out of our hands. Code written for GWT will work on all major browsers. At the time of writing, applications developed with GWT will work similarly on the most recent versions of Internet Explorer, Firefox, Safari, and Opera.
However, you must be aware that the application you develop will eventually be turned into an HTML interface that is rendered by a browser. Unfortunately, these HTML interfaces tend not to work exactly the same on different browsers. In particular, layout and styling might turn out quite different. Therefore it remains important to test your applications on all the browsers they need to support. In Chapter 7, we'll show you how to test your application on different browsers and even different operating systems.
A special note in this respect is that GWT depends on and promotes the use of CSS for styling purposes. Styling with CSS is discussed in more detail in Chapter 3.
Different Modes for Running GWT Applications
One of GWT's major advantages is that you can reuse your existing Java best practices when writing applications for GWT. In order to do this, we need a way to run the code in both a Java environment and a JavaScript environment. In other modes, there are two different modes in which you can run a GWT application: hosted and web mode.
Hosted Mode Hosted mode is where your Java code actually runs as Java inside a browser environment. GWT hosted mode is where you can set breakpoints in your Java code and then just debug it as if it were normal Java code, except that you can view the result in a browser. (Actually it isn't really a browser, but a sort of emulated version of your default browser.)
Warning
The term hosted mode is used for two things in the context of GWT. First, it refers to running GWT code as Java code, as just described. But it also refers to the environment in which the code is run—the emulated browser environment.
Web Mode
In contrast to hosted mode, web mode is the mode in which the Java code is translated to JavaScript and runs inside a browser. So web mode can be considered equivalent to running in the browser.
GWT Features
This section introduces a number of the features provided by GWT. Again, note that most of these features are discussed in more detail in the remainder of this book.
Widgets and Layout
A large part of the work of building a RIA is actually creating the user interface. At its most basic, this consists of creating and adding widgets and laying them out relative to each other. Therefore, a large part of the library provided by GWT consists of widgets and layout classes. Basically, the widgets consist of real widgets such as buttons and text fields, as well as panels that provide basic layouts. But there are also more advanced features such as styling using CSS and an event mechanism. Chapters 4 and 5 deal with widgets and layout.
Server Communication
Most GWT applications need some kind of server back end to retrieve and store data and perform other actions. Luckily, GWT provides an easy-to-use RPC mechanism for communicating with a Java server.
If your application needs to connect to an existing back end or you want finer-grained control over communication with the back end, GWT offers the right tools, including support for XML and JSON back ends. Chapter 6 deals with server communication.
Testing Support
One advantage of GWT code over normal Ajax applications is that you can easily test the code you write. You can reuse your best practices in terms of unit testing, and for some corner cases GWT provides its own testing support on top of the de facto testing framework JUnit.
In addition to testing support, GWT also provides powerful ways to benchmark your code. This will also be discussed in Chapter 7.
Advanced Features
The more advanced features such as JavaScript Native Interface (JSNI), deferred binding, image bundles, localization, and history support are all discussed in the last chapter of this book.
So far we've seen the features GWT provides to help you as a developer. Before we start using them, we have to take a closer look at the typical way a GWT application is laid out. This might seem trivial, but it's important when working with GWT. As a rigorous rule of thumb: if you get the application layout wrong when working with GWT, you're bound to run into weird problems. As we'll detail in the next sections, in particular the client, server, and module locations are important, especially how they're laid out relative to each other.
But first let's look at the project structure. GWT doesn't really care how you lay out the directories in your application. But it's of the utmost importance to lay out the package structure correctly within your source directory (or potentially more directories). GWT relies heavily upon this package structure to infer many things about your application.
Tip
GWT ships with several convenient scripts or command-line tools that help you set up your project structure correctly. It's wise to use these scripts, as they save you from making typos and ending up with strange errors. The details of the creator scripts (and other convenient scripts) are discussed in Chapter 3.
A typical GWT application consists of three mandatory parts and one optional part. These four parts are
Module descriptor—module is the name GWT uses for an individual application configuration. Therefore, a module descriptor is the configuration file that describes that configuration.
Public resources—these are all files that will be served publicly. They include the host HTML page (discussed later) and all other resources such as style sheets and images. These resources are packaged as part of your application.
Client-side code—this is the Java code that the GWT compiler translates into JavaScript, which will eventually run inside the browser. Note that this code needs to adhere to the restrictions outlined earlier in this chapter as to what classes can and can't be used.
Server-side code (optional)—this is the server part of your GWT application, the remote back end to your client-side application. Obviously, if your application doesn't require back-end services (in Java), then you don't need this part. Server-side code, as well as how you can write and use it, is discussed in more detail in Chapter 6.
The following sections describe the first two of these parts in more detail. But first, let's have a look at how these separate parts are laid out within the package structure. Note that this doesn't necessarily mean that the parts have to reside in the same source directory. For instance, if you're using Maven as a build tool, you might want to separate the Java source code and the resources into different directories. The layout in Table 2-2 only describes the different parts within the package structure.
Table 2-2. Sample Locations of Different Parts of a Typical GWT Application Layout
Name | Location |
|---|---|
Project root | com/apress/beginninggwt/ |
Module descriptor | com/apress/beginninggwt/HelloWorld.gwt.xml |
Public resources | com/apress/beginninggwt/public/ |
Client-side code | com/apress/beginninggwt/client/ |
Server-side code | com/apress/beginninggwt/server/ |
Module Descriptor
As discussed previously, the module descriptor is the file that describes the configuration of an individual GWT application or module. This so-called module descriptor comes in the form of an XML file. The configuration defined in the descriptor contains the following entries:
Inherited modules—these entries are comparable to import statements in normal Java classes, but for GWT applications.
Entry point class—this entry details which classes serve as the entry points, like the classes containing the
main(String[])method in normal Java classes. Only, GWT entry point classes have to implement theEntryPointinterface provided by GWT. Note that these entry point classes are optional and there can be more than one.Source path entries—the module descriptor allows you to customize the location of the client-side code (defaults to the client package relative to the module descriptor location, as you can see in Table 2-2).
Public path entries—these allow you to handle public path items such as source path entries (this also defaults to the public folder relative to the module descriptor location).
Deferred binding rules—these are more advanced settings that you can use to customize all kinds of aspects of your GWT application. These settings usually aren't used by the developer directly, and are therefore not discussed in this chapter. However, deferred binding is discussed in some detail in Chapter 8, when we discuss localization.
So let's look at an example of a module descriptor file. We have to create a module descriptor with the name of the module (in this case HelloWorld) and with the extension .gwt.xml, resulting in HelloWorld.gwt.xml. Leaving out the advanced features and keeping the defaults, we're left with only the inherited modules and entry point class entries, as shown in Listing 2-1.
Example 2-1. A Sample HelloWorld Module Descriptor File
<module>

    <inherits name='com.google.gwt.user.User'/>
    <entry-point class='com.apress.beginninggwt.client.HelloWorld'/>
</module>
The module descriptor in Listing 2-1 is typical of simple GWT applications. In this case, we tell GWT to create an application that inherits from the base GWT module for users. The GWT user module contains most of the code you typically need to run a GWT application. It contains all the default classes such as the EntryPoint interface we're going to use next.
As mentioned earlier, the entry point class is rather like the class containing the main(String[]) method in normal Java classes. As the name suggests, it's the entry point for the application to start. In the case of our sample module descriptor, we define an entry point class GWTasks that starts the application. In Listing 2-2, we've specified a class named HelloWorld, located in the default source path directory, as the entry point.
Example 2-2. A Sample HelloWorld Entry Point Class
public class HelloWorld implements EntryPoint {
    public void onModuleLoad() {
        // initialize the application
    }
}
Each class defined as an entry point should inherit from the EntryPoint interface provided by GWT. This interface defines one method that the GWTasks class has to implement. This method, onModuleLoad(), is the method that serves as the real entry point to the application. The GWT compiler will start analyzing and eventually translating your application starting at this point. This is where, in the following sections and chapters, we'll start adding code to make the application do some real work. But for now, adding the additional line in Listing 2-3, we just tell the user that the code is working.
Example 2-3. A Simple Hello World Implementation of the onModuleLoad Method
public void onModuleLoad() {
   Window.alert("Hello World!");
}
Note that the Window class is a utility class provided by GWT. In this case, we use it to show a JavaScript alert to the user.
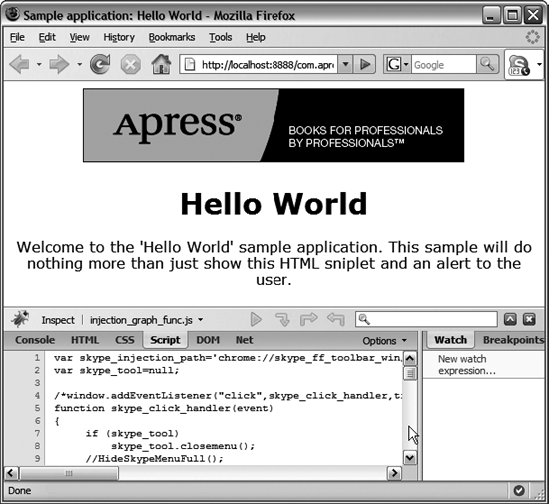
In order to be able to run our Hello World code, we need one last thing: the host HTML page that contains the GWT application. We already discussed this host page in a previous section, but now let's create one for this sample application (see Listing 2-4).
Example 2-4. The Host Page That Contains the Hello World Sample Application
<html>
    <head>
        <title>Sample application: Hello World</title>
        <link rel="stylesheet" href="styles/main.css">
    </head>
    <body>
        <img src="images/logo.gif" alt="Apress Logo"/>
        <h1>Hello World</h1>
        <p>
            Welcome to the 'Hello World' sample application. This sample will do
            nothing more than show this HTML snippet and an alert to the user.
        </p>
        <script src="com.apress.beginninggwt.HelloWorld.nocache.js"
               type="text/javascript"></script>
    </body>
</html>
In Listing 2-4, note that there are two resources: a logo image and a style sheet. Also note the script that actually loads the sample application. This host page and all resources it references need to be placed in the public resources directory. As mentioned previously, the default location is in a directory named public relative to the directory where the module descriptor is located. But you can customize this by adding an entry to the module descriptor. The logo image and style sheet that are referenced in the host page need to be placed in that directory as well. Make sure that you put them in the appropriate subdirectory. For completeness, Listing 2-5 shows the content of our style sheet.
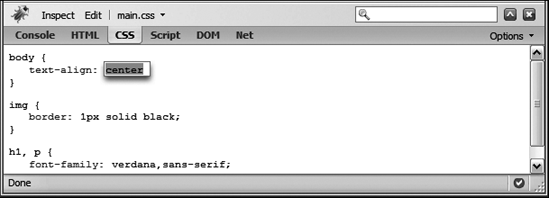
Example 2-5. The Sample Style Sheet That's Included in the Host Page
body {
    text-align: center;
}
img {
    border: 1px solid black;
}
h1, p {
    font-family: verdana, sans-serif;
}
Now run this sample in order to see it in action, using your favorite tool. If you run the sample application in hosted mode, you should see something resembling Figure 2-1.
Note
A detailed how-to guide on how to set up a GWT project correctly in your favorite IDE is provided in the appendix of this book. In order to run this sample application and all following code samples, read the appendix on how to set it up in your IDE.
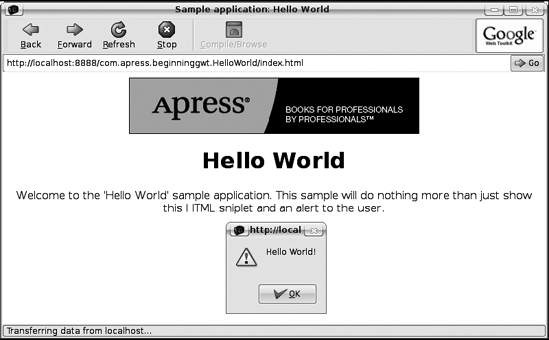
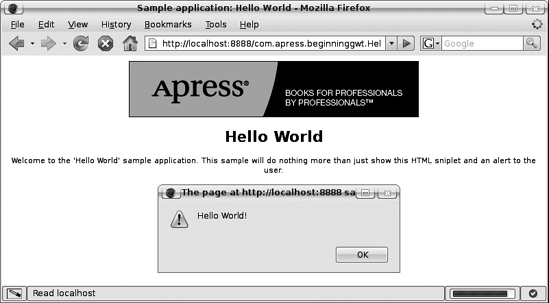
If you now click the OK button on the JavaScript alert box and then click on the Compile/Browse button, the GWT compiler will compile the application to JavaScript and start your default browser. The browser will run the full JavaScript version of your application. That's the web mode that we discussed in an earlier section. The result should look like Figure 2-2.
That's it for the basics of GWT. We've now built our first real GWT application that adheres to the default GWT application layout. Next, we'll introduce the sample application that we'll use as a reference for the rest of the book.
We've decided, whenever possible, to use one sample application throughout this book. This sample application will gradually evolve over the course of book, adding functionality as we go. We feel that reusing the same sample application decreases the effort needed to understand the individual code samples. But maybe even more important, we feel that building something real (and even usable) over the course of the book is a much more pleasurable experience.
The sample application for this book is GWTasks, an application that allows users to efficiently manage their tasks. Obviously, this sample application will be in the form of an RIA developed using GWT. The application will provide basic functionality such as logging in, registering a user, and managing categories and tasks using a web-based UI. Note that the application is kept fairly simple to make sure the code base remains easy to grasp.
Note that in addition to the GWTasks application, which is used to illustrate most GWT features as we progress through the book, some chapters also have individual code samples (like the previous samples in this chapter). All of these samples (as well as the final GWTasks application) are part of the code base that you can download from the Apress web site.
So here's how you can see the GWTasks application in action to get a feel for what you'll be building. To get started with the sample application, you must first download the source code from the Apress web site. The next thing to do is set up the project in your favorite IDE. You can either use the command-line tools (discussed in Chapter 3) or follow the instructions in Appendix A on how to set up a GWT project in your favorite IDE (only Eclipse or IntelliJ IDEA are discussed in the appendix).
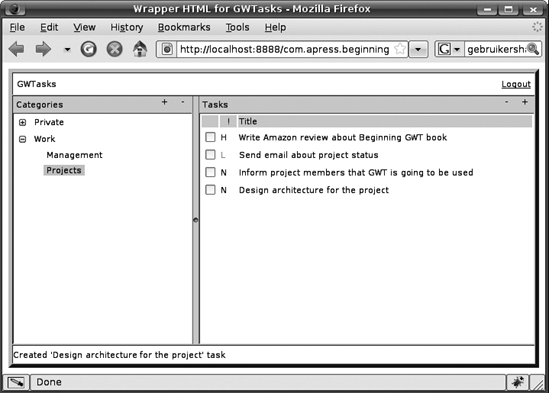
Once you have the project set up correctly, you should be able to run the sample application (again using the command-line tools or using your IDE specific launch functionality). Once successfully started, you should see a screen similar to the one in Figure 2-3.
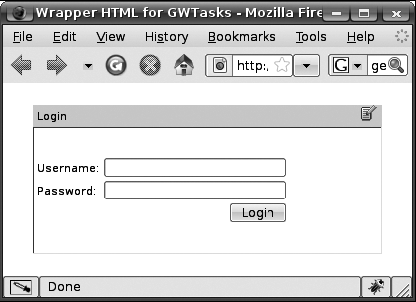
Clicking on the icon in the right corner of the Login dialog opens the Register pop-up dialog (see Figure 2-4), which you can use to register a new user. Either submit the form or click the Cancel button to go back to the Login dialog.
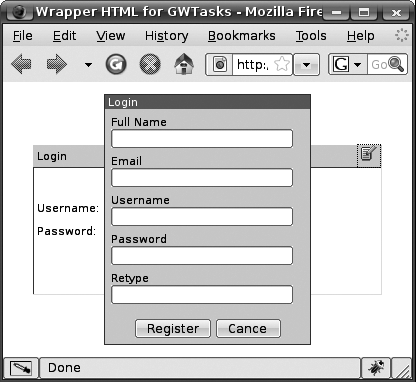
Submitting the Login form will bring you to the main screen of the GWTasks application, as shown in Figure 2-5. This screen allows you to manage your categories and tasks. Just create some categories and tasks and see how you can interact with the application.
Now before we go to the next chapter to start building the GWTasks sample application, let's first take a look at some development tools that we think will come in handy during development.
As discussed earlier, developing rich Internet applications using GWT allows you to use your Java development tools. So you can reuse your favorite IDE, your existing build tool, and even your entire continuous integration setup. However, as you eventually develop a web application, you'll need some additional tools to help you. Note that these tools are not GWT-specific; they can be used to help you with any web development.
Most of the tools listed in this section are add-ons to Firefox. We realize that not everyone uses Firefox, but there are two reasons why we recommend these (and therefore Firefox). First, unlike most browsers, Firefox is full-featured, as well as available on most platforms. Second, many of the most powerful tools are available only as Firefox add-ons.
All the tools Firefox add-ons can be downloaded and installed from their web sites, or can be installed directly from the Firefox Add-ons site at http://addons.mozilla.org/firefox/. Just go to the site, search for the tool you want, and click the Add to Firefox button. The first time you do this, you may have to add the Firefox Add-ons site to the list of sites that are trusted to installing software inside Firefox.
If you don't have Firefox installed already, we strongly recommend doing so. Go to the Firefox download site to download the latest version: http://getfirefox.com.
The web developer plug-in is a Firefox extension developed by Chris Pederick. It adds to the browser a menu and toolbar that provide several web developer tools (see Figure 2-6). The web developer plug-in provides a great many tools, but we only list the ones we use most and consider the most valuable.
View Source
This is a useful feature, especially when developing Ajax and JavaScript applications. Typically, these applications start off with a relatively simple HTML page and then dynamically build up, or replace, part of the page. Therefore, the View Source feature no longer works very well, as it only shows a limited subset of what appears on the screen. But the View Generated Source functionality is quite useful, as it shows the source of the content that's displayed on the screen. It prints out the entire DOM tree as it is at the moment you request it. Therefore, you can inspect it as you normally would. An added feature is that you can actually copy and paste the source and save it as static HTML for debugging or testing purposes.
Resize
The resize feature is also really handy. It allows you to resize your browser window to predefined dimensions at the click of a mouse. In the Preferences menu of the add-on, you can set your own predefined dimensions. It's convenient to predefine the screen resolutions that your application needs to support (and some intermediate ones). This allows you to make sure that your application resizes correctly in all of these resolutions.
There are two important things to keep in mind when using this add-on. First of all, remember that a certain screen resolution doesn't necessarily correspond to the actual browser window size. The user can obviously have a nonmaximized browser window. Second, the rendering and browser's actual view port size depend on a number of factors, such as operating system, window decoration, and enabled toolbars. So although we feel that this feature is useful to test on different resolutions easily, we do want to stress that you can never be sure what the user will actually see.
Miscellaneous
Another useful feature is the ability to clear all kinds of private data, such as the cache, history, and HTTP authentication. Especially when working with caching headers, for example to improve performance, you need an easy way to clear these kinds of data in the browser.
Tools
One last, very important feature of the web developer add-on is that it allows you to easily validate different parts of your web application, such as the HTML itself, but also the CSS style sheet, and so on. There are useful icons on the right side of the toolbar (see Figure 2-7) that indicate for the current page whether the HTML, CSS, and JavaScript contain errors.
The project page for this tool is http://chrispederick.com/work/web-developer/.
Firebug is another Firefox add-on that provides a lot of the same functionality as the web developer add-on for inspecting the current DOM and HTML. Firebug is actually the most powerful tool discussed in this section, and an absolute necessity when working with HTML interfaces, especially those containing JavaScript. So when functionalities overlap between Firebug and the web developer add-on, we usually prefer Firebug.
The great thing about Firebug is that it not only allows you to inspect almost all of the aspects of an HTML page and its resources, but also to "live edit" them. So for instance, Firebug allows you to add, modify, and remove style properties on certain elements on the fly. But let's start at the beginning.
Usually, once Firebug is installed, it's represented by a green, round icon, or a bug-like icon depending on the version, in the right bottom corner of your Firefox browser window. You have two options: based on your preference, you can either expand the add-on into the current window by clicking on the icon or right-click the icon and choose to open Firebug in a separate window. See Figure 2-8 for an example.
Firebug provides a lot of valuable functionality that you need. The following sections detail some of the most important and relevant ones.
Inspecting and Editing HTML
Firebug has a feature similar to the View Generated Source function in the web developer add-on, but even more powerful. This allows you to browse the source code "live." You can expand, collapse, and navigate the source tree of the code at any given moment. The nice thing is that you can actually click an HTML element, and that element is then highlighted in the normal browser view. This makes it easy to see how your HTML page is built.

In addition to highlighting the element in the normal browser view when you select an item in the source view, you can also do it the other way around. You can (after telling Firebug to inspect the page) simply hover and click elements in your HTML page to have the source view jump to that element in the source. You can even search for elements in the source.
An even more powerful feature is that you can modify the HTML on the fly. You can change, add, and remove elements as you wish. The browser is immediately updated in response to your changes. This is a powerful feature that lets you, for instance, try out a fix before implementing it and having to reload or even recompile the whole application.
Inspecting and Editing CSS
Firebug also provides the features we just described for CSS as well as for HTML and source elements. You can inspect the specific styling that is applied to each element. This includes not only styles that are directly applied to an element, but also styles that are inherited from other styling rules.
As with HTML, the CSS functionality allows you to modify styles on the fly. You can add, remove, and even temporarily disable styling rules. When modifying and creating styling rules, you can also enjoy autocomplete functionality, as well as previews for colors and images.
Debugging and Profiling JavaScript
This is the most powerful feature of Firebug: a full JavaScript debugging tool. In Firebug, you can easily inspect all the JavaScript files and snippets that are part of the current page. You can set breakpoints and even add conditions to them, as with any good debugger. You can also step through the JavaScript code and put watch expressions on elements in the DOM tree.
Warning
As discussed earlier, GWT allows a number of different output styles for the compiler (obfuscated, pretty, and detailed). Make sure you use the detailed style if you plan to use the Firebug debugger (or any other debugger for that matter). The obfuscated output style puts all output on one line, and is therefore not very handy for inserting breakpoints.
In addition to providing a powerful debugger for JavaScript, Firebug also allows you to profile your JavaScript code. You can easily find bottlenecks in the code.
Monitoring Network Activity
Another powerful tool provided by Firebug is the ability to monitor network activity for a certain web page. This allows you to get a detailed overview of what's loaded as part of your web page, and more important, how long each of these resources takes to fully load.

This allows you to tweak your page to the fullest extent. It shows whether images, style sheets, and scripts are compressed and cached correctly. Firebug also lists the HTTP headers that are sent and received, as well as the amount of caching that's applied.
The project page for this tool is http://www.getfirebug.com/.
Another valuable add-on to Firefox is LiveHTTPHeaders, which lets you look inside the HTTP headers that the browser sends and receives for loading a page. This is handy, especially for making sure that not too many requests are issued to different servers. As you may know, browsers can typically issue only around three simultaneous requests to the server. Because many web pages include more than three resources, page loading can be stalled by the browser waiting for requests to become available again to use for retrieving other resources. This is especially true of slow connections to sites such as advertisement servers.
LiveHTTPHeaders allows you to easily monitor the headers and the number of requests that the browser sends and receives. Although Firebug provides similar functionality, we list LiveHTTPHeaders for three reasons. First, it's quicker and easier to use. Second, similar add-ons are also available for Internet Explorer and many other browsers. And last, it allows the replay of packets, which is useful for testing what type of input a web application will accept.
The project page for this tool as an add-on for Firefox is http://livehttpheaders.mozdev.org/ and a similar add-on for Internet Explorer is a project called ieHttpHeaders: http://www.blunck.se/iehttpheaders/iehttpheaders.html.
The last development tool that we want to point out is a cacheability engine. Basically, this is a web site where you can type in a URL, and then the engine determines the cacheability of the page the URL points to. This means that the engine examines the specified page and all referenced resources and checks to what extent they can be cached by client browsers and intermediate proxy servers.
The cacheability of a page and its resources is useful information, not only because it can greatly reduce server load and save bandwidth, but more importantly to enhance the user experience. As stated in the previous section, for most web pages, the browser actually waits to retrieve resources. If you get the caching of these resources right, then the browser no longer has to issue a request to the server, because the resource can just be retrieved from the local cache. This greatly enhances the user experience, because page loading feels much more responsive.
There are many cacheability engines available on the Web. The end of this section lists some of them, but if you type "cacheability engine" into Google, then you'll find several others. These engines also provide a lot of information on how to improve the cacheability of your application.
Note
In order for these cacheability engines to test your application, it needs to be accessible from the Internet. So you either need to install your application on a public server or make sure that you route a combination of an outside IP address and port number to the server hosting your application.
Three cacheability engines that are available at the time of writing are available at http://www.mnot.net/cacheability/, http://www.ircache.net/cgi-bin/cacheability.py, and http://www.web-caching.com/cacheability.html.
This chapter has shown you why we think GWT is the best choice for writing the kind of rich Internet applications introduced in Chapter 1. We explained the basic rationale behind GWT and its inner workings. This included a high-level overview of the features provided by GWT that allow you as a developer to build interactive, user-friendly web applications.
You saw the typical GWT project structure when you built your first GWT application. Several concepts and typical parts of a GWT application were introduced as we built that application.
Next, this chapter introduced the sample application that we'll build in the course of the book. This GWTasks application will serve as a way of introducing and illustrating all interesting aspects of GWT.
Last, this chapter introduced some tools that we find to be essential when developing web applications in general, and especially GWT applications.