
![]()
Creating Your First Hybrid Application
- Understand packaging platforms for hybrid applications
- Understand server-side code writing
- How to use basic responsive CSS
- How to set up and use an AppBuilder account
- How to do local device testing
By the time you complete this chapter, you will have your first hybrid application working on Android, iOS, and Windows Phone!
Choosing a Packaging Platform
It’s time to say hi by using a hybrid application. To create your first application, you need to set up a framework along with the packaging platform. As discussed in Chapter 3, many popular frameworks and tools are available for coding and packaging. Each has its pros and cons. However, because of its ease in coding and packaging, I prefer to go with Telerik AppBuilder.
Setting Up an AppBuilder Account
To get going, let’s set up a 30-day trial account with Telerik. Here are the steps to create a trial account:
- Visit www.telerik.com/appbuilder.
- Click Start Now, as shown in Figure 4-1.

Figure 4-1. First step: visit the Telerik web site
- Complete the registration form with the required details. I filled up mine as shown in Figure 4-2. Click the Launch Telerik Platform button.
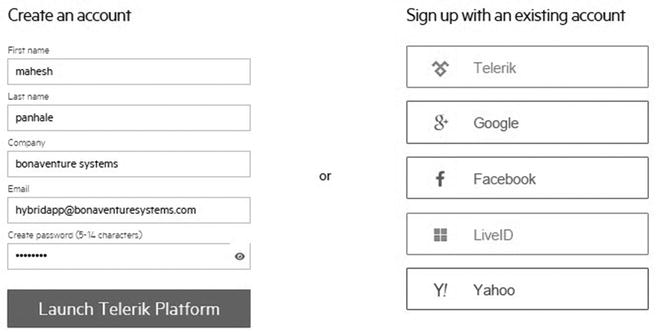
Figure 4-2. Second step: new user registration
- You might have to validate an e-mail account by clicking the URL that Telerik sends about an e-mail ID.
- After validation, you may be navigated automatically to www.telerik.com/account/, as shown in Figure 4-3. (If not, navigate by yourself.)

Figure 4-3. After e-mail verification
- Click Start 30-Day Free Trial. If you want to purchase the product, visit www.telerik.com/purchase/platform. The price starts at $39 per month per user. The portal creates a workspace for the project and navigates you automatically to https://platform.telerik.com/#workspaces, as shown in Figure 4-4.

Figure 4-4. Workspaces
- Click the Create App button.
- The screen shown in Figure 4-5 appears. Enter details for App Name and Description as shown.

Figure 4-5. Creating an app
- Click the Create App button. The next screen offers choices along with a short description about the project to be created.
- Click the Create AppBuilder Hybrid Project button The next screen offers internal templates for hybrid projects. It includes Blank and a few with Kendo UI APIs added.
- Choose Blank (the default) and assign a Name and Description for the project, as shown in Figure 4-6.

Figure 4-6. Hybrid project templates from AppBuilder
- Click the Create Project button. After the project is created, the default helper modules are added into your project, and an in-browser solution window appears.
On the right side of the solution windows, you will find index.html. This is the file in which you will code the maximum number of times.
However, as discussed earlier, because you’re going to call server-side code for getting data (JSON), you should first create the server-side code.
Let’s revisit the client side of AppBuilder.
Authoring a Basic Service Returning JSON
We have discussed the importance of JSON over XML. You can return JSON format data by using either code based on service-oriented architecture (SOA) or by returning JSON as a content type from web applications built using Microsoft .NET PHP, ASP, and JSP. Let’s start with the easiest way by creating an ASP.NET-based generic handler returning JSON data. If you are not from a Microsoft .NET background, you may use SOA base code to return JSON. (When used with Java server-side APIs, refer to https://docs.oracle.com/javaee/7/tutorial/jsonp005.htm.)
You are going to use Microsoft Visual Studio 2012 for the development. You can use an older edition such as 2010. The Microsoft Visual Studio Community 2015 edition is available for free and can be downloaded from www.visualstudio.com/en-us/downloads/download-visual-studio-vs.aspx.
An Express web edition of Visual Studio may also help.
Let’s start by opening Visual Studio 2012 (Professional, Premium, Ultimate, or Express edition):
- Create a folder named ApressCH04 on System Drive to store your project.
- Choose Start
 Program Files Microsoft Visual Studio 2012. Click the Visual Studio 2012 icon. Alternatively, you can choose Windows Run and type the devenv command.
 - Click File New Project, as shown in Figure 4-7.

Figure 4-7. Create a new project by using Visual Studio
- A New Project dialog box opens. Keep the default framework as is. From the left side of this dialog box, click Templates Visual C# Web.
- From the right pane, choose the ASP.NET Empty Web Application project.
- Name the project HelloServer.
- Change the default location for the project storage to the previously defined folder. Deselect the Create Directory for Solution check box (because you’ve already have created one on C:), as shown in Figure 4-8.

Figure 4-8. ASP.NET empty project template
- Click OK. This action creates a project and opens a workspace like the one shown in Figure 4-9.

Figure 4-9. HelloServer workspace
- In the Solution Explorer (at the top right of the project workspace), right-click the project HelloServer.
- From the context menu, choose Add Class, as shown in Figure 4-10.

Figure 4-10. Adding a class in the project
- The Add New Item dialog box opens. Add a class file named Person.cs, as shown in Figure 4-11.

Figure 4-11. Add class in project
- Open the Person.cs class file and insert the following code into it:
using System;
using System.Collections.Generic;
using System.Linq;
using System.Web;
namespace HelloServer
{
    public class Person
    {
        public string Name { get; set; }
        public string Address { get; set; }
    }
}
This code is for creating a class whose object will store one person’s or one entity’s (hard-coded) basic information, such as name and address. This information will be converted into JSON format by using a generic handler to our hybrid mobile application.
- Again right-click the HelloServer project inside Solution Explorer.
- From the context menu, choose Add New Item, as shown in Figure 4-12.

Figure 4-12. Adding a handler in the project
- Select the Generic Handler template and name it SayHello.ashx, as shown in Figure 4-13.

Figure 4-13. Adding handler into project
- From the Solution Explorer, double-click SayHello.ashx. This opens the SayHello.ashx.cs file with the default code.
- Remove the code inside the ProcessRequest method and replace it with the following code:
          // Below line is to convey client browser / hybrid
          // application that we are returning data in JSON format

          context.Response.ContentType = "text/json";

          // Create a person class object
          // Assign dummy information to the same

          Person person = new Person();
          person.Name = "James";
          person.Address = "London";
          string jsonResult = string.Empty;

          // Create Javascript serializer helper object
          // Need to refer below namespace for the same
          // Put using "System.Web.Script.Serialization"

          JavaScriptSerializer jss = new JavaScriptSerializer();

          // Serialize person's data in JSON format
          jsonResult = jss.Serialize(person);

          // Write JSON data to browser / App
context.Response.Write(jsonResult); - From the Build menu, choose Build Solution. At the bottom left of Visual Studio, make sure you can find a Build Succeeded message.
- Press the F5 key on the keyboard to run the project. After you run the application, you can see a web server program, IIS Express, started automatically. It can be seen at the bottom right of the window, beside the taskbar and under the notification windows. This web server may run on a random port. Because you’re testing this on a local machine, any random port picked up automatically will do.
- Running IIS Express opens the default browser, which initially shows nothing, or an error, as shown in Figure 4-14. Append the URL in the browser’s address bar with SayHello.ashx.

Figure 4-14. Error: Forbidden
- Click Go or press Enter inside the browser. This action calls the server-side code and shows JSON code in the browser.
- If you are using Internet Explorer (IE), it offers a download dialog box; to see the contents, you may have to download and open the same using Notepad. However, other browsers such as Chrome and Firefox may show JSON data directly on the browser itself, as shown in Figure 4-15.

Figure 4-15. Viewing JSON in the Chrome browser
- Because you’re testing the preceding code on a local machine, a random port will be picked up automatically and that will do what is needed. Run the application by pressing F5 on the keyboard. Visual Studio opens the default browser and displays the JSON, as shown in Figure 4-15.
- Because this is server-side code and you will be testing and calling it on a mobile-based hybrid application using jQuery, local server hosting may not help. A local web server for testing purposes may not exist for all mobile devices. It does exist for Android devices. Refer to https://github.com/jetty-project/i-jetty for more information. Because of this limitation, you won’t put it on a mobile based web server.
- To help you call this server-side code returning JSON, you’ll publish it on the live server. To do so, follow this Microsoft web site link, which will guide you in the publishing process: https://msdn.microsoft.com/enus/library/dd465337(v=vs.110).aspx.
- To call this code, I published it on my company web site with this URL: http://bonaventuresystems.com/Apress/BeginningHMAD/CH04/SayHello.ashx. Figure 4-16 shows the output of the URL call on the browser.

Figure 4-16. Viewing JSON in the Chrome browser
Writing a Code Snippet Based on HTML5
Now, you have to write client-side (mobile-side) code. You will start by writing code for a plain HTML file on the local drive. This will help you debug and analyze the code.
If you attempt to write the code directly into the AppBuilder project workspace, debugging it would be difficult as it compiles into the cloud and lets you download the final output based on the targeted device chosen.
So, let’s create a new folder named HelloClient under the earlier defined folder.
Follow these steps to complete the HTML5 code snippet:
- Add a new text document, New Text Document.txt into the folder <SYSTEM DRIVE>:ApressCH04 HelloClient.
- Rename New Text Document.txt to index.html. Make sure you change the file extension!
- To complete the resources required for the project, you’ll download the jQuery library. You’ll learn more about the jQuery library in the next section. Visit https://jquery.com/.
- From the Download tab, download the latest version of this library (1.11.3 at the time of this writing). The library is free.
- From http://getbootstrap.com/, download the CSS3-based Twitter library, bootstrap.css.
- Extract the compressed file and keep only bootstrap.min.css and bootstrap.min.js in the HelloClient folder. You will learn more about Bootstrap CSS in next section. The structure and content of the HelloClient folder are shown in Figure 4-17.

Figure 4-17. HelloClient folder structure
- Start Visual Studio as you did previously. Click File Open File (or press Ctrl+O), as shown in Figure 4-18.

Figure 4-18. Opening a file by using Visual Studio
- This action opens a dialog box. Browse to the HelloClient folder created earlier. Select index.html and then click the Open button.
- Insert the following code into the index.html page:
<!DOCTYPE html>
<html>
<head>
    <title>Say Hi</title>
    <script src="jquery-1.11.3.min.js"></script>
    <link rel="stylesheet" href="bootstrap.min.css" />
    <script src="bootstrap.min.js"></script>
    <script>
        $(document).ready(function () {
            $('#btnCallServer').click(function () {
                $.ajax({
                    url: 'http://bonaventuresystems.com/Apress/BeginningHMAD/CH04/
                        SayHello.ashx',
                    type: 'GET',
                    success: function (result)
                    {
                        $('#txtName').val(result.Name);
                        $('#txtAddress').val(result.Address);
                    },
                    error: function (err) { alert('Error!'); }
                });
            });
        });
    </script>
</head>
<body>
    <br /><br /><br />
    <div class="container">
        <div class="col-lg-3">
            Name: <input type="text" id="txtName" value="" />
        </div>
        <div class="col-lg-3">
            Address: <input type="text" id="txtAddress" value="" />
        </div>
        <div class="col-lg-3">
            <input type="button" id="btnCallServer" value="Call Server" />
        </div>
    </div>
</body>
</html> - Right click anywhere inside the code window (inside Visual Studio) and then select the View in Browser option. The default browser opens and shows the rendered HTML5-based output, as shown in Figure 4-19.

Figure 4-19. Running index.html on localhost using Internet Explorer
- This is the browser-based UI for your application. A similar UI will be available on the mobile screen, but you won’t see a browser window at all. Keep it in mind that the server still returns output in JSON data format. Now, when you click the Call Server button, the code throws an error. To get more details easily, let’s use Google Chrome’s developer tools. Open the Google Chrome browser.
- Type the same URL that was there while you ran index.html using Visual Studio. The URL is similar to what you see in Figure 4-19. (The port number may be different on your machine.) The UI looks like Figure 4-20.

Figure 4-20. Run index.html on localhost using Google Chrome
- Now, before clicking the Call Server button, let’s open the developer tools. Either press F12 on the keyboard or click the Customize and Control Google Chrome button at the right corner of the address bar. Then click More Tools Developer Tools, as shown in Figure 4-21. After the developer tools are open, the Chrome browser will look like Figure 4-22.

Figure 4-21. Opening developer tools on Google Chrome
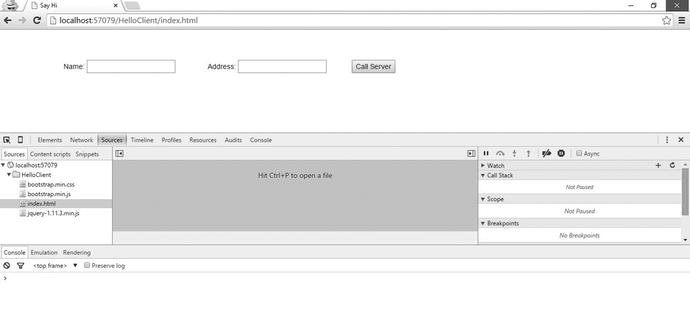
Figure 4-22. Google Chrome with developer tools
- Click the Call Server button. An error occurs as it did earlier in Internet Explorer, as shown in Figure 4-23.

Figure 4-23. Tracking the error on Google Chrome
- You can see the error details in the console window at the bottom, in default red characters. The error details convey the following:
XMLHttpRequest cannot load http://bonaventuresystems.com/Apress/BeginningHMAD/CH04/SayHello.ashx. No 'Access-Control-Allow-Origin' header is present on the requested resource. Origin 'http://localhost:57079' is therefore not allowed access.
This means that the server-side code that is on the domain bonaventuresystems.com does not permit calls from another domain (in this case, localhost:57079). This is a common issue with cross-origin calls, or calls made from one domain to another domain. Such calls have to be permitted through code. So you need to allow calls to SayHello.ashx (bonaventuresystems) from the pages that belong to a different origin (localhost:57079).
- How to do it? It’s simple. The solution is given in the error message itself. You have to add one extra line of code at the very end of the ProcessRequest method of SayHello.ashx:
context.Response.AppendHeader("Access-Control-Allow-Origin", "*");This line allows calls to SayHello.ashx as a resource from any other domain, as you have specified * in second parameter. After deploying the latest and revised SayHello.ashx file on BonavenutureSystems.com, now when you click the Call Server button, the code ends in Success! After redeployment, the output looks like Figure 4-24.

Figure 4-24. After solving a cross-origin error
Let’s now explore the important lines of HTML, jQuery, and Bootstrap code injected in index.html. This line conveys to the browser that the HTML page is written adhering to the HTML5 standard:
"<!DOCTYPE html>"
"<script src="jquery-1.11.3.min.js"></script>
    <link rel="stylesheet" href="bootstrap.min.css" />
 <script src="bootstrap.min.js"></script>"
Here referencing sequence matters:
- bootstrap.min.js uses bootstrap.min.css and is dependent on the jQuery library. The code references the latest jQuery version, 1.11.3.
- min denotes that the respective file contents are minified (reduced in size) and that the file is a production-level file.
Injecting jQuery into the Code
$ is shorthand syntax for jQuery. The following line asks jQuery to execute a function (which does not have a name—it’s anonymous). This function executes only after the Document Object Model tree (DOM tree) is ready. In simple words, it indicates to execute the function code when all controls in the HTML are loaded in the hierarchy.
"$(document).ready(function () {..........})"
The next line throws an error if it’s not written after the preceding “document ready” line. This line asks jQuery to find a control in the HTML hierarchy with an ID attribute value of btnCallServer. The # before btnCallServer conveys finding by ID. Further, this line also conveys a function (again which does not have a name—it’s anonymous), which needs to be called only when a Click event is raised with btnCallServer.
$('#btnCallServer').click(function () {
The next line makes an AJAX asynchronous call to bonaventuresystems.com/SayHello.ashx and collects the JSON data in an anonymous function conveyed after the success word.
$.ajax(....)
Also, the error is captured in a similar way. In short, the parameters convey the following:
- url: What to call?
- type: How to call (GET, POST, PUT, or DELETE )
- success: What to call after a successful reply from the server
- error: What to call after an error received from the server
In the following HTML, styles are added using classes given by bootstrap.css:.
<div class="container">
        <div class="col-lg-3">
            Name: <input type="text" id="txtName" value="" />
        </div>
        <div class="col-lg-3">
           Address: <input type="text" id="txtAddress" value="" />
        </div>
        <div class="col-lg-3">
         <input type="button" id="btnCallServer" value="Call
          Server" />
        </div>
    </div>
These classes help you achieve a responsive UI! Although this code uses only a few classes out of many, the appearance of the UI and the alignment of the controls changes based on the screen of the device.
For example, when this application’s UI is seen on mobile devices and tablets, the alignment of the controls is not a cause for concern because of the responsive UI.
To understand the importance of this library, let’s look at how this page will look on different devices of different sizes! Let’s do the early testing!
Testing the Hybrid Application UI and Code by Using a Browser
- Copy the index.html URL: http://localhost:57079/HelloClient/index.html.
- Open any browser to www.responsinator.com.
- Type the index.html URL from step 1 in the Enter Your Site text box, as shown in Figure 4-25. Then click Go.

Figure 4-25. Enter the site URL in the responsinator
Notice how responsive the UI looks on different devices, as shown in Figure 4-26. The responsinator helps display the UI for many screens.

Figure 4-26. Responsive web design in the responsinator
So all that you’ve done has tested the code on the browser. But, remember, you are deploying a mobile application! Now, let’s package the application using AppBuilder.
Packaging an Application for the First Time Using AppBuilder
Previously in this chapter, you created a trial account on the Telerik web site. Follow these steps to complete the demo packaging:
- Open the index.html file inside the Apress Project folder.
- Replace the code in index.html with the code that you wrote using Visual Studio, as shown in Figure 4-27.

Figure 4-27. Code in index.html
- Inside Solution Explorer, right-click Apress Project and then select Add Existing Files, as shown in Figure 4-28. The dialog box shown in Figure 4-29 opens.
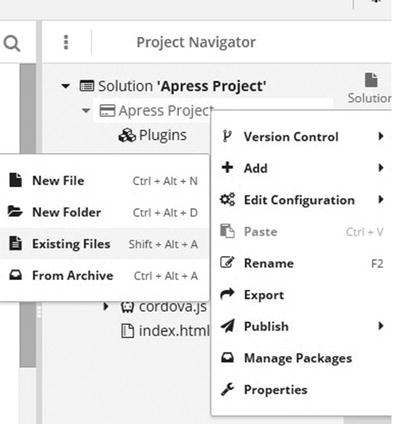
Figure 4-28. Adding existing files

Figure 4-29. Adding existing resourcess
- As shown in Figure 4-30, from the HelloClient folder, either drag and drop the following files, or click Select and then browse for and upload these three files:
- bootstrap.min.css
- bootstrap.min.js
- jquery-1.11.3.min.js

Figure 4-30. Adding existing resourcess
You don’t have to add index.html, as you already copied its contents into the default index.html from Solution Explorer. Solution Explorer will look like Figure 4-31.

Figure 4-31. Solution after adding existing resourcess
- Click the Run button. You get the option to either Build or to test the application on various simulators. Let’s test using an iPhone simulator, as shown in Figure 4-32.
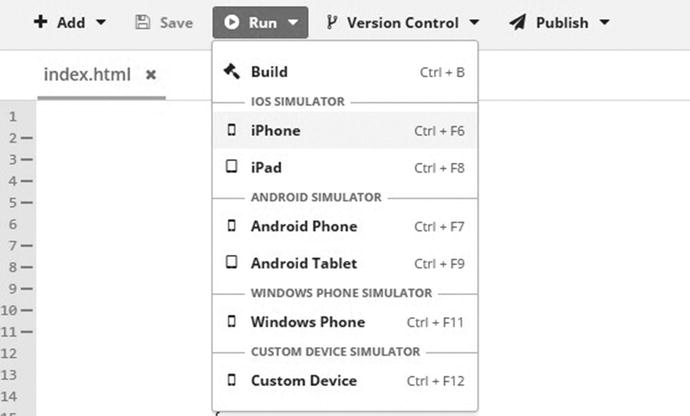
Figure 4-32. Choosing a simulator
- This selection opens the iPhone simulator in a pop-up window, as shown in Figure 4-33. Click the Call Server button to see the result.

Figure 4-33. Adding existing resourcess
- From the top-left panel in the pop-up window, change iPhone to Android Phone, as shown in Figure 4-34. Then test in a similar way, as shown in Figure 4-35.

Figure 4-34. Changing the simulator

Figure 4-35. Using the Android simulator
- Do the same for Windows Phone, as shown in Figure 4-36.
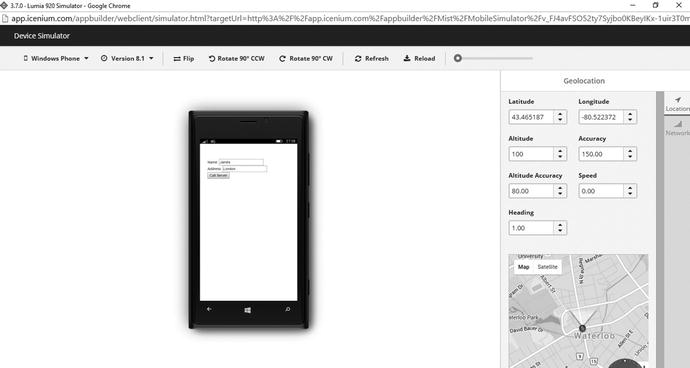
Figure 4-36. Windows Phone simulator
- Close the pop-up. Choose Run Build, as shown in Figure 4-37.

Figure 4-37. Choosing the Build option
- A pop-up opens, enabling you to choose a platform for packaging. For this example, choose Android, as shown in Figure 4-38.

Figure 4-38. Android packaging
At this point, you need to understand the options. If you choose iOS or Windows Phone, packaging won’t be as smooth as with Android. Why? iOS application packaging using AppBuilder requires that you code sign the application before it gets published!
The process for code signing is explained on the Telerik web site: http://docs.telerik.com/platform/appbuilder/code-signing-your-app/configuring-code-signing-for-ios-apps/configuring-code-signing-for-ios-apps
Windows Phone application packaging using AppBuilder requires a Telerik application enrollment token.
The process for getting a Telerik application enrollment token is explained on the Telerik web site at the following link: http://docs.telerik.com/platform/appbuilder/.
- When publishing for Android, you have two options for the final package, as you can see in the pop-up window:
- Using AppBuilder: With this approach, you need to have the AppBuilder application installed on the client’s hybrid mobile application package, or the installer will be pushed through the AppBuilder application.
- Using AppPackage: This approach asks the client to download and install the final output file directly.
- You need to indicate whether you’re finished with the application or still in the development phase. Choose Debug or Release mode.
- Click the Next button; this starts the build and packaging of the code in the cloud. You can see the progress, as shown in Figure 4-39. When the build is complete, the screen in Figure 4-40 displays.

Figure 4-39. Progress of the Android packaging

Figure 4-40. Completed Android packaging
- Click the Download button, and the final output is shown on the machine, as you can see in Figure 4-41.

Figure 4-41. Final packaging output
Running a Local Test on the Device
After your package is ready, testing it on a real device requires meeting certain prerequisites of the platforms vendors. For example, the most common requirement is to purchase a developer license from the platform vendor. Costs vary from vendor to vendor. Let’s explore these licensing terms, costs, and obstacles while working on the major platforms.
To publish applications at the App Store, Apple offers a membership program. Membership is available to individuals, organizations, and educational institutions. Fees are always annual; for an individual, the developer program fee is $99 per year. The cost varies for organizations and educational institutions.
The Apple web site says, “This Membership includes access to beta OS releases, advanced app capabilities, and tools to develop, test, and distribute apps and Safari extensions. Developers enrolled as individuals will sell apps on the App Store using their personal name.”
Normally, 100 installations for each device (iPhone, iPad, iPod, and Apple watch) for testing purposes are allowed for each developer license per membership year.
If the app is paid, Apple gets 30 percent of the cost, and the developer takes 70 percent.
More details are available at https://developer.apple.com/programs/whats-included/.
To publish applications on Google Play (formerly the Google Play Store or Android Market), Google offers a membership program. The one-time fee for a publisher account is $25.
You can transfer app output files (APKs) directly to an Android mobile device by using an SD card, the Internet, or Bluetooth without this license. The license is required if you want to publish apps through Google Play.
The revenue model remains the same as that of Apple. More details are available at http://developer.android.com/distribute/googleplay/start.html.
To publish applications on the Windows Store, Microsoft offers a membership program. An individual account costs $19 per year. A company account costs $99 per year.
More details are available at https://msdn.microsoft.com/en-in/library/windows/apps/jj863494.aspx.
Summary
Although many packaging platforms exist, in this chapter you created a simple application with the help of the AppBuilder platform from Telerik.
Using JavaScript in a flavored form such as jQuery, CSS3 in the form of responsive CSS like Twitter, along with HTML5-based UI markup has become a trend nowadays for hybrid mobile application development.
You’ll learn about the internals of HMAD in the next chapter.