
![]()
UI for HMAD
The objectives of this chapter are to
- Learn about UI creation using JavaScript and JQuery
- Learn about the event handling mechanism in JQuery
- Learn about jQuery plug-ins to generate UI dynamically
- Learn about UI effects
- Learn about responsive UI style classes
This chapter looks at dynamic UI generation, JQuery plug-ins for UI manipulation, and the CSS classes for making a UI responsive.
We already created a basic application in Chapter 4. We used very basic and static UI. Dynamically generating a user interface is not a complex task. You just need a container control (like div or section) and then programmatically find the container and append the HTML contents as a string.
When it comes to finding dynamically added controls or handling events for dynamically added controls, however, it is a complex job to accomplish. Why? Because handling events for the controls already known to the DOM tree is easy. When a control is added to the HTML <body> dynamically, then the new control’s availability needs to be conveyed to the DOM tree first.
Let’s consider a very general scenario. A hybrid mobile application pulls data from a server based on the certain filter conditions. To represent data, you can’t suggest having a static hard-coded UI because the data is dynamic. This means that a mobile app doesn’t know the amount of data it is going to receive. Hence, the application has to generate the UI dynamically, based on the size of the data.
Let’s consider that the data is a set of records with fields like Name and Address in each record.
Now, in a dynamic UI, you want to show the container <DIV> based on the number of records received. Also each <DIV> should also have a <button> dynamically added. On click of each <button>, it should show “alert” with a “Hi” message and the respective person’s name appended; for example, the message is “Hi James”, on click of the button in the <DIV>, which has “James” written in one of the controls inside <DIV>.)
Let’s build a solution considering the approach taken in Chapter 4. Let’s now consider the code authored in SayHello.ashx.
The following steps make the changes in SayHello.ashx.
- Open the HelloServer project.
Make changes in the Person class. Add an extra No property of the integer type .final Person class will look like this:
public class Person
 {
     public int No { get; set; }
     public string Name { get; set; }
     public string Address { get; set; }
 }
Now, open SayHello.ashx. Make the following changes in the SayHello class, as highlighted in Figure 7-1.
- Recall the cross origin issue discussed in Chapter 4. To solve this, let’s add the following line (keep it as is).
context.Response.AppendHeader("Access-Control-Allow-Origin", "*"); - Compile the code and publish the code, as done in Chapter 4. Follow the same steps.
I have published the changes in the HelloServer project at http://bonaventuresystems.com/Apress/BeginningHMAD/CH07/SayHello.ashx.

Figure 7-1. Changes in SayHello.ashx
After deployment, Figure 7-2 is the direct JSON output shown on the Chrome browser UI.

Figure 7-2. JSON output from SayHello.ashx
So, testing through the browser is done for SayHello.ashx.
Now, let’s focus on the client side.
- Open the HelloClient project used in Chapter 4.
- Open index.html. Figure 7-3 explains the changes to be made in index.html, along with comments.

Figure 7-3. Client-side changes in index.html
- Once done with the changes described in Figure 7-3, you can test index.html in the browser.
- Run it and then click Call Server. The click-event raises a call to the server-side SayHello.ashx.
View the data that appears in the dynamically constructed UI. After viewing it, try to resize the browser to “literally” mobile size. Note that the change in the UI is due to classes added in templates 1, 2, and 3 as col-lg-3. Figure 7-4 shows the dynamic UI appearance when viewed on a mobile-size screen.

Figure 7-4. Dynamic UI building
Notice that the Say Hi button is replicated in each record sent by the server. As of now, there is no code to handle the Say Hi button click event. Suppose that you write a function in JavaScript named F1 (). How do you tell each Say Hi button to execute F1 ()? Moreover, how will F1 () will identify which button was clicked?
Let’s solve these problems one by one.
Live Event Binding in JQuery Using On ()
First problem: Tell each dynamically added button which function to execute. Solution: Let’s use an on () function in JQuery. It works only with JQuery 1.7 and above.
As per the JQuery web site (http://api.jquery.com/on/), the on () function attaches an event handler function of one or more events to the selected elements. The live () functionality was used in JQuery until version 1.9. Today, the on () function’s performance is considered better than live ().
Add the snippet shown in Figure 7-5 after the first line of JavaScript code (i.e., after “$(document).ready (function () {“).

Figure 7-5. JQuery on ( ) functionality code
Run the page again and make sure that on the click of any Say Hi button, an alert dialog with a “Hi” message appears.
Why can’t you use the normal click () function in JQuery, which you used for the Call Server button? Use the click () function, which helps attach a click event of the controls with the respective event handler function. This works provided control exists in the Document Object Model (DOM) tree at the time the tree is created; this means that control is statically hard-coded into the HTML design.
In scenario discussed earlier, the Say Hi buttons are added to the DOM tree at runtime based on data received from the server. So, to register dynamically added controls plus their events in the DOM tree, use the on () function. Another function, bind () in JQuery 1.9+ only uses on () internally.
Now, only “Hi“ is printed in the dialog box. We want a person’s name appended to “Hi”.
Second problem: How to keep a track of which Say Hi button is clicked? Solution: Use JQuery to find information about the current button or control being clicked, which is done using “$(this)”. But since every button added in the UI has same id, name, and attribute, it becomes very difficult to identify the control. So, why not add an extra attribute with a record-specific value while constructing the button programmatically? Let’s add a “Name of person” value to title attribute of the button. Note these changes in Figure 7-6.

Figure 7-6. Dynamic UI generation along with use of on() function
Now you see an alert dialog showing “hi!” and a person’s name appended, as shown in Figure 7-7.

Figure 7-7. Dynamic UI in browser
JQuery Plug-in-based Approach to Generating a UI
Notice in the code that the entire dynamic UI generation is based on the for loop. Instead of using the for loop, can we define the <TEMPLATE> based approach? What is it? And what can this approach do? It means that instead of using template 1,2,3,4 and the “append only” approach, we define the entire person-related reusable UI along with the data holder. This approach helps reduce memory utilization.
To achieve this, many JQuery plug-ins (code libraries) exist. Some are paid and some are free. Let’s use a free library to generate the UI using s template concept called jsrender.js and available on GitHub (https://github.com/borismoore/jsrender) (see Figure 7-8).

Figure 7-8. Downloading jsrender.js library
- After downloading compressed (ZIP) content from github.com, uncompress it.
- Refer jsrender.min.js into index.html.
- Add a reusable HTML template with content placeholders for the record data. Make changes to the success function, which are shown in Figure 7-9.
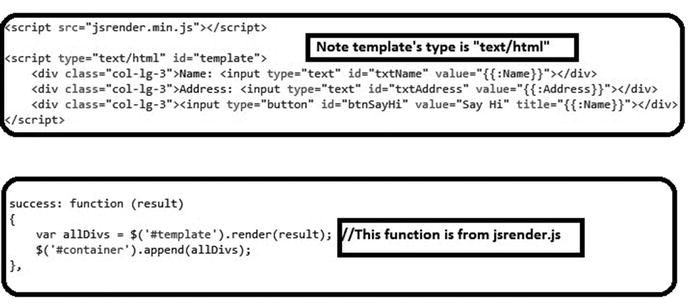
Figure 7-9. Using jsrender.js
- Run index.html in a browser. Observe that there is less code but that it still works the same as before. Also, note that there is no for loop in the success function.
Miscellaneous Libraries and Plugins
While working with hybrid mobile applications, sometimes you don’t have to reinvent the wheel. Simply find it and use it!
Many developers, companies have already authored plug-ins based on top of Java script or JQuery. These plug-ins are available for manipulating UI, creating UI effects or for creating dashboards or charts and so on. Some of the plug-ins are listed next along with short descriptions. The following information may change from Vendor and is subject to change.
Fusion Chart
A fusion chart is a JavaScript-based charting control library that works on the Web and mobile. It can be downloaded at http://www.fusioncharts.com. It is available for free or for pay (license cost $199 to $3299). The following is its list of features:
- Drill-down chart
- Zoom in/out
- Export
- Real time
- Multilingual
Touch Punch
Touch Punch is similar to famous JQUERY UI Library but specifically made to support touch gestures! Download it at http://touchpunch.furf.com for free. Its features include drag-and-drop, resize, dialog, slider, and accordion, among available major UI effects. However, to use this library, you have to refer to the JQuery UI library because Touch Punch depends on the JQuery UI.
You have come across the term responsive UI many times since the first chapter. A responsive UI means UI that changes as per the available media device.
If you develop such a UI, you have to measure the available container size and then accordingly set the content size. The efforts required for creating a responsive UI directly depends on how complex the internal UI components and controls are. Instead of reinventing the responsive UI libraries, there are already many available.
The following describes two of the more popular responsive UI libraries or CSS frameworks. The following information may change by vendor and is subject to change.
- Twitter Bootstrap
- Download at http://getbootstrap.com/
- Paid or Free: Free (MIT License)
- Features:
- Developed at Twitter
- Divides device’s screen area (real estate) into a 12-column grid
- Works on well-known mobile browsers and webviews
- Skeleton
- Download at http://getskeleton.com
- Paid or Free: Open source MIT license
- Features:
- Lightweight
- Divides device’s screen area (real estate) into a 12-column grid
- Works on most mobile browsers
Frequently Used Style Classes in Bootstrap
To create a complex UI in a hybrid application, you have to understand the style classes available from a responsive UI framework. The following are the bootstrap classes frequently used in hybrid applications and the Web.
- Table: Represents a table with prespecified border.
- table-responsive: Makes a table responsive.
- form-control: Makes any UI HTML control responsive.
- table-stripped border: Defines a table with alternate background rows.
- visible-md, visible-sm, visible-lg, and visible-x: Defines whether the control is officially visible and the default size (md means medium; sm means small; lg means large; x means extra-small).
- Nav: Defines navigation. (LI, UL) needs to be used along with Nav.
- Span 1 till 12: For example, if an element size is 12, this means the entire row is occupied by a control if it is a 12-column grid.
Now let’s summarize what we have covered in this chapter.
Summary
This chapter covered dynamic UI generation using code. It also discussed the render.js plug-in based on top of JQuery and used to replace the for each loop in the UI generation code.
We covered the event handling mechanism using JQuery, specifically live event binding. Finally, we discussed popular plug-ins available on the market related to UI only and responsive UI.
The next chapter discusses how to access device-specific features in hybrid mobile application through code.