
![]()
Using Device Features in HMAD
The objectives of this chapter are to
- Learn how to use device features
- Work with an SD card
- Use camera through plug-ins
- Use the HTML5 Geolocation service
- Learn to create, sync, and update applications
Devices come in various sizes, with various features, and at various prices. This chapter deals with some common device features. Let’s start with tracking a geolocation.
Many mobile applications (which may or may not be hybrid) can track the location of the user; popular examples include Zomato, Foursquare, and Uber. Applications like Zomato use location as a major input.
Hybrid applications can use the HTML5 Geolocation API. This API uses browser-vendor-specific services to get the user’s current latitude, longitude, and altitude. Alternatively, they can use plug-ins to do the same thing.
What are we planning to use in this chapter? Well, Cordova offers an implementation that uses this HTML5-based API at http://docs.telerik.com. We will use the core HTML5 Geolocation API with the navigator DOM object.
Again, HTML5 offers the Geolocation API with the navigator object. So we will set up index.html (like we used in Chapter 4 with the Telerik AppBuilder). Let’s create the following UI along with the DIV container to hold all the data and buttons to call the Navigator API. An explanation of the UI along with the markup is given in Figure 8-1.

Figure 8-1. Responsive UI and styles
Now, let’s add a JavaScript and JQuery code snippet in index.html. The JavaScript code explanation is shown in Figure 8-2.

Figure 8-2. Using the Geolocation API
As mentioned in the Figure 8-2, you to refer the required JS libraries into the code. On handling the button click, use a callback mechanism. As seen in the code, GetCurrentPosition() expects the first two parameters as callback functions. The first function is called after a successful reply from the server and another is called if any problem or error persists.
The third parameter is a JSON object. It has three keys: enableHighAccuracy, maximumAge, and timeout. All is explained in Figure 8-2. Note that over the Web, the timeout counter starts only after the user permits the application to track his location. Since location is very private user information, the app asks permission before usage or installation.
Along with latitude, longitude, and altitude values, you can also get speed, the time of the server’s response, and the direction that user is headed, which is provided in the angle (degrees) format, clockwise from the north.
You can package the preceding code using AppBuilder and run the application, just as we did in Chapter 4.
Geolocation Plug-ins and Helpers
You may use geolocation libraries like GEO.js, which you can download from https://code.google.com/p/geo-location-javascript. You can also use the wrapped up HTML5 Geolocation API from Cordova. Sample code is offered on the Telerik AppBuilder web site at http://docs.telerik.com/platform/samples/sample-geolocation/.
If you notice, instead of only showing latitude and longitude as numbers, we have used the Google Map API. You can also use third-party APIs to graphically show the location. Microsoft’s Bing Maps API is also helpful and easy to use in this case. Follow these steps to use the Microsoft Bing Maps API:
- Visit https://www.bingmapsportal.com.
- Log in with Live credentials.
- The user interface will look like the one shown in Figure 8-3.

Figure 8-3. Creating a key for Bing Maps usage
- Click My account
 create a new key or view/download complete list of keys (see Figure 8-4).

Figure 8-4. Creating a key for Bing Maps usage
- Change the code inside index.html (refer to AppBuilder) to the one shown and explained in Figure 8-5.

Figure 8-5. Using Microsoft Bing Maps API for geolocation
- After the build, deploy the code as in Chapter 4.
So, you can refer HTML5 or third-party plug-ins to show the geolocation of a user. The workings of the HTML5 Geolocation API are complex because it works against device-specific algorithms. It is dependent on the availability of an Internet connection, GPS, and so on.
Now, let’s focus on SD cards.
Some applications do not require Internet connectivity. To maintain the user’s data, such an application may use an SD card (a small flash memory card designed to for higher storage) or phone internal storage.
Offline applications may use an SD card or the phone’s internal storage. Applications such as WhatsApp may use an SD card or the phone’s internal storage to store data received from the Internet. This is a feature that cannot be tested on a simulator. It has to be tested on a real device.
An application that requires access to the user’s SD card or internal phone storage has to get permission from the user during installation.
When working with hybrid applications, there are many APIs available for an SD card or internal phone storage, including the READ/ WRITE operation. You can also use core the HTML5 file I/O access feature as well. More information about HTML5’s file access feature is available at http://www.w3.org/TR/FileAPI/.
Let’s use a core HTML5-based API to work with an SD card or internal phone storage. You have to refer to a window object from the DOM tree to work with memory.
Let’s make step-by-step changes to the application.
- Open index.html from the existing project (see Chapter 4).
- Make changes in the markup as per Figure 8-6. Keep a note that the app.initialize() method is referred to handle the device initialization event. The code for this function is authored in the index.js file.

Figure 8-6. UI for Read/Write on mobile device
- Now, after <body> tag–related changes, add the following JavaScript code into index.html. The code mentioned in Figure 8-7 is self-explanatory.
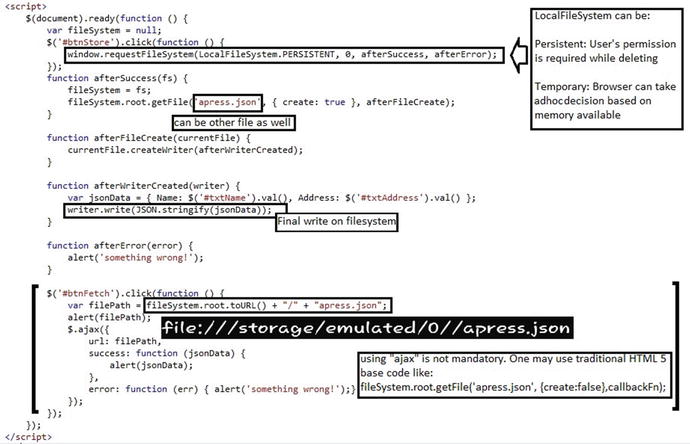
Figure 8-7. File I/O code
- Don’t forget to add a reference to the required JS libraries, as mentioned in Figure 8-8.

Figure 8-8. References into the code
- Make sure that you also refer the index.js file code at the root of the application. Replace code, if any, from index.js, as shown in Figure 8-9.

Figure 8-9. Handling device-ready event
- After this, compile and build the code. Keep in mind that since it involves interaction with the device, this app cannot be tested with an online simulator.
- Build it for Android, deploy it, and test it.
- After deployment (I did the test on Samsung Note 2), the app UI looks like what’s shown in Figure 8-10.

Figure 8-10. UI after running code on Android device
- Make an entry in the Name and the Address fields. Click Write to SD Card (see Figure 8-11).

Figure 8-11. Writing content on device
- The file is saved on the file system’s root. Now, click Read from Card. If you have noticed, we have used the AJAX function to read the data from the drive. But the URL parameter in JQuery AJAX requires URLs with a pattern. So, to access the file on the file system, you can use the native URL functionality offered by the plug-in.
- Figure 8-12 shows the alert, which in turn shows the native file system URL to access the file.

Figure 8-12. Native file system-based URL for the JSON file
The final alert dialog appears (see Figure 8-13) along with data in the form of string, which can be JSON parsed later. The file created on the file system can be seen by navigating through My Files, as shown in Figure 8-14.

Figure 8-13. JSON file contents

Figure 8-14. JSON file created on device
Along with the preceding basic functionality, you can also use the following functions available from the LocalFileSystem API:
- getDirectory(): Get folders inside the file system. You can create a folder with {Create: true} as the JSON parameter.
- readEntries(): A function available with the Reader. It helps read files available based on the directory. It offers collection as output, but in a callback way.
- moveTo(): As the name suggests, this function helps move files from one folder to another.
- copyTo(): As the name suggests, this function helps copy files from one folder to another.
Now, let’s focus on working with camera, which is one of the most popular features.
Access and Use a Device-Based Camera
Whether it’s WhatsApp, Facebook, Twitter, or so forth, one thing is commonly seen: apps asking the end user for profile photos. If a photo is not available on the file system, then you must have a facility to offer to the end user that allows him or her to use the device’s camera to take a snapshot. This is similar to the way shoot-and-share applications like Instagram demand a lot of camera usage. So, camera usage is necessary nowadays.
Using HTML5 and JavaScript, you can again use the navigator DOM object to get most of the photo work done. How do you work with a camera? We won’t be working with any external plug-in; instead, geolocation and file I/O, we will use only HTML5-specific code.
Let’s learn how to access a camera, step by step:
- Open index.html from the existing project (see Chapter 4).
- Make changes in the markup, as per Figure 8-15.

Figure 8-15. UI for camera capture
- Make sure you refer to the required JS libraries, such as Bootstrap and JQuery.
- Add the JS code from Figure 8-16. Note the explanation of the code.

Figure 8-16. Using camera features
- Compile and build the code. Keep in mind that since it involves interaction with the device, this app cannot be tested with an online simulator.
- So, build it for Android, deploy it, and test it.
- After deployment (I did the test on Samsung Note 2), the app UI should look like what’s shown in Figure 8-17.

Figure 8-17. UI for Camera Capture Code
- Click Use Camera to start the camera. Take a snapshot. I took a picture of a company logo. After accepting the snapshot, it is displayed, as shown in Figure 8-18.

Figure 8-18. Camera being accessed
There will be times that you want to find a unique identifier for the device using your hybrid application. The purpose could be for identifying who used the application. You can access a device unique identifier with the help of device.uuid (see Figure 8-19). You may want to know a device unique ID regardless of the phone or SIM number; for example, an offline application in Domain Survey. (Domain Survey is explained in the Case Study, later in the book.)

Figure 8-19. Getting unique ID of the device
Sometimes Internet connectivity is not available but applications have to continue working. In such situations, can applications continue storing data and keep running as offline applications? Yes. To check Internet availability, you can use the connection object, exposed via the navigator.connection.
However, if you keep the availability check against a timer in JS, then that may lead to higher battery usage, in which case your application could get banned from a mobile vendor store! To check the battery status (to take some ad hoc action) through code, refer to Figure 8-20.

Figure 8-20. Using offline APIs
To store data locally on the file system, we have already seen the Storage approach. You can also use HTML5’s Window.localStorage to store key-value pair-based data.
To sync such data with the server on the network, you may use AJAX with an HTTP handler, web service, or WCF service on the server side.
Common Issues and Solutions
One common problem of working with these features is the user interface. Since the code for hybrid application works inside the webview (internally, webview works with a similar default browser engine), rendering the engine may rarely create a problem.
At the same time, when it comes to Apple UI standards, you have to pay good attention to it. As discussed, if the application uses the device’s battery to a great extent, then the greater the chance that the application will not get approval on a vendor’s mobile store. Since most of the UI code is done in the index.html file, maintenance can become a problem.
It is always recommended that if you have even the smallest clue that your application’s code size will grow, then you should use an MV*-like pattern in the client-side code of the application from the onset of the project. That means use the MV* framework in HTML JavaScript code.
One such framework that has gained popularity recently is AngularJS.
It is recommended that while working with LOCALSTORAGE, test the functionality with the browser first and then build it against mobile. Similarly, if targeting geolocation, use simulators to test the application. Use actual test devices while working with the camera, SD cards, and sensor-like features.
Let’s summarize what we have learned.
Summary
This chapter discussed accessing device features, such as geolocation tracking, the camera, and the file system. With these features, we stuck to core HTML5-specific code rather than third-party plug-ins.
Considering only the features covered in this chapter, the major issues of deploying applications exist because of UI load time and battery consumption. These are norms that you must understand when creating UI-centric applications for specific mobile devices.
The next chapter discusses third-party code and library integration in hybrid mobile applications.