
![]()
Data Interchange
Thus far, you have been learning how to work with JSON data that has been stringified, parsed, persisted, and retrieved—all from within the scope of a running application. However, as JSON is a data-interchange format, it is capable of being transmitted across the Internet, which offers our applications much more possibility than we have currently been allowing them.
With the use of data interchange, we can send JSON across the Internet into a database that is owned/controlled by us. The visitor cannot as easily delete data this way, as it could be with Web Storage and the HTTP cookie. Furthermore, the ability to transmit data allows our application the ability not only to push out JSON but also to load it into our applications. In other words, not only can we load into our application the data that we’ve stored, but we can also tap into the data that others are willing to share as well. This may be data that is available to the general public free of charge or by a paid service. Consider the vast array of social sites out there that offer to the public free of charge the data that they capture. Twitter, Facebook, and Instagram are prime examples of social properties that are willing to offer aspects of their data via an API. Because of the many positive attributes that JSON possesses, it is the favored data format of nearly every social API.
In upcoming discussions, you will learn how to load JSON into our application, transmit JSON from our application, and persist JSON into a database over which we have control. Then, we will look at how to incorporate the data from the API of the social property Twitter. However, before we jump into those topics, it will be of great benefit to understand the communication that takes place under the hood of our browser during the request for a resource and the response from a server, as well as the underlying technologies that we will utilize to enable both.
The Hypertext Transfer Protocol, or simply HTTP, is the underlying mechanism responsible for our daily interactions with the Internet. It is used in conjunction with many underlying networks of protocols, in order to facilitate the appropriate request/response between a client and a server. Typically, the client utilized in the request/response exchange is that of a web browser, such as Chrome, Firefox, Internet Explorer, or Safari. However, it can also be that of another server. Regardless of whether the client is a browser or a server, the request/response can only take place upon the initiation of a request. Furthermore, a response can only be provided from a web server.
Anytime a resource is requested from a server, whether it’s a document, an image, a style sheet, etc., a request must be initiated.
HTTP-Request
It is the role of the request to outline the specifics that detail the required resource from the server. It will be these details that help to ensure that the server provides the appropriate response. A request can be thought of as your order at a restaurant. When you provide a waiter with your order, you are outlining what you are expecting from the kitchen. Additionally, it may include your preferences of how you would like it to be cooked or served. In the preceding analogy, the HTTP protocol is the waiter, the order is the HTTP request, and the food provided represents the HTTP response.
The HTTP request consists of three general components, each with a particular use for detailing what resource is required from a server. These three components can be viewed in Table 8-1.
Table 8-1. Structure of the HTTP Request
|
Parts |
Required | |
|---|---|---|
|
1 |
Request Line |
Yes |
|
2 |
Headers |
No |
|
3 |
Entity Body |
No |
Request Line
The first component, known as the request line, is absolutely mandatory for any request. It alone is responsible for the type of request, the resource of the request, and, last, which version of the HTTP protocol the client is making use of. The request line itself is composed of three parts, separated from one another by whitespace. These three components are Method, Request-URI, and HTTP-Version.
Method represents the action to be performed on the specified resource and can be one of the following: GET, POST, HEAD, PUT, LINK, UNLINK, DELETE, OPTIONS, and TRACE. For the purposes of this chapter, I will only discuss the first two.
The method GET is used to inform the server that it possesses a resource that we wish to obtain. GET is most commonly used when navigating to a particular URL in a browser, whereas the POST method is used to inform the server that you are providing data along with your request. The POST method is commonly used with HTML forms. The response that is supplied upon a form’s submission often reflects content that accounts for the form submission.
Because the GET method does not concern itself with any alterations to a server, it is commonly referred to as a safe method. The POST method, on the other hand, is referred to as an unsafe method, as it concerns working with data.
The URI of the request line simply identifies the resource, which the request method applies. The specified URI may be that of a static resource, such as a CSS file, or that of a dynamic script whose content is produced at the moment of a request.
Last, the request line must indicate the HTTP-Version utilized by the client. Since 1999, the Request-Version of browsers has been HTTP/1.1. Examples of a request line are shown in Listing 8-1.
Listing 8-1. Syntactic Structure of a Request Line
GET   http://json.sandboxed.guru/chapter8/css/style.css        HTTP/1.1
GET   http://json.sandboxed.guru/chapter8/img/physics.jpg      HTTP/1.1
POST  http://json.sandboxed.guru/chapter8/post.php             HTTP/1.1
Headers
The second component of the request concerns the manner by which the request is able to provide supplemental meta-information. The meta-information is supplied within the request in the form of a header, whereas a header, at its most atomic unit, is simply a key/value pair separated by the colon (:) and made up of ASCII characters. The server can utilize this information in order to best determine how to respond to the request.
The HTTP protocol has formalized a plethora of headers that can be utilized to relay a variety of detail to the server. These headers fall under one of three categories: general headers, request headers, and entity headers.
General Headers
The first category of header is that of the general headers. The headers that apply to this category identify general information pertaining to the request. Such general information may regard the date of the request, whether or not to cache the request, etc. The following are general headers:
- Cache-Control
- Connection
- Date
- Pragma
- Trailer
- Transfer-Encoding
- Upgrade
- Via
- Warning
Request Headers
The second category of headers is that of the request headers. These headers can be supplied with the request to provide the server with preferential information that will assist in the request. Additionally, they outline the configurations of the client making the request. Such headers may reveal information about the user-agent making the request or the preferred data type that the response should provide. By utilizing the headers within this category, we can potentially influence the response from the server. For this reason, the request headers are the most commonly configured headers.
One very useful header is the Accept header. It can be used to inform the server as to what MIME type or data type the client can properly handle. This can often be set to a particular MIME type, such as application/json, or text/plain. It can even be set to */*, which informs the server that the client can accept all MIME types. The response provided by the server is expected to reflect one of the MIME types the client can handle. The following are request headers:
- Accept
- Accept-Charset
- Accept-Encoding
- Accept-Language
- Authorization
- Expect
- From
- Host
- If-Match
- If-Modified-Since
- If-None-Match
- If-Range
- If-Unmodified-Since
- Max-Forwards
- Proxy-Authorization
- Range
- Referer
- TE
- User-Agent
At this point, feel free to navigate the browser of your choice to the following URL: http://json.sandboxed.guru/chapter8/headers.php. The content that is displayed is the response to that of an HTTP request. Ironically, the content displayed presents the HTTP request for the requested URI. Here, you can view the combination of general headers and the request headers submitted with the request. Generally speaking, as we navigate the Internet, the browser supplies the various headers with each request on our behalf. Therefore, some of the request headers supplied possess values that reflect those configured within our browser settings. Because each browser may vary in its values supplied to the reflected headers, your results may not reflect mine, shown in Listing 8-2.
Listing 8-2. The Composition of an HTTP GET Request
GET /chapter8/headers.php HTTP/1.1
Host: json.sandboxed.guru
Cache-Control: max-age=0
Connection: close
X-Insight: activate
Cookie: person={"age":"36","name":"ben","gender":"male"}
Dnt: 1
Accept-Encoding: gzip, deflate
Accept-Language: en-us,en;q=0.7,fr;q=0.3
Accept: text/html,application/xhtml+xml,application/xml;q=0.9,*/*;q=0.8
User-Agent: Mozilla/5.0 (Macintosh; Intel Mac OS X 10.9; rv:30.0) Gecko/20100101 Firefox/30.0 FirePHP/0.7.4
![]() Note The Referer header is the result of a spelling mistake that was not caught before it was incorporated within the HTTP specification.
Note The Referer header is the result of a spelling mistake that was not caught before it was incorporated within the HTTP specification.
As you can clearly see, the first line, the request line, details the method to apply to the indicated URI of /chapter8/headers.php. While the URI is that of a dynamic page, the request line states: GET the resource provided by headers.php. That resource, of course, generates its content upon receipt of the HTTP request, in order to reveal the headers as your browser configures them.
While this information will only be present for the particular URI utilizing our developer console, we will be able to view any and all HTTP requests and their responses for any resource. This can be accomplished by profiling the network activity from within the developer’s console of your favorite modern browser. Feel free to refresh the page once you have your developer console open and the network tab in view. Figure 8-1 displays the HTTP request and its headers for the request URI http://json.sandboxed.guru/chapter8/headers.php.
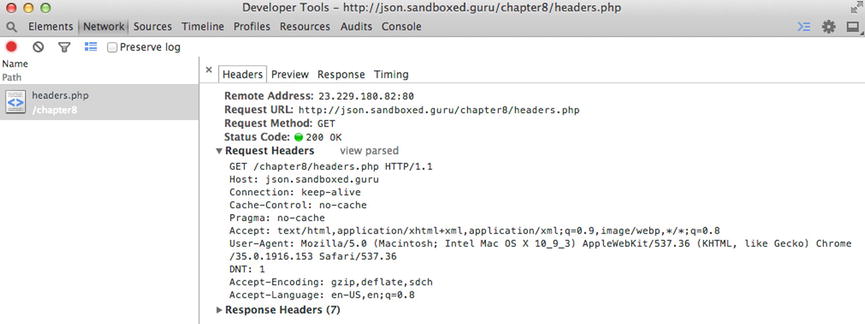
Figure 8-1. The request headers exhibited by the Chrome developer console
Entity Headers
The third category of headers is that of the entity headers. These headers are used to supply meta-information regarding any data that is being sent to the server along with the request. The provision of data that accompanies a request is always tied to the unsafe HTTP methods, such as PUT and POST. Safe methods, on the other hand, will never possess an entity body. However, when data is supplied, it will be these headers that describe the data type being sent, the character encoding it possesses, and the amount of bytes of data being transferred. The following are entity headers:
- Allow
- Content-Encoding
- Content-Languages
- Content-Length
- Content-Location
- Content-MD5
- Content-Range
- Content-Type
- Expires
- Last-Modified
Entity Body
The final component of the request is the entity body. While the entity headers carry the meta-information, the entity body is strictly the nomenclature for the data being sent to the server. The syntax of the entity can reflect that of HTML, XML, or even JSON. However, if the Content-Type entity header is not supplied, the server, being the receiving party of the request, will have to guess the appropriate MIME type of the data provided.
I will now review the request of an unsafe method, so that you can observe a request that is in possession of an entity body. Feel free to navigate your browser to the following URL: http://json.sandboxed.guru/chapter8/post.php. By filling out the two form fields and clicking submit, the form post will automatically trigger an HTTP request that will supply the filled-in fields as data. The response that will be outputted to the screen will reflect the captured headers of the POST request. Listing 8-3 reveals the HTTP request and the entity it possesses. Feel free to utilize your developer’s console, to compare the request with the results shown below.
Listing 8-3. The Composition of an HTTP POST Request
POST /chapter8/headers.php HTTP/1.1
Host: json.sandboxed.guru
Cache-Control: max-age=0
Connection: close
X-Insight: activate
Referer: http://json.sandboxed.guru/chapter8/post.php
Dnt: 1
Accept-Encoding: gzip, deflate
Accept-Language: en-us,en;q=0.7,fr;q=0.3
Accept: text/html,application/xhtml+xml,application/xml;q=0.9,*/*;q=0.8
User-Agent: Mozilla/5.0 (Macintosh; Intel Mac OS X 10.9; rv:30.0) Gecko/20100101 Firefox/30.0 FirePHP/0.7.4
Content-Length: 37
Content-Type: application/x-www-form-urlencoded

fname=ben&lname=smith&mySubmit=submit
As you can see from Listing 8-3, an empty line following the other two request components separates the entity body. Furthermore, the two supplied entity headers, Content-Length and Content-Type, provide the server with an understanding of what is being supplied, relieving the server from having to guess how to properly parse the data.
HTTP Response
For every HTTP request there is an HTTP response. Additionally, the structural composition of the HTTP response, as displayed in Table 8-2, is identical to that of the HTTP request with one major exception: the request line is replaced with a status line.
Table 8-2. Structure of the HTTP Response
|
Parts |
Required | |
|---|---|---|
|
1 |
Status Line |
Yes |
|
2 |
Headers |
No |
|
3 |
Entity Body |
No |
Status Line
The first component of the HTTP response is the status line, which details the result of the request. The composition of the status line is composed of three parts: the version of the HTTP protocol utilized by the server, a numeric status code, and an associated textual phrase that describes the status of the request. Each component is separated from the other with whitespace.
The HTTP version simply reflects the version of the HTTP protocol used by the server.
The status code represents a three-digit number that reflects the status of the request. It is the duty of the status code to inform the client whether the request was understood, if it resulted in an error, and/or if the client must take further action. There are five categories of statuses, and each three-digit status code is a member of an appropriate status class.
The status classes, as illustrated in Table 8-3, are divided into groups of hundreds, meaning that the indicated classes can possess 100 different unique status codes. While this is not currently the case, by providing each class with ample padding, additional statuses can be incorporated in the future.
Table 8-3. Response Status Classes of the HTTP-Request
|
Status Class |
Reason Phrase |
|---|---|
|
100–199 |
This class of status code indicates a provisional response, consisting only of the status line and optional headers. |
|
200–299 |
This class of status code indicates that the client’s request was successfully received, understood, and accepted. |
|
300–399 |
This class of status code indicates that further action needs to be taken by the user-agent, in order to fulfill the request. |
|
400–499 |
This class of status code is intended for cases in which the client seems to have erred. |
|
500–599 |
This class of status code indicates cases in which the server is aware that it has erred or is incapable of performing the request. |
The most common classes that will be used by the average user will be among the following: 200’s, 400’s, and 500’s. These represent the response messages from the server that will help to indicate if the resource requested has been satisfied or if there were errors along the way. The most common status codes encountered by front-end developers are the following: 200, 204, 404, and 500.
- 200 OK: The server has successfully recognized the request.
- 204 No Content: The server has successfully recognized the request; however, there is no new entity body to return.
- 404 Page Not Found: The indicated resource is unable to be located by the server.
- 500 Internal Server Error: The server has encountered an issue preventing the request from being fulfilled.
The textual phrase of the status line is utilized, so that it can be easily read and interpreted by humans. Each phrase details the meaning of its associated status code.
![]() Note You can read more on the existing status codes here: http://www.w3.org/Protocols/rfc2616/rfc2616-sec10.html.
Note You can read more on the existing status codes here: http://www.w3.org/Protocols/rfc2616/rfc2616-sec10.html.
Headers
The second component of the response concerns the mechanism by which the response is able to provide the client with supporting meta-information. As with requests, response headers are grouped into three categories: general headers, request headers, and entity headers.
General Headers
The first category of headers is the general headers. The headers that apply to this category identify general information. Such general information may regard the date of the response or whether the connection should remain open or closed. The following are general headers:
- Cache-Control
- Connection
- Date
- Pragma
- Trailer
- Transfer-Encoding
- Upgrade
- Via
- Warning
Response Headers
The second category of headers is the response headers. These headers provide the client of the request with information pertaining to the configurations of the server, as well as the requested URI. For example, the server can provide response headers to inform the request of what HTTP methods are accepted, as well as whether authorization is required in order to access the specified URI. These headers can even inform the request whether it should occur at a later point in time. The following are response headers:
- Accept-Ranges
- Age
- ETag
- Location
- Proxy-Authentication
- Retry-After
- Server
- Vary
- WWW-Authenticate
Entity Headers
The third category of headers is the entity headers. These headers are used to supply meta-information regarding the data being sent along with the response. As with entity headers for a request, the most beneficial entity headers for a response will be those that describe the MIME type of the entity provided, so that it may be parsed/read properly. This is achieved via the Content-Type header. The configured value of the Content-Type will often reflect a MIME type that was indicated as the value of the Accept header within the request. The following are entity headers:
- Allow
- Content-Encoding
- Content-Languages
- Content-Length
- Content-Location
- Content-MD5
- Content-Range
- Content-Type
- Expires
- Last-Modified
Entity Body
The final component of the response is that of the entity body. Whereas entity headers outline the meta-information, the entity body is the data provided by the server.
Let’s now revisit our earlier HTTP request from Figure 8-1, only this time, let’s focus on the response captured in Figure 8-2. Figure 8-2 reveals the response that is returned by the server for the following URL: http://json.sandboxed.guru/chapter8/headers.php. The first thing to note is the status line located below the response headers heading. It begins by revealing the HTTP version and is immediately followed by the status of the request.
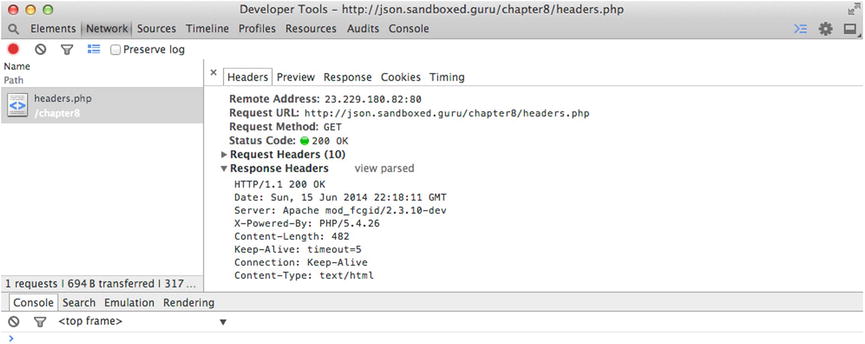
Figure 8-2. The response headers exhibited by the Chrome developer console
In this particular case, the response is successfully fulfilled, as indicated by the status code of 200. Furthermore, from the textual phrase that follows the status code, we can read that the messaging is that of OK. Below the status line, we are able to observe a variety of headers, which belong to the general headers and entity headers categories. I want to draw your attention to the final header in the listing. This particular entity header is configured to define the MIME type of the entity body being returned. This enables the browser to parse it accordingly and display it upon its arrival. In this particular case, the data being provided is HTML and, therefore, possesses the Content-Type of text/HTML.
The actual data that is returned can be viewed in the response tab, which is none other than the markup that is being presented upon arrival of the URL.
If the preceding content is new to you, don’t worry, for you are not alone. In fact, typically, only those who are server-side developers know the preceding information. This is because they generally write the code to analyze the request headers and, in turn, configure the appropriate response. Typically, HTTP requests are made behind the scenes and handled by the browser, allowing front-end developers like us to remain ignorant of the communications taking place. However, in the upcoming section, I will discuss the technique that enables us to initiate and configure our own HTTP requests, allowing us to send and receive JSON via JavaScript.
Ajax
Ajax itself is not a technology but, rather, a term coined by Jesse James Garrett in 2005. Ajax stands for Asynchronous JavaScript and XML (a.k.a. Ajax) and has become synonymous with modern-day front-end development, and for great reason. It offers the ability to initiate HTTP-Requests such as GET and POST on demand and without having to navigate away from the current web page, as shown in Figure 8-3.
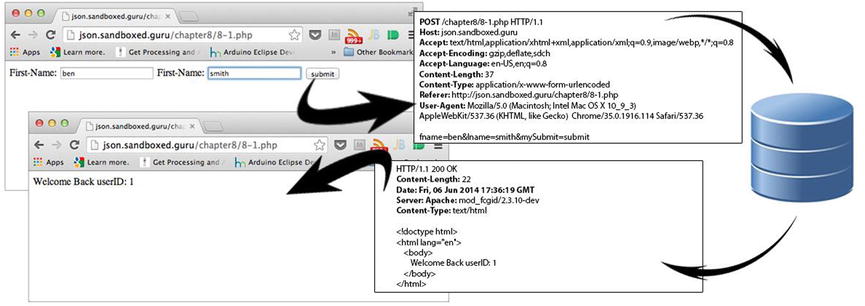
Figure 8-3. The full life cycle of an HTTP GET request
Figure 8-3 demonstrates the process by which data is integrated into a web page when solely handled by the server. The demo begins with a user landing on a web page and being invited to sign in to the site experience via a simple form. Upon clicking submit, the browser initiates a new request to the server, in order to retrieve the appropriate response that reflects the data that has been provided by the user. The headers within that request detail the necessary information for the server to respond accordingly. Once the server receives the request, it fetches the resource being requested, retrieves some information from the database, and inserts it within the content to be returned, thereby revealing an updated page for the visited URL: json.sandboxed.guru/chapter8/8-1.php.
The terms Asynchronous JavaScript and XML refer to the various web technologies that are used to incorporate the exchange of data between the current web page and a server in the background. You might be thinking that if the x in Ajax stands for XML, and this is a book on the use of JSON, why then should we care about Ajax? While the x does stand for XML, the request/response initiated via Ajax continues to remain bound to the rules of the HTTP protocol. Therefore, the server can return any and all valid data types, such as HTML, Text, XML, JSON, etc. We, of course, will be working with JSON. The x in Ajax came to be simply because the original XMLHttpRequest only supported XML parsing.1
The XMLHttpRequest object provides the interface by which JavaScript can initiate an HTTP-Request directly from within a running application, enabling communication with a server. This allows for data to be pushed out or consumed. Furthermore, as the A in Ajax suggests, this communication occurs asynchronously, implying non-blocking. This allows the executing application and the user to continue, without requiring either to stop what they’re doing, until the request has been fulfilled by the server. The HTTP request occurs outside of the process used to run our JavaScript application. More specifically, it occurs in a separate process that is used only by the browser. When the server has fulfilled the request, the browser will alert our application to its availability, by notifying our application via an event. By listening in on this event, we can obtain the response from the server to parse and use, as our application requires.
The XMLHttpRequest object, which is the ECMAScript HTTP API,2 originated as a proprietary feature within Internet Explorer 5, as a part of the Active X framework. Its practicality and implications became immediately recognized and were quickly implemented by competing browsers. Anticipating the possible variations and problems that could soon arise among vendor implementations, the W3C urged to formalize the standard of the syntax, which can be read at the following URL: www.w3.org/TR/2014/WD-XMLHttpRequest-20140130/. This standard outlines the API that developers can leverage to invoke an HTTP request that will facilitate the invocation of an HTTP request.
XMLHttpRequest Interface
The HTTP API, as exposed by the XMLHttpRequest object, consists of a variety of methods, event handlers, properties, and states, all of which provide our JavaScript application the ability to successfully facilitate an HTTP request, in addition to obtaining the response from a server. For this reason, each method, property, handler, and state will be integral in a particular aspect of the request or the response.
Global Aspects
The sole global method of the XMLHttpRequest interface is that of the constructor (see Table 8-4), which, when invoked, will return to our application a new instance of the XMLHttpRequest object. It will be through the interface inherited by this object that we will initiate and manage our requests. Furthermore, by instantiating multiple instance of the XMLHttpRequest object, we can manage simultaneous requests.
Table 8-4. XMLHttpRequest Constructor
|
Method/Property |
Parameter |
Returned Value |
|---|---|---|
|
constructor |
N/A |
XMLHttpRequest (object) |
Listing 8-4 demonstrates the instantiation of an XMLHttpRequest object and assigns the instance to a variable labeled xhr. It will be fairly common to see xhr as the reference, as this is simply the acronym for the XMLHttpRequest object.
Listing 8-4. Creating an Instance of the XMLHttpRequest Object
var xhr = new XMLHttpRequest();
Whether you are working with one xhr or many, as the HTTP request occurs asynchronously, it is necessary for our application to be notified of any change in state, for the duration of the request. Such notifications may be whether the response has been fulfilled or the connection has timed out. The XMLHttpRequest Level 2 standard outlines the event handlers possessed by each xhr instance, so that we may remain aware of the status of the request. These event handlers can be viewed in Table 8-5.
Table 8-5. The xhr Event Handlers for Monitoring the Progress of the HTTP Request
|
Event Handlers |
Event Handler Event Type |
|---|---|
|
onloadstart * |
loadstart * |
|
onprogress |
progress |
|
onload |
load |
|
onloadend * |
loadended * |
|
onerror |
error |
|
ontimeout |
timeout |
|
onabort * |
abort * |
|
onreadystatechange |
readystatechange |
![]() Note The progress events that do not appear with an asterisk (*)beside them are implemented by all modern browsers, in addition to Internet Explorer 8. However, those beside an asterisk require IE 10 or greater.
Note The progress events that do not appear with an asterisk (*)beside them are implemented by all modern browsers, in addition to Internet Explorer 8. However, those beside an asterisk require IE 10 or greater.
The event handlers in Table 8-5 will alert our application to a variety of notifications pertaining to the state of the request. Furthermore, they can be utilized in one of two possible implementations.
The first is that we can remain object-oriented and register the event of the state to which we choose to listen. For each event to which we listen, we can assign a particular function to be triggered upon notification, such as that in Listing 8-5. As different browsers implement various ways to register an event, it is necessary to make use of a cross-browser solution, as I have on line 11.
Listing 8-5. The Registration for Event Listeners Belonging to the xhr object for Each Notification of State
 1  var xhr = new XMLHttpRequest();
 2  addListener(xhr, 'loadstart', function() { alert("load-start"); });
 3  addListener(xhr, 'progress', function() { alert("progress"); });
 4  addListener(xhr, 'load', function() {  alert("load"); });
 5  addListener(xhr, 'loadended', function() {  alert("loadended"); });
 6  addListener(xhr, 'timeout', function() {  alert("timeout");});
 7  addListener(xhr, 'abort', function() {  alert("abort"); });
 8  addListener(xhr, 'readystatechange', function() { alert("readystatechange");});
 9
10  //cross browser addListener
11  function addListener(elem, eventName, handler) {
12         if (elem) {
13             elem.addEventListener(eventName, handler, false);
14         } else if (elem.attachEvent) {
15             elem.attachEvent('on' + eventName, handler);
16         } else {
17             elem['on' + eventName] = handler;
18        }
19 }
The alternative to being notified of a change in a particular state is to assign a function as the callback to the event handler, which exists as a property of the object itself. This manner of implementation is demonstrated in Listing 8-6.
Listing 8-6. Assigning Callback Functions to Each of the xhr Status Event Handlers
 1  var xhr = new XMLHttpRequest();
 2      xhr.onloadstart        = function() {  alert("onloadstart");  };
 3      xhr.onprogress         = function() {  alert("onprogress");  };
 4      xhr.onload             = function() {  alert("onload");  };
 5      xhr.onloadend          = function() {  alert("onloadend");  };
 6      xhr.ontimeout          = function() {  alert("ontimeout");  };
 7      xhr.onabort            = function() {  alert("onabort");  };
 8      xhr.onreadystatechange = function() {  alert("onreadystatechange");  };
Whether the implementation you choose to be made aware, regarding state notifications of the HTTP request, reflects that of Listing 8-5 or that of Listing 8-6, both will produce the equivalent results. The result produced is the invocation of the corresponding function that has been assigned as the receiver of a particular notification, when that event is dispatched.
There are eight progress notifications in total that will inform an application as to the particular state of the HTTP request. These notifications are the following: loadstart, progress, error, load, timeout, abort, loadend, and onreadystatechange.
The loadstart event is dispatched the moment the HTTP request begins. This is not to be confused with the moment communication occurs between the client and the server. As the loadstart event reflects the start of a request, it should be expected to be dispatched a total of one time for each request initiated.
The progress event is dispatched the moment the HTTP connection is established and the request/response is effectively relaying data. During the course of the transmission, the progress event will continue to fire until there is no further data to transmit. This, however, does not always indicate that a successful request has been fulfilled.
The error event will be dispatched exactly once, or not at all, during the course of each HTTP request initiated by the xhr object. Should the request result in an error, the error event will immediately be dispatched. This event is useful for being informed that the request was unsuccessful.
The load event will be dispatched exactly once, or not at all, during the course of each HTTP request initiated by the xhr object. Should the request be successfully fulfilled, the load event will be immediately dispatched. This event is useful for being informed that the request has been completed. It should be mentioned that just because a load is considered completed by the xhr object does not necessarily mean that the request was successfully satisfied. Therefore, it will be imperative to provide your callback method with the logic to determine the status code, in order to ensure that it was truly successful. The status code, in addition to the status text, can be obtained by the status and statusText properties of the xhr. I will discuss these two properties a bit later in the chapter.
The timeout event will be dispatched exactly once, or not at all, during the course of each HTTP request initiated by the xhr object. Should the duration of the request be determined to have surpassed a particular interval, the connection will have been deemed to be timed out, notifying our application of the matter.
The abort event is dispatched exactly once, or not at all, during the course of each HTTP request initiated by the xhr object. Should the request at any time be aborted, the abort event will be immediately dispatched.
The loadend event is dispatched exactly once during the course of each HTTP request initiated by the xhr object. The loadend notification is dispatched the moment the HTTP request is no longer active in its attempt to fulfill a request. This event is dispatched after the following possible notifications: error, abort, load, and timeout.
The onreadystatechange is the original, and at one time the only, event handler of the XMLHttpRequest implemented by earlier browsers. This event is used to notify a supplied function of the progress of the initiated HTTP request. The onreadystatechange event is dispatched multiple times during the course of each HTTP request initiated by the xhr instance. In fact, the event is dispatched each time the readyState property of the xhr instance is assigned a new state. The possible states that can be assigned to the readyState property are those outlined in Table 8-6.
Table 8-6. The Possible States of the xhr object and Numeric Representation
|
States |
Numeric Representation |
|---|---|
|
UNSENT |
0 |
|
OPENED |
1 |
|
HEADERS_RECEIVED |
2 |
|
LOADING |
3 |
|
DONE |
4 |
The states outlined in Table 8-6 are assigned to that of the readyState property that exists on each xhr instance. The assigned state reflects the progress of the HTTP request itself. There are five possible states that can be assigned to the readyState property, and each infers the given state of the request.
The state UNSENT is the default state of the readyState property. This state is used to inform our application that the xhr object, while instantiated, is not yet initialized. The readyState property during this state returns a value of 0.
The state OPENED replaces the UNSENT state the moment the request method, open, has been invoked, initializing our xhr instance. The readyState property during this state returns a value of 1.
The state HEADERS_RECEIVED is assigned as the value of the readyState property upon receiving the headers that accompany the response that will ultimately be received from a server. The readyState property during this state returns a value of 2.
The state LOADING is assigned as the value of the readyState property as the transmission of data pertaining to the response entity body is received. The readyState property during this state returns a value of 3.
The state DONE is assigned as the value of the readyState property upon the conclusion of the HTTP request. This state reflects only the closure of the request. As with the load event, the done state does not identify if the request resulted in an error, a time-out, or a successful fulfillment of a request. Therefore, it will be imperative to determine the statusCode when determining how to process the request. The readyState property during this state returns a value of 4. Listing 8-7 demonstrates an event handler that monitors all states of the readyState property.
Listing 8-7. Determining the State of the xhr object for Each Change in State
 1  var xhr = new XMLHttpRequest();
 2      xhr.onreadystatechange = handlStateChange;
 3
 4  function handleStateChange() {
 5      if (xhr.readyState === 0) {
 6            alert("XHR is now instantiated");
 7      } else if (xhr.readyState === 1) {
 8            alert("XHR is now Initialized");
 9      } else if (xhr.readyState === 2) {
10            alert("Headers are now Available");
11      } else if (xhr.readyState === 3) {
12            alert("Receiving Data");
13      } else if (xhr.readyState === 4) {
14             alert("HTTP Request ended");
15      }
As an older implementation, the onreadystatechange does not offer an application as accurate a notification system as the other seven progress events. Furthermore, the processing that is required by our JavaScript to determine the state of the HTTP request, if extensive, has the ability to block the thread, thereby delaying the events from being triggered.
The Request Aspect
The methods and properties that are outlined within this section make up the facade that enables one to correctly configure the metadata of the HTTP request. (See Table 8-7.)
Table 8-7. The Request Methods of the xhr object
|
Method |
Parameters |
Returned Value |
|---|---|---|
|
open |
String (method), String (URI), Boolean (async), String (user), String (password) |
N/A |
|
setRequestHeader |
String (field), String (value) |
N/A |
|
send |
String (entity body) |
N/A |
|
abort |
N/A |
N/A |
open
The open method, whose signature can be viewed in Listing 8-8, acts as the starting point that will be used to configure the HTTP request.
Listing 8-8. The Signature of the open Method of the xhr object
open( HTTP-Method, request-URI [, async [, user [, password]]]);
As revealed by Listing 8-8, the open method accepts five arguments. Three are optional, and two are required.
The first parameter, HTTP-Method, indicates to the server what method it requires to be performed on the specified request URI. A resource may be the target of a “safe” or “unsafe” method. As discussed in the earlier sections of the chapter, the two types of methods this chapter will focus on are GET and POST.
The second parameter, request-URI, identifies the target of our request. The argument supplied to the request-URI can be specified either as a relative URL or, alternatively, an absolute URL. As the XMLHttpRequest object is subject to the same-origin policy, the URI supplied must possess the same origin as the application configuring the request. If, however, the URL provided is that of another host outside of the current origin, the server of the URL being targeted must allow for cross-origin resource sharing. I will discuss cross-origin resource sharing in the next chapter.
![]() Note The XMLHttpRequest object is subject to the same-origin policy.
Note The XMLHttpRequest object is subject to the same-origin policy.
The required parameters will be appended together, along with the HTTP protocol version, which is typically 1.1, to form the very first line of the request, which is the request line, as shown in Listing 8-9.
Listing 8-9. A GET Request for the URI xFile.php via the HTTP/1.1 Protocol
GET /xFile.php HTTP/1.1
The third parameter of the open method does not supply metadata to the request but, rather, indicates if the request will occur asynchronously or synchronously. When this parameter is left undefined, it defaults to true, thereby processing the HTTP request in another thread.
The final two optional parameters, user and password, are used to supply credentials that may be required of a resource whose access requires basic authentication. These values will add to the metadata of the request only if the server responds with a 401 Unauthorized status code.
setRequestHeader
The next method, setRequestHeader, offers our application the opportunity to specify particular headers that will complement the request by providing supplemental information. These can be any of the recognized standard HTTP/1.1 attribute-value fields. As indicated by the signature of the setRequestHeader defined in Listing 8-10, the field and value are to be supplied as individual strings. Behind the scenes, the xhr object will append them together, separated by a colon (:) token. Furthermore, any number of request headers can be supplied to the request in question.
Listing 8-10. Signature of the setRequestHeader Method of the xhr object
setRequestHeader( field , value );
Via setRequestHeader, our application can supply any attribute value that aids in the fulfillment of the response from the server. Such headers, as illustrated in Listing 8-11, are the Accept headers, which outline the preferred media types that our application recognizes. As the content we will be requesting most commonly from the server will be that of JSON, we will be using the application/json media type.
Additionally, if the HTTP-Method is specified to be that of an “unsafe” method, we can assign the Content-Type as a request header, to outline the encoding and MIME type of the supplied entity body provided with the request. I will discuss how to append an entity body in the send method later in this section.
The headers supplied can also represent custom attribute values, which can be useful for supporting custom requests. It’s common practice to precede all custom headers with an X.
Listing 8-11. The Provision of the Accept Header and a Custom Header via the setRequestHeader Method
setRequestHeader( "Accept" , "application/json" );     //requesting JSON as the response
setRequestHeader( "X-Custom-Attribute" , "Hello-World" );  //custom header
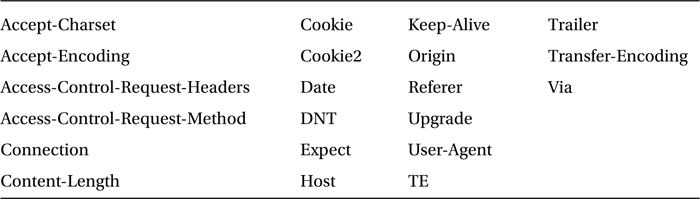
For the most part, all standard HTTP/1.1 headers can be supplied. However, there are a few particular headers that cannot be overridden, due to security measures as well as maintaining the integrity of data.3 These values are listed in Table 8-8. If your application attempts to supply values for any of the listed headers in Table 8-8, they will be overridden to their default values.
Table 8-8. The Assorted HTTP Headers That Cannot Be Set Programmatically via JavaScript
send
The send method of the xhr object is what prompts the submission of the request. As indicated by its signature in Listing 8-12, the send method can be invoked with an argument supplied. This argument represents the entity body of the request and is typically used if the request method is specified as one of the “unsafe” methods, such as POST.
Listing 8-12. The Signature of the send Method of the xhr object
send ( data );
The data supplied can consist of nearly anything; however, it must be supplied in the form of a string. Data can be as simple as a word or a series of key/value pairs strung together to resemble a form post, or even that of JSON text. Listing 8-13, Listing 8-14 and Listing 8-15 demonstrate three different Content-Types being submitted via a form post.
Listing 8-13. Data Sent As the Entity Body of the Request with the Content-Type Defaulted to text/plain
var xhr =  new XMLHttpRequest();
    xhr.open("POST", "http://json.sandboxed.guru/chapter8/xss-post.php");
    xhr.send( "fname=ben&lname=smith" );
    //content-type will be defaulted to text/plain; charset=UTF-8.
Listing 8-14. Data Sent As the Entity Body of the Request with the Content-Type Specified As x-www-form-urlencoded
<form action="8-1.php" method="post" onsubmit="return formSubmit();">
    First-Name:<input name="fname" type="text" size="25" />
    Last-Name:<input name="lname" type="text" size="25" />
</form>
<script>
function formSubmit(){
    var xhr =  new XMLHttpRequest();
        xhr.open("POST", "http://json.sandboxed.guru/chapter8/xss-post.php");
        xhr.setRequestHeader("Content-Type", "application/x-www-form-urlencoded");
        xhr.send( "fname=ben&lname=smith&mySubmit=submit" ) ;
    return false;
}
</script>
Listing 8-15. Data Sent As the Entity Body of the Request with the Content-Type Specified As JSON
var person={name:"ben", gender:"male"};
var xhr =  new XMLHttpRequest();
    xhr.open("POST", "http://json.sandboxed.guru/chapter8/xss-post.php");
    xhr.setRequestHeader("Content-Type", "application/json");
    xhr.send(  JSON.stringify( person) );
Whatever the supplied data, if you do not define the MIME type of the data by way of the Content-Type header, the type for the data provided will be defaulted to text/plain; charset=UTF-8, as in Listing 8-13. At this point, if you were to run the preceding listings (8-13 through 8-15) from your local machine, the request would fail. This is due to the fact that xhr strictly adheres to the same-origin policy. Requests can only be to a server if the request is initiated from the same origin. There is a way around this, which I will discuss further in the next chapter. In the meantime, feel free to run these listings and monitor the HTTP request via the developer console. Each listing can be viewed at the following URLs:
- http://json.sandboxed.guru/chapter8/8-12.html
- http://json.sandboxed.guru/chapter8/8-13.html
- http://json.sandboxed.guru/chapter8/8-14.html
![]() Note If you have been following along with the supplied URLs and have yet to clear your cookies, you may have witnessed some of the cookies from the previous chapter sent within the above requests.
Note If you have been following along with the supplied URLs and have yet to clear your cookies, you may have witnessed some of the cookies from the previous chapter sent within the above requests.
abort
The final method of the request, abort, informs the HTTP request to discontinue/cancel the request. This method effectively closes any connection that has been made to a server or prevents one from occurring if a connection has not yet been made.
In addition to methods, the xhr object provides a few attributes that can help us with configuring our request. These properties can be found in Table 8-9.
Table 8-9. The Request Attributes of the xhr object
|
Properties |
Returned Value |
|---|---|
|
Timeout |
Number (duration) |
|
withCredentials * |
Boolean (credentials) |
|
upload * |
XMLHttpRequestUpload (object) |
![]() Note The request properties that are not distinguished by an asterisk (*) are implemented by all modern browsers, in addition to Internet Explorer 8. Those marked by an asterisk require IE 10 or greater.
Note The request properties that are not distinguished by an asterisk (*) are implemented by all modern browsers, in addition to Internet Explorer 8. Those marked by an asterisk require IE 10 or greater.
timeout
The timeout property can be set in milliseconds to that of any duration. The value supplied will be the maximum allotted time for a request to complete. If a request surpasses the provided time, the time-out event is dispatched to notify our application.
withCredentials
The withCredentials property can be set to that of either true or false. The value supplied is used to inform the server that credentials have been supplied with a cross-origin resource request.
upload
The upload property, when read, provides our application with a reference to an XMLHttpRequestUpload object. This object provides our application with the ability to monitor the transmission progress for the entity body of a supplied request. This will be useful for any entity body that contains an excessive amount of data, such as when allowing users to post various file attachments, such as images, or media.
At this point in time, you should possess the necessary understanding of the various methods and properties possessed by the xhr object that will allow for devising and configuring an HTTP request from a JavaScript application. The xhr provides us the vehicle we can leverage to transmit JSON to and from our application.
EXERCISE 8-1. AJAX FORM POST
With this newfound knowledge, you should be able to convert the HTML <form> element of the following code into an Ajax call.
<body>
    <div class="content">
        <form action="http://json.sandboxed.guru/chapter8/exercise.php"
            method="post" onsubmit="return ajax();">
            First-Name:<input name="fname" type="text" size="25" />
            Last-Name: <input name="lname" type="text" size="25" />
            <input name="mySubmit" type="submit" value="submit" />
        </form>
    </div>
    <script>
        function ajax() {
            //... insert HTTP Request here
        }
    </script>
</body>
As we will be controlling the request via JavaScript, and because our favored Content-Type is JSON, make sure that the data of the entity body is provided as JSON. You can compare your answer to that of the preceding code.
Normally, the XMLHttpRequest object is incapable of making successful requests to servers that do not possess the same origin as the document from which the request it initiated. However, I have employed a technique, which you will learn about in Chapter 9, that will allow your xhr instances to successfully make requests to the following request URI: http://json.sandboxed.guru/chapter8/exercise.php.
Unfortunately, if you are authoring your code using Internet Explorer 8 or 9 to make requests against varying origins, you cannot utilize the XMLHttpRequest object. Instead, you must initialize the XDomainRequest object. Furthermore, while the XMLHttpRequest enables you to specify the Content-Type via the setRequestHeader, the XDomainRequest does not possess this capability.
While the xhr object enables us to configure the request, it will serve no purpose without the understanding of how to extract the response provided. Therefore, the xhr object also incorporates various methods and properties that are concerned solely with working with the response provided by the server.
As you learned earlier in the chapter, both the HTTP request and the response of said request are broken into three components. These represent the request-line/status-line, headers, and the payload. While both the headers and the payload are used in collaboration to arrive at a parsed response, they are obtained separately via the xhr interface. The methods listed in Table 8-10 reflect the three methods of the xhr interface that are utilized for working with the headers of the HTTP response, which will ultimately inform our application of any details pertaining to the response.
Table 8-10. Response Methods of the xhr object
|
Method |
Parameters |
Returned Value |
|---|---|---|
|
getAllResponseHeaders |
N/A |
String (value) |
|
getResponseHeader |
String (key) |
String (value) |
|
overrideMimeType |
String (Content-Type) |
N/A |
getAllResponseHeaders
The getAllResponseHeaders method of the xhr interface is used to return the various headers that have been configured by the server to accompany the supplied response. When invoked, xhr returns a string of all headers of the response as key/value pairs, each of which remains separated from another by a carriage return and new line control characters. These control characters are represented by the following Unicode values respectively: u000D and u000A. Furthermore, each key/value pair is separated from another via the colon (:) token.
Knowing the syntax of the value returned, we can parse the string and simply extract each header into an array, with the help of some minor string manipulation, as revealed in Listing 8-16.
Listing 8-16. Extracting All Values That Are Configured to the Provided Response Headers
     ...truncated code
 5 //when the xhr load event is triggerd parse all headers
 6 xhr.onload = parseHeaders;
 7
 8 //parseHeaders will manipulate the string
 9 function parseHeaders() {
10     var headers = new Object();
11     var responseHeaders = (this.getAllResponseHeaders());
12     //match sequences of characters that preceded control characters into an array
13     var headerArray = (responseHeaders.match(/[^u000Du000A].*/gi));
14     for (var i = 0; i < headerArray.length; i++) {
15          var akeyValuePair = headerArray[i];
16          var colonIndex = akeyValuePair.indexOf(":");
17          var headerKey  = akeyValuePair.substring(0, colonIndex);
18          var headerValue = akeyValuePair.substring(colonIndex + 1);
19          headerValue = (headerValue.charAt(0) == " ") ? headerValue(1) : headerValue;
20          headers[headerKey] = headerValue;
21     }
22 }
Listing 8-16 demonstrates how all headers can be extracted with a simple function labeled parseHeaders. Once the xhr load event notification is dispatched, parseHeaders is invoked (line 6). Once the parseHeaders function runs, we initialize an object, which will be used to retain any and all found headers and their values.
As parseHeaders is invoked by xhr, references to this remain implicitly set to the context of the xhr object. Therefore, referencing this enables our function to invoke the getAllResponseHeaders method, obtaining the string of all header-value pairs (line 11). The returned string is assigned as the value to the variable labeled responseHeaders.
Utilizing a regular expression, we can extract any sequence of characters that precede the two control characters, thereby separating one header-value pair from another. All found matches are then appended to an array in the order they are encountered. Once the entire string has been compared against the pattern, an array is returned, containing all matches respectively. In order to manipulate these matches further, we assign the array as the value to variable headerArray (line 13). From there, we iterate over each indexed value, so that we can separate the key from its value. Knowing that a colon (:) token is used to separate the two, we can determine the location of said token (line 16), allowing us to extract everything up to the token (line 17) and everything after the token (line 18). The two substrings, respectively, reflect the header and its value. While the HTTP protocol states that headers and values are separated via the colon (:) token, they are also separated by an additional space. Therefore, if the first character of the substring that represents our value is that of a space, it is effectively removed (line 19). From there, we apply each key and its correlating value to the headers object.
While it may not be immediately apparent why you would have to analyze all supplied headers, it will simply come down to the use case. The getAllResponseHeaders is essential when your actions rely on the metadata of the response. Such a use case would be when you pair an HTTP request with that of the request method HEAD, which is used to solely fetch header information from a server.
getResponseHeader
The getResponseHeader method, whose signature can be viewed in Listing 8-17, can be utilized to obtain the value for the specified response header, as configured by the server. The key supplied can be either uppercase or lowercase, but the format of the argument must be that of a string.
Listing 8-17. The Signature of the getResponseHeader Method of the xhr object
getResponseHeader( key );
If the key supplied is not a configured header among those possessed by the response, the value returned will be that of null. Much like getAllResponseHeaders, being able to analyze the meta-information supplied within the response can be vital in coordinating how you display, update, or even utilize the data provided.
As was explained earlier, the X in Ajax represents XML, because, at the time, XML was the only data type outside of plain/text able to be parsed by the xhr object. While many browsers have been making great strides to offer a variety of natively returned data types, ranging from plain text to JSON, Internet Explorer 8 and 9 continue to provide us only with the original two flavors. This makes for a particularly strong case as to why one would require the use of getResponseHeaders. If the data type supplied from the server is not in fact XML, with the use of the getResponseHeaders method, one is able to obtain the correct Content-Type of the supplied entity body and correctly parse the string per the syntax of said data format, as demonstrated in Listing 8-18.
Listing 8-18. HTTP POST to exercise.php with Configured Content-Type and Accept Headers
 1 var xhr = new XMLHttpRequest();
 2 xhr.open("POST", "http://json.sandboxed.guru/chapter8/exercise.php");
 3 xhr.setRequestHeader("Content-Type", "application/json");
 4 xhr.setRequestHeader("Accept", "application/json");
 5 xhr.onreadystatechange = changeInState;
 6 xhr.send('{"fname":"ben","lname":"smith"}'),
 7
 8 function changeInState() {
 9     var data;
10     if (this.readyState === 4 && this.status === 200) {
11     var mime = this.getResponseHeader("content-type").toLowerCase();
12          if (mime.indexOf('json'))) {
13               data = JSON.parse(this.responseText);
14          } else if (mime.indexOf('xml'))) {
15               data = this.responseXML;
16          }
17     }
18 }
Listing 8-18 leverages our earlier exercise to help demonstrate the benefit of the getResponseHeader method. Thus far, I have not discussed what data type the earlier exercise returns as the response entity. I also have not yet discussed any of the properties that enable you to read the obtained request. Unless you looked at the headers provided by the response via the developer console, you may not have known whether the entity body returned was that of XML, HTML, plain text, or JSON. Odds are you cleverly deduced it was JSON, as you realized the context of this book. However, the point is that you may not have known for certain. Therefore, rather than assuming, it’s best to account for the varying possibilities, so that you are able to work with the supplied data accordingly.
Listing 8-18 begins with the initialization of our xhr object and supplies it with the necessary HTTP-Method and request-URI (line 2). As our request method is specified as POST and will be supplying data to the server, we continue to configure the Content-Type of the provided data (line 3), informing the server how to parse it correctly. As this book concerns working with JSON, we inform the server that our application accepts the Content-Type of application/json (line 4). In order to monitor the state of the request, the changeInState function is assigned as the callback (line 5). While I chose to make use of the onreadystatechange to monitor the state of the request, I could have just as easily used the onload event handler. However, as the event handlers are only available in Internet Explorer 8, I wanted to demonstrate how to achieve the results of the onload notification, for those who must continue to work with older browsers.
Last, we use the send method of the xhr object to invoke the HTTP request and, in doing so, provide it with the necessary JSON data to POST (line 6).
The function changeInState (line 8) supplied as the callback to the onreadystatechange is not only used to determine the change in state but also the Content-Type, if the request is successful (line 11). If you relied on the onload event handler, you would not have to determine the state, as the event suggests it’s done. However, because the onreadystatechange is triggered each time the readyState property of the xhr object is updated, it’s imperative to query the status of the request.
In order to distinguish among the five various states of the xhr object, it is necessary to determine the value of the readyState property. If the readyState value is 4, we know the current state of the xhr object is DONE. However, in order to determine if the response has successfully provided us with an entity body, the status code is also analyzed (line 10). If the status code is found to be 200, which signifies that a response is successful, we can begin to determine how to parse the data of the response.
We begin by utilizing the getResponseHeader to obtain the lowercase value of the specified Content-Type for the response, as configured by the server (line 11). Once we have obtained the value, we determine if it matches the JSON MIME type (line 12) or that of XML (line 14). Depending on the outcome of the determined type, the appropriate value is assigned to the data variable. If the Content-Type is found to be that of XML, the value is obtained via the responseXML property of the xhr object (line 15). However, should it be determined that the response has been provided in the JSON data format, we must obtain the raw string from the responseText and supply it to the native JSON Object to be parsed (line 13). I will discuss the responseXML and responseText properties in the next section.
overrideMimeType
The overrideMimeType method enables our application to override the configured Content-Type of the response body when obtained. FireFox, Chrome, and Safari have implemented this method, which was added in the XMLHttpRequest Level 2 draft standard. However, at the time of this writing, it is currently unavailable in Internet Explorer 11.
Obtaining the Response
The variety of properties of the xhr object listed in Table 8-11 provides us with the necessary means to obtain the provided response of the HTTP request. It will be with the help of these attributes that we will come full circle in our ability to initiate a request and, ultimately, obtain the response of that request.
Table 8-11. The Response Properties of the xhr object
|
Properties |
Access type |
Returned Value |
|---|---|---|
|
readyState |
Read |
Integer ( state) |
|
status |
Read |
Integer (HTTP status Code) |
|
statusText |
Read |
string (HTTP status) |
|
responseXML |
Read |
XML (value) |
|
responseText |
Read |
string (value) |
|
responseType |
Read/Write |
XMLHttpRequestResponseType (object) |
|
response |
Read |
* ( value ) |
readyState
The readyState property of the xhr object exhibits the current state of the HTTP request. Throughout the asynchronous process of the HTTP request, the readyState attribute will be updated regularly to reflect the status of the request. The values for which it can be assigned are the integers discussed previously in Table 8-6.
![]() Note As the states reflected are rather broad, the readyState property will often be paired with other properties, such as the status or statusText properties, in order to arrive at the necessary outcome.
Note As the states reflected are rather broad, the readyState property will often be paired with other properties, such as the status or statusText properties, in order to arrive at the necessary outcome.
status
The status property of the xhr object supplies an application with the ability to obtain the HTTP status code of the response. Currently, there are five classes for the status codes. These classes are those outlined earlier in the chapter in Table 8-3.
Listing 8-18 relied on both the readyState and the status property to determine if the load had completed successfully. As shown on line 10, if(this.readyState === 4 && this.status === 200), we determined via the readyState if the xhr request had ended, in addition to determining whether the status of the response is that of 200. A status code of 200 indicates that the request has been acknowledged.
statusText
statusText, like the status, is yet another property of the xhr object that is concerned with providing us the appropriate status regarding the fulfillment of the response. Each status code is accompanied by a textual phrase that provides additional information regarding the status. Via statusText, the description that accompanies the status code can be obtained and read by our application.
Using our 200 status code as an example, it is accompanied with the textual phrase OK. This is very helpful when obtaining descriptive issues that can be relayed back to the user, or even a developer, during the course of debugging.
![]() Note The textual phrase that accompanies the status code is intended more for debugging than for controlling the flow of an application.
Note The textual phrase that accompanies the status code is intended more for debugging than for controlling the flow of an application.
responseXML
responseXML is the attribute of the xhr object that enables an application to obtain an XML response provided by the server. As the data supplied within the response will not always be configured as one of the XML Content-Types, application/xml or text/xml, the responseXML attribute will not always provide a value. In the case of a server providing a response with the Content-Type that is not indicative of XML, a value of null will be returned when read from our application.
It should be made known that responseXML is not solely for an XML document. Due to the resemblance, the responseXML attribute can also be used to retrieve HTML documents identified by the text/html Content-Type.
responseText
responseText is a property of the xhr object that provides our applications with the ability to obtain the raw text of the entity body, as provided by the response. While responseXML may often possess a value of null, responseText will always possess a value.
Because the responseText attribute provides our application with the raw entity body received as a string, we must obtain the value of the Content-Type header. The configured Content-Type header will give us insight as to the syntax required for parsing the string. Once this is obtained, we can parse the string into the intended format, as demonstrated on line 13 of Listing 8-18.
responseType
The responseType property of the xhr object is concerned with the parsing of data types natively, beyond that of mere XML. As has been previously stated, the xhr object has the ability to parse a response as XML data. However, as XML is not today’s data interchange standard, and has not been for quite some time, much of the parsing that occurs is forced to take place on the client side. Unfortunately, this puts the onus on the application to parse a string. Essentially, this increases the odds of blocking the single thread of the JavaScript engine. By allowing the browser to parse the request, the JavaScript thread is less likely to become blocked.
The responseType property has been added to the XMLHttpRequest Level 2 draft standard in an attempt to offload the parsing from the client side for five particular Content-Types. These are the following: arraybuffer, blob, document, text, and json. This is great news for JSON because, as you may recall, JSON.parse is a blocking method. In order to offload the parsing of our response entity to the process handling the request, we must configure the responseType before we invoke the send method. Any one of five aforementioned data types can be assigned as the value for the responseType attribute.
By configuring our request with a responseType attribute, we are able to inform the xhr process to parse the entity body against the indicated syntax. In Listing 8-19, I’ve indicated that the syntax is that of JSON.
Listing 8-19. HTTP Request Configured to Parse JSON
1 var xhr = new XMLHttpRequest();
2 xhr.open("POST", "http://json.sandboxed.guru/chapter8/exercise.php");
3 xhr.setRequestHeader("Content-Type", "application/json");
4 xhr.setRequestHeader("Accept", "application/json");
5 xhr.onreadystatechange = changeInState;
6 xhr.responseType = "json";
7 xhr.send('{"fname":"ben","lname":"smith"}'),
response
The response property of the xhr object, like responseXML and responseText, provides our application with a way to obtain the entity body of the fulfilled request. However, the major difference is that the value read will be parsed, that is, if we have configured the HTTP request with responseType. Otherwise, the value returned is an empty string.
Listing 8-20 revisits the previous listing and configures the request to utilize the responseType of JSON (line 6). As the parsing will now occur within a separate process from our application, we no longer need to parse the JSON ourselves. Therefore, we can replace line 14 with that of the response attribute, which should now hold a JavaScript object.
Listing 8-20. HTTP Request Obtaining the Parsed JSON from the xhr Response Property
 1 var xhr = new XMLHttpRequest();
 2     xhr.open("POST", "http://json.sandboxed.guru/chapter8/exercise.php");
 3     xhr.setRequestHeader("Content-Type", "application/json");
 4     xhr.setRequestHeader("Accept", "application/json");
 5     xhr.onreadystatechange = changeInState;
 6     xhr.responseType = "json";
 7     xhr.send('{"fname":"ben","lname":"smith"}'),
 8
 9 function changeInState() {
10    var data;
11     if (this.readyState === 4 && this.status === 200) {
12     var mime = this.getResponseHeader("content-type").toLowerCase();
13          if (mime.indexOf('json'))) {
14               data = this.response;
15          } else if (mime.indexOf('xml'))) {
16               data = this.responseXML;
17          }
18     }
19 }
While the responseType and response properties have been implemented in most browsers, Internet Explorer continues to remain behind the times. XMLHttpRequest Level 2 methods and attributes are only available in IE 10 or greater.
The preceding examples relied on the provision of dynamic data from a database on my server. However, Ajax does not necessarily have to work with dynamic data. In fact, Ajax is fantastic at loading static files as well. Listing 8-21 exposes the content body of a file labeled images.json, which reveals the following JSON within.
Listing 8-21. JSON Content Within /data/imagesA.json
{
    "images": [
                {
                    "title": "Image One",
                    "url": "img/AndroidDevelopment.jpg"
                }, {
                    "title": "Image Two",
                    "url": "img/php.jpg"
                }, {
                    "title": "Image Three",
                    "url": "img/Rails.jpg"
                }, {
                    "title": "Image Three",
                    "url": "img/Android.jpg"
                }
    ]
}
Listing 8-21 reveals an object that possesses a singular member labeled “images”. Images, as a key, reference the value of an ordered list, where each index of said ordered list references an object. These objects represent the necessary details pertaining to various images that will be added dynamically to our page. The key url reflects the location from which the image is supplied, while the title is used to populate the alt tag of the dynamically inserted image. Listing 8-22 reveleals the code that will load, parse and insert data/imagesA.json into an HTML document.
Listing 8-22. The Body of an HTML File That Utilizes Ajax to Load the JSON Document data/imagesA.json
 1 <body>
 2 <input type="submit" value="load images"  onclick="loadImages('data/imagesA.json')"/>
 3   <script>
 4    function loadImages(url) {
 5        var body = document.getElementsByTagName("body")[0];
 6        var xhr = (window.XDomainRequest) ? new XDomainRequest() : new XMLHttpRequest();
 7            xhr.open("GET", url);
 8            xhr.onload = function() {
 9              var data = JSON.parse(this.responseText);
10              var list = data.images;
11              for (var i = 0; i < list.length; i++) {
12                  var image = list[i];
13                  var listItem = document.createElement("li");
14                  var img = document.createElement("img");
15                      img.src = image.url;
16                      img.alt = image.title;
17                  listItem.appendChild(img);
18                  body.appendChild(listItem);
19              }
20            };
21            xhr.onerror = function() {
22               alert( this.status  + " " + this.statusText);
23            };
24        xhr.send();
25    };
26    </script>
27 </body>
Listing 8-22 demonstrates the use of Ajax to load the static file from Listing 8-21, populating a variety of images within the page. The document reveals nothing but a submit button within the page (line 2). This button, when clicked, will trigger the JavaScript code that will both load the image.json file and dynamically insert each found image into the body of our page. This will allow users to load our image set at a time of their choosing, rather than adding to the initial file size of the web page. When the button is clicked, the function loadImages (line 4) initiates the HTTP request. Because only modern browses and later versions of Internet Explorer possess the XMLHttpRequest object, we must first determine what object must be instantiated, to make the proper request. We do so by determining whether the window object possesses the XDomainRequest object (line 6). If the XDomainRequest object is available, we use our tertiary operator as a condensed if/else block, to instantiate an XDomainRequest instance. If, however, the evaluation to determine whether the XDomainRequest is available fails, our code will instantiate the more modern XMLHttpRequest. Once our xhr object is instantiated, we configure it with the appropriate request method and URL (line 7).
Because we are working with static content, rather than making a POST request, we will rely on the GET HTTP-Method to obtain the provided URI. Using the onload and onerror event handlers of the xhr object, we will monitor the state of the request. If the request is successful, the onload event handler will initiate the body of code that will obtain the request body from responseText. Knowing that the content provided within is JSON, we will obtain the plain/text from responsetText and parse it utilizing the JSON Object (line 9). Once we obtain our data tree, we can reference the ordered list of images via the images key (line 10). From there, using a for loop, we iterate over each and every index possessed by our ordered list (line 11). By regarding each image object individually, we can obtain the values held within to construct the necessary markup that will be used to present our images.
In order to have our images display as a vertical list, we create a list item for each image. By using the document.createElement method, we are able to create HTML elements simply by providing the method with a string representing the tag we wish to create. In this case, as we wish to create a list item, we supply the document.createElement method with the string li and retrain the reference to the HTMLobject returned (line 13); Next we create another HTMLobject (line 14), only this time it will be an element that represents the img tag. Using the reference to the image, we supply its attributes src and alt with the details that were extracted from the image objects (line 15 and line 16). Next, we use the appendChild method to append the image as a child of our list item (line 17). Additionally, we add the list item as a child of the body of the page, so that it will be visible to the document (line 18). This process is repeated until all images have been account for.
If the request fails, our application will alert us to the status code and the status description of the failure (line 22). Last, we invoke the request to begin by calling the send method on the instantiated xhr object (line 24). The preceding code should result as shown in Figure 8-4.
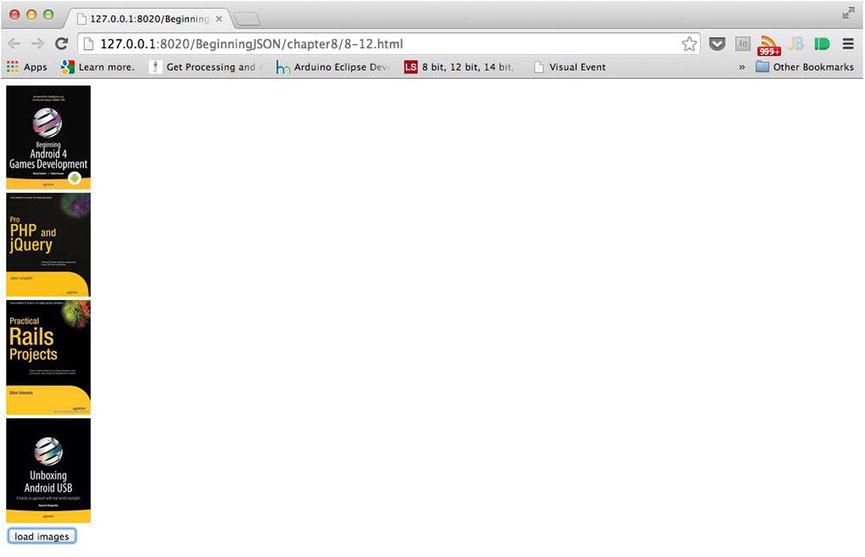
Figure 8-4. Use of Ajax to load and display images
It should be mentioned that the object that enables HTTP requests are strictly for making requests from a web server. Therefore, attempting to load files via Ajax locally will not work, unless they are run from a web server. Many web editors, such as WebStorm, Aptana, and VisualStudio, will run your local code within a temporary server, in which case, you would have no trouble following along with the provided source code.
Despite earlier discussions surrounding Content-Type and how the server should always configure it, you may have recognized that we did not have to configure the Content-Type, even though we were being provided JSON. Yet, if by some chance you were to have inspected the response header of Listing 8-22 with the developer console, you would have witnessed that the Content-Type of the response read “application/json,” as indicated in Figure 8-5.
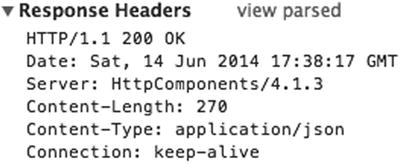
Figure 8-5. The response header for imagesA.json exhibits the configured Content-Type as application/json
As was mentioned in the history of JSON in Chapter 4, Douglas Crockford’s formalization of JSON included the registered Internet media type application/json, in addition to the file extension .json. While a file extension doesn’t explicitly define the encoding of the content contained within, servers are able to infer Content-Types for commonly recognized file extensions. As JSON is the preferred interchange format, it should come as no surprise that most servers can equate the .json extension with the Content-Type of application/json. Therefore, the response is configured with the inferred Content-Type: application/json.
EXERCISE 8-2. LOAD MORE IMAGES
If you haven’t done so already, click the “load images” button from the previous listing two more times and take note of what’s occurring. With each click, a new xhr object is instantiated, initiating a new HTTP request. Providing the request is being fulfilled, the page should now display duplicates of the images loaded. As it serves little use to display duplicate content, rewrite the code from Listing 8-22, so that each subsequent request will load a new JSON file containing no more than four different images.
You will find more images within the img folder that accompanies the source code for this chapter. (You can find the code samples for this chapter in the Source Code/Download area of the Apress web site [www.apress.com]). Reference these images within two more static JSON documents to be loaded in and displayed via Ajax. Feel free to duplicate the images.json file located within the data folder and simply replace the titles and URLs. Or, you can devise the JSON with the assistance of one of the editors discussed in Chapter 4.
Summary
This chapter covered the essentials of the Hypertext Transfer Protocol (HTTP), which is necessary to comprehend when working with the interchange of data. By applying this knowledge, combined with the built-in objects that enable HTTP requests via JavaScript, we have been able to send, as well as receive, JSON in the background of our applications. Furthermore, using the techniques that make up Ajax, we were able to incorporate data without the need for full-page refreshes.
Ajax has surely broadened the scope of possibility for modern-day front-end development. Conversely, its popularity has also resulted in an increase of security concerns. As browsers continue to improve measures to thwart malicious behavior, the ease of data interchange across origins has often been a difficult task to circumvent. In the upcoming chapters, you will not only learn how to overcome these issues from a server-side implementation, you will also set up a local server, so that you can employ these techniques.
Key Points from This Chapter
- A request/response possesses three components.
- A request is initiated by a client.
- A response can only be provided from a web server.
- The GET method is a safe method.
- The POST method is an unsafe method.
- The request URI identifies the resource that the request method applies.
- The current HTTP version is 1.1.
- General headers pertain to general information.
- Request headers communicate preferential information.
- Entity headers supply informative information regarding the supplied entity body.
- General headers and entity headers can be configured by both client and server.
- Response status codes are used to indicate the status of the request.
- The Content-Type header regards the MIME type of an entity.
- The Accept header is used to inform the server of the data types it can work with.
- The XMLHttpRequest Object enables HTTP requests from JavaScript.
- The XMLHttpRequest Object is available in all modern browsers as well as IE 8.
- XMLHttpRequest cannot be used for cross-origin requests in IE 8/9.
- XDomainRequest can be used for cross-origin requests in IE 8/9.
- XDomainRequest lacks the setRequestHeader method.
- XMLHttpRequest and XDomainRequest expose event handlers to notify of state.
- The .json extension is recognized by servers and will default the Content-Type to application/json.
- Custom headers begin with an X.
- Status code 200 represents a successful request.
- Prior to IE 10, XMLHttpRequest could only parse XML/HTML documents.
_________________
1MDN: Mozilla Developer Network, “HTML in XMLHttpRequest,” https://developer.mozilla.org/en-US/docs/Web/API/XMLHttpRequest/HTML_in_XMLHttpRequest, May 26, 2014.
2World Wide Consortium (W3C), “XMLHttpRequest,” www.w3.org/TR/2012/WD-XMLHttpRequest-20121206/#introduction, December 6, 2012.
3A. van Kesteren et al., “XMLHttpRequest,” dvcs.w3.org/hg/xhr/raw-file/tip/Overview.html, May 2014.