
![]()
Working with Templates
Generally speaking, a template is a tool that is used to structure as well as provide consistency among interchangeable parts. The benefit, with regard to interchangeable parts, is that they can be used both interchangeably and indistinguishably within an existing structure, provided they adhere to a template. The ability to allow for interchangeability is beneficial in all walks of life. The flexibility that templates offer has reinforced their utility as dependable tools in the development of modern web sites. The pairing of templates and web development has been proven to alleviate the tightly coupled architecture concerning layout and the data that it utilizes.
Owing to their nature, templates have become the backbone of many platforms, resulting in the prevalence of content management systems (CMS) such as WordPress, Drupal, and more. For the most part, these platforms use dynamic server-side programming to embed content from a database layout. However, with the prevalence of Ajax, and the fact that change is constant, it was only a matter of time before templates were being applied to the front end. Today, there is a variety of templating engines available to choose from. A few examples are Dust, JSRender, Moustache, and Handlebars, all of which rely on JSON.
Templating Engine
A templating engine, with regard to front-end development, is simply a library that binds data with markup on the fly or otherwise dynamically. This could occur at runtime or even performed at design time.
Up until now, while we have not been using a templating engine, we have been performing a similar functionality nonetheless. You may recall that in Chapter 8, we used JavaScript not only to trigger an XMLHttpRequest but to additionally append the returned JSON result set of book covers to our HTML document. This was achieved by the code shown in Listing 13-1.
Listing 13-1. An Ajax Request with the Incorporation of Markup
<!DOCTYPE html>
<html lang="en">
<head></head>
 <body>
  <ul id="image-container"></ul>
  <script>
    function loadImages() {
        var ul= document.getElementById("image-container");
        var xhr= new XMLHttpRequest();
            xhr.open("GET", "data/imagesA.json");
            xhr.onload = function() {
                var data= JSON.parse( this.responseText );
                var list = data.images;
                for (var i = 0; i < list.length; i++) {
                    var image = list[i];
                    var listItem = document.createElement("li");
                    var img = document.createElement("img");
                        img.src = image.url;
                        img.alt = image.title;
                   listItem.appendChild(img);
                   ul.appendChild(listItem);
                };
            };
            xhr.send();
    };
    loadImages();
  </script>
 </body>
</html>
The preceding listing relies on string manipulation and DOM scripting to augment the returned JSON data set at runtime into a presentable list of images utilizing HTML elements, as shown in Figure 13-1.

Figure 13-1. Revealing the markup of our dynamic inclusion of loaded data
In the preceding example, the HTML elements required to produce the layout have been entangled with our HTTP request, which makes our application convoluted. Not only is our markup not located where it ought to be, in an HTML document, but in their object-oriented form, the elements are not instantly recognizable as HTML elements.
var listItem = document.createElement("li");
var img = document.createElement("img");
    img.src = image.url;
    img.alt = image.title;
    listItem.appendChild(img);
The preceding isolated code is the presentational style that will be adopted by each item that exists within our data set, making the JavaScript code our template. While this works, the code itself is not very optimal or legible, for that matter. Furthermore, as we are integrating HTML within JavaScript, we are thereby making readability and maintainability all the more challenging. Last, as JavaScript, we lose the innate ability of most IDE’s to validate our template as proper markup at design time.
Use of a templating engine has the ability to change all of that; however, it requires that we think a bit more abstractly, as you will soon see.
Handlebars
Handlebars itself is not a programming language but, rather, a JavaScript templating engine. However, it does, for all intents and purposes, possess its own lingua franca and syntax, to enable the desired templating behavior.
As stated on the Handlebars web site, located at handlebarsjs.com, “Handlebars provides the power necessary to let you build semantic templates effectively with no frustration.” What this means is that rather than using JavaScript to define our templates, as in the preceding example, Handlebars utilizes a more elegant templating system that employs the semantic tags of HTML. This will manage to keep our code clean and extensible.
In order to make use of the Handlebars library, we must first obtain the latest source code to incorporate into our HTML documents. We can obtain the latest source code by navigating to http://handlebarsjs.com/ and clicking the bright orange button labeled “Download: 2.0.0.” (See Figure 13-2.) This will download the latest version of the Handlebars source code (currently version 2.0.0).

Figure 13-2. Handlebars main page
As shown in Figure 13-2, you can witness a link just below the orange button. This hyperlink reads “Download: runtime-2.0.0.” These two items are not one in the same and are used for different purposes, so be sure to click directly on the button. Clicking this button will begin the download process. Feel free to save the file to a location of your choosing.
![]() Note The runtime 2.0.0 library is only to be utilized by templates that have been pre-compiled.
Note The runtime 2.0.0 library is only to be utilized by templates that have been pre-compiled.
Once the download has completed, navigate to the directory in which it was saved. Once you have located the handlebars-v2.0.0.js file, move it to a more suitable location for use in our exercises. If you are following along with the source code for this chapter, you will note that I have already provided this chapter with the handlebars-v2.0.0 JavaScript file located within the directory structure at BeginningJSON/chapter13/js/libs/. If you have been working with your own folder structure, feel free to move handlebars-v2.0.0 to a location relative to your HTML documents.
Once the Handlebars library has been downloaded, all one must do is incorporate it within each HTML document intended to use the templating engine. This is easily achieved by incorporating an external script via the HTML <script> element, as seen in Listing 13-2.
Listing 13-2. Including the Handlebars Library
<!DOCTYPE html>
<html lang="en">
 <head>
   <script src="js/libs/handlebars-v2.0.0.js"></script>
 </head>
 <body>
   <script>
      alert(Handlebars);
   </script>
 </body>
</html>
Listing 13-2 incorporates the Handlebars version 2.0.0 templating engine into the head of the page utilizing the HTML <script> tag. Furthermore, to ensure that the library is properly incorporated, I have chosen to output the global Handlebars reference. If an alert of [Object, Object] is displayed within the alert box, then congratulations, you have successfully loaded the Handlebars object. This is a global object that exposes a few methods that will be used to work with our Handlebars templates. We are now ready to begin defining templates with Handlebars.
Working with Handlebars
The libraries name, Handlebars, is a nod to the tokens it makes use of to demarcate placeholders within a template. These tokens are the opening and closing curly braces, ({, }), which, when turned in the appropriate 90-degree direction, resemble a handlebar moustache, hence the name Handlebars. These handlebars are then used to demarcate an expression within a template.
A basic expression, or placeholder, as it is commonly referred to, is the building block of the Handlebars templating engine. Simply enough, the placeholder syntax is none other than the reference to a key, wrapped within two curly braces, such as the following {{key}}. This placeholder is referred to as an expression, because, at runtime, it will be replaced by the value of a key/value pair possessed by a collection with a member that matches the specified key. Furthermore, it is the most basic expression within Handlebars and is used to replace static elements, such as strings and/or numbers. You will learn about more complex expressions in a later section. First, however, let’s ease into the immersion of Handlebars by analyzing the use of a Handlebars basic expression (see Listing 13-3).
Listing 13-3. Simplest Use of a Handlebars Template
<!DOCTYPE html>
<html lang="en">
 <head>
  <meta charset="utf-8">
  <script src="js/libs/handlebars-v2.0.0.js"></script>
 </head>
 <body>
  <script type="application/x-handlebars" id="Handlebar-Name-Template">
   <span> {{name}} </span>
  </script>
  <script type="application/javascript">
   var initialTemplateWrapper = document.getElementById("Handlebar-Name-Template");
   var initialTemplateContent = initialTemplateWrapper.innerHTML;
   var dynamicTempate = Handlebars.compile(initialTemplateContent);
   var markupOutput = dynamicTempate({ "name" : "ben" });
       document.getElementsByTagName("body")[0].innerHTML = markupOutput;
  </script>
 </body>
</html>
Listing 13-3 reveals in its entirety a succinct Handlebars template and the few lines of JavaScript code required to make our template functional. Running the preceding listing results in the document revealing the name ben, surrounded by opening and closing span tags. In order to best understand what is taking place in Listing 13-3, the upcoming sections will break down the preceding code into four topics.
Defining a Handlebars Template
Defining a Handlebars template is a simple process of designing a semantic layout using ordinary HTML elements and denoting, inline, any basic expression to be replaced with actual data at a later point in time. Before we get into the syntax of the language, let’s begin by analyzing the design of a simple template. The most basic implementation of a template that can be designed in Handlebars is one that uses a single placeholder, as shown in Listing 13-4.
Listing 13-4. A Single Expression Template
 1 <!DOCTYPE html>
 2 <html lang="en">
 3  <head>
 4   <meta charset="utf-8">
 5   <script src="js/libs/handlebars-v2.0.0.js"></script>
 6  </head>
 7  <body>
 8    <script type="text/x-handlebars-template" id="Handlebar-Name-Template">
 9      <span class="name">{{name}}<span>
10    </script>
11   </body>
12  </html>
Listing 13-4 demonstrates a simple template that makes use of a single placeholder to be filled in dynamically once data is provided. The lines in bold define our Handlebars template. Let’s walk through these lines of code, to better understand what is taking place.
Listing 13-4 begins as any ordinary HTML document. However, what makes this page extraordinary is the incorporation of the Handlebars library. We utilize the script tag to load into the document the external Handlebars library, so that we can begin making use of its templating engine (line 5). Of course, along with a template engine, we require a template. The code highlighted in bold makes up a Handlebars template. However, the surrounding <script> tag plays a rather important part in the template as well.
It may come as a shock, but our template is not considered JavaScript, as noted in the type attribute of the script tag. Rather, the script type is assigned the value of text. To be more specific, it’s a particular subset of text that defines a Handlebars template. I will explain why this is important shortly. The content within our script tag, as denoted by the type, is that of our Handlebar template.
Within the template, which we have defined, is nothing more than a single placeholder contained within a <span> element. The two braces that surround our placeholder easily identify a basic expression within a Handlebars template. An expression, as we have learned in JavaScript, is simply the evaluation and return of data. In other words, the basic expression, {{name}}, will later be interpolated with the value retained by a member that matches the expression, within the given context of the data provided. Furthermore, as the term template implies, every time we reference this particular template, we can expect to generate an HTML span tag with an arbitrary name within.
If we were to run the preceding listing, I’m afraid we’d be presented with an empty document, as shown in Figure 13-3. The reason why is simple. Currently, our document lacks any HTML markup to render. If you were expecting our template to render, the reason why it doesn’t is owing to the use of the <script> tag that surrounds it.
Figure 13-3. An empty document
![]() Note By default, the <script> tag exhibits a CSS display property of none.
Note By default, the <script> tag exhibits a CSS display property of none.
Wrapping our template within the script element provides several advantages. The first is that it cleverly removes our template from being rendered by the document, lest we reveal our placeholders to our visitors. Per the W3C spec, any script tag will forgo rendering, as it will be supplied to the appropriate script engine to be evaluated. However, as our Handlebars template does not define JavaScript, the last thing we want to do is supply our Handlebars template to the script engine, where it would be parsed as such. For this reason, we provision the type attribute with a scripting language that our browser will not be able to recognize. In our example, we have provided the scripting language of text/x-handlebars-template.
Signifying that our script contains a Handlebars template not only thwarts the user-agent from supplying it to a script engine but helps to immediately identify it as a Handlebars template to any and all developers.
Provided we use the script tag as outlined previously, our template provides zero impact to the document. This is one of the greatest advantages that accompanies our Handlebar templates. This enables us to define a template inline. While this may not seem to be much at first, there is a lot to be said from a maintainability standpoint, by associating our template within the markup that will utilize it.
Last, a final benefit of our script element is that, as with all elements, we can refer to it by a particular ID. In our existing example, our template can be referenced via the identity Handlebar-Name-Template. Having the ability to reference our template by ID will become necessary, as you will soon see in the upcoming section.
At this point, all we have managed to do is define a template that our template engine will use. However, as you have just recently discovered, a template alone has no effect on our document. In order for a template to work, it must be provided to the Handlebars library, so that it can be compiled into a JavaScript function. For this, we are required to provide the content for the script ID, Handlebar-Name-Template, to the compile method exposed by the global Handlebars object. Adding five lines of code to our existing markup achieves this, as shown in Listing 13-5.
Listing 13-5. Compiling Our Handlebar-Name-Template
 1 <!DOCTYPE html>
 2 <html lang="en">
 3  <head>
 4   <meta charset="utf-8">
 5   <script src="js/libs/handlebars-v2.0.0.js"></script>
 6  </head>
 7  <body>
 8    <script type="text/x-handlebars-template" id="Handlebar-Name-Template">
 9      <span class="name"> {{name}} <span>
10    </script>
11    <script type="application/javascript">
12      var templateWrapper = document.getElementById("Handlebar-Name-Template");
13      var templateContent = templateWrapper.innerHTML;
14      var tempateFunction = Handlebars.compile(templateContent);
16    </script>
17   </body>
18  </html>
Listing 13-5 reveals, in bold, the five lines that are used to transform our template into a function that can be called repeatedly and be provided a JSON argument. As indicated by line 11, the ability to compile a template requires just a bit of good old-fashioned JavaScript.
The first line of JavaScript code (line 12) is used to target the specific template that we wish to compile. Leveraging the document method getElementById and supplying the value of Handlebar-Name-Template easily obtains a reference to the HTML script element containing our template. To keep our code clean and readable, I assign the returned element to that of a variable labeled templateWrapper.
The next step is to extract the text that occurs between the script element’s opening and closing tag. For this we use the innerHTML property, and once again, we assign the returned value to another variable. In this case, that variable is labeled templateContent. Once we have a reference to our template, all that is left is to provide it as the argument to the compile method exposed by our global Handlebars object.
Giving Context to Our Template
Supplying a template to the compile method results in the return of a JavaScript function, which can be assigned to a variable so that it can be called over and over again. As revealed by the signature displayed in Listing 13-6, this function, when invoked, accepts a JSON argument.
Listing 13-6. Signature of Our Template Function
function( object );
The object provided to the function is referred to in Handlebars nomenclature as the context. The context is named such because it represents the model and/or data set from which all Handlebars expressions (placeholders) derive their value. (See Listing 13-7.)
Listing 13-7. A Compiled Template Is Used to Render JSON Data into Markup
10    //..truncated code
11    <script type="application/javascript">
12      var templateWrapper = document.getElementById("Handlebar-Name-Template");
13      var templateContent = templateWrapper.innerHTML;
14      var templateFunction = Handlebars.compile(templateContent);
15      var outputMarkup = templateFunction({ "name":"ben" });
17      alert( outputMarkup );
16    </script>
17   </body>
18  </html>
Listing 13-7 adds to our existing code base the two lines shown in bold. The first new line (line 15) invokes templateFunction and provisions it with a JSON collection consisting of one key/value pair. You may note that the key which our JSON possesses is equivalent to the label with the placeholder used by our template. This is not simply a matter of coincidence. I mentioned earlier that interchangeable parts could be used both interchangeably and indistinguishably within an existing structure, providing they adhere to the structure of a template. In other words, the label used to represent our placeholder is replaced, or interpolated, with the corresponding value of a key of the same name, if it exists as a member on the context provided. When a template is compiled via Handlebars.compile, it is transformed into a JavaScript function. When said function is invoked with JSON as an argument, the implementation of the function relies on string manipulation to assign values from our JSON to our placeholders and returns, upon its conclusion, a string. This is not unlike our Ajax request in Listing 13-1. The only difference is that the JavaScript function is not created at design time, but, rather, it is created on the fly at runtime. This takes place the moment the reference to Handlebars.compile is parsed by the script engine. Once the function has been executed, the result is provided back to the caller of the function.
The second line of code added to our page simply alerts us to the result, as shown in Figure 13-4.
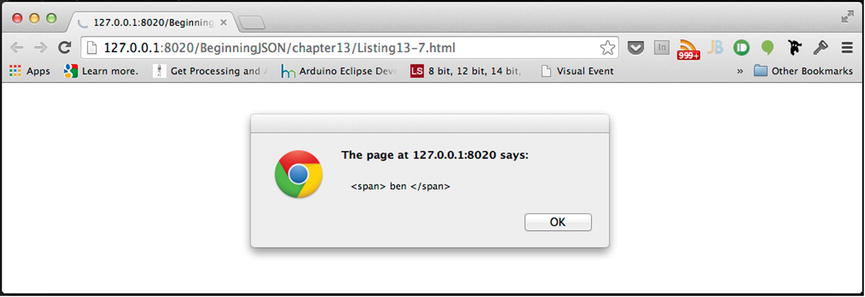
Figure 13-4. The rendered output of data
As revealed by Figure 13-4, the output that results from templateFunction is none other than the string representation <span> ben </span>. At this point, we can append the resulting string to our HTML document with some very simple DOM scripting. Furthermore, each invocation of our template function can be provided with varying contexts, thus allowing the resulting output to vary with each invocation, as shown in Listing 13-8.
Listing 13-8. Repeated Use of templateFunction with Varying Contexts
var outputMarkup;
    outputMarkup = templateFunction({ "name":"ben" });
      console.log( outputMarkup );  // <span> ben </span>
    outputMarkup = templateFunction({ "name":"ivan" });
      console.log( outputMarkup );  // <span> ivan </span>
    outputMarkup = templateFunction({ "name":"michael" });
      console.log( outputMarkup );  // <span> michael </span>
A template needn’t consist of a single placeholder. Because a placeholder is simply a reference to a key within a provided context, it’s entirely possible to construct templates that reference multiple placeholders. However, it generally helps to begin with just the one. Listing 13-9 demonstrates how multiple placeholders can be used to produce a more complex template.
Listing 13-9. Use of Multiple Placeholders Within a Template
   //..truncated code
 8 <body>
 9   <section id="directory">
10    <script type="application/x-handlebars" id="Handlebar-Employee-Template">
11     <div class="employee">
12       <p> firstName: {{fName}} </p>
13       <p> lastName:  {{lName}} </p>
14       <p> contact:   {{phone}} </p>
15     </div>
16    </script>
17   </section>
18   <script>
19   </script>
20 </body>
The markup used within Listing 13-9 reveals a template, labeled “Handlebar-Employee-Template.” This particular template is intended to house within an individual <p> element the first and last name, as well as the contact number, of one of my colleagues. Each of the three paragraphs is, furthermore, contained within a parenting <div> tag that has been provided employee as the value of the class attribute. By providing a class identifier to the template, each context, when rendered, will reveal a uniformly styled element upon its inclusion into the document.
With our template having been defined, all that remains is to provide the implementation that compiles Handlebar-Employee-Template, as well as supply it a context or two to be rendered. (See Listing 13-10.)
Listing 13-10. The JavaScript Code Required to Insert Data into a Document, with the Proper Presentation
17  //Truncated code...
18 <script type="application/javascript">
19    var initialTemplateWrapper = document.getElementById("Handlebar-Employee-Template");
20    var initialTemplateContent = initialTemplateWrapper.innerHTML;
21    var templateFunction = Handlebars.compile(initialTemplateContent);

22    var dataA = templateFunction( {"fName" : "Ben",     "lName" : "Smith",  "phone" : "555-1234"} );
23    var dataB = templateFunction( {"fName" : "Ivan",    "lName" : "Bravo" , "phone" : "555-5678"} );
24    var dataC = templateFunction( {"fName" : "Michael", "lName" : "Chang" , "phone" : "555-9090"} );

24    var directory = document.getElementById("directory");
          directory.innerHTML  = dataA;
          directory.innerHTML += dataB;
          directory.innerHTML += dataC;

25 </script>
As the code from Listing 13-10 reveals, the implementation and utilization of a template are equivalent, regardless of the number of placeholders. This is due to the magic of the Handlebars scripting engine. Executing the preceding code results in the rendering of each context to be included within the directory, as shown in Figure 13-5.
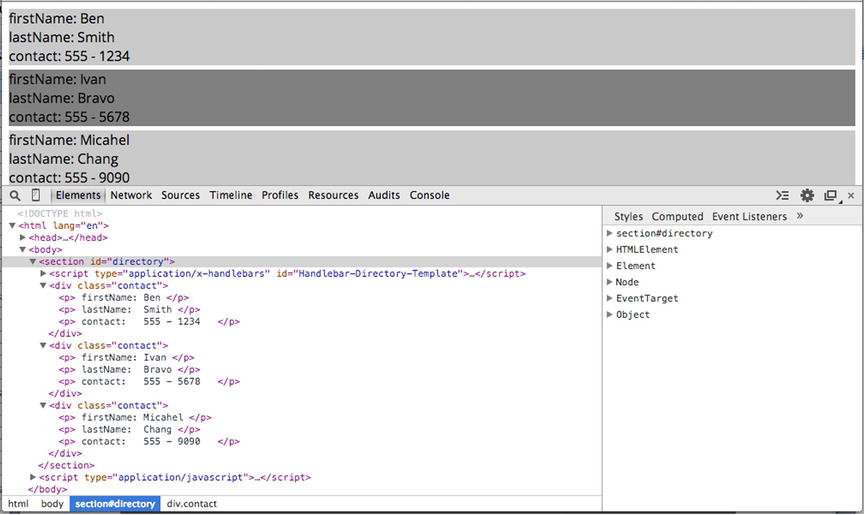
Figure 13-5. Directory listing of my coworkers
![]() Note I have not revealed any styling in the listings, to keep code to a minimum. However, I have applied a minimal amount of styling to the employee class.
Note I have not revealed any styling in the listings, to keep code to a minimum. However, I have applied a minimal amount of styling to the employee class.
One of the features that makes JSON a superior data format is that it is capable of retaining the hierarchical structure of data. As we have seen in previous chapters, JSON allows us to nest structural composites, resulting in more complex JSON structures.
A great templating engine can easily work with complex data, and Handlebars is definitely up to the task. Because all Handlebars placeholders reference the topmost structure of the provided context, any and all nested members within a data collection can be referenced with the simple use of dot notation.
Our previous example demonstrated how we could use Handlebars to output an employee directory, revealing the contact number per colleague. However, in the case of an urgent matter, it’s always best to have alternate methods of contacting an individual. Let’s revisit our previous Handlebar-Employee-Template, and reconstruct it to make use of the nested structure shown in Listing 13-11.
Listing 13-11. A Complex JSON Structure
var complexJSON =
{
    "fName" : "Ben",
    "lName" : "Smith",
    "contact" : {
       "phone" : "555 - 1234",
       "cell" : "555 - 5678",
       "email" : "[email protected]"
    }
};
Listing 13-11 reveals a JSON structure whose member, labeled “contact”, is that of a nested collection. Within the aforementioned collection are three possible forms of contact: phone, cell, and email. In order to incorporate a reference to the nested values into our template, we simply employ the use of dot notation within our placeholders, as seen in Listing 13-12.
Listing 13-12. Handlebar Template Relying on Dot Notation to Reference a Nested Collection
<section class="directory">
 <script type="application/x-handlebars" id="Handlebar-Employee-Template">
  <div class="employee">
    <p> firstName: {{fName}} </p>
    <p> lastName:  {{lName}} </p>
    <p> work:      {{contact.phone}} </p>
    <p> email:     {{contact.cell}} </p>
    <p> cell:      {{contact.email}} </p>
  </div>
 </script>
</section>
If we were to compile the template from Listing 13-12 and supply as the context complexJSON from Listing 13-11, our document would render the results shown in Figure 13-6.

Figure 13-6. Rendered template utilizing dot notation
While dot notation can be sufficient for working with nested structures, it can become rather cumbersome and repetitive. Furthermore, when working with many properties or deeply nested structures, our template can become bloated and unwieldy. For this reason, the Handlebars engine supplies us with more versatile expressions.
As stated on the Handlebars web site, “Block expressions allow you to define helpers that will invoke a section of your template with a different context than the current.” Although I have yet to discuss helpers, the key takeaway from the previous sentence is that block expressions are special expressions that can be used to change the working context within our templates. In the upcoming section “Block Helpers,” you will see how they can be paired with helpers.
As the term block implies, a lock expression is used to define a subset or group of expressions within a template. In other words, block expressions are used as containers for other expressions, wherein the expressions residing within a block expression are subject to the context defined by the block itself. This is similar to the CSS cascading effect, which child HTML elements can inherit from their parents. Furthermore, because a block expression is a special form of expression, a block expression has the capability to be the parent for another block expression. Listing 13-13 reveals the syntax of a block expression.
Listing 13-13. Syntax of a Block Expression
{{#Expression}}
       //anything that happens here is within the context of Expression
{{/Expression}}
As shown in Listing 13-13, the syntax of a block expression is much more complex than that of its counterpart the basic expression. Further examination of the syntax reveals similarities between the two. It would appear that a block expression is made up of two special basic expressions. The first expression is prefixed by a hash token (#), while the latter basic expression is simply prefixed by the solidus token (/). The two tokens that I have mentioned are used to denote the beginning and end of a block.
Any and all expressions contained within said block will inherit the context established by the block expression. What do I mean by “established by the block expression”? Like any basic expression, the block references a placeholder that will be replaced with the value for the defined key shown in Listing 13-13 as “Expression”, thus altering the context for any nested expressions.
Incorporating block expressions within a template is as simple as determining where our template would benefit from a change in context. Let’s revisit Handlebar-Employee-Template from Listing 13-12 and establish a new context that will allow us to remove all uses of dot notation. (See Listing 13-14.)
Listing 13-14. Use of a Block Expression to Alter the Current Context
<section class="directory">
 <script type="application/x-handlebars" id="Handlebar-Employee-Template">
  <div class="employee">
    <p> firstName: {{fName}} </p>
    <p> lastName:  {{lName}} </p>
      {{#contact}}
    <p> work:  {{phone}} </p>
    <p> email: {{cell}} </p>
    <p> cell:  {{email}} </p>
      {{/contact}}
  </div>
 </script>
</section>
Listing 13-14 employs a block expression in order to reflect, as the new context, contact, exposed by the current context. Mind you, the item held at contact is a collection of three keys, phone, cell, and email. From there, all placeholders contained within our block will be replaced with the values possessed by the matching keys held by the new context, thus eliminating the need for dot notation, in order to obtain references to phone, cell, and email.
![]() Tip A block expression can be used to work your way down a complex JSON structure.
Tip A block expression can be used to work your way down a complex JSON structure.
If we were to compile the template from Listing 13-14 and supply as the context complexJSON from Listing 13-11, our document would render the same result shown previously in Figure 13-6.
Block Expressions and Arrays
One extremely powerful inclusion of the block expression, aside from being used to establish a new context, is how it will loop over the indexes of an array, if that is what the expression evaluates to. In other words, if the key defined by our block expression evaluates to that of an array, each item held by all indexes of said array are individually set as the new context for any and all expressions within the block. This is especially important, because the Handlebars engine will assemble, in one shot, several data sets contained within an ordered list.
With that being said, Listing 13-15 incorporates within our initial Handlebar-Employee-Template from Listing 13-9 a block expression, shown in bold.
Listing 13-15. Incorporating a Block Expression
<body>
  <section id="directory">
   <script type="application/x-handlebars" id="Handlebar-Employees-Template">
    {{#employees}}
    <div class="employee">
        <p> firstName: {{fName}} </p>
        <p> lastName:  {{lName}} </p>
        <p> contact:   {{phone}} </p>
    </div>
    {{/employees}}
   </script>
  </section>
</body>
This very minor inclusion adds an extremely large amount of automation to our template. Up until this point, the code required to augment multiple individuals into our directory consisted of obtaining computed data, augmenting it, and inserting this into our DOM three times over. However, the inclusion of the new block expression can supply an arbitrary number of employees to our template with a single data provision.
Because both our template and data must possess a relationship in order for our template to work, it requires the provision of JSON that complements our block expression. The JSON provided must possess at least one key/value pair whose label is that of employees. Furthermore, the value which employees must retain is that of an array, whose indexes are composed of individual collections pertaining to a particular employee, as shown in Listing 13-16.
Listing 13-16. An Ordered List of Individual Employees
{
    "employees" : [
        {"fName" : "Ben",     "lName" : "Smith", "phone" : "555 - 1234" },
        {"fName" : "Ivan",    "lName" : "Bravo", "phone" : "555 - 5678" },
        {"fName" : "Michael", "lName" : "Chang", "phone" : "555 - 9090"}
    ]
};
Listing 13-16 reveals a JSON structure that complements the block expression shown in Listing 13-15. If we were to compile the template from Listing 13-15 and provide the preceding JSON to the resulting function, the resulting string returned would reflect the following markup:
<div class="employee">
 <p> firstName: Ben </p>
 <p> lastName:  Smith </p>
 <p> contact:   555 - 1234  </p>
</div>
<div class="employee">
 <p> firstName: Ivan </p>
 <p> lastName:  Bravo </p>
 <p> contact:   555 - 5678  </p>
</div>
<div class="employee">
 <p> firstName: Michael </p>
 <p> lastName:  Chang </p>
 <p> contact:   555 - 9090  </p>
</div>
All that would be left for our code to do would be to append the preceding string into our document so that it can be rendered. The full source code can be viewed in Listing 13-17.
Listing 13-17. Utilizing a Block Expression to Render Three Employees from One JSON Argument
<body>
  <section id="directory">
   <script type="application/x-handlebars" id="Handlebar-Employee-Template">
    {{#employees}}
    <div class="employee">
    <p> firstName: {{fName}} </p>
    <p> lastName:  {{lName}} </p>
    <p> contact:   {{phone}} </p>
    </div>
    {{/employees}}
   </script>
  </section>
  <script type="application/javascript">
   var initialTemplateWrapper = document.getElementById("Handlebar-Employee-Template");
   var initialTemplateContent = initialTemplateWrapper.innerHTML;
   var templateFunction = Handlebars.compile(initialTemplateContent);

   var dataA = templateFunction({
          "employees" : [
                         {"fName" : "Ben", "lName" : "Smith", "phone" : "555 - 1234" },
                         { "fName" : "Ivan", "lName" : "Bravo", "phone" : "555 - 5678" },
                         {"fName" : "Michael", "lName" : "Chang", "phone" : "555 - 9090"}
                       ]
    });

   var directory = document.getElementById("directory");
   directory.innerHTML += dataA;
  </script>
 </body>
Executing Listing 13-17 renders the results shown in Figure 13-5. While the results are the same, the difference in labor speaks for itself.
EXERCISE 13-1. ENHANCING THE DIRECTORY
While our employee directory is making use of the latest Handlebars techniques, thereby reducing the amount of JavaScript required to add new employees to our directory, we have managed to revert back to displaying only one form of contact per employee. Using the information learned thus far about Handlebars expressions, rewrite the directory template to account for the following JSON as its context:
{
"employees" : [
{
"fName" : "Ben",
"lName" : "Smith",
"contacts" : {
"phone" : "555 - 1234",
"cell" : "555 - 5678",
"email" : "[email protected]"
}
}, {
"fName" : "Ivan",
"lName" : "Bravo",
"contacts" : {
"phone" : "555 - 9012",
"cell" : "555 - 9034",
"email" : "[email protected]"
}
}, {
"fName" : "Michael",
"lName" : "Chang",
"contacts" : {
"phone" : "555 - 9035",
}
}]
}
You may note that Michael does not possess a cell or e-mail for this exercise. Take note of this when your template is rendered. You can compare your template to Listing 13-18.
If your template resembles that of Listing 13-18, then, congratulations; you are on your way to mastering the Handlebars engine.
Listing 13-18. Answer to the Preceding Exercise
<section id="directory">
 <script type="application/x-handlebars" id="Handlebar-Employee-Template">
  {{#employees}}
    <div class="employee">
    <p> firstName: {{fName}} </p>
    <p> lastName:  {{lName}} </p>
    {{#contacts}}
         <p>phone: {{phone}}</p>
         <p>cell:  {{cell}}</p>
         <p>email: {{email}}</p>
    {{/contacts}}
    </div>
  {{/employees}}
 </script>
</section>
Rendering the template from Listing 13-18 reveals that a Handlebars template outputs fields, whether or not an existing member within the provided context can replace the basic expression. As in the case of Michael, who lacked a cell as well as an e-mail address, Handlebars did not omit these fields, as shown in Figure 13-7.
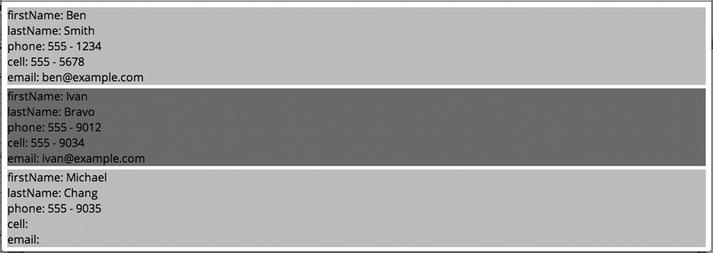
Figure 13-7. Rendering of empty fields
Applying Logic to Logic-less Templates
As was stated earlier, Handlebars templates are logic-less, which simply means that they do not incorporate the use of JavaScript operators. This is extremely beneficial, because it increases the readability, reusability, and maintainability of our templates, by ensuring the separation of presentation from functionality. Similarly, it separates our HTML from our JavaScript. However, at times, we will find it quite necessary to apply logic into our presentation. For this reason Handlebars incorporates helpers.
Helpers
In order to decouple logic from presentation, Handlebars does not permit the coupling of logic within a template—and rightfully so. HTML, CSS, and JavaScript should remain as separate from one another as possible. However, this is not to say that Handlebars templates cannot reflect the use of logic at all. In fact, the Handlebars library provides us with the necessary framework in which we can pair logic with templates in a way that is sure to decouple the logic from our layout.
In order to decouple the two, the Handlebars library relies on what are referred to as helpers. A helper is merely an expression, which, at runtime, resolves to a function of the same name. Only in the runtime environment are our template and logic intertwined. This is contrary to design time (our source code), during which our template will only exhibit what appears to be yet another expression, thus ensuring an optimal amount of separation from our presentation.
There are two types of helpers: custom and built-in. Because custom helpers are an advanced topic, this chapter will not discuss them. Rather, I will discuss the variety of remarkably useful helpers that Handlebars includes, so that we can incorporate them into our templates immediately.
Unlike custom helpers, which, as you may suspect, offer more fine-tuned logic, hence increased complexity, built-in helpers are included to supply basic logic to Handlebars templates. The helpers that I will be discussing are each, if, unless, and else.
As you may surmise from their names, the aforementioned built-in helpers facilitate the most basic of JavaScript faculties. As you will find, the built-in helpers that I will be discussing will all coincide with a block expression. Helpers that are used with block expressions are referred to in the Handlebars nomenclature as block helpers.
The syntax for a block helper, as seen in Listing 13-19, reveals a similar resemblance to that of a block expression. The sole difference between the two is that it is the name of the helper that defines the block.
Listing 13-19. Syntax of a Block Helper
{{#helper Expression}}
    // Within the context of Expression
{{/helper}}
As you can see from Listing 13-19, a block helper is a block used to apply specific logic to some context, Expression. In the case of the block helper, it is the name of the helper that succeeds the beginning and ending tokens of the block. Although the syntax varies from our earlier discussion of a block expression, a block helper is still a block, and, therefore, for all expressions within, is business as usual. In other words, all expressions within are subject to the new context brought about by the block helper.
The each helper is a remarkable helper that traverses all keys for a given context. The difference between each and the default behavior of the block expression, however, is that each will iterate over both collections as well as an ordered list. As with a block expression, each item held by the traversed key will be set to the current context for any and all expressions within the block. Listing 13-20 reveals the syntax for the each block helper.
Listing 13-20. Syntax of the each Helper
{{#each Expression}}
    //evaluate against the current context
{{/each}}
As shown in Listing 13-20, the each block helper defines a block that will traverse all keys belonging to the evaluated context, Expression. The each key provides a tremendous amount of automation that can be added to our template. It can be used like a block expression to iterate an array, or it can also be used to iterate over a collection of key/value pairs. Listing 13-21 makes use of both, to reveal the each helper’s versatility.
Listing 13-21. Revisiting Our Directory with the Assistance of the each Helper
<script type="application/x-handlebars" id="Handlebar-Employee-Template">
{{#each employees}}  //traverse an array
  <div class="employee">
    <p> firstName: {{fName}} </p>
    <p> lastName:  {{lName}} </p>
    {{#each contacts }} //traverse a collection
        <p>{{@key}}: {{this}}</p>
    {{/each}}
  </div>
{{/each}}
</script>
Listing 13-21 updates our previous Handlebar-Employee-Template. This time, it reflects the necessary code that takes advantage of the each helper. As you can see, our template will traverse our array, employees, and our object, contacts. You may notice that our template no longer explicitly includes the placeholders phone, cell, and email. In their place is a single line of code: <p>{{@key}}: {{this}}</p>. Because the use of each sets the value of each traversed key as the current context for all subsequent expressions within the block, our aforementioned placeholders will not be evaluated. This is because each value of each key held by our contacts collection is a string. For this particular reason, the Handlebars engine provides special placeholders that can be used to refer to specific parts of a context.
These special placeholders are {{@key}} and {{this}}. The placeholder {{@key}} refers to the key for which the current context is held, while, conversely, the placeholder {{this}} refers to the value of said key. These come in especially handy when iteration is involved.
Utilizing these two special placeholders, we can achieve the original output of our various methods of contact. Providing the data model shown in Listing 13-22 results in the rendering of Figure 13-8.
Listing 13-22. Complex JSON
{
    "employees" : [
     {
          "fName" : "Ben",
          "lName" : "Smith",
          "contacts" : { "phone" : "555 - 1234", "cell" : "555 - 5678", "email" : [email protected] }
     }, {
          "fName" : "Ivan",
          "lName" : "Bravo",
          "contacts" : {  "phone" : "555 - 9012",  "cell" : "555 - 9034", "email" : [email protected] }
    }, {
          "fName" : "Michael",
          "lName" : "Chang",
          "contacts" : { "phone" : "555 - 9035", }
    }]
}

Figure 13-8. Rendering of fields that exist
As you can see, the effect is nearly the same as the output from the earlier exercise within this chapter. What you may recognize, however, is that only phone has been outputted for Michael. This is because the each helper traverses only the keys that exist.
The if helper is a handy helper that can be used to add conditional logic to a block expression and takes on the implementation shown in Listing 13-23.
Listing 13-23. Syntax of the if Helper
{{#if Expression}}
    //evaluate against the current context Expression
{{/if}}
Listing 13-23 reveals the syntax of the block helper. Use of the if helper conveniently renders our block, in addition to any expressions contained within, only if Expression evaluates as truthy. In other words, if Expression evaluates to null, 0, false, or undefined, the block will be bypassed. Let’s apply our if helper to the template from our earlier exercise, in order to prevent the output of contact methods that do not exist. (See Listing 13-24.)
Listing 13-24. Incorporation of the if Helper
<script type="application/x-handlebars" id="Handlebar-Employee-Template">
 {{#employees}}
   <div class="employee">
   <p> firstName: {{fName}} </p>
   <p> lastName:  {{lName}} </p>
   {{#contacts}}
    {{#if phone}}
      <p>phone: {{phone}}</p>
    {{/if}}
    {{#if cell}}
      <p>cell: {{ cell }}</p>
    {{/if}}
    {{#if email}}
      <p>email: {{email}}</p>
    {{/if}}
  {{/contacts}}
  </div>
 {{/employees}}
</script>
As shown in bold, the if helper is used to devise a block that may or may not render. This, of course, depends on the resulting evaluation of each expression: phone, cell, and email. Remember that if an expression evaluates to null, 0, false, or undefined, each if block helper will be skipped. Executing the previous template with the data set from Listing 13-24 results in the same output as that shown in Figure 13-9.
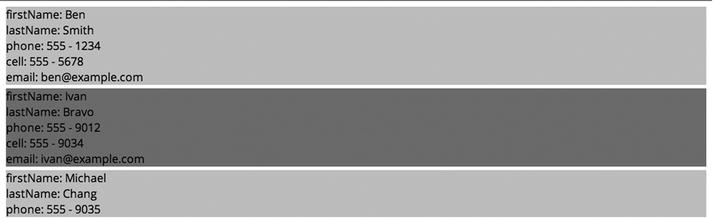
Figure 13-9. Rendering of a member, if it possesses a value
The unless helper is used to render a block only if the expression succeeding it evaluates to falsy. The syntax for the unless helper can be seen in Listing 13-25.
Listing 13-25. Syntax of the unless Helper
{{#unless Expression}}
    //evaluate against the current context Expression
{{/unless }}
The unless helper is used inversely to that of our if helper, in that it is used to render a block, if and only if Expression evaluates to null, 0, false, or undefined. You may be asking yourself when might this be useful. However, such a helper is useful when rendering invalid or empty form fields. Listing 13-26 uses the unless helper to output into our directory all contacts that have not supplied an e-mail.
Listing 13-26. Incorporation of the unless Helper
<script type="application/x-handlebars" id="Handlebar-Employee-Template">
  {{#employees}}
   {{#unless contacts.email}}
   <div class="employee">
      <p> firstName: {{fName}} </p>
      <p> lastName:  {{lName}} </p>
      {{#contacts}}
         <p>phone: {{phone}}</p>
         <p>cell: {{ cell }}</p>
         <p>email: {{email}}</p>
      {{/contacts}}
    </div>
   {{/unless}}
   {{/employees}}
</script>
Listing 13-26 demonstrates how the unless helper can be used to render colleagues that have yet to supply an e-mail address. Because we know that Michael only possesses a phone number, executing the preceding template against the data set from Listing 13-22 results in the output shown in Figure 13-10.

Figure 13-10. Use of the unless block to render a contact whose e-mail is not present
The else helper is a complementary helper for our two previously discussed helpers, unless and if. This special helper can be incorporated within the body of either if/unless blocks in order to render content, provided the conditions for unless/if are unsuccessfully met. The syntax of our else helper for both unless and if blocks can be seen in Listing 13-27.
Listing 13-27. Syntax of the else Helper
{{#if Expression}}
    //Evaluate for the current context if truthy
{{else}}
    //Evaluate for the current context if falsy
{{/if}}

{{#unless Expression}}
    //Evaluate for the current context if falsy
{{else}}
    //Evaluate for the current context if truthy
{{/unless}}
Utilizing the else helper offers our templates the ability to provide presentation to an unmet outcome. Consider our previous unless example. If we wanted to highlight for Human Resources those colleagues who currently lack a valid e-mail address, while similarly displaying those that did, utilizing the else helper would make this possible. (See Listing 13-28.)
Listing 13-28. Incorporation of the else Helper
<script type="application/x-handlebars" id="Handlebar-Employee-Template">
  {{#employees}}
   {{#unless contacts.email}}
   <div class="lacksEmail">
     <p> requires contact for{{fName}}{{lName}} </p>
   </div>
   {{else}}
   <div class="hasEmail">
      <p> congratulations {{fName}} {{lName}} </p>
   </div>
   {{/unless}}
  {{/employees}}
</script>
Listing 13-28 reveals the use of the else helper to render an alternate presentation for when our condition is not met. Executing the preceding template with the data set from Listing 13-22 results in the same output as that shown in Figure 13-11.

Figure 13-11. Use of the else helper to render an alternate condition
EXERCISE 13-2. TEMPLATIZING REMOTE JSON
With the lessons you’ve learned in this chapter, see if you can revise the exercise in Chapter 8 to incorporate Handlebars. There is no right or wrong answer.
Summary
The Handlebars library makes it easy to combine data with presentation. However, it does so cleanly and semantically, which makes it highly extensible as well as maintainable. In our industry, in which change is constant, the ability to isolate data from presentation allows for things to change independently of one another. Handlebars does this by simply taking advantage of the clear distinctions between design time and runtime.
Key Points from This Chapter
- Handlebars is a templating engine.
- Handlebars templates are encapsulated as text within script tags.
- To prevent our templates from being parsed by the JavaScript engine, we mark the type of script as an unidentifiable language.
- A placeholder is the atomic unit in Handlebars.
- All expressions are references to keys held by JSON data.
- A Handlebars template is converted into a JavaScript function at runtime.
- The JavaScript function accepts JSON data against which all placeholders are evaluated.
- Handlebar templates are logic-less.
- Basic logic can be added to a template in the form of a helper.
- The built-in helpers are used within blocks.
- Block expressions are used to alter the current context.
- Block expressions can be used to traverse arrays.
- {{this}} and {{@key}} are special placeholders that refer to current key/value pairs.
- The each helper can traverse members of an ordered list or collection.
- The if helper is used to add conditional logic to a block.
- The unless helper is used to add conditional logic to a block.
- The else helper can be used when if or unless conditions are unmet.