
![]()
X-Origin Resources
The browser’s inclusion of the XMLHttpRequest object offers front-end developers a means of interchanging data simply, with the use of JavaScript. Prior to Ajax becoming a highly recognized term, the exchange of data was primarily made possible through a series of full-page requests. Only through front-end hacks could data appear to be loaded-in dynamically. Therefore, when it became possible to make HTTP requests from within JavaScript, it instantly became a hot topic.
Such a prevalence of network access has much cause for concern, however. As Ajax became regular practice, web sites were becoming more and more exposed to the possible injection of malicious code. Needless to say, this is a serious matter for sites transmitting data, let alone sensitive data such as credit cards, bank accounts, or even personally identifiable information. In order to reduce web sites’ being exposed to malicious requests, the XMLHttpRequest restricts network access only to resources that can be considered trusted. However, therein lies part of the problem: How do you define what resources are considered trustworthy?
The policy that prevents data from being usable from varying origins is the same-origin policy (or SOP). This chapter will discuss the impact of the SOP when regarding the interchange of resources between two varying origins. Additionally within this chapter, I will discuss the techniques that can be used to combat said limitations.
Same-Origin Policy
The same-origin policy (SOP) has been in effect since the introduction of JavaScript and continues to remain an important aspect of web security. The SOP is the security model commonly adhered to by all user-agents. While the policy has been revisited many times since its genesis (largely in an ad hoc fashion), today, the SOP governs a variety of front-end securities, such as matters surrounding DOM access, cookies, Web Storage, and network access. The SOP even applies to web plug-ins, such as Flash, Java, and Silverlight. While the latter list is not complete, it’s certainly more than enough to demonstrate how the SOP can be a major obstacle for modern-day web development.
In the previous chapter, I presented you with an exercise that required the use of an HTTP request that would POST data to the specified resource exercise.php, residing at the address http://json.sandboxed.guru/chapter8/. Upon a successful reception of the request, the server would respond in kind with an entity body, which could be used by any application. However, you may recall that I mentioned that this is behavior not typically allowed by the user-agent. In that particular example, I employed a technique for that particular resource that enables an Ajax request to be successful. Ordinarily, the user-agent wouldn’t allow the request to succeed, as the origin from which your request initiated did not reflect the same origin as the resource.
Generally speaking, the SOP restricts which network messages one origin can send to another. The purpose of this policy is to prevent a resource such as a JavaScript application from origin-A from obtaining the resources provided by origin-B, as the intent may be malicious. This policy is, of course, enforced by the user-agents that are being used to make such network requests.
![]() Note Due to legacy purposes, SOP policies vary to the degree by which they are enforced between the various web technologies.
Note Due to legacy purposes, SOP policies vary to the degree by which they are enforced between the various web technologies.
At this point in time, I’d like for you to attempt to load another static file from my server. Only this time, I have not employed the same techniques as the exercise in Chapter 8.
Open your preferred browser and navigate to http://sandboxed.guru/xss-exercise.html. Next, open the developer tools provided by your browser and ensure that the console tab is in view. Using the free-form field within the console, construct an HTTP request that makes use of the GET method to enact on the following resource: http://json.sandboxed.guru/chapter9/data/images.json.
Be sure to use the log method of the console, console.log( string );, to print to the console the raw text of the response (responseText), in order to witness the returned data once the load is complete. Last, be sure to log out an error message if the onerror event handler is dispatched, should anything go wrong with our request.
If you are using Internet Explorer 8 or 9, it will be essential to instantiate the XDomainRequest over the XMLHttpRequest object, as we will be making a cross-origin request. A convenient way of determining whether your script must instantiate the XDomainRequest object over the XMLHttpRequest object for cross-origin requests is to test whether the browser executing the request possesses a particular attribute that belongs to the XMLHttpRequest Level 2 interface. This attribute is particular to cross-origin requests and exists in modern browsers as well as Internet Explorer 10 and up. The attribute is the withCredentials attribute. Utilizing the JavaScript in operator, we can test whether or not the withCredentials attribute exists on an XMLHttpRequest instance. If the attribute does not exist, we must instantiate an XDomainRequest instance. This technique eases our efforts to determine if the browser should rely on XDomainRequest, or not, for these types of requests. If you were to incorporate this conditional logic along with the necessary code required by the exercise, your code should resemble that of Listing 9-1.
Listing 9-1. Determining Whether to Use the XDomainRequest or the XMLHttpRequest Level 2 Interface for a Cross-Origin Request
 1 var xhr= new XMLHttpRequest();
 2    if(!"withCredentials" in xhr){
 3     xhr= new XDomainRequest();
 4    }
 5     xhr.open("GET","http://json.sandboxed.guru/chapter9/data/images.json");
 6     xhr.onload=function(){
 7        console.log(this.responseText);
 8     };
 9     xhr.onerror=function(){
10         console.error( "Error Occurred" );
11     }
12     xhr.send();
Listing 9-1 begins by creating an instance of the XMLHttpRequest and assigns the instance as the reference to a variable labeled xhr (line 1). Utilizing the in operator, along with the instance held by xhr, we can determine if the withCredentials attribute is exposed by the object (line 2). If the value returned by the expression is false, the instance is incapable of fulfilling cross-origin requests; therefore, we replace the existing xhr reference with an instance of the XDomainRequest (line 3).
Once you have coded the request within the console of the developer’s tools, such as in Figure 9-1, execute the code and observe the result.
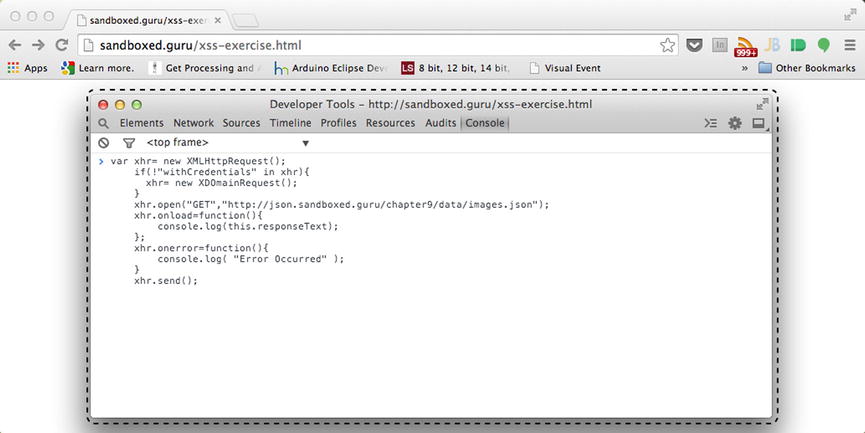
Figure 9-1. Cross-origin request being made to json.sandboxed.guru from sandboxed.guru
Next navigate your browser to http://json.sandboxed.guru/chapter9/xss-exercise.html; run the preceding code once more; and observe the results.
If you followed along with the exercise, you should have witnessed the alert box containing the raw JSON data during the execution of the latter request, as seen in Figure 9-2. However, while executing the same request from the initial origin, sandboxed.guru, the alert box was not presented. Instead, messaging was output to the console, alerting us to the fact that the request cannot occur (see Figure 9-3).

Figure 9-2. Same-origin request being made to json.sandboxed.guru from json.sandboxed.guru, resulting in response
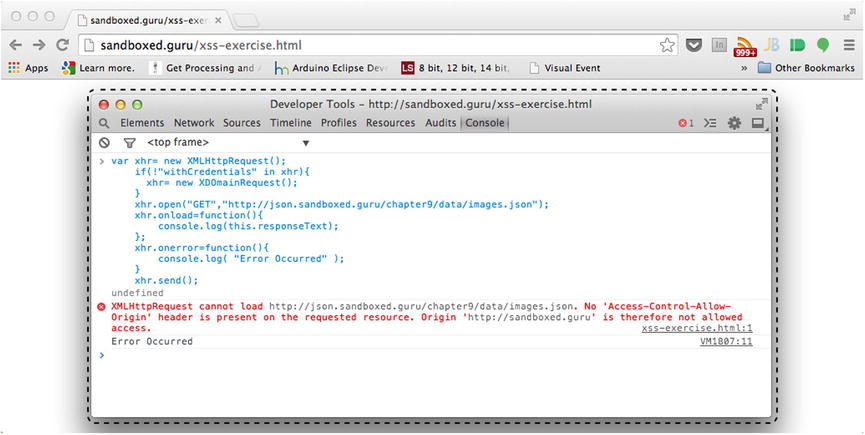
Figure 9-3. Chrome developer tools indicating that the request is not allowed access
As shown in Figure 9-3, Chrome’s developer console reveals the following error messaging:
XMLHttpRequest cannot load http://json.sandboxed.guru/chapter9/data/images.json. No 'Access-Control-Allow-Origin' header is present on the requested resource. Origin 'http://sandboxed.guru' is therefore not allowed access.
From the preceding message, we can ascertain that the request cannot be completed, because the response for the resource exercise.php is not configured to possess the Access-Control-Allow-Origin header. Depending on the browser used to make the request, you will most assuredly receive a different message. For example, Firefox, as shown in Figure 9-4, sends the following error messaging:
Cross-Origin Request Blocked: The Same Origin Policy disallows reading the remote resource at http://json.sandboxed.guru/chapter9/data/images.json. This can be fixed by moving the resource to the same domain or enabling CORS.
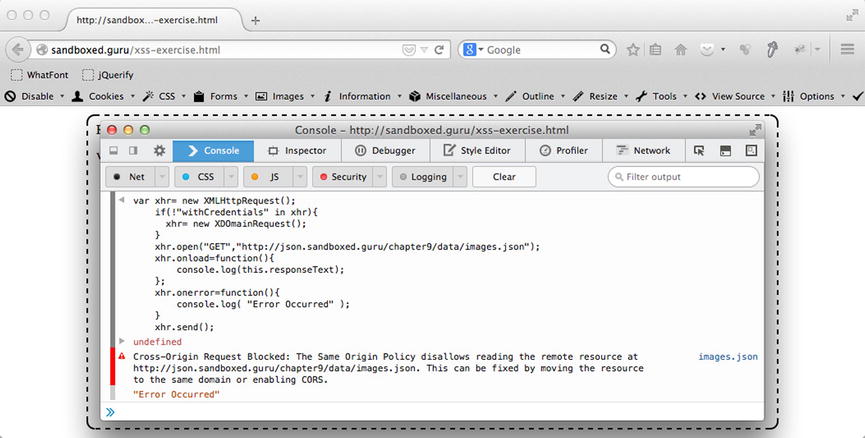
Figure 9-4. Firefox alert stating that the request is not allowed access
Unfortunately, Internet Explorer’s implementation of the XDomainRequest will not alert us to any error messaging, other than the one provided by us to be output upon a possible dispatch of the onerror notification. On the other hand, if you were using Internet Explorer 10 or greater, as those versions implement a vast majority of the XMLHttpRequest Level 2 standardization, they would inform you of the failed incident. Furthermore, the error message reveals that incorporating Cross-Origin Resource Sharing (CORS), similar to Chrome and Firefox, can resolve the problem. Before I begin to discuss CORS, I will continue to discuss our findings further.
Depending on the browser you are using to make the request, you may not witness any HTTP response headers from within the network panel of the developer console. This, unfortunately, might lead you to believe that the request is prevented from even taking place. While the response may not appear in the network tab of the developer toolbar, I can assure you that the request has, in fact, been submitted to the requested resource. However, being that the request is not considered trusted or authorized, the user-agent shields us from being able to witness a response from the server.
If you were to make the same request with the popular Firebug add-on for Firefox, you would continue to receive the same error message as with the other browsers. Yet, upon navigating to the network panel, you would be able to see a series of response headers for the request. Furthermore, the Content-Length entity header, as configured by the response, suggests there is an entity body of precisely 270 bytes, and that the MIME type of the data, as configured by the Content-Type header, is that of application/json. Last, the status line reveals that the request was understood as it is configured, with the status code 200 and the text phrase of OK (see Figure 9-5). These aspects should demonstrate unquestionably that the request is being received. However, if you were to view the Response tab from within the navigation view, you will find the data to be missing.
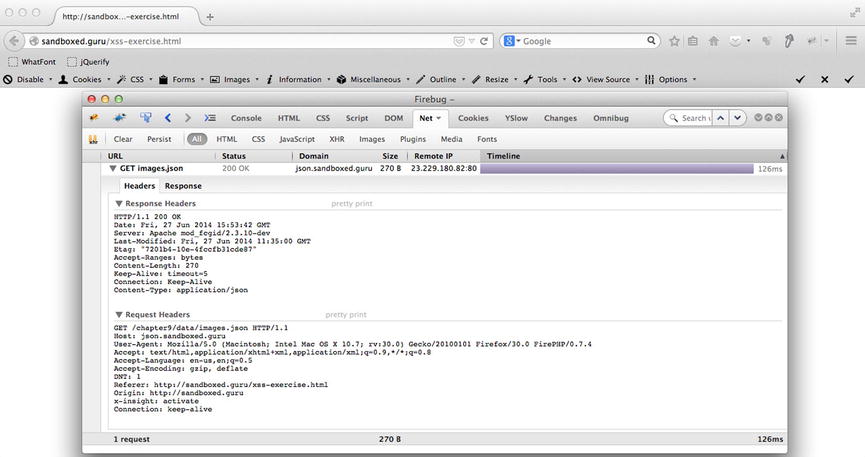
Figure 9-5. Firebug developer tool revealing the response status line as successful
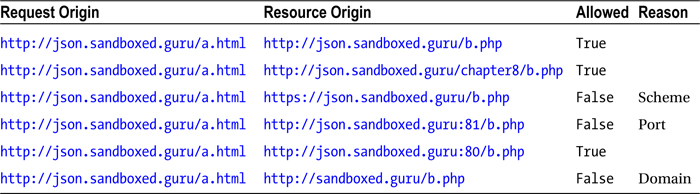
Based on the outcome of the earlier exercise, it should be evident that resources are limited in their ability to be requested from varying origins, regardless of whether the two origins involved are owned by the same individual. It should be evident that a domain and its subdomain are not considered trusted by default and, therefore, cannot make resource requests of one another. Resource requests are inherently trusted only from resources that have the same origin. This is why the subsequent request of our exercise alerted us to JSON data, while the former attempt did not.
In short, the following resource http://json.sandboxed.guru/chapter9/data/images.json is available only to another resource that has the same origin, i.e., http://json.sandboxed.guru. While these two URLs are considered to have the same origin, it is for reasons that may not be as obvious as you might think. Origins aren’t considered to be of the same origin solely because they possess the same hostname. Specifically, a resource is considered authorized to obtain/retrieve content from another resource only if the two resources possess the exact same scheme, domain, and port.
I hope that Listing 9-2 looks familiar, as this is the general schema for a web URL. If you are thrown by the :port/ component, that is okay, as it’s not always required to incorporate the port into a URL. However, that does not detract from the fact that it’s always accounted for behind the scenes.
Listing 9-2. Syntax of an HTTP URL
scheme://domain:port/path/?key=value
- Scheme: The scheme, sometimes referred to as the protocol, defines how an indicated resource will be obtained. There are a variety of protocols that can be specified, such as ftp, http, and even https. Typically, the scheme that is used when viewing web sites will be that of http. However, it can also be that of https, where the s means that the transmission occurs securely. This is commonly used when you log in to a site such as a bank or web mail.
- Domain: As you may have guessed, the domain is the human-friendly means of referring to a specific destination. However, this domain name itself is actually converted behind the scenes to a static IP address.
- Port: The port number is an optional endpoint that can be used to specify a specific application running on a common IP address. When a port is not defined, it falls back to the default port for the supplied scheme. In the case of an HTTP scheme the default port is 80. In the case of HTTPS, the default port is 443.
These three distinct aspects of the HTTP-URL scheme are used by the user-agent to determine whether it must enforce the SOP. Table 9-1 demonstrates which requests will be considered authorized and which won’t.
Table 9-1. The Same-Origin Policy in Effect, Demonstrating Whether a Source Origin Is Authorized to a Request
To further prevent any script from forging the request, certain headers are unable to be defined via the setRequestHeader method of the XMLHttpRequest object. Instead, they are explicitly defined by the user-agent. Any attempt to provide a value for these headers via the setRequestHeader will be overridden by the user-agent. These headers are the following:
- Host
- Origin
- Referer
- Via
The requests made by browsers work on our behalf, hence the term user-agent.1 It is they who enforce the SOP, to ensure that our daily Internet interactions remain as safe as possible. The SOP is an extremely important concept to understand, which is why this chapter is important to a subject that looks to network access to exchange JSON data. The fact that the user-agent acts on our behalf is an important concept for a front-end developer to grasp. The reason, as you will soon see, is because the power to bypass the limitations of the SOP lies on the back-end side of programming, rather than the front end. Unfortunately, not all back-end developers are aware of these SOP requirements, simply because server-side programing does not involve a user-agent that governs HTTP requests. To put it plainly, they don’t have to deal with these issues. As the adage goes “there’s more than one way to skin a cat,” and there is an exuberant amount of server-side languages. In this chapter, all back-end programming will be demonstrated with the use of the highly popular PHP language. However, the programming language could just as easily be Java, .NET, etc.
If you are a Chrome user, such as myself, there is a fantastic HTTP request plug-in that I use to conveniently test web services. This plug-in is known as Postman and can be obtained from the browser via the extensions URL https://chrome.google.com/webstore/search/postman%20rest%20client. Alternatively, the browser extension can be obtained from the developer’s web site: www.getpostman.com/. Once the extension is installed, navigate to the following URL: chrome://apps/, within your Chrome browser, and launch Postman by clicking the visible shortcut. Upon launch of the application, you should witness an interface that is not unlike that shown in Figure 9-6.
Figure 9-6. Interface of Postman
Figure 9-6 reveals the interface of the Postman HTTP request builder. As an extension to the browser, Postman doesn’t rely on the XMLHttpRequest or XDomainRequest objects to fulfill network requests. Therefore, any request from Postman occurs unencumbered by the SOP. Utilizing the applications interface, we will re-create the request from our earlier exercise, to obtain the following resource: http://json.sandboxed.guru/chapter9/data/images.json.
Within the form field that states “Enter request URL here,” supply the aforementioned URL. To the right-hand side of this field, you can witness a combo-box. This input field represents the request method. By giving focus to this field, we are able to select the necessary method to enact on the supplied resource. Fortunately for us, GET is the default selection, so we will leave that as is. To the right of the combo-box is the button labeled “Headers,” which, when clicked, will reveal a pair of input fields below the URL field of the request. Utilizing the Header and Value fields, respectively, we can configure specific headers of the request. Figure 9-7 illustrates the provision of two familiar headers, Accept-Language and Accept.
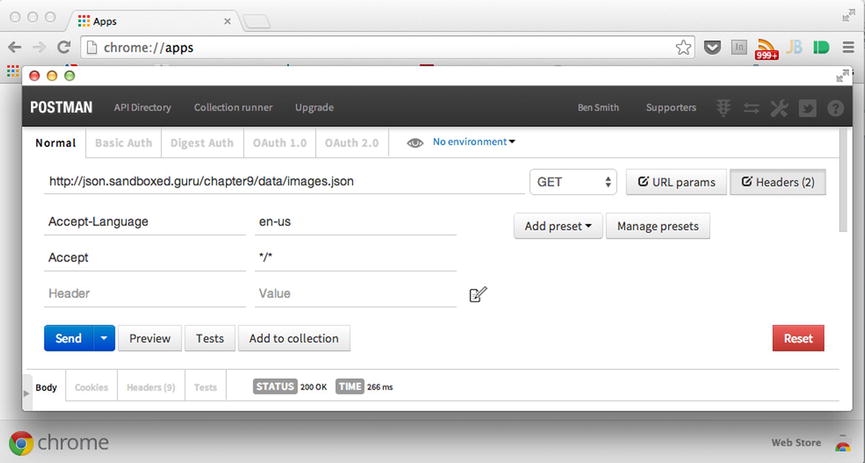
Figure 9-7. Configuring a GET request with Postman
At this point, locate the Send button at the lower left of the screen, to initiate the request. Upon sending the request, depending on your Internet connection, you should be provided with a status line of 200, revealing that the request was successful. Following the status, you should see the JSON content for the requested resource. The results should reflect those captured in Figure 9-8.
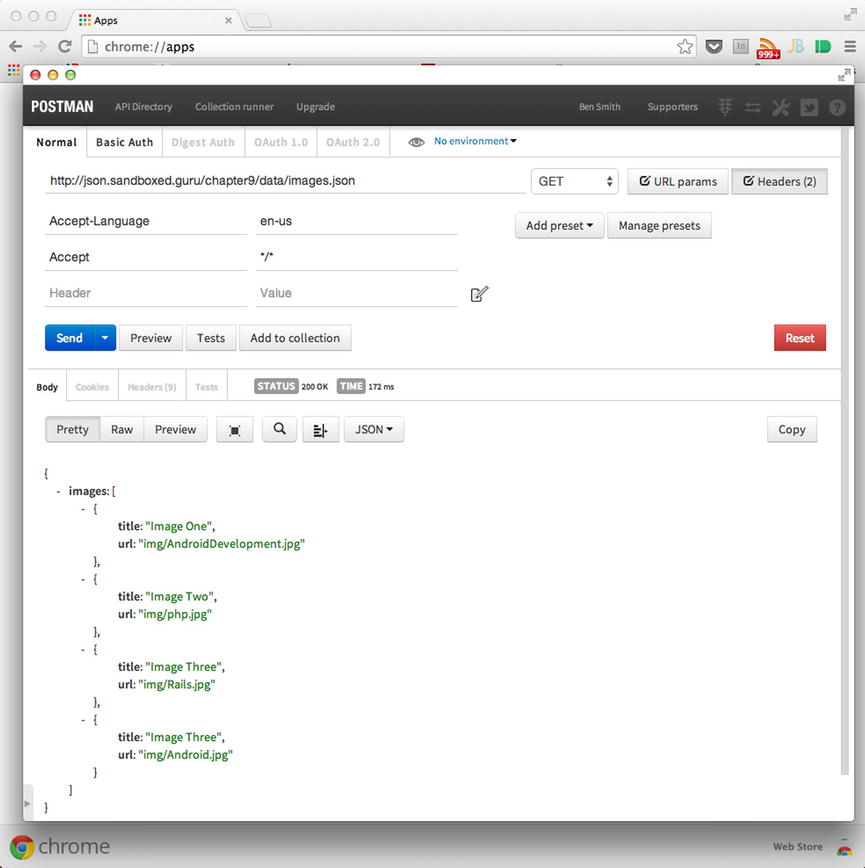
Figure 9-8. A successful response is provided
Circumventing Same-Origin Policy
As has been revealed, the browser limits the network access occurring between two varying origins, in order to enforce the same-origin policy. However, as the SOP has been adjusted in an ad hoc fashion over time, a couple of loopholes do exist, which we will leverage, in order to facilitate cross-origin requests.
CORS
The first technique that I will discuss, which sidesteps the same-origin policy (SOP), is that of CORS. CORS, as mentioned previously, is an acronym that stands for Cross-Origin Resource Sharing. CORS, which is the W3C-approved technique to handle cross-origin requests, does not eliminate the SOP. It elaborates upon the model in a way that enables servers to opt in to requests that may not be trusted, thus, informing the user-agent that it should not prevent the response from being obtained from Ajax requests of varying origins. The CORS specification defines how a server, as well as a user-agent, is to coordinate the authorization of a request by a web application from a varying origin.
The overview of how CORS works is simple. For every Ajax request, the user-agent is notified that a request is to be initiated via the send method of the xhr object. As a result of this invocation, the request begins. However, during the request, the user-agent and the server communicate via the inclusion of special HTTP headers, in order to determine if the request should be facilitated.
In our earlier exercise, we received notice from the browser that our request was unable to be carried out, due to the fact that the received response lacked the Access-Control-Allow-Origin header. Access to our origin was refused. The fact that the response did not possess a particular response header was all it took to inform the user-agent that the provided data was not intended for the origin that initiated the request. Therefore, whether or not the server successfully received the request was moot, as the user-agent denied our application access.
Access-Control-Allow-Origin is just one header among a handful that is defined by the CORS specification. In fact, there are fewer than ten in total. Three are configured by the user-agent to accompany the request, and six can be configured by the server to accompany the response. However, not all nine must be used to coordinate the authorization of an HTTP-Request. In fact, most of the time, a maximum of four headers will be exchanged. However, for the purposes of this chapter, we will consider two:
- Access-Control-Allow-Origin
- Origin
What determines which of the nine CORS headers are necessary to authorize the request depends on whether the request is deemed “simple” or requiring “preflight.” What distinguishes a request as being the former or the latter ultimately boils down to the request method chosen to enact on the indicated resource, in addition to the configured request headers.
A simple request, as defined by the specification, is one that identifies GET, POST, or HEAD as its request method. Additionally, a simple request cannot specify headers that are not among those white-listed. Those headers are the following:
- Accept
- Accept-Language
- Content-Language
- Content-Type
While you may initially find the preceding headers reasonable for GET requests, I think you will find them rather limiting for POST, after you realize that Content-Type can only be configured as application/x-www-form-urlencoded, multipart/form-data, or text/plain. What this means is that when a POST request is accompanied by an entity body whose Content-Type is configured as application/json, a preflight request must occur prior to the actual request.
A preflight request is simply an initial HTTP request submitted by the user-agent to the requested server, using the OPTIONS request method to obtain the necessary server information and configured headers that might suggest the Ajax request is authorized. In other words, before attempting to make a request that is not considered simple, and, therefore, may be considered malicious, the user-agent determines if the remote server indicates any interest in receiving such a request. As indicated earlier, this is accomplished via the OPTIONS method, which simply informs the remote server to provide a list of all acceptable headers and methods that can accompany a request to the indicated resource. If the response is not configured to handle the headers/methods as they are explicitly outlined by the user-agent, the actual request will be canceled.
I will discuss how to configure a server’s response to accommodate preflight requests in more detail in Chapter 11. In the meantime, feel free to review the CORS headers required of preflight requests, in Table 9-2.
For every “simple” cross-origin request, the user-agent, in addition to configuring any default headers, must configure a header that is essential to the CORS specification. This header, which is simply labeled “Origin,” indicates, as its configured value, the source origin of the request. On receiving the request, the server can use the configured value possessed by the Origin header to configure the fulfillment of the request. As briefly discussed, an origin is considered authorized by a user-agent if, and only if, the fulfillment of the request possesses the Access-Control-Allow-Origin header and is configured to indicate as trusted the origin that initiated the request. If the Access-Control-Allow-Origin header is not present, access to the response will not be permitted. However, if the header is present, the user-agent will determine via an algorithm whether the configured value matches the source origin. This algorithm makes up Section 7.2 of the CORS specification, Resource Sharing Check.
Resource Sharing Check
The configured headers provided by the server are merely the mechanism by which to communicate with the user-agent. They do not guarantee that a source origin can bypass the same-origin policy (SOP). As the user agent governs the SOP, it is the user-agent’s responsibility to determine whether the source origin and the value accompanying the Access-Control-Allow-Origin header meet the authorization requirements. The user-agent accomplishes this via the following steps of an algorithm:2
- If the response includes zero or more than one Access-Control-Allow-Origin header value, return fail and terminate this algorithm.
- If the Access-Control-Allow-Origin header value is the * character and the omit credentials flag is set, return pass and terminate this algorithm.
- If the value of Access-Control-Allow-Origin is not a case-sensitive match for the value of the Origin header as defined by its specification, return fail and terminate this algorithm.
- If the omit credentials flag is unset and the response includes zero or more than one Access-Control-Allow-Credentials header value, return fail and terminate this algorithm.
- If the omit credentials flag is unset and the Access-Control-Allow-Credentials header value is not a case-sensitive match for true, return fail and terminate this algorithm.
- Return pass.
In short, the value of the Access-Control-Allow-Origin header, as configured by the server, must satisfy all origins via the provision of the wild card token * or be provided as a case-sensitive match for the indicated origin, as supplied within the request. On the other hand, if the resource-sharing check determines that authorization should not be allowed, we are provided with the aforementioned network error indicating that the origin lacks sufficient authorization. As the SOP specifies trust per URI,3 the preceding outlined steps occur for each requested cross-origin resource. Listing 9-3 demonstrates how a resource can grant proper authorization to all source origins, utilizing PHP.
Listing 9-3. Authorizing All Source Origins per the Current Resource
1 <?php
2 header('Access-Control-Allow-Origin: *'),
3 $headers=getallheaders();
4 $origin =$headers["Origin"];
3 echo '{"message":"congratulations '.$origin .', your origin has been successfully authorized by your
         user-agent"}';
4 ?>
The most minimal configuration required on the server’s behalf, as demonstrated in the preceding listing, is to configure the Access-Control-Allow-Origin header with the value of the wild-card * token. With the preceding Access-Control-Allow-Origin header in place, any simple request made via XMLHttpRequest or XDomainRequest and occurring from any origin will be provided the appropriate authorization. If you were to run the following code from Listing 9-4, the source origin of your request would be entitled access to the JSON provided.
Listing 9-4. A GET Request Being Made of cors.php
 1 <script>
 2 var xhr= new XMLHttpRequest();
 3   if(!"withCredentials" in xhr){
 4    xhr= new XDomainRequest();
 5   }
 6   xhr.open("GET", "http://json.sandboxed.guru/chapter9/cors.php");
 7   xhr.onload = function() {
 8       alert(this.responseText);
 9   };
10   xhr.send();
11 </script>
No matter the source origin of the request, executing the request from the preceding listing will result in an alert box prominently appearing to inform the user that the source origin of the request has been granted authorization to the JSON response, as revealed in Figure 9-9.
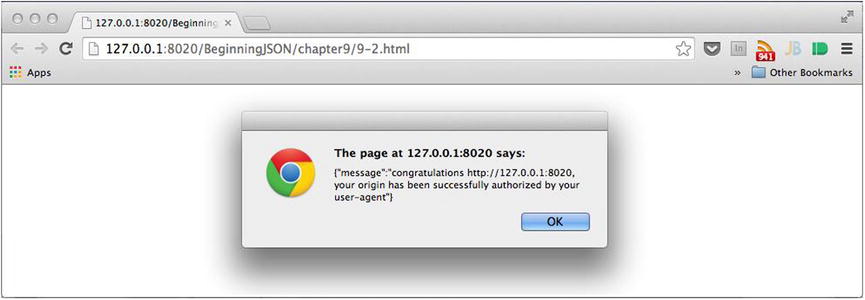
Figure 9-9. Successful attempt at Cross Origin Resource Sharing
As you can clearly witness from the URL in Figure 9-9, our local request, signified by the IP address 127.0.0.1, is able to receive access to the JSON body provided by the resource, whose origin is http://json.sandboxed.guru. By reviewing the headers of the request, as captured by the developer’s console, we can witness the inclusion of the Origin and Access-Control-Allow-Origin headers used to coordinate the source origin’s authorization, as shown in Figure 9-10.
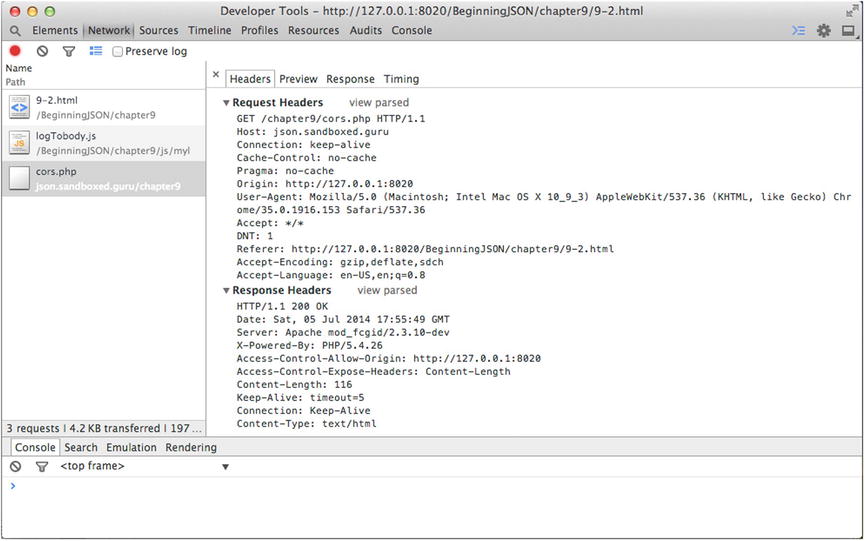
Figure 9-10. CORS response exhibiting the configuration of the Options and Access-Control-Allow-Origin headers
With the use of the two aforementioned CORS headers, we can successfully bypass the SOP and successfully enable cross-origin requests. However, this does not entitle a cross-origin request to be treated similarly to that of an SOP. Although the server has authorized the request, the user-agent continues to refrain from providing information that may reduce the security of either the client or response. For this reason, cookies, basic-authorization, and custom headers are prevented from reaching their destination, unless otherwise coordinated between the user-agent and server via two more headers. Furthermore, the user-agent will limit the application’s exposure to any headers provided by the server that are not considered to be among the following six white-listed simple response headers:
- Cache-Control
- Content-Language
- Content-Type
- Expires
- Last-Modified
- Pragma
To further broaden the scope of the authorization, to enable these aspects as required by your application, the server must coordinate with the user-agent by configuring any necessary header as supplied by the CORS specification. Following are two tables that outline the various CORS headers, as utilized by the two request categories simple and preflight.
The headers in Table 9-2 are concerned with all aspects of simple requests.
Table 9-2. CORS Simple Headers
|
Header |
Role |
Configured by |
|---|---|---|
|
Origin |
Indicates where the cross-origin request originates |
User-Agent |
|
Access-Control-Allow-Origin |
Indicates whether a resource can be shared by returning the value configured for the Origin request header, *, or null |
Server |
|
Access-Control-Allow-Credentials |
Indicates whether the response to the request can be exposed when the omit credentials flag is unused |
Server |
|
Access-Control-Expose-Headers |
Indicates which headers are safe to expose to the API XMLHttpRequest object via the getResponseHeaders method |
Server |
The headers within Table 9-3 are concerned with the more complex requests, which require an initial request, in order to determine if the server acknowledges the configured aspects of the request that are not recognized as simple. If the server indicates that it is willing to handle said aspects, only then will the actual request be sent to the server. If, however, the server does not indicate that it can handle those aspects, the user-agent will cancel the request altogether, once again resulting in the same network error indicating insufficient authorization.
Table 9-3. CORS Preflight Headers
|
Header |
Role |
Configured by |
|---|---|---|
|
Access-Control-Request-Headers |
Indicates which headers will be used in the actual request |
User-Agent |
|
Access-Control-Request-Method |
Indicates which method will be used in the actual request |
User-Agent |
|
Access-Control-Allow-Methods |
Indicates which methods can be used during the request for a targeted resource |
Server |
|
Access-Control-Allow-Headers |
Indicates which header field names can be used during the request of the targeted resource |
Server |
|
Access-Control-Max-Age |
Indicates how long the results of a preflight request can be cached |
Server |
Although CORS is the official W3C technique to abide by when working with cross-origin requests, the CORS headers can only be used by the user-agent that conforms to the algorithms of the CORS specification. This is to say that only those browsers that implement the XMLHttpRequest Level 2 specification can fully support CORS. As you learned in Chapter 8, modern browsers, in addition to Internet Explorer 10 and greater, support the XMLHttpRequest Level 2 specification. For this reason, this chapter will continue to outline two other techniques that enable cross-origin requests.
The Proxy
While the same-origin policy (SOP) is enforced by the browser, I did recently discuss that the SOP is not at all a component of the HTTP protocol. Rather, it’s a security model that is strictly adhered to by the browsers of which we make use. As demonstrated by our earlier use of Postman, when we use tools that do not rely on the browser, we are able to make requests indiscriminately. This is because the foundations of the HTTP protocol rely on the ability for any server to fulfill a request. However, it is up to the targeted server to determine whether or not that request should be allowed.
As the name suggests, the concept of a server proxy is to forward an authorized request to a local server to a remote server. (Remember: An authorized request comes from the same origin.) The process begins with an HTTP request being made to a same-origin web server. From there, either the same request, or a new request, is provided to a remote server by the local web server, unhindered by the user-agent. Provided the request is successful, the response is returned up the chain from the remote server to the local server that made the request and back to the client who invoked the request, our Ajax call. The forwarding of requests can be observed from the diagram in Figure 9-11.

Figure 9-11. Proxy diagram from sandboxed.guru to json.sandboxed.guru and back
Because the communications that take place via the user-agent remain between the same origin, all proxy requests are considered trusted and, therefore, authorized to view the response. We will begin with a review of the xhr code, as seen in Listing 9-5.
Listing 9-5. HTTP Request to the Authorized /proxy.php Resource
1 var xhr= new XMLHttpRequest();
2     xhr.open("GET","http://sandboxed.guru/proxy.php");
3     xhr.onload=function(){
4        console.log(this.responseText);
5     };
6     xhr.onerror=function(){
7         console.log( "Error Occurred" );
8     }
9     xhr.send();
Listing 9-5 should not appear new, as we have been using the same code from both the previous chapter as well as this chapter. Ultimately, we initiate a GET request to http://sanboxed.guru/proxy.php. The only thing to point out is that Listing 9-5 does not make use of the XDomainRequest. This is strictly because the XDomainRequest is only required in Internet Explorer versions 8 and 9, to make requests to varying origins. However, as the proxy technique utilizes a server program that runs on the same server from which the request will occur, we can utilize the XMLHttpRequest from IE 8+. This will provide us with more control over the request as well. Remember: The XDomainRequest object does not possess the setRequestHeader, whereas the XMLHttpRequest object does.
Upon the submission of the request, the target of the request, local resource /proxy.php, whose code can be observed in Listing 9-6, will be executed.
Listing 9-6. PHP Server-Side Proxy Implementation
1 <?php
2 if ($_SERVER['REQUEST_METHOD'] === 'GET') {
3    $ch = curl_init();
4    curl_setopt($ch, CURLOPT_URL,'http://json.sandboxed.guru/chapter9/data/images.json'),
5    curl_setopt($ch, CURLOPT_RETURNTRANSFER, false);
6    $output = curl_exec($ch);
7    curl_close($ch);
8 }
9 ?>
Listing 9-6 demonstrates the minimal PHP code required to create a request using a library known as cURL, which is simply a command-line utility that enables the interchange of data. Let’s walk through the preceding code to understand what is taking place.
The script begins by ensuring that the request method to be enacted on proxy.php is a GET (line 1). This is necessary to ensure that extraneous use of the proxy is prevented from occurring from requests other than GET requests.
Once we have determined that the request method is in fact GET, we proceed with initializing our cURL object (line 3). The cURL object, when initialized, returns an instance, which is stored on a variable labeled $ch. As with the xhr object, we configure our instance of the cURL object with the necessary headers and values to initiate the request. Our first line provides the URL of our resource, http://json.sandboxed.guru/chapter9/data/images.json (line 4). The next configuration is used to obtain the response as a string, rather than outputting the response directly (line 5). In this particular case, we set the value to false, as we will have no need to further modify the response from the remote server. The next line (line 6) executes the request. Once the response is obtained, we close the cURL resource (line 7).
It should be noted that the use of cURL is code blocking, and, therefore, the response awaited by our xhr object continues, until either the connection times out or a response is finally provided. However, once the cURL request is provided a response from the remote server, the response provided is sent back to the client request, which was prompted by Ajax, whereby either the onload or onerror event handler will be triggered.
While the preceding code successfully demonstrates how a proxy can be used to successfully bypass the SOP, the proxy is rather limited. As the indicated resource on line 4 of Listing 9-6 is hard-coded, we would require multiple proxies, if there were multiple files that our application required. While this can get quite cumbersome, we can eliminate that issue with relative ease, either by appending a query string parameter to the end of our resource or by providing the URI as a value belonging to a custom header.
In order to make this something that can be witnessed from a browser, in addition to an Ajax request, the code that follows (Listing 9-7) makes use of the former option (the query string parameter).
Listing 9-7. An xhr object Whose Target Resource Possesses a Query String Parameter Indicating the URI for the Proxy to Obtain
1 var xhr= new XMLHttpRequest();
2     xhr.open("GET","http://sandboxed.guru/proxy.php?uri=images.json");
3     xhr.onload=function(){
4        console.log(this.responseText);
5     };
6     xhr.onerror=function(){
7         console.log( "Error Occurred" );
8     }
9     xhr.send();
Listing 9-7 remains unchanged from that of Listing 9-5, with the minor appendage to the indicated resource (line 2). We have supplied the resource with a key/value pair, which, when supplied in a URL, is a query string parameter. In this case, the key is that of uri, and its value represents the desired resource to be obtained by our proxy. Our proxy must then be modified slightly to anticipate the use of a query string value. These changes that account for the new query string parameter are outlined in bold in Listing 9-8.
Listing 9-8. PHP Code Accounting for the Added jsonp URL Parameter
 1 <?php
 2 if (strtolower($_SERVER['REQUEST_METHOD']) === 'get') {
 3    $uri = (isset($_GET[uri]));
 4    if ($uri) {
 5        $uri = htmlentities($_GET[uri]);
 6        $ch = curl_init();
 7        curl_setopt($ch, CURLOPT_URL, 'http://json.sandboxed.guru/chapter9/data/' . $uri);
 8        curl_setopt($ch, CURLOPT_RETURNTRANSFER, false);
 9        $output = curl_exec($ch);
10        curl_close($ch);
11    } else {
12        header('HTTP/1.1 400 Bad Request'),
13        echo 'Append ?uri=xxxx to the target resource where xxxx is the value of the URI on
                json.sandboxed.guru/chapter9/data/xxxx';
14    }
15 }
16 ?>
Listing 9-8 revisits our proxy from Listing 9-6, with the new query string parameter being taken into account. We begin by determining if the uri key has been provided with the request and assign the returned Boolean value produced by the evaluation onto a variable labeled $uri (line 3). From there, we determine what block of code should be executed, depending on whether the $uri value is set (line 4). If the $uri variable is evaluated to be true, we continue to execute the code block that initiates the proxy. At this point, we have only determined if the uri parameter has been provided with the request. Now, we must obtain the value that it possesses. Repurposing the $uri variable, we reassign it with the obtained value held by the key (line 5). The period (.) token, in PHP, is used to concatenate strings, thereby joining the URL with the dynamic resource. Being that our Ajax request provided the uri as images.json, line 7 will result in the final URL of http://json.sandboxed.guru/chapter9/data/images.json. While this is precisely the same URL we previously targeted, the required resource is specified dynamically and, therefore, can request a variety of resources stored within the preceding path.
Should the uri parameter not be present for the provided request, the proxy will not be triggered to provide a response from the remote source. Instead, the request will be fulfilled with that of a response from our proxy server. As the request is not properly formed, the server configures the status line to possess a status code of 400 (line 12). It further specifies the textual phrase that accompanies the status code, which is Bad Request. This status code is utilized to inform the client that he/she should not continue to repeat the request without further modification. Last, in order to further clarify how to correct the request, we output a message stating that a query string must be provided (line 13).
At this point, feel free to navigate your browser to http://sandboxed.guru/proxy.php to see the results of the proxy for yourself. Upon reception of the provided messaging, append the uri parameter to the URL, whose value can be any of the following resources: images.json, string.json, or script.json.
JSONP
The final technique that enables us to interchange JSON between two varying origins is that of JSON with padding. JSON with padding, or JSONP, as Bob Ippolito coined it in 2005, regards a particular technique in which a client can obtain JSON simply by leveraging the HTML <script> element.
The same-origin policy (SOP) does not govern the requests of externally referenced content via specific HTML tags. Such tags are those of <img>, <style>, <iframe>, and <script>. As you may recall from your past experiences in web development, script tags are able to embed externally referenced JavaScript files, regardless of whether the requesting origin matches the origin of the targeted resource. Such an example that may be familiar is shown in Listing 9-9.
Listing 9-9. Script Tag Targeting the Externally Hosted jQuery Script from a CDN
<script src="//code.jquery.com/jquery-1.11.0.min.js"></script>
Listing 9-9 utilizes the script tag to retrieve the jQuery library from the jQuery CDN, regardless of the origin of the request. Furthermore, once the resource is obtained, the external script gains total access to our document, and vice versa, making this ideal transport for JSON. Unfortunately, as you will shortly see, not all JSON values can be properly parsed when obtained via the HTML <script> element.
Listing 9-10 demonstrates grammatically valid JSON, as the content of an indicated resource located at the URL http://json.sandboxed.guru/chapter8/data/imagesA.json.
Listing 9-10. JSON Content Within imagesA.json
{
    "images": [
                {
                    "title": "Image One",
                    "url": "img/AndroidDevelopment.jpg"
                }, {
                    "title": "Image Two",
                    "url": "img/php.jpg"
                }, {
                    "title": "Image Three",
                    "url": "img/Rails.jpg"
                }, {
                    "title": "Image Three",
                    "url": "img/TSQL.jpg"
                }
    ]
}
As with our earlier jQuery inclusion, we should be able to load imagesA.json into an application as an external reference, via the script tag, as shown in Listing 9-11.
Listing 9-11. Script Tag Referencing imagesA.json
<script src="http://json.sandboxed.guru/chapter8/data/imagesA.json"></script>
Unfortunately, if we were to incorporate the code from Listing 9-11 into an HTML document and view that document in a browser, we would arrive at the following syntax error, as shown in Figure 9-12.
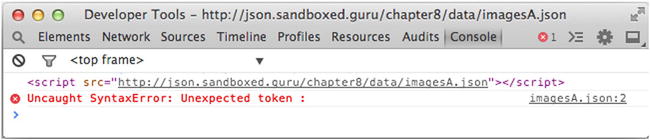
Figure 9-12. Loading /data/imagesA.json via the <script> tag results in a syntax error
The preceding error is not the result of our HTML Document loading a JSON document as an external reference but, rather, how the script engine evaluates JavaScript. Consider the more succinct JSON example being supplied to the eval function in Listing 9-12. When the following JSON is provided to the JavaScript engine, it, too, results in an error.
Listing 9-12. Supplying a JSON Collection to the Script Engine via eval
eval( '{ "test":"abc" }' ); //fails
This error occurs for no other reason than the fact that the provided content is not considered syntactically valid JavaScript. However, as explained earlier, the error is not due to the fact that we are supplying JSON. As you should recall, JSON is a subset of JavaScript. The issue simply lies in the fact that the engine favors the evaluation of statements, rather than those of expressions. According to Section 12.4, Expression Statements, of the ECMA-262 standardization:
An ExpressionStatement cannot start with an opening curly brace because that might make it ambiguous with a Block.
While this can be viewed as a setback, it is certainly not a roadblock. We simply require a way to coax the parser into seeing the provided script as an expression. Fortunately, JavaScript provides us with the operator that can manage this. That operator, of course, is the grouping operator signified by the open and closed parenthetical (( )) tokens.
![]() Note Only the initial ({ }) braces cause the parser to throw a syntax error. No other object literal suffers the same fate.
Note Only the initial ({ }) braces cause the parser to throw a syntax error. No other object literal suffers the same fate.
By wrapping our script with the grouping operator, we can inform the parser to handle the evaluation in the context of an expression. It is the padding of the parentheses for which the phrase JSON with padding refers.
By padding our object literal within the grouping operator, as seen in Listing 9-13, the script engine no longer alerts us to a syntax error. However, having crossed one hurdle, we find ourselves facing yet another.
Listing 9-13. Wrapping JSON with the Grouping Operator
eval( '( { "test":"abc" } )' ); //Successfully parsed
Once the script engine properly parses the provided JSONP, we find ourselves without a means of obtaining the parsed data. However, this can be easily overcome using the JSONP model. By preceding our JSONP with a function name, that function will be invoked upon the script’s evaluation, essentially acting as an event handler. Furthermore, the evaluated object literal, wrapped within parentheses, will be parsed into a valid JavaScript object and provide as the argument the indicated function, allowing our function to obtain the parsed JSON. The structural composition of JSONP is CALLBACK_IDENTIFIER( JSONtext );. Listing 9-14 is an example of this.
Listing 9-14. Example of the JSONP Model
someMethod({ "test" : "abc" });
As you might expect, this requires our HTML document to be in possession of a function whose identifier is equal to that of the function name prepended to our JSONP, lest the parser throw a ReferenceError, as indicated in Figure 9-13.
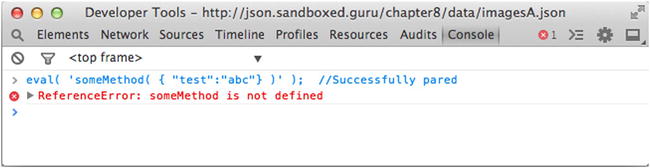
Figure 9-13. Reference error, can’t find someMethod
In Listing 9-15, the object literal, padded by the parentheses on both sides, is properly recognized by the engine as an expression and, therefore, parsed into a proper JavaScript object. From there, the evaluation is provided to the indicated function as the argument. Upon the invocation of someMethods, the statement(s) within the body of the function are able to reference the parsed data (line 3). In this case, the statement simply logs out the test key, resulting in abc being sent to the developer console.
Listing 9-15. Invocation of the Method Evaluated, and the Provision of a JSON Argument
1 eval( 'someMethod( ({ "test" : "abc" }) )' );
2 function someMethod(data){
3     console.log(data.test);  //abc;
4 }
It is the function name that forges the contract between the provider of the JSONP and the client that seeks to make use of it. This is an important fact, because if the name is defined statically, it reduces the interoperability among applications. Therefore, to keep the method name from conflicting with any application, the JSONP model requires that the resource allow the client of the request to define the name of the function that will precede the JSONP.
The manner by which the client informs the server to the preferred callback is quite simple. The client appends a jsonp query string parameter to the targeted URL and assigns its value the name of the function to invoke (see Listing 9-16).
Listing 9-16. JSONP Request
1 <script>
2    var test=function(data){
3        //do something with data here.
4    }
5 </script>
6 <script src='http://json.sandboxed.guru/chapter9/data/jsonp.php?jsonp=test'></script>
Listing 9-16 declares a function, which will operate on a supplied piece of data and assigns it to the variable test (line 1), where it can be referenced later. Next, utilizing the script tag (line 6), we make a request to our JSONP resource and append to it the jsonp parameter, whose value is that of the preferred function to invoke upon the evaluation of the received script.
Now, while Listing 9-16 accounts for the front end, the resource must account for the supplied parameter. Once again, any server-side language can manage this easily enough. I, however, will demonstrate the code as it appears in PHP (see Listing 9-17).
Listing 9-17. Fulfillment of JSON or JSONP, Pending the Provision of the jsonp Parameter
1 <?php
2 header('Content-Type: application/javascript'),
3 $callback = (isset($_GET["jsonp"])) ? $_GET["jsonp"] : "";
4 $JSONtext = ’{
       "images": [
           {
               "title": "Image One",
               "url": "img/AndroidDevelopment.jpg"
           }, {
               "title": "Image Two",
               "url": "img/php.jpg"
           }, {
               "title": "Image Three",
               "url": "img/Rails.jpg"
           }, {
               "title": "Image Three",
               "url": "img/Android.jpg"
           }
           ]
       }’
5 echo $callback . '(' .$JSONtext. ');';
6 ?>
Listing 9-17 reveals the PHP code for the requested URI: http://json.sandboxed.guru/chapter9/data/jsonp.php. For the most part, the content within can be recognized as the imagesA.json from Listing 9-10. However, the lines that appear in bold have been added to serve JSONP. The script begins by properly indicating the header of the response. As the body of the response is no longer JSON, but rather JavaScript, we must ensure that clients treat the body as JavaScript. Therefore, we set the Content-Type to application/javascript (line 2). Next, utilizing the parameters of the URL, we determine if the key labeled jsonp has been provided. If it has indeed been set, we assign its value to a variable labeled $callback. If the jsonp parameter is not present with the GET request, we assign an empty string to said variable (line 3). Next, to keep the code clean for review, I assign the intended JSON text to a variable labeled $JSONtext (line 4). This value will later be padded with parentheses and a possible callback identifier. Last, using PHP’s concatenation operator ., we join the provided callback with that of our padded JSON and output the final representation as the response of the request (line 5).
While Listing 9-16 demonstrates the implementation of a <script> element, along with a collaborating function to receive JSONP, the fact that they were defined at design time results in the immediate request, upon the execution of the HTML document. However, this may not always be the desired effect. Utilizing JavaScript, we can resort to script tag injection, thereby obtaining the results at a time of our choosing.
When an HTML document is opened within the browser, the parser scans from the top down the markup of the document for any tags that reference external content. For each <img>, <style>, or <script> encountered that may reference an external resource, an HTTP request is initiated. This, however, is not always the desired effect.
Dynamic script tag injection is a technique that relies on JavaScript to configure an HTML <script> element at runtime. By creating said tag on the fly, the tag remains absent from the markup, which prevents a resource from being fetched prematurely. Yet, at a point of our choosing, we can insert the configured tag into the body of the document, thereby initiating a request for the indicated JSONP resource. The necessary code to achieve this on demand behavior can be viewed in Listing 9-18.
Listing 9-18. Dynamic Script Tag Injection
1 function getScript(url){
2 var script = document.createElement("script");
3     script.src=url;
4     document.getElementsByTagName('head')[0].appendChild(script);
5 }
6 getScript('http://json.sandboxed.guru/chapter9/data/jsonp.php?jsonp=someMethod'),
Listing 9-18 reveals a function that, when invoked, is responsible for the creation, configuration, and the injection of a script tag within the document of the application being run. The code solely responsible for the dynamic script tag injection has been encapsulated within the getScript function, so that we can generate any number of scripts through a single endpoint (line 1). Furthermore, to account for any possible URL to be supplied as the resource of the request, the getScript function accepts a URL as a parameter.
Upon an invocation, we utilize the createElement method of the document object to create an HTML element of our choosing. As the tag we require is that of a script element, we provide script as the parameter and assign the returned element to a variable labeled script (line 2). Utilizing the script reference, we supply the URL argument as the referenced source via the src attribute (line 3). From there, we utilize the document object to obtain a reference to the HTML <head> element, whereby we will insert our newly crafted HTML <script> element. Last, to generate a dynamic tag and trigger our resource to be loaded, we invoke getScript and supply to it our JSONP URL. By using JavaScript to inject a script tag into our markup, we have more control over when the resource is loaded. The invocation can be the result of an event, such as a button click.
While getScript makes loading JSONP resources on demand a simple task, there are many available libraries, such as jQuery, that extend the code even further, so that it’s possible to provide anonymous functions for invocation upon the evaluation of the indicated JSONP request. Such a function that enables this type of behavior can be viewed in Listing 9-19.
Listing 9-19. Dynamic Script Tag Injection with Anonymous Callback Behavior
 1 var getJSONP = (function () {
 2  jsonp_callbacks={};
 3  return function(url, fName, callback) {
 4      scriptNode = document.createElement('script'),
 5      scriptNode.setAttribute('type', 'text/javascript'),
 6      scriptNode.src = url + '?jsonp=' + encodeURIComponent('jsonp_callbacks["' + fName +         '"]'),
 7      jsonp_callbacks[fName] = function (data) {
 8          delete jsonp_callbacks[fName];
 9          callback(data);
10      };
11      document.body.appendChild(scriptNode);
12  };
13 }());
14 getJSONP('http://json.sandboxed.guru/chapter9/data/jsonp.php', 'callback', function    (data) {
15     console.log(data);
16 });
Summary
This chapter pointed out three techniques that can be used to initiate cross-origin requests that fulfill the interchange of JSON. As was indicated, the majority of front-end code remains unchanged. However, it does require a slight amount of modification, with regard to requesting a JSONP resource. In contrast, it will be the onus of the server administrator to configure a resource to be made available to a cross-origin request.
With the conclusion of this chapter, you should find yourself one step closer toward being able to harness the full power of JSON. In the next chapter, we will install and work with Node.js, a platform built on Chrome’s JavaScript runtime, so that you can host your own local web server, which can be used to receive, store, retrieve, and transmit JSON, utilizing the configurations required of each of the tactics discussed in this chapter.
The wonderful news is that because Node.js works entirely on the V8 JavaScript engine, you won’t be asked to follow along with a language that you might not be used to.
Key Points from This Chapter
- The same-origin policy (SOP) is the security model adhered to by all user-agents.
- The SOP governs a variety of front-end securities.
- The SOP restricts network messages between varying origins.
- SOPs vary according to the degree by which they are enforced between different technologies.
- Use the in operator to test whether the widthCredentials attribute exists on the xhr instance.
- Cross-network errors can be corrected by moving the resource to the same domain as the source origin, or by enabling Cross-Origin Resource Sharing (CORS).
- A domain and its subdomain are not considered authorized by default.
- Origins are considered similar if they possess the same scheme, port, and domain.
- The port address for HTTP is 80, while that for HTTPS is 443
- Certain headers are unable to be altered via setRequestHeader.
- SOPs can be circumvented via server-side programming.
- The Access-Control-Allow-Origin header is required to fulfill “simple” requests from varying origins.
- If a request is not simple, it requires “preflight.”
- Simple requests use GET, POST, or Head and are limited to four white-listed headers.
- The simple header Content-Type can only be configured as application/x-www-form-urlencoded, multipart/form-data, or text/plain.
- CORS headers can only be used with user-agents that conform to the algorithms of the CORS specification.
- JSONP is JSON wrapped in parentheses and preceded by a function name.
- The client request specifies the function name via the jsonp query parameter.
- The SOP does not govern requests of externally referenced content via <script>.
- An ExpressionStatement cannot start with an opening curly brace.
- A server proxy forwards an authorized request to a remote server.
_________________
1What’s My User Agent, “What’s a User Agent String,” www.whatsmyuseragent.com/WhatsAUserAgent, 2015.
2World Wide Consortium (W3C), “Cross-Origin Resource Sharing,” www.w3.org/TR/cors/#resource-sharing-check, January 16, 2014.
3Adam Barth, Internet Engineering Task Force (IETF), “The Web Origin Concept,” www.ietf.org/rfc/rfc6454.txt, 2011.