
![]()
Posting JSON
As should be evident by now, a server has the ability to provide a tailored response to best match the indicated method, resource, and the configured headers of an incoming request. This protocol, when paired with static content, can be utilized by the server software to translate an incoming request into a location for said resource located on its file system. The specified path of the resource is translated via the server software into that of a determined directory, for which a file is thought to exist. The response is either the content of the file or a 404 page.
Similarly, the very same protocol, when paired with a dynamic programming language (such as PHP, .NET, or Java), provides cooperating developers a means of incorporating web services. Such services can be used to persist, update, and retrieve existing data. The difference, per the HTTP/1.1 Specification,1 lies with the particular method of the request. In this chapter, I will focus on the use of the POST method to provide an entity body to our Node application.
Request Entity Body
There are two sets of HTTP request methods: those that are considered safe, and those that are considered unsafe. Generally speaking, safe methods merely retrieve a resource, whereas unsafe methods seek to provide data with an HTTP request. This resource is referred to as a payload. The payload itself may be as complex as a file or as simple as an e-mail address. However, once this information is received, it is often written to a database for later retrieval.
While the preceding sentence may make immediate sense, what might not be so obvious is that without the use of a server-side code to receive and process the incoming payload, the entity provided to a server would serve little to no use. However, once that data is received and handled appropriately, its usefulness is limited to our imaginations and business goals or, as seen in the case of Twitter or Facebook, your fan base.
With the proxy example from the previous chapter, you learned that in order to obtain the payload of an IncomingMessage object, we must consume it via the inherited interface of the stream object. This is accomplished, as demonstrated in Listing 11-1, by attaching an event listener to the incoming request instance, in order to monitor the stream for a data payload. Furthermore, by pairing the listener with a callback capable of receiving incremental chunks of data as an argument, we can consume data from the stream as it is received.
Listing 11-1. Monitoring the Stream for Data
1 function requestHandler(request, response) {
2    request.addListener('data', function(chunk) {
3                //do something with data chunk
4                });
     //...truncated
8 }
Depending on the format of the payload, whether it’s in binary or ASCII, our application may begin to utilize the individual chunks as they enter it. Additionally, by monitoring the stream for the end event, our application can be made aware of when there is no further data to be consumed from the stream, as demonstrated in Listing 11-2.
Listing 11-2. Monitoring the Stream for the end of Data
1 function requestHandler(request, response) {
     //...truncated
5    request.addListener(end, function() {
6                    //stream no longer has data
7                });
8 }
The preceding lines of code, outlined in bold in both Listing 11-1 and 11-2, are essential for obtaining an entity body from an incoming request. However, the actual implementation of code that is utilized within the body is dependent on the needs of the application. Whether the incoming data chunks are immediately parsed or amassed until the stream is drained is a matter of your application’s needs and data expectancies. Furthermore, how the data is parsed is absolutely dependent on the Content-Type of the incoming payload. While GET requests can only provide data in the URL-encoded format, POST requests can supply data in a variety of formats. Such formats are the following: multipart/form-data, application/x-www-form-urlencoded, application/xml, text/xml, application/json, and more.
![]() Note In order to recognize how to parse the incoming information accordingly, it will be helpful to utilize the Content-Type header held by the incoming request via the following snippet: if(request.headers['content-type'].indexOf(substring-to-match-here)>-1){ //condition block }.
Note In order to recognize how to parse the incoming information accordingly, it will be helpful to utilize the Content-Type header held by the incoming request via the following snippet: if(request.headers['content-type'].indexOf(substring-to-match-here)>-1){ //condition block }.
HTML Form POST
As a front-end developer, it is likely that you have previously used the standard HTML <form> element to POST data to a server. The <form> element provides a convenient and standard way for a user to supply data via a series of semantic components, such as input fields, check boxes, radio buttons, etc., to a web service that is capable of processing the supplied information on the server.
In order to demonstrate a form POST, we must first devise the HTML markup that can be returned as a resource by our Node application. Listing 11-3 demonstrates the markup that will be provided to any incoming requests for the following resource /index.html.
Listing 11-3. An HTML Form POST
1   <!doctype html>
 2   <html lang="en">
 3   <head>
 4       <meta charset="utf-8">
 5   </head>s
 6   <body>
 7       <form action="formPost" method="POST" content="application/x-www-form-urlencoded">
 8           First-Name: <input name="fname" type="text" size="25"/>
 9           Last-Name: <input name="lname" type="text" size="25"/>
10           <input type="submit"/>
11        </form>
12    </body>
13    </html>
The preceding code should not come as a surprise to you, as this is standard HTML markup. The only five lines that we should discuss are those that make up our form. We use the HTML <form> element not only to declare the container, which will hold relevant form elements, but also to configure key aspects of the request (line 7). The attribute labeled “action” defines the target resource for which the method is enacted. In this case, I have set the resource to that of formPost. The second attribute, labeled “method,” defines the method to be used on the request. This can be a method such as GET or POST, but in this case, we will specify POST. These two attributes will be used in conjunction to make up the request line of our HTTP request.
Last, utilizing the attribute labeled “content,” we specify the Content-Type of the data accompanying the request. While there are many possible Content-Types in existence, only three possible values can be applied to an HTML form. These three Content-Types are the following: application/x-www-form-urlencoded, multipart/form-data, and text/plain.
![]() Note If a form is not configured with the content attribute, the Content-Type that will be used will be that of application/x-www-form-urlencoded.
Note If a form is not configured with the content attribute, the Content-Type that will be used will be that of application/x-www-form-urlencoded.
The next two lines (line 8 and line 9) simply define the input fields that will be used to capture an individual aspect of data. Utilizing the attribute labeled “name,” we can establish the key that is used to transport the supplied value. As this form will capture a user’s first and last name, I have used fname and lname as the respective keys. Next, we assign the value text to the type attribute. This will identify the input field as requiring user input, so that the browser renders it accordingly.
Last, in order to invoke the submission of the data, we must include a Submit button (line 10). This is simply achieved by utilizing yet another input field. However, as you may expect, this input field’s type attribute is supplied with that of submit. This will inform the browser to render this input field as a button. Upon the user’s click of the button, it will prompt the form to initiate the request.
EXERCISE 11-1. YOUR FIRST NODE FORM POST
ExerciseA.js has begun to incorporate the HTML document from Listing 11-3 into the appropriate conditional block. Continue to supply the remaining ten lines of markup to the following code (Listing 11-4) to complete our index.html resource.
Listing 11-4. ExerciseA.js, a Local Form POST Application
1 var http = require('http'),
2 var server = http.createServer();
3 server.addListener('request', requestHandler);
4 server.listen(1337, '127.0.0.1'),
5 function requestHandler(request, response) {
6 console.log( request.url);
7 request.addListener('data', function(chunk) {
8 console.log(chunk);
9 });
10 request.addListener("end", function() {
11 console.log("end of stream
");
12 });
13 if(request.url==="/index.html"){
14 response.statusCode = 200;
15 response.setHeader("Content-type", "text/html");
16 response.write('<!doctype html>'),
17 response.write('<html lang="en">'),
18 response.write('<body>'),
//... add code here;
28 }else{
29 response.statusCode=204;
30 }
31 response.end();
32 };
33 console.log('Server running at http://127.0.0.1:1337/index.html'),
Once the document has been incorporated into exerciseA.js, use the command-line interface to initiate our server. With the server running, navigate to http://127.0.0.1:1337/index.html, fill in the form with your first and last name, hit Submit, and take note of the data outputted to the command-line window.
If your name coincidently happens to be Ben Smith, then you should have witnessed the following output as shown following:
Server running at http://127.0.0.1:1337/index.html

/index.html
end of stream

/favicon.ico
end of stream

/formPost
<Buffer 66 6e 61 6d 65 3d 42 65 6e 26 6c 6e 61 6d 65 3d 53 6d 69 74 68>
end of stream
For those whose names are not the equivalent, you should witness something very close to what has been shown in the preceding code. In fact, the data shown in bold is present in your output as well. Let’s examine the output in detail, to gain a better understanding of what is occurring.
The moment our server is initialized, our console first outputs a reminder of the URL and PORT, for which our server is running. Additionally, to remind ourselves that we must request the index.html to be presented with our form, I have chosen to include it within the initial output.
By navigating to the URL that is outputted, we arrive at our HTML form. Because the exerciseA application logs each requested resource, the line that immediately follows is /index.html. While that should make sense, what might not be clear are the next three lines.
Following the output of our /index.html request, a message informs us that we have reached the end of our stream. This might be confusing, as you may have expected the end event to fire only after we had submitted our form. However, the reality is that our Node application has been written to monitor for incoming data with each incoming request. As the request for our index.html page was not accompanied by any data what so ever, as the stream is empty, the end event naturally fires. This check happens needlessly for every single incoming request and is made evident with each subsequent request.
The next line is one I wanted to discuss because it often confuses a lot of Node newcomers. Often, when debugging code, newcomers are curious as to why their code appears to fire multiple times after receiving an HTML document. The reason is that user-agents initiate a request that is not apparent to the end user. That request is for the icon that appears in the browser’s window tab for the displayed HTML Document. This is known as the favicon and is a 16×16 image that can be used as the icon that will identify your page should someone choose to bookmark it. An example of a favicon can be seen in Figure 11-1. As this is yet another incoming request on our server, the messaging end of stream follows. Lastly, as initiated by the submission of our form, an incoming request for /formPost is outputted to our console.

Figure 11-1. Microsoft favicon
![]() Note So as not to cause added throughput on our server, an application should only attempt to consume data from the stream of a client the requested method has determined to be an unsafe method, such as POST.
Note So as not to cause added throughput on our server, an application should only attempt to consume data from the stream of a client the requested method has determined to be an unsafe method, such as POST.
Following the output of said resource appears to be a sequence of alphanumeric characters. To keep things as simple as possible, I can assure you this is not gibberish but, rather, hexadecimal format. I won’t go into too much detail, but, ultimately, each grouping of characters represents an alphanumeric character. In the preceding output, 66 represents f, 6e represents n, 61 represents a, etc. If I were to continue to explain the next three values, you would be able to recognize the gibberish is actually spelling out “fname=.”
While reading hexadecimal is far better than reading binary, it is absolutely no substitute for plain text. Therefore, let’s shut down our current server and modify the buffer to output plain text. This is accomplished by defining the encoding via the setEncoding method exposed on our request instance. The code, request.setEncoding('utf8'),, defaults all incoming data as UTF-8. At this point in time, let’s shut down our server and incorporate this line of code just before our data event listener. Once this code is in place, restart our exerciseA application and perform a form POST once again. This time, you should observe the following output:
//..truncated output
fname=Ben&lname=Smith
end of stream
Congratulations! You have received your first HTML form POST. As you can clearly read from the output, the entity body is provided in the form of a key/value pair, similar to that of a GET. The notable difference is that the data is not preceded by the ? token. As we have been working rather extensively with key/value pairs, it should be a cinch to extract our data values from their keys, utilizing our getParamKey function from the previous chapter. Once again, let’s shut down our server and incorporate the getParamKey function, shown in Listing 11-5, into our existing server.
Listing 11-5. The getParamKey Function
function getParamKey(key, str) {
    var regExp = new RegExp(key.toLowerCase() + '=[^&]*'),
    var matchingValue = (str.toLowerCase()).match(regExp);
    for (var i = 0; i < matchingValue.length; i++) {
        var replacedValue = matchingValue[i].replace(key + '=', ''),
        matchingValue[i] = replacedValue;
    }
    return decodeURIComponent(matchingValue[0]);
};
The incorporation of getParamKey will enable us to extract the values for the supplied keys that make up the entity body. For the form POST we have been working with, those keys are fname and lname. By providing these identifiers along with the received data chunk to getParamKey, we can easily obtain their values. At this point in time, let’s shut down our currently running server and insert the necessary code required to log out the value for our two variables, by tapping into the getParamkey function. Once you have implemented the code that would result in Listing 11-6, restart the server, use the form to submit your name once again, and observe the results.
Listing 11-6. Parsing x-www-form-urlencoded Data
var http = require('http'),
var server = http.createServer();
server.addListener('request', requestHandler);
server.listen(1337, '127.0.0.1'),

function requestHandler(request, response) {
  console.log(request.url);
  request.setEncoding('utf8'),
  request.addListener('data', function(chunk) {
      console.log(getParamKey("fname", chunk));
      console.log(getParamKey("lname", chunk));
  });
  request.addListener("end", function() {
      console.log("end of stream

");
  });

  if(request.url === "/index.html") {
    response.statusCode = 200;
    response.setHeader("Content-Type", "text/html");
    response.write('<!doctype html>'),
    response.write('<html lang="en">'),
    response.write('<body>'),
    response.write('<form action="formPost" method="POST" content="application/x-www-form-urlencode">'),
    response.write('First-Name:'),
    response.write('<input name="fname" type="text" size="25"/>'),
    response.write('Last-Name:'),
    response.write('<input name="lname" type="text" size="25"/>'),
    response.write('<input type="submit"/>'),
    response.write(' </form>'),
    response.write(' </body>'),
    response.write('</html>'),
  } else {
      response.statusCode = 204;
  }
   response.end();
};

function getParamKey(key, str) {
    var regExp = new RegExp(key.toLowerCase() + '=[^&]*'),
    var matchingValue = (str.toLowerCase()).match(regExp);
    for (var i = 0; i < matchingValue.length; i++) {
        var replacedValue = matchingValue[i].replace(key + '=', ''),
        matchingValue[i] = replacedValue;
    }
    return decodeURIComponent(matchingValue[0]);
};
console.log('Server running at http://127.0.0.1:1337/index.html'),
Running the preceding code, should no errors be present, will have undoubtedly outputted the values that had been supplied to both input fields. Now that we have this extracted information, we could potentially alter the data of the response or even store the supplied information within a database. You will learn more about persisting data via back-end programming in the next chapter.
While forms are a convenient way for a visitor to supply a few fields of basic information, such as first name and last name, the possible Content-Types that can be used with a form lack the ability to maintain the structure of data such as that of JSON. However, in order to transmit the JSON data type, we will have to leverage an XMLHttpRequest object.
As has been stated throughout this book, JSON is a highly interoperable data format with many advantages. It can easily be read by humans; it is succinct, thereby keeping file size to a minimum; it can group as well as retain the structure of data; and, as a text-based format, JSON can be stored/retrieved and parsed without degrading its integrity. Of course, to utilize this functionality, our server-side application must possess the ability not only to obtain any and all incoming JSON but to parse it as well. In order to keep things backward compatible, we will build upon our code base from exerciseA. This way, if a visitor has JavaScript enabled, the data contents will be provided to our server via Ajax as JSON. However, if the user does not have JavaScript enabled, our form will continue to work as intended in the URL-encoded data format, via a full-page load.
As was stated earlier, an HTML form element can only send one of three Content-Types, and JSON is not one of them. Therefore, in order to send JSON, we must leverage our acquired knowledge of Ajax. Listing 11-7 reveals the ajax function that was discussed in Chapter 8. For the most part, the ajax function remains unchanged, with the exception that the request line has been updated to reflect the new formPost resource.
Listing 11-7. Progressively Enhancing Our HTML Form with Ajax
<script>
 function ajax() {
     var xhr = new XMLHttpRequest();
     xhr.open("POST", "formPost");
     xhr.setRequestHeader("Content-Type", "application/json");
     var input = document.getElementsByTagName("input");
     var obj = {
         fname : input[0].value,
         lname : input[1].value
     };
     xhr.send(JSON.stringify(obj));
   return false;
 }
</script>
If you recall from Chapter 8, we used the preceding function to POST two HTML form fields, First Name and Last Name, to a server, using the application/json Content-Type. Obtaining the values directly from the input fields, and then adding them as the members of an object, which was immediately serialized, accomplished this. The form, with the use of its onsubmit attribute, invoked the ajax function when its Submit button was clicked.
If you are following along with the source code provided for Chapter 11, locate the json-form.js file. This file incorporates the ajax function, shown in Listing 11-7, along with a few additional code amendments. One such amendment is the assignment of our function as the value of the form’s onsubmit attribute: <form action="formPost" method="POST" onsubmit="return ajax();">.
Furthermore, as this application will be used to demonstrate the reception of JSON, rather than our previous key/value pairs, I have incorporated a means to isolate the values for fname and lname in a manner befitting of JSON. Because our Node application is written entirely in JavaScript, I have merely incorporated the use of JSON.parse, as shown in Listing 11-8. In order to distinguish the x-www-form-urlencoded format from that of incoming JSON, we will incorporate conditions that determine whether a particular Content-Type exists as a substring of request.headers['content-type'].
![]() Note The implementation of the ajax function progressively enhances the capability of our form to transmit the captured data of a user via Ajax, without impairing the experience for those visitors who may have JavaScript turned off.
Note The implementation of the ajax function progressively enhances the capability of our form to transmit the captured data of a user via Ajax, without impairing the experience for those visitors who may have JavaScript turned off.
Listing 11-8. Determining the Content-Type of Incoming Data
request.addListener('data', function(chunk) {
  if(request.headers['content-type'] ].indexOf('application/json')>-1){
    var json=JSON.parse(chunk);
    console.log(json.fname);
    console.log(json.lname);
  }else if(request.headers['content-type'].indexOf('application/x-www-form-urlencoded)>-1){
  }
});
Be sure to shut down any Node applications that you may have running, and start up json-form. When you navigate to http://127.0.0.1:1337/index.html, you should not witness any visual differences, as we have not altered our form, only the format for which it is supplied. This time, when you submit the form, the output displayed in the command-line interface should resemble that of Figure 11-2.
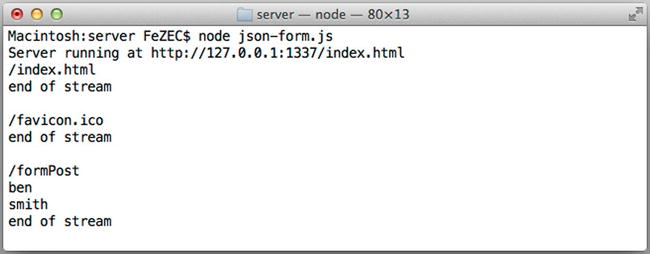
Figure 11-2. Logging out end of stream when all data has been consumed
As clearly illustrated in Figure 11-2, the fields of our data have been successfully parsed and individually outputted. Congratulations, you have parsed your first, albeit simple, JSON POST! Before you begin your celebration dance, I do wish to point out one thing. In our json-form application, in addition to our exercise application, we were attempting to parse the incoming data before we had reached the end of the stream, as illustrated in Figure 11-2. While this is not a problem for these two simple examples, we could easily run into issues when the incommoding data is extremely large. As you witnessed in the previous chapter, the data event is capable of firing multiple times, each time supplying more data to our application. In that particular example, the file that was being transferred was 1.5MB in size.
As the data being transmitted to our application within this chapter is minimal, there is no need to expect the data event to fire multiple times. However, this might not always be the case. Therefore, in order to ensure that we have received every last chunk of incoming data before attempting to parse it, we should accumulate all incoming data onto a variable (see Listing 11-9). Only once the end event has fired should our application attempt to parse our data.
Listing 11-9. Retaining All Incoming Data onto a Variable
1 function requestHandler(request, response) {
2     console.log(request.url);
3     console.log(request.headers);

4     var incomingEntity = '';
5     request.setEncoding(‘utf8’);
6     request.addListener('data', function(chunk) {
7         incomingEntity += chunk;
8       });

9      request.addListener("end", function() {
10         console.log("end of stream
");
11         console.log(incomingEntity);
12         if (request.headers['content-type'].indexOf("application/json") > -1){
13             //handle JSON payload
14         }else if(request.headers['content-type'].indexOf("application/x-www-form-urlencoded")> -1){
15             //handle x-www-form-urlencoded payload
16         }
17     });
18    if (request.url === "/index.html") {
19        response.statusCode = 200;
20        response.setHeader("Content-type", "text/html");
21        //...truncated code
22    } else {
72        response.statusCode = 204;
73        response.end();
74   }
75  }
76 console.log("response-end");
Listing 11-9 demonstrates the use of a variable labeled “incomingEntity,” which will be used to retain all incoming chunks of data. Because UTF-8 is a text-based format, we can use string manipulation to join incoming chunks of data together. However, we will not attempt to read said data until we are certain we have received it all. Once the end event is dispatched, we can safely log, parse, or inspect the accumulated data retained by an incoming entity.
EXERCISE 11-2. INCOMING ENTITY BODY
In order to minimize the amount of code used within the preceding sections, our server has neglected to respond to any request for /formPost. Instead, we have been informing the browser, via the 204-status code, that the resource being requested is without content. However, now that we have the ability to parse the information as it enters, let’s output, as the response, the full name received.
Because our existing form has been enhanced utilizing JavaScript, it is certain that visitors who do not have JavaScript enabled will require a proper response to be provided in the HTML format. This, of course, will result in a full-page load. However, for those individuals who do have JavaScript enabled, we should continue to provide them with JSON.
Be sure to check the responses from the application via the Network tab of the developer console, with JavaScript both turned on as well as off. Compare your results with Listing 11-10.
Regardless of whether JavaScript is enabled or disabled, our exercise application, whose code should reflect that of Listing 11-10, is capable of properly parsing the payload provided. Furthermore, the application responds with a corresponding Content-Type, which enables the results to be viewed by our visitor, regardless of whether JavaScript is on or off.
Listing 11-10. Answer to Exercise/Incoming Entity Body
1 var http = require('http'),
2 var server = http.createServer();
3 server.addListener('request', requestHandler);
4 server.listen(1337, '127.0.0.1'),
5 function requestHandler(request, response) {
6 console.log(request.url);
7 if (request.method === "POST") {
8 var incomingEntity = '';
9 var data;
10 request.addListener('data', function(chunk) {
11 incomingEntity += chunk;
12 });
13 request.addListener("end", function() {
14 console.log("end of stream
");
15 console.log("Raw entity: " + incomingEntity);
16 if (request.headers['content-type'].indexOf("application/json") > -1){
17 data = JSON.parse(incomingEntity);
18 if (request.url === "/formPost") {
19 response.statusCode = 200;
20 response.setHeader("Content-Type", "application/json");
21 response.end(incomingEntity);
22 }
23 }else if(request.headers['content-type'].indexOf("application/x-www-form-urlencoded")>-1){
24 if (request.url === "/formPost") {
25 response.statusCode = 200;
26 response.setHeader("Content-Type", "text/html");
27 var fname = getParamKey("fname", incomingEntity);
28 var lname = getParamKey("lname", incomingEntity);
29 response.write('<!doctype html>'),
30 response.write('<html lang="en">'),
31 response.write('<body>'),
32 response.write('</span>' + fname+ ’ ‘ +lname +'</span>'),
33 response.write('</body>'),
34 response.end();
35 return;
36 }
37 }
38 });
39 } else if (request.method === "GET") {
40 if (request.url === "/index.html") {
41 response.statusCode = 200;
42 response.setHeader("Content-Type", "text/html");
43 response.write('<!doctype html>'),
44 response.write('<html lang="en">'),
45 response.write('<body>'),
46 response.write('<form action="formPost" method="POST" onsubmit="return ajax();"
content="application/x-www-form-urlencoded">'),
47 response.write('First-Name:'),
48 response.write('<input name="fname" type="text" size="25"/>'),
49 response.write('Last-Name:'),
50 response.write('<input name="lname" type="text" size="25"/>'),
51 response.write('<input type="submit"/>'),
52 response.write('</form>'),
53 response.write('<script>'),
54 response.write('function ajax(){'),
55 response.write('var xhr = new XMLHttpRequest();'),
56 response.write('xhr.open("POST", "formPost");'),
57 response.write('xhr.setRequestHeader("Content-Type", "application/json");'),
58 response.write('xhr.setRequestHeader("Accept", "application/json");'),
59 response.write('var input = document.getElementsByTagName("input");'),
60 response.write('var obj = {'),
61 response.write('fname : input[0].value,'),
62 response.write('lname : input[1].value'),
63 response.write('};'),
64 response.write('xhr.send(JSON.stringify(obj));'),
65 response.write('return false;'),
66 response.write('}'),
67 response.write('</script>'),
68 response.write(' </body>'),
69 response.write('</html>'),
70 response.end();
71 } else {
72 response.statusCode = 204;
73 response.end();
74 }
75 console.log("response-end");
76 };
77 function getParamKey(key, str) {
78 var regExp = new RegExp(key.toLowerCase() + '=[^&]*'),
79 var matchingValue = (str.toLowerCase()).match(regExp);
80 for (var i = 0; i < matchingValue.length; i++) {
81 var replacedValue = matchingValue[i].replace(key + '=', ''),
82 matchingValue[i] = replacedValue;
83 }
84 return decodeURIComponent(matchingValue[0]);
85 };
86 console.log('Server running at http://127.0.0.1:1337/index.html'),
As it stands now, our application possesses the ability to handle two varieties of incoming payloads. This, of course, can always be enhanced to further handle even more. The code, as it stands now, can only satisfy incoming payloads from the same origin, and not simply because our code neglects to configure the Access-Control-Allow-Origin header. Rather, our code neglects to satisfy a user-agent’s preflight request.
Preflight Request
As you may recall from Chapter 9, while our application is able to receive communications from other servers, the user-agents of modern browsers will interfere with most client requests when they are made from varying source origins. Previously, we discussed how user-agents prohibit our applications from receiving a response provided by a server located at originA from being obtained by a client request from originB, due to the same-origin policy (SOP).
In Chapters 9 and 10, you learned how to circumvent the SOP so that we could obtain the response. We learned of three ways in which we could successfully do so, with the simplest of all techniques being the inclusion of the Access-Control-Allow-Origin header. While the aforementioned header has the ability to authorize the source origin, thereby allowing the client to obtain a proper response, the Access-Control-Allow-Origin header alone is not responsible for authorizing an HTTP POST from varying origins.
As explained earlier, GET requests are considered safe methods because they generally fetch a resource. I state generally because, as you have seen earlier, an application can be programmed to do as it sees fit. However, per the specification, GET requests do not incur side effects such as that of a POST method. Therefore, the only matter at hand is whether or not the source origin is authorized to receive the resource provided, which, of course, is determined with the Access-Control-Allow-Origin header.
On the other hand, a method such as POST is considered an unsafe method. This means that it can cause side effects on the server and even the response. Therefore, the user-agent can’t shoot first and then ask for authentication later. In other words, the user-agent can’t simply allow the request to occur and then determine if the source origin has proper authorization before returning the response. Instead, it must first proceed with what is referred to as a preflight request.
Preflight is a term that is defined by Webster as “preparing for or preliminary to flight.”2 As you may have guessed, preflighting is a term that originated in the aviation industry and represents a series of checks and tests that are conducted by the pilot preflight, to ensure that it will be a safe and successful one. Generally speaking, the use of preflight is to determine the risks, if any exist. While the term certainly better suits aircrafts than Ajax, the process of preflighting reduces the likelihood of irreparable damage that could otherwise take place by blindly allowing an unsafe request to occur.
In order to preflight our request, the user-agent acts sort of like a bouncer at a club—checking everybody’s identification and comparing them against the club’s rules and regulations. Such rules may be the maximum number of total occupants, in addition to minimum age restrictions. Should all club criteria be met, the bouncer allows a patron to enter the premises. Otherwise, the bouncer turns them away, forcibly, if need be.
As discussed previously, HTTP headers are used to facilitate the request/response between the client and the server. However, in the case of preflight, our bouncer, the user-agent, utilizes headers to determine if the server has any rules that may prevent an unsafe request from entering, by preceding our actual request with that of another, as depicted in Figure 11-3.
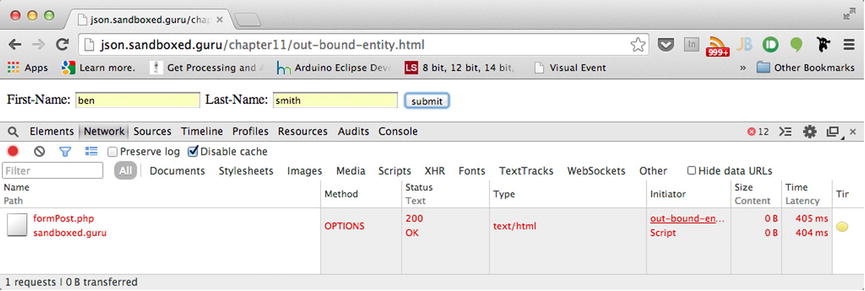
Figure 11-3. An unauthorized preflight request
Figure 11-3 demonstrates the necessary preflight request and its use of the OPTIONS request method.
The request method OPTIONS, as outlined in the original 1999 HTTP/1.1 specifications, can be used to determine the options and/or requirements associated with a given resource. Additionally, it can be used to reveal the capabilities of a server. Furthermore, the request receives such information without implying any action to be performed on the specified resource. Therefore, it will not initiate the retrieval of said resource. For this reason, OPTIONS is considered a safe method.
Generally speaking, a request for a resource utilizing the OPTIONS method reveals, by way of the configured headers, which request headers and possible request methods are capable of being used with incoming requests for the indicated resource.
As this point in time, if you are following along with the source code that accompanies this chapter, locate and run, within your browser, out-bound-entity.html. If you are not following along with this chapter’s source code, you can navigate the browser of your choice to the following URL: http://json.sandboxed.guru/chapter11/out-bound-entity.html. Upon your arrival to either the local or online version of the out-bound-entity.html resource, you will view the form shown in Figure 11-4.
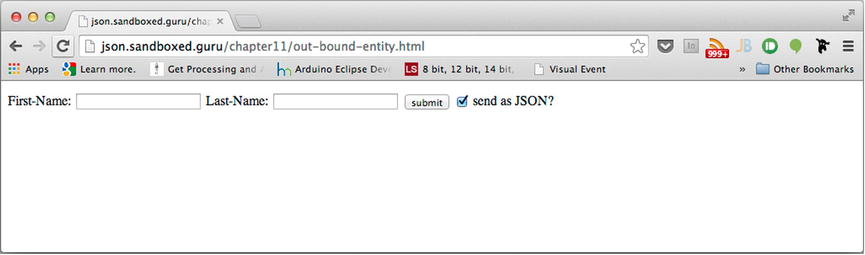
Figure 11-4. Form that makes cross-origin requests to http://127.0.0.1:1337/formPost
You may note that it’s not unlike the one used by our incomingEntityBody application. The most notable difference between this form and the previous form is the inclusion of a check box located to the right of the Submit button. In the previous exercise, I had you disable JavaScript, which caused the form post to be submitted in a different format from when JavaScript was turned on. The result is that when JavaScript was turned off, the browser parsed the response rather than the xhr object. This resulted in a new page being presented on the screen. As the source origin of the request and the response occurred from the same origin, the response appeared natural. However, this would not be the case if the form from exampleA.com resulted in a full-page reload from exampleB.com, as this would be rather apparent to the end user. Therefore, I have included this check box, which uses JavaScript to toggle between the application/x-www-form-urlencoded format and the application/json format. We will keep it checked to send as JSON for the meantime.
If you no longer have the incomingEntityBody application running, start the server once again, so that we can attempt to submit our form from a varying origin. Additionally, open the Network tab on your developer toolbar, to observe the HTTP request. Upon the submission of your form, the results, as shown in your developer toolbar, should reflect those shown in Figure 11-3. Rather than a POST occurring, an OPTIONS request takes place. In fact, our POST does not even appear in the list at all. The reason why is because the user-agent has not yet received the proper preflight authorization from the server regarding the formPost resource that would result in our request taking place. Let’s inspect the headers of the OPTIONS request that occurred.
By navigating to the “Headers” aspect within the Network tab, you should be able to review the configured headers of the preflight request. Those headers should reflect the ones that I have listed below, with the exception of the headers outlined in bold.
Access-Control-Request-Headers:  accept, content-type
Access-Control-Request-Method: POST
Cache-Control: no-cache
Origin: http://json.sandboxed.guru
Pragma: no-cache
Referer: http://json.sandboxed.guru/chapter11/out-bound-entity.html
User-Agent: Mozilla/5.0 (Macintosh; Intel Mac OS X 10_9_4) AppleWebKit/537.36 (KHTML, like Gecko) Chrome/36.0.1985.143 Safari/537.36
Of the headers listed, there are three that you might recognize from Chapter 9, which defined the headers of the CORS specifications. Those headers are Access-Control-Request-Headers, Access-Control-Request-Method, and Origin.
As you may recall, the Origin header is added by the user-agent to inform the server as to the source origin of the request, of which the server can determine whether or not to authorize the source origin, via the Access-Control-Allow-Origin header. What you may not know is that the other two headers are intended for similar use. However, rather than communicate the need for authorization among origins, they require authorization for the configured headers of our request, as well as the specified method to be enacted on the target resource.
To ensure the safety of the request, the user-agent, as per the CORS specification, extracts all headers from the actual Ajax request and configures them as a comma-delimited value for the preflight CORS-supported header Access-Control-Allow-Headers. Likewise, the request method specified in the request line of our actual request is extracted and configured as the value to yet another preflight CORS header labeled “Access-Control-Request-Method.”
Once the server receives these three headers, it is able to authorize or deny the request simply by configuring the request with the corresponding preflight CORS response headers. Those headers, as shown in Table 11-1, are the following: Access-Control-Allow-Headers and Access-Control-Allow-Methods.
Table 11-1. CORS Preflight Headers
|
Header |
Role |
Configures |
|---|---|---|
|
Access-Control-Request-Headers |
Indicates which headers will be used in the actual request |
User-Agent |
|
Access-Control-Request-Method |
Indicates which method will be used in the actual request |
User-Agent |
|
Access-Control-Allow-Methods |
Indicates, which methods can be used during the request for a targeted resource |
Server |
|
Access-Control-Allow-Headers |
Indicates which header field names can be used during the request of the targeted resource |
Server |
If, and only if, all values configured by the user-agent, are reflected in the configured values of the response will the actual request take place. Unlike the Access-Control-Allow-Origin header, which can be configured with the wildcard * token, the Access-Control-Allow-Methods and Access-Control-Allows-Headers headers must explicitly declare, in a comma-delimited fashion, all accepted header fields and methods for the identified resource.
As it stands now, we are unable to review the response within the network tab, and for good reason. Up until this moment, our incomingEntityBody application has only required the ability to respond to incoming requests that utilize GET and POST. Until we implement a response for the OPTIONS request method, the request will continue to wait for one.
Currently, the requestHandler within our incomingEntityBody application distinguishes between GET and POST methods. Depending on which request method is being used, the appropriate code block is run, resulting in the fulfillment of the request. Monitoring for the OPTIONS request is as simple as adding yet another condition, as seen in Listing 11-11.
Listing 11-11. Including the Ability to Respond to Preflight Requests
 1 //... code is truncated
 6 function requestHandler(request, response) {
 7   console.log(request.url);
 8    if (request.method === "POST") {
 9       //... code is truncated
51    } else if (request.method === "GET") {
52        //... code is truncated
88    } else if( request.method==="OPTIONS"){
89    }
90    console.log("response-end");
91 };
To keep things simple, Listing 11-11 reveals the code as it stands within incomingEntityBody, only I have condensed the areas that are not relevant to the current discussion. As you can see on lines 88 and 89, a new code block has been added to respond to any incoming OPTIONS request. Within this block, we can properly configure a response to reflect which headers and methods are allowed on either a global level or for an individual resource. For the purpose of this demonstration, we will be configuring the headers on a per-resource basis.
Listing 11-12 begins by configuring the appropriate status code that acknowledges the request was properly received (line 89). From there, we determine if the resource being requested by the client is for that of /formPost (line 90). If this is, in fact, the resource being requested, the response will be configured utilizing the appropriate CORS headers.
Listing 11-12. Demonstrating the Configuration of the Preflight CORS Headers
 88 } else if( request.method==="OPTIONS"){
 89   response.statusCode = 200;
 90   if (request.url === "/formPost") {
 91       response.setHeader('Access-Control-Allow-Origin', '*'),
 92       response.setHeader('Access-Control-Allow-Headers', 'Content-Type, Accept,
                             Accept-Language, Accept-Encoding, User-Agent, Host,
                             Content-Length, Connection, Cache-Control'),
 93       response.setHeader("Access-Control-Allow-Methods", 'GET, POST, OPTIONS'),
 94  }
 95  response.end();
 96 }
The first configured header is used to authorize the source origin. The second configured header is used to inform the user-agent of any and all headers that are authorized for the following resource. As you can see, each header field that our resource requires must be added to the Access-Control-Allow-Headers header. These configured values may regard valid HTTP/1.1 headers in addition to custom headers. In this case, I have configured the values with typical fields (line 92). These configured fields for the Access-Allow-Request-Headers header can certainly possess more that what I have listed. The third configured header regards the authorized methods that can enact upon the targeted resource. As this book only considers three HTTP/1.1 methods, GET, OPTIONS, and POST, I have provided all three (line 93).
Last, regardless of which resource is requested, we submit the response, as it is currently configured, and conclude the incoming request (line 95). Upon the reception of the response, the user-agent will compare and contrast its configured headers with those returned by the server.
CORS Preflight Request Headers
Access-Control-Request-Headers:  accept, content-type
Access-Control-Request-Method: POST
Origin: http://json.sandboxed.guru

CORS Preflight Response Headers
Access-Control-Allow-Headers: Content-Type, Accept, Accept-Language,Accept-
       Encoding, User-Agent, Host, Content-Length, Connection, Cache-Control
Access-Control-Allow-Methods: GET, POST, OPTIONS
Access-Control-Allow-Origin: *
If the configured values of the CORS preflight request headers can be matched (case-insensitive) against the corresponding CORS preflight response headers, only then will the actual request be initiated. Otherwise, the actual request will be canceled.
With our new configured headers in place, let’s run the application that possesses the code, as shown in Listing 11-12, and perform another form submission once again. Upon the submission of the form, you should see that the preflight request has been performed and succeeds and, therefore, is followed by our actual request, as shown in Figure 11-5.
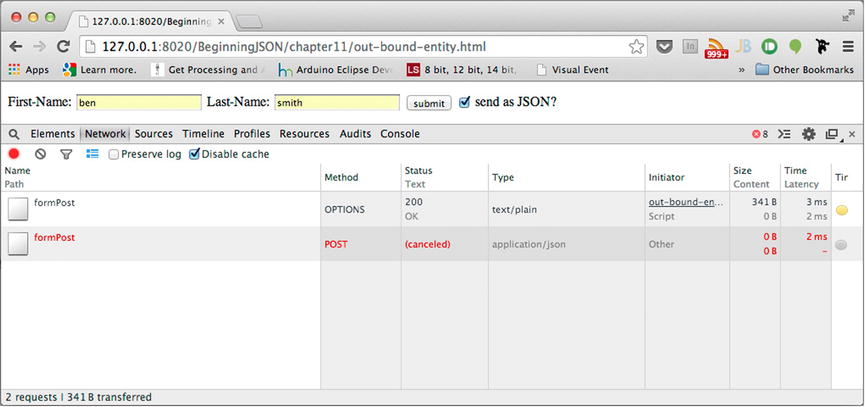
Figure 11-5. Authorized preflight request followed by an unauthorized source origin request for formPost
As depicted by Figure 11-5, the preflight request has been approved and follows up with our actual request. However, due to a network error, our request for the /formPost resource is canceled. The reason for the network error is outputted within the console tab. While the network error will vary depending on the browser being used to make the request, it should be immediately apparent as to why the request was canceled.
XMLHttpRequest cannot load http://127.0.0.1:1337/formPost. No 'Access-Control-Allow-Origin' header is present on the requested resource. Origin 'http://127.0.0.1:8020' is therefore not allowed access.
As explained via the preceding messaging provided by Chrome, the request resulted in a network error. This is due to the fact that the source origin has not been provided sufficient authorization to receive the response. However, this is simple enough to resolve by including the Access-Control-Allow-Origin header as a configured header of the response. At this point in time, let’s make this proper amendment, shown in bold in Listing 11-13, and then initiate the request once more.
Listing 11-13. Authorizing formPost for All Source Origins
 1  ...//truncated code
13       request.addListener("end", function() {
14           console.log("end of stream
");
15           console.log("Raw entity: " + incomingEntity);

16            if (request.headers['content-type'].indexOf("application/json")>-1) {
17                data = JSON.parse(incomingEntity);
18                if (request.url === "/formPost") {
19                    response.setHeader("Access-Control-Allow-Origin","*");
20                    response.statusCode = 200;
21                    response.setHeader("Content-Type", "application/json");
22                    response.end(incomingEntity);
23                }
24         }else if(request.headers['content-type'].indexOf("application/x-www-form-urlencoded")>-1) {
25                if (request.url === "/formPost") {
26                    response.statusCode = 200;
27                    response.setHeader("Access-Control-Allow-Origin","*");
28                    response.setHeader("Content-Type", "text/html");
29                      var fname = getParamKey("fname", incomingEntity);
30                      var lname = getParamKey("lname", incomingEntity);
31                    response.write('<!doctype html>'),
32                    response.write('<html lang="en">'),
33                    response.write('<body>'),
34                    response.write('</span>' + fname+ ’ ‘ +lname +'</span>'),
35                    response.write('</body>'),
36                    response.end();
37                    return;
38                }
39            }
40        });
41    ...//truncated code
If we were to run the application with the inclusion of the bold code from Listing 11-13 and resubmit our form, the results this time would be authorized, resulting in the output above our form, as shown in Figure 11-6.
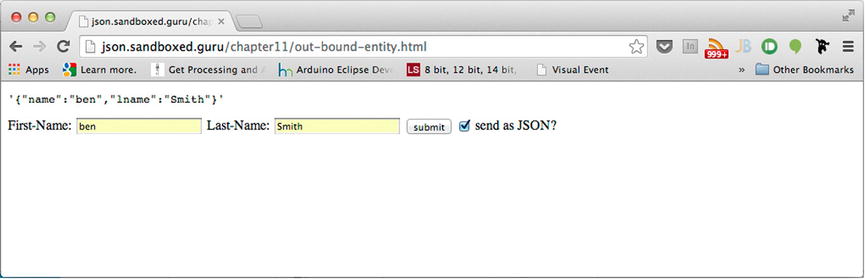
Figure 11-6. Successful Ajax POST from a remote origin
Additionally, if you were to uncheck the check box beside the Submit button, we could alter the Content-Type of the payload from application/json to application/x-www-form-urlencoded. Because our server is implemented to respond with an appropriate Content-Type that reflects the format of an incoming payload, the transmission of the two Content-Types can be clearly identified via the response, as shown in Figure 11-7.
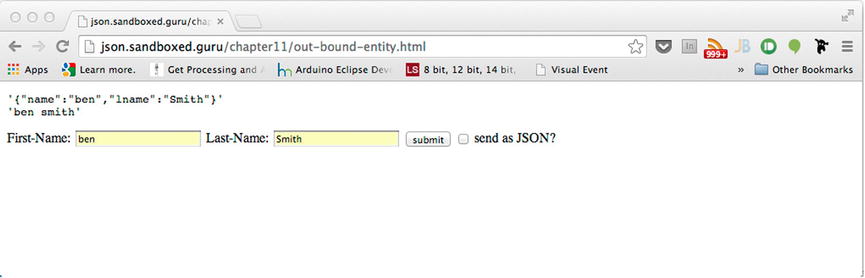
Figure 11-7. Successful form POST
Congratulations! You have just created a server that can accept incoming JSON payloads from both local and remote origins.
It should be made known that the real reason I had incorporated the check box into the preceding form was not truly to demonstrate the ability for our form to alternate between two Content-Types. Rather, I incorporated it to emphasize the conditions under which the user-agent determines if a preflight request is deemed necessary.
If you were to monitor the network traffic that occurred in Figure 11-7, you would notice that the there was only one preflight request, as signified by the OPTIONS request method. This can be observed in Figure 11-8.
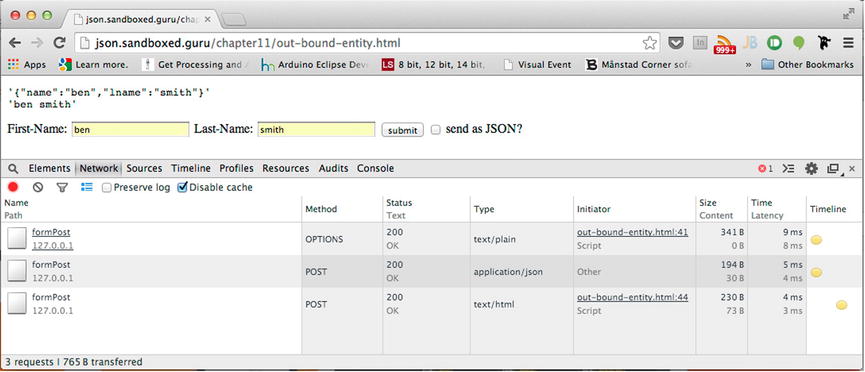
Figure 11-8. One reflight request, two POST requests
As clearly shown in Figure 11-8, the form received two responses of varying Content-Types. One response was supplied as application/json, while the other was supplied as text/html. Both responses are output as they are received in the upper-left corner of the document. However, as seen in the Network tab, three requests were made, of which only one is a preflight request.
As was stated in Chapter 9, for legacy purposes, HTTP requests that are only configured with simple request headers and simple request methods do not require the use of preflight. However, if the requests are made from varying origins, they will require proper authorization to obtain the response. This is achieved by configuring the Access-Control-Allow-Origin header. While simple request methods refer to requests that utilize either GET, POST, or HEAD as their request methods, what constitutes simple request headers is slightly more elaborate, as quoted by the CORS specification.3
A header is said to be simple, if the header field name is an ASCII case-insensitive match for Accept, Accept-Language, or Content-Language or if it is an ASCII case-insensitive match for Content-Type and the header field value media type (excluding parameters) is an ASCII case-insensitive match for application/x-www-form-urlencoded, multipart/form-data, or text/plain.
What this means for varying origins is that if your server is expecting an incoming payload whose Content-Type is not among the three that can be configured with an HTML form element, such as JSON, it will be mandatory for your application to anticipate a browser’s need for preflight. Conversely, your Ajax request may be denied if the server does not utilize these headers.
Summary
Typically, when we use APIs belonging to Twitter or Facebook, we tend to overlook what might be required of a server to make these interactions possible. Generally, we take a lot of what is taking place behind the scenes for granted. This chapter has attempted to shed some light on this matter.
We regarded what it takes to receive and process incoming data. As it turns out, POSTing JSON data can be slightly more intricate than you may have previously believed, especially when dealing with cross-origin requests.
When considering a request from a varying origin, any attempt to use an unsafe method immediately results in what is regarded as a preflight request. Only requests that use simple methods and simple headers are able to make a request without the use of preflight. Furthermore, as you have learned, any attempt to transmit the Content-Type application/json results in a preflight request. Preflight, of course, is only required when the request occurs from a source origin that varies from the origin of the server being posted to. In either case, this chapter has now prepared you to account for both.
Now that you have learned to process data, you will be able to apply this knowledge in the next chapter.
Key Points from This Chapter
- GET requests only have one MIME type, whereas POST requests have many.
- Incoming payloads can be both simple and complex.
- One must consume incoming data by monitoring the stream for the data event.
- When all data has been consumed from the stream, the end event is fired.
- The HTML <form> element can only transmit three Content-Types.
- Determining the Content-Type for incoming data is beneficial with regard to processing the received data.
- Buffers are used to read bytes from the stream.
- Preflight reduces the likelihood of malicious behavior.
- Preflight makes use of the OPTIONS request method.
- There are two preflight headers that must be properly configured by the server in order to authorize a source origin.
_________________
1R. Fielding et al., Hypertext Transfer Protocol—HTTP/1.1, http://tools.ietf.org/html/rfc2616, 1999.
2Merriam Webster Online Dictionary, “preflight,” http://www.merriam-webster.com/dictionary/preflight, 2015.
3World Wide Web Consortium (W3C), Anne van Kesteren, ed. “Cross-Origin Resource Sharing,” www.w3.org/TR/cors/, January 16, 2014.