
![]()
Bean Validation
The previous chapter talked about Context and Dependency Injection which has become a central and common specification across Java EE. It solves recurrent problems (injection, alternatives, stereotypes, producers . . .) that developers have in their day-to-day job. Validating data is also a common task that is spread across several, if not all, layers of today’s applications (from presentation to database). Because processing, storing, and retrieving valid data are crucial for an application, each layer defines validation rules its own way. Often the same validation logic is implemented in each layer, proving to be time-consuming, harder to maintain, and error prone. To avoid duplication of these validations in each layer, developers often bundle validation logic directly into the domain model, cluttering domain classes with validation code that is, in fact, metadata about the class itself.
Bean Validation solves the problem of code duplication and cluttering domain classes by allowing developers to write a constraint once, use it, and validate it in any layer. Bean Validation implements a constraint in plain Java code and then defines it by an annotation (metadata). This annotation can then be used on your bean, properties, constructors, method parameters, and return value. In a very elegant yet powerful way, Bean Validation exposes a simple API so that developers can write and reuse business logic constraints.
This chapter demonstrates why validation is crucial to an application and why it needs to be duplicated across layers. You will learn how to write constraints: from aggregating existing ones to developing your own. You will see how to apply these constraints on your application, from the presentation layer right through to the business model layer. You will then learn how to validate these constraints (whether within a Java EE container or not).
Understanding Constraints and Validation
Application developers spend most of their time making sure the data they process and store are valid. They write data constraints, apply these constraints to their logic and model, and make sure the different layers validate these constraints in a consistent manner. This means applying these constraints in their client application (e.g., web browser if developing a web application), presentation layer, business logic layer, business model (a.k.a. domain model), database schema, and, to some degree, the interoperability layer (see Figure 3-1). And, of course, for consistency, they have to keep all these rules synchronized across layers and technologies.
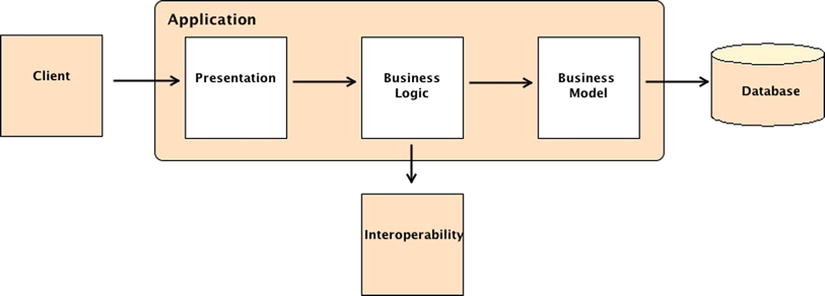
Figure 3-1. Validation occurs in several layers
In heterogeneous applications, developers have to deal with several technologies and languages. So even a simple validation rule, such as “this piece of data is mandatory and cannot be null,” has to be expressed differently in Java, JavaScript, database schema, or XML schema.
No matter if you develop a one tier or n-tier application; you still need to make sure the data you process are correct: for example, if the delivery address of the purchase order is empty you will never be able to ship the items to your customer. In Java you will commonly write code that checks if an entry is valid (if order.getDeliveryAddress() == null) and throws an exception or asks for feedback to correct it. Application-level validation is able to provide finer-grained control and allows more complex constraints (is this date a public holiday in France? is the customer’s annual total bill amount greater than the average?).
Application-level validation may reside in multiple places to ensure that the data are correct.
- Presentation layer: In this layer you validate the data because the data could have been sent from several clients (a web browser, a command line tool such as cURL, which allows you to send HTTP commands, or a native application). You also want to give your users a quicker feedback.
- Business logic layer: This layer orchestrates the calls to your internal and external services, to your domain model . . . so the processed data have to be valid.
- Business model layer: This layer usually maps your domain model to the database, so you need to validate it before storing data.
In a complex application you will repeat the exact same constraint in several layers, resulting in a large amount of code duplication.
At the end of the day, what you really want is to store valid data in your database so the data can be processed later. Constraints are enforced in relational databases because they use schemas. A data definition language (DDL, or data description language) uses a syntax for defining and constraining database structures. You can then make sure data in a column cannot be null (NOT NULL), have to be numerical (INTEGER), or have to have a maximum length (VARCHAR(20)). In this last example, trying to insert a 20-character-long string into a column will fail.
However, letting the database handle validation has several drawbacks: it has a performance cost and error messages are out of context. Invalid data must cross all application layers before being sent to the remote database server, which will then handle the validation before sending back an error. At the database level constraints are only aware of the data, not what the user is doing. So error messages are not aware of the context and cannot be very explicit. That’s why we tend to validate the data earlier in the application or in the client.
On the client side it is important to validate data so the user is quickly informed that she has entered wrong data. It reduces the number of roundtrips to the server and provides a better user experience through early error feedback. It is crucial when developing mobile applications that may use a low-bandwidth network connection.
In a typical web application, for example, JavaScript is executed in the browser for simple field-level validations and the server-side layer is used for more complex business rule validations. Native applications written in Java (Swing, Android mobile applications) can use the full power of the Java language to write and validate data.
Often enterprise applications need to exchange data with external partners and external systems. These business-to-business applications receive data in any kind of format, process them, store them, and send them back to their partner. Validating custom formats can be a complex and expensive task. Nowadays XML is the preferred language to exchange data between heterogeneous systems. Like databases that use DDL to define their structure, XML can use XSD (XML Schema Definition) to constrain XML documents. XSD expresses a set of rules to which an XML document must conform in order to be considered valid according to that schema. XML parsing and validation is a common task and easy to do with Java frameworks (more on XSD and XML validation in Chapter 16).
Bean Validation Specification Overview
As you can see validation is spread throughout layers (from client to database) and technologies (JavaScript, Java, DDL, XSD). This means that developers have to duplicate code in several layers and in different languages. This common practice is time-consuming, error prone, and harder to maintain with time. In addition, some of these constraints are so frequently used that they could be considered standards (check for a value, its size, its range . . .). It would good to be able to centralize these constraints in one place and share them across layers. That’s when Bean Validation comes into play.
Bean Validation is targeted at Java even if some attempts have been made to integrate other languages such as DDL or XSD. It allows you to write a constraint once and use it in any application layer. Bean Validation is layer agnostic, meaning that the same constraint can be used from the presentation to the business model layer. Bean Validation is available for both server-side applications as well as rich Java client graphical interfaces (Swing, Android . . .). It is seen as an extension of the JavaBeans object model and, as such, can be used as a core component in other specifications (as you’ll see in most of the chapters of this book).
Bean Validation allows you to apply already defined common constraints in your application, and also write your own and use them to validate beans, attributes, constructors, method returned types, and parameters. The API is very easy to use and flexible as it encourages you to define your constraints using annotations (XML is also possible).
A Brief History of Bean Validation
Developers have been constraining and validating their business model since Java was first developed. Homemade code and frameworks gave birth to practices that were implemented in early open source projects. For example, back in 2000, Struts, the famous Web MVC framework, already implemented a user input validation. But we had to wait some time for validation frameworks that were dedicated solely to Java (and not just web interaction). The best known are probably the Commons Validator from the Apache Commons and Hibernate Validator. Others are iScreen, OVal, and the ubiquitous Spring framework that comes with its own validation package.
Inspired by these validation frameworks, Bean Validation 1.0 (JSR 303) standardized data validation and was included in Java EE 6 in 2009.
What’s New in Bean Validation 1.1?
Today Bean Validation 1.1 (JSR 349) is integrated into Java EE 7. This minor release brings many new features and improves existing ones. The major new features are as follows:
- Constraints can now be applied to method parameters and return value. Thus Bean Validation can be used to describe and validate the contract (pre- and postconditions) of a given method.
- Constraints can also be applied on constructors.
- There is a new API to obtain metadata information on constraints and constrained objects.
- Integration with Context and Dependency Injection has been increased (injection in validators is now possible).
Table 3-1 lists the main packages defined in Bean Validation 1.1 today.
Table 3-1. Main Bean Validation Packages
Hibernate Validator is the open source reference implementation of Bean Validation. The project was originally launched in Hibernate Annotations in 2005 by JBoss, became an independent project in 2007, and became the reference implementation in 2009 (with Hibernate Validator 4). Today, Hibernate Validator 5 implements Bean Validation 1.1 and adds specific features, which include a fail fast mode (return from the current validation as soon as the first constraint violation occurs), a programmatic constraint configuration API, and extra built-in constraints.
At the time of writing this book, Hibernate Validator is the only Bean Validation 1.1 compliant implementation. Apache BVal implemented Bean Validation 1.0 and is in the process of getting the 1.1 certification. Oval doesn’t implement the full Bean Validation specification but knows how to process Bean Validation’s constraints.
Writing Constraints
So far I’ve talked about constraints applied to several layers of your application, possibly written in different languages and technologies, but I also mentioned the duplication of validation code. So how difficult it is to apply a constraint to your Java classes with Bean Validation? Listing 3-1 shows how simple it is to add constraints to your business model.
Listing 3-1. A Book POJO with Constraint Annotations
public class Book {

  @NotNull
  private String title;
  @NotNull @Min(2)
  private Float price;
  @Size(max = 2000)
  private String description;
  private String isbn;
  private Integer nbOfPage;

  // Constructors, getters, setters
}
Listing 3-1 shows the Book class with attributes, constructors, getters, setters, and annotations. Some of these attributes are annotated with built-in constraints such as @NotNull, @Min, and @Size. This indicates to the validation runtime that the title of the book cannot be null and that the description cannot be longer than 2000 characters. As you can see, an attribute can have several constraints attached to it (such as price that cannot be null and whose value cannot be lower than 2).
Constraints are defined by the combination of a constraint annotation and a list of constraint validation implementations. The constraint annotation is applied on types, methods, fields, or other constraint annotations in case of composition. In most of the Java EE specifications, developers use already defined annotations (e.g., @Entity, @Stateless, and @Path). But with CDI (which you saw in the previous chapter) and Bean Validation, developers need to write their own annotations. Because a constraint in Bean Validation is made of
- An annotation defining the constraint.
- A list of classes implementing the algorithm of the constraint on a given type (e.g., String, Integer, MyBean).
While the annotation expresses the constraint on the domain model, the validation implementation decides whether a given value passes the constraint or not.
Constraint Annotation
A constraint on a JavaBean is expressed through one or more annotations. An annotation is considered a constraint if its retention policy contains RUNTIME and if the annotation itself is annotated with javax.validation.Constraint (which refers to its list of constraint validation implementations). Listing 3-2 shows the NotNull constraint annotation. As you can see, @Constraint(validatedBy = {}) points to the implementation class NotNullValidator.
Listing 3-2. The NotNull Constraint Annotation
@Target({METHOD, FIELD, ANNOTATION_TYPE, CONSTRUCTOR, PARAMETER})
@Retention(RUNTIME)
@Documented
@Constraint (validatedBy = NotNullValidator .class)
public @interface NotNull {

  String message () default "{javax.validation.constraints.NotNull.message}";

  Class<?>[] groups () default {};

  Class<? extends Payload>[] payload () default {};
}
Constraint annotations are just regular annotations, so they must define some meta-annotations.
- @Target({METHOD, FIELD, ...}): Specifies the target to which the annotation can be used (more on that later).
- @Retention(RUNTIME): Specifies how the annotation will be operated. It is mandatory to use at least RUNTIME to allow the provider to inspect your objects at runtime.
- @Constraint(validatedBy = NotNullValidator.class): Specifies the class (zero, in case of constraint aggregation, or a list of classes) that encapsulates the validation algorithm.
- @Documented: This optional meta-annotation specifies that this annotation will be included in the Javadoc or not.
On top of these common meta-annotations, the Bean Validation specification requires each constraint annotation to define three extra attributes.
- message: This attribute (which generally is defaulted to a key) provides the ability for a constraint to return an internationalized error message if the constraint is not valid.
- groups: Groups are typically used to control the order in which constraints are evaluated, or to perform partial validation.
- payload: This attribute is used to associate metadata information with a constraint.
Once your constraint defines all the mandatory meta-annotations and elements, you can add any specific parameter you need. For example, a constraint that validates the length of a String can use an attribute named length to specify the maximum length.
Constraint Implementation
Constraints are defined by the combination of an annotation and zero or more implementation classes. The implementation classes are specified by the validatedBy element of @Constraint (as seen in Listing 3-2). Listing 3-3 shows the implementation class for the @NotNull annotation. As you can see, it implements the ConstraintValidator interface and uses generics to pass the name of the annotation (NotNull) and the type this annotation applies to (here it’s Object).
Listing 3-3. The NotNull Constraint Implementation
public class NotNullValidator implements ConstraintValidator<NotNull, Object> {

  public void initialize ( NotNull parameters) {
  }

  public boolean isValid ( Object object, ConstraintValidatorContext context) {
    return object != null;
  }
}
The ConstraintValidator interface defines two methods that need to be implemented by the concrete classes.
- initialize: This method is called by the Bean Validation provider prior to any use of the constraint. This is where you usually initialize the constraint parameters if any.
- isValid: This is where the validation algorithm is implemented. This method is evaluated by the Bean Validation provider each time a given value is validated. It returns false if the value is not valid, true otherwise. The ConstraintValidatorContext object carries information and operations available in the context the constraint is validated to (as you’ll see later).
A constraint implementation performs the validation of a given annotation for a given type. In Listing 3-3 the @NotNull constraint is typed to an Object (which means that this constraint can be used on any datatype). But you could have a constraint annotation that would have different validation algorithms depending on the datatype. For example, you could check the maximum characters for a String, but also the maximum number of digits for a BigDecimal, or the maximum number of elements in a Collection. In the code that follows notice that you have several implementations for the same annotation (@Size) but for different datatypes (String, BigDecimal, and Collection<?>):
public class SizeValidatorForString     implements<Size, String >        {...}
public class SizeValidatorForBigDecimal implements<Size, BigDecimal >    {...}
public class SizeValidatorForCollection implements<Size, Collection<?> > {...}
Applying a Constraint
Once you have an annotation and an implementation, you can apply the constraint on a given element type (attribute, getter, constructor, parameter, return value, bean, interface, or annotation). This is a design decision that developers have to make and implement using the @Target(ElementType.*) meta-annotation (see Listing 3-2).
- FIELD for constrained attributes,
- METHOD for constrained getters and constrained method return values,
- CONSTRUCTOR for constrained constructor return values,
- PARAMETER for constrained method and constructor parameters,
- TYPE for constrained beans, interfaces and superclasses, and
- ANNOTATION_TYPE for constraints composing other constraints.
As you can see, constraint annotations can be applied to most of the element types defined in Java. Only static fields and static methods cannot be validated by Bean Validation. Listing 3-4 shows an Order class that uses constraint annotations on the class itself, attributes, constructor, and a business method.
Listing 3-4. A POJO Using Constraints on Several Element Types
@ChronologicalDates
public class Order {

  @NotNull @Pattern(regexp = "[C,D,M][A-Z][0-9]*")
  private String orderId;
  private Date creationDate;
  @Min(1)
  private Double totalAmount;
  private Date paymentDate;
  private Date deliveryDate;
  private List<OrderLine> orderLines;

  public Order() {
  }

  public Order( @Past Date creationDate) {
    this.creationDate = creationDate;
  }

  public @NotNull Double calculateTotalAmount( @GreaterThanZero Double changeRate) {
    // ...
  }

  // Getters and setters
}
In Listing 3-4 @ChronologicalDates is a class-level constraint which is based on several properties of the Order class (in this case it makes sure that the creationDate, paymentDate, and deliveryDate are all chronological). The orderId attribute has two constraints as it cannot be null (@NotNull) and it has to follow a regular expression pattern (@Pattern). The Order constructor makes sure that the creationDate parameter has to be in the past. The calculateTotalAmount method (which calculates the total amount of the purchase order) checks that the changeRate is @GreaterThanZero and that the returned amount is not null.
![]() Note So far the examples I’ve shown annotate attributes, but you could annotate getters instead. You just have to define constraints either on the attribute or on the getter but not on both at the same time. It is best to stay consistent and use annotations always on attributes or always on getters.
Note So far the examples I’ve shown annotate attributes, but you could annotate getters instead. You just have to define constraints either on the attribute or on the getter but not on both at the same time. It is best to stay consistent and use annotations always on attributes or always on getters.
Bean Validation is a specification that allows you to write your own constraints and validate them. But it also comes with some common built-in constraints. You’ve already seen a few in the previous examples but Table 3-2 gives you an exhaustive list of all the built-in constraints (i.e., all the constraints that you can use out of the box in your code without developing any annotation or implementation class). All of the built-in constraints are defined in the javax.validation.constraints package.
Table 3-2. Exhaustive List of Built-In Constraint Annotations
| Constraint | Accepted Types | Description |
|---|---|---|
| AssertFalseAssertTrue | Boolean, boolean | The annotated element must be either false or true |
| DecimalMaxDecimalMin | BigDecimal, BigInteger, CharSequence, byte, short, int, long, and respective wrappers | The element must be greater or lower than the specified value |
| FuturePast | Calendar, Date | The annotated element must be a date in the future or in the past |
| MaxMin | BigDecimal, BigInteger, byte, short, int, long, and their wrappers | The element must be greater or lower than the specified value |
| NullNotNull | Object | The annotated element must be null or not |
| Pattern | CharSequence | The element must match the specified regular expression |
| Digits | BigDecimal, BigInteger, CharSequence, byte, short, int, long, and respective wrappers | The annotated element must be a number within accepted range |
| Size | Object[], CharSequence,Collection<?>, Map<?, ?> | The element size must be between the specified boundaries |
Defining Your Own Constraints
As you’ve just seen, the Bean Validation API provides standard built-in constraints, but they cannot meet all your application’s needs. Therefore, the API allows you to develop and use your own business constraints. There are several ways to create your own constraints (from aggregating existing constraints to writing one from scratch) and also different styles (generic or class-level).
An easy way to create new constraints is by aggregating already existing ones without having an implementation class. This is pretty easy to do if the existing constraints have a @Target(ElementType.ANNOTATION_TYPE), which means that an annotation can be applied on another annotation. This is called constraints composition and allows you to create higher-level constraints.
Listing 3-5 shows how to create an Email constraint just by using built-in constraints from the Bean Validation API. This Email constraint makes sure that the e-mail address is not null (@NotNull), the minimum size is seven characters (@Size(min = 7)) and that it follows a complex regular expression (@Pattern). A composed constraint also has to define the message, groups, and payload attributes. Note that there is no implementation class (validatedBy = {}).
Listing 3-5. An E-mail Constraint Made of Other Constraints
@NotNull
@Size(min = 7)
@Pattern(regexp = "[a-z0-9!#$%&'*+/=?^_`{|}∼-]+(?:\.[a-z0-9!#$%&'*+/=?^_`{|}∼-]+)*" →
        + "@(?:[a-z0-9](?:[a-z0-9-]*[a-z0-9])?\.)+[a-z0-9](?:[a-z0-9-]*[a-z0-9])?")
@Constraint( validatedBy = {} )
@Target({METHOD, FIELD, ANNOTATION_TYPE, CONSTRUCTOR, PARAMETER})
@Retention(RetentionPolicy.RUNTIME)
public @interface Email {

  String message() default "Email address doesn't look good";
  Class<?>[] groups() default {};
  Class<? extends Payload>[] payload() default {};
}
Each built-in constraint (@NotNull, @Size, and @Pattern) already has its own error message (the message() element). This means that if you have a null e-mail address, the constraint in Listing 3-5 will throw the @NotNull error message upon validation instead of the one defined (“E-mail address doesn’t look good”). You may want to have a single error message for the Email constraints rather than having several ones. For that, you could add the @ReportAsSingleViolation annotation (as you’ll see later in Listing 3-24). If you do, the evaluation of the composing constraints stops at the first failing constraint and the error report corresponding to the composed constraint (here, the @Email constraint) is generated and returned.
Constraint composition is useful because it avoids code duplication and facilitates the reuse of more primitive constraints. It is encouraged to create simple constraints rather than consolidate them to create more complex validation rules.
![]() Note When you create a new constraint, make sure you give it a meaningful name. A carefully chosen annotation name will make constraints more readable in the code.
Note When you create a new constraint, make sure you give it a meaningful name. A carefully chosen annotation name will make constraints more readable in the code.
Generic Constraint
Simple constraint composition is good practice but is usually not enough. Often you need to have complex validation algorithms; check a value in a database, delegate some validation to helper classes, and so on. That’s when you need to add an implementation class to your constraint annotation.
Listing 3-6 shows a POJO that represents a network connection to the CD-BookStore items server. This POJO has several attributes of type String, all representing a URL. You want a URL to have a valid format, and even set a specific protocol (e.g., http, ftp . . .), host, and/or port number. The custom @URL constraint makes sure the different String attributes of the ItemServerConnection class respect the URL format. For example, the resourceURL attribute can be any kind of valid URL (e.g., file:// www.cdbookstore.com/item/123). On the other hand, you want to constrain the itemURL attribute to have an http protocol and a host name starting with www.cdbookstore.com (e.g., http://www.cdbookstore.com/book/h2g2).
Listing 3-6. A URL Constraint Annotation Used on Several Attributes
public class ItemServerConnection {

  @URL
  private String resourceURL;
  @NotNull @URL(protocol = "http", host = "www.cdbookstore.com")
  private String itemURL;
  @URL(protocol = "ftp", port = 21)
  private String ftpServerURL;
  private Date lastConnectionDate;

  // Constructors, getters, setters
}
The first thing to do to create such a custom URL constraint is to define an annotation. Listing 3-7 shows the annotation that follows all the Bean Validation prerequisites (@Constraint meta-annotation, message, groups, and payload attributes) but also adds specific attributes: protocol, host, and port. These attributes are mapped to the annotation element names (e.g., @URL(protocol = "http")). A constraint may use any attribute of any datatype. Also note that these attributes have default values such as an empty String for the protocol and host or -1 for the port number.
Listing 3-7. The URL Constraint Annotation
@Constraint(validatedBy = { URLValidator.class })
@Target({METHOD, FIELD, ANNOTATION_TYPE, CONSTRUCTOR, PARAMETER})
@Retention(RUNTIME)
public @interface URL {

  String message() default "Malformed URL";
  Class<?>[] groups() default {};
  Class<? extends Payload>[] payload() default {};

  String protocol () default "";
  String host () default "";
  int port () default -1;
}
Listing 3-7 could have aggregated already existing constraints such as @NotNull. But the main difference between a constraint composition and a generic constraint is that it has an implementation class declared in the validatedBy attribute (here it refers to URLValidator.class).
Listing 3-8 shows the URLValidator implementation class. As you can see it implements the ConstraintValidator interface and therefore the initialize and isValid methods. The important thing to note is that URLValidator has the three attributes defined in the annotation (protocol, host, and port) and initializes them in the initialize(URL url) method. This method is invoked when the validator is instantiated. It receives as a parameter the constraint annotation (here URL) so it can extract the values to use for validation (e.g., the value for the itemURL protocol attribute in Listing 3-6 is the String "http").
Listing 3-8. The URL Constraint Implementation
public class URLValidator implements ConstraintValidator<URL, String> {

  private String protocol ;
  private String host ;
  private int port ;

  public void initialize (URL url) {
    this.protocol = url.protocol();
    this.host = url.host();
    this.port = url.port();
  }

  public boolean isValid (String value , ConstraintValidatorContext context) {
    if (value == null || value.length() == 0) {
      return true;
    }

    java.net.URL url;
    try {
      // Transforms it to a java.net.URL to see if it has a valid format
      url = new java.net.URL( value );
    } catch (MalformedURLException e) {
      return false;
    }

    // Checks if the protocol attribute has a valid value
    if ( protocol != null && protocol.length() > 0 && !url.getProtocol().equals(protocol)) {
      return false;
    }

    if ( host != null && host.length() > 0 && !url.getHost().startsWith(host)) {
      return false;
    }

    if ( port != -1 && url.getPort() != port) {
      return false;
    }

    return true;
  }
}
The isValid method implements the URL validation algorithm shown in Listing 3-8. The value parameter contains the value of the object to validate (e.g., file:// www.cdbookstore.com/item/123). The context parameter encapsulates information about the context in which the validation is done (more on that later). The return value is a boolean indicating whether the validation was successful or not.
The main task of the validation algorithm in Listing 3-8 is to cast the passed value to a java.net.URL and see if the URL is malformed or not. Then, the method checks that the protocol, host, and port attributes are valid too. If one of these attributes is not valid then the method returns false. As you’ll see later in the “Validating Constraints” section of this chapter, the Bean Validation provider will use this Boolean to create a list of ConstraintViolation.
Note that the isValid method considers null as a valid value (if (value == null ... return true)). The Bean Validation specification recommends as good practice to consider null as valid. This way you do not duplicate the code of the @NotNull constraint. You would have to use both @URL and @NotNull constraints to express that you want a value to represent a valid URL that is not null (such as the itemURL attribute in Listing 3-6).
The class signature defines the datatype to which the constraint is associated. In Listing 3-8 the URLValidator is implemented for a type String (ConstraintValidator<URL, String>). That means that if you apply the @URL constraint to a different type (e.g., to the lastConnectionDate attribute) you will get a javax.validation.UnexpectedTypeException at validation because no validator could be found for type java.util.Date. If you need a constraint to be applied to several datatypes, you either need to use superclasses when it is possible (e.g., we could have defined the URLValidator for a CharSequence instead of a String by writing ConstraintValidator<URL, CharSequence>) or need to have several implementation classes (one for String, CharBuffer, StringBuffer, StringBuilder . . .) if the validation algorithm is different.
![]() Note A constraint implementation is considered to be a Managed Bean. This means that you can use all the Managed Bean services such as injecting any helper class, an EJB, or even injecting an EntityManager (more on that in the following chapters). You can also intercept or decorate both initialize and isValid methods, or even use life-cycle management (@PostConstruct and @PreDestroy).
Note A constraint implementation is considered to be a Managed Bean. This means that you can use all the Managed Bean services such as injecting any helper class, an EJB, or even injecting an EntityManager (more on that in the following chapters). You can also intercept or decorate both initialize and isValid methods, or even use life-cycle management (@PostConstruct and @PreDestroy).
Multiple Constraints for the Same Target
Sometimes it is useful to apply the same constraint more than once on the same target with different properties or groups (as you’ll see later). A common example is the @Pattern constraint, which validates that its target matches a specified regular expression. Listing 3-9 shows how to apply two regular expressions on the same attribute. Multiple constraints use the AND operator; this means that the orderId attribute needs to follow the two regular expressions to be valid.
Listing 3-9. A POJO Applying Multiple Pattern Constraints on the Same Attribute
public class Order {

  @Pattern.List({
          @Pattern(regexp = "[C,D,M][A-Z][0-9]*"),
          @Pattern(regexp = ".[A-Z].*?")
  })
  private String orderId;
  private Date creationDate;
  private Double totalAmount;
  private Date paymentDate;
  private Date deliveryDate;
  private List<OrderLine> orderLines;

  // Constructors, getters, setters
}
To be able to have the same constraint multiple times on the same target, the constraint annotation needs to define an array of itself. Bean Validation treats constraint arrays in a special way: each element of the array is processed as a regular constraint. Listing 3-10 shows the @Pattern constraint annotation that defines an inner interface (arbitrarily called List) with an element Pattern[]. The inner interface must have the retention RUNTIME and must use the same set of targets as the initial constraint (here METHOD, FIELD, ANNOTATION_TYPE, CONSTRUCTOR, PARAMETER).
Listing 3-10. The Pattern Constraint Defining a List of Patterns
@Target({METHOD, FIELD, ANNOTATION_TYPE, CONSTRUCTOR, PARAMETER})
@Retention(RUNTIME)
@Constraint(validatedBy = PatternValidator.class)
public @interface Pattern {

  String regexp();
  String message() default "{javax.validation.constraints.Pattern.message}";
  Class<?>[] groups() default {};
  Class<? extends Payload>[] payload() default {};

  // Defines several @Pattern annotations on the same element
  @Target({METHOD, FIELD, ANNOTATION_TYPE, CONSTRUCTOR, PARAMETER})
  @Retention(RUNTIME)
  @interface List {
    Pattern[] value();
  }
}
![]() Note When you develop your own constraint annotation, you should add its corresponding multivalued annotation. The Bean Validation specification does not mandate it but strongly recommends the definition of an inner interface named List.
Note When you develop your own constraint annotation, you should add its corresponding multivalued annotation. The Bean Validation specification does not mandate it but strongly recommends the definition of an inner interface named List.
So far you’ve seen different ways of developing a constraint that is applied to an attribute (or a getter). But you can also create a constraint for an entire class. The idea is to express a constraint which is based on several properties of a given class.
Listing 3-11 shows a purchase order class. This purchase order follows a certain business life cycle: it is created into the system, paid by the customer, and then delivered to the customer. This class keeps track of all these events by having a corresponding creationDate, paymentDate, and deliveryDate. The class-level annotation @ChronologicalDates is there to check that these three dates are in chronological order.
Listing 3-11. A Class-Level Constraint Checking Chronological Dates
@ChronologicalDates
public class Order {

  private String orderId;
  private Double totalAmount;
  private Date creationDate ;
  private Date paymentDate ;
  private Date deliveryDate ;
  private List<OrderLine> orderLines;
  // Constructors, getters, setters
}
Listing 3-12 shows the implementation of the @ChronologicalDates constraint. Like the constraints you’ve seen so far, it implements the ConstraintValidator interface whose generic type is Order. The isValid method checks that the three dates are in chronological order and returns true if they are.
Listing 3-12. The ChronologicalDates Class-Level Constraint Implementation
public class ChronologicalDatesValidator implements ConstraintValidator< ChronologicalDates , Order > {

  @Override
  public void initialize(ChronologicalDates constraintAnnotation) {
  }

  @Override
  public boolean isValid( Order order, ConstraintValidatorContext context) {
    return order. getCreationDate ().getTime() < order. getPaymentDate ().getTime() && →
           order. getPaymentDate ().getTime()  < order. getDeliveryDate ().getTime();
  }
}
Method-level constraints were introduced in Bean Validation 1.1. These are constraints declared on methods as well as constructors (getters are not considered constrained methods). These methods can be added to the method parameters (called parameter constraints) or to the method itself (called return value constraints). In this way Bean Validation can be used to describe and validate the contract applied to a given method or constructor. This enables the well-known Programming by Contract programming style.
- Preconditions must be met by the caller before a method or constructor is invoked.
- Postconditions are guaranteed to the caller after a method or constructor invocation returns.
Listing 3-13 shows how you can use method-level constraints in several ways. The CardValidator service validates a credit card following a specific validation algorithm. This algorithm is passed to the constructor and cannot be null. For that, the constructor uses the @NotNull constraint on the ValidationAlgorithm parameter. Then, the two validate methods return a Boolean (is the credit card valid or not?) with an @AssertTrue constraint on the returned type and a @NotNull and @Future constraint on the method parameters.
Listing 3-13. A Service with Constructor and Method-Level Constraints
public class CardValidator {

  private ValidationAlgorithm validationAlgorithm;

  public CardValidator( @NotNull ValidationAlgorithm validationAlgorithm) {
    this.validationAlgorithm = validationAlgorithm;
  }

  @AssertTrue
  public Boolean validate( @NotNull CreditCard creditCard) {

    return validationAlgorithm.validate(creditCard.getNumber(), creditCard.getCtrlNumber());
  }

  @AssertTrue
  public Boolean validate( @NotNull String number, @Future Date expiryDate, →
                          Integer controlNumber, String type) {

    return validationAlgorithm.validate(number, controlNumber);
  }
}
Constraint Inheritance
Often a business model has inheritance. And with Bean Validation you end up with constraints on your business model classes, superclasses, or interfaces. Constraint inheritance on properties works like normal inheritance in Java: it is cumulative. This means that when a bean inherits from another, its constraints are also inherited and will be validated.
Listing 3-15 shows the CD class that extends from Item (Listing 3-14). Both have attributes and constraints on these attributes. If an instance of CD is validated, not only its constraints are validated but also the constraint from the parent class.
Listing 3-14. An Item Superclass Using Constraints
public class Item {

  @NotNull
  protected Long id;
  @NotNull @Size(min = 4, max = 50)
  protected String title;
  protected Float price;
  protected String description;

  @NotNull
  public Float calculateVAT() {
    return price * 0.196f;
  }

  @NotNull
  public Float calculatePrice( @DecimalMin("1.2") Float rate) {
    return price * rate;
  }
}
Listing 3-15. A CD Class Extending Item
public class CD extends Item {

  @Pattern(regexp = "[A-Z][a-z]{1,}")
  private String musicCompany;
  @Max(value = 5)
  private Integer numberOfCDs;
  private Float totalDuration;
  @MusicGenre
  private String genre;

  // ConstraintDeclarationException : not allowed when method overriding
  public Float calculatePrice( @DecimalMin("1.4") Float rate) {
    return price * rate;
  }
}
The same inheritance mechanism applies to method-level constraints. The calculateVAT method declared in Item is inherited by CD. But in case of method overriding, special care must be taken when defining parameter constraints. Only the root method of an overridden method may be annotated with parameter constraints. The reason for this restriction is that the preconditions must not be strengthened in subtypes. Conversely, return value constraints may be added in subtypes without any restrictions (you can strengthen the postconditions).
So when you validate the calculatePrice of the CD class (see Listing 3-15), the Bean Validation runtime will throw a javax.validation.ConstraintDeclarationException saying that only the root method of an overridden method may use parameter constraints.
As seen earlier (Listing 3-2), a constraint annotation definition has several mandatory attributes: message, groups, and payload. Every constraint must define a default message of type String which is used to create the error message if there is a constraint violation when validating a bean.
The value of the default message can be hard coded, but it is recommended to use a resource bundle key to allow internationalization. By convention the resource bundle key should be the fully qualified class name of the constraint annotation concatenated to .message.
// Hard coded error message
String message() default "Email address doesn't look good";
// Resource bundle key
String message() default "{org.agoncal.book.javaee7. Email.message }";
By default the resource bundle file is named ValidationMessages.properties and must be in the class path of the application. The file follows the key/value pair format, so this is what you need to write to externalize and internationalize an error message.
org.agoncal.book.javaee7. Email.message =Email address doesn't look good
This default message defined in the constraint annotation can then be overridden on a per-usage basis at declaration time.
@Email( message = "Recovery email is not a valid email address" )
private String recoveryEmail;
Thanks to message interpolation (javax.validation.MessageInterpolator interface), the error message can contain placeholders. The goal of interpolation is to determine the error message by resolving the message strings and the parameters between braces. The error message that follows is interpolated so the {min} and {max} placeholders are replaced by the value of the corresponding elements:
javax.validation.constraints.Size.message = size must be between {min} and {max}
Listing 3-16 shows a Customer class that uses error messages in several ways. The userId attribute is annotated with @Email, meaning that if the value is not a valid e-mail address, the default error message will be used. On the other hand the recoveryEmail overrides the default error message. Note that for the firstName and age attributes, the default error messages are overridden with messages using placeholders.
Listing 3-16. A Customer Class Declaring Several Error Messages
public class Customer {
private String userId;
@NotNull @Size(min = 4, max = 50, message = "Firstname should be between {min} and {max}")
private String firstName;
private String lastName;
@Email(message = "Recovery email is not a valid email address")
private String recoveryEmail;
private String phoneNumber;
@Min(value = 18, message = "Customer is too young. Should be older that {value}")
private Integer age;
// Constructors, getters, setters
}
ConstraintValidator Context
So far you’ve seen that constraint implementation classes need to implement ConstraintValidator and, thus, to define their own isValid method. The isValid method signature takes the datatype to which the constraint is applied but also a ConstraintValidationContext. This interface encapsulates data related to the context in which the validation is executed by the Bean Validation provider. Table 3-3 lists the methods defined in the javax.validation.ConstraintValidatorContext interface.
Table 3-3. Methods of the ConstraintValidationContext Interface
| Method | Description |
|---|---|
| disableDefaultConstraintViolation | Disable the default ConstraintViolation object generation |
| getDefaultConstraintMessageTemplate | Returns the current uninterpolated default message |
| buildConstraintViolationWithTemplate | Returns a ConstraintViolationBuilder to allow the building of a custom violation report |
The ConstraintValidatorContext interface allows redefinition of the default constraint message. The buildConstraintViolationWithTemplate method returns a ConstraintViolationBuilder, based on the fluent API pattern, to allow building custom violation reports. The code that follows adds a new constraint violation to the report:
context.buildConstraintViolationWithTemplate("Invalid protocol")
       .addConstraintViolation();
This technique allows you to generate and create one or more custom report messages. If we take the example of the @URL constraint (Listing 3-7) we notice that there is only one error message for the entire constraint (“Malformed URL”). But this constraint has several attributes (protocol, host, and port) and we might want to have specific error messages for each attribute such as “Invalid protocol” or “Invalid host.”
![]() Note The ConstraintViolation interface describes a constraint violation. It exposes the constraint violation context as well as the message describing the violation. More on that later in the “Validating Constraints” section.
Note The ConstraintViolation interface describes a constraint violation. It exposes the constraint violation context as well as the message describing the violation. More on that later in the “Validating Constraints” section.
Listing 3-17 revisits the URL constraint class implementation and uses the ConstraintValidatorContext to change the error message. The code completely disables the default error message generation (disableDefaultConstraintViolation) and solely defines custom error messages for each attribute.
Listing 3-17. The URL Constraint Using the ConstraintValidatorContext to Customize Error Messages
public class URLValidator implements ConstraintValidator<URL, String> {

  private String protocol;
  private String host;
  private int port;

  public void initialize(URL url) {
    this.protocol = url.protocol();
    this.host = url.host();
    this.port = url.port();
  }

  public boolean isValid(String value, ConstraintValidatorContext context ) {
    if (value == null || value.length() == 0) {
      return true;
    }

    java.net.URL url;
    try {
      url = new java.net.URL(value);
    } catch (MalformedURLException e) {
      return false;
    }

    if (protocol != null && protocol.length() > 0 && !url.getProtocol().equals(protocol)) {
      context .disableDefaultConstraintViolation();
      context .buildConstraintViolationWithTemplate(" Invalid protocol ").addConstraintViolation();
      return false;
    }

    if (host != null && host.length() > 0 && !url.getHost().startsWith(host)) {
      context.disableDefaultConstraintViolation();
      context.buildConstraintViolationWithTemplate("Invalid host").addConstraintViolation();
      return false;
    }

    if (port != -1 && url.getPort() != port) {
      context .disableDefaultConstraintViolation();
      context .buildConstraintViolationWithTemplate(" Invalid port ").addConstraintViolation();
      return false;
    }

    return true;
  }
}
Groups
When a bean is validated it means that all the constraints are validated once at the same time. But what if you need to partially validate your bean (a subset of constraints) or to control the order in which constraints are evaluated? That’s when groups come into play. Groups allow you to restrict the set of constraints applied during validation.
In terms of code a group is just an empty interface.
public interface Payment {}
In terms of business logic a group has a meaning. For example, in a workflow “Payment” would suggest that attributes belonging to this group will be validated during the payment phase or the purchase order. To apply this group to a set of constraints you just need to use the groups attribute and pass it the interface.
@Past( groups = Payment.class )
private Date paymentDate;
You can have as many groups as your business logic needs and you can apply multiple groups to a constraint as the groups attribute allows an array of groups.
@Past(groups = {Payment.class, Delivery.class} )
private Date deliveryDate;
Every constraint annotation must define a groups element. If no group is specified then the default javax.validation.groups.Default group is considered declared. So the following constraints are equivalent and are both part of the Default group:
@NotNull
private Long id;
@Past( groups = Default.class )
private Date creationDate;
Let’s take the previous-use case seen with the @ChronologicalDates and apply groups to it. The Order class in Listing 3-18 has several dates to keep track of the purchase order workflow: creationDate, paymentDate, and deliveryDate. When you first create a purchase order the creationDate attribute is set but not the paymentDate and deliveryDate. You want to validate these two last dates later in a different workflow phase, but not at the same time as the creationDate. By applying groups you can validate the creationDate during the default group (since no group is specified for this annotation its default group is javax.validation.groups.Default), the paymentDate during the Payment phase, and deliveryDate and @ChronologicalDates during the Delivery phase.
Listing 3-18. A Class Using Several Groups
@ChronologicalDates( groups = Delivery.class )
public class Order {

  @NotNull
  private Long id;
  @NotNull @Past
  private Date creationDate ;
  private Double totalAmount;

  @NotNull( groups = Payment.class )  @Past( groups = Payment.class )
  private Date paymentDate ;

  @NotNull( groups = Delivery.class ) @Past( groups = Delivery.class )
  private Date deliveryDate ;

  private List<OrderLine> orderLines;

  // Constructors, getters, setters
}
As you’ll soon see, during the validation you just need to explicitly mention which group(s) you want to validate and the Bean Validation provider will do partial validation.
Deployment Descriptors
Like most Java EE 7 technologies, Bean Validation allows you to define metadata using annotations (what I’ve been doing so far in all the examples) as well as XML. Bean Validation can have several optional files under the META-INF directory. The first one, validation.xml, can be used by applications to refine some of the Bean Validation behavior (such as the default Bean Validation provider, the message interpolator, or specific properties). Then, you can have several files describing constraints declarations on your beans. Like all the deployment descriptors in Java EE 7, the XML overrides the annotations.
Listing 3-19 shows the validation.xml deployment descriptor that has a validation-config XML root element but, more important, defines one external constraint mapping file: constraints.xml (Listing 3-20).
Listing 3-19. A validation.xml File Declaring a Constraint Mapping File
<?xml version="1.0" encoding="UTF-8"?>
< validation-config
        xmlns=" http://jboss.org/xml/ns/javax/validation/configuration "
        xmlns:xsi=" http://www.w3.org/2001/XMLSchema-instance "
        xsi:schemaLocation=" http://jboss.org/xml/ns/javax/validation/configuration →
                            validation-configuration-1.1.xsd"
        version="1.1">

  <constraint-mapping>META-INF/ constraints.xml </constraint-mapping>

</validation-config>
Listing 3-20. A File Defining Constraints on a Bean
<?xml version="1.0" encoding="UTF-8"?>
<constraint-mappings
        xmlns=" http://jboss.org/xml/ns/javax/validation/mapping "
        xmlns:xsi=" http://www.w3.org/2001/XMLSchema-instance "
        xsi:schemaLocation=" http://jboss.org/xml/ns/javax/validation/mapping →
                            validation-mapping-1.1.xsd"
        version="1.1">

  <bean class="org.agoncal.book.javaee7.chapter03. Book " ignore-annotations="false">
    <field name=" title ">
      <constraint annotation="javax.validation.constraints. NotNull ">
        < message >Title should not be null</message>
      </constraint>
    </field>
    <field name=" price ">
      <constraint annotation="javax.validation.constraints. NotNull "/>
      <constraint annotation="javax.validation.constraints. Min ">
        <element name=" value "> 2 </element>
      </constraint>
    </field>
    <field name=" description ">
      <constraint annotation="javax.validation.constraints. Size ">
        <element name="max"> 2000 </element>
      </constraint>
    </field>
  </bean>
</constraint-mappings>
The constraints.xml file in Listing 3-20 defines the XML metadata for declaring constraints on the Book class. It first applies a @NotNull constraint on the attribute title and redefines the default error message (Title should not be null). For the price attribute two distinct constraints are applied and the minimum value is set to 2. This resembles the code in Listing 3-1 where metadata was defined using annotations.
Validating Constraints
So far we’ve been dealing with constraints, defining them, aggregating them, implementing our own, customizing error messages, affecting groups—but without a validation runtime the constraints cannot be validated. Like most Java EE technologies the code needs to run inside a container or be managed by a provider.
Constraints can be applied to beans, attributes, getters, constructors, method parameters, and return values. So validation can occur on all these element types. You can validate beans, properties, values, methods, and groups but also a graph of objects with their own constraints. For all these constraints to be validated at runtime you need a validation API.
The validation runtime uses a small set of APIs to be able to validate constraints. The main API is the javax.validation.Validator interface. It holds the contracts to validate objects and objects graphs independently of the layer in which it is implemented (presentation layer, business layer, or business model). Upon validation failure a set of javax.validation.ConstraintViolation interfaces is returned. This interface exposes the constraint violation context as well as the message describing the violation.
Validator
The main entry point for validation is the Validator interface. Its API is able to validate instances of beans using only a few methods described in Table 3-4. All these validation methods have the following routine for each constraint declaration:
- Determine the appropriate ConstraintValidator implementation to use for the constraint declaration (e.g., determine the ConstraintValidator for the @Size constraint on a String).
- Execute the isValid method.
- If isValid returns true, continue to the next constraint.
- If isValid returns false, the Bean Validation provider adds a ConstraintViolation to the list of constraint violations.
If some unrecoverable failure happens during this validation routine, it raises a ValidationException. This exception can be specialized in some situations (invalid group definition, invalid constraint definition, invalid constraint declaration).
Table 3-4. Methods of the Validator Interface
| Method | Description |
|---|---|
| <T> Set<ConstraintViolation<T>> validate (T object, Class<?>... groups) | Validates all constraints on an object |
| <T> Set<ConstraintViolation<T>> validateProperty (T object, String propName, Class<?>... groups) | Validates all constraints placed on a property |
| <T> Set<ConstraintViolation<T>> validateValue (Class<T> beanType, String propName, Object value, Class<?>... groups) | Validates all constraints placed on a property for a given value |
| BeanDescriptor getConstraintsForClass(Class<?> clazz) | Returns the descriptor object describing bean constraints |
| ExecutableValidator forExecutables () | Returns a delegate for validating parameters and return values on methods & constructors |
The methods validate, validateProperty, and validateValue are used, respectively, for validating an entire bean, a property, or a property for a given value. All methods take a varargs parameter that can be used to specify the groups to validate. The forExecutables provides access to a ExecutableValidator for validating methods and constructor parameters and return value. Table 3-5 describes the ExecutableValidator API.
Table 3-5. Methods of the ExecutableValidator Interface
| Method | Description |
|---|---|
| <T> Set<ConstraintViolation<T>> validateParameters (T object, Method method, Object[] params, Class<?>... groups) | Validates all constraints placed on the parameters of a method |
| <T> Set<ConstraintViolation<T>> validateReturnValue (T object, Method method, Object returnValue, Class<?>... groups) | Validates all return value constraints of a method |
| <T> Set<ConstraintViolation<T>> validateConstructorParameters (Constructor<T> constructor, Object[] params, Class<?>... groups) | Validates all constraints placed on the parameters of a constructor |
| <T> Set<ConstraintViolation<T>> validateConstructorReturnValue (Constructor<T> constructor, T createdObject, Class<?>... groups) | Validates all return value constraints of a constructor |
All the validating methods listed in Tables 3-4 and 3-5 return a set of ConstraintViolation which can be iterated in order to see which validation errors occurred. If the set is empty then the validation succeeds. Otherwise a ConstraintViolation instance is added to the set for each violated constraint. The ConstraintViolation describes a single constraint failure and its API gives a lot of useful information about the cause of the failure. Table 3-6 gives an overview of this API.
Table 3-6. Methods of the ConstraintViolation Interface
| Method | Description |
|---|---|
| String getMessage() | Returns the interpolated error message for this constraint violation |
| String getMessageTemplate() | Return the non-interpolated error message |
| T getRootBean() | Returns the root bean being validated |
| Class<T> getRootBeanClass() | Returns the class of the root bean being validated |
| Object getLeafBean() | Returns the leaf bean the constraint is applied on |
| Path getPropertyPath() | Returns the property path to the value from the root bean |
| Object getInvalidValue() | Returns the value failing to pass the constraint |
| ConstraintDescriptor<?> getConstraintDescriptor() | Returns the constraint metadata |
Obtaining a Validator
The first step toward validating a bean is to get hold of a Validator instance. Like most of the Java EE specifications you can either get a Validator programmatically (if your code is executed outside a container) or get it injected (if your code is executed in an EJB or web container).
If you do it programmatically you need to start with the Validation class which bootstraps the Bean Validation provider. Its buildDefaultValidatorFactory method builds and returns a ValidatorFactory which in turn is used to build a Validator. The code looks like the following:
ValidatorFactory factory = Validation.buildDefaultValidatorFactory();
Validator validator = factory.getValidator();
You then need to manage the life cycle of the ValidatorFactory and programmatically close it.
factory.close();
If your application runs in a Java EE container, then the container must make the following instances available under JNDI:
- ValidatorFactory under java:comp/ValidatorFactory
- Validator under java:comp/Validator
Then you can look up these JNDI names and get an instance of Validator. But instead of looking the instances up via JNDI, you can request them to be injected via the @Resource annotation.
@Resource ValidatorFactory validatorFactory;
@Resource Validator validator;
If your container is using CDI (which by default it is in Java EE 7), the container must allow the injection via @Inject.
@Inject ValidatorFactory;
@Inject Validator;
Either way (with @Resource or @Inject) the container looks after the life cycle of the factory. So you do not need to manually create or close the ValidatorFactory.
Validating Beans
Once the Validator is obtained programmatically or by injection we can use its methods to validate either an entire bean or just a single property. Listing 3-21 shows a CD class with constraints set on properties and on method parameters and return value.
Listing 3-21. A Bean with Property and Method Constraints
public class CD {

  @NotNull @Size(min = 4, max = 50)
  private String title;
  @NotNull
  private Float price;
  @NotNull(groups = PrintingCatalog.class)
  @Size(min = 100, max = 5000, groups = PrintingCatalog.class)
  private String description;
  @Pattern(regexp = "[A-Z][a-z]{1,}")
  private String musicCompany;
  @Max(value = 5)
  private Integer numberOfCDs;
  private Float totalDuration;

  @NotNull @DecimalMin("5.8")
  public Float calculatePrice( @DecimalMin("1.4") Float rate) {
    return price * rate;
  }

  @DecimalMin("9.99")
  public Float calculateVAT() {
    return price * 0.196f;
  }
}
To validate the entire bean properties we just need to create an instance of CD and call the Validator.validate() method. If the instance is valid, then an empty set of ConstraintViolation is returned. The code that follows shows a valid CD instance (with a title and a price) that is validated. The code then checks that the set of constraints violations is empty.
CD cd = new CD("Kind of Blue", 12.5f);
Set<ConstraintViolation<CD>> violations = validator. validate (cd);
assertEquals( 0, violations.size() );
On the other hand the following code will return two ConstraintViolation objects—one for the title and another one for the price (both violating @NotNull):
CD cd = new CD();
Set<ConstraintViolation<CD>> violations = validator.validate(cd);
assertEquals( 2, violations.size() );
The previous examples validate the entire bean properties. But with the help of the Validator.validateProperty() method, we can validate a single named property of a given object. This method is useful for partial object validation.
The code below creates a CD object with null title and price, meaning that the bean is not valid. But because we only validate the numberOfCDs property, the validation succeeds and the set of constraint violations is empty.
CD cd = new CD();
cd. setNumberOfCDs ( 2 );
Set<ConstraintViolation<CD>> violations = validator. validateProperty (cd, " numberOfCDs ");
assertEquals(0, violations.size());
On the contrary, the following code raises one constraint violation because the maximum number of CDs should be 5 and not 7. Notice that we use the ConstraintViolation API to check the number of violations, the interpolated message returned by the violation, the invalid value, and the message template.
CD cd = new CD();
cd.setNumberOfCDs( 7 );
Set<ConstraintViolation<CD>> violations = validator.validateProperty(cd, "numberOfCDs");
assertEquals(1, violations.size() );
assertEquals("must be less than or equal to 5", violations.iterator().next(). getMessage() );
assertEquals(7, violations.iterator().next(). getInvalidValue() );
assertEquals("{javax.validation.constraints.Max.message}",
             violations.iterator().next(). getMessageTemplate() );
Using the Validator.validateValue() method, you can check whether a single property of a given class can be validated successfully, if the property had the specified value. This method is useful for ahead-of-time validation because you don’t even have to create an instance of the bean or populate or update its values.
The code that follows doesn’t create a CD object but just refers to the numberOfCDs attribute of the CD class. It passes a value and checks that the property is valid (number of CDs lower or equal than 5) or not:
Set<ConstraintViolation<CD>> constr = validator. validateValue (CD.class, "numberOfCDs", 2 );
assertEquals( 0, constr.size() );
Set<ConstraintViolation<CD>> constr = validator. validateValue (CD.class, "numberOfCDs", 7 );
assertEquals( 1, constr.size() );
The methods for the validation of parameters and return values of methods and constructors can be found on the interface javax.validation.ExecutableValidator. The Validator.forExecutables() returns this ExecutableValidator on which you can invoke validateParameters, validateReturnValue, validateConstructorParameters, or validateConstructorReturnValue.
The code that follows calls the calculatePrice method passing the value 1.2. This will cause a constraint violation on the parameter as it violates @DecimalMin("1.4"). To do that, the code first needs to create a java.lang.reflect.Method object targeting the calculatePrice method with a parameter of type Float. Then it gets the ExecutableValidator object and invokes validateParameters passing the bean, the method to invoke, and the parameter value (here 1.2). It then checks that there are no constraints violated.
CD cd = new CD("Kind of Blue", 12.5f);
Method method = CD.class.getMethod(" calculatePrice ", Float .class);
ExecutableValidator methodValidator = validator. forExecutables ();
Set<ConstraintViolation<CD>> violations = methodValidator.validateParameters (cd, method,
                                                           new Object[]{new Float( 1.2 )});
assertEquals(1, violations.size());
Validating Groups
A group defines a subset of constraints. Instead of validating all constraints for a given bean, only a subset is validated. Each constraint declaration defines the list of groups it belongs to. If no group is explicitly declared, a constraint belongs to the Default group. From a validation point of view all the validation methods have a varargs parameter which can be used to specify which validation groups shall be considered when performing the validation. If the parameter is not specified, the default validation group (javax.validation.groups.Default) will be used. If a group other than Default is specified, then Default is not validated.
In Listing 3-21 all the constraints belong to the Default group except for the description attribute. A description is needed (@NotNull @Size(min = 100, max = 5000)) only if it has to be printed on a catalog (the PrintingCatalog group). So if we create a CD with no title, no price, and a description and validate the Default group, then only the two @NotNull constraints on title and price will be violated.
CD cd = new CD();
cd. setDescription ("Best Jazz CD ever");
Set<ConstraintViolation<CD>> violations = validator. validate (cd, Default.class );
assertEquals( 2 , violations.size());
Note that the previous code explicitly mentions the Default group during validation, but it can be omitted. So the following code is identical:
Set<ConstraintViolation<CD>> violations = validator. validate (cd);
On the other hand, if we decided to validate the CD for only the PrintingCatalog group, then the code that follows will only violate the constraint on description as its value is too short:
CD cd = new CD();
cd.setDescription("Too short");
Set<ConstraintViolation<CD>> violations = validator.validate(cd, PrintingCatalog .class);
assertEquals( 1 , violations.size());
If you want to validate your bean for both, the Default and the PrintingCatalog, you will end up with three constraints violated (@NotNull constraints on title and price and description too short):
CD cd = new CD();
cd.setDescription("Too short");
Set<ConstraintViolation<CD>> violations = validator.validate(cd, Default.class ,
 PrintingCatalog .class);
assertEquals( 3 , violations.size());
Putting It All Together
Now let’s put all these concepts together and write Java Beans where we can apply built-in constraint as well as developing our own. This example uses CDI and Bean Validation constraints running in Java SE (no need to deploy anything in GlassFish for now) and two integration tests to check if our constraints are correct.
Figure 3-2 shows a Customer class that has a delivery address (Address). Both beans have built-in constraints (@NotNull, @Size, and @Past) on their attributes. But they also use two constraints that we need to develop.
- @Email, an aggregated constraint that checks that the e-mail address is valid.
- @ZipCode that checks if the zip code is valid for the United States. This constraint is made of an annotation as well as an implementation class (ZipCodeValidator). Note that ZipCodeValidator injects the helper class ZipCodeChecker with @Inject (and the CDI qualifier @USA).
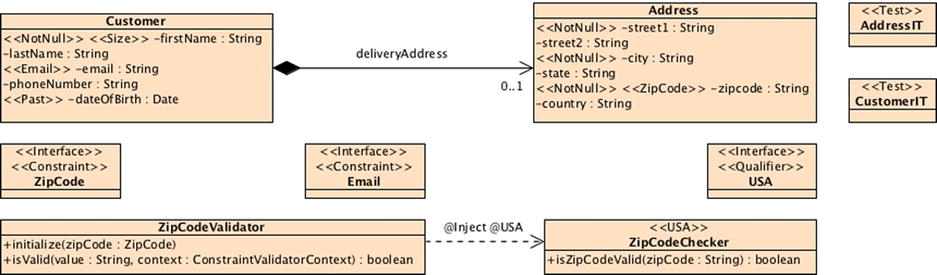
Figure 3-2. Putting it all together
The classes described in Figure 3-2 follow the Maven directory structure and have to be placed in the following directories:
- src/main/java: The directory for the Customer, Address beans and ZipCode, and Email constraints.
- src/main/resources: The beans.xml file so we can use CDI as well as the ValidationMessages.properties file for the constraints error messages.
- src/test/java: The directory for the integration tests AddressIT and CustomerIT.
- pom.xml: The Maven Project Object Model (POM) describing the project and its dependencies.
In the CD-BookStore application a customer buys items online and these items are then delivered to his home address. To do so, the application needs valid information to ship the items such as the customers’ name, e-mail address, and delivery address. The date of birth allows the application to send an annual birthday e-mail. Listing 3-22 shows the Customer bean with some built-in constraints on attributes (firstname cannot be null and the dateOfBirth has to be in the past), as well the @Email constraint that we will develop, and checks that a String is a valid e-mail address.
Listing 3-22. A Customer Bean with Built-In and E-mail Constraints
public class Customer {
@NotNull @Size(min = 2)
private String firstName;
private String lastName;
private String email;
private String phoneNumber;
@Past
private Date dateOfBirth;
private Address deliveryAddress;
// Constructors, getters, setters
}
A Customer has zero or one delivery address. An Address is a bean that has all the needed information for an item to be shipped: street, city, state, zip code, and country. Listing 3-23 shows the Address bean with the @NotNull constraint applied on crucial attributes (street1, city, and zipcode) as well as the @ZipCode constraint that checks that a zip code is valid (developed later).
Listing 3-23. An Address Bean with Built-In and @ZipCode Constraints
public class Address {

  @NotNull
  private String street1;
  private String street2;
  @NotNull
  private String city;
  private String state;
  @NotNull @ZipCode
  private String zipcode;
  private String country;

  // Constructors, getters, setters
}
Writing the @Email Constraint
The @Email constraint is not built in Bean Validation, so we need to develop it. There is no need to have an implementation class (@Constraint(validatedBy = {})) as a simple constraint annotation with the right regular expression (@Pattern) and size will work. Listing 3-24 shows the @Email constraint annotation.
Listing 3-24. The E-mail Constraint Annotation with Built-In Constraints Aggregation
@Size (min = 7)
@Pattern (regexp = "[a-z0-9!#$%&'*+/=?^_`{|}∼-]+(?:\."
        + "[a-z0-9!#$%&'*+/=?^_`{|}∼-]+)*"
        + "@(?:[a-z0-9](?:[a-z0-9-]*[a-z0-9])?\.)+[a-z0-9](?:[a-z0-9-]*[a-z0-9])?")
@ReportAsSingleViolation
@Constraint(validatedBy = {})
@Target({METHOD, FIELD, ANNOTATION_TYPE, CONSTRUCTOR, PARAMETER})
@Retention(RUNTIME)
public @interface Email {

  String message() default " {org.agoncal.book.javaee7.chapter03.Email.message} ";
  Class<?>[] groups() default {};
  Class<? extends Payload>[] payload() default {};

  @Target({METHOD, FIELD, ANNOTATION_TYPE, CONSTRUCTOR, PARAMETER})
  @Retention(RUNTIME)
  @interface List {
    Email[] value();
  }
}
Notice that in Listing 3-24 the error message is a bundle key that is defined in the META-INF/ ValidationMessages.properties file.
org.agoncal.book.javaee7.chapter03.Email.message=invalid email address
Writing the @ZipCode Constraint
The @ZipCode constraint is more complex to write than @Email. A zip code has a certain format (e.g., five digits in the United States) and this can be easily checked with a regular expression. But to be sure that the zip code is not just syntactically correct but valid, we need to access an external service that will check if a certain zip code exists in a database or not. That’s why the ZipCode constraint annotation in Listing 3-25 needs an implementation class (ZipCodeValidator).
Listing 3-25. The @ZipCode Constraint Annotation
@Constraint( validatedBy = ZipCodeValidator.class )
@Target({METHOD, FIELD, ANNOTATION_TYPE, CONSTRUCTOR, PARAMETER})
@Retention(RUNTIME)
public @interface ZipCode {

  String message() default "{org.agoncal.book.javaee7.chapter03.ZipCode.message}";
  Class<?>[] groups() default {};
  Class<? extends Payload>[] payload() default {};

  @Target({METHOD, FIELD, ANNOTATION_TYPE, CONSTRUCTOR, PARAMETER})
  @Retention(RUNTIME)
  @interface List {
    ZipCode [] value();
  }
}
Listing 3-26 shows the ZipCode constraint implementation class: ZipCodeValidator implements the javax.validation.ConstraintValidator interface with the generic type String. The isValid method implements the validation algorithm that consists of matching a regular expression pattern and calling an external service: ZipCodeChecker. The code of the ZipCodeChecker is not shown here because it is not relevant. What’s important is to note that it is injected (@Inject) with a CDI qualifier (@USA shown in Listing 3-27). So you can see both CDI and Bean Validation specifications working together.
Listing 3-26. The ZipCodeValidator Constraint Implementation
public class ZipCodeValidator implements ConstraintValidator < ZipCode , String> {

  @Inject @USA
  private ZipCodeChecker checker ;
  private Pattern zipPattern = Pattern.compile("\d{5}(-\d{5})?");

  public void initialize(ZipCode zipCode) {
  }

  public boolean isValid(String value , ConstraintValidatorContext context) {
    if (value == null)
      return true;

    Matcher m = zipPattern.matcher( value );
    if (!m.matches())
      return false;

    return checker .isZipCodeValid(value);
  }
}
Listing 3-27. The USA CDI Qualifier
@Qualifier
@Retention(RUNTIME)
@Target({FIELD, TYPE, METHOD})
public @interface USA {
}
![]() Note In the next chapters, you will see how to integrate Bean Validation with other specifications such as JPA (you can add constraints to your entities) or JSF (you can constrain your backing beans).
Note In the next chapters, you will see how to integrate Bean Validation with other specifications such as JPA (you can add constraints to your entities) or JSF (you can constrain your backing beans).
Writing the CustomerIT and AddressIT Integration Tests
How can we now test our constraints on our beans? We can’t really write unit tests for @Email, as it is a constraints aggregation annotation, or for @ZipCode because it needs injection to work (which is a container service). The easiest is to write an integration test; that is, use the ValidatorFactory to get a Validator and validate our beans.
Listing 3-28 shows the CustomerIT class that integration-tests the Customer bean. The init() method initializes the Validator (using the ValidatorFactory) and the close() method releases the factory. Then the class consists of two tests: one creating a valid Customer object and another one creating an object with an invalid e-mail address and checking whether the validation fails.
Listing 3-28. The CustomerIT Integration Test
public class CustomerIT {

  private static ValidatorFactory vf;
  private static Validator validator;

  @BeforeClass
  public static void init() {
    vf = Validation.buildDefaultValidatorFactory() ;
    validator = vf.getValidator() ;
  }

  @AfterClass
  public static void close() {
    vf.close();
  }

  @Test
  public void shouldRaiseNoConstraintViolation() {

    Customer customer = new Customer("John", "Smith", " [email protected] ");

    Set<ConstraintViolation<Customer>> violations = validator.validate(customer) ;
    assertEquals( 0 , violations.size());
  }

  @Test
  public void shouldRaiseConstraintViolationCauseInvalidEmail() {

    Customer customer = new Customer("John", "Smith", " DummyEmail ");

    Set<ConstraintViolation<Customer>> violations = validator.validate(customer) ;
    assertEquals( 1 , violations.size());
    assertEquals("invalid email address", violations.iterator().next(). getMessage() );
    assertEquals("dummy", violations.iterator().next(). getInvalidValue() );
    assertEquals("{org.agoncal.book.javaee7.chapter03.Email.message}",
                                  violations.iterator().next(). getMessageTemplate() );
  }
}
Listing 3-29 follows the same pattern (creating a Validator with a factory, validating a bean, and closing the factory) but for the Address bean.
Listing 3-29. The AddressIT Integration Test
public class AddressIT {

  @Test
  public void shouldRaiseConstraintViolationCauseInvalidZipCode() {

    ValidatorFactory vf = Validation.buildDefaultValidatorFactory();
    Validator validator = vf.getValidator();

    Address address = new Address("233 Spring Street", "New York", "NY", " DummyZip ", "USA");

    Set<ConstraintViolation<Address>> violations = validator.validate(address);
    assertEquals(1, violations.size());

    vf.close();
  }
}
Compiling and Testing with Maven
All the classes need now to be compiled before they get tested. The pom.xml in Listing 3-30 declares all necessary dependencies to compile the code: Hibernate Validator (the reference implementation for Bean Validation) and Weld (for CDI). Notice that the pom.xml declares the Failsafe plug-in that is designed to run integration tests (used to run both CustomerIT and AddressIT integration test classes).
Listing 3-30. The pom.xml File to Compile and Test the Constraints
<?xml version="1.0" encoding="UTF-8"?>
<project xmlns=" http://maven.apache.org/POM/4.0.0 " →
         xmlns:xsi=" http://www.w3.org/2001/XMLSchema-instance " →
         xsi:schemaLocation=" http://maven.apache.org/POM/4.0.0 →
         http://maven.apache.org/xsd/maven-4.0.0.xsd ">
  <modelVersion>4.0.0</modelVersion>

  <parent>
    <artifactId>chapter03</artifactId>
    <groupId>org.agoncal.book.javaee7</groupId>
    <version>1.0</version>
  </parent>

  <groupId>org.agoncal.book.javaee7.chapter03</groupId>
  <artifactId>chapter03-putting-together</artifactId>
  <version>1.0</version>

  <dependencies>
    <dependency>
      <groupId>org.hibernate</groupId>
      <artifactId> hibernate-validator </artifactId>
      <version>5.0.0.Final</version>
    </dependency>
    <dependency>
      <groupId>org.jboss.weld.se</groupId>
      <artifactId> weld-se </artifactId>
      <version>2.0.0.Final</version>
    </dependency>

    <dependency>
      <groupId>junit</groupId>
      <artifactId>junit</artifactId>
      <version>4.11</version>
      <scope>test</scope>
    </dependency>
  </dependencies>

  <build>
    <plugins>
      <plugin>
        <artifactId>maven-compiler-plugin</artifactId>
        <version>2.5.1</version>
        <configuration>
          <source> 1.7 </source>
          <target>1.7</target>
        </configuration>
      </plugin>
      <plugin>
        <artifactId>maven-failsafe-plugin</artifactId>
        <version>2.12.4</version>
        <executions>
          <execution>
            <id>integration-test</id>
            <goals>
              <goal> integration-test </goal>
              <goal>verify</goal>
            </goals>
          </execution>
        </executions>
      </plugin>
    </plugins>
  </build>
</project>
To compile the classes, open a command line in the root directory containing the pom.xml file and enter the following Maven command:
$ mvn compile
To execute the integration tests with the Maven Failsafe plug-in enter the following:
$ mvn integration-test
Summary
Bean Validation has a very comprehensive approach to validation problems and solves most of the use cases by validating properties or methods in any application layer. If you find that some cases have been ignored or forgotten, the API is flexible enough to be extended to properly fit your needs.
In this chapter you saw that a constraint is made of an annotation and a separate class implementing the validation logic. You can then aggregate these constraints to build new ones or reuse existing ones. Bean Validation comes with already built-in constraints, although it is regrettable that there are some missing (@Email, @URL, @CreditCard . . .).
In the first version of the specification, Bean Validation only allowed the validation of beans and attributes. This gave us better Domain-Driven Design, by putting the shallow domain validation in the POJO itself and in this way avoiding the anemic object anti-pattern. In Bean Validation 1.1, validating constructors and method parameters and return value were introduced. This now gives us pre- and postconditions validation, something close to design by contract.
In the following chapters you will see how Bean Validation is integrated in Java EE, particularly with JPA and JSF, and how it can be used in most of the specifications.