![]()
Callbacks, Timer Service, and Authorization
In the previous chapter, you learned that session beans are container-managed components. They live in an EJB container, which wraps business code behind the scenes with several services (dependency injection, transaction management, etc.). Three of these services are life-cycle management, scheduling, and authorization.
Life cycle means that a session bean goes through a predefined set of state transitions. Depending on the type of your bean (stateless, stateful, singleton), the life cycle will consist of different states. Each time the container changes the life-cycle state, it can invoke methods that are annotated with callback annotations.
The EJB timer service is the standard answer to scheduling tasks. Enterprise applications dependent on calendar-based notifications use this service to model workflow-type business processes.
Securing data is also important. You want your business tier to act like a firewall and authorize some actions to certain groups of users and deny access to others (e.g., only employees are allowed to persist data, but users and employees are authorized to read data).
In this chapter you will learn that stateless and singleton session beans share the same life cycle and that stateful beans have a slightly different one. You will also see how both stateless and singleton can use the timer service to schedule tasks declaratively or programmatically. This chapter finishes by showing how authorization works in the EJB container and how you can easily allow users with specific roles to access your code.
As you’ve seen in the previous chapter, a client doesn’t create an instance of a session bean using the new operator. It gets a reference to a session bean either through dependency injection or through JNDI lookup. The container is the one creating the instance and destroying it. This means that neither the client nor the bean is responsible for determining when the bean instance is created, when dependencies are injected, or when the instance is destroyed. The container is responsible for managing the life cycle of the bean.
All session beans have two obvious phases in their life cycle: creation and destruction. In addition, stateful session beans go through the passivation and activation phases, which I mentioned in the previous chapter. Similar to the callback methods used in entities that you saw in previous chapters, EJBs allow the container, during certain phases of its life, to automatically invoke annotated methods (@PostConstruct, @PreDestroy, etc.). These methods may initialize state information on the bean, look up resources using JNDI, or release database connections.
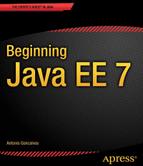
Stateless and singleton beans have in common the fact that they don’t maintain conversational state with a dedicated client. Both bean types allow access by any client—stateless does this on a per-instance basis, while singleton provides concurrent access to a single instance. Both share the same life cycle shown in Figure 8-1 and described as follows:
- The life cycle of a stateless or singleton session bean starts when a client requests a reference to the bean (using either dependency injection or JNDI lookup). In the case of a singleton, it can also start when the container is bootstrapped (using the @Startup annotation). The container creates a new session bean instance.
- If the newly created instance uses dependency injection through annotations (@Inject, @Resource, @EJB, @PersistenceContext, etc.) or deployment descriptors, the container injects all the needed resources.
- If the instance has a method annotated with @PostContruct, the container invokes it.
- The bean instance processes the call invoked by the client and stays in ready mode to process future calls. Stateless beans stay in ready mode until the container frees some space in the pool. Singletons stay in ready mode until the container is shut down.
- The container does not need the instance any more. It invokes the method annotated with @PreDestroy, if any, and ends the life of the bean instance.
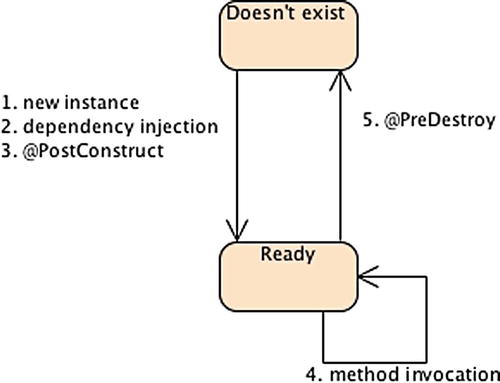
Figure 8-1. Stateless and singleton bean life cycle
Stateless and singleton beans share the same life cycle, but there are some differences in the way they are created and destroyed.
When you deploy a stateless session bean, the container creates several instances and adds them into a pool. When a client calls a method on a stateless session bean, the container selects one instance from the pool, delegates the method invocation to that instance, and returns it to the pool. When the container no longer needs the instance (usually when the container wants to reduce the number of instances in the pool), it destroys it.
![]() Note EJB monitoring can be done through the GlassFish Administration Console. GlassFish then allows you to customize several EJB pool parameters. You can set a pool size (initial, minimum, and maximum number of beans in the pool), the number of beans to be removed when the pool idle timeout expires, and the number of milliseconds for the pool to time out. These options are implementation specific and may not be available on other EJB containers.
Note EJB monitoring can be done through the GlassFish Administration Console. GlassFish then allows you to customize several EJB pool parameters. You can set a pool size (initial, minimum, and maximum number of beans in the pool), the number of beans to be removed when the pool idle timeout expires, and the number of milliseconds for the pool to time out. These options are implementation specific and may not be available on other EJB containers.
For singleton session beans, creation depends on whether they are instantiated eagerly (@Startup) or not, or whether they depend (@DependsOn) on another singleton that had been eagerly created. If the answer is yes, the container will create an instance at deployment time. If not, the container will create an instance when a client invokes a business method. Because singletons last for the duration of the application, the instance is destroyed when the container shuts down.
Stateful
Stateful session beans are programmatically not very different from stateless or singleton session beans: only the metadata change (@Stateful instead of @Stateless or @Singleton). But the real difference is that stateful beans maintain conversational state with their client, and therefore have a slightly different life cycle. The container generates an instance and assigns it only to one client. Then, each request from that client is passed to the same instance. Following this principle and depending on your application, you might end up with a one-to-one relationship between a client and a stateful bean (e.g., 1000 simultaneous users might produce 1000 stateful beans). If one client doesn’t invoke its bean’s instance for a long enough time, the container has to clear it before the JVM runs out of memory, preserve the instance state to a permanent storage, and then bring back the instance with its state when it’s needed. The container employs the technique of passivation and activation.
Passivation is when the container serializes the bean instance to a permanent storage medium (file on a disk, database, etc.) instead of holding it in memory. Activation, which is the opposite, is done when the bean instance is needed again by the client. The container deserializes the bean from permanent storage and activates it back into memory. This means the bean’s attributes have to be serializable (it must either be a Java primitive or implement the java.io.Serializable interface). Figure 8-2 shows the stateful bean life cycle and describes it as follows:
- The life cycle of a stateful bean starts when a client requests a reference to the bean (either using dependency injection or JNDI lookup). The container creates a new session bean instance and stores it in memory.
- If the newly created instance uses dependency injection through annotations (@Inject, @Resource, @EJB, @PersistenceContext, etc.) or deployment descriptors, the container injects all the needed resources.
- If the instance has a method annotated with @PostContruct, the container invokes it.
- The bean executes the requested call and stays in memory, waiting for subsequent client requests.
- If the client remains idle for a period of time, the container invokes the method annotated with @PrePassivate, if any, and passivates the bean instance into a permanent storage.
- If the client invokes a passivated bean, the container activates it back to memory and invokes the method annotated with @PostActivate, if any.
- If the client does not invoke a passivated bean instance for the session timeout period, the container destroys it.
- Alternatively to step 7, if the client calls a method annotated by @Remove, the container then invokes the method annotated with @PreDestroy, if any, and ends the life of the bean instance.
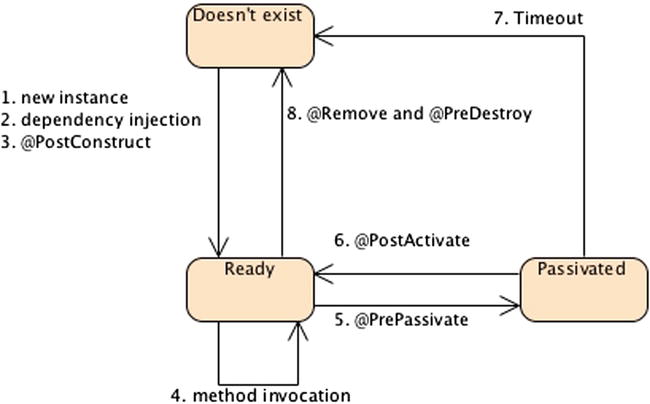
Figure 8-2. Stateful bean life cycle
In some cases, a stateful bean contains open resources such as network sockets or database connections. Because a container cannot keep these resources open for each bean, you will have to close and reopen the resources before and after passivation using callback methods. Another possibility is to deactivate the default activation/passivation behavior or your stateful bean. You have to be very careful with that, but if it’s what you really need you can annotate your stateful bean with @Stateful(passivationCapable=false).
Callbacks
As you just saw, each type of session bean has its own container-managed life cycle. The container lets you optionally provide your own business code when the state of the bean changes. The change from one state to another can be intercepted by the container to invoke methods annotated by one of the annotations listed in Table 8-1.
Table 8-1. Life-Cycle Callback Annotations
| Annotation | Description |
|---|---|
| @PostConstruct | Marks a method to be invoked immediately after you create a bean instance and the container does dependency injection. This annotation is often used to perform any initialization. |
| @PreDestroy | Marks a method to be invoked immediately before the container destroys the bean instance. The method annotated with @PreDestroy is often used to release resources that had been previously initialized. With stateful beans, this happens after timeout or when a method annotated with @Remove has been completed. |
| @PrePassivate | Stateful beans only. Marks a method to be invoked before the container passivates the instance. It usually gives the bean the time to prepare for serialization and to release resources that cannot be serialized (e.g., it closes connections to a database, a message broker, a network socket, etc.). |
| @PostActivate | Stateful beans only. Marks a method to be invoked immediately after the container reactivates the instance. Gives the bean a chance to reinitialize resources that had been closed during passivation. |
![]() Note The javax.ejb package of the EJB 3.2 specification (JSR 345) defines the @PrePassivate and @PostActivate annotations. They are related to the stateful EJB life cycle and can happen many times during the EJB lifetime. @PostConstruct and @PreDestroy are part of the Common Annotations 1.2 specification (JSR 250) and come from the javax.annotation package (like @Resource or other security annotations that you’ll see next). They are related to Managed Beans’ life cycle and happen only once during the class lifetime (at creation and at destruction).
Note The javax.ejb package of the EJB 3.2 specification (JSR 345) defines the @PrePassivate and @PostActivate annotations. They are related to the stateful EJB life cycle and can happen many times during the EJB lifetime. @PostConstruct and @PreDestroy are part of the Common Annotations 1.2 specification (JSR 250) and come from the javax.annotation package (like @Resource or other security annotations that you’ll see next). They are related to Managed Beans’ life cycle and happen only once during the class lifetime (at creation and at destruction).
The following rules apply to a callback method:
- The method must not have any parameters and must return void.
- The method must not throw a checked exception but can throw runtime exceptions. Throwing a runtime exception will roll back the transaction if one exists (as explained in the next chapter).
- The method can have public, private, protected, or package-level access but must not be static or final.
- A method may be annotated with multiple annotations (the init() method shown later in Listing 8-2 is annotated with @PostConstruct and @PostActivate). However, only one annotation of a given type may be present on a bean (you can’t have two @PostConstruct annotations in the same session bean, for example).
- A callback method can access the beans’ environment entries (see the “Environment Naming Context” section in Chapter 7).
These callbacks are typically used to allocate and/or release the bean’s resources. As an example, Listing 8-1 shows the singleton bean CacheEJB using a @PostConstruct annotation to initialize its cache. Straight after creating the single instance of the CacheEJB, the container invokes the initCache() method.
Listing 8-1. A Singleton Initializing Its Cache with the @PostConstruct Annotation
@Singleton
public class CacheEJB {

  private Map<Long, Object> cache = new HashMap<>();

  @PostConstruct
  private void initCache() {
    cache.put(1L, "First item in the cache");
    cache.put(2L, "Second item in the cache");
  }

  public Object getFromCache(Long id) {
    if (cache.containsKey(id))
      return cache.get(id);
    else
      return null;
  }
}
Listing 8-2 shows a snippet of code for a stateful bean. The container maintains conversational state, which can include heavy-duty resources such as a database connection. Because it is expensive to open a database connection, it should be shared across calls but released when the bean is idle (or passivated).
Listing 8-2. A Stateful Bean Initializing and Releasing Resources
@Stateful
public class ShoppingCartEJB {

  @Resource(lookup = "java:comp/defaultDataSource")
  private DataSource ds ;
  private Connection connection ;

  private List<Item> cartItems = new ArrayList<>();

  @PostConstruct
  @PostActivate
  private void init() {
    connection = ds.getConnection();
  }

  @PreDestroy
  @PrePassivate
  private void close() {
    connection.close();
  }

  // ...

  @Remove
  public void checkout() {
    cartItems.clear();
  }
}
After creating an instance of a stateful bean, the container injects the reference of a default data source (more on data sources later and in the next chapter) to the ds attribute. Once the injection is done, the container will call the designated @PostConstruct method (init()), which creates a database connection. If the container happens to passivate the instance, the close() method will be invoked (@PrePassivate). The purpose of this is to close the JDBC connection, which holds native resources and is no longer needed during passivation. When the client invokes a business method on the bean, the container activates it and calls the init() method again (@PostActivate). When the client invokes the checkout() method (annotated with the @Remove annotation), the container removes the instance but first will call the close() method again (@PreDestroy). Note that for better readability, I’ve omitted the SQL exception handling in the callback methods.
Timer Service
Some Java EE applications need to schedule tasks in order to provide notifications at certain times. For example, the CD-BookStore application needs to send a birthday e-mail to its customers every year, print monthly statistics about the items sold, generate nightly reports about inventory levels, and refresh a technical cache every 30 seconds.
As a result, EJB 2.1 introduced a scheduling facility called the timer service because clients couldn’t use the Thread API directly. Compared with other proprietary tools or frameworks (the Unix cron utility, Quartz, etc.), the timer service was less feature rich. The EJB specification had to wait until the 3.1 version to see a drastic improvement of the timer service. It took its inspiration from Unix cron and other successful tools, and today competes with the other products as it responds to most scheduling use cases.
The EJB timer service is a container service that allows EJBs to be registered for callback invocation. EJB notifications may be scheduled to occur according to a calendar-based schedule, at a specific time, after a specific elapsed duration, or at specific recurring intervals. The container keeps a record of all the timers, and invokes the appropriate bean instance method when a timer has expired. Figure 8-3 shows the two steps involving the timer service. First, the EJB needs to create a timer (automatically or programmatically) and get registered for callback invocation, and then the timer service triggers the registered method on the EJB instance.
Figure 8-3. Interaction between the timer service and the session bean
Timers are intended for long-lived business processes and are by default persistent. This means they survive server shutdowns, and once the server starts again, the timers are executed as if no shutdown had happened. Optionally, you can specify timers to be nonpersistent.
![]() Note Stateless beans, singletons, and MDBs can be registered by the timer service, but stateful beans can’t and shouldn’t use the scheduling API.
Note Stateless beans, singletons, and MDBs can be registered by the timer service, but stateful beans can’t and shouldn’t use the scheduling API.
Timers can be created automatically by the container at deployment time if the bean has methods annotated with the @Schedule annotation. But timers can also be created programmatically and must provide one callback method annotated with the @Timeout annotation.
The timer service uses a calendar-based syntax that takes its roots from the Unix cron utility. This syntax is used for programmatic timer creation (using the ScheduleExpression class) and for automatic timer creation (via the @Schedule annotation or the deployment descriptor). A scheduling expression looks as follows:
year = "2008,2012,2016" dayOfWeek = "Sat,Sun" minute = "0-10,30,40"
Table 8-2 and Table 8-3 define the attributes creating calendar-based expressions.
Table 8-2. Attributes of a Calendar-Based Expression
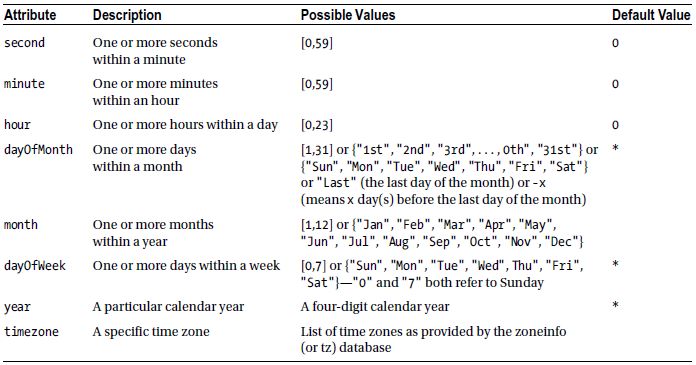
Each attribute of a calendar-based expression (second, minute, hour, etc.) supports values expressed in different forms. For example, you can have a list of days or a range of years. Table 8-3 defines the different forms that an attribute can take.
Table 8-3. Forms of Expression
| Form | Description | Example |
|---|---|---|
| Single value | The attribute has only one possible value. | year = "2010" month= "May" |
| Wildcard | This form represents all possible values for a given attribute. | second = "*" dayOfWeek = "*" |
| List | The attribute has two or more values separated by a comma. | year = "2008,2012,2016" dayOfWeek = "Sat,Sun" minute = "0-10,30,40" |
| Range | The attribute has a range of values separated by a dash. | second = "1-10" dayOfWeek = "Mon-Fri" |
| Increments | The attribute has a starting point and an interval separated by a forward slash. | minute = "*/15" second = "30/10" |
If you have used Unix cron syntax before, this might sound familiar and much simpler. With this rich syntax, you can express nearly any kind of calendar expression, as shown in Table 8-4.
Table 8-4. Examples of Expressions
| Example | Expression |
|---|---|
| Every Wednesday at midnight | dayOfWeek="Wed" |
| Every Wednesday at midnight | second="0", minute="0", hour="0", dayOfMonth="*", month="*", dayOfWeek="Wed", year="*" |
| Every weekday at 6:55 | minute="55", hour="6", dayOfWeek="Mon-Fri" |
| Every weekday at 6:55 Paris time | minute="55", hour="6", dayOfWeek="Mon-Fri", timezone="Europe/Paris" |
| Every minute of every hour of every day | minute="*", hour="*" |
| Every second of every minute of every hour of every day | second="*", minute="*", hour="*" |
| Every Monday and Friday at 30 seconds past noon | second="30", hour="12", dayOfWeek="Mon, Fri" |
| Every five minutes within the hour | minute="*/5", hour="*" |
| Every five minutes within the hour | minute="0,5,10,15,20,25,30,35, 40,45,50,55", hour="*" |
| The last Monday of December at 3 p.m. | hour="15", dayOfMonth="Last Mon", month="Dec" |
| Three days before the last day of each month at 1 p.m. | hour="13", dayOfMonth="-3" |
| Every other hour within the day starting at noon on the second Tuesday of every month | hour="12/2", dayOfMonth="2nd Tue" |
| Every 14 minutes within the hour, for the hours of 1 and 2 a.m. | minute = "*/14", hour="1,2" |
| Every 14 minutes within the hour, for the hours of 1 and 2 a.m. | minute = "0,14,28,42,56", our = "1,2" |
| Every 10 seconds within the minute, starting at second 30 | second = "30/10" |
| Every 10 seconds within the minute, starting at second 30 | second = "30,40,50" |
Timers can be created automatically by the container at deployment time based on metadata. The container creates a timer for each method annotated with @javax.ejb.Schedule or @Schedules (or the XML equivalent in the ejb-jar.xml deployment descriptor). By default, each @Schedule annotation corresponds to a single persistent timer, but you can also define nonpersistent timers.
Listing 8-3 shows the StatisticsEJB bean that defines several methods. statisticsItemsSold() creates a timer that will call the method every first day of the month at 5:30 a.m. The generateReport() method creates two timers (using @Schedules): one every day at 2 a.m. and another one every Wednesday at 2 p.m. refreshCache() creates a nonpersistent timer that will refresh the cache every ten minutes.
Listing 8-3. A StatisticsEJB Registering Four Timers
@Stateless
public class StatisticsEJB {

  @Schedule(dayOfMonth = "1", hour = "5", minute = "30")
  public void statisticsItemsSold() {
    // ...
  }

  @Schedules({
          @Schedule(hour = "2"),
          @Schedule(hour = "14", dayOfWeek = "Wed")
  })
  public void generateReport() {
    // ...
  }

  @Schedule(minute = "*/10", hour = "*", persistent = false )
  public void refreshCache() {
    // ...
  }
}
To create a timer programmatically, the EJB needs to access the javax.ejb.TimerService interface using either dependency injection or the SessionContext (SessionContext.getTimerService(), see section “Session Context” in Chapter 7), or through JNDI lookup. As listed in Table 8-5, the TimerService API has several methods that allow you to create different kinds of timers and get information about timers.
Table 8-5. TimerService API
| Annotation | Description |
|---|---|
| createTimer | Creates a timer based on dates, intervals, or durations. These methods do not use calendar-based expressions. |
| createSingleActionTimer | Creates a single-action timer that expires at a given point in time or after a specified duration. The container removes the timer after the timeout callback method has been successfully invoked. |
| createIntervalTimer | Creates an interval timer whose first expiration occurs at a given point in time and whose subsequent expirations occur after specified intervals. |
| createCalendarTimer | Creates a timer using a calendar-based expression with the ScheduleExpression helper class. |
| getAllTimers | Returns the list of available timers (interface javax.ejb.Timer). |
The ScheduleExpression helper class allows you to create calendar-based expressions programmatically. You will find methods related to the attributes defined in Table 8-2, and you will be able to program all the examples that you saw in Table 8-4. Following are some examples to give you an idea:
new ScheduleExpression().dayOfMonth("Mon").month("Jan");
new ScheduleExpression().second("10,30,50").minute("*/5").hour("10-14");
new ScheduleExpression().dayOfWeek("1,5").timezone("Europe/Lisbon");
new ScheduleExpression().dayOfMonth(customer.getBirthDay())
All the methods of TimerService (createSingleActionTimer, createCalendarTimer, etc.) return a javax.ejb.Timer object that contains information about the created timer (what time was it created, whether it is persistent, etc.). Timer also allows the EJB to cancel the timer prior to its expiration. When the timer expires, the container calls the associated @javax.ejb.Timeout method of the bean, passing the Timer object. A bean can have at most one @Timeout method.
When CustomerEJB (see Listing 8-4) creates a new customer in the system (createCustomer() method), it creates a calendar timer based on the date of birth of the customer. Thus, every year the container will trigger a bean to create and send a birthday e-mail to the customer. To do that, the stateless bean first needs to inject a reference of the timer service (using @Resource). The createCustomer() persists the customer in the database and uses the day and the month of her birth to create a ScheduleExpression. A calendar timer is created and given this ScheduleExpression and the customer object using a TimerConfig. new TimerConfig(customer, true) configures a persistent timer (as indicated by the true parameter) that passes the customer object.
Listing 8-4. A CustomerEJB Creating a Timer Programmatically
@Stateless
public class CustomerEJB {

  @Resource
  TimerService timerService;

  @PersistenceContext(unitName = "chapter08PU")
  private EntityManager em;

  public void createCustomer(Customer customer) {
    em.persist(customer);

    ScheduleExpression birthDay = new ScheduleExpression().→
             dayOfMonth(customer.getBirthDay()).month(customer.getBirthMonth());

    timerService. createCalendarTimer ( birthDay , new TimerConfig (customer, true));
  }

  @Timeout
  public void sendBirthdayEmail( Timer timer) {
    Customer customer = (Customer) timer .getInfo();
    // ...
  }
}
Once you create the timer, the container will invoke the @Timeout method (sendBirthdayEmail()) every year, which passes the Timer object. Because the timer had been serialized with the customer object, the method can access it by calling the getInfo()method. Note that a bean can have at most one @Timeout method for handling programmatic timers.
Authorization
The primary purpose of the EJB security model is to control access to business code. In Java EE authentication is handled by the web tier (or a client application); the principal and its roles are then passed to the EJB tier, and the EJB checks whether the authenticated user is allowed to access a method based on its role. Authorization can be done either in a declarative or a programmatic manner.
With declarative authorization, access control is made by the EJB container. With programmatic authorization, access control is made in the code using the JAAS API.
Declarative Authorization
The declarative authorization can be defined in the bean using annotations or in the XML deployment descriptor. Declarative authorization involves declaring roles, assigning permission to methods (or to the entire bean), or changing temporarily a security identity. These controls are made by the annotations described in Table 8-6. Each annotation can be used on the bean and/or on the method.
Table 8-6. Security Annotations
| Annotation | Bean | Method | Description |
|---|---|---|---|
| @PermitAll | X | X | Indicates that the given method (or the entire bean) is accessible by everyone (all roles are permitted). |
| @DenyAll | X | X | Indicates that no role is permitted to execute the specified method or all methods of the bean (all roles are denied). This can be useful if you want to deny access to a method in a certain environment (e.g., the method launchNuclearWar() should only be allowed in production but not in a test environment). |
| @RolesAllowed | X | X | Indicates that a list of roles is allowed to execute the given method (or the entire bean). |
| @DeclareRoles | X | Defines roles for security checking. | |
| @RunAs | X | Temporarily assigns a new role to a principal. |
The @RolesAllowed annotation is used to authorize a list of roles to access a method. It can be applied to a particular method or to the entire bean (then all business methods will inherit the bean’s role access). This annotation can take either a single String (only one role can access the method) or an array of String (any of the roles can access the method). The @DeclareRoles annotation that you’ll see later in this section can be used to declare other roles.
![]() Note Security annotations (@RolesAllowed, @DenyAll, etc.) are part of the Common Annotations 1.2 specification (JSR 250) and come from the javax.annotation.security package.
Note Security annotations (@RolesAllowed, @DenyAll, etc.) are part of the Common Annotations 1.2 specification (JSR 250) and come from the javax.annotation.security package.
Listing 8-5 shows the ItemEJB using the @RolesAllowed annotation at the bean and method levels. This code indicates that any method is accessible by a principal associated with one of the following roles: user, employee, or admin. The deleteBook() method overrides the class-level settings and is only allowing access to the admin role.
Listing 8-5. A Stateless Bean Allowing Certain Roles
@Stateless
@RolesAllowed({"user", "employee", "admin"})
public class ItemEJB {

  @PersistenceContext(unitName = "chapter08PU")
  private EntityManager em;

  public Book findBookById(Long id) {
    return em.find(Book.class, id);
  }

  public Book createBook(Book book) {
    em.persist(book);
    return book;
  }

  @RolesAllowed("admin")
  public void deleteBook(Book book) {
    em.remove(em.merge(book));
  }
}
@RolesAllowed defines a list of roles that are allowed to access a method. The @PermitAll and @DenyAll annotations are applied for any role. So, you can use the @PermitAll annotation to mark an EJB, or a method, to be invoked by any role. Conversely, the @DenyAll forbids any role to have access to a method.
As you can see in Listing 8-6, because the findBookById() method is annotated with @PermitAll, it can now be accessible to any role, not just user, employee, and admin. On the other hand, the findConfidentialBook() method is not accessible at all (@DenyAll).
Listing 8-6. A Stateless Bean Using @PermitAll and @DenyAll
@Stateless
@RolesAllowed({"user", "employee", "admin"})
public class ItemEJB {

  @PersistenceContext(unitName = "chapter08PU")
  private EntityManager em;

  @PermitAll
  public Book findBookById(Long id) {
    return em.find(Book.class, id);
  }

  public Book createBook(Book book) {
    em.persist(book);
    return book;
  }

  @RolesAllowed("admin")
  public void deleteBook(Book book) {
    em.remove(em.merge(book));
  }

  @DenyAll
  public Book findConfidentialBook(Long secureId) {
    return em.find(Book.class, secureId);
  }
}
The @DeclareRoles annotation is slightly different as it doesn’t permit or deny any access. It declares roles for the entire application. When you deploy the EJB in Listing 8-6, the container will automatically declare the user, employee, and admin roles by inspecting the @RolesAllowed annotation. But you might want to declare other roles in the security domain for the entire application (not just for a single EJB) through the @DeclareRoles annotation. This annotation, which only applies at the class level, takes an array of roles and declares them in the security domain. In fact, you declare security roles using either one of these two annotations or a combination of both. If both annotations are used, the aggregation of the roles in @DeclareRoles and @RolesAllowed are declared. We usually declare roles for the entire enterprise application, so in this case it makes more sense to declare roles in the deployment descriptor than with the @DeclareRoles annotation.
When you deploy the ItemEJB in Listing 8-7, the five roles HR, salesDpt, user, employee, and admin are declared. Then, with the @RolesAllowed annotation, certain of these roles are given access to certain methods (as previously explained).
Listing 8-7. A Stateless Bean Declaring Roles
@Stateless
@DeclareRoles({"HR", "salesDpt"})
@RolesAllowed({"user", "employee", "admin"})
public class ItemEJB {

  @PersistenceContext(unitName = "chapter08PU")
  private EntityManager em;

  public Book findBookById(Long id) {
    return em.find(Book.class, id);
  }

  public Book createBook(Book book) {
    em.persist(book);
    return book;
  }

  @RolesAllowed("admin")
  public void deleteBook(Book book) {
    em.remove(em.merge(book));
  }
}
The last annotation, @RunAs, is handy if you need to temporarily assign a new role to the existing principal. You might need to do this, for example, if you’re invoking another EJB within your method, but the other EJB requires a different role.
For example, the ItemEJB in Listing 8-8 authorizes access to the user, employee, and admin role. When one of these roles accesses a method, the method is run with the temporary inventoryDpt role (@RunAs("inventoryDpt")). This means that when you invoke the createBook() method, the InventoryEJB.addItem() method will be invoked with an inventoryDpt role.
Listing 8-8. A Stateless Bean Running as a Different Role
@Stateless
@RolesAllowed({"user", "employee", "admin"})
@RunAs("inventoryDpt")
public class ItemEJB {

  @PersistenceContext(unitName = "chapter08PU")
  private EntityManager em;

  @EJB
  private InventoryEJB inventory ;

  public List<Book> findBooks() {
    TypedQuery<Book> query = em.createNamedQuery("findAllBooks", Book.class);
    return query.getResultList();
  }

  public Book createBook(Book book) {
    em.persist(book);
    inventory.addItem(book);
    return book;
  }
}
As you can see, declarative authorization gives you easy access to a powerful authentication policy. But what if you need to provide security settings to an individual, or apply some business logic based on the current principal’s role? This is where programmatic authorization comes into play.
Declarative authorization covers most security cases needed by an application. But sometimes you need a finer grain of authorizing access (allowing a block of code instead of the entire method, permitting or denying access to an individual instead of a role, etc.). You can use programmatic authorization to selectively permit or block access to a role or a principal. That’s because you have direct access to the JAAS java.security.Principal interface, as well as the EJB context to check the principal’s role in the code.
The SessionContext interface defines the following methods related to security:
- isCallerInRole(): This method returns a boolean and tests whether the caller has a given security role.
- getCallerPrincipal(): This method returns the java.security.Principal that identifies the caller.
To show how to use these methods, let’s take a look at an example. The ItemEJB in Listing 8-9 doesn’t use any declarative security but still needs to do some kind of checking programmatically. First of all, the bean needs to get a reference to its context (using the @Resource annotation). With this context, the deleteBook() method can check whether or not the caller has an admin role. If it doesn’t, it throws a java.lang.SecurityException to notify the user about the authorization violation. The createBook() method does some business logic using the roles and the principal. Notice that the getCallerPrincipal() method returns a Principal object, which has a name. The method checks whether the principal’s name is paul, and then sets the "special user" value to the book entity.
Listing 8-9. A Bean Using Programmatic Security
@Stateless
public class ItemEJB {

  @PersistenceContext(unitName = "chapter08PU")
  private EntityManager em;

  @Resource
  private SessionContext ctx ;

  public void deleteBook(Book book) {
    if (!ctx. isCallerInRole ("admin"))
      throw new SecurityException("Only admins are allowed");

    em.remove(em.merge(book));
  }

  public Book createBook(Book book) {
    if (ctx. isCallerInRole ("employee") && !ctx. isCallerInRole ("admin")) {
      book.setCreatedBy("employee only");
    } else if (ctx. getCallerPrincipal ().getName().equals("paul")) {
      book.setCreatedBy("special user");
    }
    em.persist(book);
    return book;
  }
}
Putting It All Together
In the “Putting It All Together” section in Chapter 4, I demonstrated the development of a Book entity (shown in Listing 4-3) that is mapped to a Derby database. Then I showed you a Main class (shown in Listing 4-4) that uses the entity manager to persist a book and retrieve all the books from the database (using explicit transactional demarcation: tx.begin() and tx.commit()).
The following example employs the same use case but replaces the Main class used in Chapter 4 with a stateless session bean (BookEJB). EJBs are transactional by nature (as you’ll see in the next chapter), so our stateless session bean will handle CRUD operations on the Book entity with container-managed transactions (CMT). I will also add a singleton (DatabasePopulator) that will populate the database at startup so there are some data in the database, as well as a CDI producer to be able to inject the persistence unit (with @Inject). The BookEJB, the Book entity, the DatabasePopulator Singleton, the CDI producer, and all the needed XML configuration files will then be packaged and deployed into GlassFish. The BookEJB will be invoked remotely by a Main class (see Figure 8-4) and integration-tested with an embedded container (BookEJBIT).
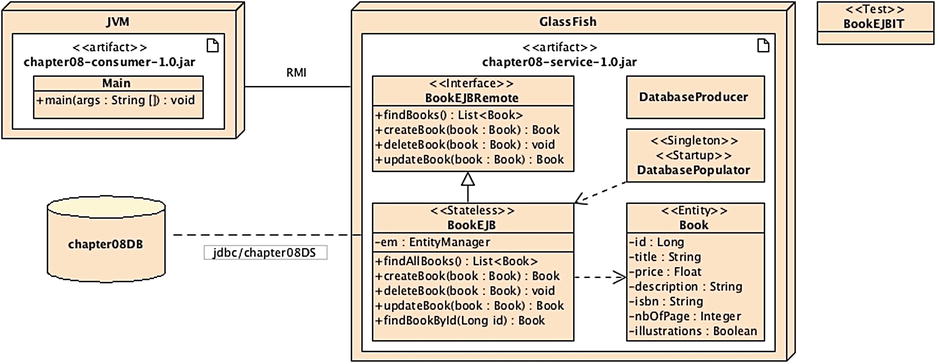
Figure 8-4. Putting it all together
To use transactions, the stateless session bean needs to access the database through a data source (jdbc/chapter08DS) that will have to be deployed in GlassFish and linked to the chapter08DB database (thanks to @DataSourceDefinition as you’ll later see).
The directory structure for the project follows the Maven conventions, so you have to place classes and files in the following directories:
- src/main/java: For the Book entity, the BookEJB, the BookEJBRemote interface, the DatabasePopulator and the DatabaseProducer class.
- src/main/resources: The persistence.xml file containing the persistence unit used for the Derby database and the beans.xml that triggers CDI.
- src/test/java: The BookEJBIT class for integration-testing.
- pom.xml: The Maven Project Object Model (POM) describing the project, its dependencies on other external modules, and components.
Writing the Book Entity
Listing 8-10 refers to the same Book entity described in Chapter 4 (Listing 4-3), so I will not explain it in much detail (it uses JPA and Bean Validation annotations). One difference though is that the Book entity in Listing 8-10 implements Serializable because it needs to be accessed remotely by the Main class.
Listing 8-10. A Book Entity with a Named Query and Bean Validation Constraints
@Entity
@NamedQuery (name = FIND_ALL, query = "SELECT b FROM Book b")
public class Book implements Serializable {

  public static final String FIND_ALL = "Book.findAllBooks";

  @Id @GeneratedValue
  private Long id;
  @NotNull
  @Column(nullable = false)
  private String title;
  private Float price;
  @Size(max = 2000)
  @Column(length = 2000)
  private String description;
  private String isbn;
  private Integer nbOfPage;
  private Boolean illustrations;

  // Constructors, getters, setters
}
Writing the BookEJB Stateless Session Bean
The BookEJB is a stateless session bean that acts like a façade and handles CRUD operations on the Book entity. Listing 8-11 shows the Java class that needs to be annotated with @javax.ejb.Stateless, exposes a no-interface view thanks to @LocalBean, and implements the BookEJBRemote interface (see Listing 8-12). The EJB obtains a reference of an entity manager using @Inject because the EntityManager is produced by the DatabaseProducer (Listing 8-13). Some explanations on each business method follow:
- findBooks: This method uses the findAllBooks named query defined in the Book entity to retrieve all the book instances from the database.
- createBook: This method takes a Book (that cannot be null) as a parameter, persists it to the database, and returns it.
- updateBook: This method takes a detached Book (that cannot be null) as a parameter and merges it. By using the merge() method, the object is attached to the entity manager and synchronized with the database.
- deleteBook: Before removing a Book entity from the database, this method has to reattach the object to the entity manager (using merge()) and then remove it.
Listing 8-11. A Stateless Session Bean Acting Like a Façade for CRUD Operations
@Stateless
@LocalBean
public class BookEJB implements BookEJBRemote {

  @Inject
  private EntityManager em ;

  public List<Book> findBooks () {
    TypedQuery<Book> query = em .createNamedQuery(FIND_ALL, Book.class);
    return query.getResultList();
  }

  public @NotNull Book createBook ( @NotNull Book book) {
    em .persist(book);
    return book;
  }

  public @NotNull Book updateBook (@NotNull Book book) {
    return em .merge(book);
  }

  public void deleteBook (@NotNull Book book) {
    em .remove( em .merge(book));
  }
}
The main differences between the Main class defined in Chapter 4 (Listing 4-4) and the class in Listing 8-11 is that an instance of EntityManager is directly injected into the session bean instead of using the EntityManagerFactory to create it. The EJB container deals with the EntityManager life cycle, so it injects an instance of it and then closes it when the EJB is destroyed. Also, JPA calls are not wrapped between tx.begin() and tx.commit() anymore, as session bean methods are implicitly transactional. This default behavior is known as a CMT and I discuss it in the next chapter.
Because the BookEJB is invoked remotely by the Main class, the BookEJB needs to implement a remote interface. The only difference between a normal Java interface and a remote interface is the presence of the @Remote annotation as shown in Listing 8-12.
Listing 8-12. A Remote Interface
@Remote
public interface BookEJBRemote {

  List<Book> findBooks();
  Book createBook(Book book);
  void deleteBook(Book book);
  Book updateBook(Book book);
}
Writing the CDI DatabaseProducer
In Listing 8-11 the BookEJB has an EntityManager injected using @Inject. As you now know, JPA allows an application to have several persistence units, each differentiated by a name (here "chapter08PU"). Because @Inject doesn’t have String parameter (you can’t write @Inject("chapter08PU")) the only way to inject an EntityManager is with @PersistenceContext(unitName = "chapter08PU"). Thanks to CDI producers (presented in Chapter 2) the bean in Listing 8-13 produces an EntityManager which is now injectable with the @Inject annotation.
Listing 8-13. CDI Bean Producing an EntityManager
public class DatabaseProducer {

  @Produces
  @PersistenceContext(unitName = "chapter08PU")
  private EntityManager em;
}
Persistence Unit for the BookEJB
In Chapter 4, the persistence unit (Listing 4-5) had to define the JDBC driver, the JDBC URL, the user, and the password to connect to the Derby database because the application managed the transactions (transaction-type ="RESOURCE_LOCAL"). In a container-managed environment, the container manages EJBs and transactions, not the application. So transaction-type of the persistent unit (see Listing 8-14) is set to "JTA". Another difference is that in Listing 4-5 we had to manually specify which JPA provider to use (EclipseLink) and list all the entities the provider had to manage. In a container-managed environment we rely on the default JPA provider (the one bundled with the EJB container). At deployment the container introspects the archive and finds all the entities it needs to manage (no need to explicitly use the <class> element in the persistence.xml).
Listing 8-14. A Persistence Unit Using the chapter08DS Datasource
<?xml version="1.0" encoding="UTF-8"?>
<persistence xmlns=" http://xmlns.jcp.org/xml/ns/persistence "
             xmlns:xsi=" http://www.w3.org/2001/XMLSchema-instance "
             xsi:schemaLocation=" http://xmlns.jcp.org/xml/ns/persistence →
             http://xmlns.jcp.org/xml/ns/persistence/persistence_2_1.xsd "
             version="2.1">

  <persistence-unit name=" chapter08PU " transaction-type=" JTA ">
    <jta-data-source> java:global/jdbc/chapter08DS </jta-data-source>
    <properties>
      <property name="eclipselink.target-database" value="DERBY"/>
      <property name="eclipselink.ddl-generation" value="drop-and-create-tables"/>
      <property name="eclipselink.logging.level" value="INFO"/>
    </properties>
  </persistence-unit>
</persistence>
In Listing 8-11, the BookEJB gets injected with a reference of an EntityManager associated with the chapter08PU persistence unit. This persistence unit (defined in Listing 8-14) needs to define the name of the data source to connect to (jdbc/chapter08DS) without specifying any access properties (URL, JDBC driver, etc.).
Writing the DatabasePopulator and Defining the Data Source
The jdbc/chapter08DS data source required by the persistence unit must be created within the EJB container. And there are several ways to do so. The simplest one is to have a @DataSourceDefinition annotation on any Managed Bean (see Listing 8-15). The container will deploy the bean and create the data source. Another way is to use the GlassFish interface, as you’ll see next.
Listing 8-15. A Singleton Deploying a Datasource and Initializing the Database at Startup
@Singleton
@Startup
@DataSourceDefinition (
        className = "org.apache.derby.jdbc.EmbeddedDataSource",
        name = " java:global/jdbc/chapter08DS ",
        user = "app",
        password = "app",
        databaseName = " chapter08DB ",
        properties = {"connectionAttributes=;create=true"}
)
public class DatabasePopulator {

  @Inject
  private BookEJB bookEJB ;

  private Book h2g2;
  private Book lord;

  @PostConstruct
  private void populateDB() {
    h2g2 = new Book("Beginning Java EE 7", 35F, "Great book", "1-8763-9125-7", 605, true);
    lord = new Book("The Lord of the Rings", 50.4f, "SciFi ", "1-84023-742-2", 1216, true);

    bookEJB.createBook (h2g2);
    bookEJB.createBook(lord);
  }

  @PreDestroy
  private void clearDB() {
    bookEJB.deleteBook (h2g2);
    bookEJB.deleteBook(lord);
  }
}
The DatabasePopulator singleton (Listing 8-15) is used to initialize some data at startup (@Startup). At deployment the container will initialize the singleton and will execute the populateDB() method because it is annotated with @PostConstruct. This method uses the BookEJB to create a few books in the database. At shutdown the container will invoke the clearDB() method (annotated with @PostConstruct) to remove the books from the database.
Instead of using the @DataSourceDefinition annotation to create a data source at deployment, you can also create it using the GlassFish administration console or the command line. The command-line method is quick and easy to reproduce. Make sure Derby and GlassFish are up and running before entering the following commands.
![]() Note @DataSourceDefinition defines a data source and, as you will see in Chapter 13 (Listing 13-18), JMS 2.0 also uses the same mechanism to define resources (ConnextionFactory and Destination) thanks to the @JMSConnectionFactoryDefinition and @JMSDestinationDefinition annotations.
Note @DataSourceDefinition defines a data source and, as you will see in Chapter 13 (Listing 13-18), JMS 2.0 also uses the same mechanism to define resources (ConnextionFactory and Destination) thanks to the @JMSConnectionFactoryDefinition and @JMSDestinationDefinition annotations.
Before creating a data source, you need a connection pool. GlassFish comes with a set of already-defined pools you can use, or you can create your own with the following command:
$ asadmin create-jdbc-connection-pool →
  --datasourceclassname=org.apache.derby.jdbc.ClientDataSource →
  --restype=javax.sql.DataSource →
  --property portNumber=1527:password=APP:user=APP:serverName=localhost:→
  databaseName= chapter08DB :connectionAttributes=;create=true Chapter08Pool
This command creates the Chapter08Pool using a Derby data source and a set of properties to connect to the database: its name (chapter08DB), the server (localhost) and the port (1527) it listens to, a user (APP), and a password (APP) to connect to. If you now ping this data source, Derby will create the database automatically (because you set connectionAttributes=;create=true). To ping the data source, use the following command:
$ asadmin ping-connection-pool Chapter08Pool
After you successfully execute this command, you should see the directory chapter08DB on your hard drive where Derby stores the data. The database and the connection pool are created, and now you need to declare the jdbc/chapter08DS data source and link it to the newly created pool as follows:
$ asadmin create-jdbc-resource --connectionpoolid Chapter08Pool jdbc/chapter08DS
To list all the datasources hosted by GlassFish, enter the following command:
$ asadmin list-jdbc-resources
Writing the BookEJBIT Integration Test
In version 1.x and 2.x of EJBs, integration testing our BookEJB wasn’t easy; you had to use specific features of certain application servers or make some twists to the code. With the new embedded container, an EJB becomes a testable class like any other, as it can run in a normal Java SE environment. The only thing necessary is to add a specific jar file to your class path, as done in the pom.xml file (shown later in Listing 8-17) with the glassfish-embedded-all dependency.
In Chapter 4, I explained how to integration-test an entity with an embedded database, so I will not go into too much detail here on the subject. To integration-test an EJB you use the in-memory Derby database, a different persistence unit, and the in-memory EJB embedded container. Everything is embedded and runs in the same process, necessitating only a JUnit test class (see Listing 8-16). This test initializes the EJBContainer (EJBContainer.createEJBContainer()), gets the JNDI context, looks up the EJB, and uses it to retrieve, create, and delete a book into/from the in-memory database. Thanks to try-with-resources, the embedded container gets closed automatically at the end of the try block.
Listing 8-16. Integration Test of the BookEJB Using the Embeddable Container
public class BookEJBIT {

  @Test
  public void shouldCreateABook () throws Exception {

    Map<String, Object> properties = new HashMap<>();
    properties.put(EJBContainer.MODULES, new File("target/classes"));

    try ( EJBContainer ec = EJBContainer.createEJBContainer(properties) ) {
      Context ctx = ec.getContext();

      // Check JNDI dependencies (Datasource and EJBs)
      assertNotNull(ctx.lookup("java:global/jdbc/chapter08DS"));
      assertNotNull( →
ctx.lookup("java:global/classes/BookEJB!org.agoncal.book.javaee7.chapter08.BookEJBRemote"));
      assertNotNull( →
      ctx.lookup("java:global/classes/BookEJB!org.agoncal.book.javaee7.chapter08.BookEJB"));

      // Looks up the EJB
      BookEJB bookEJB = (BookEJB) →
       ctx.lookup("java:global/classes/BookEJB!org.agoncal.book.javaee7.chapter08.BookEJB");

      // Finds all the books and makes sure there are two (inserted by the DBPopulator)
      assertEquals(2, bookEJB.findBooks() .size());

      // Creates an instance of book
      Book book = new Book("H2G2", 12.5F, "Scifi book", "1-24561-799-0", 354, false);

      // Persists the book to the database
      book = bookEJB.createBook(book) ;
      assertNotNull("ID should not be null", book.getId());

      // Finds all the books and makes sure there is an extra one
      assertEquals(3, bookEJB.findBooks() .size());

      // Removes the created book
      bookEJB.deleteBook(book);

      // Finds all the books and makes sure there is one less
      assertEquals(2, bookEJB.findBooks() .size());
    }
  }
}
The shouldCreateABook() method is an integration test that checks the total number of books (there should be two because the DatabasePopulator has initialized the database with two books), creates a new one, checks that the total number of books has increased by one, removes it, and checks that the total number of books is back to two. For that, the test case creates an EJB container, gets the JNDI context, and uses that context to look up the BookEJB (to then retrieve and create books).
Compiling, Testing, and Packaging with Maven
Now you can use Maven to compile the Book entity, the BookEJB, the BookEJBRemote interface, the DatabasePopulator singleton, and the CDI DatabaseProducer class. Then Maven packages the whole lot in a jar file with the persistence unit (persistence.xml) as well as a CDI beans.xml file. Maven uses the pom.xml file in Listing 8-17 to describe the project and the external dependencies. This example needs the glassfish-embedded-all dependency that comes with all the Java EE 7 APIs, as well as JUnit for integration tests. The classes will be compiled and packaged in a jar file named chapter08- service-1.0.jar, and Maven needs to be informed that you are using Java SE 7 by configuring the maven-compiler-plugin as shown in Listing 8-17.
Listing 8-17. The pom.xml File to Compile, Test and Package the EJBs
<?xml version="1.0" encoding="UTF-8"?>
<project xmlns=" http://maven.apache.org/POM/4.0.0 " →
         xmlns:xsi=" http://www.w3.org/2001/XMLSchema-instance " →
         xsi:schemaLocation=" http://maven.apache.org/POM/4.0.0 →
         http://maven.apache.org/xsd/maven-4.0.0.xsd ">
  <modelVersion>4.0.0</modelVersion>

  <parent>
    <artifactId>chapter08</artifactId>
    <groupId>org.agoncal.book.javaee7</groupId>
    <version>1.0</version>
  </parent>

  <groupId>org.agoncal.book.javaee7.chapter08</groupId>
  <artifactId>chapter08-service</artifactId>
  <version>1.0</version>

  <dependencies>
    <dependency>
      <groupId>org.glassfish.main.extras</groupId>
      <artifactId> glassfish-embedded-all </artifactId>
      <version>4.0</version>
      <scope>provided</scope>
    </dependency>
    <dependency>
      <groupId>junit</groupId>
      <artifactId> junit </artifactId>
      <version>4.11</version>
      <scope>test</scope>
    </dependency>
  </dependencies>

  <build>
    <plugins>
      <plugin>
        <groupId>org.apache.maven.plugins</groupId>
        <artifactId>maven-compiler-plugin</artifactId>
        <version>2.5.1</version>
        <configuration>
          <source> 1.7 </source>
          <target>1.7</target>
        </configuration>
      </plugin>
      <plugin>
        <artifactId>maven-failsafe-plugin</artifactId>
        <version>2.12.4</version>
        <executions>
          <execution>
            <id>integration-test</id>
            <goals>
              <goal> integration-test </goal>
              <goal>verify</goal>
            </goals>
          </execution>
        </executions>
      </plugin>
    </plugins>
  </build>
</project>
Notice this code includes the glassfish-embedded-all dependency (<scope>provided</scope>), used by the test class (<scope>test</scope>), to invoke the embedded container and run the EJB.
To compile and package the classes, open a command-line interpreter and enter the following Maven command:
$ mvn package
The BUILD SUCCESSFUL message should appear, letting you know that compilation and packaging were successful. Further, if you check under the target subdirectory, you’ll see that Maven has created the chapter08-service-1.0.jar file.
You can execute the integration test (Listing 8-16) with the Maven Failsafe plug-in by entering the following Maven command:
$ mvn integration-test
Now that all the classes have been packaged into a jar archive, it can be deployed to the GlassFish application server. Before doing so, make sure GlassFish and Derby are up and running.
Use the asadmin utility to deploy the application into GlassFish. After you execute this command, it delivers a message informing you of the result of the deployment operation.
$ asadmin deploy --force=true targetchapter08-service-1.0.jar
Now that the EJB is deployed with the entity, helper classes, and the persistent unit in GlassFish; Derby is running; and the data source is created, it’s time to write and run the Main class.
Writing the Main Class
Frequently, Java EE applications consist of web applications acting as clients for EJBs, as described in Chapter 10, where JSF backing beans would invoke EJBs. For now, let’s use a plain Java class.
The Main class (see Listing 8-18) uses JNDI to get the InitialContext so it can look up the BookEJBRemote interface (using the portable JNDI name). Remember that this Main class is executed outside the EJB container, so injection is not possible. The main() method starts by looking up the remote interface of the EJB, displaying all the books from the database, creating a new instance of the Book object, and using the EJB createBook() method to persist the entity. It then changes the value of the book’s title, updates the book, and removes it. Because the code of this Main class has no persistence context, the Book entity is seen as a detached object manipulated as a normal Java class by another Java class, with no JPA involved. The EJB is the one holding the persistence context and using the entity manager to access the database.
Listing 8-18. A Main Class Invoking the BookEJBRemote
public class Main {

  public static void main(String[] args) throws NamingException {

    // Looks up the EJB
    Context ctx = new InitialContext();
    BookEJBRemote bookEJB = (BookEJBRemote) ctx .lookup("java:global/ →
           chapter08-service-1.0/BookEJB!org.agoncal.book.javaee7.chapter08.BookEJBRemote");

    // Gets and displays all the books from the database
    List<Book> books = bookEJB.findBooks() ;
    for (Book aBook : books) {
      System.out.println(aBook);
    }

    // Creates an instance of book
    Book book = new Book("H2G2", 12.5F, "Scifi book", "1-24561-799-0", 354, false);

    book = bookEJB.createBook(book) ;
    System.out.println("Book created : " + book);

    book.setTitle("H2G2");
    book = bookEJB.updateBook(book) ;
    System.out.println("Book updated : " + book);

    bookEJB. deleteBook(book) ;
    System.out.println("Book deleted");
  }
}
Thanks to the Maven Exec plug-in, just enter the following command and Maven will execute the Main class (Listing 8-18). You should then see all the logs displayed in the prompt.
$ mvn exec:java
Summary
In this chapter, you learned that stateless and singleton session beans share the same life cycle and that stateful beans have a slightly different one. That’s because stateful beans keep a conversational state with the client and need to temporarily serialize their state to a permanent storage (passivation). Callback annotations allow you to add business logic to your bean before or after an event occurs (@PostConstruct, @PreDestroy, etc.).
Since EJB 3.1 the timer service has been enhanced and can now effectively compete with other scheduling tools. It takes its roots from cron but adds more expressiveness so you can write complex but readable schedule expressions either declaratively or programmatically.
For security, you have to bear in mind that the business tier doesn’t authenticate users; it authorizes roles to access methods. Declarative security is done through a relatively small number of annotations and allows you to cover most cases an enterprise application is likely to need. Again, you can switch to programmatic security and manipulate the JAAS API.