![]()
Setting Up the Development Environment
This appendix focuses on setting up your development environment so you can do some hands-on work by following the code snippets listed in the previous chapters. This book has lots of code, and most of the chapters have a “Putting It All Together” section. This section provides a step-by-step example showing how to develop, compile, deploy, execute, unit-test, and integration-test a component. To run these examples, you need to install the required software:
- JDK 1.7
- Maven 3
- JUnit 4
- Derby 10.8 database (a.k.a. Java DB)
- GlassFish 4 application server
Essential for the development and the execution of the examples in the book is the Java Development Kit (JDK). It includes several tools such as a compiler (javac), a virtual machine, a documentation generator (javadoc), monitoring tools (Visual VM), and so on. To install the JDK 1.7, go to the official Oracle web site (http://www.oracle.com/technetwork/java/javase/downloads/index.html), select the appropriate platform and language, and download the distribution.
If you are running on Mac OS X (Linux and Windows environments are not tested in this book but the code should be portable), double-click the jdk-7u15-macosx-x64.dmg file and the screen shown in Figure A-1 will ask you to double-click the JDK package. A wizard will then invite you to accept the license of the software and will install the JDK.
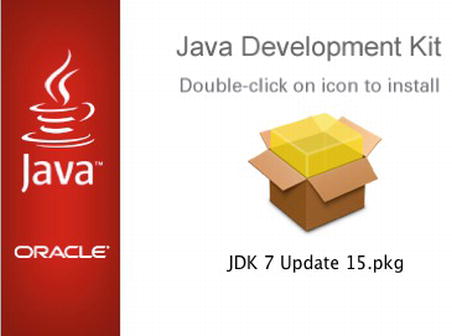
Figure A-1. Setting up the JDK installation
Once the installation is complete, it is necessary to set the JAVA_HOME variable and the $JAVA_HOME/bin directory to the PATH variable. Check that your system recognizes Java by entering java –version (see Figure A-2).
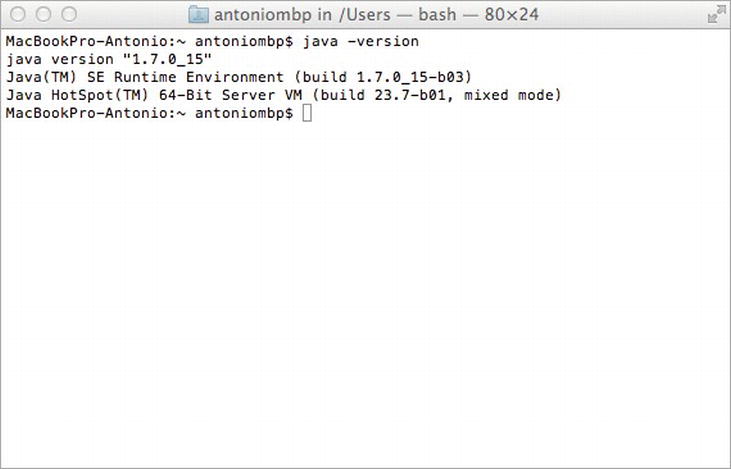
Figure A-2. Displaying the JDK version
To reflect what you’ll find in the real development world, I’ve decided to use Apache Maven (http://maven.apache.org) to build the examples of this book. The purpose of this book is not to explain Maven. You will find plenty of resources for Maven on the Internet or in bookstores. But I will introduce some elements so that you can easily understand and use the examples.
Building a Java EE application requires different operations.
- Generating code and resources,
- Compiling Java classes and test classes,
- Running unit and integration tests, and
- Packaging the code in an archive (jar, ear, war, etc.) with potentially external jar libraries.
Doing these tasks manually can be time-consuming and can generate errors. Thus, development teams have looked for ways of automating these tasks. That’s how Maven was created—to fulfill these gaps.
In 2000, Java developers started to use Apache Ant (http://ant.apache.org), allowing them to create scripts for building applications. Ant itself is written in Java and offers a range of commands that, unlike a Unix Make tool, are portable across platforms. Development teams started to create their own scripts to fulfill their needs. Yet Ant was quickly pushed to its limits when projects had to start encompassing complex heterogeneous systems. Companies faced difficulties to industrialize their build system. There was no real tool to easily reuse a build script between different projects (copy/paste was the only way).
In 2002, Apache Maven was born, and this project not only addressed these issues but also went beyond being a simple building tool. Maven offers projects a building solution, shared libraries, and a plug-in platform, allowing you to do quality control, documentation, teamwork, and so forth. Based on the “convention over configuration” principle, Maven brings a standard project description and a number of conventions such as a standard directory structure (as shown in Figure A-3). With an extensible architecture based on plug-ins (a.k.a. mojos), Maven can offer many different services.

Figure A-3. Standard Maven directory structure
Maven is based on the fact that a majority of Java and Java EE projects face similar needs when building applications. A Maven project needs to follow standards as well as define specific features in a project descriptor, or Project Object Model (POM). The POM is an XML file (pom.xml) placed at the root of the project that contains all the metadata of the project. As shown in Listing A-1, the minimum required information to describe the identity of the project is the groupId, the artifactId, the version, and the packaging type.
Listing A-1. Minimal pom.xml
<?xml version="1.0" encoding="UTF-8"?>
<project xmlns=" http://maven.apache.org/POM/4.0.0 " →
         xmlns:xsi=" http://www.w3.org/2001/XMLSchema-instance "→
         xsi:schemaLocation=" http://maven.apache.org/POM/4.0.0 →
         http://maven.apache.org/xsd/maven-4.0.0.xsd ">

  <modelVersion>4.0.0</modelVersion>
  <groupId>org.agoncal.book.javaee7</groupId>
  <artifactId>chapter01</artifactId>
  <version>1.0-SNAPSHOT</version>
  <packaging>jar</packaging>
</project>
A project is often divided into different artifacts. These artifacts are then grouped under the same groupId (similar to packages in Java) and uniquely identified by the artifactId. Packaging allows Maven to produce the artifact following a standard format (jar, war, ear, etc.). Finally, the version allows identifying an artifact during its lifetime (version 1.1, 1.2, 1.2.1, etc.). Maven imposes versioning so a team can manage the life of its project development. Maven also introduces the concept of SNAPSHOT versions (the version number ends with the string -SNAPSHOT) to identify an artifact when it’s being developed.
The POM defines much more information about your project. Some is purely descriptive (name, description, etc.); other information concerns the application execution such as the list of external libraries used, and so on. Finally, the pom.xml defines environmental information to build the project (versioning tool, continuous integration server, artifacts repositories), and any other specific process to build your project.
Maven goes beyond building artifacts; it also offers a genuine approach to archive and share these artifacts. Maven uses a local repository on your hard drive (by default in ∼/.m2/repository) where it stores all the artifacts that the project’s descriptor manipulates. The local repository (see Figure A-4) is filled either by the local developer’s artifacts (e.g., myProject-1.1.jar) or by external ones (e.g., javax.ejb-3.2.jar) that Maven downloads from remote repositories. By default, Maven uses a main repository at http://search.maven.org to download the missing artifacts.
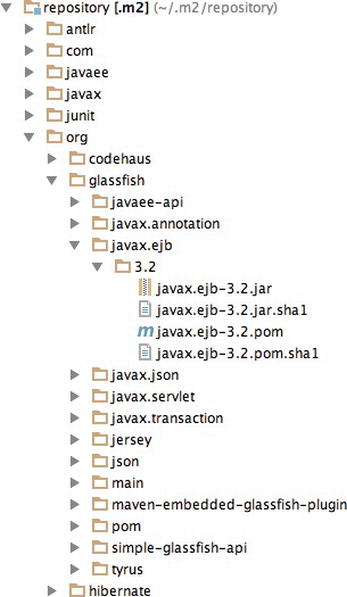
Figure A-4. Example of a local repository
A Maven project defines a single artifact in a declarative way with its dependencies in the POM (groupId, artifactId, version, type) as shown in Listing A-2. If necessary, Maven will download them to the local repository from remote repositories. Moreover, using the POM descriptors of these external artifacts, Maven will also download the artifacts they need, and so on. Therefore, the development team doesn’t have to manually deal with project dependencies. Maven automatically adds the necessary libraries.
Listing A-2. Dependencies in the pom.xml
<dependencies>
  <dependency>
    <groupId>org.eclipse.persistence</groupId>
    <artifactId>javax.persistence</artifactId>
    <version>2.1</version>
    <scope>provided</scope>
  </dependency>
  <dependency>
    <groupId>org.glassfish</groupId>
    <artifactId>javax.ejb</artifactId>
    <version>3.2</version>
    <scope>provided</scope>
  </dependency>
</dependencies>
Dependencies may have limited visibility (called scope).
- test: The library is used to compile and run test classes but is not packaged in the produced artifact.
- provided: The library is provided by the environment (persistence provider, application server, etc.) and is only used to compile the code.
- compile: The library is necessary for compilation and execution.
- runtime: The library is only required for execution but is excluded from the compilation (e.g., JSF components and JSTL tag libraries).
Project Modularity
To address project modularity, Maven provides a mechanism based on modules. Each module is a Maven project in its own right. Maven is able to build a project with different modules by calculating the dependencies they have between them (see Figure A-5). To facilitate reusing common parameters, POM descriptors can inherit from parent POM projects.
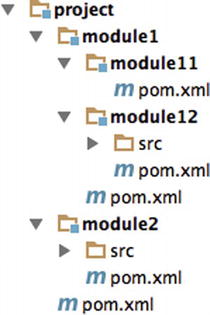
Figure A-5. A project and its modules
Maven uses a life cycle made of several phases (see Figure A-6): it cleans the resources, validates the project, generates any needed sources, compiles Java classes, runs test classes, packages the project, and installs it to the local repository. This life cycle is the vertebral column on which Maven plug-ins hang. Depending on the type of project you build, the associated mojos can be different (a mojo to compile, another to test, another to build, etc.). In the project description, you can link new plug-ins to a life-cycle phase, change the configuration of a plug-in, and so on. For example, when you build a web service client, you might add a mojo that generates web service artifacts during the generate-sources phase.
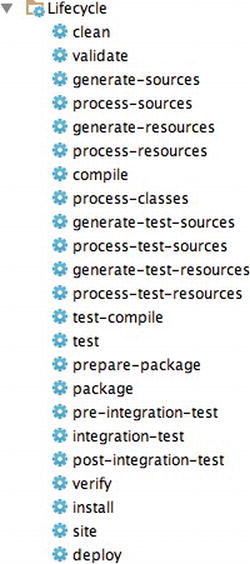
Figure A-6. Project life cycle
The examples of this book have been developed with Apache Maven 3.0.5. Once you have installed JDK 1.7, make sure the JAVA_HOME environment variable is set. Then download Maven from http://maven.apache.org/, unzip the file on your hard drive, and add the apache-maven/bin directory to your PATH variable.
Once you’ve done this, open a command line and enter mvn -version to validate your installation. Maven should print its version and the JDK version as shown in Figure A-7.
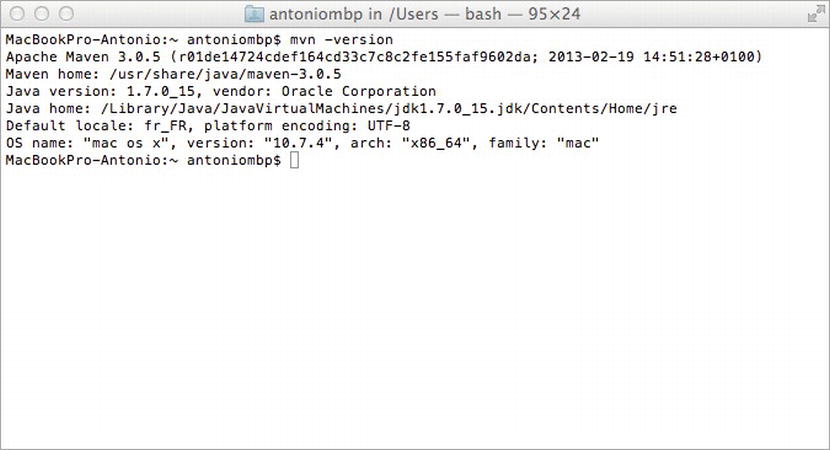
Figure A-7. Maven displaying its version
Be aware that Maven needs Internet access so it can download plug-ins and project dependencies from the main repository. If you are behind a proxy, see the documentation to configure your settings.
Here are some commands that you will be using to run the examples in the book. They all invoke a different phase of the project life cycle (clean, compile, install, etc.) and use the pom.xml to dd libraries, customize the compilation, or extend some behaviors with plug-ins:
- mvn clean: Deletes all generated files (compiled classes, generated code, artifacts, etc.).
- mvn compile: Compiles the main Java classes.
- mvn test-compile: Compiles the test classes.
- mvn test: Compiles the main Java classes as well as the test classes and executes the tests.
- mvn package: Compiles, executes the tests and packages the code into an archive.
- mvn install: Builds and installs the artifacts in your local repository.
- mvn clean install: Cleans and installs. (Note that you can add several commands separated by a space.)
![]() Note Maven allows you to compile, run, and package the examples of this book. It decouples the fact that you need to write your code (within an IDE) and build it. To develop you need an integrated development environment (IDE). I use IntelliJ IDEA from JetBrains, and you will see some screenshots of it throughout these pages. But you can use any IDE you want because this book only relies on Maven, not on specific IntelliJ IDEA features.
Note Maven allows you to compile, run, and package the examples of this book. It decouples the fact that you need to write your code (within an IDE) and build it. To develop you need an integrated development environment (IDE). I use IntelliJ IDEA from JetBrains, and you will see some screenshots of it throughout these pages. But you can use any IDE you want because this book only relies on Maven, not on specific IntelliJ IDEA features.
JUnit is an open source framework to write and run repeatable tests. JUnit features include
- Assertions for testing expected results,
- Fixtures for sharing common test data, and
- Runners for running tests.
JUnit is the de facto standard testing library for the Java language, and it stands in a single jar file that you can download from http://www.junit.org/ (or use Maven dependency management to do it). The library contains a complete API to help you write your unit tests and a tool to execute them. Unit and integration tests help your code to be more robust, bug free, and reliable.
JUnit was originally written by Erich Gamma and Kent Beck in 1998. It was inspired by Smalltalk’s SUnit test framework, also written by Kent Beck. It quickly became one of the most popular frameworks in the Java world.
Bringing the benefits of unit testing to a wide range of languages, JUnit has inspired a family of xUnit tools like nUnit (.NET), pyUnit (Python), CppUnit (C++), dUnit (Delphi), and others. JUnit took an important place in achieving test-driven development (TDD).
How Does It Work?
Since JUnit 4, writing unit and integration tests is simplified by using annotations, static import, and other Java features. Compared to the previous versions of JUnit, it provides a simpler, richer, and easier testing model, as well as introducing more flexible initialization, cleanup, timeouts, and parameterized test cases.
Let’s see some of the JUnit features through a simple example. Listing A-3 represents a Customer POJO. It has some attributes, including a date of birth, constructors, getters, and setters. It also provides a utility method to calculate the age of the customer (calculateAge()).
Listing A-3. A Customer Class
public class Customer {

  private Long id;
  private String firstName;
  private String lastName;
  private String email;
  private String phoneNumber;
  private Date dateOfBirth ;
  private Integer age ;

  // Constructors, getters, setters

  public void calculateAge () {
    if (dateOfBirth == null) {
      age = null;
      return;
    }

    Calendar birth = new GregorianCalendar();
    birth.setTime(dateOfBirth);
    Calendar now = new GregorianCalendar();
    now.setTime(new Date());
    int adjust = 0;
    if (now.get(Calendar.DAY_OF_YEAR) - birth.get(Calendar.DAY_OF_YEAR) < 0) {
      adjust = -1;
    }
    age = now.get(Calendar.YEAR) - birth.get(Calendar.YEAR) + adjust;
  }
}
The calculateAge() method uses the dateOfBirth attribute to set the customer’s age. To test the calculateAge() method, we could use the JUnit class CustomerTest described in Listing A-4.
Listing A-4. Unit Test Class for Customer
public class CustomerTest {

  private Customer customer;

  @Before
  public void clearCustomer () {
    customer.clear();
  }

  @Test
  public void ageShouldBeGretaterThanZero () {
    customer = new Customer("Rita", "Navalhas", "[email protected]");
    customer.setDateOfBirth(new GregorianCalendar(1975, 5, 27).getTime());

    customer.calculateAge();

    int calculatedAge = customer.getAge();

    assertTrue (calculatedAge >= 0);
  }

  @Test
  public void ageShouldBe42 () {
    int expectedAge = 42;

    Calendar birth = new GregorianCalendar();
    birth.roll(Calendar.YEAR, expectedAge * (-1));
    birth.roll(Calendar.DAY_OF_YEAR, -1);

    customer = new Customer("Rita", "Navalhas", "[email protected]");
    customer.setDateOfBirth(birth.getTime());

    customer.calculateAge();

    assertEquals (new Long(expectedAge), new Long(customer.getAge()));
  }

  @Test(expected = NullPointerException.class)
  public void shouldThrowAnExceptionCauseDateOfBirtheIsNull() {
    customer = new Customer();

    customer.calculateAge();
  }

  @Test @Ignore("Test is not ready yet")
  public void shouldCalculateOldAge() {
    // some work to do
  }
}
The test class in Listing A-4 contains four test methods all annotated with @Test. The JUnit framework will execute the four methods and will return the execution result (i.e., how many have succeeded and how many have failed).
Test Methods
In JUnit 4, test classes do not have to extend anything. To be executed as a test case, a JUnit class needs at least one method annotated with @Test. If you write a class without at least one @Test method, you will get an error when trying to execute it (java.lang.Exception: No runnable methods).
A test method must use the @Test annotation, return void, and take no parameters. This is controlled at runtime and throws an exception if not respected. The @Test annotation supports the optional expected parameter, which declares that a test method should throw an exception. If it doesn’t or if it throws a different exception than the one declared, the test fails. In Listing A-4, trying to calculate the age of a null customer object should throw a NullPointerException (method shouldThrowAnExceptionCauseDateOfBirtheIsNull).
Listing A-4 does not implement the shouldCalculateOldAge method. However, you don’t want the test to fail; you just want to ignore it. You can add the @Ignore annotation in front or after @Test. Test runners will report the number of ignored tests, along with the number of tests that succeeded and failed. Note that @Ignore takes an optional parameter (a String) in case you want to record why a test is being ignored.
Test cases must assert that objects conform to an expected result. For that, JUnit has an Assert class that contains several methods. In order to use it, you can either use the prefixed syntax (e.g., Assert.assertEquals()) or import statically the Assert class.
Fixtures are methods to initialize and release any common object during tests. JUnit uses @Before and @After annotations to execute code before or after each test. These methods can be given any name (clearCustomer() in Listing A-4), and you can have multiple methods in one test class. JUnit uses @BeforeClass and @AfterClass annotations to execute specific code only once per class. These methods must be unique and static. @BeforeClass and @AfterClass can be very useful if you need to allocate and release expensive resources.
To run the JUnit launcher, you must add the JUnit jar file to your CLASSPATH variable (or add a Maven dependency). After that, you can run your tests through the Java launcher as shown in the following code:
java org.junit.runner.JUnitCore org.agoncal.book.javaee7.CustomerTest
The preceding command will provide the following result:
JUnit version 4.11
..E.I
Time: 0.016
There was 1 failure:
1) ageShouldBe33(org.agoncal.book.javaee7.CustomerTest)
java.lang.AssertionError: at CustomerTest. ageShouldBe33(CustomerTest.java:52)

FAILURES!!!
Tests run: 3, Failures: 1
The first displayed information is the JUnit version number (4.11 in this case). Then JUnit gives the number of executed tests (here, three) and the number of failures (one in this example). The letter I indicates that a test has been ignored. Remember that you can run your tests with the following Maven command:
mvn test
JUnit is currently very well integrated with most IDEs (IntelliJ IDEA, Eclipse, NetBeans, etc.). When working with these IDEs, in most cases, JUnit highlights in green to indicate successful tests and in red to indicate failures. Most IDEs also provide facilities to create test classes.
JUnit is also integrated to Maven through the Surefire plug-in used during the test phase of the build life cycle. It executes the JUnit test classes of an application and generates reports in XML and text file formats. The following Maven command runs the JUnit tests through the plug-in:
mvn test
Initially called Cloudscape, the Derby database developed in Java was given to the Apache foundation by IBM and became open source. Sun Microsystems and then Oracle have released their own distribution called JavaDB. Of small footprint (2MB), Derby is a fully functional and transactional relational database that can easily be embedded in any Java-based solution.
Derby provides two different modes: embedded and network server. The embedded mode refers to Derby being started by a simple single-user Java application. With this option, Derby runs in the same JVM as the application. In this book, I use this mode during integration testing. The network server mode refers to Derby being started as a separate process and providing multiuser connectivity. I use this mode throughout the book when running applications.
Installing Derby is very easy; in fact, you may find it is already installed because it is bundled with the JDK 1.7. During the installation of JDK 1.7, the wizard proposed you install Java DB. And by default it does. If you don’t have it installed, you can download the binaries from http://db.apache.org.
Once installed, set the DERBY_HOME variable to the path where you’ve installed it, and add $DERBY_HOME/bin to your PATH variable. Start the Derby network server by launching the $DERBY_HOME/bin/startNetworkServer script. Derby displays some information to the console such as the port number it listens to (1527 by default).
Derby comes with several utilities, one of them being sysinfo. Open a command interpreter, enter the sysinfo command line, and you should see information about your Java and Derby environment, as shown in Figure A-8.
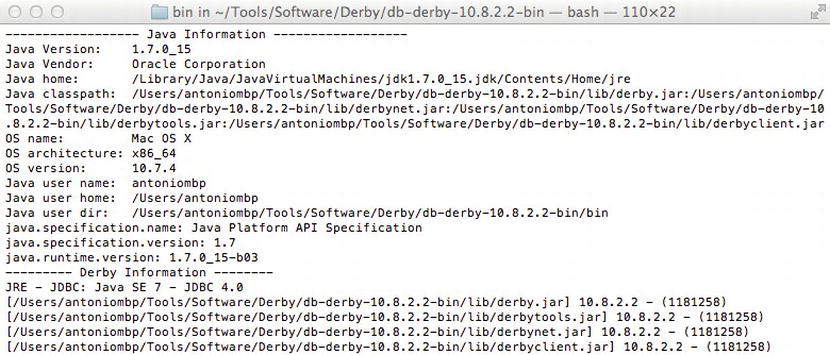
Figure A-8. sysinfo output after installing Derby
Usage
Derby provides several tools (located under the bin subdirectory) to interact with the database. The simplest are probably ij, which allows you to enter SQL commands at a command prompt, and dblook, which lets you view all or part of a database’s data definition language (DDL).
Make sure you’ve started the Derby network server, and type the command ij to enter the command prompt and run interactive queries against a Derby database. Then, enter the following commands to create a database and a table, insert data into the table, and query the data:
ij> connect 'jdbc:derby://localhost:1527/Chapter01DB;create=true';
This connects to the Chapter01DB database. Because it doesn’t exist already, the create=true parameter forces the database creation. Now let’s create the customer table by entering the following command line:
ij> create table customer (custId int primary key, firstname varchar(20), lastname varchar(20));
This creates a customer table with a primary key column and two varchar(20) columns for the first name and last name. You can display the description of the table by entering the following command: ij> describe customer;
COLUMN_NAME |TYPE_NAME  |DEC&   |NUM&   |COLUM& |COLUMN_DEF |CHAR_OCTE& |IS_NULL&
---------------------------------------------------------------------------------
CUSTID      |INTEGER    |0      |10     |10     |NULL       |NULL       |NO
FIRSTNAME   |VARCHAR    |NULL   |NULL   |20     |NULL       |40         |YES
LASTNAME    |VARCHAR    |NULL   |NULL   |20     |NULL       |40         |YES
Now that you have created the table, you can add data using the insert SQL statement as follows:
ij> insert into customer values (1, 'Fred', 'Chene'),
ij> insert into customer values (2, 'Sylvain', 'Verin'),
ij> insert into customer values (3, 'Robin', 'Riou'),
You can then use all the power of the SQL select statement to retrieve, order, or aggregate data.
ij> select count(*) from customer;
1
-----------
3

ij> select * from customer where custid=3;
CUSTID |FIRSTNAME |LASTNAME
-----------------------------------------------------
3      |Robin     |Riou

ij> exit;
To get the DDL of the created table, you can exit ij and run dblook against the Chapter01DB database. Figure A-9 shows the output of the dblook command.
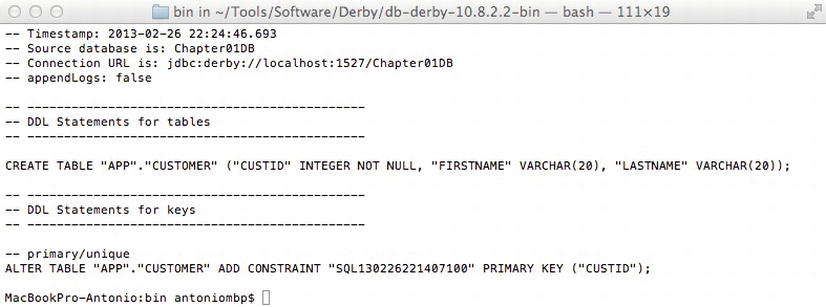
Figure A-9. dblook output of the Chapter01DB database
While a fairly new application server, GlassFish is already used by a large number of developers and corporations. Not only is it the Reference Implementation (RI) for the Java EE technology, it is also what you get when downloading the Java EE SDK. You can also deploy critical production applications on the GlassFish application server. Besides being a product, GlassFish is also a community that has gathered around the open source code and lives on http://glassfish.java.net. The community is quite responsive on mailing lists and forums. Today GlassFish has support for a diverse ecosystem: Java EE, of course, but also for Ruby on Rails or PHP applications.
The origins of GlassFish take us back to the early Tomcat days when Sun and the JServ group donated this technology to Apache. In 2005, Sun created the GlassFish project. The initial main goal was to produce a fully certified Java EE application server. GlassFish version 1.0 shipped in May 2006. At its core, the web container part of GlassFish had a lot of Tomcat heritage (in fact, at that time, an application running on Tomcat would run unmodified on GlassFish).
GlassFish v2 was released by Sun in September 2007 and had several updates. GlassFish tended to be pretty good at maintaining the same user experience across major releases, not breaking code or changing developers’ habits. Also, there is no quality difference between the “community” and “supported” versions of GlassFish. While paying customers have access to patches and additional monitoring tools (GlassFish Enterprise Manager), the open source version available from http://glassfish.java.net and the supported version available from http://www.oracle.com/goto/glassfish have undergone the same amount of testing, making it easy to switch to a supported version at any time in the project cycle.
In March 2010, soon after the acquisition of Sun Microsystems by Oracle, a roadmap for the community was published, with version 3.0.1, and 3.1, 3.2, and 4.0, planned for the next few years, and clustering being brought back into the 3.1 version (it was not initially in the 3.0 release, which had full Java EE 6 support and modularity as higher priorities).
For the purpose of this book, I have used GlassFish Open Source Edition 4.0 which shipped in May 2013. The main goal of GlassFish 4 is modularization of the core features, with an OSGi-based kernel and full support for Java EE 7. A number of developer-friendly features such as fast startup time and session preservation across redeployments are also part of this release.
![]() Note The GlassFish team has put a tremendous effort toward having rich and up-to-date documentation, making available many different guides: Quick Start Guide, Installation Guide, Administration Guide, Administration Reference, Application Deployment Guide, Developer’s Guide, and more. Check them out at http://glassfish.java.net/docs. Also check the FAQs, how-to’s, and the GlassFish forum for more information.
Note The GlassFish team has put a tremendous effort toward having rich and up-to-date documentation, making available many different guides: Quick Start Guide, Installation Guide, Administration Guide, Administration Reference, Application Deployment Guide, Developer’s Guide, and more. Check them out at http://glassfish.java.net/docs. Also check the FAQs, how-to’s, and the GlassFish forum for more information.
As an application programmer (and not one of the GlassFish developers), you do not need to understand the internal architecture of GlassFish v4, but you might be interested in the main architectural choices and guiding principles. Being built on a modular kernel powered by OSGi, GlassFish ships and runs straight on top of the Apache Felix implementation. It also runs with Equinox or Knopflerfish OSGi runtimes. HK2 (the Hundred-Kilobyte Kernel) abstracts the OSGi module system to provide components, which can also be viewed as services. Such services can be discovered and injected at runtime. OSGi is not exposed to Java EE developers for the time being but it is quite possible to inject OSGi Declarative Services into Java EE components using the standard @Resource annotation.
![]() Note OSGi is a standard for dynamic component management and discovery. Applications or components can be remotely installed, started, stopped, updated, and uninstalled without requiring a reboot. Components can also detect the addition or removal of new services dynamically and adapt accordingly. Apache Felix, Equinox, and Knopflerfish are OSGi implementations.
Note OSGi is a standard for dynamic component management and discovery. Applications or components can be remotely installed, started, stopped, updated, and uninstalled without requiring a reboot. Components can also detect the addition or removal of new services dynamically and adapt accordingly. Apache Felix, Equinox, and Knopflerfish are OSGi implementations.
This modularity and extensibility are how GlassFish v4 can grow from a simple web server listening to administrative commands to a more capable runtime by simply deploying artifacts such as war files (a web container is loaded and started, and the application deployed) or EJB jar files (which will dynamically load and start the EJB container). Additionally, the bare-bones server starts in just a few seconds (less than five seconds on reasonably modern hardware), and you only pay for what you use in terms of startup time and memory consumption. Starting the web container on the fly takes about three more seconds, and deployments are often less than one second. This all makes GlassFish v4 a very developer-friendly environment.
No matter how many modules GlassFish v4 dynamically loads, the administration console, the command-line interface, and the centralized configuration file are all extensible, and each remains unique. Also worth mentioning is the Grizzly framework, which started out as a nonblocking, I/O-based HTTP server to become one of the key elements in GlassFish as shown in Figure A-10.
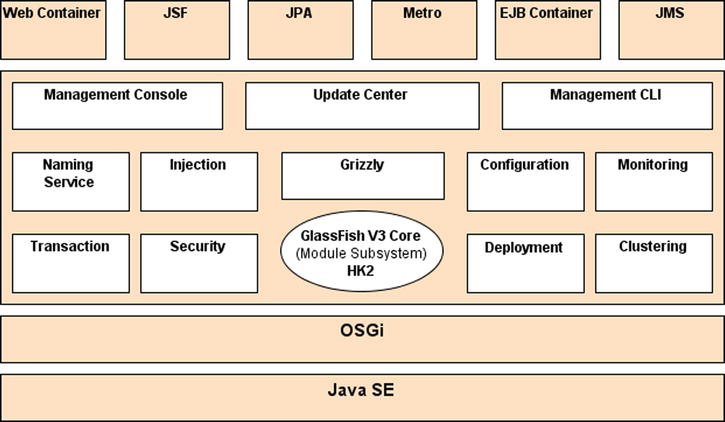
Figure A-10. GlassFish v4 architecture
Once you’re given a modular application server, you can start to mix and match various modules to build your own environment just like you would with IDEs and Linux distributions, or similar to the way Firefox or Chrome let you manage your extensions. The GlassFish Update Center is a set of graphical and command-line tools to manage your runtime. The technology behind this is the Image Packaging System (IPS, also known as pkg), which is what the OpenSolaris project uses for package management. GlassFish v4 is available in two distributions: Web Profile (defined by the Java EE 7 Web Profile) and Full Profile. These distributions each ship with a specific set of modules, the web profile being a strict subset of the full profile. Beyond this default combination, a user can connect to one or more repositories to update the existing features (such as move from the Web Profile to the Full Java EE 7 Profile), add new features (Grails support, a JDBC driver, a portlet container, etc.) or even add new third-party applications. In a corporate environment, you can set up your own repository and use the update center pkg command-line tool to provision and bootstrap the installation of GlassFish-based software.
In practice, with GlassFish v4, the update center can be accessed via theadmin console, the graphical client available at $GLASSFISH_HOME/bin/updatetool, or the pkg command line. All three allow you to list, add, and remove components available from a set of multiple repositories (although, in the case of the admin console, a number of operations are not available since the application server should not be running at the time of install). In the case of pkg (also located in $GLASSFISH_HOME/bin), the most common commands are pkg list, pkg install, pkg uninstall, and pkg image-update.
There are many different parts to the GlassFish application server, so the project was broken up into subprojects. This helps you to further understand not only the different pieces but also the adoption of individual features outside the GlassFish environment, in stand-alone mode or within another container. Figure A-11 shows a high-level architecture of the functional parts of the application server.

Figure A-11. Functional parts of GlassFish
OpenMQ, for instance, is a production-quality open source implementation of JMS. Although it is often used stand-alone for message-oriented architectures, OpenMQ can also be integrated in various ways with GlassFish (in-process, out-of-process, or remote). The administration of OpenMQ can be done via the GlassFish admin console or the asadmin command-line interface (see the “The asadmin CLI” section). The community web site is at http://mq.dev.java.net.
Metro is the one-stop shop for web services. This complete stack builds on the JAX-WS development paradigm and augments it with advanced features such as trusted, end-to-end security; optimized transport (MTOM, FastInfoset); reliable messaging; and transactional behavior for SOAP web services. Such quality of service (QoS) for web services is based on standards (OASIS, W3C), is expressed in the form of policies, and does not require the use of a new API in addition to JAX-WS. Metro is also regularly tested with Microsoft against .NET implementations to ensure interoperability between the two technologies. The community web site is at http://metro.java.net.
Mojarra is the name of the JSF 2.2 implementation in GlassFish and is available at http://mojarra.java.net. It is certainly one of the most often reused projects by other application servers.
Jersey is the production-quality RI for the new JAX-RS 2.0 specification. Both the specification and the implementation were the early comers to Java EE 7 and GlassFish. Jersey is also used internally by GlassFish v4 to offer a RESTful administration API which complements the existing tools described in the next section. The Jersey community web site is at http://jersey.java.net.
Obviously, being a compliant application server means that GlassFish implements 100% of the Java EE 7 specifications, but it also has additional features that make it a polished product, such as its administrative capabilities, be it through the admin console or via a powerful asadmin command-line interface. Almost all the configuration is stored in a file called domain.xml (located in domains/domain1/config), which can be useful for troubleshooting, but this file should not be edited by hand; instead, one of these two administration tools should be used. Both of them rely on the extensive JMX instrumentation provided by GlassFish.
Admin Console
The admin console is a browser-based administration user interface (see Figure A-12) for the application server. This tool is for both administrators and developers. It provides graphical representation of the objects under management, enhanced log file viewing, system status, and monitoring data. At a minimum, the console manages the creation and modification of configurations (JVM tuning, log level, pool and cache tuning, etc.), JDBC, JNDI, JavaMail, JMS, and connector resources, as well as applications (deployment). At any time in the navigation of the tool, contextual help is available via the top-right Help button. With a default installation, the admin console is available upon GlassFish startup at http://localhost:4848. Starting with GlassFish v4, an anonymous user can be set up at install time, removing the need to log in. Note that the admin console is loaded in the application server on the first hit to the preceding URL, thus illustrating the load-on-demand feature of GlassFish v4.

Figure A-12. Web administration console
The asadmin command-line interface (CLI) is quite powerful and often what people use in production, as it can be scripted to create instances and resources, deploy applications, and provide monitoring data on a running system. The command is located under the bin subdirectory of GlassFish and can manage multiple local or remote application server domains. asadmin offers several hundred commands, but you should get away with using only a small subset of these. If you are curious about the commands, try asadmin help. Useful commands in a simple developer profile include asadmin start-domain, asadmin stop-domain, asadmin deploy, asadmin deploydir, and asadmin undeploy. In case of a typo, asadmin will give you a choice of the closest matching command. Try asadmin resource, for instance, and asadmin will give you the related commands as shown in Figure A-13.

Figure A-13. asadmin CLI
GlassFish can be downloaded via multiple distribution mechanisms. The most obvious choices are to get it from http://glassfish.java.net/, or with the Java EE SDK (it also ships with the NetBeans IDE 7.3 and above). I’ll document here how to download and install GlassFish from the community web site.
Go to the main download page, http://glassfish.java.net/public/downloadsindex.html, and select the download link for “GlassFish Open Source Edition 4.” You are then offered the choice of both a graphical installer download and a simple Zip download. Each option further offers the choice between the Java EE 7 Full Profile and Web Profile. I will document here the installer version of the Full Profile. Note that GlassFish is available for Windows, Linux, Solaris, and Mac OS X. Executing the shell will start the graphical installer, which will
- Ask you to agree to the license.
- Request an install location.
- Let you configure an admin username and password (or default to an anonymous user).
- Let you configure HTTP and admin ports (while checking that they’re not already in use).
- Install and enable the update tool (pkg and updatetool clients). With the Zip installer, the updatetool is not installed by default and will be installed from the network on the first run.
It will then decompress a simple preconfigured GlassFish install with default settings: admin port is 4848, HTTP port is 8080, and no explicit admin user configured. Once properly installed, GlassFish can be started with the asadmin command line (see Figure A-14).
asadmin start-domain -v

Figure A-14. Starting GlassFish
You can then go to the admin console (shown earlier in Figure A-12) at http://localhost:4848 or to the default welcome page at http://localhost:8080.
![]() Tip If you only have one domain, you can omit the default domain name and start GlassFish with only asadmin start-domain. If you’d like to have the log file appear inline rather than checking the content of the dedicated log file (domains/domain1/logs/server.log), you can use asadmin start-domain --verbose or –v.
Tip If you only have one domain, you can omit the default domain name and start GlassFish with only asadmin start-domain. If you’d like to have the log file appear inline rather than checking the content of the dedicated log file (domains/domain1/logs/server.log), you can use asadmin start-domain --verbose or –v.
There are many more things that GlassFish has to offer; I show you some of them in this book, but I’ll leave it to you to explore its support for session preservation across redeployments, incremental deployment in NetBeans, Eclipse and IntelliJ IDEA, advanced OSGi hybrid application support, diagnostic services, RESTful management, monitoring, and the various security configurations.