
At this point in the book, you have examined and worked with every single aspect of JavaServer Pages. The knowledge that you have gained thus far can be put immediately to use in creating new Web applications using JSP technology, or in the maintenance of existing JSP projects. Although most of the projects in this book work mainly with the dynamic generation of HTML template data, creating interactive Web-based interfaces, this chapter focuses on the dynamic generation of content that is not HTML. While using exactly the same set of JSP techniques, the dynamic content generated will be client-side scripting elements and XML documents.
Client-side scripting elements, typically coded in the JavaScript programming language, can be used to enhance the user's interactive experience. One very practical application of JavaScript on the client side is for the validation of data entered within forms. The examples in this chapter show how JSP-generated client-side scripting elements can be used to perform client-side data validation.
Many concepts and techniques introduced in the previous chapters are put to work in this chapter. Concepts and techniques reviewed in this chapter include the following:
Standard JSP actions
JSP directives
JSP actions
JavaBeans
Custom actions in JSTL
EL
Use of implicit objects
Alternate XML syntax for JSP
Using a front controller to forward requests
Processing request parameters using JSP
Creating a custom tag library using JSP tagfiles
There are three hands-on examples in the chapter, providing step-by-step illustrations of how to use JSP in generating non-HTML Web application elements.
By the end of the chapter, you will know how to generate client-side validation code from your JSP applications. In addition, you will be familiar with the techniques used in generating XML-based content.
You already examined data validation in the first auction bidding example of Chapter 9, "JSP and JavaBeans." The example presents a form for users to input their bids for items. The following is a brief review. The range of the incoming bid is checked to ensure that it is between 0 and 999, inclusive. This check is coded in JSP. The data validation is performed by the following highlighted JSP highlighted code in the Chapter 9 index.jsp file (the first Try It Out exercise):
<%@ taglib prefix="c" uri="http://java.sun.com/jsp/jstl/core" %>
<c:choose>
  <c:when test="${empty param.action}">
    <jsp:forward page="enterbid.jsp"/>
  </c:when>
  <c:when test="${param.action eq 'bid'}">
    <c:if test="${(param.price <= 0) ||  (param.price >= 999)}">
      <jsp:useBean id="biderror" class="com.wrox.begjsp.ch09.BidError"
         scope="request">
        <jsp:setProperty name="biderror" property="msg"
          value="Sorry, your bid is not in range. Please enter again."/>
       </jsp:useBean>
       <jsp:forward page="enterbid.jsp"/>
    </c:if>
    <jsp:useBean id="bidinfo" class="com.wrox.begjsp.ch09.Bid" scope="request">
      <jsp:setProperty name="bidinfo" property="*"/>
    </jsp:useBean>

    <jsp:forward page="showbid.jsp"/>
  </c:when>
</c:choose>
The validation is performed using the JSTL <c:if> flow control action. The test attribute is specified as an EL expression:
${(param.price <= 0) || (param.price >= 999)}The user will be asked to reenter his or her bid if the incoming bid is out of this range. The form input is handled by the enterbid.jsp page.
While this solution works reasonably well, it is not the preferred way of performing data validation. It is not preferred because it is inefficient, as you will see in the following section.
Figure 12-1 illustrates why data validation using JSP is rather inefficient.
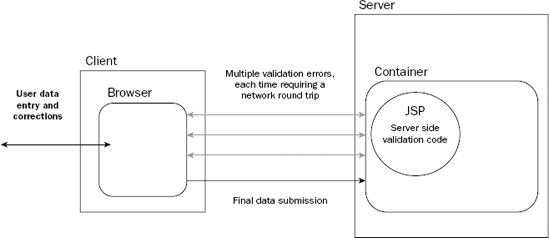
In Figure 12-1, the user input data must be transmitted between a user's browser and the server before the data can be validated. If the data is in error, it must be reentered and retransmitted to the server for validation. Because the JSP logic is executed in the container on the server, data validation code implemented in JSP always occurs on the server side.
Note
Data validation implemented using JSP logic occurs on the server side.
Server-side validation is generally inefficient for the following reasons:
Each validation and retry sequence requires a separate network call.
The bandwidth and processing power of the server may be burdened by the validation task.
The user may have to wait a significant amount of time before the data can be validated, especially if the server is clogged with validation requests from other users.
There is a lot of computing power on modern client computers. Current versions of popular browsers (such as Microsoft Internet Explorer 6.x and Netscape 7.x) are feature-rich and support powerful scripting languages that can be used to write client-side programs. You can exploit this combination of computing power and browser scripting capability to perform data validation on the client side. Figure 12-2 illustrates client-side validation.
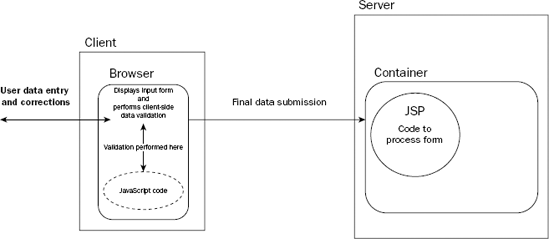
In Figure 12-2, the user input is validated on the client side by script code executed on the browser. If a validation error is detected, the user is immediately prompted to correct the input. There is no network access during this entire phase. Data is transmitted between the client and the server only when it is validated successfully on the client.
Performing data validation on the client side has the following advantages:
The server does not have the burden of low-level data validation.
Bandwidth between client and server is conserved by eliminating the need to transmit potentially invalid input to the server.
The user always experiences a fast response because the validation code executes on the powerful client hardware.
Because client-side validation is generally more efficient than server-side validation, one might imagine that all data validation should be performed on the client side. This is not possible in practice, and you will learn the reason why in the next section.
Note
Client-side data validation is generally more resource-efficient than server-side validation.
It is not possible to perform all data validation on the client side because some validation work requires access to server resources. For example, an application may need to verify that an item is in stock before an order can be placed. The client's browser cannot determine this information alone.
Another less common reason why server-side validation is necessary occurs in networks where a user's legacy browser may not support the execution of scripting code. In these cases, the implementation of client-side data validation is not possible.
Note
Not all validation tasks can be performed on the client side.
Certain types of data validation tasks can be, and should be, performed on the client. They include the following:
Verifying that numerical values are valid numbers
Verifying the length of textual input data
Verifying that input data is in particular textual formats (for example, an all-numeric serial number, a telephone number, a credit card number, an e-mail address, or a postal code)
Checking the value range of numeric data (if the range is fixed and does not depend on server information)
The common characteristic of all the items in the preceding list is that they can all be accomplished independently, without accessing server-side data or information.
Therefore, in a typical Web application, data validation is separated into two stages. The client-side validation checks input for allowable range, data format, and type validity. The server-side validation, if it exists, performs checks that require access to server side resources, such as databases.
Note
In most real-world applications, data validation is performed both on the client and on the server.
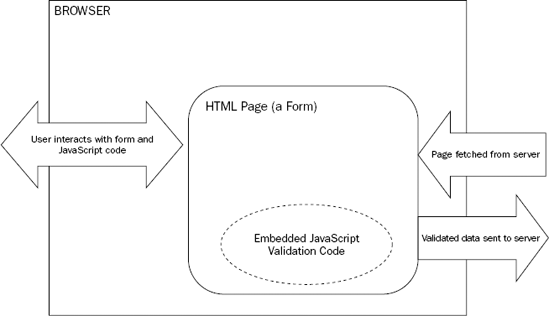
Figure 12-3 shows the components that are involved in client-side validation.
In Figure 12-3, the client-side validation code is embedded in the HTML page. This code is transmitted from the server to the client when the HTML page is fetched. The user then enters data into the form presented by the HTML. When the user clicks a button to submit the form, the client-side validation script code is executed. If errors are detected, the data is not submitted to the server.
The user is requested to correct any error and resubmit the form. The data is transmitted to the server only when all the client-side validation is performed successfully.
The client-side validation code is written in an interpreted script language. The interpreter for this scripting language is embedded in the browser. There are two very popular scripting languages:
ECMAScript is a standard scripting language that is actually a subset of JavaScript. Scripting code written in the ECMAScript subset is most portable across different browsers.
VBScript has a syntax that is similar to Microsoft's Visual Basic programming language. VBScript is supported only by the Microsoft Internet Explorer browser. JavaScript is supported by both Netscape and Microsoft browsers. In order to write client-side validation code that will work on both Internet Explorer and Netscape, JavaScript should be used.
The following Try It Out exercise shows how JavaScript can be used for client-side data validation.
Try It Out: Client-Side Validation
This first example enables a user to enter information for a product offered by an e-commerce store. The form is generated and processed by JSPs. The form uses client-side JavaScript code to perform client-side data validation for the form. To try out this example, you will need the ch12.war archive.
Make sure that your Tomcat 5 server is running and then deploy ch12.war to the server. Review Chapter 1 if you do not remember how to deploy a WAR archive.
Open your browser and access the following URL:
http://localhost:8080/ch12/example1/index.jsp
A form similar to the one shown in Figure 12-4 will be displayed, enabling you to enter the product information.
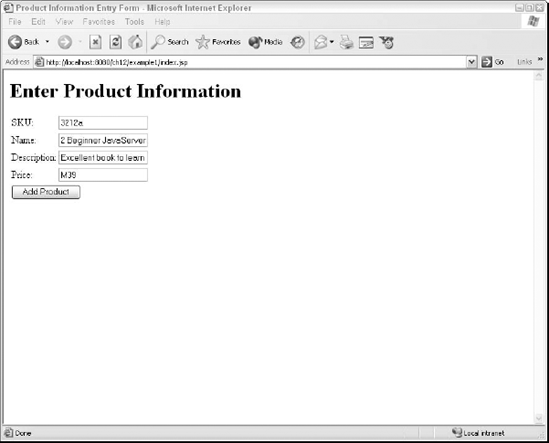
Enter the following values into the form:
For the
skufield, enter 3212a.For the
namefield, enter 2 Beginning JavaServer Pages.For the
descfield, enter Excellent book to learn JSP with.For the
pricefield, enter M39.
By design, the previous input values contain several errors. These errors should be caught by the validation code.
Click the Add Product button. This will start the client-side validation code. The errors are detected and you should see a pop-up dialog box, as shown in Figure 12-5.
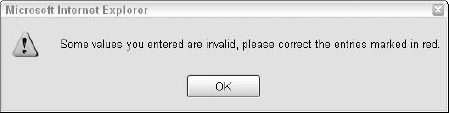
Click the OK button to dismiss the dialog box. The errors are now highlighted in the form. No data has been sent to the server yet at this point. Your form now looks similar to Figure 12-6.

Figure 12-6 shows that three errors were detected. The first one is in the value entered for sku. The sku format should contain all numeric digits, and does not allow any characters. To fix this, delete the trailing a character. Click the Add Product button again. The resulting screen is shown in Figure 12-7.
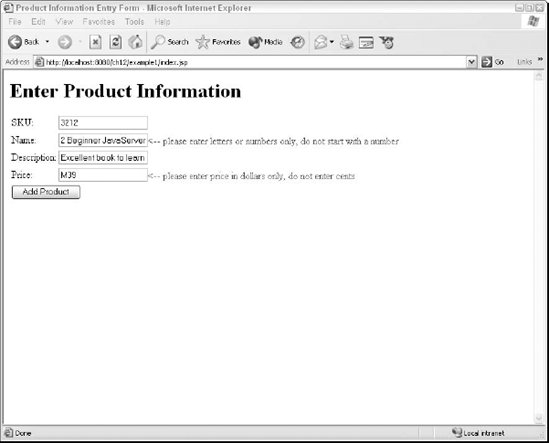
Note in Figure 12-7 that the sku is now valid, and only two errors remain. To correct these errors:
Remove the leading
2in thenamefield, as this field must begin with an alpha character.Remove the leading
Min thepricefield, as this field must contain the numeric dollar value only.
Click the Add Product button again.
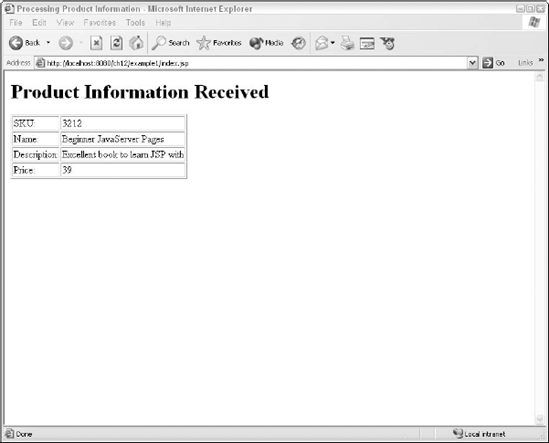
This time, all the values pass validation, and the form data is finally submitted to the server. The form data is processed by a server-side JSP. This JSP simply displays the values of the form fields. The resulting display should be similar to Figure 12-8.
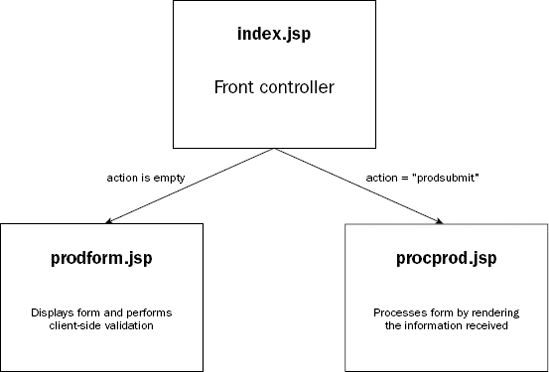
This example uses a front controller page, index.jsp, to forward the requests to different JSP pages. Figure 12-9 shows the architecture.
In Figure 12-9, the request attribute called action is used to determine where to forward the request. When index.jsp is first accessed, the action attribute will have no value. In this case, the request is forwarded to the prodform.jsp page. The prodform.jsp page prompts for the entry of product information. The prodform.jsp page also has client-side validation built in. When the data from prodform.jsp is submitted, the action attribute has the value prodsubmit. When the action attribute has the value of prodsubmit, index.jsp forwards the request to procprod.jsp. The procprod.jsp page renders the values entered for the product.
The front controller in this example is the index.jsp page. The index.jsp page is located at <Tomcat Installation Directory>/webapps/ch12/example1/index.jsp. It is reproduced here:
<%@ taglib prefix="c" uri="http://java.sun.com/jsp/jstl/core" %>
<c:choose>
  <c:when test="${empty param.action}">
    <jsp:forward page="prodform.jsp"/>
  </c:when>

  <c:when test="${param.action eq 'prodsubmit'}">
    <jsp:forward page="procprod.jsp"/>
  </c:when>
</c:choose>
A JSTL <c:choose> construct is used to forward incoming requests depending on the action request attribute. If the action attribute does not exist, the request is forwarded to the prodform.jsp page by the following code:
<c:when test="${empty param.action}">
    <jsp:forward page="prodform.jsp"/>
  </c:when>
If the action attribute has the value prodsubmit, the request is forwarded to the procprod.jsp page for processing:
<c:when test="${param.action eq 'prodsubmit'}">
    <jsp:forward page="procprod.jsp"/>
</c:when>The prodform.jsp page, located at <Tomcat Installation Directory>/webapps/ch12/example1/prodform.jsp, contains the code for client-side validation. It is presented here, with JavaScript coding highlighted:
<html>
<head>
  <title>Product Information Entry Form</title>
  <script language="JavaScript">
    function isDigitsOnly(inParam)
    {
        var chkExp = /^d+$/;
        return (chkExp.test(inParam));
    }
    function isTextOnly(inParam)
    {
        var chkExp = /^[a-z][a-zd ]+$/i;
        return (chkExp.test(inParam));
    }
    function validateForm()
    {
        var formValid = true;
        if (!isDigitsOnly(document.prodform.sku.value))
        {
            document.getElementById("skuError").style.visibility = "visible";
            formValid = false;
        }
        else
            document.getElementById("skuError").style.visibility = "hidden";

        if (!isTextOnly(document.prodform.name.value))
        {
            document.getElementById("nameError").style.visibility = "visible";
            formValid = false;
        }
        else
            document.getElementById("nameError").style.visibility = "hidden";

        if (!isTextOnly(document.prodform.desc.value))
        {
            document.getElementById("descError").style.visibility = "visible";
            formValid = false;
}
else
document.getElementById("descError").style.visibility = "hidden";
if (!isDigitsOnly(document.prodform.price.value))
{
document.getElementById("priceError").style.visibility = "visible";
formValid = false;
}
else
document.getElementById("priceError").style.visibility = "hidden";
if (!formValid)
alert("Some values you entered are invalid, please correct the entries marked in red." );
return formValid;
}
</script>
<style>
span.validateError
{
color: red;
visibility: hidden;
}
</style>
</head>
<body>
<h1>Enter Product Information</h1>
<form name="prodform" action="index.jsp" method="post"
onsubmit="return validateForm()">
<table border="0" >
<tr>
<td>SKU:</td>
<td>
<input name="sku" type="text" width="40"/>
<span id="skuError" class="validateError">
<-- please enter digits only
</span>
</td>
</tr>
<tr>
<td>Name:</td>
<td>
<input name="name" type="text" width="40"/>
<span id="nameError" class="validateError">
<-- please enter letters or numbers only, do not start with a number
</span>
</td></tr>
<tr>
<td>Description:</td>
<td>
<input name="desc" type="text" width="40"/>
<span id="descError" class="validateError">
<-- please enter letters or numbers only, do not start with a number
</span>
</td>
</tr>
<tr>
<td>Price:</td>
<td>
<input name="price" type="text" width="40"/>
<span id="priceError" class="validateError">
<-- please enter price in dollars only, do not enter cents
</span>
</td>
</tr>
<tr>
<td colspan="2">
<input type="submit" value="Add Product" />
<input type="hidden" name="action" value="prodsubmit"/>
</td>
</tr>
</table>
</form>
</body>
</html>The following paragraphs provide an analysis of the client-side validation coding.
JavaScript coding is embedded in an HTML page using the <script> tag. Because browsers such as Microsoft Internet Explorer also support VBScript, the language attribute of the <script> tag is used to specify JavaScript as the scripting language:
<script language="JavaScript">
Only two validation functions are necessary in this example. The first utility validation function, isDigitsOnly(), verifies that an incoming parameter consists of all numeric digits. Embedded character or blanks are not allowed in this case. The isDigitsOnly() function is implemented as follows:
function isDigitsOnly(inParam)
{
    var chkExp = /^d+$/;
    return (chkExp.test(inParam));
}
In the isDigitsOnly() function, a JavaScript regular expression object called chkExp is used to perform the validation. The test() method of a JavaScript regular expression is used to determine if the inParam parameter matches the specified expression. The test() method will return a Boolean true value if a match is determined, or false if no match is found. This expression matches only runs of numeric digits.
A detailed description of the JavaScript programming language, and the associated regular expression engine, is beyond the scope of this book. Interested readers are encouraged to consult Beginning JavaScript, 2nd Edition (ISBN 0-7645-5587-1).
A JavaScript regular expression is framed by the slash (/) character. The following table describes the symbols used in this expression.
Symbol | Matches |
|---|---|
^ | The beginning of the string to match |
d | Matches a single numeric digit |
$ | The end of the string to match |
+ | One or more occurrences of the matched character immediately before |
The second and last utility validation function, isTextOnly(), checks to see if the incoming parameter contains alphanumeric characters or blanks. The incoming parameter must start with a letter and not a numeric character or a blank:
function isTextOnly(inParam)
{
    var chkExp = /^[a-z][a-zd ]+$/i;
    return (chkExp.test(inParam));
}
In isTextOnly(), a JavaScript regular expression object is also used. The trailing i at the end of the expression indicates that the expression match should be performed without consideration to uppercase or lowercase. The i stands for insensitive, as in case-insensitive. The following table describes two other new matching symbols in the expression.
Symbol | Matches |
|---|---|
[a-z] | A single alphabet letter |
[a-zd ] | A single alphabet letter, a numeric digit, or a blank |
chkExp.test() will attempt a match of the regular expression against the incoming parameters, and return a Boolean true if a match is found (or false otherwise).
Following the isTextOnly() utility function, the next function is the actual function used to validate the form. This function is called validateForm(). The first thing that it does is to set a Boolean JavaScript variable called formValid to the true value. This variable will be returned to the caller. It is set to false if any validation error is detected.
function validateForm()
{
    var formValid = true;
Next in the validateForm() function is a series of checks that access the value of the form fields. When using JavaScript, the form fields can be accessed through the object model provided by the browser. Roughly speaking, each HTML or form element can be given an ID. The element can then be accessed in the scripting language to modify its properties or attributes. For example, in the first set of validation codes, the value of the sku field can be accessed via the JavaScript expression document.prodform.sku.value. This expression will access the sku value just entered by the user. In this case, the value is passed to isDigitsOnly() to ensure that the sku consists of all numeric digits:
if (!isDigitsOnly(document.prodform.sku.value))
    {
        document.getElementById("skuError").style.visibility = "visible";
        formValid = false;
    }
    else
        document.getElementById("skuError").style.visibility = "hidden";
Note that the document.getElementById() method (a method provided by the Document Object Model, or DOM, and supported by the browser) is used to modify the CSS style of an element called skuError. This element is used to render the validation error.
Using the hidden <span> tag to reveal multiple validation errors
When a validation error is detected, it is possible to
Immediately ask the user to correct it
Remember it and continue with validation
The first Try It Out example uses the second alternative, which provides a less cumbersome user experience because multiple errors will be detected at one time. This enables the user to correct multiple errors without being repeatedly bothered by the notification pop-up window.
The validation error message appears right next to the field in which the error occurs. Refer to Figure 12-6 to see where the error messages are displayed.
These error messages are actually rendered as part of the table, but they are made invisible using CSS properties within a <span> tag. The style under which each error message is created is defined in the validateError CSS class. This is embedded as a <style> element within index.jsp:
...
<style>
  span.validateError
  {
    color: red;
    visibility: hidden;
  }
</style>
</head>
<body>
Note that the visibility attribute is set to hidden, which makes the error messages invisible initially.
For example, the row containing the validation error for the sku field is pre-rendered as follows:
<tr>
  <td>SKU:</td>
  <td>
    <input name="sku" type="text" width="40"/>
    <span id="skuError" class="validateError">
      <-- please enter digits only</span>
  </td>
</tr>
Because the error message is specified to have the validateError style class, it is initially invisible.
Upon validation, the visibility of this <span> tag is toggled to visible if an error occurs. During the validation process, the following highlighted code is responsible for turning the visibility of this tag on and off:
if (!isDigitsOnly(document.prodform.sku.value))
  {
      document.getElementById("skuError").style.visibility = "visible";
      formValid = false;
  }
  else
      document.getElementById("skuError").style.visibility = "hidden";
Note that it is necessary to turn the visibility off for the fields that have valid data. This is because a user may not have corrected all the errors before attempting to submit the form again.
When the user submits the form, the browser will send the data to the server. However, if a JavaScript onsubmit handler is specified, it will be called before the actual submission. This allows for hooking in the data validation code as a handler. The following form element, from index.jsp, calls this handler:
<form  name="prodform" action="index.jsp" method="post"
  onsubmit="return validateForm()">
The
actionattribute of the form specifies thatindex.jspshould be used to process the form. Recall thatindex.jspis actually a front controller. It will forward the request toprocprod.jspfor processing because a request attribute calledactionis set to the valueprodsubmitwithin the form.
Note the use of a JavaScript code segment in the onsubmit attribute:
return validateForm()
If the onsubmit handler returns true, the form data is sent to the server for further processing. If the onsubmit handler returns false, the original form is displayed and no data will be sent to the server.
The validateForm() method uses its own formValid Boolean variable to determine whether any validation error occurred. This variable is returned to the caller, which means that the form will not submit any data to the server until all validation errors are corrected.
The form data is finally submitted back to index.jsp and the request is forwarded to procprod.jsp for processing. procprod.jsp is located at <Tomcat Installation Directory>/webapps/ch12/example1/procprod.jsp. The content of procprod.jsp is reproduced here:
<%@ taglib prefix="c" uri="http://java.sun.com/jsp/jstl/core" %>
<html>
<head>
  <title>Processing Product Information</title>
</head>
<body>
  <jsp:useBean id="localProd" class="com.wrox.begjsp.ch03.Product" />
  <jsp:setProperty name="localProd" property="*" />
  <h1>Product Information Received</h1>
  <table border="1">
    <tr>
      <td>SKU:</td> <td><jsp:getProperty name="localProd" property="sku"/> </td>
    </tr>

    <tr>
      <td>Name:</td> <td><jsp:getProperty name="localProd" property="name"/> </td>
    </tr>
    <tr>
      <td>Description:</td>
      <td><jsp:getProperty name="localProd" property="desc"/>
      </td>
    </tr>
    <tr>
      <td>Price:</td> <td> ${localProd.price}</td>
    </tr>

  </table>
</body>
</html>
This code is taken directly from the first example in Chapter 9. It creates an instance of the com.wrox.begjsp.ch03.Product JavaBean. The properties of this JavaBean are set with the values entered by the user. These property values are subsequently rendered using a mixture of <jsp:getProperty> standard actions and EL expressions.
This concludes the coverage of the Try It Out exercise. While the index.jsp in this first example implemented client-side data validation JavaScript code, the code was not generated dynamically using JSP. Instead, the entire JSP acted more like a static HTML page.
Instead of placing the client-side validation code in the JSP file as static template text, it is possible to create a JSP tag library that generates this code.
Using JSP to generate the client-side validation code has the following advantages:
It reduces the amount of complex coding required in the main JSP page, simplifying long-term maintenance.
It enables easy reuse of the JavaScript code and validation mechanism.
It enables developers who are not fluent in JavaScript coding to implement client-side validation, by simply using the JSP tag library.
The last advantage is very important indeed. In fact, modern JSP-based frameworks, such as JSF (JavaServer Faces, covered in Chapter 21, "JavaServer Faces"), makes extensive use of this capability to create highly interactive user interface components.
The next Try It Out exercise performs exactly the same function as the first one. However, a custom tag library is used to dynamically generate the client validation code.
Because the index.jsp and procprod.jsp pages in this example remain unchanged from those in the previous example, they are not revisited here.
The major difference between the two examples is in the prodform.jsp page, located at <Tomcat Installation Directory>/webapps/ch12/example2/prodform.jsp. It is reproduced here:
<%@ taglib prefix="my" tagdir="/WEB-INF/tags/wroxtags" %>
<html>
<head>
  <title>Product Information Entry Form</title>
  <my:validateFunctions>
    <my:checkField name="sku" type="digits"/>
    <my:checkField name="name" type="alphanum"/>
    <my:checkField name="desc" type="alphanum"/>
    <my:checkField name="price" type="digits"/>
  </my:validateFunctions>
</head>
<body>
  <h1>Enter Product Information</h1>
  <form  name="prodform" action="index.jsp" method="post"
    onsubmit="return validateForm()">
  <table border="0" >
    <tr>
      <td>SKU:</td>
      <td>
        <input name="sku" type="text" width="40"/>
        <my:validateErrMsg name="sku"
          msg="<-- please enter digits only"/>
      </td>
    </tr>

    <tr>
      <td>Name:</td>
      <td>
      <input name="name" type="text" width="40"/>
      <my:validateErrMsg name="name"
         msg="<-- please enter letters or numbers only, do not start with a number"/>
      </td>
    </tr>
    <tr>
      <td>Description:</td>
      <td>
        <input name="desc" type="text" width="40"/>
        <my:validateErrMsg name="desc"
          msg="<-- please enter letters or numbers only, do not start with a number"/>
      </td>
    </tr>
    <tr>
      <td>Price:</td>
      <td>
        <input name="price" type="text" width="40"/>
        <my:validateErrMsg name="price"
          msg="<-- please enter price in dollars only, do not enter cents"/>
      </td>
    </tr>
<tr>
<td colspan="2">
<input type="submit" value="Add Product" />
<input type="hidden" name="action" value="prodsubmit"/>
</td>
</tr>
</table>
</form>
</body>
</html>Compare this to the prodform.jsp from the first example. You will notice the improvements.
Instead of the embedded JavaScript code, this new prodform.jsp page contains the following set of tags:
<my:validateFunctions>
  <my:checkField name="sku" type="digits"/>
  <my:checkField name="name" type="alphanum"/>
  <my:checkField name="desc" type="alphanum"/>
  <my:checkField name="price" type="digits"/>
</my:validateFunctions>
The my prefix is used to address a custom tag library. This custom tag library is included using the <%@ taglib %> directive:
<%@ taglib prefix="my" tagdir="/WEB-INF/tags/wroxtags" %>
This usage of the <%@ taglib %> directive specifies that the tag files making up the tag library can be found in the <Tomcat Installation Directory>/webapps/ch12/WEB-INF/tags/wroxtags directory.
There are three custom tags in this tag library. The following table describes the usage of each tag.
Using these tags, a JSP developer can
Provide client-side data validation, without knowing anything about the coding of JavaScript functions
Easily add new validated fields to the form
To render a validation error, the <my:validiateErrMsg> tag is used. For example, the following code renders the validation error for the sku field:
<tr>
  <td>SKU:</td>
  <td>
    <input name="sku" type="text" width="40"/>
    <my:validateErrMsg name="sku"
      msg="<-- please enter digits only"/>
  </td>
 </tr>
The highlighted code is the <my:validateErrMsg> tag that renders the validation error message.
If we look inside the tag files that implement this library, it is evident that the very same JavaScript code used in the first example is at work.
The <my:validateFunctions> custom tag
First, the <my:validateFunctions> tag, contained in the <Tomcat Installation Directory>/webapps/ch12/WEB-INF/tags/wroxtags/validateFunctions.tag file, is reproduced here:
<script language="JavaScript">
function isDigitsOnly(inParam)
{
    var chkExp = /^d+$/;
    return (chkExp.test(inParam));
}
function isTextOnly(inParam)
{
    var chkExp = /^[a-z][a-zd ]+$/i;
    return (chkExp.test(inParam));
}
function validateForm()
{
    var formValid = true;
    <jsp:doBody/>
    return formValid;
}
</script>
<style>
span.validateError
{
color: red;
visibility: hidden;
}
</style>This tag contains the embedded JavaScript code, with an embedded <jsp:doBody> standard action. The body content of this <my:validateFunctions> tag will be rendered at the location of this tag.
First, this tag defines the utility JavaScript functions:
<script language="JavaScript">
function isDigitsOnly(inParam)
{
var chkExp = /^d+$/;
return (chkExp.test(inParam));
}
function isTextOnly(inParam)
{
var chkExp = /^[a-z][a-zd ]+$/i;
return (chkExp.test(inParam));
}Next, the tag defines the validateForm() function, but without the actual code to do the validation. This is because that code will be generated by a separate <my:checkField> tag for each field on the form. The output from these <my:checkField> tags will be rendered at the location of the <jsp:dobody/> tag:
function validateForm()
{
var formValid = true;
<jsp:doBody/>
return formValid;
}
</script>Last but not least, this tag also uses the <style> element to define the CSS style for the validation error message:
<style>
  span.validateError
  {
    color: red;
    visibility: hidden;
  }
</style>The <my:checkField> custom tag
The second tag, <my:checkField>, is used to generate the code that performs the validation using the utility JavaScript functions; it takes two attributes as parameters. This tag, contained in the <Tomcat Installation Directory>/webapps/ch12/WEB-INF/tags/wroxtags/checkField.tag file, is reproduced here:
<%@ taglib prefix="c" uri="http://java.sun.com/jsp/jstl/core" %>
<%@attribute name="name" type="java.lang.String" %>
<%@attribute name="type" type="java.lang.String" %>

<c:choose>
  <c:when test="${type eq 'alphanum'}">
    if (!isTextOnly(document.prodform.${name}.value))
    {
  </c:when>

  <c:when test="${type eq 'digits'}">
    if (!isDigitsOnly(document.prodform.${name}.value))
    {
  </c:when>
</c:choose>
document.getElementById("${name}Error").style.visibility = "visible";
formValid = false;
    }
  else
    document.getElementById("${name}Error").style.visibility = "hidden";
This tag uses the JSTL library. The two attributes, name and type, are both declared as of type String using the <jsp:attribute> directive:
<%@ taglib prefix="c" uri="http://java.sun.com/jsp/jstl/core" %>
<%@ attribute name="name" type="java.lang.String" %>
<%@ attribute name="type" type="java.lang.String" %>
A JSTL <c:choose> construct is used to generate either a call to isTextOnly() or the isDigitsOnly() utility validation function. The decision is made based on the value of the type attribute of this <my:checkField> tag. Note the use of the EL expression, ${name}, in rendering the value of the name parameter:
<c:choose>
  <c:when test="${type eq 'alphanum'}">
    if (!isTextOnly(document.prodform.${name}.value))
    {
  </c:when>

  <c:when test="${type eq 'digits'}">
    if (!isDigitsOnly(document.prodform.${name}.value))
    {
  </c:when>
</c:choose>
The last part of this tag file contains the rest of the validation logic, setting the visibility of the hidden error message <span> element, and the value of the formValid Boolean variable:
document.getElementById("${name}Error").style.visibility = "visible";
      formValid = false;
  }
  else
      document.getElementById("${name}Error").style.visibility = "hidden";
In the preceding code, again note the use of the EL expression, ${name}, to render the actual name of the field to be validated.
The <my:validateErrMsg> custom tag
The last tag in the library, the <my:validateErrMsg> tag, is used to render the <span> that contains the validation error message. This <my:validateErrMsg> tag, contained in the <Tomcat Installation Directory>/webapps/ch12/WEB-INF/tags/wroxtags/validateErrMsg.tag file, is reproduced here:
<%@attribute name="name" type="java.lang.String" %>
<%@attribute name="msg" type="java.lang.String" %>
<span id="${name}Error" class="validateError">${msg}</span>
This tag is very straightforward. The two attributes are both of type String. They are rendered into the HTML code fragment using EL expressions. The resulting <span> tag is initially invisible, but will be made visible if a validation error occurs with the associated field.
This concludes our coverage of the second example, and of dynamically generating client-side JavaScript code.
Another interesting non-HTML content type that JSP often generates is XML. The last example of this chapter works with the generation of XML data.
The examples in Chapter 7, "JSP Directives," explored the generation of XML documents using JSP. This section reviews some of the techniques and concepts, and continues the exploration.
Remember the following points when using JSP to generate XML:
JSP can be used to generate any textual data; XML is just another textual data type.
Use the
contentTypeattribute of the<%@page %>directive and set it totext/xmlfor maximal browser/application compatibility.All JSP 2.x pages can also be expressed in an XML view, where the entire unprocessed JSP page is in a well-formed XML document.
The last point is less important for most developers, but important for vendors who create tools. Having a JSP in a pure XML format enables development tools to easily parse and work with the page.
The last Try It Out exercise in this chapter examines a very common problem with the generation of XML documents using JSP.
Try It Out: Generating XML
This chapter's last Try It Out example is a JSP that generates an XML document. This XML document displays a programming tip of the day for the user, presumably retrieved from a database, although in the example, a custom tag is used to generate the data for display.
To view the generated XML document, you can use your browser. If you are using the Microsoft Internet Explorer browser, it can display a well-formed XML file in a collapsible view.
To try out this example, make sure that the ch12.war archive is deployed on your running Tomcat 5 server, and then access the following URL:
http://localhost:8080/ch12/example3/index.jsp
If you are using Internet Explorer as a browser, you will see that the resulting XML file has an error. Figure 12-10 illustrates what you will see.
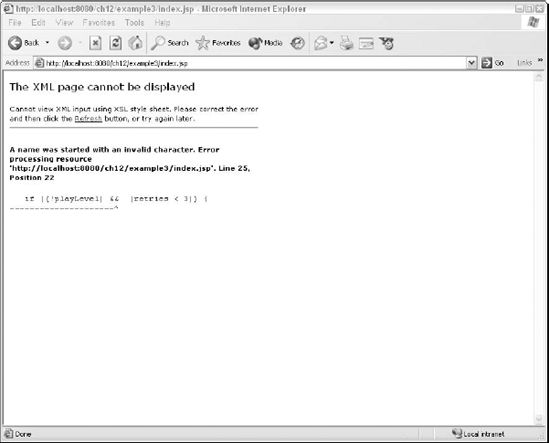
The resulting XML document is not valid because certain XML reserved characters conflict with the characters in the printed code. For example, the characters & and < are reserved in XML.
To see a properly working JSP without this problem, try the following URL:
http://localhost:8080/ch12/example3/index1.jsp
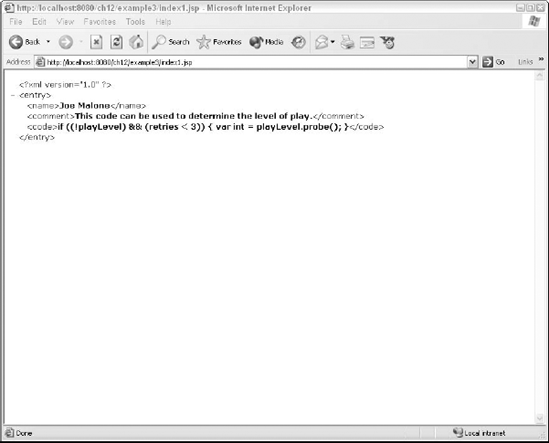
This time, the JSP generates a well-formed XML and the browser displays it in a collapsible view (if you are using Microsoft Internet Explorer). Figure 12-11 illustrates the well-formed document.
First, take a look at the JSP page that generated the bad XML document. This is the index.jsp page, located at <Tomcat Installation Directory>/webapps/ch12/example3/index.jsp. It is reproduced here:
<%@ taglib prefix="my" tagdir="/WEB-INF/tags/wroxtags" %>
<%@page contentType="text/xml" %>
<?xml version="1.0"?>
<entry>
  <my:getInfo/>
  <name>
    ${name}
  </name>
  <comment>
    ${comment}
  </comment>
  <code>
    ${code}
  </code>
</entry>
First, the <%@ taglib %> directive associates the my prefix with the tag files in the <Tomcat Installation Directory>/webapps/ch12/WEB-INF/tags/wroxtags directory:
<%@ taglib prefix="my" tagdir="/WEB-INF/tags/wroxtags" %>
Next, the <%@ page %> directive is used to set the generated content type to XML. This directive is followed immediately by the obligatory XML declaration:
<%@page contentType="text/xml" %>
<?xml version="1.0"?>
After the XML declaration, the root element <entry> starts. One of the tags in the tag library is called. This tag is named <my:getInfo>. This tag retrieves the details of the "programming tip of the day." When invoked, this tag simply sets three scoped variables called name, comment, and code, respectively.
The values of these variables are rendered using EL expressions within the XML template data. The EL expressions that render the variables are highlighted here:
<entry>
  <my:getInfo/>
  <name>
    ${name}
  </name>
  <comment>
    ${comment}
  </comment>
  <code>
    ${code}
  </code>
</entry>
While everything looks okay, it was observed earlier that this JSP will produce a bad XML document.
The culprit is within the code variable. This variable contains the following code fragment:
if ((!playLevel) && (retries < 3))
{
    var int = playLevel.probe();
}
Both the & character and the < character are reserved, and have special meanings in XML documents. To use them in other parts of the XML document, they must be escaped. The following table shows the corresponding escaped characters.
Character | XML Escape |
|---|---|
|
|
|
|
Therefore, for a well-formed XML document, the code fragment must be expressed as follows:
if ((!playLevel) && (retries < 3))
{
    var int = playLevel.probe();
}
Unfortunately, simply using EL expressions is not sufficient. Thankfully, however, the JSTL output tag, <c:out>, will escape XML by default.
Therefore, it is a simple matter of replacing the EL expressions with the <c:out> JSTL action. This is exactly what happened in index1.jsp, located at <Tomcat Installation Directory>/webapps/ch12/example3/index1.jsp. The content of this XML file is reproduced here, with the new <c:out> tags highlighted:
<%@ taglib prefix="c" uri="http://java.sun.com/jsp/jstl/core" %>
<%@ taglib prefix="my" tagdir="/WEB-INF/tags/wroxtags" %>
<%@page contentType="text/xml" %>
<?xml version="1.0"?>
<entry>
  <my:getInfo/>
  <name>
    <c:out value="${name}"/>
  </name>
  <comment>
    <c:out value="${comment}"/>
  </comment>
  <code>
    <c:out value="${code}"/>
  </code>
</entry>
An EL function called
escapeXml()can also be used instead of JSTL<c:out>. For example, you can use${fn:escapeXml(name)}to achieve the same effect.
When working with XML data, it is very important to know if the dynamically generated data is escaped for the XML special characters, and to perform the required escape if necessary. This awareness will help you avoid common programming mistakes such as the following:
Using un-escaped text in XML document, as shown in the preceding example
Showing escaped text when displaying a non-XML document
The <my:getInfo> custom tag is the only thing remaining in this example that has not been discussed. This tag generating the data for the XML file is called <my:getInfo>. The code for this tag can be found in the <Tomcat Installation Directory>/webapps/ch12/WEB-INF/wroxtags/getInfo.tag file. The content of this file is shown here:
<%@ tag body-content="empty" %>
<%@ taglib prefix="c" uri="http://java.sun.com/jsp/jstl/core" %>
<%@ variable name-given="code" variable-class="java.lang.String" scope="AT_END" %>
<%@ variable name-given="name" variable-class="java.lang.String" scope="AT_END" %>
<%@ variable name-given="comment" variable-class="java.lang.String" scope="AT_END" %>
<c:set var="code">
  if ((!playLevel) &&  (retries < 3))
  {
      var int = playLevel.probe();
  }
</c:set>
<c:set var="name">
  Joe Malone
</c:set>
<c:set var="comment">
  This code can be used to determine the level of play.
</c:set>
First, the <%@ tag %> directive is used to specify that the tag cannot have a body:
<%@ taglib prefix="c" uri="http://java.sun.com/jsp/jstl/core" %>
Next, the JSTL tag library is included and the three variables are defined using the <%@ variable %> directive. All of them are of type String, and they are synchronized at the end, making them available to the calling JSP page at the end of the tag's appearance:
<%@ taglib prefix="c" uri="http://java.sun.com/jsp/jstl/core" %>
<%@ variable name-given="code" variable-class="java.lang.String" scope="AT_END" %>
<%@ variable name-given="name" variable-class="java.lang.String" scope="AT_END" %>
<%@ variable name-given="comment" variable-class="java.lang.String" scope="AT_END" %>
The value for the code variable is set to the following code fragment:
<c:set var="code">
  if ((!playLevel) &&  (retries < 3))
  {
      var int = playLevel.probe();
  }
</c:set>
Finally, the value of the name and comment variables is also set:
<c:set var="name">
  Joe Malone
</c:set>
<c:set var="comment">
  This code can be used to determine the level of play.
</c:set>
Upon the execution of this tag, the three variables will be available within the calling page, containing the desired data.
JSP, as a presentation technology, is not restricted to the dynamic generation of HTML content. It can be used to generate any type of dynamic textual content. One common alternative content type is XML. When generating XML, be careful of the need to escape certain reserved special characters. Careful use of the JSTL <c:out> tag in generating dynamic XML output can help alleviate any problems.
This chapter used JSP to generate validation code for execution on the user's browser. This code is created in the JavaScript programming language. Also explored was the possibility for JSP to dynamically generate executable code. The process of client-side data validation is simplified when JSP is used to generate the code. The following validation topics are covered:
Form data validation can be performed on the server-side (i.e., via JSP) or on the client-side (using JavaScript code).
Server-side data validation is generally inefficient, requiring network access and server-side CPU time. However, it is absolutely necessary for certain validation tasks.
A well-designed Web application will take advantage of client-side validation wherever possible but may still have server-side data validation logic.
By encapsulating the dynamic generation of client-side executable JavaScript code in a custom tag library, it is possible to reuse the logic. This enables even developers with no knowledge of JavaScript coding to create JSP code that takes advantage of client-side validation.
Using the custom tag library in the second Try It Out exercise, create a form that will accept the following user input for an auction:
Name: The name of the bidder; should be an alphanumeric inputItem Number: The number of the item to bid on; should be a numeric valueBid Price: The bid in dollars; should be a numeric value
Test the client-side data validation using this new form thoroughly.
Modify
index1.jspfrom the third Try It Out exercise to use the EL functionescapeXml()to render a well-formed XML document.