This chapter introduces the Tiles framework and illustrates how it can provide structure and flexibility in presenting an interface to customers of your Web site. The chapter also demonstrates how to integrate Tiles with the Struts framework discussed in the last chapter.
This chapter covers the following topics:
An introduction to Tiles
Installing Tiles for use in a Web application
Tiles definitions
Tiles tags
Advanced Tiles usage with parameters and inheritance
The use of Tiles with Struts
Web developers have an awful habit of forgetting one of the most important concepts of software development: reuse. Why do something twice when you can do it once and use it everywhere? It has been said that some of the best software developers are essentially lazy souls who are always trying to ensure that they develop something only once, designing it flexibly enough so that it, whatever it is, can be used everywhere. Many of the techniques and tools explained in this book are created with this goal in mind. The Tiles framework is no different.
Tiles was first developed as a simple templating framework called Components by Cedric Dumoulin, and has since been renamed to Tiles to avoid the confusion that could result from using that word. Today, Tiles has been completely integrated into the Struts framework, although it can still be used independently.
Pages that are displayed on Web sites often contain areas that are repeated in many places; menus, headers, and footers are typical examples. Web sites, therefore, are often designed in a layout or a number of layouts that don't change; only the content or what is actually displayed in those areas changes. Developers have traditionally tackled this challenge by using jsp:include invocations in an attempt to modularize these display elements. This approach, while achieving some degree of modularity, is limited because the included pages can become tightly bound to the pages in which they are used, with no way to define them, generally, across the application.
The Tiles framework enables a developer to use templates that contain common parts of an interface, without using includes. Tiles also organizes these templates into a series of reusable components that can be referenced from within the application.
For example, Figure 20-1 shows a very typical Web page layout. The separate areas have been shaded differently.
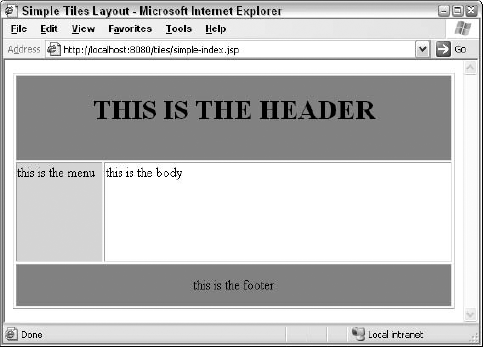
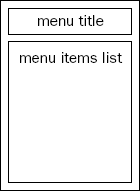
The page displayed here uses a template (or layout in Tiles terminology) that defines four separate areas, or regions. In the Tiles framework, these regions are referred to as tiles. A tile in this context is a simple JSP page that displays some content: the header, some menu items, or the footer of a page. The layout that has been developed to show this page is a JSP file as well. It makes use of the tiles that have been provided and places them in the correct positions.
Figure 20-2 illustrates this structure of layouts and tiles being used to display a page.
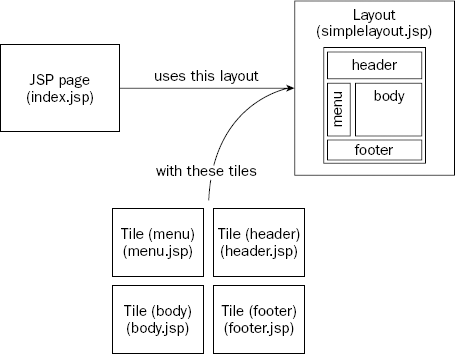
In this example, the index.jsp file defined which layout it will use and which tiles will be used in that layout. The tiles are passed to the layout as parameters. Note that the names defined in the layout page are consistent with the names of the tiles, such as header, footer, and body. When the tiles are passed to the layout, it uses these names to determine where each should be placed.
This instance of usage could also be defined as a definition and given a name that can be referenced in the application. Therefore, instead of the index.jsp file stipulating which tiles to use with the layout, and other pages having to do the same, it is defined centrally in an XML configuration file or another JSP file and called on by whatever pages require it. Each particular usage of this definition could then add special characteristics it requires. This second level of abstraction provided by tiles is enormously powerful.
This chapter uses terms that could become confusing if not understood in the correct context. This section defines the terms used in tiles to ensure that you understand the concepts presented in the rest of the chapter.
A layout is a JSP page that uses tiles to create an interface. An application can make use of many different layouts. A layout is simply a template for how a series of tiles can be placed together to form a view.
The term layout is used in this chapter instead of template, as it is consistent with Tiles terminology. In practice, the word template is equally correct.
A tile is an element or region of a layout; it represents a section of an interface or Web page that is likely to be reused in many layouts. Examples include menus, headers, and footers.
The Tiles framework is available as part of the Struts framework described in Chapter 19, "Struts Framework," or on its own from the Tiles Web site at http://www.lifl.fr/~dumoulin/tiles/index.html.
This chapter uses Tiles on its own and then investigates its integration with the Struts framework. The following steps will prepare a Web application on your computer to use the Tiles framework without using Struts:
Download the latest distribution from the Tiles Web site at
www.lifl.fr/~dumoulin/tiles/index.html.Extract the file you downloaded into a directory on your computer; in a Windows system this might be
C: iles.Copy the
tiles.jarfile fromC: ileslibinto theWEB-INF/libdirectory of your Web application.Copy the
struts-tiles.tldandtiles-config.dtdfiles fromC: ileslibinto theWEB-INFdirectory of your Web application.Tiles also requires some commons libraries from Jakarta (
http://jakarta.apache.org/commons/). Download the following commons libraries and include the associated JAR files in theWEB-INF/libdirectory:Although this step isn't compulsory for Tiles, the examples in this chapter use the JSTL. Place the
jstl.jarandstandard.jarfiles from the JSTL you have used in previous chapters in the/WEB-INF/libdirectoryMake sure the
WEB-INF/web.xmlfile in your Web application contains the following:<?xml version="1.0" encoding="ISO-8859-1" ?> <web-app xmlns="http://java.sun.com/xml/ns/j2ee" xmlns:xsi="http://www.w3.org/2001/XMLSchema-instance"xsi:schemaLocation="http://java.sun.com/xml/ns/j2ee http://java.sun.com/xml/ns/j2ee/web-app_2_4.xsd" version="2.4"> <icon></icon> <display-name>Tiles Examples</display-name> <description>This is a Tiles Example</description> <servlet> <servlet-name>action</servlet-name> <servlet-class>org.apache.struts.tiles.TilesServlet</servlet-class> <init-param> <param-name>definitions-config</param-name> <param-value>/WEB-INF/tiles-defs.xml</param-value> </init-param> <load-on-startup>1</load-on-startup> </servlet> <servlet-mapping> <servlet-name>action</servlet-name> <url-pattern>*.do</url-pattern> </servlet-mapping> <welcome-file-list> <welcome-file>index.jsp</welcome-file> </welcome-file-list> </web-app>The servlet specified here is provided by the Tiles framework, and is required in order to initialize the Tiles factory with the specified configuration file (
tiles-defs.xml). This configuration file will define the Tiles definitions available in the Web application. In addition to thedefinitions-configparameter, the following table describes the additional parameters that can be set.Create a file called
tiles-defs.xmlin theWEB-INFdirectory of your Web application. Note that the location matches the value of theinit-paramin the servlet definition in the previous step. Place the following content in thetiles-defs.xmlfile. This content doesn't actually do anything yet, but it will ensure that the file can be initialized properly when the servlet container loads it:<!DOCTYPE tiles-definitions PUBLIC "-//Apache Software Foundation//DTD Tiles Configuration//EN" "http://jakarta.apache.org/struts/dtds/tiles-config.dtd"> <tiles-definitions> </tiles-definitions>
Your application is now ready to use Tiles in the following Try It Out exercise. The examples in this chapter assume you are familiar with establishing an application in a servlet container such as Tomcat and applying changes as each example is discussed.
Central to this example is the layout and the JSP page that uses it. The simple-insert-index.jsp page has used the tiles:insert tag to invoke a layout:
...
<tiles:insert page="/layout/simplelayout.jsp" flush="true">
...
</tiles:insert>
Nested within the insert tag are various put tags that define which tiles the layout will use. Each of these put tags defines a name for the tile with the name attribute and the file that is associated with that name in the value attribute:
...
<tiles:put name="menu" value="/tiles/simple-menu.jsp" />
...
We are effectively passing parameters into the layout page so that it knows which pages to use. These parameters are placed into the tile scope of the layout page, which you will learn more about later.
The layout page itself uses the tile values passed to it in order to display the correct tiles. Each placeholder for a tile uses the insert tag to display the page passed in the put tag from the invoking page:
...
<td><tiles:insert attribute="menu"/></td>
...
The attribute menu was passed to this layout page as an attribute that is now within its scope. The insert tag here inserts the content that the menu parameter represents: simple-menu.jsp.
From this simple example, you can see how the layout can be given various references for the tiles it expects to receive. These could even be determined dynamically, changing the behavior of the layout based on various conditions such as user preferences or internationalization settings.
Throughout this book, you will have become familiar with the various scopes that are available from within JSP pages: application, session, request, and page. The Tiles framework introduces a new scope in order to avoid clashes with attributes that may appear in other scopes. This new scope is called tile scope. Internally, tile scope refers to a Map of objects placed within the existing page context. Some tags in the Tiles tag library allow you to copy values from the tile scope into the standard scopes you are already familiar with. From there, you can use the value just like other values in JSP pages.
As you will see in the following sections, when an attribute is passed to a layout tile or standard tile, it is placed within the tile scope of that tile only; it is not available to the other tiles that are being used. Developers must explicitly manage the scope and delegation of values from layout to tile and so on. This explicit declarative approach means that tiles will not become mistakenly reliant on an attribute unless it is deliberately made available. This enhances the decoupled nature of the components of the application.
One limitation of the previous example is that the simple-insert-index.jsp page actually stipulates the tiles to be used, as well as the layout itself. What if this configuration were required from another page on the site? The same insert tag would be used, with the same parameters being passed. This is duplication, one of the many traps that Web applications fall into. Were a change to be made, such as the name of the simple-menu.jsp file, then each instance would have to be separately changed and tested. In a large system this is a serious problem, and in a smaller one it's just annoying.
Remember the comment that some of the best programmers are lazy? Making such a site-wide change could mean a lot of work. Thankfully, Tiles provides a way to define this instance of layout usage in a central place so that it can be used by the entire application and changed only in one place if the need arises.
This concept is the definition that was discussed earlier. Definitions can be stored centrally in two ways: within a JSP file that is included on pages within the site, or within an XML configuration file that resides in the /WEB-INF/ directory of your Web application. Once a definition is specified, JSP pages can use the layout by using the insert tag in a slightly different way from the simple-insert-index.jsp page in the preceding example. If the definition were defined in a Tiles configuration file, the content of that page would appear as follows:
<%@ page language="java" %>
<%@ taglib uri="/WEB-INF/struts-tiles.tld" prefix="tiles" %>
<tiles:insert definition="simple.layout" flush="true" />
Note that there is no reference to the specific tiles used within the JSP page anymore. The following Try It Out exercise illustrates the use of a definition, as specified within a JSP page.
In the preceding examples, you saw the use of some of the Tiles tags that are available. This section introduces these and the remaining tags, and explains the attributes that can be used with them.
You have seen the insert tag used in at least two capacities so far: First it was used within the nontile JSP pages so that a layout could be inserted and various tiles passed to it as parameters with the put tag. Second, it was used in the layout JSP page to display values it had been passed. The following table explains the attributes available for this tag.
This tag is used to establish a definition as described earlier. A corresponding definition element in a tiles-defs.xml file performs the same basic function. This tag effectively creates a bean that can be used with the insert tag. This tag also supports more advanced usage whereby a new definition can inherit and add to the characteristics of another definition defined in the tiles-defs.xml file. You will see an example of this behavior in subsequent sections. The following table describes the attributes of the definition tag.
Attribute | Description |
|---|---|
| The value of this optional attribute is the |
| The identifying name of this definition. Used by the |
As this tag effectively creates a bean to be used, this attribute specifies the scope into which this bean will be placed. The default value of this optional attribute is | |
| The value of this optional attribute is a path to a tile or layout to be used with this definition. |
| See template. |
| This optional attribute is used to specify the role that a user must have in order for this tag to be executed by the server. |
This tag is used to pass parameters to components. You saw this tag used earlier where paths to tiles (JSP pages) were passed within the confines of a definition tag and where the insert tag was used to insert a layout for display. The put tag can only be used within the definition or insert tags.
Attribute | Description |
|---|---|
| This optional attribute defines the name of a bean to be passed. The |
| This optional attribute is used in conjunction with the |
| The scope used to retrieve the value specified in |
| Same as value. |
| See |
| This defines the content type of the value being put. Valid values here are as follows:
If the If the This is an optional attribute. |
| The name of this parameter. The value of this required attribute is used to reference the value this tag represents. |
| An object that is the value being put. The value of this attribute is entered either directly as a string value, or as the name of a bean that is available where this tag is being used. Optional, but one of |
| The role of users for which this tag will be used. If the user is not in the specified role, this tag is ignored. This attribute is optional. |
The putList tag, like put, defines a parameter to be passed to another Tiles component; however, putList creates a list of other objects as the value. This tag can be used only inside the definition or insert tags.
Internally, putList represents the data created as a java.util.List object. Elements are added to the object created by putList with nested add tags. You can use the attributes shown in the following table with putList.
Attribute | Description |
|---|---|
| The name of this parameter. The value of this required attribute is used to reference the value this tag represents. |
| This optional attribute defines the role of users for which this tag will be used. If the user is not in the specified role, this tag is ignored. |
The add tag is used to add items to a surrounding putList tag. It cannot be used within any other tag. Its behavior is identical to that of the put tag described earlier (internally, the AddTag extends the PutTag class), except the values are added to the list being defined. All the parameters described in put apply to this tag, with the exception of the name attribute.
The get tag is used to retrieve a value that has been placed within the tile scope, and either print out its value (in the case of a string) or include it where this tag is called (in the case of a tile). Internally, the GetTag class extends the InsertTag class. The main difference between the get tag and the insert tag, other than the former having significantly fewer attributes, is the default value for the ignore attribute. The following table shows the attributes available for working with the get tag.
Attribute | Description |
|---|---|
| The name of the attribute or value on which the tag will act. This is a required attribute. |
| If the value specified in |
| Used to flush the body of the page to the output stream after this tag is invoked. The default value of this optional attribute is |
| The role of users for whom this tag will be used. If the user is not in the specified role, this tag is ignored. This attribute is optional. |
The getAsString tag basically invokes a toString() method on the object it is passed, and renders it via the JspWriter. It accepts the attributes shown in the following table.
Attribute | Description |
|---|---|
| This required attribute defines the name of the attribute or value on which the tag will act. |
| If the value specified in |
| The role of users for whom this tag will be used. If the user is not in the specified role, this tag is ignored. This attribute is optional. |
The useAttribute tag is used to copy a value from the tile scope into a specified scope and the page scope. If the scope attribute is not specified, the value is only exposed to the page scope. There the value can be used like any other variable in the page. useAttribute accepts the attributes described in the following table.
Attribute | Description |
|---|---|
| The variable name with which the value can be referenced in the page and specified scopes. The default value of this optional attribute is the name of the value, its existing name (specified in the |
| This required attribute specifies the name of the value to be acted on by this tag. |
| In addition to the |
| If the value specified in |
| The class of the value being acted on by this tag. It has no impact on the behavior of the tag. |
This tag is used to import a single value or all values in the tile scope into a specified scope. If the name attribute is not used, all values in the tile scope are imported. This tag accepts the attributes shown in the following table.
Attribute | Description |
|---|---|
| This required attribute specifies the name of the value to be acted on by this tag. |
| This optional attribute specifies the scope into which the value is imported. The default is |
| This optional attribute is relevant only when importing a single value. If the value specified in |
The initComponentDefinations tag is used to initialize the definition factory with the specified XML configuration file. The following table describes the attributes this tag accepts.
Attribute | Description |
|---|---|
| This required attribute specifies the file that contains the definition elements. |
| This optional attribute specifies the |
Earlier in this chapter, you saw how parameters were passed within the body of the insert tag and definition tags. The parameters passed were pointers to tiles to be used in the template or layout tiles. It is also possible to pass other values to tiles components using the put and putList tags.
A simple example of this is where a string is passed to a layout as part of a definition and then used within the layout tile or a content tile. The following code fragment shows a definition tag being used to pass various parameters to the layout tile, including a string that will form the title of a page:
<tiles:definition
           id="simple.include.layout.title"
           page="/layout/simplelayout-title.jsp"
           scope="request">
  <tiles:put name="title" value="This is my New Title" />
  <tiles:put name="header" value="/tiles/simple-header-title.jsp" />
  <tiles:put name="menu" value="/tiles/simple-menu.jsp" />
  <tiles:put name="body" value="/tiles/simple-body.jsp" />
  <tiles:put name="footer" value="/tiles/simple-footer.jsp" />
</tiles:definition>
The parameters passed to this layout are placed in the tile scope of the layout; they are now accessible from within the simplelayout-title.jsp page using the getAsString tag (this tag only retrieves values from the tile scope). You have seen in the previous examples how most of these parameters can then be used. In the case of the title parameter, it can be displayed in the simplelayout-title.jsp page with the following code:
<%@ taglib uri="/WEB-INF/struts-tiles.tld" prefix="tiles" %>

<html>
  <head>
    <title>
      <tiles:getAsString name="title"/>
    </title>
  </head>
<body bgcolor="white">
...
This will display the value of the title parameter in the title of the Web page. What if you wanted to have the title parameter also within the scope of the header tile? The value would have to be specifically placed within the scope of that tile using the following addition to the insert tag of this tile in the simplelayout-title.jsp page:
...
  <td colspan="2" height="100" bgcolor="gray">
      <tiles:insert attribute="header">
          <tiles:put name="headerTitle" beanName="title"/>
      </tiles:insert>
  </td>
...
Now the value of the title parameter is within the tile scope of the header tile with an alias of headerTitle, and can be used in the same way. A String object suited our example here, but the same scope accessibility could be achieved with any Java object. What results from this of course is the capability to use the parameter within tiles that have been given access to it.
The following sections build on the principles of tiles you have learned so far and introduce some advanced topics.
As discussed earlier, definitions are a powerful feature of the Tiles framework. Configuring various layout tiles, standard tiles, and other parameters under a common name enables them to be used everywhere in an application; reuse is a good thing.
Of course, there may be times when the definition used for 99 percent of a site doesn't suit the other 1 percent. For instance, in a members only area, a different menu tile might be presented, or the same tile with different parameters may be used. Your first approach might be to create another definition to suit this new situation, but then you would end up just replicating all the tiles and parameters that didn't change. All the brownie points you got for exercising reuse are gone.
Tiles provides an excellent solution to this and other scenarios in which certain characteristics of an existing definition need to be used in a new definition, a concept called inheritance. A cornerstone of object-oriented software development, inheritance means that one object inherits some or all of the characteristics of another object. The child entity may then override certain characteristics with its own version or even add new ones. Tiles uses the inheritance principle to allow definitions to inherit (or extend in Java speak) the characteristics of another definition. The application can then use the child definition in special situations. Note that you can implement as many generations of inheriting definitions as you want—that is, until it gets too complicated for you to understand. As always, features like this are often overused by eager developers who end up with something that is way too complicated for a human to understand and therefore becomes unmaintainable. Keep the structure of definitions simple and logical, even at the expense of some reuse if it keeps things clearer.
To illustrate, the following Try It Out exercise implements two definitions to be used in two different pages. The second page will use a definition that extends the first page by only changing some of its defined parameters.
Try It Out: Definition Inheritance
The first task is to define the parent definition and the parameters it will use. This example uses a mother/son combination to enforce the fact that inheritance is being used. Add the following mother definition to the tiles-defs.xml file discussed in the simple tiles example earlier:
<definition name="inh.mother.layout" path="/layout/inh-layout.jsp">
      <put name="header" value="/tiles/inh-header.jsp" />
      <put name="menu" value="/tiles/inh-mother-menu.jsp" />
      <put name="footer" value="/tiles/inh-footer.jsp" />

      <putList name="myMovies">
          <add value="The Bridges Over Madison County"/>
          <add value="Steel Magnolias"/>
          <add value="What Women Want"/>
          <add value="You've Got Mail"/>
          <add value="Sleepless in Seattle"/>
      </putList>
  </definition>
As you can probably tell from the definition, the example will show header, menu, and footer tiles, as well as make use of a list of favorite movies to display. The movies listed here (some of my mother's favorites!) will be displayed on the layout tile defined by the path attribute of the definition element, /layout/inh-layout.jsp.
The son's definition will extend the mother's definition, making its own adjustments to suit the audience. In doing so, the list of movies will be changed to reflect the son's taste, and the menu tile will change to show a different menu. The remaining elements of the definition—the header and the footer tiles—will not need to be specified in the son's definition, as they are inherited from the mother's definition. This is a great demonstration of reuse. The son's definition should be added to the tiles-defs.xml file as follows:
<definition name="inh.son.layout"
              extends="inh.mother.layout">
      <put name="menu" value="/tiles/inh-son-menu.jsp" />

      <putList name="myMovies">
          <add value="The Matrix"/>
          <add value="The Return of The King"/>
          <add value="A Midnight Clear"/>
          <add value="Apocalypse Now"/>
          <add value="Tigerland"/>
          <add value="Spaced - Series 2"/>
      </putList>
  </definition>
You might notice that the son's definition doesn't even include the path attribute to specify the name of the layout tile to use; this has been inherited as well. Perhaps more important, this characteristic could also be overridden by the son's definition, using a different layout tile completely.
Now that the definitions are established, we have a few more tasks to complete. First we need the layout tile to display the various tiles, and to list the myMovies list. The layout tile is similar to the one presented earlier, but this time we need to use the JSTL in order to iterate through the list and display each value. For this to work, we also have to use the importAttribute tag to copy the parameters passed to this tile from tile scope into page scope:
Create a new file called inh-layout.jsp in the /layout/ directory of your Web application and enter the following code:
<%@ taglib uri="/WEB-INF/struts-tiles.tld" prefix="tiles" %>
<%@ taglib uri="http://java.sun.com/jsp/jstl/core" prefix="c"%>

<tiles:importAttribute />
<html>
  <head>
    <title>Inheritance Example</title>
  </head>
<body bgcolor="white">

<table border="1" width="100%" height="100%" border="1">
<tr>
  <td colspan="2" height="100" bgcolor="gray">
        <tiles:insert attribute="header"/>
  </td>
</tr>
<tr>
  <td width="20%" valign="top" bgcolor="lightgrey">
      <tiles:insert attribute="menu"/>
  </td>
<td valign="top" align="left">
<h3>Favorite Movies</h3>
<ul>
<c:forEach items="${myMovies}" var="thisMovie">
<li>${thisMovie}</li>
</c:forEach>
</ul>
</td>
</tr>
<tr>
<td colspan="2"><center><tiles:insert attribute="footer"/></center></td>
</tr>
</table>
</body>
</html>In addition to the layout tile, we also need to establish common header and footer tiles that will be used by both definitions, as well as a separate menu tile for each.
First create two files called inh-header.jsp and inh-footer.jsp in the /tiles/ directory of your Web application. These tiles will be common to the two definitions (the son's definition doesn't redefine these tiles with its own values). Add the following content to these two new files:
inh-header.jsp:
<center><h2>This is the header tile</h2></center>
<i>Mother and Son Web Sites Incorporated 2005</i>
Both these files will be used by both mother and son definitions. However, we require each definition to have its own menu tile.
Create a new file called inh-son-menu.jsp in the /tiles/ directory of your Web application. This will be the menu used by the son's definition. Place the following in this file:
<h5>Son's Menu</h5>
<ul>
<li>War Movies</li>
<li>Books</li>
<li>Loud Music</li>
<li>Parties</li>
<li>College Website</li>
<li>Fast Cars</li>
</ul>
Now create a file called inh-mother-menu.jsp in the /tiles/ directory of your Web application. This will be the menu used by the mother's definition. Place the following in this file:
<h5>Mom's Menu</h5>
<ul>
<li>Knitting</li>
<li>Tennis</li>
<li>Weekends Away</li>
<li>Pottery</li>
<li>Cooking Ideas</li>
</ul>
We now need some files to actually use these definitions. To achieve this, we will create two files, each to call a different definition. Create a file called inh-mother-index.jsp in the root directory of your Web application and add the following code:
<%@ page language="java" %>
<%@ taglib uri="/WEB-INF/struts-tiles.tld" prefix="tiles" %>
<tiles:insert definition="inh.mother.layout" flush="true" />
Create another file in the same directory called inh-son-index.jsp and add the following:
<%@ page language="java" %>
<%@ taglib uri="/WEB-INF/struts-tiles.tld" prefix="tiles" %>
<tiles:insert definition="inh.son.layout" flush="true" />
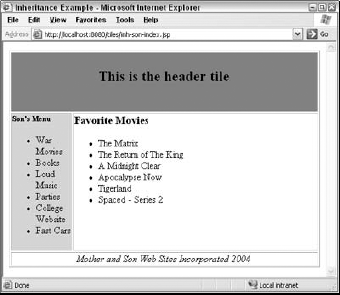
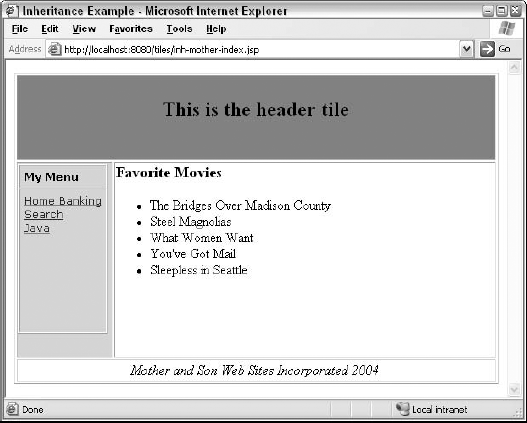
If you now point your browser to the son's definition index page, inh-son-index.jsp, you should see something similar to what is shown in Figure 20-3.
As mentioned before, there is no limit to the number of generations of inherited definitions that can be defined (grandson definitions, etc.). And while this is powerful feature, overzealous use can quickly become unmanageable.
The result of the insert tags in the inh-son-index.jsp and inh-mother-index.jsp is to display the relevant definition elements, with the desired effect that the son definition (inh.son.layout) includes all the elements of the mother definition (inh.mother.layout), except those that were overridden—namely, the myMovies list and the menu tile.
In previous examples, we used a definition to render a layout with certain tile and data attributes. This has only really defined a very simple layout pattern of two levels: the layout and the tiles used by it. Some Web sites use more complex layouts and have features or regions of a page that can themselves use a separate layout. To accommodate this, Tiles enables developers to insert a definition within a layout. It doesn't take long to appreciate the limitless combinations of tiles, definitions, and layouts that this provides.
The following Try It Out exercise illustrates the use of a new definition from within a layout.
Try It Out: Using a New Definition for the Menu
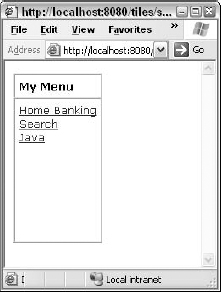
The new definition will use a new layout that defines only the specific region we are trying to represent. The definition will then be used inside one of the existing layouts we have already used in this chapter. The new layout will present a small list of menu items. The associated definition will therefore need to provide a title tile and body tile.
The best way to approach such tasks is to design the new layout in isolation from other definitions as much as possible; that way, the definition becomes a separate component that can be used in other definitions with a minimum of coupling. The menu we will create will comprise two regions, a small header and the list of menu items, as shown in Figure 20-4.
As the header will display only some text, we can probably live with this being output from the layout file itself, rather than from a separate tile. Therefore, the header will simply be a string value parameter passed to the layout. The menu list itself will be a separate tile. The menu tile will also need a list of items to display. This list forms the third parameter to send to the layout.
Now that we have a clear specification of the layout, create a new definition in the tiles-defs.xml file with the following content:
<definition name="menu"
              path="/layout/menu-layout.jsp">
    <put name="menuTitle" value="My Menu"/>
    <put name="menuTile" value="/tiles/menu-tile.jsp"/>
    <putList name="menuItems">
          <item value="Home Banking" link="http://somebank.com"/>
          <item value="Search" link="http://goggle.com"/>
          <item value="Java" link="http://java.sun.com"/>
    </putList>
  </definition>
The syntax here should be familiar to you now. The putList encloses a series of item elements, rather than adding elements that were used in previous examples. Tiles provides this element when defining menu items in a definition. Under the covers, each item element here places a org.apache.struts.tiles.beans.MenuItem object in the list defined by putList. A MenuItem object contains values for value and link properties as used here, but also for icon and tooltip, which can be used in an interface. Very handy indeed!
The preceding definition places the three parameters (menuTitle, menuTile, and menuItems) within the tile scope of the layout tile /layout/menu-layout.jsp. With this in mind, we can now set about creating the layout itself. Remember that our goal here it to produce only the layout for the menu, nothing else.
Create a new file called menu-layout.jsp in the layout directory of your Web application. To display the layout presented in Figure 20-4, add the following code to this new file:
<%@ taglib uri="/WEB-INF/struts-tiles.tld" prefix="tiles" %>

<tiles:importAttribute/>

<table cellspacing="0" cellpadding="5" height="200" border="1">
<tr height="10">
    <td><font face="verdana" size="2"><b>
            <tiles:getAsString name="menuTitle"/>
        </b></font>
    </td>
</tr>
<tr>
    <td valign="top">
    <tiles:insert attribute="menuTile">
        <tiles:put name="menuList" beanName="menuItems" beanScope="tile"/>
    </tiles:insert>
    </td>
</tr>
</table>
All the parameters defined in the definition are represented here. First, the menuTitle attribute is output to the screen using the getAsString tag. Second, the menuTile tile is inserted in the appropriate place in the layout. Third, the menuItems bean is passed to the menuTile tile's tile scope as menuList. In order to have access to the menuItems bean, we used the importAttribute tag to place it within the page scope.
Note that there is no formatting where the insert tag places the menu tile. This is a good thing; it means that the menu's display is independent of other components. Of course, in a more complicated example where the items in the menu are provided by the Model layer of an application, the dependencies are more involved.
Now we can create the JSP page for the menuTile tile so that it can display the items in the menuItems bean, although it will see this value as menuList. The menuTile tile will make use of the JSTL tags to produce the output. The file /tiles/menu-tile.jsp is created with the following content:
<%@ taglib uri="/WEB-INF/struts-tiles.tld" prefix="tiles" %>
<%@ taglib uri="http://java.sun.com/jsp/jstl/core" prefix="c"%>

<tiles:importAttribute/>

<table cellspacing="0" cellpadding="0" border="0">
<c:forEach items="${menuList}" var="thisItem">
    <tr>
    <td><font face="verdana" size="2">
        <a href="${thisItem.link}">${thisItem.value}</a>
        </font></td>
    </tr>
</c:forEach>
</table>
Note that the importAttribute tag has been used again to place the menuList bean within the page scope of this tile. Once this is done, the items in the list can be iterated over, outputting the link and value properties of each.
So far, we have done nothing more than create a new, relatively simple definition, layout, and tile structure that is independent of the rest of the application. This structure can be verified independently as well. Simply create a new JSP page to use the new definition and it will display the new menu on its own. The new JSP file to display the definition would appear as follows:
<%@ page language="java" %>
<%@ taglib uri="/WEB-INF/struts-tiles.tld" prefix="tiles" %>
<tiles:insert definition="menu" flush="true" />
The output of this page should look like Figure 20-5.
Our next task is to incorporate this definition inside another layout page. To achieve this, the new definition will serve to replace the menu tile in the inheritance example from earlier. In the /layout/inh-layout.jsp file, make the following adjustment (the change is highlighted):
...
<table border="1" width="100%" height="100%" border="1">
<tr>
  <td colspan="2" height="100" bgcolor="gray">
        <tiles:insert attribute="header"/>
  </td>
</tr>
<tr>
  <td width="20%" valign="top" bgcolor="lightgrey">
      <tiles:insert definition="menu"/>
  </td>
  <td valign="top"  align="left">
  <h3>Favorite Movies</h3>
      <ul>
          <c:forEach items="${myMovies}" var="thisMovie">
                <li>${thisMovie}</li>
          </c:forEach>
      </ul>
  </td>
</tr>
...
We have simply changed the insert tag to use a definition named menu instead of a tile attribute. In addition to the preceding change, you will have to remove the menu tile put element from the inh.mother.layout and inh.son.layout definitions. The mother definition in the tiles-defs.xml file should now appear as follows:
<definition name="inh.mother.layout" path="/layout/inh-layout.jsp">
  <put name="header" value="/tiles/inh-header.jsp" />
  <put name="footer" value="/tiles/inh-footer.jsp" />

  <putList name="myMovies">
    <add value="The Bridges Over Madison County"/>
    <add value="Steel Magnolias"/>
    <add value="What Women Want"/>
    <add value="You've Got Mail"/>
    <add value="Sleepless in Seattle"/>
  </putList>
</definition>
Note that the menu tile put element has been removed. This works because the inh-layout.jsp file inserts the new menu definition directly.
If you now browse to either the inh-mother-index.jsp or inh-son-index.jsp files from the inheritance example, the new menu definition output will be displayed, nested within the layout, as shown in Figure 20-6.
This change we have made could be a little confusing. Let's step through the process again. Our goal was to replace the menus used by the mother and son definitions with a separate definition called menu, illustrating that a separate definition can be used from within a layout.
We first created a definition in the tiles-defs.xml file called menu. This new definition was given some data to display as menu items, defined within the definition entry of the tiles-defs.xml file. We then created a layout for the new definition to handle the layout for the menu itself. This new layout was provided with a new Tile called menuTile that displays the list of menu items. To verify that this worked, we displayed the menu on its own, as shown in Figure 20-5.
To make use of the definition properly, we then changed the inh-layout.jsp page to call on this new menu definition directly, meaning that both the mother and son definitions would now show the same menu. As a bit of cleanup, the menu put entry for the mother and son definitions in the tiles-defs.xml file was removed.
This is all well and good, but our layout JSP page will always display a menu in the left-hand region, and to change it we would have to modify the inh-layout.jsp file. Instead of inserting the definition directly in the layout file, the definition could be passed to the layout as just another attribute, configured as such in the configuration file. This is the goal of the next Try It Out exercise.
In the preceding Try It Out example, we called the menu definition directly from the inh-layout.jsp file. The change in this section involved replacing this direct call with the use of a parameter that has been passed to the layout. This parameter just happened to be a definition, a definition to display the menu.
This is probably a good place to summarize the last few topics; we've made some real progress from some very humble beginnings.
We started with a simple mother/son definition inheritance in which a single layout was used but one definition was set up with certain parameters and another definition inherited some of these parameters, replacing the rest with its own version of things, such as the movie list and a menu.
We then decided that the menu itself was to be an important repeatable component and deserved its own definition along with some menu items. We used this new menu definition in the inheritance layout tile to show the menu in all circumstances. Now, with this latest change, the menu definition is passed as a parameter in the mother inheritance definition, which is therefore inherited by the son definition.
Tiles has now become an integral part of the Struts framework described in Chapter 19. This section assumes you have read and understood the material presented in that chapter. If you haven't, it would be wise to do so now; you wouldn't want to miss out on this very powerful duo.
In the first part of this chapter, we initialized Tiles in our application by registering the Tiles servlet. This initializes the definitions file, making the definitions available to the application. Within a Struts application, Tiles is configured slightly differently. The following steps will guide you through the addition of Tiles to an existing Struts application:
Ensure that the following commons JAR files are within the
/WEB-INF/libdirectory:Add the following plug-in entry to the
struts-config.xmlfile:... <plug-in className="org.apache.struts.tiles.TilesPlugin" > <set-property property="definitions-config" value="/WEB-INF/tiles-defs.xml" /> <set-property property="definitions-debug" value="2" /> <set-property property="definitions-parser-details" value="2" /> <set-property property="definitions-parser-validate" value="true" /> </plug-in> ...
Note that the
set-propertyelements within the plug-in set the same parameters used earlier to initialize the Tiles factory in theTilesServlet.Create a
tiles-defs.xmlfile within the/WEB-INF/libdirectory along the same lines as before. There are no changes to the format of this file.Ensure that the
/WEB-INFdirectory contains thestruts-tiles.tldfile.
The Struts application should now be able to use Tiles as it has been used throughout this chapter.
An action forward defined in the struts-config.xml file is typically given a name and a path that points to a JSP file or another action, as shown in the following example:
...
<action-mappings>
  <action path="/mypage"
          type="com.wrox.begjsp.ch20.struts.SomeAction"
          scope="request">
    <forward name="success" path="/somefile.jsp"/>
  </action>
</action-mappings>
...
The execute method of the action class then uses the name success to pass processing to the JSP file and, ultimately, to be displayed as a Web page. This is very powerful, as a layer of abstraction has been placed between the Controller portion of the application, the action, and the view portion, the JSP file.
When integrated with Tiles, a definition or tile name can be used as the value of the path attribute in the forward element. The preceding action mapping would appear as follows:
...
<action-mappings>
  <action path="/mypage"
          type="com.wrox.begjsp.ch20.struts.SomeAction"
          scope="request">
    <forward name="success" path="homepage"/>
  </action>
</action-mappings>
...
In the preceding code, homepage represents the name of a definition initialized by the Tiles factory (i.e., those definitions defined within the tiles configuration XML file, tiles-defs.xml).The following explanation will walk you through creating a very simple Struts action to display the inheritance example explained earlier.
The following listing shows a simple Struts action, much like the examples you have seen in the previous chapter. This action (HomePageAction) returns an ActionForward object, which has been given the name success:
package com.wrox.begjsp.ch20.struts;

import javax.servlet.http.HttpServletRequest;
import javax.servlet.http.HttpServletResponse;

import org.apache.struts.action.Action;
import org.apache.struts.action.ActionForm;
import org.apache.struts.action.ActionForward;
import org.apache.struts.action.ActionMapping;

public class HomePageAction extends Action
{
public ActionForward execute(ActionMapping mapping,
ActionForm form,
HttpServletRequest request,
HttpServletResponse response)
throws Exception
{
return mapping.findForward("success");
}
}Your first reaction might be, "Well, that's no different from all the other Struts examples!" I know, isn't it great! The action itself just knows it has to forward processing on to something called success; it is up to the view portion of the application, as well the application configuration, to determine exactly what that means.
The action mapping to invoke this action is configured in the struts-config.xml file with the following:
...
<action-mappings>
    <action path="/homepage"
            type="com.wrox.begjsp.ch20.struts.HomePageAction"
            validate="true"
            scope="request">
        <forward name="success" path="inh.mother.layout"/>
    </action>
</action-mappings>
...
Instead of a path to a JSP file, the path attribute of the forward element now refers to the definition described earlier (with my Mom's favorite movies). Now browsing to /homepage.do will present the same screen shown in Figure 20-6.
When an application uses Struts, typically the bulk of the data being used for content will come from a database or some other data source to which only the Model and Controller layers have access. While setting parameters inside configuration files is excellent for minor settings, they hardly suit the broad content demands of a sophisticated Web site. In Chapter 19, you saw examples of data being passed from the Controller layer to the View layer and being presented accordingly.
With Tiles, certain components (tiles, layouts, and so on) may be expecting elements of data, no matter what the source, to be in their tile scope. The following Try It Out exercise illustrates how data can be provided from a Struts action and used within the tiles of an application. To demonstrate the flexibility of tiles, the menu definition from a previous example will be used to display menu items provided by the action, rather than the definition, without changing any code.
As you can see, the menu data has been provided by two methods that construct a list of SimpleMenuItem objects (these were discussed earlier). The movies are constructed by the getMovies() method. The result of these methods is added to the request using the request.setAttribute method and given the appropriate names that are expected in the foobar-layout.jsp file.
The result of this is to display a page not unlike others in this chapter, except this time the data has been served by a Struts action and we have managed to reuse the characteristics of the menu definition that was developed earlier. If you browsed to the action (/foobar.do), you would see a screen similar to the one shown in Figure 20-7.

You can see how relatively easy it is to replace the data provided by one source with another. In a (much) more sophisticated application, the movie and menu data might come from a database; even so, the view components would be unaffected.
Although the full set of features and capabilities of the Tiles framework, as well as its integration with Struts, is beyond the scope of this chapter, the chapter has provided you with enough information to realize their power both separately and together and to use them in some capacity in your next Web application.
Some of the important features of Tiles that are not explained here include its capability to develop powerful portals, channels, and tabs, and the capability to integrate the insert tag with Struts controller classes, among others. Internationalization is also notably missing, but is featured in one of the exercises for this chapter.
Despite these omissions, this chapter has covered a lot of ground, including the following:
The chapter began by introducing the need for a framework like Tiles. You learned the basic way in which Tiles is used and how its major concepts coordinate to add a level of abstraction between what is presented and how it is presented.
After installation of Tiles was covered, a simple example was introduced. This then led to configurations either using a JSP include file or via definitions in an XML configuration file. The intricacies of definitions were then explored, including inheritance and various ways in which parameters can be passed—as tiles, data, or even definitions themselves—to other components. The chapter then finished with two examples of Tiles integration with the Struts framework.
Create a simple definition inheritance example using three definitions. Ensure that at least one item is overridden by the child definitions.
Using the Struts and Tiles resources on the Internet to help you, develop a one-page application using Struts that will display the result of a different definition based on different locale settings specified by the user.