A database forms part of many enterprise applications, and Web applications are prime candidates for searching, displaying, and capturing data. Understanding how to use a database in a Web application is a very important part of a JSP developer's toolkit. Persistence of data is such a common requirement in modern applications that many developers consider not having any data storage or retrieval to be a mistake in the collection of requirements.
This chapter covers an introduction to databases and the standard means of accessing relational databases from Java, the JDBC API. It explores the different ways of accessing databases from a JSP, from using the <sql> tags provided by the JSTL for simple applications to more comprehensive approaches that are used as the complexity of the data model and data use increases. This exploration includes an examination of different types of common data access mechanisms using JDBC, as well as the issues associated with object-relational mapping (ORM).
Finally, the chapter looks at some other database access mechanisms, including object-relational mapping tools such as Hibernate and JDO.
This chapter covers the following topics:
The fundamental components used in accessing databases from Java
An introduction to the JDBC APIs
Different techniques for accessing databases
How to use direct JDBC calls to access a database
How to use Hibernate to access a database
This chapter assumes a basic working knowledge of SQL syntax and the basic SQL commands required to set up and manage databases and tables, as well as SQL used for working with the data within the database and tables.
A database can be considered a means of storing data; this may include relational databases, object databases, or even files in a directory. The most common form of database known to the majority of developers is a relational database. Examples of relational databases are Oracle, IBM's DB2, Microsoft's SQL Server, and the freely available MySQL, PostgreSQL, and Hypersonic.
Because of the overwhelming dominance of relational databases in the marketplace, this chapter focuses on solutions involving those technologies. Clearly, databases form a core part of an enterprise's IT assets, and the data they contain is often the reason why funding is allocated for development.
A database may be specific to a single Web application, but it is more common that the database is owned by the enterprise, and the Web application forms another access mechanism for the data. It is more complicated to build applications to access historical data than to start with a completely new application.
Many applications require the capability to save and recover information that may have to last for a long period of time. Usernames and passwords, user preferences, bulletin board postings, news articles, and even defect reports are all candidates for storage in a database.
Therefore, for all Java application developers, whether developing for the Web using J2EE or a standalone application, the skills that enable you to understand how to work with databases are an important set to have.
A database is such a common component in Web applications that the J2EE specification requires that an application server provide transparent access to databases for all the applications installed on the container. This capability is provided by a JNDI lookup to obtain a DataSource and configuration in the J2EE container. While a Web container is not required to provide this functionality, most of the currently available Web containers (such as Tomcat) have provided this, because of demand and a desire to enable applications to work on J2EE containers.
Therefore, after determining that your application needs to use a database, the next step is to consider which database to use. As an enterprise developer, this isn't generally something that is within the control of an individual application, but a decision that is made at a corporate level. However, when developing at home, or for pleasure, you can choose between a database and other means of persisting the data.
Different classes of relational databases are available, each providing different pros and cons. One set of databases consists of those likely to be found as enterprise solutions. These large-scale commercial offerings, such as Oracle and DB2, are traditionally complicated software products that require specialist skills to set up, manage, and maintain. They do offer the benefit of having the most comprehensive feature sets, but this comes at a cost, that of understanding how to work with them.
Fortunately, these systems are generally installed in large-scale commercial environments, so specialists are usually at hand to assist developers.
The next tier of databases includes the more developer-friendly systems such as MySQL and PostgreSQL. These databases are not lightweights; they contain the features required to develop robust and reliable Web applications, but they may lack some of the more comprehensive features provided in commercial offerings.
Finally, there are databases that are so lightweight they act as "in-memory" databases. HSQLDB is a Java-based version, with a JDBC driver that provides a subset of the SQL standard. This can be of great value during development and testing where setup and configuration of a "disk-based" database might be more complicated than is necessary, especially if the application, or testing requirements, are all based on reading data. Using a database like HSQLDB can provide a migration path as data requirements become more complicated. The JDBC standard provides interoperability between implementations, and supports a sufficiently large subset of the SQL standard. The JDBC driver implementation is conforming, so migration to other databases is a relatively straightforward process.
This book is not about databases, so this is a very general and highly subjective discussion of the databases. While there may be some merit in looking at databases from this angle, it is not within the scope of this book to perform a thorough analysis of different databases.
Because of the free availability of MySQL as a database platform, and the acceptance of MySQL in the developer community, coupled with the developer-friendly nature of the database, this chapter will test all code, and provide examples, using MySQL. There is no specific need to use MySQL to work through the code examples or exercises, but working with different database software may require changes to some of the database setup scripts and connection information, and some minor changes to keywords depending on the database you are using.
As discussed in the preceding section, Java has a standard set of APIs for connecting to a database. The JDBC APIs support accessing relational databases and other data sources such as flat files.
As an interesting aside, JDBC is a trademarked term and not an acronym. However, it is commonly considered to stand for Java Database Connectivity, or Java Database Connection.
The JDBC APIs define what is available to client software. To connect to any particular database, a JDBC-compatible driver must be provided by the database vendor, or a third party. Sun has provided a comprehensive (and probably database-backed) searchable list of currently available drivers at http://servlet.java.sun.com/products/jdbc/drivers.
This allows for searching for drivers based on a number of criteria. Obviously, searching by database is an option, but so is searching for the JDBC API driver version number, and the JDBC driver type.
One of the most important considerations for developers, apart from the JDBC API driver version, is the driver type. This determines, in general, how easy it will be to install and update the driver, and tends to indicate how recently the driver has been built, and how seriously the database vendor wishes to work with Java developers.
There are four basic types of drivers:
A JDBC-ODBC bridge
Native API/partly Java driver
Net-protocol fully Java driver
Native-protocol fully Java driver
The type 1 driver was one of the first available driver types supporting JDBC for database vendors. This is mostly due to the existing support and availability of ODBC drivers for databases, and the JDBC-ODBC bridge provides a unified API utilizing that support.
The main advantage that the JDBC-ODBC bridge had (which is now obsolete as a result of support for later, more comprehensive driver types across most database vendors) was the availability of ODBC drivers, which were already installed on the client machines that needed to use the database.
However, JDBC-ODBC bridge drivers suffer from a massive performance penalty because the JDBC call is routed through the bridge to the ODBC driver and then to the native database interface. When the database responds, the reverse occurs.
Another significant downside of the JDBC-ODBC bridge drivers is that for each new client machine that is installed, native support must be installed on each of those machines. This makes it much harder to deploy Java-only solutions.
Type 1 drivers are relatively uncommon now, having primarily been replaced by type 3 or type 4 drivers.
The type 2 driver was a step up from the type 1 driver, where custom Java driver code was integrated with native database client code to provide a hybrid driver for communicating with the database.
Many type 2 drivers suffer from disadvantages similar to those of the type 1 client: low performance and the requirement for native code installation on the client. However, some of the type 2 drivers, notably the Oracle OCI drivers, have optimized native code for specific platforms, and so perform quite well.
The advantage that type 2 drivers have over type 1 drivers is an increase in performance. Like type 1 drivers, type 2 drivers represent a significant minority, especially for modern versions of the popular databases.
The type 3 driver is the first of all Java drivers available for JDBC access. A type 3 driver communicates with special database-specific middleware that converts JDBC calls to database-specific calls. The main advantage the type 3 driver provides is that the client code is all Java; no native client install is required, so distribution and configuration of Java applications is vastly simplified.
The middleware server can serve many different versions of databases and can act as a gateway to multiple database servers.
In general, the type 3 drivers are significantly faster than the type 1 or 2 drivers.
The type 4 driver, like the type 3 driver, provides an all-Java driver for the client. The main difference between the type 4 and type 3 drivers is that the type 4 driver communicates directly with the database, converting the JDBC calls to database-specific protocols within the JDBC driver.
One theoretical disadvantage of the type 4 drivers over type 3 is the need for specific drivers for each of the databases supported, whereas a type 3 driver could potentially serve many databases behind the middleware server. In practice, this isn't much of an issue.
Connecting to a database using JDBC can be performed in one of two ways. The first is to load the JDBC driver directly. The second is to use the J2EE container to provide an abstraction and obtain a DataSource object via JNDI.
The advantages of obtaining a DataSource from the container include the following:
Configuration is not contained in client code, and is instead managed during deployment, allowing for substitution of drivers and databases.
Additional features such as connection pooling can be implemented transparently to the application.
A Web container is not required to provide a JNDI resource pool containing a DataSource. Most do provide this facility, but to cover all the bases, the following examples highlight the differences between the two approaches. Both end up with a Connection object, and both examples are quite simple.
The following code fragment shows how to load a JDBC driver and obtain a Connection directly:
Connection conn = null;
try
{
    Class.forName("com.mysql.jdbc.Driver").newInstance();
    conn = DriverManager.getConnection("jdbc:mysql://localhost/mysql?params");
}
catch (SQLException unexpected)
{
    System.out.println("Error occurred obtaining connection");
    System.out.println(unexpected.getMessage());
}
...
The following code fragment shows how to locate a JDBC driver via a JNDI lookup, and obtain a Connection from the DataSource:
Connection conn = null;
try
{
    Context initialContext = new InitialContext();
    Context env = (Context) initialContext.lookup("java:comp/env");
    DataSource source = (DataSource) env.lookup("jdbc/FootyDB");
    conn = source.getConnection();
}
catch (SQLException unexpected)
{
    System.out.println("Error occurred obtaining connection");
    System.out.println(unexpected.getMessage());
}
....
Notice that the structure and layout of the code is almost identical. There's only a minor difference between the two approaches in obtaining a Connection.
At this point, not much can be done without setting up a database. The remaining examples assume that this setup and configuration are handled. This is not a comprehensive guide to setting up MySQL; for additional assistance, the MySQL Web site (www.mysql.org) provides very detailed instructions for installation and troubleshooting.
The installation instructions vary slightly depending on the operating system that is used to run the database, and on the application server that is to be used.
To download MySQL, go to www.mysql.org.
Download the latest production version of the MySQL database server. At the time of writing, this was 4.0.20.
If MySQL is to be installed on a Linux system and the distribution supports the RPM format, then download the
MySQL-server-VERSION.i386.rpmandMySQL-client-VERSION.i386.rpm. Otherwise, download the appropriate.tar.gzpackage.Download the latest production version of the Connector/J driver. At the time of writing, this was 3.0.14
(Optional) Download the latest version of MySQL Control Center. This is a GUI tool that uses a cross-platform toolkit to run on both Windows and UNIX environments. This tool will make it easier to manage the installation of MySQL, create tables, and modify user permissions. MySQL Control Center can be downloaded from
devmysql.com/products/mysqlcc/.
For Microsoft Windows:
Unzip the downloaded binary package.
Run the
setup.exeprogram to begin the installation process.The default options are appropriate for the examples. If the default options are not chosen, then additional configuration may be required after installation.
For Linux systems, the standard RPM tools will install the MySQL binaries and distribution to the appropriate places.
The procedure for installing a JDBC driver depends on the application server that is installed for the examples. In general, it requires making the classes available to the application server so that they can be found and utilized by the server.
The Tomcat Web application server recommends placing the driver JAR file into <Tomcat Installation Directory>/common/lib; this enables it to take advantage of loading through the JNDI DataSource.
If there is no need or any interest in using the JNDI DataSource for locating and loading the driver, then the Connector/J JAR file can be packaged with the WAR during deployment.
All the following examples require that the driver JAR be installed with the application server, as the code will obtain a DataSource according to a JNDI lookup. This will enable the examples to be relatively independent of any database-specific setup or classes.
Starting MySQL is as simple as running mysqld.exe (Windows) or safe_mysql (UNIX). Using the RPM installation under Linux will create scripts to automatically start and stop the database when the system is started and shut down.
Windows users can install MySQL as a service, which provides the same lifecycle functionality.
The JDBC APIs consist of several packages that provide various services for application developers. Version 2.0 of the JDBC APIs contains two major parts: the JDBC 2.1 Core API (represented by classes in the java.sql packages) and the JDBC 2.0 Optional Package API (represented by classes in the javax.sql packages). In version 3.0 of the JDBC APIs, the two major parts have been combined into one, the JDBC API; in version 3.0, however the original package naming for all the classes still remains.
This set of packages contains the core classes and interfaces that are necessary when dealing with databases. These elements relate to tasks such as the following:
Making a connection to the database via the
DriverManagerSending SQL statements to a database, including elements such as
Statement, PreparedStatement, andConnectionDealing with responses and updates via the
ResultSetStandard mapping of SQL types to classes and interfaces in the Java language, including elements such as
Array, Blob, Clob, Date, Time, andTimestampObtaining metadata from a database via
DatabaseMetaData, columns in aResultSetviaResultSetMetaDataDealing with exceptions such as
SQLException.
This set of packages contains the classes and interfaces that are used for server-side data source access. The javax.sql packages are now included in Java 1.4, but are also required as part of J2EE environments. The main inclusion as part of javax.sql is the DataSource provided as an alternative to DriverManager. However, it also includes such things as connection pooling, distributed transactions, and the -RowSet implementation.
The following table describes some of the more common classes and interfaces used to obtain database connections and perform queries on the database.
The following table describes the common Java data types that are needed to support the SQL data types. Using these Java classes may be required when obtaining information from a ResultSet.
Now that you are familiar with the descriptions of common components used when working with databases in Java, you can experiment with the following Try It Out example, which includes many of the concepts that have been covered.
The first steps in creating an application are to create the database and the tables that will hold the data. This can be done via JDBC or via an administrative tool. To keep things simple, it will be easiest to use an administrative tool to manage the creation of the database and tables.
To create the database, use the MySQL Control Center administration tool (mysqlcc). Downloading instructions are provided in a previous section of the chapter, "Downloading and Installing MySQL." Instructions for using the MySQL Control Center are located at the MySQL Web site (www.mysql.org).
Create the database using the following SQL, or mysqlcc:
CREATE DATABASE footydb;
Create a user and password to access the database using the following SQL, or create a user called footy@localhost with a password footy, with access to the footydb using mysqlcc:
GRANT ALL ON footydb.* TO footy@localhost IDENTIFIED BY 'footy';
Create the tables for the following entities: roster, round, fixture, and venue. Use either the following SQL or mysqlcc to create the tables:
CREATE TABLE `roster` (
  `id` int(11) NOT NULL auto_increment,
  `teamname` varchar(100) NOT NULL default '',
  PRIMARY KEY  (`id`)
) TYPE=MyISAM;

CREATE TABLE `round` (
  `id` int(11) NOT NULL auto_increment,
  `number` int(11) NOT NULL default '0',
  `startdate` date NOT NULL default '0000-00-00',
  `enddate` date NOT NULL default '0000-00-00',
  PRIMARY KEY  (`id`)
) TYPE=MyISAM;

CREATE TABLE `fixture` (
`id` int(11) NOT NULL auto_increment,
  `roundid` int(11) NOT NULL default '0',
  `hometeam` int(11) NOT NULL default '0',
  `awayteam` int(11) NOT NULL default '0',
  `venueid` int(11) NOT NULL default '0',
  PRIMARY KEY  (`id`)
) TYPE=MyISAM;

CREATE TABLE `venue` (
  `id` int(11) NOT NULL auto_increment,
  `location` varchar(100) NOT NULL default '',
  PRIMARY KEY  (`id`)
) TYPE=MyISAM;
This has created a fresh database for the application, without any data. The next step is to build an application that will allow the addition of the teams to the roster.
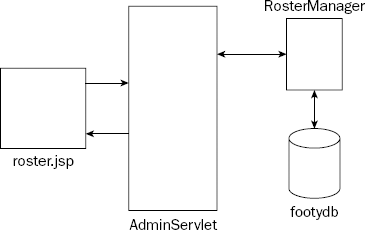
Figure 23-1 shows the components of the application that will be built to support the addition of teams to the roster table.
The Web application will follow the same structure as other Web applications in the book, so create an empty directory structure as follows:
chapter23/
          src/
          web/
             WEB-INF/
                     lib/
Copy the jstl.jar and standard.jar used in earlier chapters into the lib directory.
Create the Tomcat context file chapter23.xml in the chapter23 directory with the following contents:
<?xml version='1.0' encoding='utf-8'?>
<Context docBase="/path/to/chapter23/web"
  path="/chapter23"
  reloadable="true"
  workDir="/path/to/chapter23/work">

  <Resource name="jdbc/FootyDB"
      type="javax.sql.DataSource"
      auth="Container"
      />

  <ResourceParams name="jdbc/FootyDB">
      <parameter>
          <name>username</name>
          <value>footy</value>
      </parameter>
      <parameter>
          <name>password</name>
          <value>footy</value>
      </parameter>
      <parameter>
          <name>driverClassName</name>
          <value>com.mysql.jdbc.Driver</value>
      </parameter>
      <parameter>
          <name>url</name>
          <value>jdbc:mysql://localhost/footydb?autoReconnect=true</value>
      </parameter>
  </ResourceParams>

</Context>
The /path/to in docBase and workDir must match the full path to the chapter23 directory. Under Windows this might look like the following:
<Context docBase="c:/dev/begjsp/chapter23/web"
Copy this file to <Tomcat Installation Directory>/conf/Catalina/localhost. This configuration enables Tomcat to find the web directory in the development directories, rather than needing to copy files when they are changed, or to work directly in the <Tomcat Installation Directory>/webapps directory.
The additional configuration required in this context fragment enables Tomcat to manage the database connection automatically. This removes all need for the Web application to understand how to connect, or even what database is used. This can make it easy to develop using lightweight databases, and to deploy using fully featured enterprise databases.
Finally, to set up the Web application, create the Web application deployment descriptor web.xml in the web/WEB-INF directory with the following contents:
<?xml version="1.0" encoding="ISO-8859-1"?>
<web-app version="2.4" uri="http://java.sun.com/xml/ns/j2ee" >

  <servlet>
    <servlet-name>AdminServlet</servlet-name>
    <display-name>Football administration servlet</display-name>
    <description>Football administration servlet</description>
    <servlet-class>com.wrox.begjsp.ch23.football.AdminServlet</servlet-class>
  </servlet>
  <servlet-mapping>
    <servlet-name>AdminServlet</servlet-name>
    <url-pattern>/admin</url-pattern>
  </servlet-mapping>

  <resource-ref>
    <res-ref-name>jdbc/FootyDB</res-ref-name>
    <res-type>javax.sql.DataSource</res-type>
    <res-auth>Container</res-auth>
  </resource-ref>

</web-app>
The <resource-ref> element providing the link to the <Resource> is defined in the chapter23.xml configuration for Tomcat.
Starting with the AdminServlet, this will perform a check on the method of calling, and if an HTTP GET is used to invoke the servlet, it will display the roster.jsp. roster.jsp will perform a few duties; these include providing a list of currently entered teams, deleting entered teams when necessary, changing the name of an existing team, or adding a new team.
It would not normally be a good idea to include so much responsibility in one page, but as the roster table is so simple and the operations to be performed on the data are not complex, it's not going to cause any major issues. Create the JSP code for roster.jsp in the web directory as follows:
<!--
<%@ taglib prefix="fmt" uri="http://java.sun.com/jsp/jstl/fmt" %>
<%@ taglib prefix="c" uri="http://java.sun.com/jsp/jstl/core" %>
-->
<jsp:useBean id="roster" class="java.util.ArrayList" scope="request" />
<jsp:useBean id="SERVLET_PATH" class="java.lang.String" scope="request" />
<c:set value="Team Roster Management" var="title" />
<html>
  <head>
    <script type="text/javascript" >
      function modifyTeam(id) {
      var roster = document.rosterlist;
      roster.ACTION.value="ROSTER_MODIFY";
      roster.teamid.value=id;
      var elementName = "teamname_"+id;
      var name = roster.elements[elementName].value;
roster.teamname.value=name;
roster.submit();
}
function deleteTeam() {
document.rosterlist.ACTION.value="ROSTER_DELETE";
document.rosterlist.submit();
}
</script>
<title><c:out value="${title}" /></title>
</head>
<body>
<h1><c:out value="${title}" /></h1>
<table border="1">
<tr>
<th>Team ID</th>
<th>Team Name</th>
<th>New Name</th>
<th colspan="2"> </th>
</tr>
<form name="rosterlist" action="<c:out value="${SERVLET_PATH}" />"
method="POST">
<input type="hidden" name="ACTION" value="ROSTER" />
<input type="hidden" name="teamid" value="" />
<input type="hidden" name="teamname" value="" />
<c:forEach var="team" items="${roster}" >
<tr>
<td>${team.id}</td>
<td>${team.name}</td>
<td><input id="teamname_${team.id}" type="text" size="20" /></td>
<td><input type="button" value="Modify"
onclick="modifyTeam('${team.id}')" /></td>
<td><input name="DELETE_LIST" type="checkbox" value="${team.id}" /></td>
</tr>
</c:forEach>
<tr>
<td align="right" colspan="4">Delete selected items</td>
<td><input type="button" value="Delete Checked"
onclick="deleteTeam()" /></td>
</tr>
</form>
<form action="<c:out value="${SERVLET_PATH}" />" method="POST">
<input type="hidden" name="ACTION" value="ROSTER_ADD" />
<tr>
<td colspan="2"><b>Add new Team</b></td>
<td><input name="teamname" type="text" size="20" /></td>
<td><input name="ADD" type="submit" value="Add" /></td>
<td> </td>
</tr>
</table>
</body>
</html>This first section (in the <head> tags) contains some functions that make operating the HTML a little easier. Because of a minor limitation on the way that HTML works, dual operations such as the Modify and Delete can be performed this way. The jsp:useBean for roster contains the results of the database query performed by the AdminServlet. The remainder of roster.jsp (the section in the <body>) is fairly standard, displaying the team id and team name in a list.
The next listing shows the AdminServlet that controls the inputs from the JSP page, determines what action to take, and then coordinates the results back to the JSP page. This is another example, a very simple example admittedly, of the Model View Controller (MVC) architecture covered in more detail in Chapter 17, "Model View Controller."
Create the file AdminServlet.java in the src/com/wrox/begjsp/ch23/football directory with the following contents:
package com.wrox.begjsp.ch23.football;

import java.io.IOException;
import java.sql.SQLException;
import java.util.List;

import javax.naming.NamingException;
import javax.servlet.RequestDispatcher;
import javax.servlet.ServletException;
import javax.servlet.http.HttpServlet;
import javax.servlet.http.HttpServletRequest;
import javax.servlet.http.HttpServletResponse;

public class AdminServlet extends HttpServlet
{
    private static final String ROSTER_PAGE       = "roster.jsp";

    private static final String ACTION_TOKEN      = "ACTION";

    private static final String ACTION_ROSTER     = "ROSTER_LIST";
    private static final String ACTION_ROSTER_ADD = "ROSTER_ADD";
    private static final String ACTION_ROSTER_MOD = "ROSTER_MODIFY";
    private static final String ACTION_ROSTER_DEL = "ROSTER_DELETE";


    private FootyJDBCHelper     _jdbcHelper       = null;

    public void init() throws ServletException
    {
        try
        {
            _jdbcHelper = new FootyJDBCHelper();
        }
        catch (NamingException unexpected)
        {
            throw new ServletException("Cannot locate required database : " +
                                        unexpected);
        }
    }
public void doGet(HttpServletRequest request, HttpServletResponse response)
throws ServletException, IOException
{
doPost(request, response);
}
public void doPost(HttpServletRequest request, HttpServletResponse response)
throws ServletException, IOException
{
String action = findAction(request);
if (ACTION_ROSTER_ADD.equals(action))
{
String newNameString = request.getParameter("teamname");
if (isValidString(newNameString))
{
processRosterAdd(newNameString);
}
}
else if (ACTION_ROSTER_DEL.equals(action))
{
String deleteIDs[] = request.getParameterValues("DELETE_LIST");
if (deleteIDs != null)
{
for (int i = 0; i < deleteIDs.length; i++)
{
String idString = deleteIDs[i];
int id = Integer.parseInt(idString);
processRosterDelete(id);
}
}
}
else if (ACTION_ROSTER_MOD.equals(action))
{
String modIdString = request.getParameter("teamid");
int modId = Integer.parseInt(modIdString);
String modTeamName = request.getParameter("teamname");
if (isValidString(modTeamName) && (modId > 0))
{
processRosterModify(new Team(modId, modTeamName));
}
}
processRosterList(request);
performRedirect(ROSTER_PAGE, request, response);
}
private void processRosterList(HttpServletRequest request)
{
RosterManager manager = null;
try
{
manager = getRosterManager();
List teams = manager.getTeamsInRoster();request.setAttribute("roster", teams);
}
catch (DataException unexpected)
{
log("Error processing roster list : " + unexpected);
}
finally
{
if (manager != null)
{
manager.releaseResources();
}
}
}
private void processRosterDelete(int teamId)
{
RosterManager manager = null;
try
{
manager = getRosterManager();
manager.deleteTeamFromRoster(teamId);
}
catch (DataException unexpected)
{
log("Error adding new team to roster : " + unexpected);
}
finally
{
if (manager != null)
{
manager.releaseResources();
}
}
}
private void processRosterAdd(String newTeam)
{
RosterManager manager = null;
try
{
manager = getRosterManager();
manager.addNewTeamToRoster(new Team(0, newTeam));
}
catch (DataException unexpected)
{
log("Error adding new team to roster : " + unexpected);
}
finally
{
if (manager != null)
{
manager.releaseResources();
}}
}
private void processRosterModify(Team team)
{
RosterManager manager = null;
try
{
manager = getRosterManager();
manager.modifyTeamInRoster(team);
}
catch (DataException unexpected)
{
log("Error modifying team in roster : " + unexpected);
}
finally
{
if (manager != null)
{
manager.releaseResources();
}
}
}
private RosterManager getRosterManager() throws DataException
{
RosterManager manager;
try
{
manager =
RosterManagerFactory.createRosterManager(
_jdbcHelper.getConnection());
}
catch (SQLException connectionFailure)
{
throw new DataException(connectionFailure.getMessage());
}
return manager;
}
private boolean isValidString(String input)
{
return ((input != null) && (input.length() > 0));
}
private String findAction(HttpServletRequest request)
{
String action;
if ((action = request.getParameter(ACTION_TOKEN)) == null)
{
action = ACTION_ROSTER;
}
return action;}
private void performRedirect(String path, HttpServletRequest request,
HttpServletResponse response) throws ServletException, IOException
{
if (path != null)
{
request.setAttribute("SERVLET_PATH", request.getContextPath()
+ request.getServletPath());
RequestDispatcher dispatch = request.getRequestDispatcher(path);
dispatch.forward(request, response);
}
}
}The AdminServlet is the coordination point for the application. It receives requests from the browser, checks for errors, and sends the request off to the appropriate method for processing.
The init() method creates an instance of the FootyJDBCHelper(). This object provides a simple means of looking up and getting database connections. The details for FootyJDBCHelper are shown in a later section of code.
The doPost() method identifies the appropriate action, and then calls the appropriate method to process the data from the browser. This works well for this simple example. More complicated applications with more actions and processes will find that an approach like this quickly becomes cumbersome. Jakarta Struts may be an appropriate framework to manage this complexity, and is described in detail in Chapter 19, "Struts Framework." However, Struts may be overkill for some applications, so a simplified mechanism for dealing with this complexity is shown in later sections.
processRosterList() is the first in a group of methods that are very similar. The all use an implementation of the RosterManager and a connection from the JDBC helper. The RosterManager provides an encapsulation of the database-specific code. RosterManager is an interface, and the reasons behind this choice will become more apparent as the chapter progresses. processRosterDelete(), processRosterAdd(), and processRosterModify() provide the additional methods that process the commands coming from the browser.
One of the advantages of using interfaces rather than concrete classes is that we can change the underlying implementation without changing the calling code. This chapter examines a number of different persistence techniques, each of which can create a specific implementation of
RosterManager.
A very, very important consideration when building code that works with databases is cleaning up the resources used with each database interaction. Not closing the connection in the manner shown previously can lead to resource starvation.
As an interesting exercise, remove the
manager.releaseResources()fromprocessRosterList()(or other methods) and then repeatedly access the Web application. Depending on the configuration of the application server, resource starvation may result as the database connections become exhausted.
Management of externally located resources is an important consideration for Web application development. Correctly identifying the error paths and exception paths through code, and making sure that the resources are always cleaned up, is a time-consuming, but necessary activity.
Comprehensive unit testing can assist with locating issues like resource mismanagement, and Chapters 25, "Performance," and 26, "Best Practices and Tools," contain some additional tips on this topic for readers who are curious to explore this further.
The method getRosterManager() is worthy of a little explanation. This method could be implemented by just creating a specific implementation of a RosterManager, as shown here:
private RosterManager getRosterManager()
    {
        return new JDBCRosterManager(
                              _jdbcHelper.getConnection());
    }
However, when the implementation changes to another mechanism—for example, a HibernateRosterManager—then it is necessary to change the AdminServlet. RosterManagerFactory implements all the logic for determining which version of the RosterManager will be used by the application.
This can be configured externally by an XML file, a properties file, or even by using deployment descriptor parameters. Not only can the application be installed on different application servers, it now can choose which mechanism it wants to use to persist the data, all of which is isolated in a couple of support classes, rather than scattered throughout the business logic of the application.
Some readers may consider this additional work excessive for small applications. The Web application shown here is about as small as it gets, and the additional work consisted of creating an interface and a very simple factory class to provide the concrete classes. When coupled with the testing advantages this approach provides, it should be considered a useful addition to even the smallest Web applications.
The remaining methods in AdminServlet are some utility methods for processing inputs and redirecting to an output page.
The final class to be entered is the most interesting in the context of database development. The JDBCRosterManager class contains all the JDBC-specific persistence code. This is where the application utilizes the JDBC objects for communicating with the database.
In the next section, this class is examined in more detail than the previous classes were because a number of new concepts are introduced.
The constructor for JDBCRosterManager allows the Connection to be provided to the object. This gives the controlling code much greater scope for determining what capabilities JDBCRosterManager will provide. For example, in testing JDBCRosterManager, there is the capacity to provide a Connection that checks to see if it has been closed correctly. This helps to ensure that the code using JDBCRosterManager and the JDBC Connection will operate correctly in a production environment.
The method getTeamsInRoster() is used to process the request for the list of teams. The creation of the Statement from the Connection enables a SQL statement to be processed by the database. The results of the query are returned in a ResultSet. The data in the ResultSet is processed to return a List of Team objects.
It may be very tempting to just return the ResultSet and let the JSP extract the data required. While this might be an appropriate solution for an application of limited complexity, writing applications in this manner causes implementation details that affect the database structure to be reflected in the display logic of the application. This unnecessarily causes ripple effects when changes are made to the database during development, or enhancements are added to the application.
Creating a layer that deals with database access, and then produces results in terms of the business domain—in our case, the Team object—enables the persistence mechanism to be transparently changed without affecting the rest of the application.
In the section on Hibernate (another persistence mechanism), the benefits of this decision will become apparent, as it can be implemented, replacing the JDBCRosterManager, without changing the rest of the application.
The getTeamsInRoster() method completes with a call to safeClose(). This again follows the approach of releasing resources as soon as practical. Closing the Statement will also close the ResultSet that is associated with the Statement.
The safeClose() and releaseResources() methods ignore the SQLException that can be thrown by the close() methods. In general, ignoring a SQLException is not a good practice, but if the close fails, there is little the application can do to address the situation. In a more production-focused application, it would be worth logging the SQLException, as this might indicate more fundamental problems with the environment and assist with locating the issue.
Adding the logging code to this example would not add to our discussion here, and may end up obscuring the more important concepts in this section.
addNewTeamToRoster(), modifyTeamInRoster(), and deleteTeamFromRoster() all use the PreparedStatement for sending commands to the database.
The PreparedStatement enables precompilation of the SQL, and the use of parameters to allow for different values to be included as part of the processing.
Note that when using a
PreparedStatement, the parameters are specified by number. This process can be error prone, especially as the number of parameters increases. If changes to the database schema are likely, good testing of these methods is very important!
The final classes and interfaces for this Web application are included here for completeness. These are the RosterManager interface, and the RosterManagerFactory and FootyJDBCHelper classes.
Create the file RosterManager.java in the src/com/wrox/begjsp/ch23/football directory with the following contents:
package com.wrox.begjsp.ch23.football;

import java.util.List;

public interface RosterManager
{

    void releaseResources();

    List getTeamsInRoster() throws DataException;
    boolean addNewTeamToRoster(Team newTeam) throws DataException;
    boolean modifyTeamInRoster(Team modifyTeam) throws DataException;
    boolean deleteTeamFromRoster(int teamId) throws DataException;
}
This interface will expand over time. After the teams, the venue, round and fixture access methods need to be added as more functionality is developed.
Create the file RosterManagerFactory.java in the src/com/wrox/begjsp/ch23/football directory with the following contents:
package com.wrox.begjsp.ch23.football;

import java.sql.Connection;

public class RosterManagerFactory
{
    public static final String JDBC_MANAGER      = "JDBC";
    public static final String HIBERNATE_MANAGER = "HIBERNATE";

    private static String      _currentManager   = JDBC_MANAGER;

    public static void setRosterManagerType(String type)
    {
        _currentManager = type;
    }

    public static RosterManager createRosterManager(Connection connection)
    {
        if (JDBC_MANAGER.equals(_currentManager))
        {
            return new JDBCRosterManager(connection);
        }
        throw new IllegalStateException(_currentManager +
                                        " persistence not implemented");
    }
}
The RosterManagerFactory provides a transparent means of selecting the persistence mechanism. At this stage of the application, the only choice is the JDBCRosterManager. Later in the application, development of an alternative persistence mechanism will be implemented.
Create the file FootyJDBCHelper.java in the src/com/wrox/begjsp/ch23/football directory with the following contents:
package com.wrox.begjsp.ch23.football;

import java.sql.Connection;
import java.sql.SQLException;

import javax.naming.Context;
import javax.naming.InitialContext;
import javax.naming.NamingException;
import javax.sql.DataSource;

public class FootyJDBCHelper
{
    private DataSource _dataSource;

    public FootyJDBCHelper() throws NamingException
    {
        Context context = new InitialContext();
        Context applicationEnv = (Context)context.lookup("java:comp/env");
        _dataSource = (DataSource)applicationEnv.lookup("jdbc/FootyDB");
    }

    public Connection getConnection() throws SQLException
    {
        return _dataSource.getConnection();
    }
}
The FootyJDBCHelper provides a means to obtain a Connection from a JNDI DataSource, and is just a simple utility class to put the external lookup code in one place.
To run the Web application, make sure the MySQL database is running, and that the Web application is deployed correctly to Tomcat, which is also running.
Browse to the following URL:
http://localhost:8080/chapter23/roster.jsp
This will display a page similar to Figure 23-2.
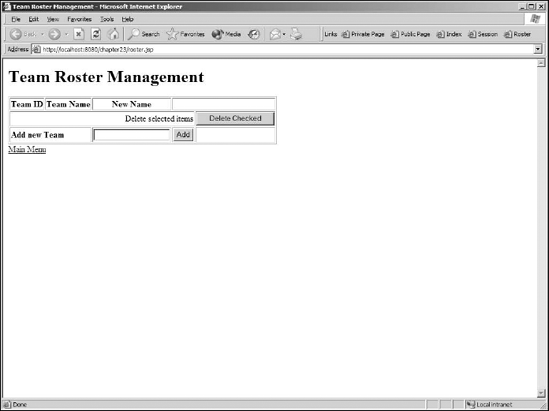
It may seem that there was a lot of code written to perform a very simple Web input screen. The infrastructure code in the AdminServlet and the JDBCRosterManager provide a level of separation between the requests and responses to the Web front end and the loading and storing of data in the database. A small application does not do justice to the value of this separation; however, in later sections of this chapter, you will see the benefits of this separation as additional code is added to the Web application with a very small amount of effort.
This Web application uses a number of different JDBC classes and interfaces:
DataSource:FootyJDBCHelperlocates aDataSourcevia a JNDI lookup, and maintains a reference so thatConnectionobjects can be obtained.Connection:FootyJDBCHelper.getConnection()returns aConnectionso that it can be used byJDBCRosterManagerto query the database.Statement,PreparedStatement:JDBCRosterManageruses aConnectionto createStatements that execute SQL, which may return aResultSet.ResultSet:JDBCRosterManager.getTeamsInRoster()loops through aResultSetextracting the returned data and creating objects that will be used by the rest of the application.
Another important lesson is that database resources need to be managed carefully. If you fail to do this, you will end up with a very unreliable Web application.
The next section examines some of the aspects of building database-backed Web applications. Due to the multi-threaded, multi-user nature of a Web application, many of the more complex elements are immediately important and relevant to even the smallest Web application.
This section covers a broad range of topics related to building Web applications using databases. Most of these are not specific to Web applications or JSP, but are common to any applications using a database.
As described in the preceding section, developers of even the smallest Web applications need a higher level of understanding of database use than they would for single-user desktop applications.
When building an application that uses a database, it is important to consider not only the data that is part of the application, but how that data is used.
Different patterns of data use can drastically alter the methods used to work with the data, which can affect how the application should be built.
For example, administrators need to add, modify, and delete data, whereas the primary consumers might need read-only access. Designing the application in the same way that a data entry workflow system is built may result in an application that suffers from severe performance issues.
Some of the questions that developers need to consider include the following:
How the data is used: Are there many updates and not many reads, or vice versa? Does the application have an administration interface that requires strong transaction control? Is there a need to select large sets of data?
Concurrent updates: Do most of the updates occur on the same sets of data, or are most updates likely to occur on completely different data? Examples of this are workflow applications compared to a bulletin board, or a Web site with personal data updated by individuals.
Stale data: Does it matter if the data on the screen does not reflect the exact state of the database? In the content entry administration of a workflow application, this is probably very important, but in the display of the content to end users, probably less so. Due to the inherently stateless nature of the interactions with the Web browser, the possibility of stale data is worthy of extra consideration when you are building a Web application. The scope of this issue is broader than just the nature of the database transaction, but covers the entire end-to-end round-trip of the data from the database to the browser and back again.
Data history: Is there a need to keep historical information about the data? Is there a versioning requirement? These requirements might lead to the concept of a logical delete, whereby the data is never removed from the database, but instead a flag is maintained on records to indicate its status. This will have profound implications on the manner in which data is not only maintained but queried.
Data migration: Does data need to move from staging databases to production databases? Is backup and restoration of data needed? Using auto-incrementing identifiers or sequences are very convenient for generating primary keys for data, but when these are also moved or migrated to a different system, special consideration needs to be given to how this will be performed.
Many of the preceding points relate to how data will be managed during an update or query. This will directly influence the transaction strategy for the Web application. The next section covers transactions in more detail.
A transaction is a unit of work whereby everything within the scope of the transaction must succeed or nothing will be allowed to succeed. It's an "all or nothing" situation. The most common example of a transaction is the transfer of funds from one bank account to another. If any error occurs during processing, then the state of the accounts must return to the state they were in before the transaction started. This property is known as atomicity.
Transactions are crucial for data integrity in a multi-user environment. When an application undergoes a transaction, it should move from one consistent state to the next. This property of a transaction is not directly under the control of the transaction and requires application support. For example, the transaction doesn't know that account balances cannot become negative; this is an application developer's responsibility. All the transaction can guarantee is that if the application data started in a valid state, it will end up in a valid state after the transaction has completed. This second property of a transaction is known as consistency.
The third property specifies that while the accounts are under the transaction, no external changes can be made. For example, in the bank accounts example, after it is determined that sufficient funds are available for transfer, another withdrawal may occur, causing the account to become overdrawn. This property is known as isolation.
The final property of a transaction specifies that the results of the transaction are permanently saved. Of course, another transaction might later change the data, but for each transaction, when complete, the changes are persisted. This property is known as durability.
These four properties of a transaction (atomicity, consistency, isolation, and durability) are known by the acronym ACID.
Transactions can be completed when they are committed, or rolled back. A committed transaction will make the results of the changes durable; and a rolled back transaction will return the application to the consistent state, prior to the application starting.
After discovering the power of the transaction to keep the data in the database and the application in a consistent, valid state, one might be tempted to use transactions everywhere. Again, there is no such thing as a free lunch, and transactions require careful use to avoid significant performance issues.
Imagine that for every read of the database, all of the data that was to be read was locked so no changes were possible. What benefit would that be for most applications? Certainly for a multi-user reporting application with no data updates, this would severely impact the performance, as each user has to wait for the previous user to complete the read.
The effects of isolation on a transaction can result in the application performing worse than it would without using transaction control at all. However, any JDBC query from a database will require a transaction. It appears that we've reached an impasse!
Luckily, there is a solution; the transaction isolation can be relaxed, lessening the constraints on the changes that can occur during the transaction. This relaxation, however, can produce other potential problems for the application:
Dirty reads: A dirty read occurs when changes to data are visible to other transactions prior to the point at which the transaction making the changes has committed the changes. Dirty reads are generally okay in a read-only or read-mostly application, but will cause great difficulty when data integrity is paramount.
Nonrepeatable reads: A nonrepeatable read occurs when an application, in the context of a transaction, reads some data, and then re-reads the same data and it has changed. This is different than the dirty read, in that the same transaction is interfered with by external changes.
Phantom read: A phantom read is a close cousin of the nonrepeatable read. Instead of the data changing, new data is added. Therefore, an initial query and subsequent query will result in a different number of rows returned.
With these potential problems identified, JDBC supports four isolation levels, as well as support for no transactions, but databases are not required to support these isolation levels, or even indicate what level of support they provide.
These isolation levels (including no transactions) are as follows:
TRANSACTION_NONE: This is the most relaxed isolation, and indicates that transactions are not supported. This is not normally supported by JDBC drivers, as a compliant driver requires transaction support. However, vendors may choose to support this as an option. This isolation level allows all three problems identified earlier to occur.TRANSACTION_READ_UNCOMMITTED: This isolation level allows for the reading of uncommitted data by other transactions. This level also allows all three problems to occur.TRANSACTION_READ_COMMITTED: This level prevents dirty reads because only committed changes to data are visible to the transaction. This level does not prevent nonrepeatable or phantom reads from occurring. This level is the most commonly supported, and often the default level for databases.TRANSACTION_REPEATABLE_READ: In addition to READ_COMMITTED, this level prevents other transactions from interfering with data that is being read by the transaction. This prevents the nonrepeatable read problem, and for most applications this isolation level provides sufficient data integrity.TRANSACTION_SERIALIZABLE: This is the most restrictive isolation level, and provides complete protection for the problems identified previously. Other transactions cannot read, update, or create new data in the data set for this transaction. Databases may have different mechanisms for performing this serialization, and applications need to understand how a specific database supports this facility.
The transaction isolation level is not set by the JDBC driver, but the default value is provided by the database, and can be updated by a call to Connection.setTransactionIsolation().
A relational database does a great job of storing the data and allowing languages such as SQL to provide access. Java, and by extension JSP, provide a fantastic object-oriented development environment with a robust set of capabilities for creating objects rich in functionality and for encapsulating data.
While the relational database data structure and the object class model are deceptively similar, the manner in which relationships between the data in the database and the data in the object model are handled by developers is quite different.
This difference and the requirements to persist the data managed by objects are known as the object-relational impedance mismatch. To resolve this mismatch, a series of tools have been developed. These tools are known as object-relational mapping (ORM) tools.
In the Java world, several commercial tools are available, such as TopLink and CocoBase. There is also the Java Data Objects (JDO) specification, led by the Java Community Process (JCP), which provides a standardized approach to object persistence.
The most commonly used ORM tool in Java today is Hibernate. Hibernate enjoys much of its success because it is simple, robust, and one of the best documented open-source products available. Hibernate is available from www.hibernate.org.
Hibernate is simple in the sense that it provides an API that is easy to work with, and there are no framework or infrastructure requirements for using Hibernate. This provides a very flat learning curve, with developers being able to start using the tool very quickly.
Another major benefit is that Hibernate is designed to work with plain Java objects. All the Java object needs to do in order for Hibernate to be able to persist it is to implement a JavaBean (not a Enterprise JavaBean) interface.
A later example uses Hibernate as the ORM layer in the application.
One of the major benefits of the J2EE technology stack is the flexibility it offers developers in choosing between a very simple implementation and scaling up to a more complex implementation as the need demands. After carefully considering the contents of the preceding section, it still may be useful to build a simple, JSP-based Web application.
The following sections start with examples of building simple applications, and describe techniques for dealing with more complex applications. The more complex applications will still be quite simple, and it might be difficult to understand the value in implementing ORM mapping technologies such as JDO or Hibernate. Chapter 28, "JSP Project II: Shopping Cart Application," builds a more complete application using Hibernate, which should provide a better indication of the advantages to be found over using direct access to the database using JDBC.
Two characteristics that may result from building an application using simple techniques include the following:
Short life span: An application that is developed only for a prototype or a "once-off" activity is often a good candidate for a simple implementation. The maintenance issues associated with building a database-backed Web application are negated by a Web application that has a short life.
Small scope: The smaller the better! An application with many JSPs or complex data arrangements will very quickly become too cumbersome and prone to errors when building.
Two approaches that are suitable for building simple Web applications include the following:
Have a JSP page connect directly to a database, using the
<sql:>tags.Use simple JDBC-based helper classes with the JSP page to encapsulate the database functionality.
The characteristics and approaches identified here are not exhaustive but do illustrate the style of application and the solutions that may be appropriate. As with all software development activities, spending the appropriate time thinking about the problem and potential solutions will lead to a better result than blindly following advice written in a book!
This part of the application will perform the data entry and viewing of information for the rounds table. Like the previous example of storing data in the roster table, this is a very simple part of the application. To contrast the development style, compare how the data entry and result display is performed in this section with the roster code.
The following Try It Out example uses the <sql> tags available in the JSTL to directly communicate with the database using JSP. The <sql> tags provide wrappers around the JDBC classes so they can be directly used by the JSP pages.
To run the Web application, make sure the MySQL database is running, and that the Web application is deployed correctly to Tomcat, which is also running.
Browse to the following URL:
http://localhost:8080/chapter23/round-input.jsp
This will display a page similar to Figure 23-3.
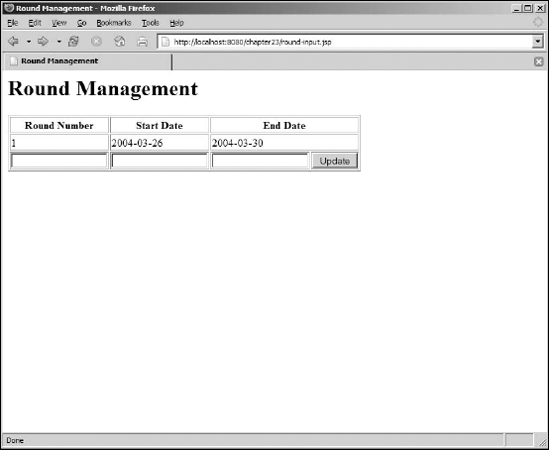
Entering data in the input fields and clicking the Update button on round-input.jsp will post the form data to round-process.jsp. This provides an example of writing a Web application using no Java code at all.
The preceding code is very simple and took very little time to implement. There is limited checking of input data, and any data that isn't correctly formatted or of the correct value (for example, using xxx as the round number) produces erroneous results.
If we examine round-process.jsp, we see that it is possible to introduce logic to check the inputs for validity and redirect to error pages. However, the nature of writing more complex code in a JSP will rapidly lead to cumbersome pages that will become a maintenance nightmare over time. This is why it is recommended to use JSP for data capture and presentation, and servlets for the controlling logic for applications that have more complex requirements, and a longer active life.
Using this technique for developing Web applications is fantastic for prototyping and for working with customers or other developers to elicit further requirements. Rapid feedback of the visual interface, complete with realistic data, can assist in furthering the application's development.
Some of the application characteristics that may constrain a developer from building an application using the simple techniques shown previously include the following:
Medium to long life span: As soon as an application enters a maintenance phase, adding new features and fixing defects can necessitate a more structured code base. This enables developers to minimize the potential for introducing errors into currently working code.
Changing requirements: If requirements are changing, so will the code that implements the requirements. If an application has an unclear separation of responsibilities (the preceding example had viewing and database access in one JSP), then modifying a single piece of code can result in unintended side-effects. In general, separating responsibilities is good practice, but when working with databases it is even more important, as some of the subtle defects that occur when resources are not released correctly, or when transaction control is applied incorrectly, can lead to great frustration when the client is asking for "just a simple change."
Larger scope: A larger scope means more work, more code, and potentially more developers, all of which results in a greater likelihood of errors occurring.
The first example shown in this chapter, the development of the code for roster data entry, demonstrates a set of techniques that enable development to scale to more complex applications.
The next example looks at implementing database access using the ORM tool Hibernate.
Hibernate is described by the Hibernate developers as "relational persistence for idiomatic Java." Hibernate provides a service for persisting plain Java objects (as opposed to a framework such as EJB) and a query language (HQL).
Using Hibernate enables a different approach to using JDBC to persist data. The use of the RosterManager shown earlier is a common pattern using JDBC. The Manager interface provides a service layer that will translate Java objects (such as the Team) and then use an SQL command to store or retrieve the data. This mapping layer becomes quite cumbersome as application complexity increases, especially when data relationships become involved.
However, using Hibernate (or JDO), the Java objects are used directly as part of the transaction. These objects can also contain collections of other objects, representing the data relationships that will also be persisted.
The following example uses Hibernate to select objects from a database:
Query allTeams = session.createQuery("from Team as team order by team.id asc");
List list = allTeams.list();
The returned List contains fully created and populated Team objects. The session object is used to maintain a conversation between the application and the database and is responsible for maintaining a cache of the persistent objects.
Compare this to the equivalent JDBC:
ResultSet teams = statement.executeQuery("SELECT * FROM roster ORDER BY id ASC");
while (teams.next())
{
    int id = teams.getInt("id");
    String name = teams.getString("teamname");
    Team team = new Team(id, name);
    results.add(team);
}
Not a huge difference for a query, but performing an insert or an update is where Hibernate's affinity with the Java language becomes apparent.
You can insert a new record using JDBC as follows:
Team newTeam = new Team(0, "New Town");
insertStmt = con.prepareStatement("INSERT INTO roster (teamname) values (?)");
insertStmt.setString(1, newTeam.getName());

result = statement.execute();
Unfortunately, this example isn't very "Java-like." Compare this to the Hibernate equivalent:
Team newTeam = new Team(0, "New Town");
Transaction tx = session.beginTransaction();
session.save(newTeam);
tx.commit();
To achieve this, Hibernate needs to be configured with a mapping between the objects and the relational data structures. This is done by an XML configuration file for each of the objects that are persisted.
An example of a mapping file is as follows:
<hibernate-mapping>
  <class name="com.wrox.begjsp.ch23.football.Team" table="roster">
    <id name="_id" column="id" access="field" type="integer" unsaved-value="0">
      <generator class="native" />
    </id>
    <property name="_name" column="teamname" access="field" type="string" />
  </class>
</hibernate-mapping>
The file consists of the name of the class and the table that contains the data. The next elements are the fields of the objects and the mapping to the columns in the database. The id element represents the primary key of the data in the table. It is conventional to place the metadata mapping files in the same directory as the Java objects that they configure.
As the preceding short fragments indicate, Hibernate is a fairly easy tool to work with—the following example elaborates on the capabilities of Hibernate, including relationships between objects.
The first task is to download and install Hibernate. Download the latest version from www.hibernate.org. At the time of this writing, this is version 2.1.4.
Installing Hibernate is a matter of uncompressing the downloaded hibernate-2.1.4 archive. The archive contains all the Hibernate JAR files and all the Hibernate documentation.
To use Hibernate in the Web application, a number of libraries must be installed in the WEB-INF/lib directory of the Web application.
The hibernate-2.1.4/lib directory contains a README.txt file that describes all the libraries provided by Hibernate, and which of them are required for the runtime. This example extends the football roster application, so copy these files into the current WEB-INF/lib.
The files used are as follows:
cglib-full-2.0.1.jarcommons-collections-2.1.jarcommons-logging-1.0.3.jardom4j-1.4.jarehcache-0.7.jarhibernate2.jarjta.jarodmg-3.0.jar
In the following series of Try It Out examples, you use Hibernate to build a Web application. This example builds the fixture and venue components for the football application. All the code for this example is available for download from www.wrox.com. The complete application contains significant amounts of code, so the following examples highlight the development activities involved in using Hibernate.
This is a fairly detailed walkthrough of using databases with Hibernate, and it contains several different sections to make it easier to follow the steps required. Not all of the Try It Out examples create a working application. Where the Web application can be successfully operational, it will be mentioned in the "How It Works" section.
Venue is a standard-looking JavaBean, except for the provision of the private setters and the default no-argument constructor. The Venue objects are immutable, and Hibernate can work with objects such as these in two ways. The method used in Venue.java is to provide private setters. Hibernate can then use those setters to populate the objects. The second method is shown in the file containing the Hibernate XML for Team.java shown previously. Hibernate can directly manipulate the fields of the object when the XML configuration for the property includes the access="field" attribute and value, as shown in the following example:
<property name="_name" column="teamname" access="field" type="string" />
Hibernate's developers do not recommend using the access="field" attribute, but this is for reasons of encapsulation, rather than any underlying technical issue. The choice of which approach to take is left in the hands of the application developer.
The next Try It Out example uses the persistent object just configured to create, load, and update data stored in the database. This section introduces the simple API that Hibernate provides to perform these operations.
The HibernateRosterManager file contains all the code required to set up a Hibernate connection, find the configuration for the persistent objects, and work with the objects. The constructor contains all the necessary code for setting up Hibernate ready for use.
There are two ways to configure Hibernate. In this Try It Out example, you implement the programmatic method. This involves creating a Configuration object and setting the appropriate properties. The most common method is to create a Hibernate configuration file that is loaded. Hibernate supports a Properties format file (hibernate.properties), as well as an XML format configuration file (hibernate.cfg.xml).
The configuration must include the objects that are to be persisted. You do this by specifying the classes (as shown previously), or by specifying the hbm.xml files. If the hbm.xml files are in the same location as the objects, then Hibernate will locate them and load the mapping correctly.
Finally, the specific configuration for the database is required. hibernate.dialect is used so that Hibernate will generate the correct SQL and use the correct sequence generators (if available) when communicating with the database. To maintain interface compatibility with the JDBCRosterManager, the sessionFactory creates sessions with a provided Connection object. The second configuration item prevents PreparedStatements from being cached. This is required when an external Connection object is used to create sessions. Session creation is handled by the openSession() method on a session factory; an example of this is found later in the initSession() method.
Building a session factory is a slow process, so this should be done as infrequently as possible. In this example, a session factory is created each time the
AdminServletprocesses a request. Because aSessionFactoryis responsible for maintaining a configuration relating to a single database, it would be possible to initialize the servlet factory once on Web application initialization, and make the factory available to all servlets by placing it in the application scope of the Web application.
To keep this example simple, the creation of the SessionFactory is included in the construction of the HibernateRosterManager.
The Session object created by the SessionFactory is used to perform all the actions on the persistent objects. This object provides the Hibernate methods to enable retrieval, addition, deletion, and modification of the data.
In the method getVenuesInRoster() is a call to a private method getAllItems(), with an appropriately structured query. The public interface for obtaining a list of Venue objects has been separated from the private implementation. This enables easy extension as more methods are added to the public interface, and allows the implementation to be changed if required without affecting the client code. This is an important concept when developing infrastructure so that other developers using the persistence layers do not have to continually update code as the persistence infrastructure matures
The methods addNewVenueToRoster () and modifyVenueInRoster () both use the same underlying private method addOrModifyVenue() to save or update the data. Hibernate provides a saveOrUpdate() method to deal with inserting new objects or updating existing object data. This reduces the amount of duplicated code that exists when using save() or update() methods independently. The second parameter to the public methods is only to provide additional information if the Hibernate methods fail.
Deleting objects is also simple and straightforward. The method deleteVenueFromRoster provides an example of how this is performed. The object is first loaded to confirm that it is exists; it would be a good idea to use additional error-checking prior to deleting a potentially nonexistent object. Then a call to the delete() method removes the object.
Best practices for using Hibernate include starting sessions and transaction management in servlet filters, and leaving the business code free of persistence infrastructure. This becomes very important as applications increase in size and complexity, but for this simple application it's more convenient to keep all the code together.
The methods initSession(), flushSession(), and releaseResources() are utility methods for dealing with the session and releasing resources as required. As with previous examples in this chapter, exceptions are caught and then ignored. This is not good practice, but for the sake of focusing on the important concepts in the example (the data interface), exception handling is deliberately ignored.
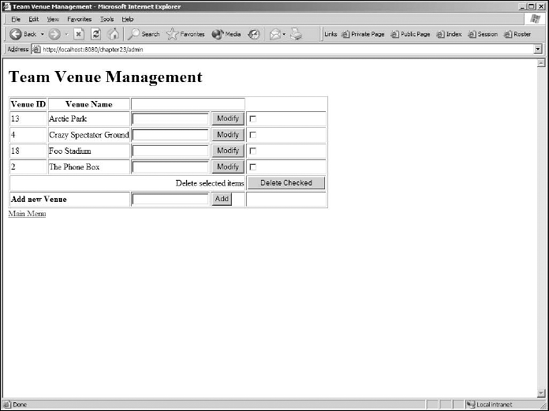
The next Try It Out example shows the data display and entry JSP for the venue data. This example ties together all the previous sections to create a working Web application.
The first part of the servlet defines some constants for working with the different requests from the Web browser. Notice how the definitions of the ROSTER_ACTIONS and VENUE_ACTIONS are strings that represents the first part of the group of actions for that type of data. The venue.jsp has a number of actions such as VENUE_ADD and VENUE_DELETE, which are used in the AdminServlet.doPost() method to determine which operation to perform. A very simple HTML-based menu called menu.html has been created and is used to select between the various administration tasks.
The actions that are specific to each particular data-entry screen have been removed from the AdminServlet and moved to classes that will process the data-entry requirements for each data-entry area. This is an important step in keeping complexity under control; imagine how large the AdminServlet would become if there were ten different data-entry screens, each having a list, add, modify, and delete action.
The code in AdminServlet.doPost() replaces all the previous roster processing code and also includes the venue processing code. As more processing is required, implementations of ProcessingCommand can be provided for each group of actions. This enables the AdminServlet to focus on determining which command to execute, with the commands themselves containing the processing code.
AdminServlet.findAction() has been simplified in this version to identify when a request is made without supplying an action. In this case, the method will return null to indicate that status and is handled by the AdminServlet.doPost() method by redirecting to the menu page. It would have been possible to create a NullProcessingCommand() to deal with this option, but this was simpler.
The ProcessingCommands are now responsible for processing each of the groups of actions for a particular set of data. The example of the VenueProcessingCommand shows a template for how the remaining ProcessingCommands should be implemented.
The VenueProcessingCommand now contains all the constants that were defined in the AdminServlet specific to the processing of requests relating to the venue data. This enables the AdminServlet to focus on coordination and the ProcessingCommand to work with the required data.
The changes to the code are long, but are reasonably simple; the code that was in AdminServlet.doPost() has been moved to the VenueProcessingCommand.execute() method. The AdminServlet selects a command to run and then invokes a method to run the command. The remaining methods are the workers that perform the tasks for the identified actions, finding a persistence manager and then calling the appropriate method.
Browse to the following URL:
http://localhost:8080/chapter23/menu.html
This will display the simple menu available. Click the link for Venue and after a short delay while the database connection is established and the Hibernate mapping files are processed, this should display a page similar to the one shown in Figure 23-4.
The final component in this example is the creation of the fixture data entry. This is slightly different than the elements created previously, as there are relationships between the fixture, round, venue, and roster tables. Using JDBC, it rapidly becomes a difficult proposition to query the different tables and then later match up the foreign keys.
Using Hibernate, the relationships can be managed in the same way that Java code manages relationships. The Round, Roster, and Venue objects are created and added to the Fixture object representing the match to be played. It's easier and cleaner and requires much less code than the equivalent JDBC approach.
The following Try It Out example creates the fixture data-entry screens and objects for the Web application.
The Web application has grown to a reasonably complex application, with a significant proportion of the functionality required to manage the data for the football roster implemented. The fixture data management shows how Hibernate can manage relationships between objects in a very convenient way for the Web application developer without having to resort to cumbersome and repetitive SQL. Under the covers of the Hibernate libraries, SQL is still issued to the database via the JDBC interfaces. The Hibernate team has done a comprehensive job of shielding the developer from needing to understand the complexity of the underlying SQL.
Notice how the Fixture class is very "Java-like." It's an object, and it contains other objects. It was difficult to see this in previous parts of the example, as the other objects map very closely to their relational database representations with only simple fields. The persistence of different types of objects with relationships between objects is where Hibernate shines.
In many projects, the Fixture class would be implemented with the following fields:
private int   _id;
    private int   _roundId;
    private int   _homeTeamId;
    private int   _awayTeamId;
    private int   _venueId;
This would make it very easy to map to a database and avoid much of the complicated JDBC code normally found with hand-built ORM, but it sacrifices the advantages of using Java as the programming language.
Hibernate removes the complication, enabling Java developers to express their business objects in a far more expressive and natural manner.
The Fixture.hbm.xml mapping file should appear quite familiar, except for the new element, many-to-one, that has been introduced. The choice of the many-to-one element may seem a little unusual. However, that's the relationship that Fixture has with Round (or Team and Venue), a unidirectional many-to-one association. The relationship is only one way (from Fixture to Round) and the column roundid in the fixture table is a foreign key for the primary key column for the Round object.
Notice how the <many-to-one> elements specify only the field (round, homeTeam, and so on) that contains the object. Hibernate uses runtime reflection to determine the actual class name, locates the appropriate mapping file, and then performs the appropriate mapping for the foreign key. How cool is that!
The class attribute can be used in the <many-to-one> mapping to make the relationship more explicit:
<many-to-one name="homeTeam" class="Team" column="hometeam" />
Browse to the following URL:
http://localhost:8080/chapter23/menu.html
This will display the simple menu available. Click the link for Fixture. This should show a screen similar to the one shown in Figure 23-5.
Similar to the other JSP output shown previously, the table contains the list of existing fixtures, with check boxes for the deletion of fixtures and addition of new fixtures. However, unlike other JSP examples the fixtures are all added via drop-down lists of currently available records.
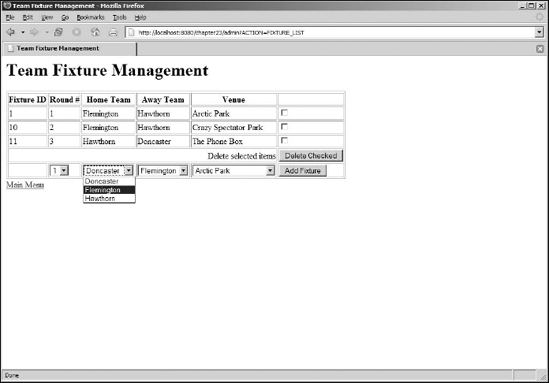
The adding of fixtures is done by using existing data created by other screens. The drop-down menus contain lists of data that are chosen to create the fixture. The Fixture processing is managed in a symmetrical way to the Venue processing, via the implementation of a ProcessingCommand.
The FixtureProcessingCommand is very similar to the existing VenueProcessingCommand, converting the parameters contained in the HttpServletRequest into the correct values and invoking the appropriate RosterManager methods.
The Strings defined at the start of the class are used by fixture.jsp to load lists of data obtained from the database.
The add action occurs when the action parameter equals the constant ACTION_FIXTURE_ADD, obtaining the parameters from the fixture.jsp POST and converting it into objects that represent the foreign key values. In a production quality system, better checking of the input values would be mandatory, but for this example they are skipped for clarity.
To add the new Fixture, the processFixtureAdd() method is called, and the parameters obtained from the Web application are used to load the objects from the database. Again, this would be a good place to add some error-checking to ensure that the objects returned exist prior to adding the new Fixture.
The processFixtureList() method loads a number of collections of objects into request scope so the fixture.jsp can render the lists appropriately. The fixtures list is used to display the currently existing fixtures, and the venues, teams, and rounds are used to display the drop-down lists on the page.
The HibernateRosterManager has been modified to include the new fixture processing functionality. The new elements are highlighted in the following code.
The configuration created in the constructor now includes all four objects requiring persistence.
The value in extracting out the common functionality for the query of objects becomes more apparent as more objects are added. The getXXXInRoster() methods all call the same method to perform the work. Adding extra objects now only requires minor additions to the HibernateRosterManager, which can be done safely and without spending significant time.
Moving down the class, more common functionality is performed in one method: addXXXToRoster() and modifyXXXInRoster() both call the addOrModifyObject() method. The alternative is to have four separate implementations of addOrModifyObject(), one for each persistent object. This would cause excessive code duplication, which makes modification more complex and error prone.
Similarly, the loadObjectById() method provides a common method for the associated type-specific public interfaces. The use of the Class as a parameter to _currentSession.load() provides the necessary information to Hibernate to correctly locate the appropriate object based on the primary key. This is a very powerful feature of Hibernate that provides convenient implementation options for the developer. Instead of having to write conditional code for each object type, this is handled transparently by Hibernate, which significantly reduces the work of the Web application developer and greatly reduces the likelihood of errors creeping into the code.
The pattern repeats for the deleteObject() method. However, to obtain the appropriate object to delete, the loadObjectById() method is called. This will find the object to be deleted to ensure that it exists. This is a slightly different pattern from the other methods, and at first glance seems very strange. Why create an object just for the purpose of deleting it?
The alternative is to create an identity object holding just the id in the deleteXXXXFromRoster() methods. However, that may require the addition of a specific constructor that takes only the id as a parameter, as shown here:
deleteObject(new Team(id));
Alternatively, you can relax the error-checking in the constructor, allowing null values to be passed into the object:
deleteObject(new Team(id, null);
Finally, you can enable the construction of temporary objects specifically for deletion:
deleteObject(new Team(id, "deleteMe"));
While these options are possible, none of them are particularly clean; and with more complex objects, they start to look far less attractive:
deleteObject(new Fixture(id, (Round)null, (Team)null, (Team)null, (Venue)null));
The downside of creating an identity object is that these techniques make it impossible for the rest of the application to now rely on the consistent state of the persistent objects. Creating an identity object might be appropriate for very short-lived objects that exist only in the persistence management layer of the application. However, another developer may choose to use one of the identity object creation methods in another part of the application, causing major errors to occur. It is not a good idea to create objects that exist in an illegal state under most circumstances, especially when there are alternatives.
Hibernate will work with any of the preceding options, but these are generally considered a workaround to enable persistence, and it is a better idea to load the object prior to deletion.
Some developers may dismiss the load and then delete strategy for performance reasons, arguing that the load from the database will adversely affect the application too greatly. The good news is that the Hibernate session cache will generally have these objects available in the cache ready for loading without needing to perform a database access. Yet again, Hibernate provides functionality to enable Java developers to work with the objects in a natural way without penalty.
The fixture.jsp is similar to the previous JSP, but the use of the collections of objects to create the drop-down lists is something not shown before. Nonetheless, it's a very common feature to be found in Web applications accessing databases. Single and multiple selections of data from lists drive many Web user interfaces.
When developing the Web application, remember that even though the data from the database was used to create the initial lists, there is no guarantee that when the form data is sent back to the server the information represented by the keys exists. The data may have been deleted or the user may be maliciously trying to cause errors. This is another good reason to be vigilant about checking the data coming from Web browsers, and validating the use of that data within the Web application.
The Hibernate example shown in this chapter only scratches the surface of the power available to the developer using this tool. Additionally, Hibernate provides support for collections of data, lazy-loading of child objects to prevent a cascade of objects from loading with the parent object, and many-to-many relationships. The Hibernate Query Language (HQL) also provides extensive means for working with selecting complex graphs of objects.
Developers with a further interest in this topic should read Professional Hibernate by Eric Pugh and Joseph Gradecki (Wrox, 2004).
This chapter has covered Web application development using a database. The coverage included directly communicating to a database via a JSP using the JSTL tags, using raw JDBC with a persistence layer, and using the open-source ORM tool Hibernate.
To conclude this chapter, let's review some of its key points:
Database access is commonly required in Web applications.
Incorrectly implementing database access can lead to excessive complexity.
Ignoring important considerations such as resource cleanup and transaction management will lead to an unstable Web application.
The database connection and management is best handled as a separate layer to the business objects.
Checking of data for validity and properly handling error conditions will assist in building a robust and reliable Web application. Failing to adequately address unexpected situations or erroneous input can lead to crashes and embarrassing errors.
ORM mapping tools such as Hibernate can provide a more natural mechanism for persisting rich Java objects than hand-built JDBC.