The previous chapter presented JSP as a server-side mechanism used in the generation of dynamic HTML responses to an incoming request. It also demonstrated how static templated data (such as a fragment or a whole page of HTML) can be included and combined as part of the output. This chapter adds another dimension, showing how JSP generalized templating can be combined with scripting code written in the Java programming language.
The ability to include Java elements in a JSP page is the center of focus in this chapter. When working with JSP 2.0 and JSTL 1.1, there is very little reason to embed raw Java programming code into a JSP page. However, the Expression Language (EL) and JSTL features presented in the previous chapter are brand-new to most commercial JSP containers (compliant to the JSP 2.0 standard). Older, existing production code will typically not be using JSTL/EL, and will very likely have embedded Java code. This body of production code will need to maintained, and perhaps migrated. In this chapter, you will learn how to deal with legacy code that makes extensive use of embedded Java code via scripting elements in JSPs.
The primary mechanism of embedding Java code into a JSP page is called scripting. Scripting is typically done through scripting elements—declarations, expressions, and scriptlets—within a JSP. These elements are covered briefly in the previous chapter. This chapter fully explores the role of these elements within the composition of a JSP page.
The sample code within the chapter makes extensive use of scripting elements. This sample code features the design and creation of a simple Web-based storefront that displays different categories of products and allows users to add products to their shopping cart. Through three successively more complex examples, you will discover the fundamental coding techniques that are used on e-commerce sites.
Scoping is a very important concept for the JSP developer. This chapter explores global application scope, session scope, and request scope. Actual code from the e-commerce example will take advantage of all of these scopes. Exploring session scope requires an understanding of the container-managed session. This chapter introduces the concept of a session, reveals how it is implemented, and shows how it can be extremely useful in the JSP implementation of e-commerce applications. By the end of this chapter, you should
Understand the interaction between a JSP and embedded Java code
Be fluent in the use of scripting elements within JSP
Be able to maintain, enhance, and migrate JSP code that contains scripting elements
Be familiar with the design and operation of a basic electronic storefront
Be able to implement a working shopping cart using JSP
Understand the application, session, and request scopes in JSP
Understand why sessions are necessary and how to work with them from within your JSP
Historically, JSP and Java go hand-in-hand. In early versions of the JSP standard, Java code was used routinely as the glue for supplementing the standard JSP actions during content generation.
In fact, JSP 1.0 lacked a mechanism for implementing custom actions, and the standard actions that were included were extremely limited. This virtually guaranteed extensive embedding of Java coding in all but the simplest JSP 1.0 code.
The first version that supported a workable way of extending JSP standard actions was JSP 1.1. Even though JSP 1.1 started to support third-party tag libraries, the art of tag library creation and integration is not well documented. As a result, a standard set of available generalized tags was lacking. Not until JSP 1.2 did the use of custom tag libraries became popular.
JSP 2.0 is the first version of JSP to introduce an Expression Language (EL) designed to work in conjunction with a standard tag library (JSTL 1.1). It is also the first version of JSP to simplify the creation of custom tags, via support of tagfiles (creating new tags using JSP as the implementation language). In other words, JSP 2.0 is the first version of JSP that enables the creation of pure JSP coding right out of the box without the need to embed Java coding.
As a result, if you ever need to look at existing or legacy code, you are likely to see embedded Java within JSP pages. In this old JSP code, there was simply no other way to accomplish tasks that are not covered by standard JSP actions.
As a JSP developer, you should be aware that JSP is considered a presentation layer technology. In other words, it should be used in the creation of a dynamic presentation of data. In fact, JSP containers are designed and optimized specifically for this purpose. This also means that JSP should not be used as the primary way to process or manipulate data within an application. These activities are best left for developers at the business tier, using technology such as Enterprise JavaBeans (EJBs) or through the creation of custom Java classes. Allowing embedded Java code in JSP pages encourages the mixing of data processing functions, which JSP is not designed for and cannot do well. In fact, years of industry experience confirm that mixing JSP and Java coding can lead to code that is difficult to maintain. Therefore, given a choice, modern JSP developers should seek to reduce or completely eliminate the use of embedded Java code in their JSPs. Having said this, in some real-world situations, you may be asked to enhance or maintain legacy JSP code that is written using earlier versions of the JSP standard. In these cases, you will need to have a working knowledge of scripting elements within JSPs.
To embed Java coding into a JSP page, you need to use scripting elements. There are three general ways to do this, as briefly mentioned in Chapter 2. Fully explored in this chapter are the following three types of scripting elements:
Declarations
Expressions
Scriptlets
Declaration scripting elements are used to insert methods, constants, and variable declarations into JSP pages. Here is a declaration scripting element that declares three constants (EXAMPLE, SHOP_PAGE, and CART_PAGE), and a method called dispPrice ():
<%!
  private static String EXAMPLE = "/example2";
  private static String SHOP_PAGE = "/estore.jsp";
  private static String CART_PAGE = "/shopcart.jsp";
  private  String dispPrice( String price)
  {
      int len = price.length();
      if (len <= 2)
          return price;
      else
      return "$" + price.substring(0,len −2) + "."
        + price.substring(len-2);
  }
%>
The following properties are illustrated by the preceding declaration scripting element:
Declaration scripting elements are enclosed by
<%! ... %>.The content of scripting elements in general, and declaration scripting elements specifically, is actually code fragments written in Java.
Constants, variables, and methods declared within declaration scripting elements are used within the JSP page, by other scripting elements, EL expressions, or JSP actions.
You can have multiple declaration scripting elements within a single JSP page. The JSP container will merge them into one when processing the page, so it isn't necessary to separate them.
In the preceding embedded Java code, note that the constant paths (
EXAMPLE, SHOP_PAGE, andCART_PAGE) are hard-coded into the JSP. If these paths were to change in the future, all of the code containing them would have to be changed. Chapter 17, "Model View Controller," illustrates a more flexible approach whereby the application flow can be configured without changing any JSP or Java code.
You can define two very special methods within a declaration scripting element. They are methods with the following signatures:
public void jspInit(void);public void jspDestory(void);
These methods are special because the JSP container will call them at two well-defined points during the life of a JSP page. The following table describes when the container calls these methods.
Method Name | When It Is Called |
|---|---|
| Called during the initialization of the JSP page, before the first request is processed by the page. This method can be used to acquire global resources that may be used by the page's request processing logic. This method is optional for a JSP page author. Most JSP pages have no need to declare this method. |
| Called by the container just before destroying the JSP page. This method can be used to release the resources that it acquired in |
To fully understand what these methods do, you must realize that a JSP container typically creates only one single instance (see the following note) of a JSP to service all incoming requests. The jspInit() method is called by the container during the initialization of this single instance. If the incoming request processing load is heavy, a JSP container may eliminate some initialized JSPs that have not been used for a while. If this happens, the container is obliged to call the jspDestroy() method before eliminating the JSP.
Some JSP containers may take advantage of multiple Java Virtual Machines (JVMs) on a Symmetric MultiProcessor (SMP), or a clustering system. These specialized containers may maintain one instance of a JSP per JVM to process incoming requests.
The following declaration scripting element declares the two special methods. In this case, the Java code attaches an object as an attribute to the ServletContext in the jspInit() method, and the jspDestroy() method removes this attribute.
For readers who are avid Java programmers, the following information will enable you to determine what code can go into these methods. Every JSP is actually a Java class. A JSP Java class always implements the
javax.servlet.Servletinterface. In other words, a JSP is always a servlet. It implements all of the methods of the Servlet interface. For example, the following code uses thegetServletContext()of the Servlet interface. The servlet context of a JSP corresponds to its implicitapplicationobject. Theapplicationobject is readily available for use in expression scripting elements and scriptlet scripting elements.
<%!
  public void jspInit()
  {
      getServletContext().setAttribute("cats", EShop.getCats());
  }

  public void jspDestroy()
  {
      getServletContext().removeAttribute("cats");
  }
%>An expression scripting element is an embedded Java expression that is evaluated and converted to a text string. The resulting text string is placed in the JSP output, in the location at which the element appears. You will find expression scripting elements in a JSP in the following locations:
Within certain attributes of JSP actions (standard or custom)
Within templated data
For example, the following expression scripting elements are used to print out some data values within a row of a table:
<table>
  <tr>
    <td><%= curItem.getName() %></td>
    <td><%= dispPrice(String.valueOf(curItem.getPrice()))  %></td>
  </tr>
</table>
From the example, note the following about expression scripting elements:
They are bracketed by
<%= .... %>.They contain expressions in the Java programming language—for example, a variable, a field, or the result of a method call.
Their output is merged with the template data, HTML in the preceding example.
Expression scripting elements may also be used in attributes of JSP actions. The following example shows an expression scripting element used in the value attribute of the standard <jsp:param> action:
<jsp:include page="weather.jsp" >
        <jsp:param name="user"
             value="<%= request.getParameter("username")%>"/>
       </jsp:include>
In this case, the expression scripting element will be evaluated first. The text string value of the request.getParameter() method call will be substituted before the <jsp:param> action is evaluated. The expression scripting element in this case is said to be a request time expression (because it is evaluated during request processing).
Scriptlet scripting elements are used to include complete fragments of Java code in the body of the JSP. These elements differ from declarations and expressions in two ways:
They are not limited to the declaration of methods, variables, and constants.
They do not generate a string output directly, as expressions do.
If you need to generate output within a scriptlet scripting element, you can use the out implicit object. The out implicit object is of the javax.servlet.jsp.JspWriter type, which in turn is a subclass of java.io.Writer, and all of its methods are available. For example, the following scriptlet scripting element prints a total cost, conditionally with local tax added on:
<%
  if (state.isLocal())
     out.print(totalCost * localTax);
  else
     out.println(totalCost);
%>
The following is an example of several scriptlet scripting elements in the layout of a table with varying numbers of output rows. Note the free mix of template data and scriptlet scripting elements:
<table border="1">
  <tr><th align="left">Item</th><th align="left">Price</th></tr>
  <%
    String selectedCat = request.getParameter("catid");
    if (selectedCat == null)
        selectedCat = "1";
    ArrayList items = (ArrayList) EShop.getItems(selectedCat);
    for (int i=0; i< items.size(); i++)
    {
        Product curItem = (Product) items.get(i);
  %>
  <tr>
    <td><%= curItem.getName()   %></td>
    <td><%= dispPrice(String.valueOf(curItem.getPrice()))  %></td>
  </tr>
  <%
    }
  %>
</table>
An especially important technique to note is the use of scriptlet scripting elements in the control flow of the JSP. In the preceding case, the highlighted code implements a loop that prints a row for each element in the items ArrayList collection. The use of scriptlet scripting elements—expression scripting elements and template data (HTML)—is freely mixed. Note the following characteristics of scriptlet scripting elements:
They are Java code fragments that are bracketed in
<% ... %>.They can be placed anywhere within the JSP body, mixed among the template data.
All the Java control flow structures (
if, for, while, switch, and so on) may be used for control flow within a JSP page.
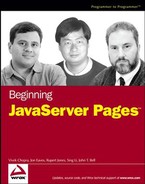
If the placement of scripting elements within a JSP reminds you of the coding syntax of a Java class, you are very observant. In fact, the combined scripting elements on a JSP page match precisely certain elements in a Java class. In most JSP containers, the entire JSP page is translated to a Java class in source code before compilation. Figure 3-1 illustrates the correspondence between scripting elements in the layout and the syntax of a Java class.
Declaration scripting elements are placed as the first thing in the body of the Java class definition.
The JSP body, including any scriptlets scripting elements, is placed in the body of the Java class immediately after JSP generated code that defines the JSP implicit objects and sets up the page environment. This implies the following:
You are likely to have encountered many Web-based stores in your daily Internet surfing activities. The example in this chapter provides a glimpse into how these stores are built. More specifically, you will see how JSP can be used to implement navigation and presentation in the user interface of a Web-based store. The JSP in this example makes extensive use of embedded Java coding and provides you with hands-on experience working with scripting elements.
The first example implements a catalog of products. Within this catalog, shoppers may select a product category, and the products in that category will be displayed on the screen with their prices.
Try It Out: Creating a Products Catalog
To try out the first example, make sure Tomcat 5 is running and deploy the ch03.war file (see Chapter 1 for details if you do not remember how to use the Manager application to deploy a war file). Point your browser to the following URL:
http://localhost:8080/ch03/example1/estore.jsp
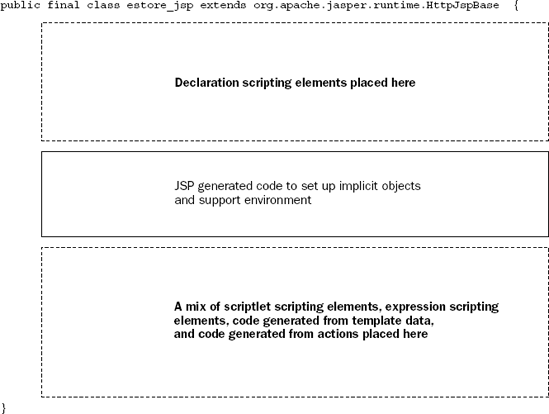
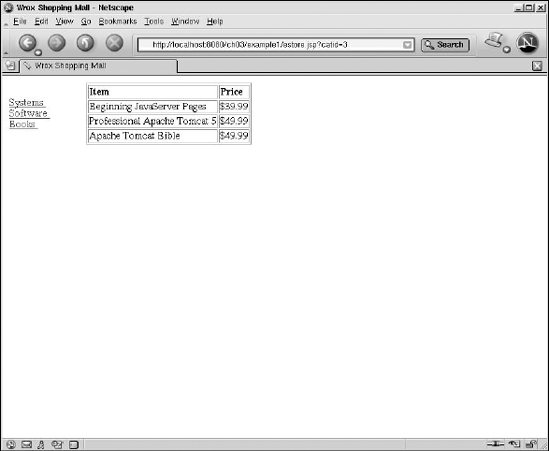
You should see the simple catalog shown in Figure 3-2.
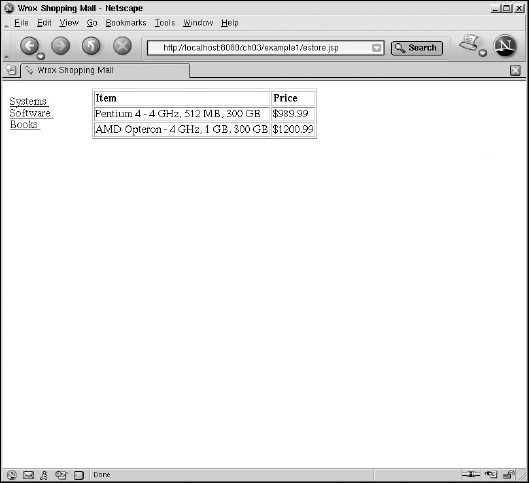
In Figure 3-2, the categories of products are displayed on the left side of the page. Each product category is represented by a hyperlink. If you click the product category hyperlink, a list of products and their prices are displayed on the right-hand side. Now try clicking the link for the Software product category. You should see the selection of software available, as shown in Figure 3-3.
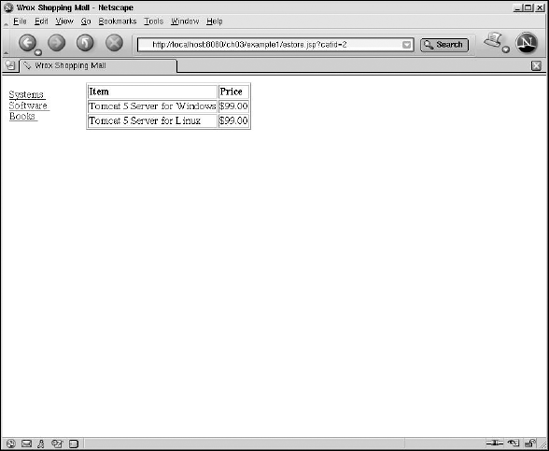
The software selection shows two Tomcat servers available and their prices. Finally, click the Books product category. You should see the three books that are available, as shown in Figure 3-4.
This catalog application is simple and free of fancy HTML formatting so we can focus on the JSP and scripting code. It is always a good idea to test your code before adding formatting elements. This best practice is covered in Chapter 1.
This catalog makes use of only a single JSP page. This JSP page presents the information contained in a set of objects. These objects are already provided for us. Similar to the JavaBean used in Chapter 2, the objects are coded in Java. In most production environments, the description of the objects that you can use within your JSPs is provided for you. In a production environment, the objects are often called business objects. The following table describes the available objects.
The compiled code for these Java objects is located in a package called com.wrox.begjsp.ch03; you can find it under the <Tomcat Installation Directory>/webapps/WEB-INF/classes directory. Figure 3-5 illustrates how the Java objects are used within the catalog.
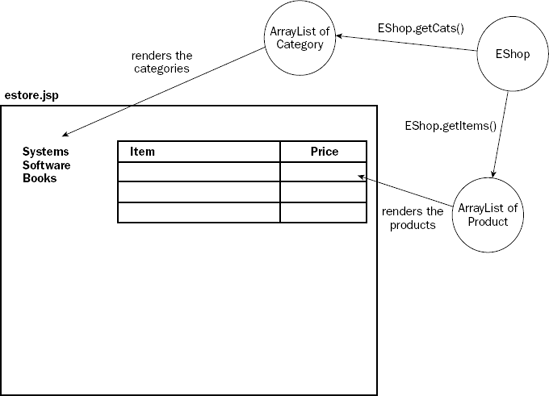
In Figure 3-5, Java coded scripting elements will be used to glue the object data to the JSP template, resulting in the generated HTML catalog page.
The code to this catalog can be located in the estore.jsp JSP page. The estore.jsp file is reproduced here, but you can find it in the <Tomcat Installation Directory>/ch03/example1/estore.jsp file:
<%@ page language="java"
  import = "com.wrox.begjsp.ch03.*,java.util.*" %>

<%!
  public void jspInit()
  {
      getServletContext().setAttribute("cats", EShop.getCats());
  }

  public void jspDestroy()
  {
      getServletContext().removeAttribute("cats");
}
private String dispPrice( String price)
{
int len = price.length();
if (len <= 2)
return price;
else
return "$" + price.substring(0,len −2) + "." + price.substring(len-2);
}
%>
<html>
<head>
<title>Wrox Shopping Mall</title>
</head>
<body>
<table width="600">
<tr>
<td width="20%">
<%
ArrayList cats = (ArrayList) application.getAttribute("cats");
for (int i=0; i< cats.size(); i++)
{
Category curCat = (Category) cats.get(i);
%>
<a href="<%= request.getRequestURL() + "?catid=" + curCat.getId() %>">
<%= curCat.getName() %>
</a>
<br/>
<%
}
%>
</td>
<td>
<h1></h1>
<table border="1">
<tr><th align="left">Item</th><th align="left">Price</th></tr>
<%
String selectedCat = request.getParameter("catid");
if (selectedCat == null)
selectedCat = "1";
ArrayList items = (ArrayList) EShop.getItems(selectedCat);
for (int i=0; i< items.size(); i++)
{
Product curItem = (Product) items.get(i);
%>
<tr>
<td><%= curItem.getName() %></td>
<td><%= dispPrice(String.valueOf(curItem.getPrice())) %></td>
</tr>
<%
}
%></table>
</td>
</tr>
</table>
</body>
</html>Lines containing scripting elements are highlighted in the preceding code. You can see plenty of examples of all three types of scripting elements (declarations, expressions, and scriptlets).
At the top of the JSP is a <%@page> directive. This is a directive that has not appeared before:
<%@ page language="java" import = "com.wrox.begjsp.ch03.*,java.util.*" %>
The <%@page> directive describes certain properties of the JSP, via its attributes, to the container. For example, this <%@page> directive is saying that the programming language used in scripting elements is "java", and that the classes in packages com.wrox.begjsp.ch03.* and java.util.* should be imported. The import attribute is equivalent to the following Java code:
import com.wrox.begjsp.ch03.*; import java.util.*;
The next section in estore.jsp is a declaration scripting element. In this case, the special jspInit() and jspDestroy() methods are defined. Also note the declaration of a Java method called dispPrice() that takes a string representation of a number and displays it in the dollar price $???.?? format:
<%
public void jspInit()
{
getServletContext().setAttribute("cats", EShop.getCats());
}
public void jspDestroy()
{
getServletContext().removeAttribute("cats");
}
private String dispPrice( String price)
{
int len = price.length();
if (len <= 2)
return price;
else
return "$" + price.substring(0,len −2) + "." + price.substring(len-2);
}
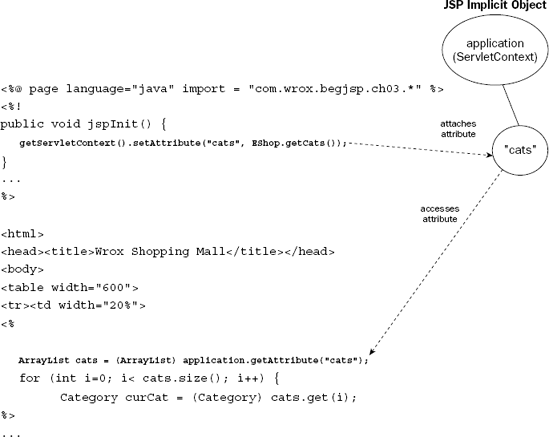
%>The jspInit() method attaches an attribute to the servlet context of the JSP. The servlet context of a JSP is completely equivalent to the application implicit object. However, remember from our earlier discussion that implicit objects are not yet set up and are therefore not available from within the jspInit() method. This is why it is necessary to call getServletContext() instead. getServletContext() is a method on the javax.servlet.Servlet interface, an interface that the underlying class of a JSP implements. Calling EShop.getCats() will return an ArrayList containing Category objects that describe the categories available in the catalog. Therefore, the following line will attach an attribute with the name "cats" to the application implicit object:
getServletContext().setAttribute("cats", EShop.getCats());This means that the categories will be attached to the application implicit object when the JSP is first used by the container, even before the first request is processed. jspInit() will never be called again, unless the page is destroyed and recreated by the container. Should the page be destroyed to make more room for others, the container will call the jspDestroy() method, which will in turn remove the attribute.
Later within the JSP code, you can obtain the categories ArrayList using the following Java code:
ArrayList cats = (ArrayList) application.getAttribute("cats");This is exactly what happens in the first scriptlet scripting element within the estore.jsp page. Note the use of the application implicit object instead of the equivalent but more cumbersome getServletContext() call.
You will frequently see this practice of attaching an attribute to an object, to be retrieved during processing by the JSP. This pattern occurs regularly in JSP programming.
Attaching attributes to implicit objects is the primary mechanism that enables the different elements of a JSP page to cooperate. It can also be used as a mechanism for passing information between a JSP page and any included JSP page, or even between JSP pages within the same application. Figure 3-6 illustrates the basic action of attaching attributes to JSP implicit objects for request processing.
In Figure 3-6, attributes attached by an element of a JSP page (for example, a declaration scripting element) are later used by another element within the JSP page (a scriptlet element, the <jsp:UseBean> standard action, a custom tag, and so on).
Attributes are any Java-based object that can be attached to certain implicit objects using a textual name. JSP or scripting code can then later retrieve an attribute as long as it knows the textual name. The primary implicit objects that you can attach attributes to are the scoping objects, including the following:
pageContextrequestsessionapplication
Each of these objects implements an interface that has the setAttribute() and getAttribute() method, enabling you to attach Java objects as attributes.
The following table shows the interfaces that enable attribute attachment for each of the implicit objects.
Implicit Object | Interface/Superclass Supporting Attributes |
|---|---|
| |
| |
|
|
|
|
Each implicit object that supports the attachment of attributes has a unique scoping. Scoping determines how long and under what circumstances the attributes attached will be available. Scoping is explained in detail after the next example.
Let's turn our attention back to estore.jsp; the page is laid out into two table cells, as illustrated in Figure 3-7.

The first cell on the left-hand side is basically a list of categories in the "cats" attribute.
The code that performs the rendering of the list of categories on the left side of Figure 3-7 is reproduced here. The code involves several scriptlet scripting elements mixed among template data (HTML) and expression scripting elements:
<td width="20%">
<%
ArrayList cats = (ArrayList) application.getAttribute("cats");
for (int i=0; i< cats.size(); i++)
{
Category curCat = (Category) cats.get(i);
%>
<a href="<%= request.getRequestURL() + "?catid=" + curCat.getId() %>">
<%= curCat.getName() %>
</a>
<br/>
<%
}
%>
</td>In the highlighted scriptlet scripting element, note that the "cats" attribute is retrieved from the application implicit object and placed into the cats ArrayList. Then the code iterates through all the categories in this list and assigns each category to the temporary curCat variable.
The curCat variable is then used to display the category name, using the expression scripting element:
<%= curCat.getName() %>
This name is made into a hyperlink using another expression scripting element within an HTML <a> element:
<a href="<%= request.getRequestURL() + "?catid=" + curCat.getId() %>"> ... </a>
The getRequestURL() method on the request implicit object obtains the URL that is used to access the current JSP. During runtime, this may be transformed to a URL such as the following:
http://localhost:8080/ch03/example1/estore.jsp?catid=3
You may recognize this as the form submission GET method that was used in Chapter 2 to attach parameters to a request URL. Indeed, this is a technique frequently used in JSP programming to send parameters to another JSP for processing.
While this method of creating a URL is simple and works under most circumstances, it can be problematic when user sessions are used. Sessions are explained later in this chapter. Chapter 6, "JSP Tag Libraries and JSTL," describes some tags that can be used to create URLs that will automatically maintain session information.
In the right-hand cells of the table in Figure 3-7, the products in the currently selected category are displayed. This cell is rendered using the following code. Note that the structure of the code is very similar to the code presented for the categories list.
<table border="1">
<tr><th align="left">Item</th><th align="left">Price</th></tr>
<%
String selectedCat = request.getParameter("catid");
if (selectedCat == null)
selectedCat = "1";
ArrayList items = (ArrayList) EShop.getItems(selectedCat);
for (int i=0; i< items.size(); i++)
{
Product curItem = (Product) items.get(i);
%>
<tr>
<td><%= curItem.getName() %></td>
<td><%= dispPrice(String.valueOf(curItem.getPrice())) %></td>
</tr><%
}
%>
</table>In the description of the previous section, you saw that clicking a category hyperlink within the left-hand cell generates a (GET method) submit to the estore.jsp with a catid parameter.
The first scriptlet scripting element obtains this catid parameter from the request implicit object. Note that the first time the page is displayed, there is no catid parameter included with the URL. In this case, the default is simply set to the value of "1".
Next, the EShop.getItems() static method call obtains all the products in a category. This is returned in an ArrayList and assigned to a variable called items by the code:
ArrayList items = (ArrayList) EShop.getItems(selectedCat);
The rest of the code iterates through the list of products in the items ArrayList. Each product's name and price are printed as a table cell. Each product in the items ArrayList will cause a row in the table to be rendered. Note the use of the dispPrice() method, defined in the declaration scripting element, to display the price in $???.?? format.
After finishing the interactive catalog to display categories and products, the next step in building an electronic storefront is adding a shopping cart. This Try It Out exercise reveals how you can add a simple shopping cart to the product catalog example described in the preceding section.
In this example, the user will be enabled to do the following:
Browse through the catalog
Click a Buy link to place an item into her or his shopping cart
Increase the quantity of the product placed into the shopping cart
Try It Out: Adding a Shopping Cart
Use the following URL to test the second example:
http://localhost:8080/ch03/example2/estore.jsp
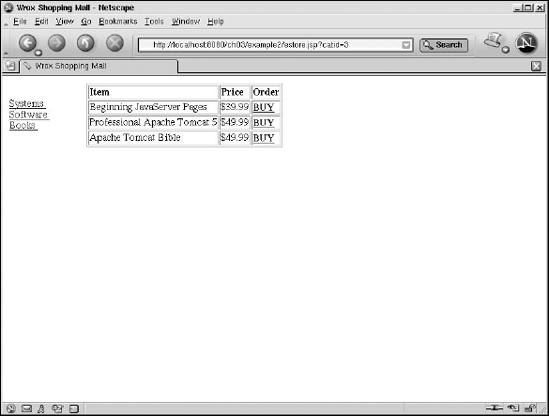
You should see the new catalog page, as illustrated in Figure 3-8. It looks the same as the one in the previous Try It Out exercise except that every product displayed now has an associated Buy hyperlink.
Click the Books category on the left-hand side. The list of available books will be displayed, as shown in Figure 3-9.

To purchase the Beginning JavaServer Pages book, click the Buy hyperlink. At this point, your shopping cart is displayed, as shown in Figure 3-10.
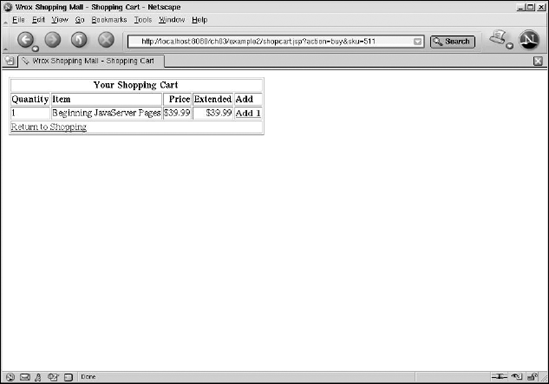
One copy of the book has been placed into the shopping cart. In Figure 3-10, you can see that the extended price for this order is $39.99.
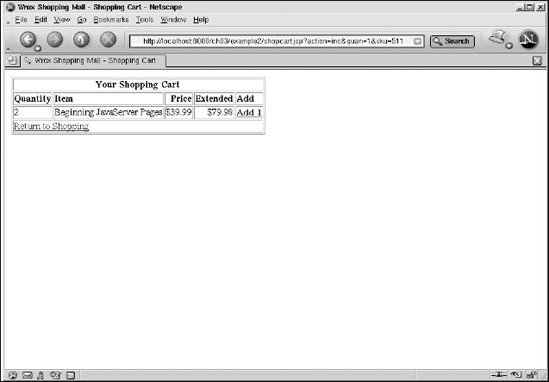
Now, buy another copy of this book. Do this by clicking the Add 1 hyperlink. You should see the quantity increase to 2, and a new extended price of $79.98, as shown in Figure 3-11.
If you click the Add 1 link a few more times, the quantity and price will increase accordingly.
To create the Add 1 hyperlink for each product, the estore.jsp file is modified. You can find the modified file at <Tomcat Installation Directory>/webapps/ch03/example2/estore.jsp. The content of this file is reproduced in the following code, with modifications highlighted:
<%@ page language="java"
import = "com.wrox.begjsp.ch03.*,java.util.*" %>
<%!
public void jspInit()
{
getServletContext().setAttribute("cats", EShop.getCats());
}
public void jspDestroy()
{
getServletContext().removeAttribute("cats");
}
private String dispPrice( String price)
{
int len = price.length();
if (len <= 2)return price;
else
return "$" + price.substring(0,len −2) + "." + price.substring(len-2);
}
%>
<html>
<head>
<title>Wrox Shopping Mall</title>
</head>
<body>
<table width="600">
<tr>
<td width="20%">
<%
ArrayList cats = (ArrayList) application.getAttribute("cats");
for (int i=0; i< cats.size(); i++)
{
Category curCat = (Category) cats.get(i);
%>
<a href="<%= request.getRequestURL() + "?catid=" + curCat.getId() %>">
<%= curCat.getName() %>
</a>
<br/>
<%
}
%>
</td>
<td>
<h1></h1>
<table border="1">
<tr><th align="left">Item</th><th align="left">Price</th>
<th align="left">Order</th></tr>
<%
String selectedCat = request.getParameter("catid");
if (selectedCat == null)
selectedCat = "1";
ArrayList items = (ArrayList) EShop.getItems(selectedCat);
for (int i=0; i< items.size(); i++)
{
Product curItem = (Product) items.get(i);
%>
<tr>
<td><%= curItem.getName() %></td>
<td><%= dispPrice(String.valueOf(curItem.getPrice())) %></td>
<td><a href="<%= request.getContextPath() + "/example2/shopcart.jsp?action=buy&sku=" + curItem.getSku() %>">
<b>BUY</b></a>
</td>
</tr>
<%
}
%></table>
</td>
</tr>
</table>
</body>
</html>The highlighted code creates a hyperlink out of the word BUY. This is done via the generation of an <a> HTML element. The URL generated for the href attribute of the <a> elements is as follows:
http://localhost:8080/ch03/example2/shopcart.jsp?action=buy&sku=511
This URL will call up the shopcart.jsp page, with two parameters. The first parameter is action, with value "buy". The second parameter is sku, and the value is the actual sku of the product that you have selected.
The shopping cart is implemented in the shopcart.jsp page. The shopcart.jsp page can be located at <Tomcat Installation Directory>/webapps/ch03/example2/shopcart.jsp. It is reproduced here with the scripting elements highlighted:
<%@ page language="java"
import = "com.wrox.begjsp.ch03.*,java.util.*" %>
<%!
private static String EXAMPLE = "/example2";
private static String SHOP_PAGE = "/estore.jsp";
private static String CART_PAGE = "/shopcart.jsp";
private String dispPrice( String price)
{
int len = price.length();
if (len <= 2)
return price;
else
return "$" + price.substring(0,len −2) + "." + price.substring(len-2);
}
%>
<html>
<head>
<title>Wrox Shopping Mall - Shopping Cart</title>
</head>
<body>
<%
int quan = 1;
String action = request.getParameter("action");
if (action.equals("inc")){
String oldQuan = request.getParameter("quan");
quan = Integer.parseInt(oldQuan);
quan++;
} // else - action=buy
%>
<table width="600">
<tr>
<td>
<h1></h1>
<table border="1">
<tr><th colspan="5">Your Shopping Cart</th></tr>
<tr><th align="left">Quantity</th><th align="left">Item</th>
<th align="right">Price</th>
<th align="right">Extended</th>
<th align="left">Add</th>
</tr>
<%
String sku = request.getParameter("sku");
Product item = null;
if (sku != null)
item = EShop.getItem(sku);
%>
<tr>
<td><%= quan %></td>
<td><%= item.getName() %></td>
<td align="right"><%= dispPrice(String.valueOf(item.getPrice())) %></td>
<td align="right"><%= dispPrice(String.valueOf(item.getPrice() * quan)) %></td>
<td>
<a href="<%= request.getContextPath() + EXAMPLE + CART_PAGE + "?action=inc&quan=" + quan + "&sku=" + sku %>">
<b>Add 1</b></a>
</td>
</tr>
<tr>
<td colspan="5">
<a href="<%= request.getContextPath() + EXAMPLE + SHOP_PAGE %>">
Return to Shopping</a>
</td>
</tr>
</table>
      </td>
    </tr>
  </table>
</body>
</html>The initial declaration scripting element contains the same dispPrice() method for formatting the product price. It also contains three constant declarations for EXAMPLE, SHOP_PAGE, and CART_PAGE.
The first scriptlet scripting element decodes the incoming URL parameters. This element is reproduced here for convenience:
<%
int quan = 1;
String action = request.getParameter("action");
if (action.equals("inc"))
{
String oldQuan = request.getParameter("quan");
quan = Integer.parseInt(oldQuan);
quan++;
} // else - action=buy
%>The variable quan tracks the quantity of the item. It defaults to 1. The default is used when the Buy hyperlink on the estore.jsp page is clicked. In this case, the incoming URL is similar to the following:
http://localhost:8080/ch03/example2/shopcart.jsp?action=buy&sku=511
Note that there is no quan request parameter in the URL, resulting in the use of the default quantity of 1.
If the Add 1 link on the shopcart.jsp page is clicked, the incoming URL is similar to the following:
http://localhost:8080/ch03/example2/shopcart.jsp?action=inc&quan=3&sku=511
Note that in this case, the URL has a quan request parameter. The default will not be used in this case. The quan parameter contains the quantity displayed before the Add 1 link is clicked. The action in this case is inc instead of buy. The preceding code ensures that the quantity is increased by 1 when the Add 1 link is clicked.
The second scriptlet scripting element in shopcart.jsp decodes the sku request parameter. This element is reproduced here:
<%
String sku = request.getParameter("sku");
Product item = null;
if (sku != null)
item = EShop.getItem(sku);
%>In this case, if an sku parameter is available, the method EShop.getItem() is called. This method will retrieve the product associated with sku parameter. The preceding code assigns the item variable with this product.
The order information is rendered as a row of the HTML table, as shown by the following code:
<tr> <td><%= quan %></td> <td><%= item.getName() %></td> <td align="right"><%= dispPrice(String.valueOf(item.getPrice())) %></td> <td align="right"><%= dispPrice(String.valueOf(item.getPrice() * quan)) %></td> <td> <a href="<%= request.getContextPath() + EXAMPLE + CART_PAGE + "?action=inc&quan=" + quan + "&sku=" + sku %>"> <b>Add 1</b> </a> </td> </tr>
The quan variable is used within an expression scripting element to render the current quantity ordered. It is also used within the expression scripting element that renders the extended price. The item variable is used to access the name and price of the product (associated with the incoming sku request parameter). The dispPrice() method is used for both the price and extended price cells to format the output. The URL within the href attribute of the <a> HTML element around the Add 1 hyperlink is rendered here. It is typically in a form similar to the following:
http://localhost:8080/ch03/example2/shopcart.jsp?action=inc&quan=3&sku=511
The final expression scripting element in shopcart.jsp renders an HTML row that has a hyperlink for returning to the estore.jsp page. The code is as follows:
<tr>
<td colspan="5">
<a href="<%= request.getContextPath() + EXAMPLE + SHOP_PAGE %>">
Return to Shopping</a>
</td>
</tr>This code makes use of the getContextPath() method of the request implicit object. This will return a portion of the URL used to access this page, up to the application name (ch03 in our case). The constants EXAMPLE and SHOP_PAGE are appended, resulting in a URL similar to the following:
http://localhost:8080/ch03/example2/estore.jsp
The highlighted portion of the URL represents the portion returned by the getContextPath() method.
This concludes the coverage of how the shopping cart works in example 2. This implementation has some major limitations, however, as described in the following section.
To observe the limitations of this shopping cart, first repeat the action of the previous Try It Out exercise. This will result in two books in the shopping cart, similar to what is shown in Figure 3-11.
At this point, click the Return to Shopping hyperlink. This results in the display of the catalog page (refer to Figure 3-8), showing the available systems.
Now click the Software category on the left side. The list of software products is now displayed, as shown in Figure 3-12.
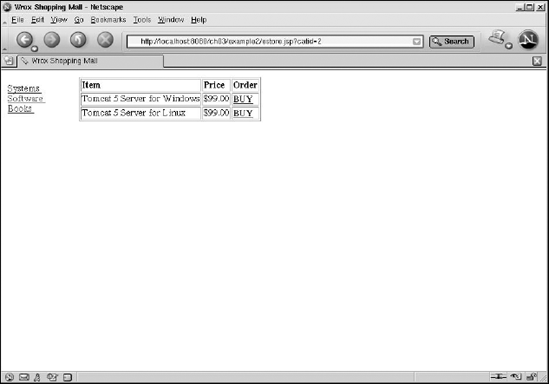
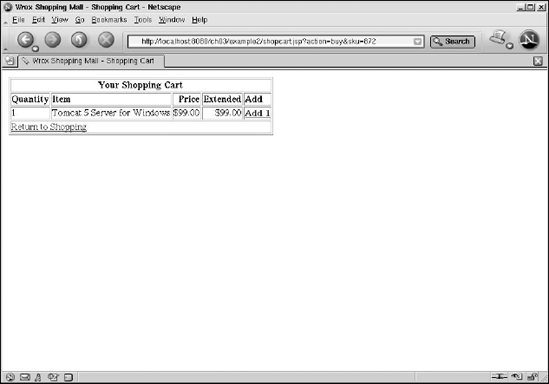
Click the Buy link of the Tomcat 5 Server for Windows product. This will return you to the shopping cart, as shown in Figure 3-13.
The limitations of this shopping cart should be evident at this point:
The shopping cart displays only the most recently purchased product.
The previously purchased book has disappeared forever.
The next Try It Out exercise will eliminate these limitations. However, it is important to appreciate why these limitations exist.
If you consider how the shopping cart (shopcart.jsp) page and the catalog (estore.jsp) page work together, you will notice the following:
There is no mechanism to remember what has been ordered previously.
All communication and data passing between the two pages are limited to the parameters with the URL request; namely the
action, sku, andquanparameters. This mechanism does not allow information for multiple items to be passed.
Two steps are needed to overcome these limitations:
Create a mechanism to remember what had been ordered.
Use a communication mechanism that can pass an unlimited row of product and quantity information.
The following Try It Out exercise provides both. Try the example and see for yourself.
Try It Out: Overcoming the Shopping Cart Limitations
Access example 3 via the following URL:
http://localhost:8080/ch03/example3/estore.jsp
The catalog is displayed as shown in Figure 3-8 in the preceding Try It Out exercise.
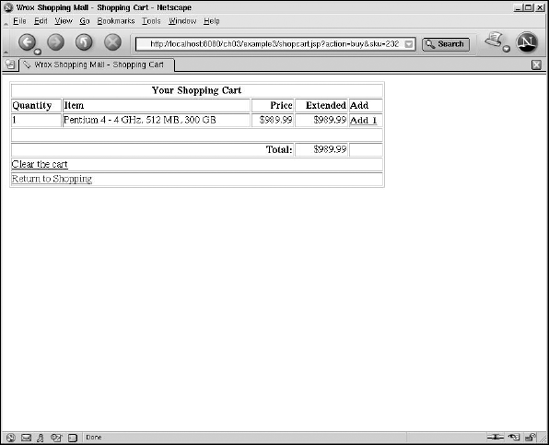
The Systems category is displayed by default. The list of available systems are displayed on the right-hand side of the page. Click the Buy hyperlink of the first system (Pentium 4), adding it to your shopping cart. The improved shopping cart is now displayed as shown in Figure 3-14.
This new shopping cart calculates the total price of the order on a separate row of the table. It also has a link to clear the cart.
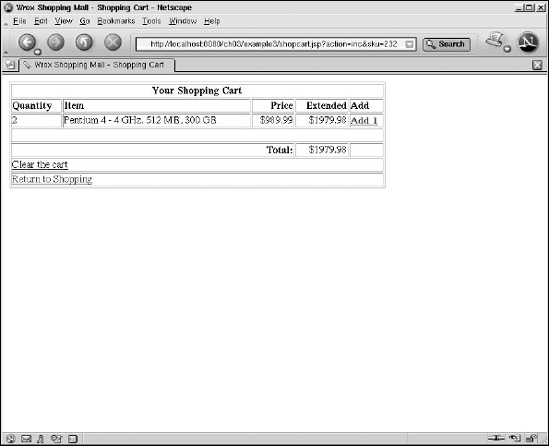
Now, click the Add 1 hyperlink to add another Pentium system. As shown in Figure 3-15, the cart shows two Pentium systems, and the total price is updated.
Next, click the Return to Shopping link. This will return you to the catalog.
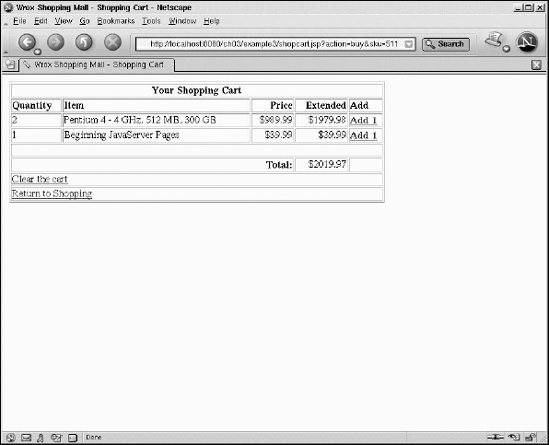
On the left side, select Books. Once the books are displayed on the right, click the Buy link for Beginning JavaServer Pages. This will take you back to your shopping cart. You will see that the book has been added to the shopping cart. Unlike the cart in the previous Try It Out exercise, this time both of the Pentium systems that you have ordered are displayed in the cart. Note that the total price has been updated to include the 2 Pentium systems and the book. Figure 3-16 illustrates the cart, with all the line items shown.
You may want to add other items, and try increasing their quantity.
Finally, click the Clear the Cart hyperlink. Note that all of the items in the shopping cart are now cleared, as shown in Figure 3-17.
The next section reveals how this improved shopping cart works behind the scenes.
To implement this improved cart, the following new pieces are needed:
A Java class that represents a single line item in the cart, called
LineItemA new
ArrayListofLineItemsobjects to track the objects ordered
The LineItem class has properties called quantity, sku, description, and price. The code for this Java class can be found in the com.wrox.begjsp.ch03 package. The source code for this package is located in the <Tomcat Installation Directory>/webapps/WEB-INF/classes directory. You may wish to study the source code for this class; this chapter focuses only on the JSP usage of this class.
The ArrayList to track products ordered is created within the shopping cart JSP code, presented next.
The estore.jsp for example 3, located at <Tomcat Installation Directory>/webapps/ch03/example3/estore.jsp, is identical to estore.jsp in the second Try It Out exercise, earlier in this chapter. This page is not presented again.

The shopcart.jsp for the current example is significantly different, and is located in <Tomcat Installation Directory>/webapps/ch03/example3/shopcart.jsp. The code for this shopcart.jsp is reproduced here, with major differences from the previous version highlighted:
<%@ page language="java"
import = "com.wrox.begjsp.ch03.*,java.util.*" session="true" %>
<%!
private static String EXAMPLE = "/example3";
private static String SHOP_PAGE = "/estore.jsp";
private static String CART_PAGE = "/shopcart.jsp";
private String dispPrice( String price)
{
int len = price.length();
if (len <= 2)
return price;
else
return "$" + price.substring(0,len −2) + "." + price.substring(len-2);
}
%><html>
<head>
<title>Wrox Shopping Mall - Shopping Cart</title>
</head>
<body>
<%
ArrayList items = (ArrayList) session.getAttribute("lineitems");
String action = request.getParameter("action");
String sku = request.getParameter("sku");
Product prod = null;
if (sku != null)
prod = EShop.getItem(sku);
if (items == null)
{ // add first item
items = new ArrayList();
items.add(new LineItem(1,sku,prod.getName(),
prod.getPrice() ));
session.setAttribute("lineitems", items);
}
else if (action.equals("clear"))
{
items.clear();
}
else
{
boolean itemFound = false;
// check to see if sku exists
for (int i=0; i<items.size(); i++)
{
LineItem curItem = (LineItem) items.get(i);
if (curItem.getSku().equals(sku))
{
itemFound = true;
curItem.setQuantity(curItem.getQuantity() + 1);
break;
} // of if
} //of for
if (!itemFound)
items.add(new LineItem(1,sku,prod.getName(),
prod.getPrice() ));
} // of final else
int total = 0;
%>
<table width="600">
<tr>
<td>
<h1></h1>
<table border="1" width="600">
<tr><th colspan="5">Your Shopping Cart</th></tr>
<tr><th align="left">Quantity</th><th align="left">Item</th><th align="right">Price</th><th align="right">Extended</th>
<th align="left">Add</th></tr>
<%
for (int i=0; i< items.size(); i++)
{
LineItem curItem = (LineItem) items.get(i);
int quan = curItem.getQuantity();
long price = curItem.getPrice();
long extended = quan * price;
total += extended;
%>
<tr>
<td><%= quan %></td>
<td><%= curItem.getDesc() %></td>
<td align="right"><%= dispPrice(String.valueOf(price)) %></td>
<td align="right"><%= dispPrice(String.valueOf(extended)) %></td>
<td>
<a href="<%= request.getContextPath() + EXAMPLE + CART_PAGE + "?action=inc&sku=" + curItem.getSku() %>">
<b>Add 1</b></a>
</td>
</tr>
<%
}
%>
<tr>
<td colspan="5">
</td>
</tr>
<tr>
<td colspan="3" align="right"><b>Total:</b></td>
<td align="right"><%= dispPrice(String.valueOf(total)) %></td>
<td> </td>
</tr>
<tr>
<td colspan="5">
<a href="<%= request.getContextPath() + EXAMPLE + CART_PAGE + "?action=clear" %>">
Clear the cart</a>
</td>
</tr>
<tr>
<td colspan="5">
<a href="<%= request.getContextPath() + EXAMPLE + SHOP_PAGE %>">
Return to Shopping</a>
</td>
</tr>
</table>
</td></tr> </table> </body> </html>
The first thing to note in this new shopcart.jsp is the new attribute, session, specified in the <%@ page> directive. The directive is reproduced here for reference:
<%@ page language="java" import = "com.wrox.begjsp.ch03.*,java.util.*" session="true" %>
Specifying session="true" tells the JSP container explicitly that this page should participate in a session. While it is stated explicitly here for learning purposes, it is not necessary because the default value, when the attribute is not specified, is true. It is important to understand what a session is and how it is implemented.
A session is a managed object that resides on the server, within the JSP container. The main purpose of a session is to track incoming requests from the same user.
To understand the need for sessions, it is necessary to reexamine only the second Try It Out exercise. Observe the way that request URLs are marked up to include parameters (such as action, sku, quan), and think about what actually happens between the user's browser and the JSP container.
When the user clicks a Buy link on the estore.jsp in this example, the browser requests a URL similar to the following:
http://localhost:8080/ch03/example2/shopcart.jsp?action=buy&sku=511
From the perspective of the JSP container, an independent request (unrelated to the original request for estore.jsp) is asking for the shopcart.jsp page. The only things that link the two independent requests are the parameters encoded at the end of the URL.
From the perspective of the users, the two requests are absolutely related. When they click the Buy link, they expect to see the product in the shopping cart. This kind of perceived relationship between independent requests from the user perspective is the main motivation for establishing a session. A session binds these logically related requests together.
Therefore, it should be clear that you can encode GET method parameters to a URL within a generated page to create the illusion that two separate JSP pages belong to the same "session."
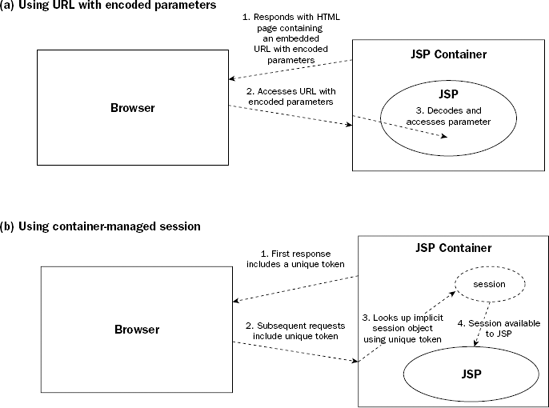
However, this method is clearly limited. There is no easy way to encode an entire shopping cart, full of items, to the same URL. Fortunately, this is a very common need, and the JSP container manages a session object specifically for this purpose. Figure 3-18 illustrates the JSP managed session.
In Figure 3-18a, encoding in the URL is used to tie together requests in the same session. All the data parameters are attached to the request by the JSPs in the application. In Figure 3-18b, the JSP container manages the session. The application only needs to attach data to the session implicit object as attributes. Any JSP element or JSP pages in the same session can then access these attributes for rendering.
The JSP container cooperates with the browser to implement sessions using the standard HTTP protocol. A JSP developer never needs to implement sessions or work directly with the session implementation mechanism. JSP developers can take advantage of sessions in the following simple ways:
In some cases, however, it is advantageous to have an appreciation for how sessions are actually implemented behind the scenes. The most common method for implementing a session is via cookies. Figure 3-19 illustrates this method of session implementation.
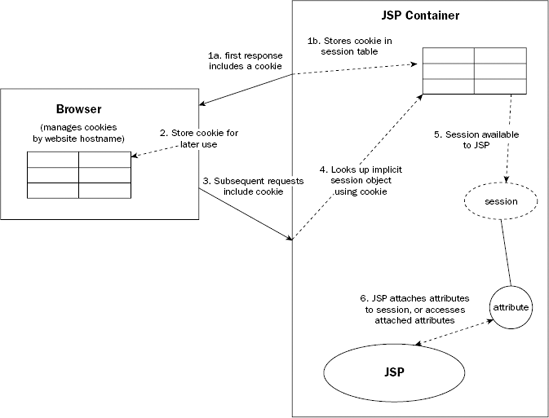
In Figure 3-19, the JSP container creates a unique token called a cookie and hands it to the browser on the first incoming request. The browser is programmed to hand this unique token back to the JSP container on subsequent requests (all modern browsers support cookies). Within the JSP container, a table maps the cookie's unique value to a session object. When a request comes into the JSP container, it is checked for a cookie. If a cookie is found, it is used to look up the session. Because the session object can have an unlimited number of attributes attached to it, the cookie (a very small token) can potentially be used to access a very large set of session-specific data (shopping cart information, user preferences, and so on).
Let's turn our attention back to the examination of the new shopcart.jsp; the code that maintains the line items in the current shopping cart is the first scriptlet scripting element, reproduced here for reference:
<%
ArrayList items = (ArrayList) session.getAttribute("lineitems");
String action = request.getParameter("action");
String sku = request.getParameter("sku");
Product prod = null;if (sku != null)
prod = EShop.getItem(sku);
if (items == null)
{ // add first item
items = new ArrayList();
items.add(new LineItem(1,sku,prod.getName(),
prod.getPrice() ));
session.setAttribute("lineitems", items);
}
else if (action.equals("clear"))
{
items.clear();
}
else
{
boolean itemFound = false;
// check to see if sku exists
for (int i=0; i<items.size(); i++)
{
LineItem curItem = (LineItem) items.get(i);
if (curItem.getSku().equals(sku))
{
itemFound = true;
curItem.setQuantity(curItem.getQuantity() + 1);
break;
} // of if
} //of for
if (!itemFound)
items.add(new LineItem(1,sku,prod.getName(),
prod.getPrice() ));
} // of final else
int total = 0;
%>This preceding Java code handles the decoding of three different types of requests:
When the user first clicks a Buy link in a session: A session attribute called
lineitemsdoes not exist in this case. Create a newArrayListofLineItems and attach it with the namelineitems. The product that the user wishes to purchase should be added to this initialArrayListas aLineItem.When the user clicks the Clear the Cart link: The request carries an
actionparameter with theclearvalue; delete everything in thelineitems ArrayList.When the user clicks the Add 1 link on the shopping cart for a specific line item: The request carries an
actionparameter with theincvalue. Go through thelineitems ArrayListand find theLineItemwith the incomingskuand increase the quantity ordered.
The table of line items is rendered by the following code:
<%
for (int i=0; i< items.size(); i++)
{
LineItem curItem = (LineItem) items.get(i);
int quan = curItem.getQuantity();
long price = curItem.getPrice();
long extended = quan * price;
total += extended;
%>
<tr>
<td><%= quan %></td>
<td><%= curItem.getDesc() %></td>
<td align="right"><%= dispPrice(String.valueOf(price)) %></td>
<td align="right"><%= dispPrice(String.valueOf(extended)) %></td>
<td>
<a href="<%= request.getContextPath() + EXAMPLE + CART_PAGE + "?action=inc&sku=" + curItem.getSku() %>">
<b>Add 1</b></a>
</td>
</tr>
<%
}
%>The initial scriptlet scripting element contains the for loop that will render a table row for each LineItem in the items ArrayList (previously fetched from the session). The quantity is extracted from the LineItem to calculate the extended price. A variable called total is used to sum all the extended prices.
The final segment of new code in shopcart.jsp renders the total price and the new Clear the Cart hyperlink, each in its own HTML table row:
<tr>
<td colspan="3" align="right"><b>Total:</b></td>
<td align="right"><%= dispPrice(String.valueOf(total)) %></td>
<td> </td>
</tr>
<tr>
<td colspan="5">
<a href="<%= request.getContextPath() + EXAMPLE + CART_PAGE + "?action=clear" %>">
Clear the cart</a>
</td>
</tr>The Clear the Cart hyperlink has a URL with the value of the action parameter set to clear. This is a specific case handled by the first scriptlet scripting element on this page, and will clear everything within the lineitems session attribute.
The final topic covered in this chapter is the scoping of implicit objects. Earlier in this chapter, you learned that typical JSP programming may involve the attachment of Java object attributes to one of the four JSP implicit objects:
In Java programming terms, a reference to the attributes is maintained by one of these objects when an attribute is attached. Because destroying an implicit object will cause all attached attributes to disappear, the lifetime of the attributes depends on the lifetime of the object they are attached to.
The lifetime of an attribute and the accessibility of an attribute together make up the scope of the attribute. The following table summarizes the different scopes available when attributes are attached to the different implicit objects.
Implicit Object | Scope | Lifetime | Accessibility |
|---|---|---|---|
| Page scope | Lasts only until all the output for the current request has been rendered, or when request processing is passed to another JSP page. | Accessible only within the current JSP page. |
| Request scope | Lasts until the end of the processing of the current request. This means that the object is still valid if the same request is being passed to another JSP page for processing. | Accessible from all the JSP pages that service the same request. |
| Session scope | Lasts until the end of the session. Note that a session can last over many independent requests. The precise lifetime of a session depends on the container. | Accessible from all the session-aware JSP pages (session attribute set to |
Lasts until the entire application is unloaded by the JSP container—for example, if the | Accessible within all the JSP pages within the application. This is the global scope. |
In the third Try It Out exercise in this chapter, the lineitems attribute is attached to the request implicit object and therefore has a request scope. The cats attribute, however, is attached to the application scope within the jspInit() method in the estore.jsp page. This means that cats should be accessible from any JSP page within the same ch03 application. To convince yourself of this, try to access the following URL:
http://localhost:8080/ch03/examplex/showglob.jsp
You should see a list of the available categories, as shown in Figure 3-20.
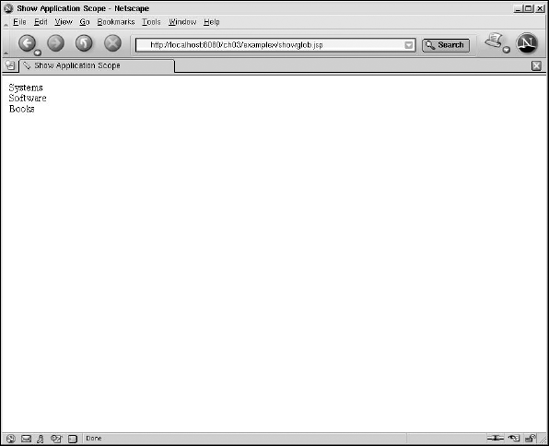
This shows that the cats attribute remains available, long after the earlier session testing. This global cats attribute is attached to the application scope, and accessed by the showglob.jsp page. The showglob.jsp file can be located at <Tomcat Installation Directory>/webapps/ch03/examplex/showglob.jsp. It is reproduced here, with scripting elements highlighted:
<%@ page language="java"
  import = "com.wrox.begjsp.ch03.*,java.util.*" %>
<html>
<head>
<title>Show Application Scope</title>
</head>
<body>
<table width="600">
<tr>
<td>
<%
ArrayList cats = (ArrayList) application.getAttribute("cats");
for (int i=0; i< cats.size(); i++)
{
Category curCat = (Category) cats.get(i);
%>
<%= curCat.getName () %>
<br/>
<%
}
%>
</td>
</tr>
  </table>
</body>
</html>
The cats attribute is still available to showglob.jsp despite the following:
showglob.jspdoes not create thecatsattribute.estore.jspis executed beforeshowglob.jsp.showglob.jspis not even part of example 3.
Herein lie both the benefits and shortcomings of the application scope. The application scope is global to the entire application, allowing its attributes to be accessed by any JSP or other Web elements within the same application.
The JSP standard, prior to JSP 2.0, had shortcomings that necessitated the use of embedded Java programming code. In the earliest JSP incarnation, JSP 1.0, this was absolutely necessary.
Due to the existence of legacy code, the practicing JSP developer must be familiar with the mechanism and techniques used for embedding Java code within JSP. The primary mechanism for embedding Java code within JSP is through scripting elements.
Through three successive Try It Out exercises, you have thoroughly explored scripting elements in the form of declarations, expressions, and scriptlets.
Also presented in this chapter was an e-commerce example of an electronic storefront, which demonstrated the following concepts:
How to implement an interactive catalog showing categories of products
How to implement a working shopping cart
How to use Java objects as attributes to pass information between JSP elements or multiple JSP pages
How to use implicit JSP objects that support the attachment of attributes, and the lifetime of these implicit objects
The importance of scoping in JSP, and how to take advantage of it in your applications
The idea of a session, and how to make use of it in e-commerce applications