Chapter 13
App Stores
WHAT YOU WILL LEARN IN THIS CHAPTER:
- Creating icons for your app
- Creating a splash screen for your app
- Preparing screenshots
- Preparing app metadata
- Understanding App Store terms and conditions
- Building and submitting an iPhone app
- Building and submitting an Android app
It is finally time to release your app to the world! For both the iPhone and Android platforms, you register with an online portal to submit and manage your apps. You have to follow specific technical requirements and procedures to produce app binary packages that users can install. This chapter takes you through that process.
Before you perform the build and deploy steps you also need to prepare supplementary materials, such as screenshots, and make certain decisions about your app, such whether it is free or paid. Some preparation in advance will save you time and effort when you are filling in the online forms.
This chapter assumes that you can get your app to the point where you are happy with the quality, and where it is usable by others (you have conducted at least informal usability tests, right?). An assumption is also made that you have spent some time optimizing the code for performance. This is something that you will have to do with all hybrid apps, because it is easy to introduce glitches and pauses in the app user interface if you are not careful with your HTML and JavaScript code.
The tonvo app from Chapter 12 is used as an example in this chapter. It has been submitted to the iPhone App Store and the Android Marketplace, and you can find it by searching for the keyword “tonvo.”
You should also ensure that you are using the Xcode version 4 (which was released during the writing of this book) in order to follow the iPhone submission example. The procedure is quite different from Xcode version 3.
WHAT YOU NEED TO PUBLISH YOUR APP
One of the really great things about building your app using HTML5 and PhoneGap is that you can publish an iPhone and Android version from the same code base. This means your app can appear on both the iPhone App Store and Android Marketplace without too much extra effort.
The iPhone and Android versions of your app will diverge when it comes to platform-specific assets such as icons and splash screens. You can make your life a lot easier by setting up a sensible folder structure in advance. Create a single top-level project folder to hold both the iPhone and Android project folders — you might as well call these subfolders iphone and android, respectively.
To share your HTML, CSS, and JavaScript code directly, create a symbolic link pointing from the Android project assets folder to the iPhone project www folder:
ln -s iphone/www android/assets
This means you can edit one canonical version of your code without worrying about accidental versioning. Refer to Chapters 9 and 10 if you need a reminder on the details of setting up Xcode and Eclipse projects.
Although you can maintain a unified code base, you will need to maintain separate project folders. Each platform has different configurations and icon image file requirements, and the separate project folders are a good place to keep these files.
Icons
The icon for your app is the most visible image associated with it, and will appear on the device home screen. Though it is important to have a unique and recognizable icon, it is also important to keep to the icon design guidelines for each platform. Unless you also have graphic design skills, you will need to bring in a graphic designer to get icons with a professional appearance.
You need to provide a number of different icon image files in different sizes. Some are required, and some are optional. The optional sizes are created automatically by resizing the icons you have provided, and this may not always produce the best results. If you have the resources, you should try to provide specific icon versions for each size.
To make this easier, ask your graphic designer to design the icon using a vector-based format, because this enables easy resizing. You should be aware that even vector-based icons may need manual adjustment, especially for smaller icon sizes.
Your app icon will appear in a variety of places — more than you think. In addition to the home screen, your icon is used in the app stores for your app listing, in iTunes in your list of apps, in search results, and in promotional slots if you are lucky enough to be selected as an “app of the day.”
What can you do if you don’t have access to a graphic designer? You can still produce reasonable icons. The trick is to stick to simple ideas. For example, your icon could just be the name of your app, written using a distinctive decorative font.
The PhoneGap project provides you with a default configuration for your icons, and there is little need to change this. PhoneGap defines a set of icon names to use, and references them in a set of standard folders. You can change the names and folder locations to a certain extent, by modifying the various plist files in your iPhone project, or the AndroidManifest.xml file, but there is little to be gained from a non-standard configuration.
The image file format used for icons on both the iPhone and Android platforms is the PNG format. More specifically, the color depth should be 24 bit, the images should have no transparency, and the density should be 72 DPI (dots-per-inch). Although your graphic designer may be the one producing the images, it is important that you understand the technical requirements for the images.
When it comes to the iPhone, you will need to produce two versions of some icons, one double the size of the other. This is because the Retina display, introduced with the iPhone 4, has double the number of physical pixels in the screen. Whereas the iPhone 3 had a 320 x 480 pixel screen, the iPhone 4 has a 640 x 960 pixel screen. Apple introduced a special naming convention that ensures the correct version is used. You append the character sequence @2x to the end of the filename, before the file type extension. For example, icon.png becomes [email protected].
Here are the required iPhone icons:
- 57 x 57 pixels: This is the main icon, used on the home screen. The icon file should be saved as Resources/icons/icon.png in your iPhone project.
- 114 x 114 pixels: The Retina version of the main icon, saved as Resources/icons/[email protected] in your iPhone project.
- 512 x 512 pixels: App store icon, in both iTunes and the online app store pages. Save this as Resources/iTunesArtwork in your iPhone project. The .png extension should be removed for this icon.
In addition to these required icons, you can provide a set of icons for search results and custom document types. The full list, and the most recent updates to the list, are available online from the Apple developer documentation at http://developer.apple.com.
The techniques in this book enable you to build iPad applications as well as iPhone applications. The design considerations for iPad are different for smaller devices, and in particular, additional, different, icon sizes are required. The Apple developer documentation is the best place to review these requirements if you are also going to build iPad apps.
Your Android app will also need a home screen icon, known in the Android environment as a “launcher” icon. Due the wide variety of Android devices, you will need to provide three different icon sizes. These sizes correspond to low, medium, and high pixel density Android device screens.
Android launcher icons also need an empty border, because they may be modified for display. This means that the practical size for your icon graphic is actually smaller than the full pixel dimensions of the image. You are restricted to a central square-shaped zone.
Here are the required Android icons:
- 72 x 72 pixels: For high-density displays; however, the usable internal area is 60 x 60 pixels. Save this file as res/drawable-hdpi/icon.png in your Android project.
- 48 x 48 pixels: For medium-density displays; however, the usable internal area is 40 x 40 pixels. Save this file as res/drawable-mdpi/icon.png in your Android project.
- 36 x 36 pixels: For low-density displays; however, the usable internal area is 30 x 30 pixels. Save this file as res/drawable-ldpi/icon.png in your Android project.
- 512 x 512 pixels: Android Marketplace icon. You’ll upload this separately when you publish your app, so it does not need to be stored within your Android project folder.
In addition to these required icons, you can specify other optional platform-specific icons, such as icons for menus and the status bar. Refer to the Android developer documentation for the latest details on these at http://developer.android.com.
When you create an iPhone or Android project using PhoneGap, default versions of these required icons are created for you. The minimum work necessary to publish your app is to replace the default .png files in the project with your own.
Splash Screen
Your app will also require a splash screen. This is a static full-screen image that is displayed while your app is loading. It can be tempting to use the splash screen for promotional content, but a more user-focused approach, and the one recommend by Apple, is to display an “empty” version of your app’s main page.
When you do this, your app will appear to load more quickly, because the main page will present itself to the user without delay and then appear to update as the app finishes loading. You can see this behavior when you start the built-in native apps on the iPhone.
The default iPhone splash screen provided by PhoneGap is located at Resources/splash/Default.png, and is a 320 x 480 pixel image. You can produce your own splash screen image very easily by simply starting a clean install of your app that has no data, and taking a screen capture. Press the Home button and the Sleep/Wake button at the same time, and a screen capture of the current screen will be saved to the photo album on your iPhone.
For the Retina display on the iPhone 4, you’ll need a 640 x 960 pixel image for the splash screen. Either capture this directly as a screen capture if you have an iPhone 4, or take a screenshot on your Mac using the iPhone simulator application. The Retina version should, as usual, be saved with the name [email protected].
If your app starts in a landscape, rather than a portrait orientation, you can provide a splash screen for this case by naming your file Default-Landscape.png.
Android apps do not normally have splash screens. Instead you are launched directly into the app interface. If you really need one, it is possible to write custom Java code to simulate a splash screen, and you can find some examples on the PhoneGap forums at www.phonegap.com/community.
Screenshots and Orientations
When you submit your app to the Apple App Store and the Android Marketplace, you’ll need to provide screenshots as part of the upload. These screenshots will be displayed on the details page for your app, and are an opportunity to present your app in its best light.
Your screenshots should of course match the primary orientation that your app is designed for. If your app can support multiple orientations, you should provide screenshots demonstrating that.
You screenshots should show the primary use case for your app. They should tell a story. When you look at them in sequence, they should show the viewer how your app is used and how it can benefit them. Far more people will simply review your screenshots than read your app description text, so they are vital elements in your marketing.
Capturing screenshots on your iPhone is easy. Create the view that you want, and then hold the Home button and Wait/Sleep button at the same time, as noted earlier. If you do not have access to an iPhone 4, you can create retina screenshots using the desktop simulator application that came with Xcode. Open your app in the simulator and grab a rough version that is slightly too large using the Cmd+Shift+4 key combination on your Mac. Then edit the screen capture (which is saved to your desktop as a .png file) using an image editor, cropping it down to the correct size (640 x 960 pixels).
![]()
NOTE If you don’t have access to Photoshop for working with images on your Mac, you can download the free SeaShore image editor from http://seashore.sourceforge.net. This image editor is quite adequate for simple jobs like cropping and resizing. On Windows, try Paint.NET available from http://getpaint.net. It is also free, and very easy to use. On Linux, your best bet is GIMP, from http://www.gimp.org, although beware: this application is almost as complex as Photoshop.
On Android, you can hold the Back key and then also press the Home key after a few seconds to grab a screen capture in much the same way as on the iPhone. The capture will be saved to your photo gallery. However, this feature does depend on the version of Android that you have, and produces images corresponding to the screen size of your device.
For greater flexibility, you can use the Android emulator instead to generate screenshots. This gives you greater control and enables you to generate screenshots for different device sizes. Capture and crop the images using an image editor.
When you are preparing your app for publication, you will need to specify the device orientations that it supports. You do this using the Xcode and Eclipse development environments.
To specify the device orientations that you support for your iPhone app, click your app target (under the TARGETS heading on the left of the main Xcode interface), and then click the Summary tab. You can then visually select the supported orientations by clicking the icons for each one.
For your Android app, you can set the supported orientation by opening the AndroidManifest.xml file in Eclipse. Open the Application tab of the manifest editor window, and select the top-level node from the Application Nodes tree on the bottom right. A property editor form appears on the right, containing a Screen Orientation property that you can set.
App Metadata
When you submit your app to the app stores, you’ll be asked for various metadata items. You’ll need to determine your answers in advance, before you go online and start filling out the forms. A little bit of preparation, especially if you are building an app for a client, will go a long way. Here’s what you’ll need:
- A short textual description: This should encourage users to download and install your app. Focus on the benefits of your app to the user, rather than simply describing features.
- Categories: You can choose up to two app store categories for your app. Choose wisely. Review the categories in the app store to see where you fit best.
- Keywords: These are relevant for search results.
- Supporting websites: Do you have a website for your app? See Chapter 14 for some ideas.
- Promotional graphics and videos: If you are lucky enough to get selected for premium positioning, you’ll need these.
- Change log: A description of changes if you a releasing a newer version of an existing app.
- Content rating: The app store tightly controls apps that contain mature content.
- Market geography: The countries that your app should be available in.
To give your app the best chance for success, and to take maximum advantage of the short launch window when your app appears near the top of the recent releases list, you should take some time to develop these items of metadata.
Working with the App Stores
Unlike mobile web apps, which you can deliver from any web server, apps that are downloaded from the app stores must first be successfully submitted and listed on those app stores. This process is more challenging for iPhone apps, because your app has to pass automated and manual reviews by Apple.
For both app stores you will need to digitally sign your apps. Again, though doing so is more onerous with Apple, you still need to follow essentially the same technical process with Android.
If you are releasing a free app, your life will be much easier. The only significant warranty that you have to provide is that your app complies with U.S. export regulations with respect to cryptography. If your app does use cryptography, you’ll need a source of deeper legal and technical knowledge and advice than this author can provide.
If you are releasing a paid app, things can also get interesting. The app stores are continuing to experiment with new business models, and now offer not only one-time app purchases and in-app purchases of digital content, but also regular subscription services. The standard commission for these payment services is 30 percent, in both the Apple App Store and the Android Marketplace. That means that if you sell an app for $10, you will only see $7.
That’s the large print. There’s also a significant amount of small print, and that small print changes frequently. You will need to make sure that you are happy with the full developer agreements required by the app stores.
Payment terms are typically on a 30-day monthly cycle, so you should factor that into your budgeting. You’ll also need to take into account tax issues. You will of course need to pay tax on sales of your app — this is regular income. If you are based outside the U.S., you’ll need to submit the appropriate tax forms to the U.S. tax authorities. There may also be sales tax issues depending on your location. In order to sell Android apps, you’ll need to sign up for a Google Checkout merchant account, because Android purchases are processed via Google Checkout.
Consider carefully the implications of selling apps directly via the app stores. You may find it easier to produce revenue via in-app advertising rather than direct sales, and you may also find your tax and accounting situation is easier to deal with.
To register with the Android Marketplace, visit http://developer.android.com, and click the Publish link on the right menu. You can submit your apps directly to the Android Marketplace, and you do not have to wait for a manual review to have them listed. The next section takes you through the steps required to build your app for release and upload it to the marketplace.
To submit your app to the Apple App Store, you will need to set up an iTunes Connect account, at http://itunesconnect.apple.com. This is the portal provided by Apple for content producers, including app developers. The next section takes you through the steps required to get your iPhone app built and released.
The iPhone App Store is more difficult to get into than the Android Marketplace. Apple has a strict review process that includes both automated and manual steps. Typically you will submit your app for review and wait for about two weeks to get approval. Or not. Your app can be rejected, and you will then have to make suitable changes before resubmitting. Be careful here. If you are building an app for a client, you need to make it very clear that you cannot provide any guarantees with regard to this part of the process. Set this expectation from the beginning.
Apple maintains a set of terms and conditions, known as the iOS Developer Agreement, that defines the rules for iPhone apps. These rules include restrictions on access to internal iPhone APIs, “beta” quality apps, trademark infringements, and so on. The documentation on http://developer.apple.com explains the full list. If you develop iPhone apps, you will need to stay up-to-date with these rules. Apple enforces them quite strictly.
Now it is time to submit your app to the app stores — to “go live.” Before you do this, you will need to make sure that you have done final testing, fixed all the bugs you know about, are happy with performance and usability, and have tested on as many physical devices as you have access to. Only once you are happy that you can deliver an application binary of sufficient quality should you proceed to the publishing stage.
To publish your app, you will need to digitally sign it with a distribution certificate. For Android, you can create your own, self-signed, certificate. For iPhone, you’ll need to obtain a distribution certificate, in much the same way as you obtain a developer certificate. The following examples will take you through this process.
Let’s publish your app!
TRY IT OUT: Submitting an iPhone Binary
The basic set of steps you need to perform for publishing an iPhone app are as follows:
1. Register your app.
2. Obtain a distribution certificate.
3. Create a distribution build.
4. Upload and wait for a review.
This example works through these steps in detail. As noted at the start of this chapter, these steps assume you are using Xcode version 4.
1. Register with http://itunesconnect.apple.com.
2. Log in to the iTunes Connect site and click the Manage Your Applications link.
3. You’ll see an empty dashboard because you don’t have any apps yet. Click the Add New App button at the top.
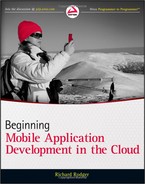
4. You’ll see the first page of details that you need to fill out for your app. An example is shown in Figure 13-1.
5. Enter the name of your app (which must be unique), a SKU number (just choose a unique code if your company or client does not use SKU numbers), and the Bundle ID corresponding to your distribution certificate. If you are using a wildcard certificate (these end with the character *), you will also need to supply a unique suffix (as shown in Figure 13-1). When you are ready, click the Continue button.
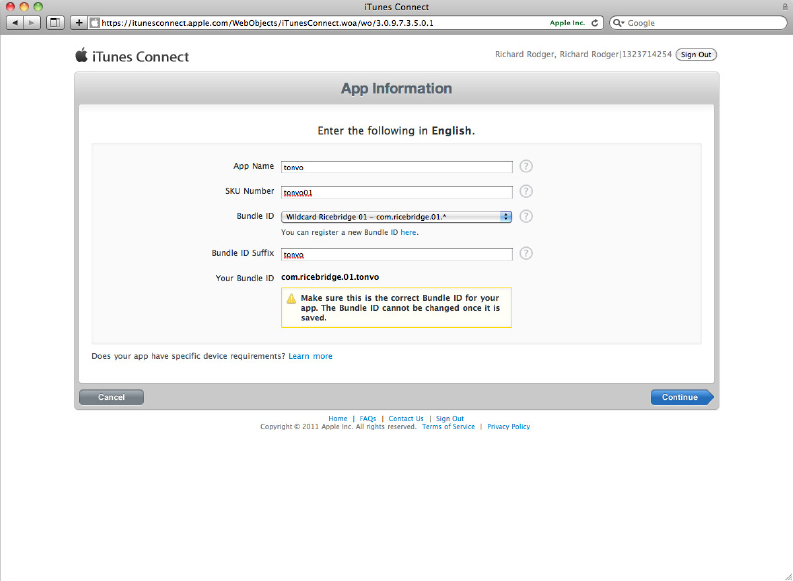
6. You can now set your app pricing and availability date, as shown in Figure 13-2. You cannot set the price directly, but instead have to choose a pricing tier. Click the Continue button.
7. The next page is a long form where you enter all the metadata for your app. Because you’ve prepared this in advance (right?), just fill in the details. You’ll also upload your screenshots and the iTunesArtwork icon file here. Figure 13-3 shows the bottom of this page with the screenshots of the tonvo app from Chapter 12 as an example. Click Continue once you are done.

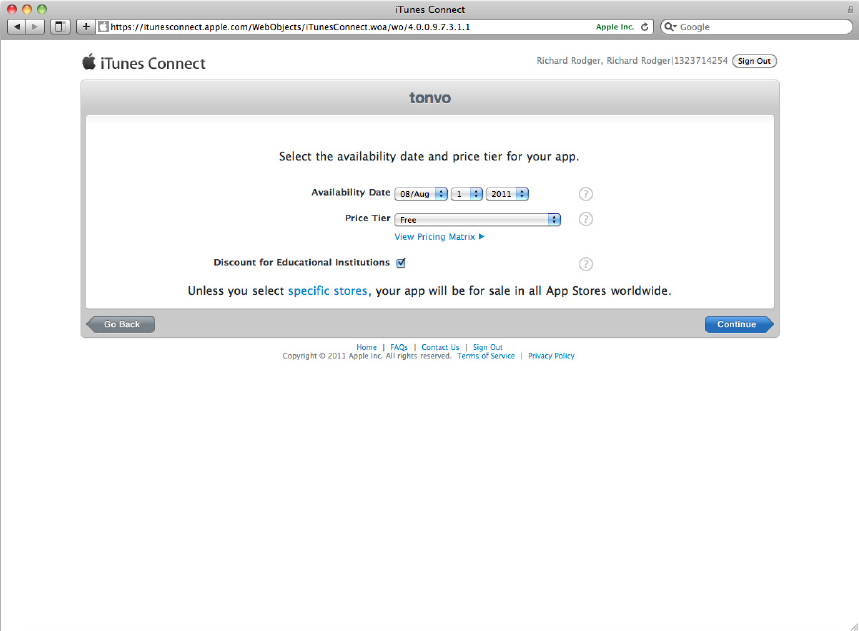
8. You are presented with a summary page for your app, showing its current status as “Prepare for Upload.” Click the Ready to Upload Binary button at the bottom. You are asked if your app uses cryptography. Click No if this does not apply to you. You are then taken back to the summary page, which appears as shown in Figure 13-4. You are now ready to build and upload the distribution binary version of your app!
![]()
WARNING If you forget to click the Ready to Upload Binary button, you will not be able to upload your app. This can be very confusing, because all the app details, such as the name and version, will be correct, but the Xcode uploader will still disclaim any knowledge of your app!
9. Log in to http://developer.apple.com and click the iOS Provisioning Portal link.
10. Click the Distribution tab on the left, and then the Prepare App sub tab at the top. Follow the detailed instructions provided by Apple to obtain a distribution certificate. The procedure is much the same as for development certificates, discussed in Chapter 9.
11. Create, download, and install a Distribution Provisioning Profile using the iOS Provisioning Portal. This enables your Xcode to create distribution builds. The process is again similar to creating, downloading, and installing a Developer Provisioning Profile (see Chapter 9).
12. Open your app project in Xcode, click your app target, and click the Info tab. Make sure that you have the correct settings for your Bundle Identifier and Bundle version (which should be a set of numbers in the format X.Y.Z). The Bundle Identifier should correspond to your distribution certificate, either fully, or as a wildcard prefix.
13. In Xcode, select the Product / Archive menu option. This triggers a build using your distribution certificate. If the build is successful, the Organizer window opens, showing the Archives tab, as shown in Figure 13-5.
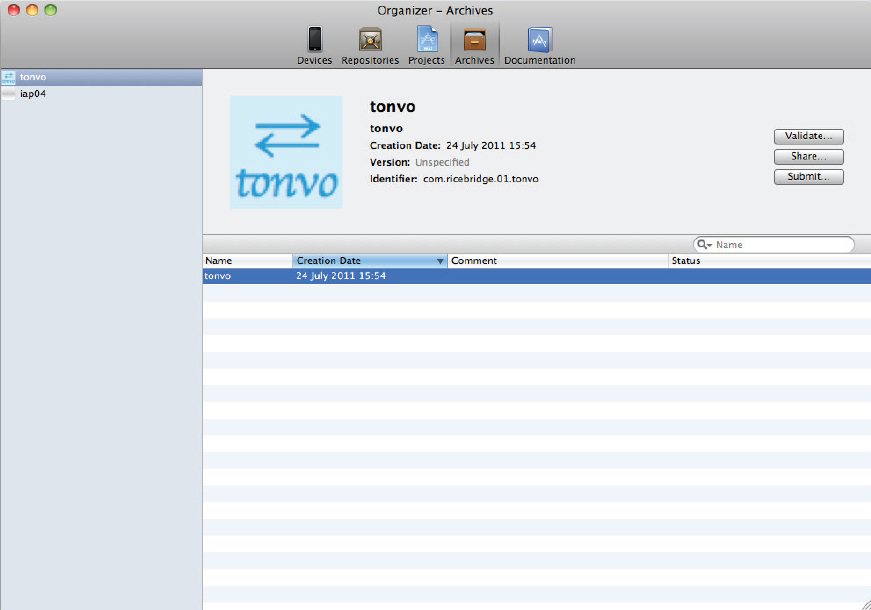
![]()
NOTE Xcode automatically archives your production builds to ~/Library/Xcode/Archives. You may want to create an independent backup of these binaries.
14. On the Archives tab of the Organizer window, click the Validate button.
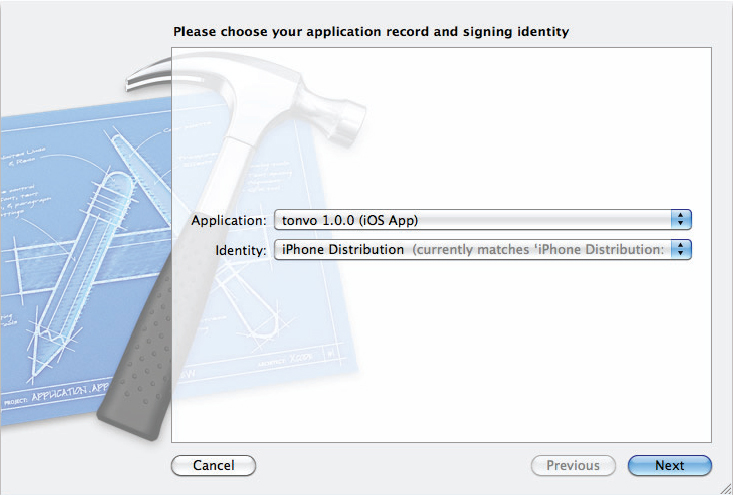
15. You are asked to log in to your iTunes Connect account from within Xcode. Enter your username and password in the dialog window that appears.
16. You are then asked to confirm your app registration details. A dialog window, shown in Figure 13-6, lists your app name and version number, and the signing identity for your distribution certificate. Click Next if everything is correct.
17. The validation process then runs, and your app is checked against various Apple criteria in an automated manner. An error message appears if there are any problems, which you must resolve before validation will pass.
18. If validation passes, you can now submit your app. Click the Submit button on the Organizer / Archives tab. You are presented with the same dialog sequence as for validation. If there are no errors, your app is uploaded to Apple’s servers.
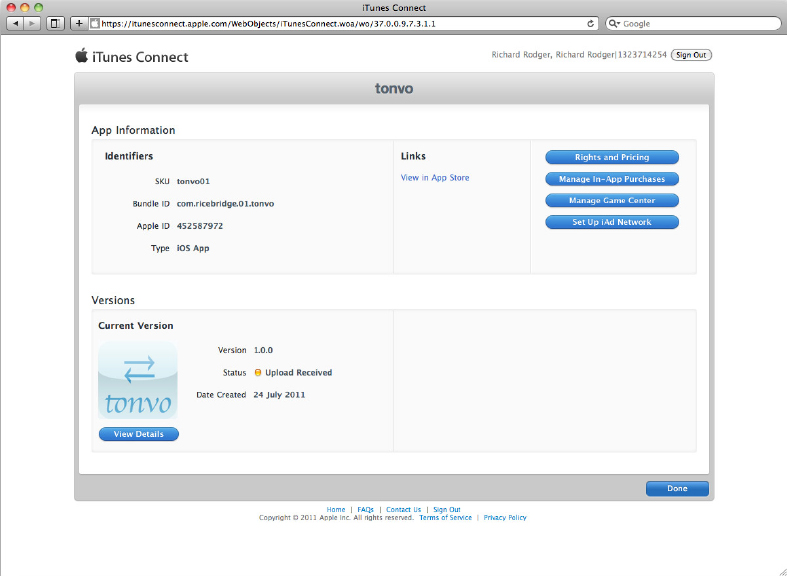
19. Return to the iTunes Connect website. Open the details page for your app. You can now see that the app status has changed to “Upload Received,” as shown in Figure 13-7.
20. Within 24 hours, the status of your app will change to “Waiting For Review.” Once your app passes the review, it will go live on to the App Store!
How It Works
You need to have an Apple developer account to use the iTunes Connect site and the iOS Provisioning Portal. If you are building your own apps, you will use your own account. If you are building an app for a client, you will need an account that your client owns. It is not a good idea to maintain client apps from your own account, unless you have a long-term maintenance contract with them.
When you have multiple clients, you will end up with multiple accounts, certificates, and provisioning profiles. Be extremely careful in your management of these files. Make sure you back them up securely. Write down all your passwords (on paper), and keep them safe. When you import certificates and profiles into Xcode, make sure to use the Notes field to keep track of important details about the certificate.
As matter of professional practice you should also ensure that your clients have a copy of their certificates. This will make the transition to a new developer (this can happen for many reasons) much easier for everybody.
When you create your distribution certificate and provisioning profile, it is a good idea to use a wildcard identifier. This means you can use the same certificate and profile for multiple apps, changing only the app suffix. This reduces the amount of work you have to do to keep track of certificates.
Apple requires you to provide a version number for your app. This is also required by the Android Marketplace. The convention is to use a string in the format X.Y.Z where X, Y, and Z are integers, typically standing for major, minor, and patch release numbers.
The availability date is the date on which your app will be made available in the app store. You’ll mostly want to set this to be as soon as possible, so that the only delay will come from the review process. However, on some occasions you will want to delay the release to coordinate with external events, and you can use the availability date to do this.
If you have built a paid app, you will not be able to set the price directly. Instead, Apple provides a fixed set of pricing tiers. These correspond to set prices in various currencies. A link to the current table of tiers and prices is available as part of the app registration process.
App pricing is very elastic, meaning that lower prices will lead to higher sales volumes, and higher prices will lead to lower sales volumes. You may need to experiment to find the sweet spot that delivers maximum revenue. There is one other thing to take into account: the higher the price, the more scrutiny you will face as part of the review process. If you intend to set a high price for your app, be prepared to deliver a higher quality app as well.
TRY IT OUT: Submitting an Android Binary
To publish an Android app, you need to complete these basic steps:
1. Create a signed version.
2. Upload to the Android Marketplace.
3. Provide your app details.
As you can see, the process is slightly less complex than for iPhone apps. On the other hand, you need to pay far more attention to the range of devices you support, due to the wide variety of Android versions.
1. Open your app project in Eclipse, and open the AndroidManifest.xml file.
2. Select the Manifest tab in the Manifest editor window, and enter a unique package name for your app. Use the Java reverse-domain name convention: com.example.appname. Set the version name to a string in the format X.Y.Z. Set the version code to be an integer value. Start with 1. An example of these settings for the tonvo app from Chapter 12 is shown in Figure 13-8.

3. Also on the Manifest tab, specify the screen sizes that you support by using the drop-down menu items on the bottom right.
4. Select the Application tab, and set the Debuggable property (which appears in the list on the right) to false.
5. Select the Permissions tab. Remove all the permissions your app does not need.
6. Right-click the name of your project in the tree-view on the left, and select the Android Tools / Export Signed Application Package option. An export wizard window appears, as shown in Figure 13-9.
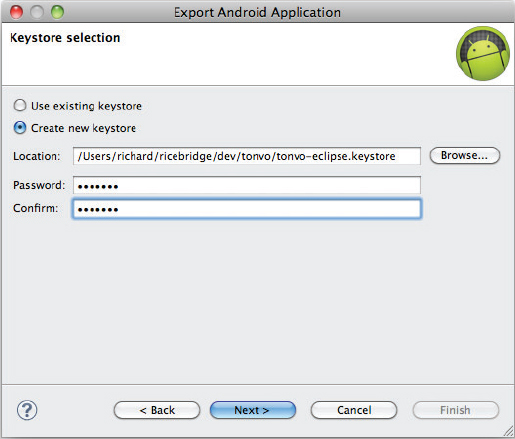
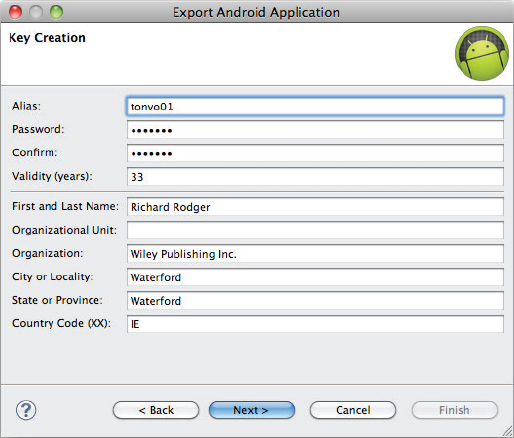
7. Select the Create New Keystore option. Enter a file location for the keystore file. In Figure 13-9, a location at the top level of the project was chosen. Enter a password for the keystore file. Click Next.
![]()
NOTE Write down your keystore passwords, on paper. Do it right now. If you are building many different apps for many different clients, you do not want to lose any passwords. I use one of those trendy Moleskine address books. They work very well because the pages are alphabetized: http://www.moleskine.com.
8. Now you need to enter your self-signed certificate details. You should aim to be as accurate as possible. A validity period lasting beyond 2033 is required, and a period of least 25 years is recommended. An example for the tonvo app is shown in Figure 13-10.
9. A signed binary package for your app is now generated. Save this file, which has an .apk extension, to a safe place. As with the iPhone, you should back up the binaries that you submit.
10. Go to http://market.android.com/publish and register a developer account. You will need to pay a one-time fee of $25.
11. Once you have registered, you can log in, and you are presented with an empty dashboard, because you have no apps. Click the Upload Application button.
12. You are presented with a simple dialog window, as shown in Figure 13-11. Select your .apk file and upload it.

13. Once your app has uploaded, click the Product Details tab. A long form appears, where you can enter your app metadata (which you have prepared already!). As with the iTunes Connect site, you can upload an icon and a set of screenshots. When you are done, click the Save button.
14. To publish your app, live, to the Android Marketplace, simply click the Publish button! It may take some time for your app to appear in the search results, but you can visit your listing page right way by entering a URL in the following format, replacing com.package.name (highlighted), with the package name of your app:
http://market.android.com/details?id=com.package.name
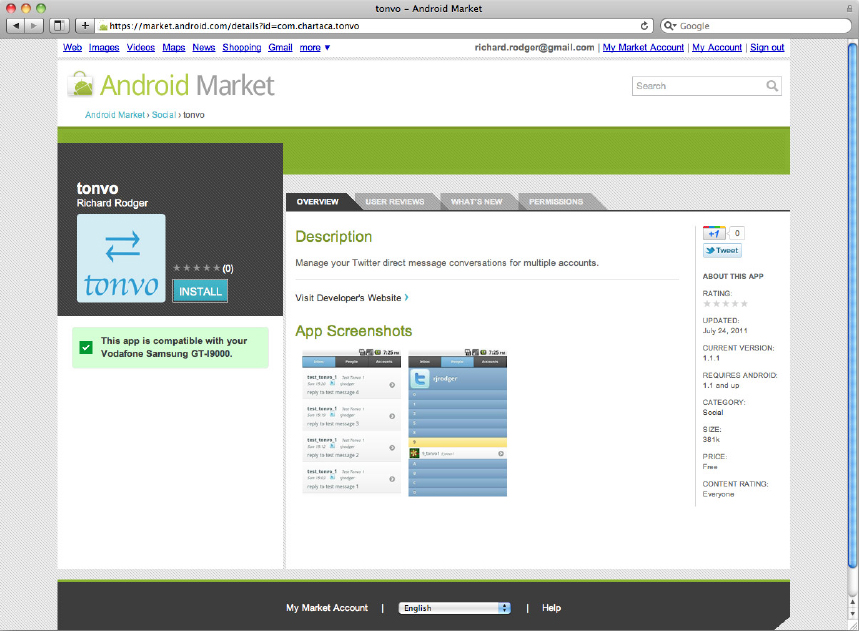
15. Your app listing page appears, looking something like Figure 13-12.
How It Works
Publishing your Android app is an easy and immediate experience, in contrast to the awkward wait to have your iPhone app reviewed by Apple. On the other hand, the challenge with Android is to produce an app that works on as many devices as possible.
There is no substitute for on-device testing, and you will need to try to get your hands on as many physical Android phones as possible to test. If you are limited in the number of devices that you can get physical access to, your next best option is to use an online testing service, such as http://deviceanywhere.com. This service is relatively expensive because it charges by the minute. You will probably want to pass on this cost to your client, so make it part of your contract from the start.
As important as supporting a wide range of devices is preventing installation on devices where your app will not work. There is no quicker way to get bad reviews than to make your app available to devices that it simply cannot work on. Be careful to set the device parameters tight enough to prevent this. Choose the right API level when you start your Android project, and decide on the screen sizes that you will support in advance.
For your Android app, you need to supply two version numbers: a version name and a version code. The version name should be a string in the X.Y.Z format. The version code is an integer value that you have to increase each time you release a new version. It is essentially just a counter.
Because the Android Marketplace does not review apps, the burden is placed on the user to decide if an app is suitable. This means that a fine-grained set of permissions are required for each app to perform the tasks that it needs. For example, you need the android.permission.INTERNET permission to make outbound HTTP calls from your app. Choose the minimum set of permissions required. There is no need to request permissions that you do not need; for example, for access to the camera. The PhoneGap Android template includes all permissions by default, so make sure to delete unnecessary permissions from the manifest before publishing your app.
This chapter took you through the process of preparing, submitting, and publishing your app on the iPhone App Store and the Android Marketplace.
In the next chapter, you move forward to the challenge of getting users to download, install, and use your app!
• WHAT YOU HAVE LEARNED IN THIS CHAPTER
| TOPIC | KEY CONCEPTS |
| Launch Icon | This icon is the first point of reference for your app that the user interacts with on a daily basis. This icon is placed on the home screen of the device, and launches your app when touched. You will need to provide multiple versions to satisfy different screen sizes and resolutions. |
| Splash screen | A static image shown while your app is loading. The best practice is not to use this for promotional content, but rather to enhance the user’s perception of the performance of the app by presenting an empty initial page, which then appears to be filled in once the app proper starts. |
| App Stores | To install your app in their devices, users will visit the Apple App Store or Android Marketplace. Although other services exist to install apps, particularly those that have been “jail-broken” to circumvent built-in security restrictions, these two main app stores are by far the most important when listing your app. Each app store has its own set of guidelines and terms and conditions, and these do change on a regular basis. You will need to familiarize yourself with the official documentation provided by the app stores. |
| Distribution Signing | To publish your app, you need to digitally sign the binary file so that it can be accepted by the app stores. This requirement ensures that the developer of an app can be identified, and also ensures that the integrity of the app code is protected. This prevents malicious behavior. The requirement to digitally sign your app does introduce an added layer of complication when building and publishing your app, and you should make sure you have set aside time to complete the process in your project schedule. |