
Chapter 7
Enhancing the User Experience
WHAT YOU WILL LEARN IN THIS CHAPTER:
- Building a tab bar–style app
- Using the built-in jQuery Mobile scrolling feature
- Using the iScroll library for near-native content scrolling
- Playing audio files in your app
- Playing video files in your app
- Launching other apps from your app
In this chapter, you’ll learn how to provide an improved user experience by making your app look and feel like native apps. You’ll also learn how to play multimedia content and how to interact with other apps on the device.
By building your app using HTML5, you get to reach the widest audience possible because your app is cross-platform out of the box. The challenge is to avoid giving your app a lowest-common-denominator interface that is obviously implemented using HTML. This chapter looks at a few techniques you can use to avoid this.
CREATING A CLASSIC TAB BAR INTERFACE
Mobile web apps built using HTML5 are usually productivity-style apps. If you go to the iPhone App Store or the Android Marketplace and take a look at the apps in the productivity category, you’ll notice that many of them have a tab bar at the bottom. This layout style presents a row of tabs at the bottom of the screen. Tapping a tab opens a new page of the app. Each tab corresponds to a logical grouping of app features. Most apps have between four and six tabs.
This layout style is so common that the native code libraries provide preconfigured classes that make it easy for developers to build tab bars. You can do this in HTML. But it’s not as simple as just positioning a tab bar at the bottom of the screen. You also need to solve a tricky problem: scrolling the content above the tab bar. The user needs to be able to scroll this content in the same way as in any native app. With a one-finger touch, a user should be able to flick the content up and down at high speed and see it “rubber-band” at the start and end of the scroll.
Generally, in a mobile web app, scrolling applies to the whole app, not just your content element. But you don’t want a user to be able to scroll your entire interface, including the tab bar! You want the tab bar to say in place and the rest of the app to scroll. The To Do List app in the previous chapters side-stepped this problem by having no tab bar at the bottom. But this is not an option if your client wants one.
In a non-mobile context, the way that you make the content of an HTML element scrollable is by adding the CSS style overflow:scroll. If you do this in a mobile context, you will make the content scrollable, but only with two fingers. This is still not what you want.
There are two solutions. One is the jQuery Mobile solution, which involves making the tab bar fade out while the user is scrolling and making it fade it back in when the scrolling is done. This solution has the advantage of using the mobile browser’s built-in page scrolling, which is always going to be fast. The disadvantage is that this is not the same as native scrolling behavior. It is an acceptable solution for a mobile web app that will remain in a browser window. For full-screen mobile web apps, however, you need another solution. This is where the iScroll library comes into play. The iScroll library is a custom JavaScript library for mobile scrolling that intercepts touch events over a given element and uses those events to control the scrolling of the element. The scrolling effect is carefully tuned using hardware-accelerated CSS3 transitions to closely replicate the feel of native scrolling. The iScroll library is not quite as fast as native scrolling, but it does work very well for small- to medium-sized scrolling lists.
In the following sections, you’ll see how to implement both of these solutions.
Implementing the jQuery Mobile Solution
The scrolling effect is built into the jQuery Mobile library and is thus very easy to use. By setting custom properties on the jQuery Mobile elements, you can control which elements remain in place when the user scrolls the page. In the following example, you’ll create a small demonstration app to learn how to achieve the effects described in this and the remaining code examples in this chapter. The tab bar you create here will have pages that correspond to the other code examples in this chapter.
TRY IT OUT: Scrolling with jQuery Mobile
You can use the code in this example as a template for your own tab bar–style apps. Here’s what you do:
1. Create a new folder called enhanced. Copy the jquery.js, jquery.mobile.js, and jquery.mobile.css files as well as the jQuery Mobile images folder into the enhanced folder.
2. Open your nginx.conf file in your nginx installation folder and add the following lines to the server section:
location /enhanced/ {
  alias /path/to/your/enhanced/;
}
code snippet nginx.conf.additions.txt
3. Reload the nginx configuration file with this command:
sudo nginx -s reload
4. Create a file called scroll-jqm.css and insert the following code in it:
#main, #footer {
  padding: 0px;
}
div.content {
  display:none;
}
code snippet scroll-jqm.css
5. Create a file called scroll-jqm.html and insert the following code in it:
<!DOCTYPE html>
<html>
<head>
  <title>Enhanced App</title>
  <meta name="viewport"
    content="user-scalable=no,initial-scale=1.0,maximum-scale=1.0" />
  <meta name="apple-mobile-web-app-capable" content="yes" />

  <link rel="stylesheet" href="jquery.mobile.css" />
  <link rel="stylesheet" href="scroll-jqm.css" />

  <script src="jquery.js"></script>
  <script src="jquery.mobile.js"></script>
  <script src="scroll-jqm.js"></script>
</head>
<body>

<div id="main" data-role="page">

  <div data-role="header" data-position="fixed">
    <h1>Enhanced App</h1>
  </div>

  <div data-role="content">
    <div id="content_scroll" class="content">
      <ul data-role="listview">

        <li>a</li><li>b</li><li>c</li><li>d</li>
        <li>e</li><li>f</li><li>g</li><li>h</li>
        <li>i</li><li>j</li><li>k</li><li>l</li>
        <li>m</li><li>n</li><li>o</li><li>p</li>
        <li>q</li><li>r</li><li>s</li><li>t</li>
        <li>u</li><li>v</li><li>w</li><li>x</li>
        <li>y</li><li>z</li>

        <li>A</li><li>B</li><li>C</li><li>D</li>
        <li>E</li><li>F</li><li>G</li><li>H</li>
        <li>I</li><li>J</li><li>K</li><li>L</li>
        <li>M</li><li>N</li><li>O</li><li>P</li>
        <li>Q</li><li>R</li><li>S</li><li>T</li>
        <li>U</li><li>V</li><li>W</li><li>X</li>
        <li>Y</li><li>Z</li>

      </ul>
    </div>

    <div id="content_audio" class="content">
      <p>audio example</p>
    </div>

    <div id="content_video" class="content">
      <p>video example</p>
    </div>

    <div id="content_launch" class="content">
      <p>launch example</p>
    </div>

  </div>

  <div id="footer" data-role="footer" class="ui-bar" data-position="fixed">
    <div data-role="navbar" class="ui-navbar">
      <ul class="ui-grid-b">
        <li class="ui-block-b">
          <a id="tab_scroll"
             href="javascript:void(0)">scroll</a></li>
        <li class="ui-block-c">
          <a id="tab_audio"
             href="javascript:void(0)">audio</a></li>
        <li class="ui-block-d">
          <a id="tab_video"
             href="javascript:void(0)">video</a></li>
        <li class="ui-block-e">
          <a id="tab_launch"
             href="javascript:void(0)">launch</a></li>
      </ul>
    </div>
  </div>

</div>

</body>
</html>
code snippet scroll-jqm.html
6. Create a file called scroll-jqm.js and insert the following code in it:
$(function(){

  function handletab(tabname) {
    return function(){
      $("div.content").hide()
      $("#content_"+tabname).show()
    }
  }

  $("#tab_scroll").tap(handletab('scroll')).tap()
  $("#tab_audio").tap(handletab('audio'))
  $("#tab_video").tap(handletab('video'))
  $("#tab_launch").tap(handletab('launch'))
})
code snippet scroll-jqm.js
7. Open the application by visiting http://YOUR_IP_ADDRESS/enhanced/scroll-jqm.html in your mobile browser.
8. To install the example as a mobile web app, perform the home screen installation procedure described in Chapter 3.
9. Verify that you can scroll the list of items on the first page and that the header and tab bar fade in and out when you stop and start scrolling, as shown in Figure 7-1.

10. Verify that the tab bars function correctly. Tapping on each tab should show the content for that tab.
How It Works
The code in this example follows the basic HTML mobile template you have been using for all the examples in this book.
This example uses a single jQuery Mobile page (div id="main") to display the full user interface of the app. You don’t use separate pages as that would require cutting and pasting the header and footer content for each page.
The scrolling behavior is very simple to activate. You simply add the data-position="fixed" attribute to the header and footer. Now, whenever you scroll the page, these elements reposition themselves so that they always appear at the top and bottom of the page. Because it would be impossible to match the speed of the page scrolling, the elements are faded out while the scroll animates, and they’re faded back in when it is finished.
Tapping on a tab causes the content for that tab to appear. You enable this functionality manually, by attaching a tap event handler to each tab. The event handler is built dynamically using a generator function:
  function handletab(tabname) {
    return function(){
      $("div.content").hide()
      $("#content_"+tabname).show()
    }
  }
The generator function takes the name of the tab, dynamically creates a tap function just for that tab, and returns the new dynamically created function (shown boldfaced here). This returned function (not the handletab function itself!) is then attached to the tab. Dynamic function generation prevents you from having to work out the ID of the tapped element by using the event object. You’ll see more examples of dynamic function generation in later chapters. It’s a feature of the JavaScript language that you can often use to your advantage.
The tap handler itself is very simple. It just hides all content and then shows the content for the tapped tab.
This tab bar solution is best used when you have a mobile website with an app-like interface. In the next section, you’ll learn about a better solution for mobile web apps that need a more native feel.
![]()
NOTE jQuery Mobile supports automated page transitions, which can make writing your own tap event handlers unnecessary. However, the jQuery Mobile page transition feature is more suitable for mobile web sites that have multiple physical pages, and it is not as useful for single page sites that are really app interfaces.
Using the iScroll Solution
To give a more native feel to content scrolling, you need to use a supporting JavaScript library. Several of them are available. The one you’ll use here is called iScroll, and it is available at http://cubiq.org/iscroll-4. You should download this library now because you will need it for this example.
iScroll works by tracking finger movements over the content to be scrolled. The library listens for touch events and converts them into scroll actions that mimic the native scrolling behavior. The library is very well implemented and re-creates the feel of native scrolling quite effectively. It even enables the flick effect, where a user can scroll faster by flicking a finger over the content. It also enables the “rubber band” effect, which allows the user to temporarily scroll the content above or below its natural limit and have the content bounce back as soon as he or she lets go.
How does a JavaScript library manage to get near-native performance? By using CSS3 animation properties such as -webkit-translate3d. You learned about these CSS3 properties in Chapter 4. This 3-D translation property is hardware accelerated, which means it delivers near-native performance. The iScroll library looks after the math and works out the correct transitions for you.
The iScroll library requires you to include some extra markup in your HTML. Because of the way the library is implemented and because the library needs to know the exact size of the scrollable area, you need to provide an additional div that wraps your content. You always use the following pattern:
<div class="wrapper">
  <div class="scroller">
    <p> your content that scrolls </p>
  </div>
</div>
You must also give the wrapper element an exact height value. This is important. Without an exact height, iScroll will fail to function properly.
Inside the wrapper, the first element becomes the one that will be scrollable. In the above example code, this first element is the div with class=”scroller”, shown in the boldfaced text.
TRY IT OUT: Scrolling with iScroll
In this example, you’ll upgrade the previous example to use the iScroll library. You already have nginx set up, so you can just create a new set of files with the new functionality. Follow these steps:
1. Copy the iscroll.js file from your download of the iScroll library into the enhanced folder.
2. Create a file called scroll-is.css and insert the following code in it:
div {
  padding: 0px !important;
}

ul, p {
  margin: 0px !important;
}

div.content {
  display: none;
}
code snippet scroll-is.css
3. Copy the scroll-jqm.html file and save it as scroll-is.html. In the new file, as shown in the following boldfaced code, replace the references to scroll-jqm.css and scroll-jqm.js with scroll-is.css and scroll-is.js, respectively. Insert a script statement to load the iscroll.js file:
...
  <link rel="stylesheet" href="jquery.mobile.css" />
  <link rel="stylesheet" href="scroll-is.css" />

  <script src="jquery.js"></script>
  <script src="jquery.mobile.js"></script>
  <script src="iscroll.js"></script>
  <script src="scroll-is.js"></script>
</head>
<body>
...
code snippet scroll-is.css
4. Create a file called scroll-is.js and insert the following code in it:
document.ontouchmove = function(e){ e.preventDefault(); }

$(function(){

  var current = 'scroll'
  var scrollers = {}

  var header  = $("#header")
  var footer  = $("#footer")

  header.css({zIndex:1000})
  footer.css({zIndex:1000})

  function handletab(tabname) {
    return function(){
      $("#content_"+current).hide()
      current = tabname
      $("#content_"+tabname).show()
      refresh()
    }
  }

  $("#tab_scroll").tap(handletab('scroll')).tap()
  $("#tab_audio").tap(handletab('audio'))
  $("#tab_video").tap(handletab('video'))
  $("#tab_launch").tap(handletab('launch'))


  function refresh() {
    var content = $("#content_"+current)
    if( !scrollers[current] ) {
      scrollers[current] = new iScroll("content_"+current,{hscroll:false})
    }

    content.height(
      $('body').height() - header.height() - footer.height() - 4
    )
    scrollers[current].refresh()
  }

  window.onresize = function() {
    refresh()
  }
}
code snippet scroll-is.js
5. Open the application by visiting http://YOUR_IP_ADDRESS/enhanced/scroll-is.html in your mobile browser.
6. Install the app onto your home screen as a mobile web app to get the full effect.
7. Verify that you can scroll the list of items on the first page and that the header and tab bar remain in place when you scroll. Also ensure that you can perform native scrolling actions such as flicking and rubber-banding, as shown in Figure 7-2.

![]()
WARNING The iScroll library is designed to provide scrolling for touchscreen devices. When you review or debug your app using a desktop browser and a mouse, you may notice inconsistent scrolling behavior.
How It Works
In this example, you use JavaScript to set up the user interface so that it has the characteristics of a native app. Because you will be handling content scrolling yourself, you need to prevent the default web browser scrolling behavior of scrolling the entire page. If you don’t deactivate this in the browser, your entire app will rubber-band. This line of code intercepts and disables the standard touch move event that causes scrolling:
document.ontouchmove = function(e){ e.preventDefault(); }
As an experiment, try commenting out this line, reloading the app, and seeing what happens when you press and hold one of the tabs and then move upward. Your whole app moves up! So you can see that this line prevents that from happening.
The remaining code executes when the web app HTML document has fully loaded. You use a jQuery shortcut here: $(function(){...}). This passes a function directly to the $ jQuery object. The function will be called when the document is ready. You need to use this standard jQuery code pattern to make sure that the browser has properly created and set up all the HTML elements before you modify them and attach your event listeners.
Because there are multiple tabs, you need to keep track of which one is currently being shown; you do this by using the current variable. This is not very important for this example because the other tabs have no content. But you will use this app template for the rest of the chapter, and keeping track of which tab is being shown will become more important as you build the rest of the complete tab bar app.
Each content section for each tab needs to be scrollable, so you need to create an iScroll object for each one. The scrollers variable keeps track of the iScroll objects, using the name of the tab.
In order to calculate the proper height of the content area so that you can give it to iScroll, you need to get the heights of the header bar at the top and the tab bar at the bottom. Then you add these together and subtract that number from the total body height. For now, you can just store jQuery references to these elements in the variables header and footer:
  var header  = $("#header")
  var footer  = $("#footer")
To make sure that the header and footer are always visible above anything else on the page, you set their z-index CSS property by using jQuery:
  header.css({zIndex:1000})
  footer.css({zIndex:1000})
The handletab function from the previous example needs some additional logic. You need to record the name of the tab that was just tapped and also refresh the iScroll object that controls the content for that tab. You do this by calling a refresh function; you will see the code for this shortly. This refresh enables iScroll to work again. When the user taps on a different tab and moves away from this tab, the content is hidden using CSS. Now that the user has returned to this tab, the content is made visible again, and iScroll needs to know about it. The lines to store the current tab and call the refresh function are shown boldfaced:
  function handletab(tabname) {
    return function(){
      $("#content_"+current).hide()
      current = tabname
      refresh()
      $("#content_"+tabname).show()
    }
  }
You attach the tab handlers as in the previous example, using the handletab generator function to create a new tap handler function for each tab.
The refresh function does the work of setting up the iScroll objects if they do not already exist or refreshing them if they do. This is an example of “lazy initialization,” which is a strategy for improving performance. According to this strategy, you create only the objects you need, when you need them. You don’t create them all at once when the app starts up.
The refresh function first gets the content div for the current tab. A sensible naming convention helps you here. Giving each content div an identifier in the form content_tabname makes it easy to construct the string value of the id attribute of the element you want:
  function refresh() {
    var content = $("#content_"+current)
Next, you check whether you have a scroller already. If not, you need to create one. The iScroll object constructor takes the value of the id attribute of the element that contains content to scroll, as well as a set of options. You use the hscroll:false option to disable horizontal scrolling because you only want vertical scrolling:
    if( !scrollers[current] ) {
      scrollers[current] = new iScroll("content_"+current,{hscroll:false})
    }
The iScroll website provides an up-to-date list of the available configuration options that you can specify in the second parameter.
Once you have your iScroll object, you can proceed with the refresh. You recalculate the height of the content section each time because the device orientation may have changed. To get the height of the content section, you subtract the height of the header and footer from the height of the body. You also need to subtract an additional 4 pixels to account for the 1-pixel borders on the header and footer divs:
    content.height(
      $('body').height() - header.height() - footer.height() - 4
    )
After you have the height set, you can refresh the scroller:
    scrollers[current].refresh()
  }
The last little piece of housekeeping is to make sure you call the refresh function when the user changes the device orientation:
  window.onresize = function() {
    refresh()
  }
The iScroll library always requires you to refresh if there are any changes to the content or the layout. If you don’t refresh, the scroll will behave incorrectly. If in doubt, refresh!
![]()
WARNING The first argument to the iScroll constructor is the identifier of the element that contains the content to scroll. This value is not a jQuery selector, so you don’t put a # in front of it. It is just the plain element identifier string. Also, if you give iScroll the identifier of the wrong element, especially the parent of the content element, you may see behavior that is almost, but not quite, right. Double-check your element identifiers!
![]()
NOTE Version 5 of the iPhone platform (known as iOS 5) introduces support for overflow:scroll. That’s the good news. Actually it gets better: Add a -webkit-overflow-scrolling: touch property to the scrollable element, and you get native speed and scrollbars! The bad news? This is iOS 5 only. You’ll still need to use something like iScroll for full cross-platform support. There can be no doubt that iScroll will be updated to hand over scrolling to the native implementation on iOS 5 devices, so it is still your best option for cross-platform, and multiple-version supporting code.
ENABLING MOBILE AUDIO AND VIDEO
It is possible to play audio and view video within your mobile web app. HTML5 provides a range of new capabilities in this area. Unfortunately, it is also an area with many challenges, both technical and legal.
In this section, you’ll learn how to get simple embedded players working, on both iPhone and Android devices. You’ll learn about simple use cases where you just need to play the content as part of your app.
Playing Audio in Your App
In theory, playing audio files in a mobile web app should be as easy as displaying an image. The new HTML5 audio tag is meant to be used in much the same way as the traditional img tag. You have a src element that you point to your media file:
<audio src="audio.mp3" controls="yes">
In practice, using the audio tag directly is not yet feasible. While the iPhone has a solid implementation, many Android phones, even up to version 2.3 of Android, do not support the audio tag correctly. Therefore, you need a workaround. You can use Flash. Or, rather, you can use a third-party library that uses Flash. Once you reach the stage where your code requires multiple hacks based on browser and device versions, it is best to delegate that logic to a component library. There are quite a few audio and video JavaScript libraries out there that can help. In this book, you’ll use the jPlayer library. This library is a jQuery plug-in, which makes life even easier.
The jPlayer library is available at www.jplayer.org. You need to download this library to complete the examples in this chapter. You also need to download the Blue Monday theme stylesheet files from the same download page.
Before you start coding, you also need to consider the file formats that you’ll need for your audio file. There are many audio file formats. Not all of them are free. Some are patented and require the payment of royalties. You will find, however, that both iPhone and Android can handle MP3 files, so this is a good format to use. If you need to convert from other formats, you might need to install a utility to do so. The open source Audacity sound-editing application is adequate for this purpose. You can download Audacity at http://audacity.sourceforge.net.
You need some sound files to run the code examples in this chapter. If you do not have any MP3 files available, you can use Audacity to create some. Or you can download some files from www.pdsounds.org, which is a library of free public domain sound files.
If you are building an app that relies heavily on audio, you need to conduct further research to determine the best audio formats and quality levels to use. The example in this book will get you started, in the sense that it will give you just enough rope to hang yourself!
In the following example, you’ll add an audio player to the audio tab section of your app. You’ll need to take care of a complication: Each tab section is hidden, shown only when the user taps on it. However, the jPlayer library requires that its player HTML tags remain visible at all times. The solution is simply to place the audio player offscreen and move it onscreen when the audio tab is displayed.
TRY IT OUT: Embedding Audio in Your App
In this example, you’ll embed audio in your app. Here’s how:
1. Copy the jquery.jplayer.js file from the jPlayer download into the enhanced folder. Also copy the Jplayer.swf file.
2. Copy the Blue Monday theme stylesheet files into the enhanced folder as well:
jplayer.blue.monday.*
3. Copy the scroll-is.html file from the preceding example and save it as scroll-audio.html.
4. Modify the scroll-audio.html file by inserting or modifying the following boldfaced lines:
...
  <link rel="stylesheet" href="jquery.mobile.css" />
  <link rel="stylesheet" href="scroll-full.css" />

  <link type="text/css" href="jplayer.blue.monday.css" rel="stylesheet" />

  <script src="jquery.js"></script>
  <script src="jquery.mobile.js"></script>
  <script src="iscroll.js"></script>
  <script src="jquery.jplayer.js"></script>

  <script src="scroll-audio.js"></script>
</head>

...
    <div id="content_audio" class="content">
      <p> </p>
    </div>
...
</div>

<div id="audio" style="position:absolute;top:9999px;overflow:hidden">
  <div id="jquery_jplayer_1" class="jp-jplayer"></div>
  <div class="jp-audio">
    <div class="jp-type-single">
      <div id="jp_interface_1" class="jp-interface">
        <ul class="jp-controls">
          <li><a href="#" class="jp-play" tabindex="1">play</a></li>
          <li><a href="#" class="jp-pause" tabindex="1">pause</a></li>
          <li><a href="#" class="jp-stop" tabindex="1">stop</a></li>
          <li><a href="#" class="jp-mute" tabindex="1">mute</a></li>
          <li><a href="#" class="jp-unmute" tabindex="1">unmute</a></li>
        </ul>
        <div class="jp-progress">
          <div class="jp-seek-bar">
            <div class="jp-play-bar"></div>
          </div>
        </div>
        <div class="jp-volume-bar">
          <div class="jp-volume-bar-value"></div>
        </div>
        <div class="jp-current-time"></div>
        <div class="jp-duration"></div>
      </div>
      <div id="jp_playlist_1" class="jp-playlist">
        <ul>
          <li>Audio</li>
        </ul>
      </div>
    </div>
  </div>
</div>

</body>
</html>
code snippet scroll-audio.html
5. Copy the scroll-is.js file from the preceding example and save it as scroll-audio.js.
6. Modify the scroll-audio.js file by inserting or modifying the following boldfaced lines:
  var audio = null

  function refresh() {
    var content = $("#content_"+current)
    if( !scrollers[current] ) {
      scrollers[current] = new iScroll("content_"+current,{hscroll:false})
    }

    if( 'audio' == current ) {
      if( !audio ) {
        $("#jquery_jplayer_1").jPlayer({
          ready: function () {
            $(this).jPlayer("setMedia", {
              mp3: "audio.mp3",
            });
          },
          swfPath:'',
          supplied: "mp3"
        });
        audio = true;
      }

      $('#audio').css({top:header.height()})
    }
    else {
      $('#audio').css({top:9999})
    }

    content.height(
      $('body').height() - header.height() - footer.height() - 4
    )
    scrollers[current].refresh()
  }
code snippet scroll-audio.js
7. Copy an MP3 file into the enhanced folder. Rename the file audio.mp3.
8. Open the application by visiting http://YOUR_IP_ADDRESS/enhanced/scroll-audio.html in your mobile browser.
9. Install it as a mobile web app.
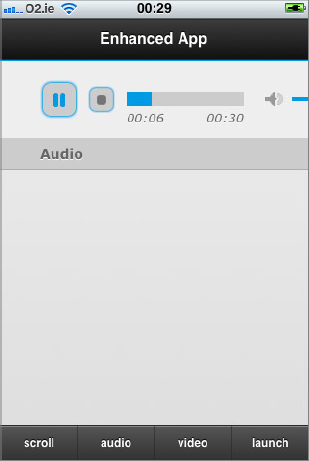
10. Verify that you can see the audio control box when you tap the audio tab. Press play to start the audio track. Verify that the control works as expected. Your screen should look as shown in Figure 7-3.
How It Works
The jPlayer library is quite easy to use. You just include the jquery.jplayer.js script file and provide some skinning CSS. The code in this example creates a simple audio player box with standard controls.
You can’t hide the jPlayer HTML tags in the normal manner, so you simply position them offscreen:
<div id="audio" style="position:absolute;top:9999px;overflow:hidden">
The HTML tags inside this positioning div construct the player audio controls. You can get these tags — consisting of multiple elements styled with the jp-* family of CSS classes — from the jPlayer website. You can customize this view to create your own player.
The audio content page div itself contains a filler paragraph: <p> </p>. This ensures that iScroll continues to function correctly.
The JavaScript code for this example consists of extra logic executed when the audio tab is viewed. The audio variable keeps track of the existence of the jPlayer library object. You want to create it only once — but lazily. This is the same performance optimization you used for the iScroll library. You configure the jPlayer object with a set of properties that specify the media files to play, the location of supporting files, such as the Jplayer.swf Flash file, and various other options:
        $("#jquery_jplayer_1").jPlayer({
          ready: function () {
            $(this).jPlayer("setMedia", {
              mp3: "audio.mp3",
            });
          },
          swfPath:'',
          supplied: "mp3"
        });
Finally, you need to ensure that the audio player is moved in and out of view, as needed. You do this by placing it just below the header if the audio tab is active or moving it far down the page, below the visible section, when the audio tab is not active:
    if( 'audio' == current ) {
      ...
      $('#audio').css({top:header.height()})
    }
    else {
      $('#audio').css({top:9999})
    }
Playing Video in Your App
Playing video in your app involves many of the same challenges as playing audio. The HTML5 video tag, like the audio tag, does not work reliably on Android versions up to 2.3. Here’s what the tag looks like:
<video srv="video.m4v" controls="yes">
As with audio, you have to use a third-party library to play videos if you want a practical solution. Luckily, the jPlayer library can also do this, and the code is very similar.
The main challenge with video is not so much getting it to play as getting it into the right format. To have video play on iPhone and Android, you need to use the MPEG4 video container format. Inside, this uses the H.264 video codec. You need to use a video converter utility or service, such as www.zencoder.com, to convert your videos to this format.
The H.264 codec is patent-protected, so you can’t use it freely. In many cases, you can transmit H.264-encoded content over the Internet without incurring a charge. However, the licensing details are rather complex, and you should obtain legal advice if you plan to deliver video in a commercial context.
In the future, other options for video encoding may become more widespread (for example, Ogg Theora, Google WebM). It remains to be seen whether Apple will support these. Until it does, you’re stuck with H.264.
In the following example, you will continue to extend the tab bar app by filling out the video content tab.
TRY IT OUT: Embedding Video in Your App
Like the audio example, this example uses the jPlayer library. You again need to make sure that the video player tags are not hidden but rather pushed off the visible area. Follow these steps:
1. Copy the scroll-audio.html file from the last section and save it as scroll-video.html.
2. Modify the scroll-audio.html file by inserting or modifying the following boldfaced lines:
...
    <div id="content_video" class="content">
      <p> </p>
    </div>
...
</div>

<div id="video" style="position:absolute;top:9999px;overflow:hidden">
  <div class="jp-video jp-video-270p">
    <div class="jp-type-single">
      <div id="jquery_jplayer_2" class="jp-jplayer"></div>
      <div id="jp_interface_2" class="jp-interface">
        <div class="jp-video-play" ></div>
        <ul class="jp-controls">
          <li><a href="#" class="jp-play" tabindex="1">play</a></li>
          <li><a href="#" class="jp-pause" tabindex="1">pause</a></li>
          <li><a href="#" class="jp-stop" tabindex="1">stop</a></li>
          <li><a href="#" class="jp-mute" tabindex="1">mute</a></li>
          <li><a href="#" class="jp-unmute" tabindex="1">unmute</a></li>
        </ul>
        <div class="jp-progress">
          <div class="jp-seek-bar">
            <div class="jp-play-bar"></div>
          </div>
        </div>
        <div class="jp-volume-bar">
          <div class="jp-volume-bar-value"></div>
        </div>
        <div class="jp-current-time"></div>
        <div class="jp-duration"></div>
      </div>
      <div id="jp_playlist_1" class="jp-playlist">
        <ul>
          <li>Video</li>
        </ul>
      </div>
    </div>
  </div>
</div>

</body>
</html>
code snippet scroll-video.html
3. Copy the scroll-video.js file from the preceding example and save it as scroll-video.js.
4. Modify the scroll-video.js file by inserting or modifying the following boldfaced lines:
  var video = null
  var audio = null

  function refresh() {
    var content = $("#content_"+current)
    if( !scrollers[current] ) {
      scrollers[current] = new iScroll("content_"+current,{hscroll:false})
    }

    ...
    else {
      $('#audio').css({top:9999})
    }

    if( 'video' == current ) {
      if( !video ) {
        $("#jquery_jplayer_2").jPlayer({
          ready: function () {
            $(this).jPlayer("setMedia", {
              m4v: "video_h264aac.m4v",
              poster: "poster.png"
            });
          },
          swfPath: "",
          supplied: "m4v",
          cssSelectorAncestor: '#jp_interface_2'
        });
        video = true;
      }

      $('#video').css({top:header.height()})
    }
    else {
      $('#video').css({top:9999})
    }

    content.height(
      $('body').height() - header.height() - footer.height() - 4
    )
    scrollers[current].refresh()
  }
code snippet scroll-video.js
5. Copy an MPEG4 video file into the enhanced folder. Rename the file video_h264aac.m4v. The jPlayer library is quite sensitive to the name format, so make sure you include the h264aac part. If you have a still image that you want to use as the initial content of the video box before it starts playing, you should also copy it into the enhanced folder and call it poster.png.
6. Open the application by visiting http://YOUR_IP_ADDRESS/enhanced/scroll-video.html in your mobile browser.
7. Install it as a mobile web app.
8. Verify that you can see the video control box when you tap the video tab. Press play to start the video. Verify that the control works as expected.
![]()
WARNING On the iPhone, the video does not play embedded in your app. Instead, the app launches a full-screen video player. Tapping the Done button returns to your app.
How It Works
As in the preceding example, the jPlayer library does all the hard work for you. For a production app, you need to adjust the styling on the jp-* classes to get the sizing, look, and feel you want.
The video control exists side-by-side with the audio control from the preceding example. In order to make it work, jPlayer requires that you provide a different set of HTML tags as the control template. You do so by pointing the cssAncestorSelector property at the HTML tags for the video controls:
        $("#jquery_jplayer_2").jPlayer({
          ready: function () {
            $(this).jPlayer("setMedia", {
              m4v: "video_h264aac.m4v",
              poster: "poster.png"
            });
          },
          swfPath: "",
          supplied: "m4v",
          cssSelectorAncestor: '#jp_interface_2'
        });
The jPlayer library has many more controls and options. There isn’t enough space to cover them all in this book. Check out the jPlayer site for details and more examples: http://jplayer.org.
You can run other apps from your own app. To do so, you just need to use specially formatted URLs. You replace the http:// part of the URL with a code string known as a URL scheme. When the user taps a link with one of these URLs, the associated application opens. iPhone and Android phones recognize a standard set of URLs, and you’ll learn how to use them in this section.
Installed native applications can also register their own custom URL schemes. You’ll learn how to do this yourself in Chapter 10. A number of sites keep a registry of custom URL schemes. One of the most comprehensive is http://applookup.com. You can use this site to find the URL schemes of apps that you might want to launch from your own app.
The standard URL schemes allow you to launch a number of apps, as described in the following sections.
Launching a Web Browser from Your App
Any normal a tag link will work as usual when your app is running inside the mobile browser. When you install your app as a mobile web app on the home screen, the link will instead open the browser app separately, maintaining the illusion that your web app is a native app. The URL scheme has the following formats (replace www.example.com with the URL of the website you want to display):
http://www.example.com
https://www.example.com
Launching a Phone from Your App
You can start phone calls by using this URL scheme:
tel:123456789
To prevent malicious use, the phone number can contain only digits and hyphens. This prevents an app from activating special functions using the # and * characters. The iPhone simulator does not contain a phone application, so you need a real device to test this.
Launching SMS from Your App
You can start an SMS messaging application from your app. When you do this, you can enter the phone number to SMS, but again, as a security measure, you cannot set the text of the message. This scheme has the following format:
sms:123456789
Launching Mail from Your App
You can open the mail application and create a new email message for the user to send. Unlike with the SMS scheme, you can set some parameters here. This scheme has the following basic format:
mailto:[email protected]
You can set the subject and body of the email like this:
mailto:[email protected]?subject=Hello&body=How+are+things%3F
The text in the URL must be URL encoded, or it will not work. You use the JavaScript escape function to URL encode a string.
Launching Maps from Your App
To send a user directly to a maps application, you use a special form of the standard Google Maps URL. In this case, there is no URL scheme, but the mobile device browser will nonetheless recognize the URL as a special case. You use this format:
http://maps.google.com/maps?q=Dublin,Ireland
Launching YouTube from Your App
You can link directly to YouTube videos from your app. As with maps, there is no URL scheme, but the browser will recognize URLs if you use this format:
http://www.youtube.com/watch?v=Xzhlrggtesg
TRY IT OUT: Launching Apps
The code in this example displays a list of links that each open a separate app, placing your mobile web app in the background. Follow these steps:
1. Copy the scroll-video.html file from the preceding example and save it as scroll-launch.html.
2. Open the scroll-launch.html file and insert the following boldfaced HTML content into its launch content section:
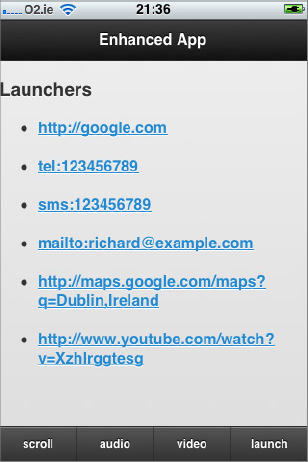
    <div id="content_launch" class="content">
      <div>
        <h3>Launchers</h3>
        <ul>
          <li><a href="http://google.com">http://google.com</a><br><br></li>
          <li><a href="tel:123456789">tel:123456789</a><br><br></li>
          <li><a href="sms:123456789">sms:123456789</a><br><br></li>
          <li><a href="mailto:[email protected]">
            mailto:[email protected]</a><br><br></li>
          <li><a href="http://maps.google.com/maps?q=Dublin,Ireland">
            http://maps.google.com/maps?q=Dublin,Ireland</a><br><br></li>
          <li><a href="http://www.youtube.com/watch?v=Xzhlrggtesg">
            http://www.youtube.com/watch?v=Xzhlrggtesg</a><br><br></li>
        </ul>
      </div>
    </div>
code snippet scroll-launch.html
3. Install the application as a web app from http://YOUR_IP_ADDRESS/enhanced/scroll-launch.html.
4. Start the app and tap the launch tab. You should see a list of links, as shown in Figure 7-4. Tap each link in turn to launch the different apps.
How It Works
In this example, the mobile browser does all the hard work for you. All you have to do is make sure to follow the correct URL syntax for each type of app.
In this chapter, you learned a number of techniques that you can use to enhance your mobile web app. It is quite possible to replicate many native features through innovative use of HTML5 and by using some of the excellent third-party JavaScript libraries that are available.
In the next chapter, you’ll take a break from the client side and learn how to build the server-side logic of your app. You’ll also learn how to make good use of cloud hosting to accelerate your development and ensure that the service your app provides is scalable to large numbers of users.
EXERCISES
1. The transitions between tabs in the example applications in this chapter are instantaneous. Use CSS transforms to create a sliding animation that animates the tab content by sliding it upwards when the user taps on a tab. Consider using the CSS keyframe syntax.
2. By default, the iScroll library provides you with a scrolling area that mimics native scrolling as closely as possible. Sometimes this is not what you want, either for performance reasons or to provide a custom user interface selection control. Adjust the iScroll code to hide the simulated scrollbar and prevent momentum-based scrolling.
3. You can also launch the iTunes application from your iPhone app. However, iTunes links are quite complex to construct. Is there an automated way to “make iTunes links”?
4. Many apps that feature scrollable content also let you refresh that content by pulling down on the scrollable area. For example, the official Twitter mobile app loads new tweets whenever you pull down on the list of tweets. Replicate this feature by using iScroll.
Answers to the Exercises can be found in the Appendix.
• WHAT YOU LEARNED IN THIS CHAPTER
| TOPIC | KEY CONCEPTS |
| Tab bar apps | The tab bar style is a very common app interface layout, where the app content appears above a fixed navigation bar that contains a number of tabs. The tabs can contain text or icons. Tapping a tab opens the content page for that tab. |
| jQuery Mobile scroll support | The jQuery Mobile project enables you to use the native scrolling behavior of the mobile browser by handling the placement of fixed page elements automatically. Due to performance limitations, this placement can only be achieved by fading the fixed elements out when scrolling occurs and fading them back in when scrolling ceases. |
| iScroll library | iScroll is an open source JavaScript library that replicates the native scrolling interaction by listening for touch events on a particular HTML element and then moving the element’s contents to mimic native scrolling. By using hardware-accelerated CSS3 transforms, you can achieve near-native performance. |
| HTML5 media tags | The HTML5 standard introduces the audio and video tags. These tags provide a standard set of controls for playing media files. Unfortunately, due to inconsistent implementations and media format support issues, these tags are not yet ready for cross-platform production use. |
| jPlayer library | jPlayer is an open source JavaScript library that hides the complexity of embedding audio and video in your app. It supports multiple formats and enables a number of workarounds for browsers that do not properly support the HTML5 media tags. |
| Custom URL scheme | Native apps installed on a device can register a code string that can be used as a URL in the mobile browser. Tapping on a link with this code string launches the app. You can use a number of standard URL schemes to launch some of the standard device apps, such as email or the phone. |