
![]()
Hosting a Neo4j Application
After you’ve put in the effort to build an application, you’ll eventually want to show it to the world, and for that, the application will need to be hosted. There are a huge amount of ways to host content on the internet these days, ranging from static website hosting from GitHub, to shared hosting via a company like site5. Although there are a lot of options out there, that isn’t the case when it comes to hosting Neo4j.
To allow for the installation and customization of Neo4j, it means that you can’t just go with any old hosting. To get the best results, you either need to go for a dedication Neo4j hosting platform, or install Neo4j yourself on a virtual private server, or VPS. Each of these options has a number of drawbacks and benefits, which we’ll go over later, but both are still perfectly viable solutions.
We’ll be going over the different options for both, and will also run through an example of hosting Neo4j using the hosting provider Digital Ocean. With that out of the way, let’s get straight into it, starting with the technical requirements for Neo4j.
A big thing to keep in mind when hosting your Neo4j application is why you’re putting it online in the first place. If you’re simply performing some tests on live hardware, you may not need as powerful of a hosting solution as you would for a production environment. The same goes if your application is going to be in production, but isn’t going to get much traffic.
Whichever reason you’re hosting your application, you should aim to have at least 2GB of RAM dedicated to Neo4j. If you then start performing large amounts of Reads/Writes to the database in too short a time, then it’ll start to slow down. If you’re just testing, this is manageable, and the usage of the application will no doubt be spiked depending on the usage.
If you’re hosting Neo4j for a large amount of intended use, then it’s recommended that you have between 8 and 32GB for your hosted solution. This level of use is for applications doing huge amounts of reads/writes every second, if that isn’t the case, start out with a 2GB solution and monitor the performance of the hosting. This way, it could be possible to migrate to a better hosting environment, should you need more RAM.
Although RAM is the most important factor, as more RAM makes Neo4j faster, disc space is also important, and should be considered. You need to be sure to try to have at least 10GB of storage available; ideally, through the use of SSDs ( solid state drives), which are faster than the disc-based hard drives.
If you’re doing a lot of complex queries, it may also be worth checking which processor your hosting provider uses. If possible, it’s recommended to have at least an Intel core i3 processor. The processor shouldn’t really be an issue, unless you’re hosting Neo4j for a high-traffic website or application, and it’ll get a lot of use.
Hosting Neo4j
When it comes to making your choice regarding where to host your instance of Neo4j, it comes down to whether or not you want dedicated Neo4j hosting, or if you want to host Neo4j yourself. Each of these solutions has pros and cons associated with it, including sometimes cost. The high-level way to look at it is, if you host Neo4j yourself, you’re in complete control, so you can change it as much as desired. This also means you can load your own extensions onto Neo4j to extend its functionality, which isn’t always possible with hosted solutions. With dedicated hosting, you’re still in control, but must rely on the hosting vendor to have all of the features you need to run your database correctly.
Let’s dig into this a bit more, starting with a VPS based solution and then look at some dedicated hosting options.
There are a huge amount of hosting solutions out there now for different use cases. We’re going to cover three different solutions: Digital Ocean, Linone, GrapheneDB, and Graphstory. Each are hosting providers in their own right, and have their own benefits and drawbacks, which we’ll cover. Enough of that though, let’s get straight into things, starting with DigitalOcean.
DigitalOcean
DigitalOcean (DO) has the slogan “Simple Cloud Hosting, Built for Developers” and certainly tries to keep true to that slogan. They’ve put a lot of work into their product, trying to make it as simple as possible, and you can find them at https://www.digitalocean.com. You can deploy a new SSD cloud server in under 55 seconds according to the website, which is pretty impressive. When you create your cloud server, or Droplet in DO speak, you get the choice of a location, a range of different specifications, and some additional options, including whether or you want private networking. There are a lot of different droplet specifications available, but the more popular configurations can be seen in Figure 9-1.
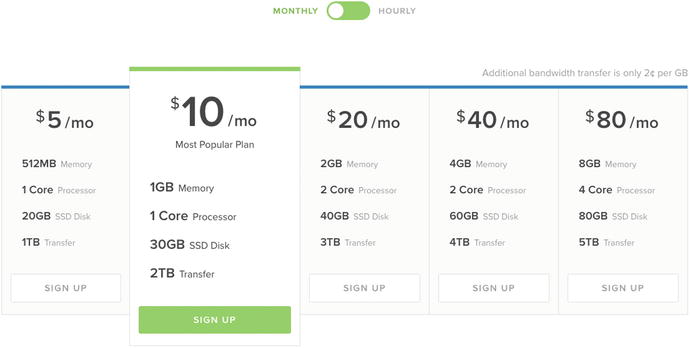
Figure 9-1. The plans available for DigitalOcean droplets
As can be seen by the slider above the prices, rates can also be broken down by hour, rather than a monthly cost. This means if you only need to have a box up for two weeks, then you can calculate the cost for this up front, which is always useful.
The $20/month solution would be enough to host the Neo4j instance and the application using it. This droplet has 2GB of RAM a 2 core processor and 40GB SSD, which is plenty to run Neo4j. Of course, you could still install Neo4j on any of the other droplets, it just wouldn’t run as efficiently as it would with more RAM, but since DO has SSDs by default, an increase in speed is gained from that which can offset the RAM requirement. There are also plans above this level for more high traffic applications, topping out with the $640/month which boasts 64GB of RAM, 640GB of storage, and a 20 core CPU, but I think it may be a little excessive for a small Neo4j application.
As you would expect, DO has a decent list of features that help make it what it is. To give a better overview of DO a few will be detailed below, however for a full list of features, be sure to check out the DO website.
Although this technically isn’t a feature, it’s something worth mentioning about DO, as the articles within its knowledge base are brilliant. If you’re going to deploy something on DO, or you’re having trouble with something on one of your droplets, odds are there’s a DO article that can help you. Anyone can get paid to write support articles for DO, so there are a good range of articles, accomplishing a number of different tasks.
We’ve already covered that you can deploy a droplet in under 55 seconds, which is pretty fast. There’s a gif on the homepage of the website which shows how this process works, and how easy it is. You can also save an image of a Droplet and then create new droplets from this image, so you can have pre-built boxes that are ready to go, they just need to be deployed, which is always useful.
Being able to utilize private networking is a big plus, as this allows you to communicate with other droplets you have, but not with the outside world. This means your applications can use internal requests instead of external ones, which is a lot quicker, but also more secure, as any connections made internally, are protected by DOs network.
All of the droplets on DO are virtual, but there’s a reason for this. Using virtualized environments means that performance and security are big factors, and are taken very seriously. If any security issues are discovered, they can be addressed a lot easier with virtual environments than physical ones, which is one of the reasons DO is as fast and secure as it is.
DO have spent a lot of time to make their product friendly for developers, and it definitely shows, especially in the control panel. The focus of the control panel is usability, to make it as easy as possible to perform complex actions, and also making sure this process is fast, and easy to understand.
API
Since DO is made for developers, they’ve also made sure that they not only offer an API, but that it’s also as fully featured as possible. The API can be used to accomplish most of the tasks that can be done from the dashboard, including of course, creating Droplets.
99.99% Uptime
When you’re hosting anything, you want a guarantee that it’s going to be online all the time, and DO does this with a 99.99% uptime SLA. This is achieved by having multiple data centers across the world, and ensuring the communication between these is as fast as possible; in this case, with the use of 10 gig-E networking, to ensure capacity, and redundancy. Each of the datacenters used by DO has battery backups, onsite generators, and physical security, so your droplets not only stay up, they’re also secure.
If you use DO, you know that you’ll have a server that will be up when you need it, and will stay there. Thanks to how easy it is to use, creating new Droplets is easy, and since you only pay for what you use, you can test something out on a droplet, and then destroy it to keep the costs down.
If you use DO a lot, then the API can come in very useful for deploying and destroying your droplets. Since you still get charged if your Droplet is suspended, being able to shut down any unused boxes is always useful. This can of course be achieved in the control panel too, and if you wanted, you could also take an image of the Droplet before it was destroyed, so it can be provisioned again.
One good positive about DO is its smallest droplet, which is $5 a month. Thanks to how cheap it is (provided you don’t leave the boxes up after they’re needed) it means many can be created at once to test things like clustering configurations, without running up a huge bill.
If you realize you’ve made one of your droplets too small, and it needs to be upgraded, then no problem. If you power off your Droplet, you can then scale it up as you need to. This means you don’t need to provision huge boxes immediately, but you can start smaller and work up.
There may be a time when you pick a promo code for DO that gives you some free credit, but if you’ve already signed up, you can’t use it, right? Not the case, with DO. If you get a promo code, you can redeem it at any time within your profile, which is always a nice to be able to do. Speaking of credit, you can also earn more by referring friends, which again, is a nice thing to be able to do.
Conclusion
DigitalOcean is a brilliant platform, and is more than capable or serving Neo4j, or any other application comfortably. With DOs credit system, keeping on top of your spending is easy, and thanks to its uptime SLA, if you deploy a Droplet, it’ll be available 99.99% (until your credit is used up, that is). Whether you’re looking to fire up a few servers to test out a cluster, or if you’re hosting your production environment, DO can help.
Another offering in the cloud hosting market is Linode, which offers cloud hosting, with all packages using SSDs. With Linode you get a lot of benefits and features, which we’ll cover in a moment, one of which is the ability to deploy a Linde within seconds, at least that’s what the website says. Hardware at Linode also runs on a 40GB network, to ensure that any traffic you get, whether internal or external, isn’t slowed down by the network. With over 350,000 customers, the people over at https://www.linode.com must be something right, which is evident in their features and their pricing. When deploying a new server (or Linode) you can choose a location within a choice of eight datacenters in three different regions, with a number of packages to choose from, as shown in Figure 9-2.
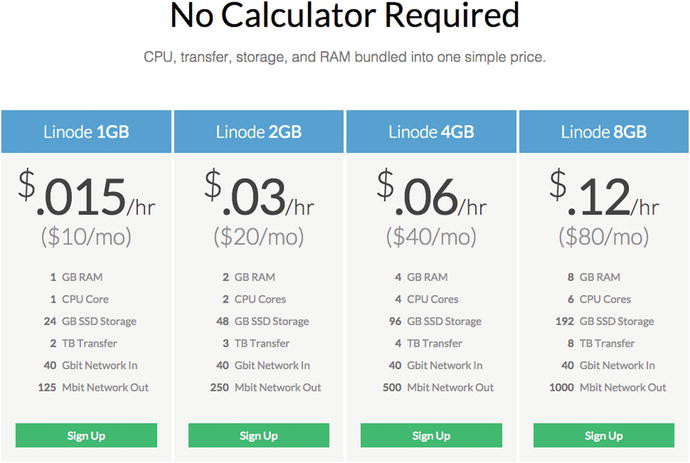
Figure 9-2. The price of the different Linodes at https://www.linode.com
The prices are broken down into hourly and monthly costs, which gives a good overview of what your particular Linode will cost, especially if you’re going to have it up for less than a month. Each Linode is actually billed by the hourly rate, with a cap set to the monthly cost, so you’re never going to be overpaying here, unless you go over your usage cap, that is.
For hosting Neo4j, the Linode 2GB package would be sufficient to host both Neo4j, and also the application that’s using it without any real issue. Although having more RAM is always beneficially, the SSD hosting used helps compensate for this, so with 2GB of RAM and SSDs, a small-scale Neo4j database should be perfectly fine. You can also go all the way up to a Linode 96GB plan, which sports 96GB of RAM, 20 CPU cores, 1920GB storage, and a $1.44 / hour ($960 / month) price tag. This is of course an instance for a huge application, and most likely overkill for a number of applications, but it’s nice to know the option is there either way.
Features
To compete in the hosting market, your features need to do the talking, and Linode certainly talks a lot with all of the features it has to offer. We’ll go through a few noteworthy ones in a moment, but for a full list of features, check out the website.
Intel E5 Processors
Linode doesn’t just have any processors; they have Intel E5 Processors. These are high-end, server-based CPUs, and they’re pretty fast. This is good to know if your application happens to do any CPU-intensive actions. Even if this isn’t the case for your application, it’ll still run smoother and faster thanks to these chips, so it’s definitely a good benefit to Linode.
Nodebalancers
An available feature with Linode is the use of a Nodebalancer, which is a load balancer, but with a bit of a difference from others. On a base level, what the Nodebalancer does is sit in front of your backend Linodes and takes large amounts of traffic. Any requests are then passed off to the required backend Linodes, but there’s a little more to it that than. It’ll also monitor each backend Linode, and if for whatever reason it’s in an unhealthy state, the request won’t be routed to it.
The best thing about the Nodebalancers is how easy they are to use. They can be added at any time, and at $20.00/month, adding one Nodebalancer could replace the need for an additional server instance, thanks to how it shares traffic. Although you may not always need them, it’s always good to know a feature like this is available, and is easy to use.
Monitoring your servers is always a good thing, and Longview makes this as easy for you as possible. To make managing multiple Linodes easier, Longview lets you check the status of all your servers on one page, rather than having to manage them individually. With the free tier, you get the last 12 hours of data, with updates every 5 minutes. You can also upgrade to pro for $20.00/month for the 1–3 systems, with larger packages available for larger setups. With pro, you get all of your historical data and updates every 60 seconds. This essentially means, if you have an outage over the weekend, you can look back on Monday to see what happened and try to fix the issue.
Managed
Sometimes you just don’t want to spend the time maintaining a server to ensure it’s always running. Linode knows this, and they also offer a managed package, which means once the application is running, they’ll keep it running. If you commit to at least 3 months, Linode will even help with the migration from your existing hosting to a managed Linode. At $100.00/mo, this isn’t a cheap service but if you’re in a position where downtime isn’t an option for your application, it’s nice to know Linode can have your back.
One common thing when provisioning servers, is that there can be a lot of repetition, so you’ll end up doing the same steps a number of times on multiple servers, which can get annoying. Other people have had these thoughts and written ways to automate these things, and thanks to StackScripts, they can be yours to use. There are a number of different environments that can be provisioned through answering a couple of questions required for the installation and then setting it away. Essentially, it’s always worth checking the StackScripts library to see if what you’re about to do has been added as a StackScript, so it can be run with minimal effort.
Through its various services, Linode offers a lot of different features, and if you only want a website migration, Linode can quote for that. If you aren’t sure on the exact server configuration needs, or need some help streamlining a server, these are things Linode can help with. Each service is done on a quote basis, so you won’t know how much something will cost beforehand, but it’s an option that’s there, if required.
Linode is brilliant hosting platform, and can be the home for both small and large applications. Thanks to its hour-based billing, you know how much you’ll be paying a month, which saves being worried about whether or not you’ll overpay. Of course, if you use all of your bandwidth and need some more, there will be a charge for that, but if it’s happening consistently, you can upgrade.
Speaking of upgrading, this process is made as simple as possible in Linode, and if you need to upgrade an instance, just go to its control panel, make the needed change, and let Linode do the rest. If you realize you’re spending too much time monitoring your services because they’ve grown above your control, why not get Linode in to help? With its reasonable prices and free offerings, it can be a stable platform for any application as it starts with features to support it as it grows.
Linode also has a referral scheme, whereby you can earn additional Linode credit to help your servers stay up even longer, and also share the love you have for Linode, of course.
![]() Note Of course you can manage the installation of Neo4j yourself, but that isn’t the only way to do things. As with other database systems, there are companies that offer remote Neo4j hosting. This means you can have your database and your application in two separate places. There can be a slight delay thanks to it being remote, but that sacrifice is worth it, so that you know your database is going to be there, even if your application isn’t.
Note Of course you can manage the installation of Neo4j yourself, but that isn’t the only way to do things. As with other database systems, there are companies that offer remote Neo4j hosting. This means you can have your database and your application in two separate places. There can be a slight delay thanks to it being remote, but that sacrifice is worth it, so that you know your database is going to be there, even if your application isn’t.
One of the offerings in the Neo4j hosting market is GrapheneDB, and hosting Neo4j is what they do. It offers a lot of the features you’d want in Neo4j hosting, as well as still giving you full access to your data. GrapheneDB hosts your database on one of two systems, AWS (Amazon Web Services) or Microsoft Azure. Both systems are cloud-based hosting platforms that are more than capable of hosting your database. It’s also possible to use GrapheneDB as a Heroku extension, which gives even more flexibility to the service.
GrapheneDB takes the pain of doing the deployment on these services yourself, and instead gives an easy to use the website, with a number of top-quality features. When your server is provisioned on GrapheneDB, it is then available to communicate with via REST. To make this even easier, GrapheneDB also included a number of “Getting started” snippets for many popular programming languages.
There are free plans available on both platforms, but these aren’t intended to be used in production environments, but rather for hobby use only. The plans for use on AWS can be seen in Figure 9-3, as it has an additional plan, and with the first package in each being the same price, AWS made sense. On the GrapheneDB website (http://www.graphenedb.com) you can see a full list of plans and features, but we’ll just run through a notable few for now, just remember to check the website if you’d like additional information.
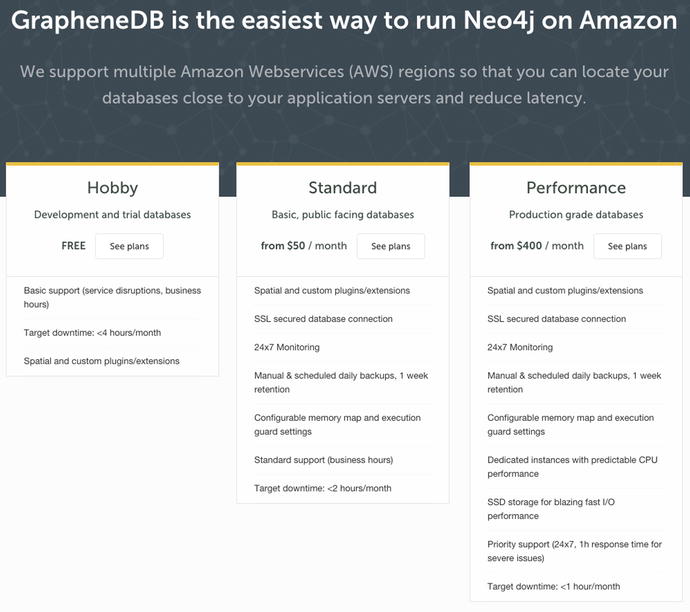
Figure 9-3. The pricing structure for hosting Neo4j on AWS, using GrapheneDB
The first thing to note is the price of the first package, which is the one intended for personal use. You really don’t get a lot with the free package, and it’s capped at 1K nodes and 10K nodes. You can increase this to 100k nodes and 1M relationships, for $9/mo. Although you don’t get a lot of space for storage, you do get a hosted Neo4j instance that can be used for testing. That being said, it will be unpredictable on performance and may not always be available, but for testing that’s just fine.
From $50/month you get into the standard packages, which have a lot more features, including SSL, backups, access to custom Neo4j settings, and more. The interesting thing about the $50 plan is the hardware, which is 512MB of RAM and 1G storage. This plan is still classed as Standard, so if you’re running an average-sized website you should be fine on this plan.
When it comes to hosting a large database, you’ll want the Professional plan, which starts from $400/mo where you get 3GB of RAM and 40GB of storage. You get dedicated servers here, so you know the performance you’re getting is going to be consistent, as well as everything else from the previous packages. You also get a target downtown of less than 1 hour a month.
Features
In the paid packages there are a number of features, so let’s go into them in a bit more detail, shall we?
If your usage or nodes spike for some reason, you’ll be notified but engineers will ensure your database is running, 24/7. Of course, depending on your plan, there will be some downtime over the month, but outside of these scheduled occasions, any malicious or unscheduled outage will be resolved.
Thanks to the databased being hosted on cloud hosting platforms, it allows for great scalability. It’ll be able to handle the traffic being thrown at it without falling over, and upgrading couldn’t be easier. If you need more out of your database, you can upgrade just as easily as you signed up, then let the website do the work.
When subscribed to a Standard or Performance plan, you then get access to the expert support team at GrapheneDB. This isn’t just support with issues or bugs; this is support for you as a developer, and the team can help with anything from query optimization to driver configuration. With this support, your application and database will be running as smoothly as it possibly can.
Having a backup system in place is always important, and here is no exception. Your hosted database will be backed up on a daily basis. You can also manually initiate snapshots of the database, so you can always backup before that big migration. The daily backups will be kept a total of 7 days, but can be downloaded at any time, so if you like, you can download a backup manually each week. You can also restore from a backup at any time, so if the worst does happen and data is lost, or you need to revert back for whatever reason, the option is there.
Being able to see how your database is running is important, so on your dashboard, it’s possible to see streaming download of Neo4js server logs. This gives the flexibility to quickly get a handle on what’s happening within the database without manually looking at the logs. So if your website is running slow for some reason, you can check for issues.
At the Performance tier, you also get access to detailed server metrics for your dedicated database instance. In addition to knowing how the database is running, you can also make sure the server is running.
One of the issues with hosted solutions can be the inability to customize the hosted instance, but that isn’t the case this time. You enable popular Neo4j extensions, as well as being able to code your own. This allows you to customize your database to your hearts content, as it should be.
GrapheneDB has a brilliant set of features and is very easy to use. It takes no time at all to sign up and create a sandbox database, which is ready to be used in your development project, without any mess. The inclusion of the quick start code samples to communicate over REST is brilliant, and really speeds things up.
When your data is the most important thing, having it looked after and backed up is what you always want to do, so knowing GrapheneDB takes care of all that is a big relief. In some instances, the price point may be a factor, but for that price you get access to a lot of features, including access to the expert support team. As well as knowing your database will be kept online, you also have the ability to still extend and customize it, so your database can grow with you. Overall it’s a brilliant service, even just for the free tier alone, and the ability to integrate that into Heroku gives some brilliant development power, which is always a good thing.
Another space in the Neo4j hosting market is Graphstory. Although there is a free tier available, and a number of smaller ones too, the main action here is in the production-based bundles. It’s possible to get signed up for a free account very quickly, and you’re given instant access to a database. This database is functioning and available via REST, but its storage capabilities or limitations are unknown.
There is a developer plan, which gives you access to 1GB of RAM, 5GB of SDD storage and on-demand backups for $9.99/mo. Above this plan, there are also Startup (from $49.99/mo) plans, Premium (from $299.99) plans, and the Enterprise plan, which requires you to contact them for a price. Although the pricing of these plans seems expensive, you do get a lot for you money, at least with the Premium plan.
The Startup plan is a more equipped version of the developer plan, offering 2GB RAM, 40GB SSD, and a 2 core CPU machine. If you upgrade your starter plan to the S3 package at $149.99/mo, you then get access to the main weapon of Graphstory, its clustering. In Figure 9-4, you can see the options that come with the Premium level cluster services, and the price associated with them. At the standard level tier, the staging machine is 2GB instead of 4GB, but this can be increased by jumping to the $199.99/month plan.
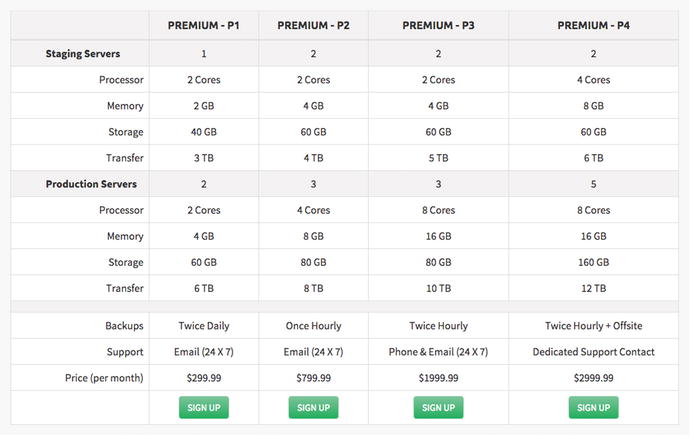
Figure 9-4. The premium plans available to Graphstory customers.
As you can see, the options for clusters are crazy, and that’s all taken care of for you, without having to worry about it. Sure, it’s a lot of money, but you also get a fully maintained cluster that isn’t going to fall down, no matter what happens. With the highest tier, you also get twice hourly backups that are also offsite, so when it comes to keeping data safe, they aren’t playing around.
Conclusion
Graphstory looks to be a very powerful provider when it comes to hosting. They even utilize DigitalOcean for hosting the servers. Although it has a lot of features, it’s really geared towards larger applications, rather than just a regular developer. The features offered aren’t detailed too heavily on the website, because they want you to get in touch and ask. This is fine and the platform itself seems very solid, however for developers building smaller applications, it may not be the best solution.
A Hosting Example
The best way to go through hosting Neo4j, is to host Neo4j. To show this, I’ll be running through the process used to host the Pokémon app (which was used to gather the data used in Chapter 7) which is a PHP-based application, backed by Neo4j.
In this case, my choice of hosting provider was DigitalOcean, primarily because I had credit in my account that I could use. Also, I find DigitalOcean very easy to use so it just made sense to host it there. Other than having the credit, in terms of cost and features, there could have been other choices used to host the application (Linode, for one) but this application isn’t going to be hosted long term, so DigitalOcean made sense.
Since installation instructions are one of the things that have a habit of changing, the commands used here will be stored in a GitHub gist, so any changes can be documented there because books cannot be corrected after print. The URL for the gist is GIST_URL_HERE, but if you check my gists (ChrisDKemper) you should find it there.
Creating a Droplet
To start things off, a droplet needs to be created so I actually have something to deploy Neo4j to. Since I had the credit available, I decided to go with the $20/month instance which gives me 40GB of storage, and 2GB of RAM, more than enough to run a small PHP application and Neo4j. I also opted for a London-based droplet, as this is closer to me, which can been seen along with the rest of the setup in Figure 9-5.
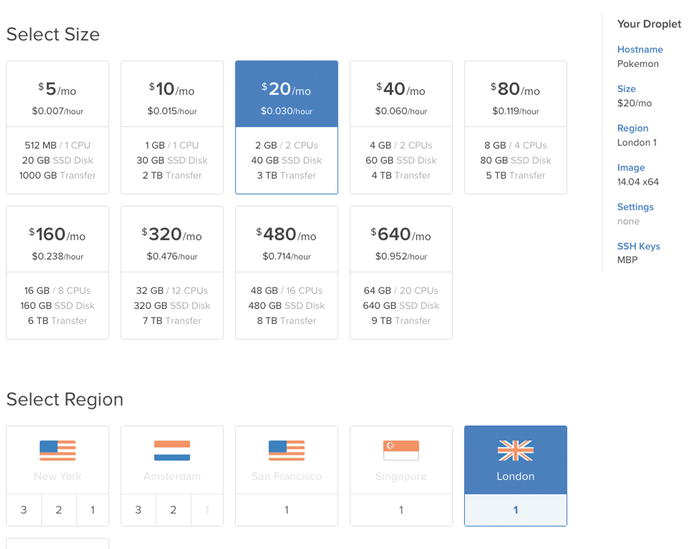
Figure 9-5. The setup used to create the Pokémon droplet
I added my MacBook’s SSH key to the box to give me access to it, then set things away and within a minute, I had my running droplet.
Using Terminal, it was time to SSH into the droplet and get ready to install Neo4j. Since this droplet is running Ubuntu, it’s possible to use the information from Chapter 3 to our advantage here, as an Ubuntu server was used there. It’s worth noting that I’ve SSH’d into the droplet as `root`, so all of the commands are run as `root` which essentially means every command has a `sudo` infant of it, and `root` saves you from doing that. First, we first need to add the Neo4j key to `aptitute`, to give it access to the code repositories, once they’re added. To add the key, the following command is used:
wget -O - http://debian.neo4j.org/neotechnology.gpg.key | apt-key add -
The key will be fetched from the Neo4j website, and added to `apt` and when it’s done, you should see OK, with your prompt back to normal. With access now granted to the repository, it’s now time to actually add the Neo4j repository so it can be found, which is done like so:
echo ’deb http://debian.neo4j.org/repo stable/’ > /etc/apt/sources.list.d/neo4j.list
There won’t be any interaction from the Terminal here. It’ll just run and you’ll be presented back with the terminal prompt. The next stage is to perform an update, and by doing so, pull in the new definitions, which will allow Neo4j to be installed. To run the update, use the following code:
apt-get update -y
With everything up to date, it’s time to actually install Neo4j. Rather than opting to say `Yes` to every installation, I used the -y flag, so the install just runs, and installs everything. The command looks like so:
apt-get install neo4j -y
After many output lines from the installation, you’ll be prompted saying Neo4j is up and running at localhost:7474, and you may also see a warning regarding the number of max open files, which will look something like this:
![]() Warning Max 1024 open files allowed, minimum of 40,000 recommended. See the Neo4j manual.
Warning Max 1024 open files allowed, minimum of 40,000 recommended. See the Neo4j manual.
To solve this problem, we need to increase the max open files. It is possible to do this using the `ulimit` command, but that’s only for the active session, and this needs to be all the time. The first file that needs amending is `/etc/security/limits.conf`which needs the following lines added to it:
root   soft    nofile  40000
root   hard    nofile  40000
These lines give the root user permission to have this many files open at once. The next step is to allow this property to be read, by editing another file, `/etc/pam.d/su`, and uncommenting, or adding, the following line:
session required pam_limits.so
This means that from now on, every session with the user, that user will be allowed to have 40,000 open files, which is what we want. For this to take effect, the server needs to be restarted, which is done by using the following command:
sudo shutdown -r now
Using this command will kill any connections you have to the server so don’t worry about that, just wait a little while for it to reboot and SSH back in. With the code in place, Neo4j will now run without displaying the error, which is good news. Although Neo4j is running, if you tried to go to IP_address:7474, you wouldn’t see anything. This is because by default Neo4j only serves to localhost, which isn’t what we want. This is easily fixed though, and it involves changing a file, which is located at `/etc/neo4j/neo4j-server.properties`
In the file, you’ll want to locate the following line:
org.neo4j.server.webserver.address=0.0.0.0
This will need to be uncommented, and then `0.0.0.0` needs to be changed to the IP address of the Droplet. With that change made, it’s just a case of restarting Neo4j once again to get everything working.
service neo4j-service restart
The browser is now available at IP:7474, which means an important thing can now happen: setting the password for your database, as using default values in production is a bad idea. Also, because Neo4j also thinks this is important you need to change the password before it’ll work, so it’s better to make it something secure now.
Before the Pokémon website can run, it needs a few other things, such as PHP, Nginx, Git (for the cloning of the repository), and a couple of other things. The installation of these things isn’t really relevant to the hosting of Neo4j, so I won’t go into detail.
When starting the Neo4j service, you may see the following warning:
![]() Warning not changing user
Warning not changing user
This warning isn’t something to be worried about, as it’s not actually true anyway. Neo4j needs to be run as `root`, but does actually switch users, and the process itself, runs as the `neo4j` user. At the time of writing, I couldn’t find a reason or solution for this warning, as Neo4j is actually running just fine. It seems worth mentioning, as it seems like it could be quite an important warning, but in fact, it just lies.
Of course, things do change, so if a solution or reason has been found since the book was published, it’ll be inside available on the GitHub gist mentioned earlier, which will contain the full installation instructions for Neo4j, kept up to date with changes, so if the command in the book doesn’t work, check the Gist.
Using a Standalone Neo4j Server
From the previous research on hosted Neo4j solutions, it seems you can easily run Neo4j on environments that have specs which are a lot less than the minimum specs required. With that in mind, it makes sense to put Neo4j on its own server (or droplet, in this case) which will mean I can dedicate all of the available resources to Neo4j, and it won’t have to share with the application instance. Both servers in this case would be the $5/pm droplet, which even though it has two servers, it’s half the running cost of the larger one.
In reality, nothing much needs to change here. The previous installation steps can be followed to install Neo4j, but instead of installing the rest of the application on the same server, it’s installed on a different one. In this particular case, private networking is required for both of these boxes, as the application will communicate with Neo4j via the internal IP address, not the external one. Earlier we set the org.neo4j.server.webserver.address property in the /etc/neo4j/neo4j-server.properties file, which now needs to be set to the internal IP of the Neo4j droplet. This ensures that no external traffic can access the Neo4j instance, and it can only be reached from inside the Digital Ocean network. In terms of private networking, you need to ensure any droplets you’d like to communicate with each other are in the same datacenter, so with this in mind, both the droplets I’m using are in the London datacenter.
The final step is to change the main application to use the internal IP address of the Neo4j droplet, rather than `localhost` like it had done previously, since everything was hosted on the same machine. There will be a decrease in speed because the database is now on another server, but since Digital Ocean’s internal network is around 1GB/ps, and the application utilizes a queue system, any reduction in speed won’t be noticed by the user. This essentially means the hosting costs are halved, and the app remains the same speed, with Neo4j getting more dedicated resources since it no longer has to share, which is a win/win/win.
Using ansible to Deploy Automatically
Although there isn’t another Neo4j instance needed for the Pokémon application, there will be other times that one is, and for that reason it’s good to look at automated deployments. Of course, you could easily manually set up Neo4j on a new server using the previously mentioned commands, and that’d be fine, but wouldn’t it be nicer to just hit a button and have all that work done for you? I thought that, so I ended up looking at Ansible.
In Ansible 2.0 (currently in beta, at the time of writing) it has Digital Ocean integration. This is currently available but the 2.0 version uses V2 of the Digital Ocean API, and since I like Digital Ocean, I figured I’d go with it. With that out of the way, below is a code sample that includes two Ansible files, the playbook, and the variables (vars.yml) file.
##vars.yml

#DigitalOcean stuff
digital_ocean_token: TOKEN_HERE
digital_ocean_ssh_name: ocelot.pub
digital_ocean_ssh_pub: "{{ lookup(’file’, ’/vagrant/ansible/ssh/ocelot.pub’) }}"
digital_ocean_ssh_key: /vagrant/ansible/ssh/ocelot
digital_ocean_droplet_name: ocelotdroplet
digital_ocean_droplet_size_id: 512mb
digital_ocean_droplet_region_id: lon1
digital_ocean_droplet_image_id: 13089493
digital_ocean_droplet_private_networking: yes
#Neo4j stuff
neo4j_config_file: "{{ lookup(’file’, ’/vagrant/ansible/neo4j/neo4j-server.properties’) }}"

##neo4j.yml
---
- hosts: 127.0.0.1
  connection: local
  vars_files:
    - vars.yml
  tasks:
    - name: Ensure ocelot key is available
      digital_ocean:
        state=present
        command=ssh
        name="ocelot.pub"
        ssh_pub_key="{{ digital_ocean_ssh_pub }}"
        api_token="{{ digital_ocean_token }}"
      register: ssh_key
    - name: Create a digital ocean droplet
      digital_ocean:
        state=present
        command=droplet
name="{{ digital_ocean_droplet_name }}"
        size_id="{{ digital_ocean_droplet_size_id }}"
        region_id="{{ digital_ocean_droplet_region_id }}"
        image_id="{{ digital_ocean_droplet_image_id }}"
        wait_timeout=500
        private_networking={{ digital_ocean_droplet_private_networking }}
        ssh_key_ids={{ ssh_key.ssh_key.id }}
        api_token="{{ digital_ocean_token }}"
        unique_name=yes
      register: my_droplet
    - name: Register droplet as dynamic host
      add_host:
        name="{{ digital_ocean_droplet_name }}"
        groups=droplets
        ansible_ssh_host="{{ my_droplet.droplet.networks.v4[1].ip_address }}"
        ansible_ssh_user=root
        ansible_ssh_private_key_file="{{ digital_ocean_ssh_key }}"
- hosts: droplets
  tasks:
  - debug: msg="{{ ansible_eth0.ipv4.address }}"
  - debug: msg="{{ ansible_eth1.ipv4.address }}"
  - name: Check if neo4j is installed
    command: dpkg --get-selections | grep neo4j
    register: neo4j_check
  - name: Key1
    shell: wget -O - http://debian.neo4j.org/neotechnology.gpg.key | apt-key add -
    when: neo4j_check.stdout == “”
  - name: Key2
    shell: echo ’deb http://debian.neo4j.org/repo stable/’ > /etc/apt/sources.list.d/neo4j.list
    when: neo4j_check.stdout == “”
  - name: Install Neo4j
    apt: name=neo4j update_cache=yes state=latest
    when: neo4j_check.stdout == “”
  - name: Set the correct address
    lineinfile: dest=/etc/neo4j/neo4j-server.properties
    regexp=^#org.neo4j.server.webserver.address=
    line=org.neo4j.server.webserver.address={{ ansible_eth1.ipv4.address }}
    when: neo4j_check.stdout == “”
    notify:
      - restart neo4j
  handlers:
  - name: restart neo4j
    service: name=neo4j-service state=restarted
  - name: restart machine
  command: shutdown -r now "Ansible updates triggered"
  async: 0
  poll: 0
  ignore_errors: true
  - name: waiting for server to come back
  local_action: wait_for host={{ inventory_hostname }}
                state=started
  sudo: false
This file would need to be need to be split up, and is adapted from a project called Ocelot which I’m working on. It’ll work independent of it of course, it’s just the names and paths that are used really, but those can be easily changed. With a couple of changes, the playbook can be created for different applications or for droplets with different names for multiple Neo4j instances. Automated deployments always have some benefit, even if that benefit is ease of use. You may of course still need to do some manual changes to these environments when they’re created, but it will save time in the long run. The code used here will be available as a gist (https://gist.github.com/chrisdkemper/7a9fff23309c7cf55963) so any updates will be available there.
To make this process a little easier, I created a small website to make running these playbooks easier. The project is currently very young, but can be found at https://github.com/chrisdkemper/ocelot and will no doubt change and improve, but it’s called Ocelot, and it allows you to run a playbook and watch the terminal output in the browser. It’s also on Vagrant so it’ll run on any system capable of running it, so hopefully it’ll be of use to somebody. Anyway, enough about that. If the Playbook will be useful to you then by all means use it, it’ll be kept up to date on the gist, so even after this book is printed, the gist will always be correct.
Optimizing Neo4j
When it comes to optimizing Neo4j there are a couple of different approaches. There are small changes that can help, but could be left as defaults, such as optional extras. The other side is the more complex side, which includes configuring the server in a certain way, tweaking the JVM settings, and so on. We’ll be covering the former side of the optimizations, as these changes can make things a little more secure, with a small amount of effort.
To make things easier each one will be broken down into its command. First, we have a couple of additions to the neo4j-server.properties file, which is located at /etc/neo4j/neo4j.properties on a default installation. The following line adds a max timeout to a query, to save on runaway queries that traverse the graph multiple times. Any queries will be rolled back because they’re in a transaction, so no damage will be done.
org.neo4j.server.transaction.timeout=60
Next is changing the org.neo4j.server.manage.console_engines property to match the following. This disables the use of the consoles available in webadmin, so no malicious actions can happen. You should be safe, but it’s a good failsafe unless you use the shell commands; in which case leave the line as it is. For no console, mirror the next line.
org.neo4j.server.manage.console_engines=
Each of the following lines need to be done in a neo4j.properties file which will need to be created in the same directory as the neo4j-server.properties file.
execution_guard_enabled=true
This teamed with the previous line in the neo4j-server.properties stops queries that would otherwise potentially run forever, which is a good failsafe for production servers.
dbms.pagecache.memory=128m
The final change is setting a pagecache. This doesn’t need to be too much, in this case it’s 128MB, but if you don’t have much memory available, as long as this value is around 2MB (it can’t be 0) you’ll be fine.
To keep these valid, these config values will be available in a gist () so if there’s any updates, they’ll be logged there. This gist and the others from the book will be available at https://gist.github.com/chrisdkemper.
Summary
This chapter has given a lot of information on how to host Neo4j. There are choices for giving it a try, hosting small instances, right up to automated deployments. Since the instructions are there (and available in a gist if they change) the instructions to set up Neo4j on any Linux server and you’ll be ready to go. For local testing a server, it’s also possible to use the vagrant box I set up, which is available at https://github.com/chrisdkemper/neo4j-vagrant, just in case you need it.
The optimization gist will be kept up to date as time goes on, by anyone that contributes to it, so if you keep checking back it’ll be a useful resource when it comes to optimizing a server. Then you’ll be ready to have your own hosted Neo4j application for whatever you need it for, even if it’s just for testing.
If you’re up for automating your deployments, then the Ansible playbook will come in useful to deploy Neo4j instances even easier. Also if you want it even easier, there’s always the Ocelot project, which can found at https://github.com/chrisdkemper/ocelot.
Hopefully the book has given you a good journey into Neo4j, showing you enough about Cypher to get started and even how to do recommendations. It will be enough to start any project (hopefully) with enough reference to give the extra information needed for those more challenging queries. If you like the book, please get in touch on Twitter (@chriskemper, drop me an e-mail, or just get in touch some how. I’d love to hear feedback, good or bad.