
In this chapter, we are going to cover the architecture of PostgreSQL. This includes how it is designed, its limitations, and how to install it. We explain each component in the architecture. We talk about different installation procedures and getting started with commands to work with PostgreSQL. We also talk about the basic parameters.
PostgreSQL is the world’s most advanced Open Source database. It is designed for extensibility and customization. It has ANSI/ISO compliant SQL support (strongly conforms to the ANSI-SQL:2008 standard specification). It has been actively developed for more than 25 years. It is well-known for its portability, reliability, scalability, and security.
Key Features of PostgreSQL
PostgreSQL is written in ANSI C . As we all know, C is a very powerful and widely used language. Despite the prevalence of higher-level languages, C continues to empower the world.
PostgreSQL is POSIX complaint and supports Windows, Linux, Mac OS/X, and major UNIX platforms.
PostgreSQL is ACID compliant. So need to worry about the atomicity, consistency, isolation, and durability of your databases.
PostgreSQL supports transactions. Transactions bundle multiple steps into a single, all-or-nothing, operation. If you see a failed statement in a transaction, that transaction would be rolled back.
PostgreSQL supports savepoints. You can create savepoints within a transaction and roll back to that point when needed.
PostgreSQL uses write ahead logging for crash recoveries and point in time recoveries of the databases.
PostgreSQL uses multi-version concurrency control, which protects the transactions from viewing inconsistent data.
PostgreSQL supports table partitioning, which is used to improve the performance of the database in case of large tables.
PostgreSQL supports tablespaces to store some data into other filesystems to save I/O.
PostgreSQL employs host-based access control. You can specify the clients allowed for your database.
PostgreSQL provides object-level permissions, which can secure objects from other users.
PostgreSQL supports logging for more visibility on the database on what is happening and supports SSL for more security.
PostgreSQL supports replication of data, which is useful for load balancing.
PostgreSQL supports high availability using streaming replication in disaster scenarios.
PostgreSQL supports full text search for searching documents through queries.
PostgreSQL supports triggers and functions like other databases.
PostgreSQL supports custom procedural languages such as PL/pgSQL, PL/Perl, PL/TCL, PL/PHP, etc.
PostgreSQL supports hot-backup and point-in-time recovery and it supports write ahead logging.
PostgreSQL supports warm standby/hot standby/streaming replication and logical replication for load balancing and high availability.
PostgreSQL maintains data consistency internally using Multi-Version Concurrency Control (MVCC) . While querying a database, each transaction sees a snapshot of data (a database version) as it was some time ago. It prevents transactions from viewing inconsistent data and provides transaction isolation in concurrent transactions. Readers do not block writers and writers do not block readers.
Makes a record of each insert/update/delete before it actually takes place.
System does not consider data safe until the log is written to disk.
Provides recovery in case of system crash or failure.
Similar to Oracle REDO logs (no separate undo).
PostgreSQL has some limitations, which are generally defined by operating system limits, compile-time parameters, and data type usage.
Maximum database size is unlimited.
Maximum table size is 32TB.
Maximum row size is 1.6TB.
Maximum field size is 1GB.
Maximum rows per table is unlimited.
Maximum columns per table is 250 - 1600 depending on the column types.
Maximum indexes per table is unlimited.
Visit this link for more information: https://www.postgresql.org/about/ .
The PostgreSQL community keeps adding new features, which are for bigger databases for integrating with other Big Data systems. PostgreSQL is a reasonable choice for big data analytics, because of its development features. For example, PostgreSQL 9.5 includes BRIN indexes, faster sorts, cube/rollup/grouping sets, FDWS, tablesamples, etc. These features ensure that PostgreSQL continues to have a strong role in the rapidly growing Open Source Big Data marketplace.
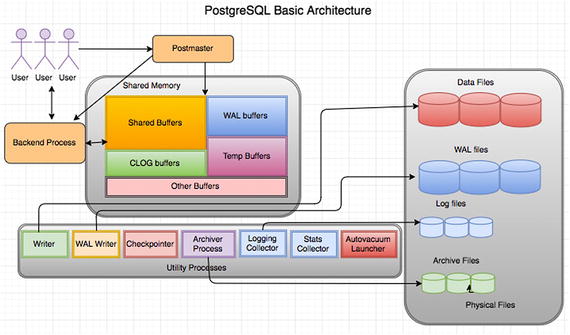
PostgreSQL Architecture
PostgreSQL utilizes a multi-process architecture, which is where one process is created per session.
It has three types of processes—primary (postmaster), per-connection backend process, and utility (maintenance processes). Each process is explained in detail in the following sections.
- 1.
Allocates the shared memory.
- 2.
Starts the utility processes.
- 3.
Starts semaphores (a semaphore is a label that indicates the status of the process).
- 4.
Accepts connections and spins off a backend for each new connection.
As soon as the postmaster receives the connection, it creates a backend process that does an authentication check as part of the parsing process (checking the query syntactically and symmetrically—which is syntax of the query and privileges of user on the objects involved in the query). If everything goes well, it attaches that backend process to that session. Everything that runs in the session will be taken care by that backend process. So everything for a connection will be taken care of by backend processes as well.
Each backend (server process) gets its pointers to shared memory from the postmaster. It is pretty disastrous if the postmaster dies with backends still running, so we have it do as little as possible, so that there isn’t as much that can crash it. Postgres does have a pool of shared memory; however, it does not have a library or dictionary cache stored in that memory. This means that statements need to be parsed and planned every time they are entered. If parse/plan overhead is an issue, use prepared statements instead. The parser is quite lightweight, so we feel that the overhead of parsing the query each time is acceptable.
Components of Shared Memory
PostgreSQL has shared memory that can be used by all sessions of the database. Each component of shared memory is explained in the following sections.
Shared Buffers
The biggest chunk of shared memory is the shared_buffers. When pages from a table or index are read from the OS, they are read into shared_buffers, and the backends reference the pages and their contents right there in the shared memory. An exception are temporary tables, where (since only the creating backend can reference the temp table) data is accessed in the temp_buffer space as much as possible. temp_buffer is separate. It is not in shared memory. It’s faster to access process-local memory like that because you don’t need to worry about pinning or locking the data, since you are not sharing it.
WAL Buffers
These are for buffering data to be written to the WAL files.
Temp Buffers
These are buffers created from temp tables.
CLOG (Commit LOG) Buffers
PostgreSQL holds the status of each ongoing transaction in buffers, which are called CLOG buffers. If there are any crashes or improper shutdowns of the database, these buffers will be used to determine the transaction status during the recovery.
Lock Space
Memory structures in shared memory are generally protected by “lightweight” locks, which are in shared memory. Tables are protected by “heavyweight” locks, which are also in shared memory (and themselves protected by lightweight locks). Of course, lightweight locks are protected by spinlocks.
Other Memory Areas
Other buffers are probably mostly SLRU buffers besides CLOG (which was the first user of the SLRU system). SLRU is good for data where you mostly want to use recently accessed data and you are done with it relatively quickly.
The opposite of shared memory is process-local memory—only the one process that allocates it can access it. Each SLRU system has a separate subdirectory. Shared memory is memory that all of the backend server processes can directly access. To prevent chaos, access to shared memory must follow some rules, which tends to make it a little slower, like locking areas of memory a process will be using. Process-local memory is allocated by one backend server process, and the other backend server processes can’t see it or use it, so it’s faster to access and there are no worries about another process trashing it while you’re using it.
Utility Processes
The WRITER process is responsible for writing the dirty buffers to data files.
The CHECKPOINTER process is for checkpoint. This process is responsible for creating safe points as a checkpoint record in current WAL from which a recovery can begin; the background writer tries to keep some pages available for re-use so that processes running queries don’t need to wait for page writes in order to have free spots to use in shared buffers. Both the checkpointer and writer processes write to the same files; however, the checkpointer writes all data that was dirty as of a certain time (the start of the checkpoint) regardless of how often it was used since the data was dirtied, whereas the background writer writes data that hasn’t been used recently, regardless of when it was first dirtied. Neither knows nor cares whether the data being written was committed, rolled back, or is still in progress.
The WAL WRITER process is for writing the dirty buffers in WAL buffers to WAL files.
The AUTOVACUUM launcher process launches autovacuum when required (depends on your autovacuum settings in PostgreSQL configuration file).
The STATS COLLECTOR process collects the statistics of objects in the database required by Optimizer to improve the performance.
The LOGGING COLLECTOR is responsible for writing database messages into database log files. According to the level set in the configuration file, it writes into log files.
The ARCHIVER process is responsible for copying files from the pg_xlog location to the archive location.
Directory Structure
Each table/relation/index in PostgreSQL gets a database file that can be extended to 1GB. So file-per-table, file-per-index.
Each tablespace is a directory under the PGDATA/pg_tblspc.
Each database that uses that tablespace gets a subdirectory under PGDATA/pg_tblspc.
Each relation using that tablespace/database combination gets one or more files, in 1GB chunks.
Additional files used to hold auxiliary information (free space map, visibility map) look like 12345_fsm, 12345_vm.
Each file name is a number that’s called an Object ID (OID).
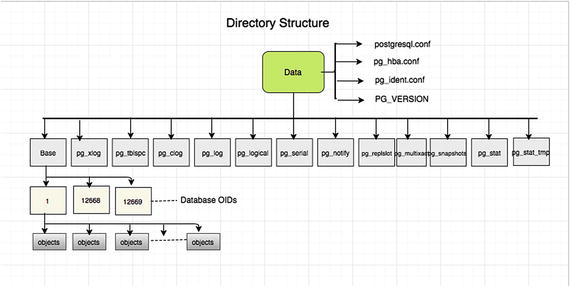
PostgreSQL directory structure
You can get a detailed description at https://www.postgresql.org/docs/current/static/storage-file-layout.html .
The catalog cache is information from the system tables, which describes the tables, indexes, views, etc. in the database. If you had to re-read that from the system tables each time, it would be slow. Even shared memory would be clumsy for that, so each backend process has its own cache of system catalog data for fast lookup.
When anything changes, all backends are sent a signal to update or reload their cache data. When pages are read or written, they go through the OS cache, which is not directly under PostgreSQL control. The optimizer needs to keep track of a lot of information while it parses and plans a query, which is why that is shown. A plan has execution nodes, some of which may need to use memory. That is where work_mem comes in—a sort or hash table (as examples) will try not to exceed work_mem for that node. It is significant that one query might use quite a few nodes, which each allocate memory up to work_mem. But since most queries are simpler and might not use any work_mem allocations, people often do their calculations based on an expected maximum of one allocation per backend (i.e., per connection). But that could be off by quite a bit if all connections are running queries with five nodes allocating memory.
It is worth noting that if there is enough RAM on the machine to have a good-sized OS cache, a PostgreSQL page read will often just be a copy from OS cache to pg shared_buffers, and a page write will often just be a copy from pg shared_buffers to the OS cache. The fsync of tables is the part of the checkpoint process when they are actually written from the OS to the storage system. But even there a server may have a battery-backed RAM cache, so the OS write to storage is often just a copy in RAM. That is, unless there is so much writing that the RAID controller’s cache fills, at which point writes suddenly become hundreds of times slower than they were.
Other interesting dynamics are pg will try to minimize disk writes by hanging onto dirty buffers (ones that have logically been updated) before writing them to the OS. But buffers may need to be written so they can be freed so that a new read or write has a buffer to use. If a request to read a page or write to a new buffer can’t find an idle page, the query might need to write a buffer dirtied by some other backend before it can do its read (or whatever). The background writer can help with this. It tries to watch how fast new pages are being requested and write dirty pages at a rate that will stay ahead of demand.
Installation
Source installation
Binary installation
RPM installation
One-click installer
As PostgreSQL is Open Source, the source code is available on the postgresql.org website. We are going to cover each installation in detail in the following sections.
Source Installation
Source installation is nothing but compiling the source code of PostgreSQL. Here are the high-level steps that you should follow to install from source.
- 1.
Download the PostgreSQL source from here:
https://ftp.postgresql.org/pub/source/v9.6.2/postgresql-9.6.2.tar.bz2
- 2.
Unzip the downloaded file:
unzip postgresql-9.6.2.tar.bz2 - 3.
Go inside the directory created by unzip of Step 2 and run the configure command as follows:
cd postgresql-9.6.2./configureA simple configure installs in the default location, which is /usr/local/pgsql. If you want to install it in a different location, use the prefix option to configure it.
--prefix=/location/to/install/Configure basically looks at your machine for dependency libraries necessary for PostgreSQL. It reports if your machine is missing any. You can install missing libraries first and then re-run the configure command. So basically, it prepares your machine for installation. - 4.
Once the compilation is done, you can use make and make install to complete the installation.
make -j 8 && make install-j is for parallel jobs. Define this value based on your CPU cores, which can be utilized for the compilation job.
- 5.
Once the installation is done, create a data directory where data can be stored. You need to create the postgres user to own that data directory.
Each instance of PostgreSQL is referred to as a “cluster”. This means an instance can have multiple databases . Don’t get confused with a cluster of server nodes. Each data directory contains all the data and configuration files of one instance. So each instance can be referred to in two ways:Location of the data directory
Port number
A single server can have many installations and you can create multiple clusters using initdb.
Here are the commands that need to be executed to create a user, create data directory, and initialize that data directory :
adduser postgresmkdir /usr/local/pgsql/datachown postgres /usr/local/pgsql/datasu - postgres/usr/local/pgsql/bin/initdb -D /usr/local/pgsql/dataNote that /usr/local/pgsql/data is the data directory. initdb is the binary to initialize a new data directory.
- 6.
You need to start the data directory to connect the database. pg_ctl is the binary to start/stop a PostgreSQL data directory.
/usr/local/pgsql/bin/pg_ctl -D /usr/local/pgsql/data start
Details of basic requirements, installation procedure, post-installation steps, and supported platforms are found at https://www.postgresql.org/docs/current/static/installation.html .
Binary Installation
This installation is nothing but downloading already compiled binaries (from source installation) from different repositories maintained by communities and PostgreSQL support vendors.
Binary installation expects the server to satisfy all the dependencies. However, most of the package managers are smart enough to detect the required dependencies and install them if required.
There are portable/relocatable binaries also, such as what BigSQL package manager offers at https://www.openscg.com/bigsql/package-manager/ .
RPM Installation
PostgreSQL maintains a repository where you can see all versions of PostgreSQL at https://yum.postgresql.org/rpmchart.php
- 1.
Install the repository RPM:
yum install https://download.postgresql.org/pub/repos/yum/9.6/redhat/rhel-7-x86_64/pgdg-redhat96-9.6-3.noarch.rpm - 2.
Install the client packages :
yum install postgresql96 - 3.
Optionally install the server packages:
yum install postgresql96-server - 4.
Optionally initialize the database and enable automatic start:
/usr/pgsql-9.6/bin/postgresql96-setup initdbsystemctl enable postgresql-9.6systemctl start postgresql-9.6 - 5.
Post-installation.
Automatic restart or auto-initialization of the data directory is not enabled for Red Hat family distributions due to some policies. You need to perform the following steps manually to complete your database installation.
On Fedora 24 and other later derived distributions:
Installers for Windows and Mac
The easiest way to install is through installers. One-click installers provide a graphical wizard for installation. These installers have options for choosing your installation and data directory locations, as well as ports, user, passwords , etc.
Download the installers from here (according to your operating system): https://www.openscg.com/bigsql/postgresql/installers/
Double-click on the installer and follow the GUI wizard.
Setting Environment Variables
PATH: Should point to the correct bin directory
PGDATA: Should point to the correct data cluster directory
PGPORT: Should point to the correct port on which the database cluster is running. You will get the port number of the instance from the port parameter in the postgresql.conf file.
PGUSER: specifies the default database user name.
Edit the .profile or .bash_profile file to set these variables. In Windows, set these variables using the My Computer Properties page. More environment variables are found here: https://www.postgresql.org/docs/current/static/libpq-envars.html .
Getting Started with PostgreSQL
This section talks about some basic commands that are very helpful on a day-to-day basis. The following examples involving service startup are on Linux . However, these commands work across all platforms.
The pg_ctl command can be used to control the PostgreSQL database. To check the status of the PostgreSQL instance:
Or:
To start the PostgreSQL service:
To start the Postgresql service as a Postgres user (an operating system user), use this command:
To stop the PostgreSQL service, use this command:
Reload PostgreSQL means to force the PostgreSQL service to allow the modifications in postgresql.conf/pg_hba.conf. To reload the PostgreSQL service:
Or:
Use the psql utility to connect to the database. It needs a port, username, hostname, and database name to be passed. An example:
To get the object details, PostgreSQL has meta-commands that help you get the list of objects . Connect to the psql prompt and execute these commands.
dv: Meta command to get the list of views
di: List of indexes
d: Table description
You can find all these meta-commands by executing ? in the psql terminal. These commands are not supported in any other applications.
To monitor the database connections, such as which application user executes which query from which IP, you can use the following query to list all the connection details of a cluster.
To list all the active connections (the connections that are doing some actions on the database), use this command:
To list all the connections that are waiting, use this command.
To get the current locks in database, use this command.
Configuration Parameters
postgresql.conf holds parameters used by clusters. Parameters are case-insensitive.
postgresql.conf is normally stored in data directory.
Initdb installs a default copy of the config file.
Some parameters take effect only on server restart (pg_ctl), while others go into effect by signaling the postmaster.
# is used for comments.
One parameter allowed per line.
They can also be specified as command-line option.
Some parameters can be changed per session using the SET command and some parameters can be changed at the user level using ALTER USER. Some parameters can be changed at the database level using ALTER DATABASE. The SHOW command can be used to see settings. The pg_settings catalog table lists the settings information.
Connection Settings
listen_addresses (default localhost): Specifies the addresses on which the server is to listen for connections or from which hosts you can connect to instance. Provide user-comma separated host IPs or use * for all hosts.
port (default 5432): The port the server listens on. The default is 5432; however, you can use any port number that is free on the server.
max_connections (default 100): The maximum number of concurrent connections the server can support. If you want to increase this parameter, remember that you can see an increase in memory in case of all concurrent sessions.
superuser_reserved_connections (default 3): Number of connection slots reserved for superusers. If max_connections are 100, the normal user connections would be 100 – superuser_reserved_connections. These are reserved for the worst case when an instance is running out of connections for normal users.
unix_socket_directory (default /tmp): Directory to be used for UNIX socket connections to the server.
Security and Authentication Settings
authentication_timeout (default 1 minute): Maximum time to complete client authentication, in seconds. Default is one minute and it will error out after one minute.
ssl (default off): Enables SSL connections for more security.
ssl_ciphers: List of SSL ciphers that may be used for secure connections.
Memory Settings
shared_buffers (default really small): Size of PostgreSQL shared buffer pool in shared memory. Rule of thumb is 25% of system memory to a maximum of 8GB on Linux; or 512MB on Windows.
temp_buffers (default 8MB): Amount of memory used by each backend for caching temporary table data. It is used only when temporary tables are created.
work_mem (default 1MB): Amount of memory used for each sort or hash operation before switching to temporary disk files. Default is conservative, but don't overdo it. If you increase, it may cause the system to go out of memory. Rule of thumb is 25% of RAM/max_connections.
maintenance_work_mem (default 16MB): Amount of memory used for each index build or VACUUM. It is useful to increase it at the session level when you are running VACUUM or CREATE INDEX, but not at the instance level.
Query Planner Settings
random_page_cost (default 4.0): Estimated cost of a random page fetch, in abstract cost units. May need to be reduced to account for caching effects. It is used during index scans.
seq_page_cost (default 1.0): Estimated cost of a sequential page fetch, in abstract cost units. May need to be reduced to account for caching effects. Must always set random_page_cost >= seq_page_cost to get better performance. However, the planner decides which scan is to be performed based on the stats. You can force seq scan or index scan by altering these parameters, when necessary.
effective_cache_size (default 128MB): Used to estimate the cost of an index scan. Rule of thumb is 75% of system memory.
Write Ahead Log Settings
wal_level (default minimal): Determines how much information is written to the WAL. Other values are archive and hot_standby. Set to archive if you want to enable only archiving for point in time recovery and set to hot_standby if you want to set up a replication.
fsync (default on): Turn this off to make your database much faster and silently cause arbitrary corruption in case of a system crash. It is not recommended to turn it off.
wal_buffers (default 64KB): The amount of memory used in shared memory for WAL data. May need to be raised to 1-16 MB on busy systems.
checkpoint_timeout (default 5 minutes): Maximum time between checkpoints. After this much time, the checkpoint will be performed automatically.
max_wal_size (integer): Maximum size to let the WAL grow to between automatic WAL checkpoints. This is a soft limit; WAL size can exceed max_wal_size under special circumstances, like under heavy load, a failing archive command, or a high wal_keep_segments setting. The default is 1GB. Increasing this parameter can increase the amount of time needed for crash recovery. This parameter can only be set in the postgresql.conf file or from the server command line.
min_wal_size (integer): As long as WAL disk usage stays below this setting, old WAL files are always recycled for future use at a checkpoint, rather than removed. This can be used to ensure that enough WAL space is reserved to handle spikes in WAL usage. For example, when running large batch jobs. The default is 80MB. This parameter can only be set in the postgresql.conf file or from the server command line.
Where to Log
log_destination: Destination to log written types. Valid values are combinations of stderr, csvlog, syslog, and eventlog, depending on the platform.
logging_collector: Enables advanced logging features. csvlog requires logging_collector. Enabling it creates a utility process called “logger process,” which takes care of writing into log files.
log_directory: Directory where log files are written. Requires logging collector to be turn on.
log_filename: Format of log file name (e.g., postgresql-%Y-%M- %d.log). Allows regular log rotation. Requires logging collector.
log_rotation_age: Automatically rotates logs after this much time. Requires logging_collector to be turn on.
log_rotation_size: Automatically rotates logs when they get this big. Requires logging_collector to be turn on.
When to Log
client_min_ messages (default NOTICE): Messages of this severity level or above are sent to the client. Other severity levels are LOG, WARNING, ERROR, FATAL, and PANIC.
log_min_messages (default WARNING): Messages of this severity level or above are sent to the database log files.
log_min_error_statement (default ERROR): When a message of this severity or higher is written to the server log, the statement that caused it is logged along with it.
log_min_duration_statement (default -1, disabled): When a statement runs for at least this long (specified in milliseconds), it is written to the server log, with its duration.
What to Log
log_connections (default off): Log successful connections to the server log. Useful when generating reports on the number of connections based on log files.
log_disconnections (default off): Log some information each time a session disconnects, including the duration of the session. Useful when generating reports on number of connections based on log files.
log_error_verbosity (default “default”): Can also select “terse” or “verbose”.
log_duration (default off): Log duration of each statement. Useful when you want to see the duration of each statement that is logged.
log_line_prefix: Additional details to log with each line. You can log details of each statement such as hostname, pid, database/username, duration, etc.
log_statement (default none): Legal values are none, ddl, mod (DDL and all other data-modifying statements), or all. Though all is specified, it will not log error statements, as this is applicable to the statements that pass parsing.
log_temp_files (default -1): Log temporary files of this size or larger in kilobytes. These files are created when work_mem is not sufficient during the sorting of the queries.
Background Writer Settings
bgwriter_delay (default 200 ms): Specifies time between activity rounds for the background writer. Resting time of background writer after it writes and before it starts writing again.
bgwriter_lru_maxpages (default 100): Maximum number of pages that the background writer may clean per activity round. Increasing it makes the background writer write more buffers and may cause some I/O on the server.
bgwriter_lru_multiplier (default 2.0): Multiplier on buffers scanned per round. By default, if the system thinks 10 pages will be needed, it cleans 10 * bgwriter_lru_multiplier of 2.0 = 20.
Vacuum Cost Settings
vacuum_cost_delay (default 0 ms): The length of time, in milliseconds, that the process will wait when the cost limit is exceeded. By default, it does not wait.
vacuum_cost_page_hit (default 1): The estimated cost of vacuuming a buffer found in the PostgreSQL buffer pool.
vacuum_cost_page_miss (default 10): The estimated cost of vacuuming a buffer that must be read into the buffer pool.
vacuum_cost_page_dirty (default 20): The estimated cost charged when vacuum modifies a buffer that was previously clean.
vacuum_cost_limit (default 200): The accumulated cost that will cause the vacuuming process to sleep.
Autovacuum Settings
autovacuum (default on): Controls whether the autovacuum launcher runs and starts worker processes to vacuum and analyze tables. It may create some load on heavily active tables (update/deletes); however, it increases the performance of the table. It is not recommended to turn this off.
log_autovacuum_min_duration (default -1): Autovacuum tasks running longer than this duration (in milliseconds) are logged.
autovacuum_max_workers (default 3): Maximum number of autovacuum worker processes that may be running in parallel at one time.
We covered a few of the most important parameters. However, there are a lot of parameters not covered here. For more information, visit https://www.postgresql.org/docs/9.5/static/runtime-config.html .
Summary
This chapter covered the detailed architecture of PostgreSQL and its design and data limits. We went through the installation procedures and showed you how to get started with PostgreSQL. We also looked at the directory structure and some basic parameters. The next chapter covers one of the main PostgreSQL service cloud vendors, Amazon Cloud. We talk about the types of instances, including how to choose one, and the limitations and advantages of EC2 and RDS instances.