
This chapter covers Amazon Web Services (AWS) and how to get started with it. We talk about availability zones and getting started with AWS and answer queries that most of the people raise before they choose AWS. We cover only a few services related to PostgreSQL, like ec2 machines and RDS instances. We describe the step-by-step process of creating each service, which will give you a better idea about which option you should choose for your environment.
Amazon Cloud or Amazon Web Services
As discussed in Chapter 1, AWS is widespread across 16 geographic regions with 43 availability zones. It is about to launch four more regions with 11 availability zones. AWS also has over 66 edge locations or CDN endpoints for CloudFront.
AWS Regions and Availability Zones
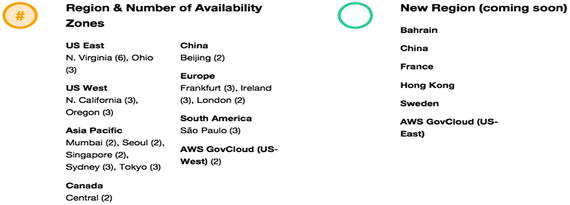
The 16 geographic regions across various locations in the world
As seen in Figure 3-1, each region or location has at least two availability zones (AZ) to enable high availability and disaster recovery features for production environments . An availability zone is a data center in simple terms. To enable high availability, all the availability zones in a region are connected through a fast and private fiber optic network with redundant power and security. Choosing multiple availability zones for your infrastructure helps you build redundant applications that manage failover automatically. You can build replication between multiple regions or within the same region using availability zones.
Getting Started with AWS
How do you create an AWS account?
What is the difference between an RDS and EC2 instance?
When do you choose between an RDS and an EC2 for PostgreSQL?
How do you create a PostgreSQL RDS instance or an EC2 instance on AWS?
How do you choose a region? When should you choose a multi-availability zone and how?
How should you determine the correct specifications or instance type?
What are all services you need to know to implement PostgreSQL on AWS?
How can you monitor PostgreSQL on AWS?
Is PostgreSQL on AWS secured?
How do you choose a VPC?
How do you encrypt data in motion and data at rest?
How do you take backups of PostgreSQL on AWS?
How is user management and privileged access control achieved on AWS?
What is Aurora PostgreSQL and how is it different from Community PostgreSQL?
All these questions are answered in the next pages.
Creating an AWS Account
Creating an AWS account is very easy and user friendly. Using the following link, you can directly land on the page that requires you to enter your AWS account name, email address, and password. See https://portal.aws.amazon.com/billing/signup .
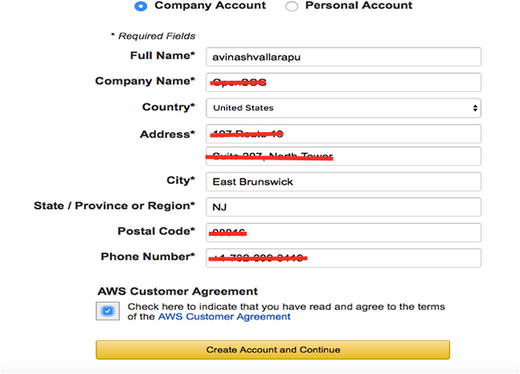
Creating the account
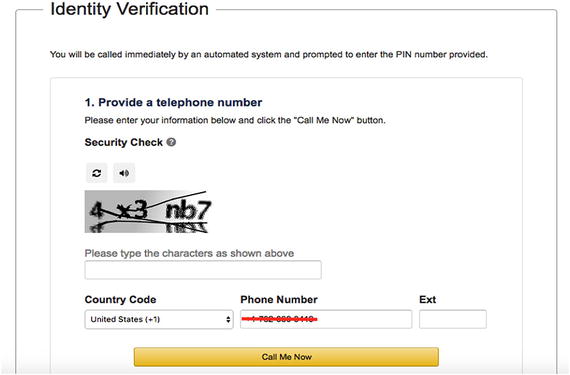
Provide a phone number for verification
Basic support plan
Developer support plan
Business support plan
Enterprise support plan
If you are planning to try AWS for the first time, feel free to choose the Basic support plan, which is available at no extra cost. To see more details on the support plans offered by AWS, visit https://aws.amazon.com/premiumsupport/compare-plans/ .
Once you have selected your support plan, you are done with AWS account creation. It may take up to 24 hours for your account to be activated. AWS should send you an email if they need more details from you.
Choosing an AWS Service
As you have already seen the procedure for creating an AWS account, let’s see how you can get to the services offered by AWS. Once you have logged in to your AWS account, click on the Services icon on the top-left corner of your AWS Console. You can use the following URL to land on the services offered by AWS.
https://console.aws.amazon.com/console/
Relational Database Service (RDS)
Elastic Compute Cloud (EC2)
RDS
As discussed in the Chapter 1, Amazon RDS is a managed relational database service or a DBaaS (Database as a Service) offered by AWS.
Amazon RDS offers a customizable database service that allows scaling of components like CPU, memory, storage, and IOPS independently. RDS enables developers to focus on building their applications, as many of the time-consuming tasks such as database provisioning, administration, backups, database software installation, database setup, upgrades, patching, and monitoring can be automated and left to AWS. Amazon provides this service for a variety of database software products such as PostgreSQL and MySQL.
Choosing an RDS Instance
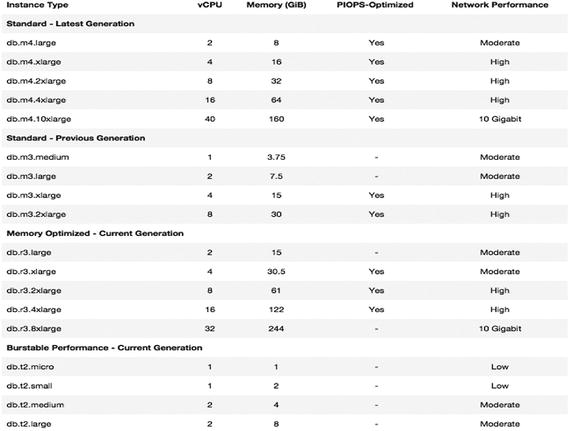
List of instance types
General Purpose (SSD) Storage
Provisioned IOPS (SSD) Storage
General Purpose (SSD), or gp2 , is suitable for applications that don’t require guaranteed and consistent IOPs and are not concerned about huge IO intensive transactions. IOPS is the number of input/output operations second. This storage type scales at a rate of three IOPS per gigabyte of storage. For example, 33.33GB of storage gets you 100 IOPS . There is also a hard limit of 10,000 IOPS being the maximum for gp2 storage when you choose a storage of size 3,334GB and above. To get more IOPS, you need to choose more storage. Choosing 100GB General Purpose (SSD) storage gets you 300 IOPS. Choosing gp2 type of storage gets you an initial credit balance of IOPS (5.4 million IOPS), which can be used automatically by the instance to sustain a burst performance when large amounts of IO are happening. These credits can sustain 3000 IOPS for 30 minutes. Hence, if you are building an OLTP environment that gets a huge number of transactions for longer durations, needing more IOPS, you may not choose this storage type.
Provisioned IOPS (SSD) Storage is a storage type that lets you provision your instance IOPS between 3 to 10 times of your storage, unlike General Purpose Storage. That means that choosing a storage of size 1,000GB lets you choose an IOPS between 3,000 to 10,000, incremented by 1000. 300GB of storage would let you choose an IOPS between 1000 to 3000, which are always rounded off to multiples of 1000. This is why the minimum storage you can choose while choosing the Provisioned IOPS Storage type is 100GB and it’s scalable up to 6144GB.
You can choose up to 30,000 IOPS per database instance irrespective of the instance type you choose. Hence, your instance is now capable of processing a bigger number of I/O requests concurrently if you have chosen this storage type. Provisioned IOPS storage is highly suitable for OLTP workloads. Increased IOPS refers to decreased IO latency in a system with huge transactions, which makes your transactions complete more quickly. If you want to modify your storage type from gp2 to Provisioned IOPS, doing so requires downtime. Storage, once allocated, can be upgraded without downtime, but it is not possible to downgrade your storage size.
Creating PostgreSQL on an RDS
- 1.As you saw earlier, you need to search for the RDS service in the AWS Console. Once you click on RDS, you should land on an RDS Dashboard. Click on Instances and you should see an option to launch a DB instance . Figure 3-5 shows the options highlighted for your understanding.
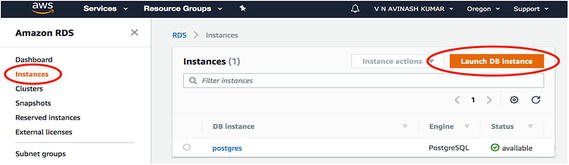 Figure 3-5
Launching the DB instance
- 2.Once you click on Launch DB Instance, you should select your engine . Since we are talking about PostgreSQL, lets select PostgreSQL, as highlighted in Figure 3-6. Click Next to continue.
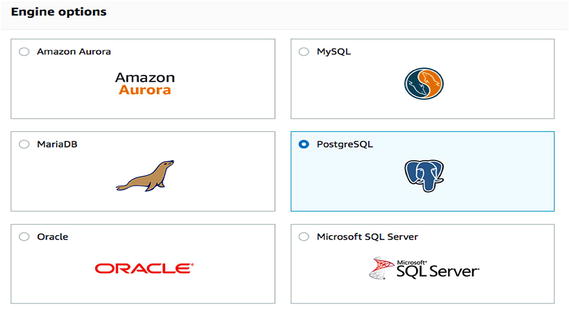 Figure 3-6
Select PostgreSQL as the engine
- 3.Now you need to select your use case from the two options—production and development (see Figure 3-7). If you are building this service for production, select production. However, there is no difference between production and development except for the Multi-AZ and Provisioned IOPS selected by default. You can choose the same options if you select development as your use case. Click Next to proceed.
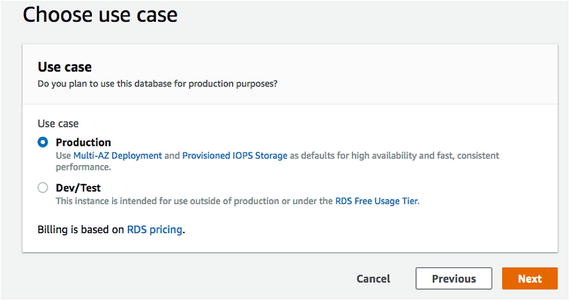 Figure 3-7
Select the use case
- 4.
This step is crucial. You need to select the PostgreSQL version you want to install on your RDS instance. AWS takes care of the installation automatically. You see an option to choose your instance class or instance type. Among the list of instances available, you need to select the type that suits your environment in terms of CPU and memory. As seen in Figure 3-8, Create Replica In Different Zone is automatically highlighted for you. As discussed at the beginning of this chapter, there are at least two availability zones in every region. Amazon creates a replica that can be used for reads and high availability when you select this option. Choosing a use case as production will select this option automatically for you.
In the same step, you can see Storage type - Provisioned IOPS selected by default. As discussed, you need to select your IOPS based on a mathematical formula rounded off to multiples of 1000. Otherwise, you’ll see an error that helps you choose the correct numbers, as shown in Figure 3-8.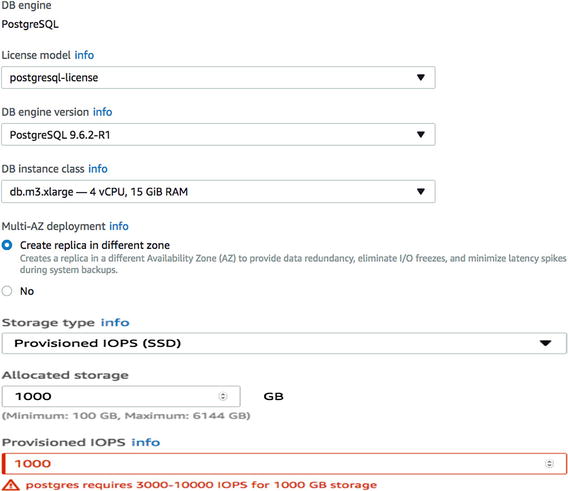 Figure 3-8
The error tells you the correct range for the entry
On the same page, once you scroll down to the end, you should see Settings (see Figure 3-9). Choose a name that will help you identify this instance. Look at the standard naming conventions at your organizational level. You can choose your own username and passport that helps you get superuser access to this instance. Click Next to proceed.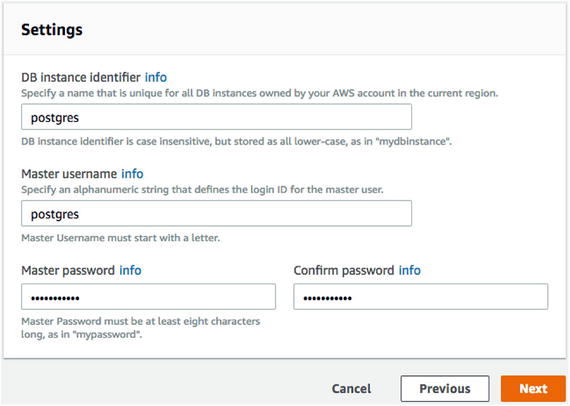 Figure 3-9
Fill in the settings here
- 5.
Now you’ll land on the Advanced Settings page (see Figure 3-10). You can create your own VPC or choose an existing VPC. One of the important decision is whether to let your instance be publicly accessible. If you need to let other EC2 instances or devices outside the VPC of your instance connect to your instance, you need to choose Yes. However, you need to specifically choose the VPC so devices can connect to your instance explicitly.
There are multiple availability zones in every region, and you can choose one AZ from your region in which to create this instance using the dropdown under Availability Zone.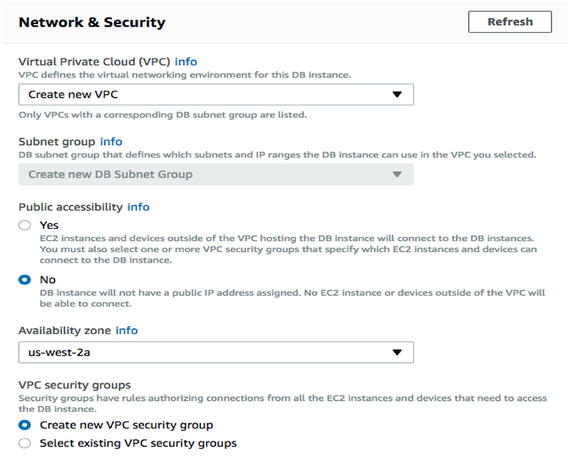 Figure 3-10
The advanced settings page
- 6.On the same page , choose your default database name and the port on which this instance should run. You can select Yes for encryption if you would like to encrypt your data at rest, such as database storage, snapshots, backups, etc. See Figure 3-11.
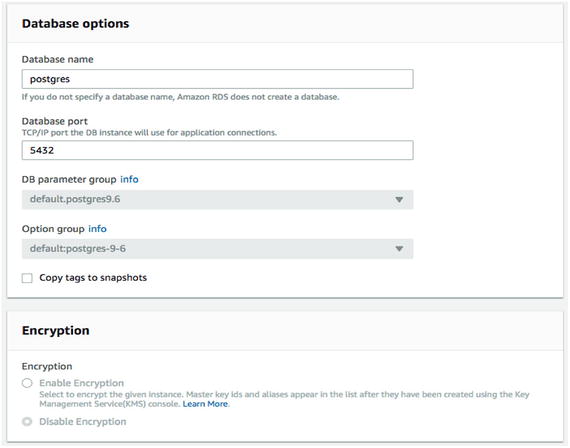 Figure 3-11
Choose the database name and port
- 7.
Once you scroll down, you can choose your backup retention period, which is modifiable at later stages. AWS automatically takes care of your backups . You can enable more detailed monitoring by selecting Enable Enhanced Monitoring under Monitoring. See Figure 3-12.
- 8.The final step before launching the database instance is to enable or disable the automatic maintenance of your instance. You must be careful while enabling automatic maintenance, as it can perform minor version upgrades of your PostgreSQL instance automatically during a scheduled maintenance window. You can choose your maintenance window or let AWS proceed with the maintenance window, which would be announced in their community forums. I prefer to choose No to take care of such maintenance in my production environments through a planned downtime.
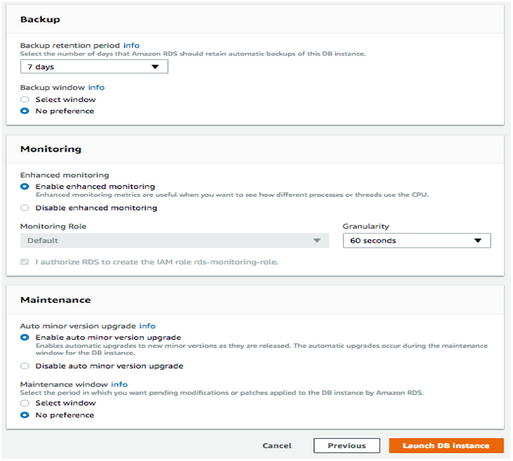 Figure 3-12
Set up the backup, monitoring, and maintenance features of you database instance
Now, click on Launch DB Instance to finish creating your RDS instance.
EC2
EC2 stands for Elastic Compute Cloud. Unlike an RDS instance, this web service allows users to configure a compute capacity in the cloud with complete control over it. EC2 instances can be provisioned in no time, irrespective of the number of instances you create simultaneously. It is much easier to scale capacity on demand. EC2 instances get root access to users and allow them to install any external applications and software on the server without hassle. Amazon EC2 also commits to a Service Level Agreement of 99.95%.
Spot instances
Reserved instances
Dedicated hosts
Dedicated instances
Elastic GPUs
EC2 Spot Instances
Spot instances help users save more money for a workload that is tolerant for interruption. Users can create a spot instance for non-mission critical requirements such as analytics and testing. Using spot instances, you can choose a price you want to pay for an instance you choose, per hour, through a bid. You can view the current spot price and choose a price higher than that through a bid. This way, you can provision your spot instances at the same time. The history of spot pricing is available on the Amazon website and it will help you understand the spot price in the last 90 days. Using this history, you can choose a price that can sustain for a longer period. When the bid reaches or exceeds the spot price chosen by the user, the service is interrupted. The reason that many users choose a spot instance is because it is very cheap when compared to a EC2 reserved instance but has the same performance.
Reserved Instances
Standard RIs: Help you choose an instance with a great discount without the feature of changing the instance family and other attributes.
Convertible RIs: Gets you a good discount (could be less than standard RIs) but allows you to change the attributes of the RI at the same or higher value.
Scheduled RIs: These instances best suit a predictable workload. For example, I perform a month-end report on the last day of the month or a weekly report every Sunday. You can select a Scheduled RI that would be available for launch for a specified time through a one-year term.
Dedicated Hosts
EC2 dedicated hosts help you create your own physical server. This makes it easier to launch your instances on your own dedicated host, which helps you meet your organizational compliance requirements. Dedicated hosts also allow you to use your existing software licenses, which are calculated on per socket, per core (or VM core) basis, subject to the terms and conditions of the software. You can let Amazon create your instance on your dedicated host explicitly.
Dedicated Instances
Dedicated instances run on hardware that is dedicated to a single customer. You may choose to launch an instance on your dedicated host. However, by choosing a dedicated instance, you would only pay per hour billing for the dedicated instance .
Elastic GPUs
AWS allows you to add virtual graphics, which is as easy as adding an EBS volume to an EC2 instance. Users do not have to choose a physical GPU that is very costly and choose a fraction of resources using elastic GPUs. Elastic GPU instances save users who are involved in 3D gaming and designing a lot of money.
General purpose
Compute optimized
Memory optimized
Accelerated computing
Storage optimized
General Purpose
- T2 instances: These instances are also referred to as burstable performance instances . These instances allow users to get more CPU performance than the baseline through CPU credits. CPU credits are accumulated depending on the idle time of an instance. More CPU credits can be accumulated by a bigger instance type. Environments or applications that are idle most of the time but require a burst performance while running a certain activity or analysis find this instance type better. Currently, you can choose up to 8 vCPUs and 32GB of RAM with EBS-Only. See Figure 3-13.
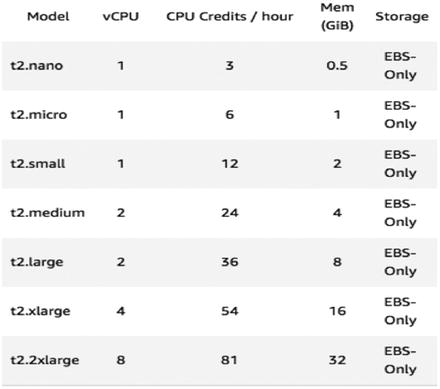 Figure 3-13
The T2 instances
- M3 instances: These instances are SSD-based storage Instances for fast I/O performance . You can choose up to eight vCPUs and 30GB RAM and 2 x 80GB of SSD storage. See Figure 3-14.
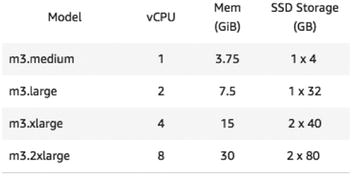 Figure 3-14
M3 instances
- M4 instances: These instances provide a great balance of CPU, memory , and network resources. Thus, it can be one of the instance types chosen by many applications. These instances are EBS optimized by default. They use 2.3GHz and 2.4GHz of Intel Xeon processors. See Figure 3-15.
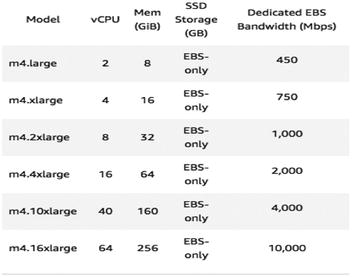 Figure 3-15
M4 instances
Compute Optimized
- C5 instances: These instances are chosen by users who deal with time-series data collection and machine learning, and gaming and video encoding, or by users who have a demand for high-performance web servers. This instance features a 3.0 GHz Intel Xeon processor, which can go up to 3.5 GHz using Intel Turbo Boost. The highest instance in this family consists of 72 vCPUs and 144GB of RAM with a dedicated network bandwidth. Figure 3-16 shows the type of instances available in this family of instances.
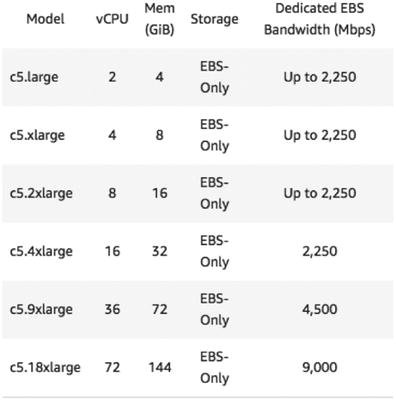 Figure 3-16
C5 instances
- C4 instances: These instances are built with Intel Xeon E5-2666 processors and are EBS-optimized. Applications needing high performance and users with gaming needs should choose an instance from this instance class. See Figure 3-17.
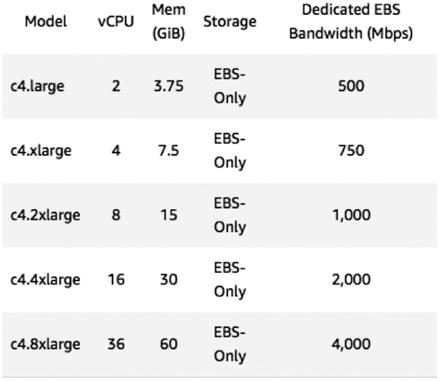 Figure 3-17
C4 instances
- C3 instances: These Instances are good for high performance with local SSD-based storage. They include Intel Xeon E5 processors with EBS-optimization available at an extra cost. See Figure 3-18.
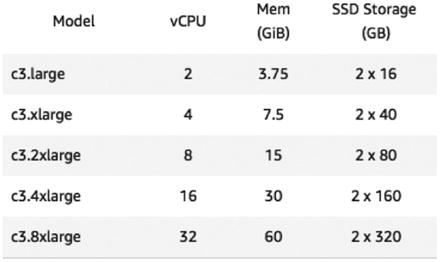 Figure 3-18
C3 instances
Memory Optimized Instances
- X1e instances: X1e instances are designed for high performance in-memory databases and memory intensive applications. These instances include a high frequency Intel Xeon E7 processor and the highest instance of this class can be configured with up to 3,904GB of RAM. These instances include SSD and are EBS-optimized by default. See Figure 3-19.
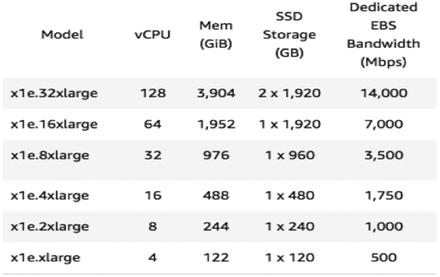 Figure 3-19
X1e instances
- X1 instances: Designed for memory intensive applications and databases that are designed for in-memory . These instances can scale up to 128 vCPUs and 1,952GB of RAM. These instances include SSD and are EBS-optimized by default. See Figure 3-20.
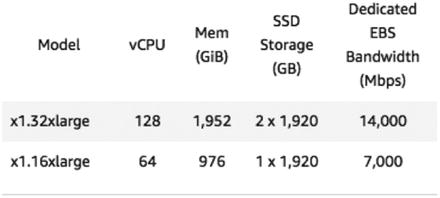 Figure 3-20
X1 instances
- R4 instances: R4 instances are considered for memory intensive applications with less memory and vCPUs requirements when compared to the X1e and X1 instances. These instances include SSD by default and reach up to 25GB of network performance. See Figure 3-21.
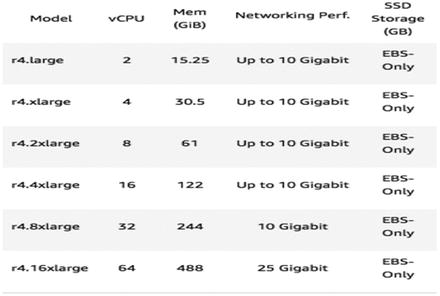 Figure 3-21
R4 instances
- R3 instances: RS instances are chosen for memory intensive applications but with less memory and vCPUs requirements than R4 instances. These instances include SSD storage by default. See Figure 3-22.
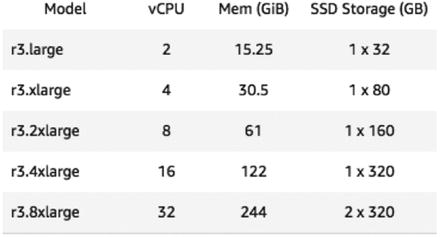 Figure 3-22
R3 instances
Accelerated Computing
- P3 instances: These instances better suit applications that deal with high-performance computing, speech recognition, high-end gaming, and 3D graphics. These instances offer up to 128GB of graphics memory and 488GB of RAM. These instances include eight NVIDIA Tesla V100 GPUs and a high frequency Intel Xeon E5 processor. Figure 3-23 shows the list of P3 instances currently available.
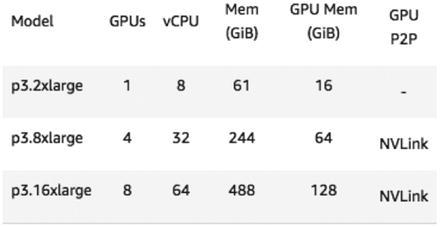 Figure 3-23
P3 instances
- P2 instances: P2 instances suit environments with massive parallel graphics processing and high performance computing dealing with 3D graphics rendering, etc. These instances have higher configurations available than P3 instances. You can choose up to 16 GPUs with 64 vCPUs and 732GB of RAM and 192GB of GPU memory. Figure 3-24 shows the list of instances available in P2.
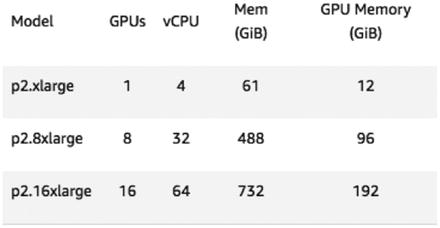 Figure 3-24
P2 instances
- G3 instances: These instances suit graphics intensive applications better. G3 instances feature an Intel Xeon E5 series processor with NVIDIA Tesla M60 GPUs, each with 2048 parallel processing cores and 8GB of memory. These instances are good for users looking for 3D visualizations, 3D rendering, and video encoding. These instances consist of an elastic network adapter with 25GBs of network bandwidth. Figure 3-25 shows the list of instances within the G3 instances family.
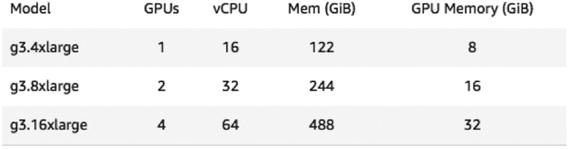 Figure 3-25
G3 instances
F1 instances: These instances offer high frequency Intel Xeon E5 series processors and SSD storage with an enhanced networking support. These instances especially offer customizable hardware with FPGAs (field programmable gate arrays). Users looking for Big Data analytics and genomics searches may choose this as their preferred instance type.
Figure 3-26 shows a list of instances available within this family.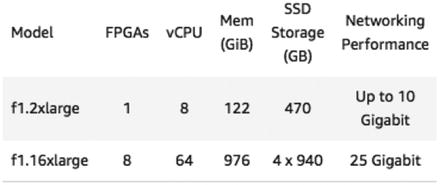 Figure 3-26
F1 instances
Storage Optimized Instances
- I3 - high I/O instances: These instances use NVMe SSD Storage up to 8 x 1.9 TB, which is good for a very high random I/O performance and a much higher sequential read throughout. These instances are preferred for data warehouse and NoSQL databases such as Cassandra, MongoDB, and Redis. Figure 3-27 shows a list of instances available in this instance class.
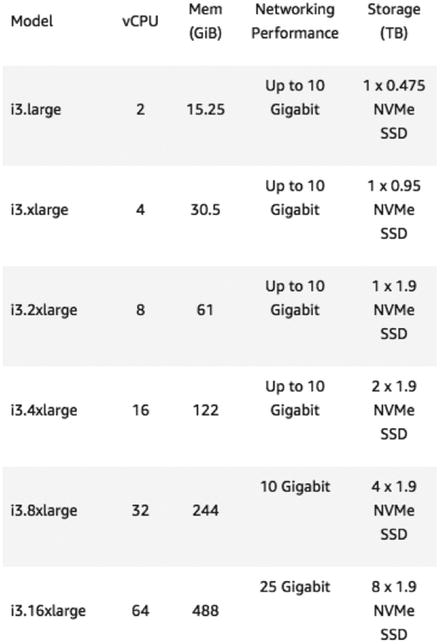 Figure 3-27
I3 instances
- D2 - Dense-storage instances: These instances offer up to 48TB of local HDD-based storage with a high disk throughout and enhanced networking support. These instances are better for MPP data warehousing environments , such as MapReduce and Hadoop. Figure 3-28 shows the list of instances available in this family.
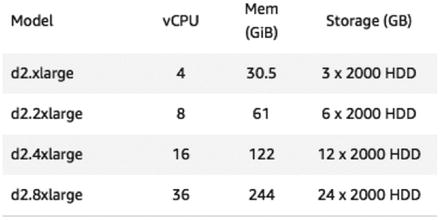 Figure 3-28
D2 instances
Creating an EC2 Instance
- 1.
In the AWS Services Dashboard, search for EC2. Once you see EC2 listed as one of your services, click on it.
- 2.You should see the screen similar to Figure 3-29. What you see here is an EC2 Dashboard that helps you launch an EC2 instance for the first time and manage your EC2 instances that are already created. You could see options to request spot instances, reserved instances, and dedicated hosts in the same EC2 dashboard.
 Figure 3-29
The EC2 Dashboard
- 3.Click on Launch Instance to launch your first EC2 instance. Once you click on Launch Instance, you should see an option to choose your AMI (see Figure 3-30). You can proceed to choose the Amazon Linux AMI or any option of your choice.
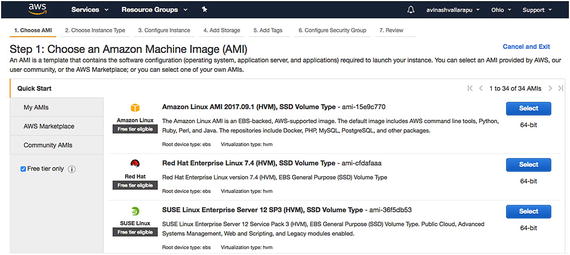 Figure 3-30
Choose your AMI from this window
- 4.Now you should land to the page that asks for the instance type . If you click on the dropdown for All Instance Types, you’ll see all the instance types discussed previously. You may choose the Free tier instance or an instance of your choice. Click on New: Configure Instance Details. See Figure 3-31.
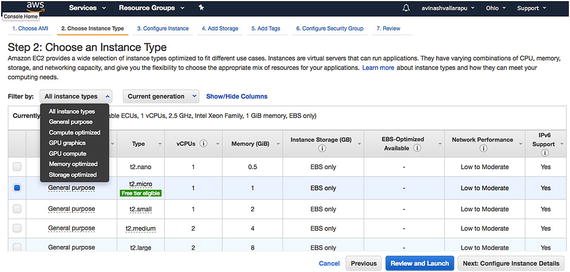 Figure 3-31
Choose an instance type
- 5.You get an option to configure your instance details , as shown in Figure 3-32. Leave the defaults if you are trying this for the first time. We discuss VPC and subnet more in the next chapters. If you click on Request Spot Instance, you can see if Spot Instances are currently available for the instance type you choose.
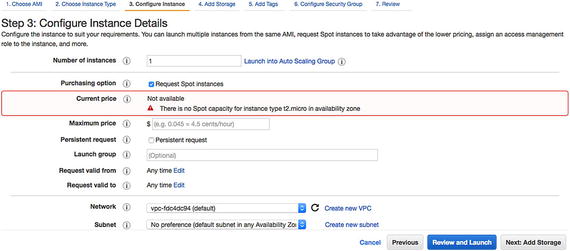 Figure 3-32
Configure your instance details here
- 6.Click on Next: Add Storage to add more storage. Once you click on Add Storage , you can see that the default root partition is already available (see Figure 3-33). You can click on Add New Volume and add more storage and choose the volume type that suits your needs. Free tier customers are eligible for up to 30GB of EBS General Purpose Storage for free. You can choose your preference and click Next: Add Tags.
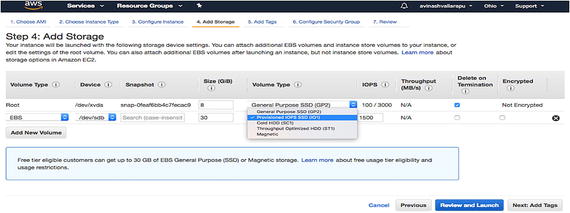 Figure 3-33
Adding storage
- 7.You can now add a tag to the instance you are creating and click on Next: Configure Security Group to proceed. See Figure 3-34.
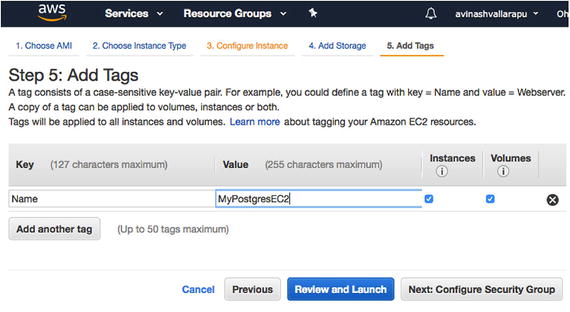 Figure 3-34
Add a tag to your instance
- 8.
Configuring security groups is important. You see a default SSH rule for port 22 already added as an option. You can edit it or add more rules for TCP or HTTP.
In Figure 3-35, a new rule is added which is the custom TCP for port 5432 from 10.0.0.0/32 series of IPs.
You should also see a warning that 0.0.0.0/0 is accessible by all IPs. You may modify it per your requirements. Once you have selected your rules, click on Review and Launch.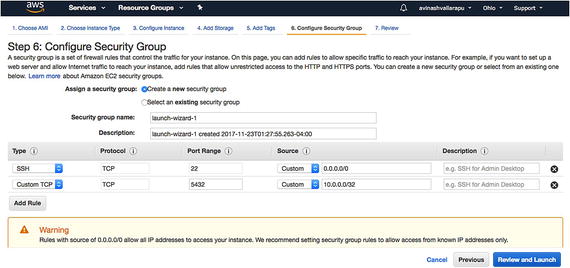 Figure 3-35
Configuring security groups
- 9.Now you get a box that asks you to select an existing key pair or create a new one. If it is the first time you are creating an EC2 instance, you can select Create a New Key Pair and type a key pair. Once you type a name, click on Download Key Pair. The downloaded key pair should be kept safe to ensure that you can connect to your EC2 instance once it has been created. It should take some time to launch your first EC2 instance. The status can be seen on the EC2 Dashboard.
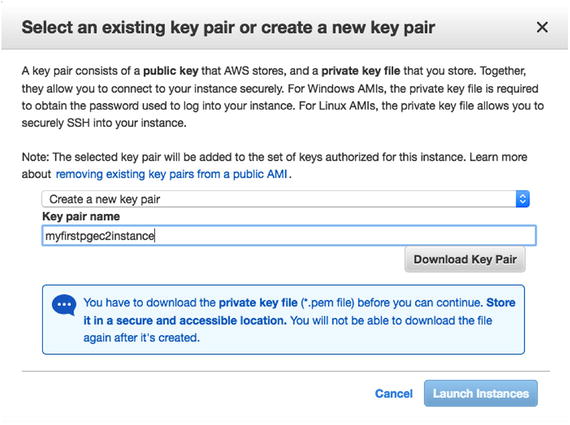 Figure 3-36
Creating a key pair
Connecting to Your First EC2 Instance
- 1.You can see the public IP or the public DNS that you can use to connect to your EC2 instance under Description, as seen in Figure 3-37.
 Figure 3-37
Look for the public IP or public DNS
- 2.Let’s say you are using Linux or a Mac. You can safely copy the .pem file to a location and modify its permissions so that only the owner has read and write access. Once that’s done, SSH to the EC2 instance using the default user ec2-user. See Figure 3-38.
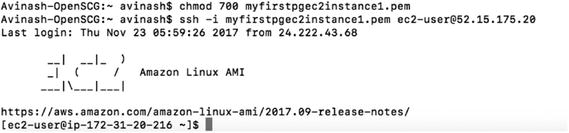 Figure 3-38
Copy the .pem file
This way, you can connect to your EC2 instance.
Creating Your First PostgreSQL on an EC2 Instance
- 1.
Copy and paste the following link in your EC2 instance to download the BigSQL tarball. See Figure 3-39.
python -c "$(curl -fsSL https://s3.amazonaws.com/pgcentral/install.py)"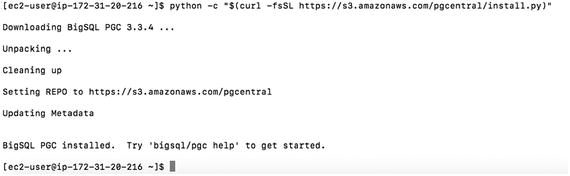 Figure 3-39
Downloading BigSQL
- 2.
- 3.Now start the installed PostgreSQL software. When you start it the first time, you will be asked to select your superuser password and re-enter it. This will be your Postgres superuser password. See Figure 3-41.
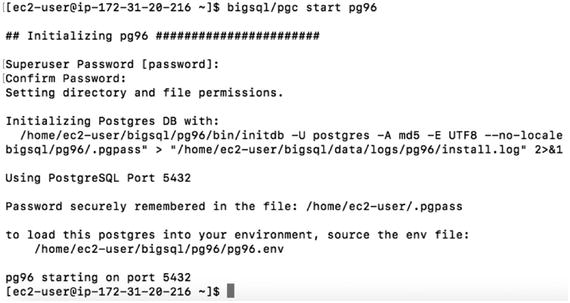 Figure 3-41
Enter the superuser password

Your first PostgreSQL instance
Summary
This chapter introduced AWS and its available zones. As only a few services are related to PostgreSQL, we covered only those. You learned about EC2 and RDS instances and how to create these services with the step-by-step process using snapshots for each step. We hope this chapter helps you get started with AWS services for PostgreSQL. In the next chapter, we cover Rackspace cloud and its services. We talk about the services that it provides for PostgreSQL and its backups.