
This chapter covers why we need backups for our machines and databases. The chapter talks about the backup options available with each cloud vendor and how to deal with them. Every cloud vendor is not the same when it comes to backup schedules and cost. We cover all the backup solutions available with each vendor.
Backups on the AWS Cloud
Amazon allows users to manage backups of RDS instances through a user-friendly console. These backups can also be encrypted and are easily recoverable. The AWS Console allows users to perform point in time recovery of their RDS instances with a few clicks. This makes it one of the easiest backup tools available on the cloud for users.
While creating an RDS instance, you can choose your backup policy. If you already have an RDS instance, you can easily modify and choose a backup strategy using the options covered here.
Backing Up an RDS Instance
- 1.
Log in to the Amazon AWS Console and search for RDS. Click on it.
- 2.
Click on Instances to view a list of Instances created using the account .
- 3.Choose the instance for which you want to modify the backup policy and click on Instance Actions, as shown in Figure 8-1. Click on Modify to proceed.
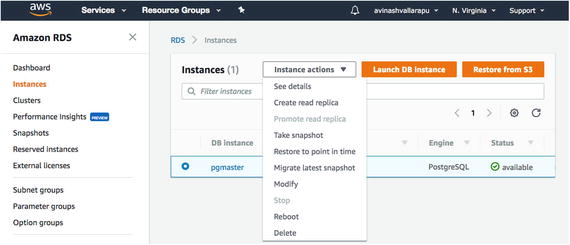 Figure 8-1
Accessing the instance actions
- 4.You can modify the backup retention period and the backup window, as shown in Figure 8-2.
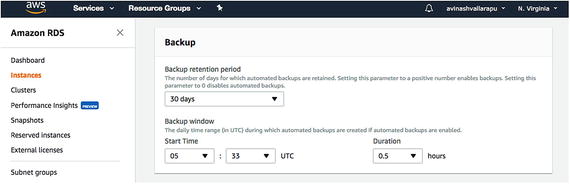 Figure 8-2
Modifying the backup options
- 5.Click on Continue and Modify DB Instance to make the changes, as shown in Figure 8-3.
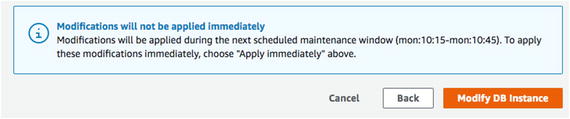 Figure 8-3
Click on Modify DB Instance
Restore an AWS RDS Instance from Backup
- 1.Choose the instance for recovery. Click on Instance Actions and choose Restore to Point in Time, as shown in Figure 8-4.
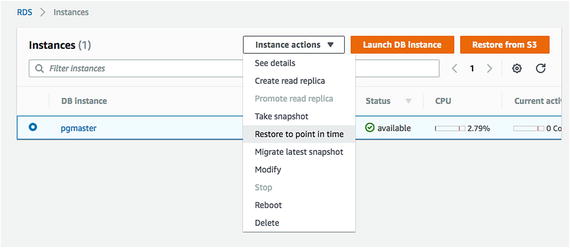 Figure 8-4
Restoring an instance to a point in time
- 2.You can either click on Latest Restorable Time or Custom to choose a custom restore time. See Figure 8-5.
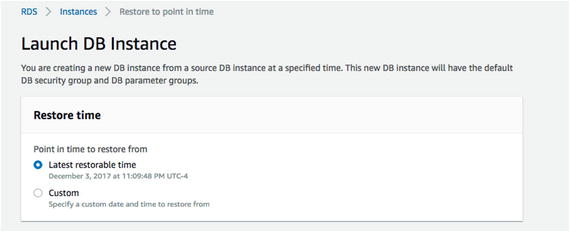 Figure 8-5
Choose the restore options
- 3.Now you can choose the DB Instance Identifier and click on Launch DB Instance to perform recovery of the database you selected. See Figure 8-6.
 Figure 8-6
The restore operation can take several hours
Backup of an EC2 Instance
The AWS Console does not give you an option to manage backup and recovery of a PostgreSQL database on an EC2 instance. You can use backup options such as pg_basebackup and pgbackrest or pgbarman to manage backups on an EC2 instance. However, these backups need not be stored locally.
S3 (Simple Storage Service). Object based storage.
GLACIER. Used to archive S3 backups as it is very low cost. Takes more time to restore.
EFS. Elastic File Service is block-based storage. This type of storage is good for DBs and apps.
EBS. Elastic Block Store for EC2 instances.
- 1.
On the AWS Cloud Console, search for S3 Service and click on it.
- 2.Click on Create Bucket, as shown in Figure 8-7.
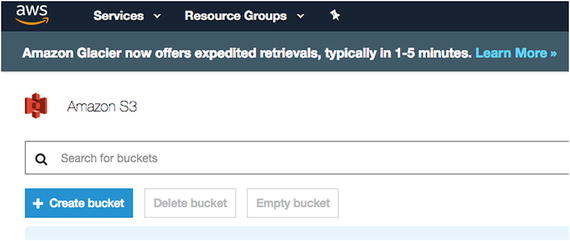 Figure 8-7
Click on Create Bucket
- 3.Choose a bucket name that can be uniquely identified for its purpose. Select the region where you want to create this bucket (see Figure 8-8). Click Next to continue. If you already have a bucket, you can copy the settings from that and skip the following steps.
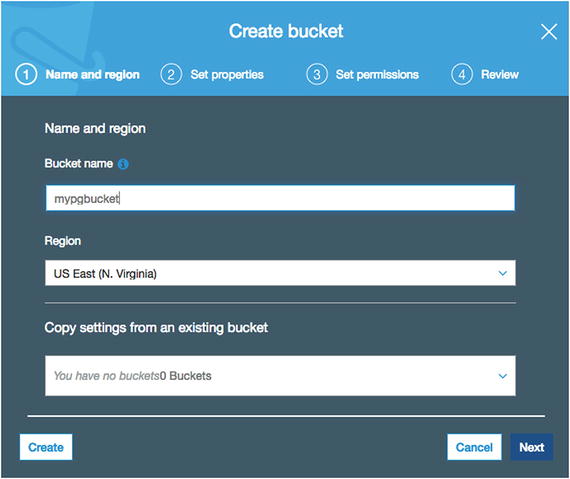 Figure 8-8
Enter the bucket’s settings
- 4.
You can now choose an encryption option. Choose the KMS key you want to use to encrypt the data in the S3 bucket , if needed. See Figure 8-9.
Click Next to proceed.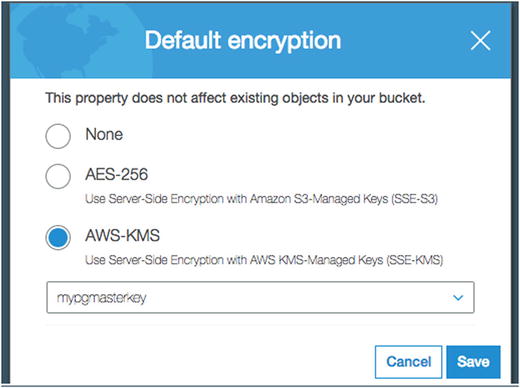 Figure 8-9
Pick an encryption option
- 5.Now you can choose all the accounts that can have read or read/write access to this S3 bucket. See Figure 8-10.
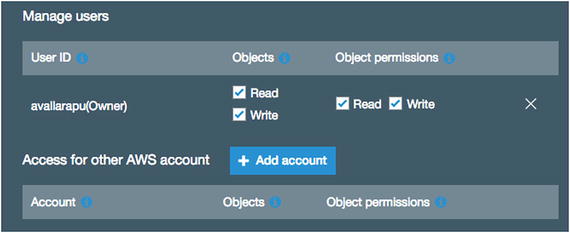 Figure 8-10
Choose the accounts
- 6.Click on Create Bucket . Now, the S3 Bucket you created should appear, as shown in Figure 8-11.
 Figure 8-11
The new bucket is shown here
Performing Backups on an EC2 Instance
- 1.
If you do not have pip already installed on your OS, install it (see the commented section at the start of the following listing). Once you’re done, you can proceed to install AWS cli using pip.
# yum install python-setuptools -y# sudo easy_install pip# pip install --upgrade pip# Install awscli using pip and set PATHsu - postgrespip install --upgrade --user awscliexport PATH=~/.local/bin:$PATHaws --version - 2.
Now configure AWS using the following command. You need to know your AWS access key ID and AWS secret ID, which are generated while creating the user account set as the owner of the S3 bucket you need to access.
$ aws configureAWS Access Key ID [None]: (Access Key)AWS Secret Access Key [None]: (Secret Key)Default region name [None]:Default output format [None]: - 3.
See if you are able to list the S3 buckets created or accessible to your account.
$ aws s3 ls - 4.
Back up the PostgreSQL instance using pg_basebackup.
$ pg_basebackup -h localhost -p 5432 -D /tmp/backup -x -Ft -z -P - 5.
Now, push the backup to S3 using the following command.
$ aws s3 cp /tmp/backup s3://yourbucketname/dbbackups
Restore Your Backup to an EC2 Instance
- 1.
You need to use the same cp command to copy the backup pushed to S3.
$ aws s3 cp s3://yourbucketname/dbbackups/* /tmp/backup/* - 2.
Once it’s copied, you can use tar to extract the backup and restore it to start PostgreSQL using the backup.
Backups on Rackspace Cloud
In Chapter 4, we talked about the solutions that Rackspace provides—Managed Hosting, Managed Cloud, and Cloud Block Storage. In this chapter, we talk about how to back up a Rackspace cloud server.
Check the box to enable backups
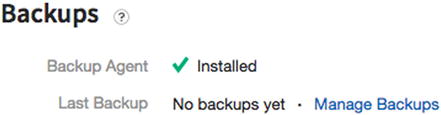
Click the Manage Backups link

You can create/restore/delete backups from this page
Enabling the backup option should install backup agents automatically. However, if you manage your backup without using the option, you can install the backup agent by following these steps: https://clouddrive.rackspace.com/installer
- 1.
Log in to the Rackspace Portal at https://mycloud.rackspace.com/cloud/1042301/home .
- 2.Click on the Backups tab and then click Systems, as shown in Figure 8-15.
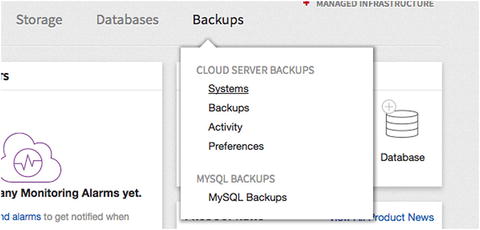 Figure 8-15
Scheduling a backup
- 3.
On the Cloud Backup Systems page, click the name of the server for which you want to create a backup.
- 4.You will see the Configure Backups page, as shown in Figure 8-16.
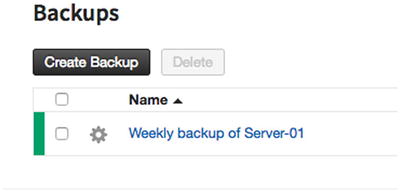 Figure 8-16
The Configure Backups page
- 5.On the Configure Backup page , configure the items shown in Figure 8-17 and then click Next Step.
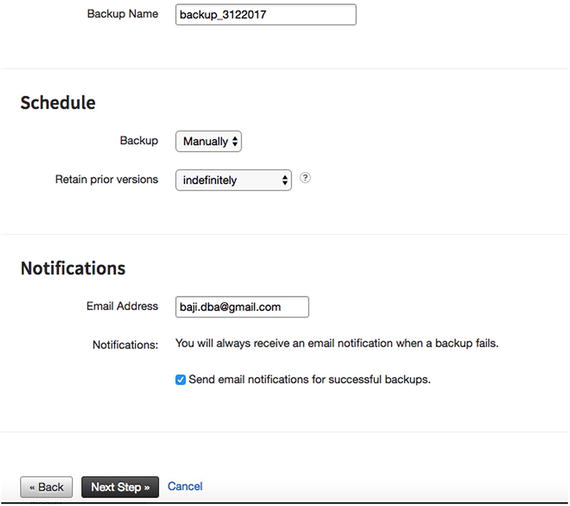 Figure 8-17
Configure the items here
Name: Enter a name for the backup.
In the Schedule section, specify a schedule for the backup and select how many prior backup versions to retain.
In the Notifications section, specify the email address for notifications and select whether you want to receive notifications of successful backups.
- 6.Select the folder that you want to back up and click on Next Step , as shown in Figure 8-18.
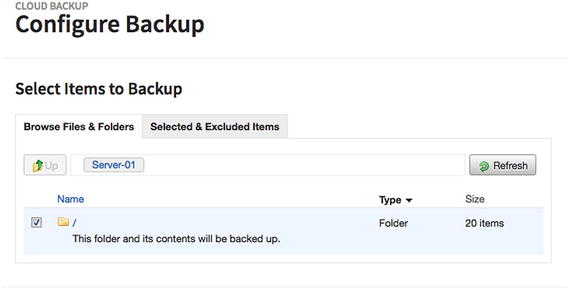 Figure 8-18
Choose the folder you want to back up
- 7.Check the backup details and click on Save. See Figure 8-19.
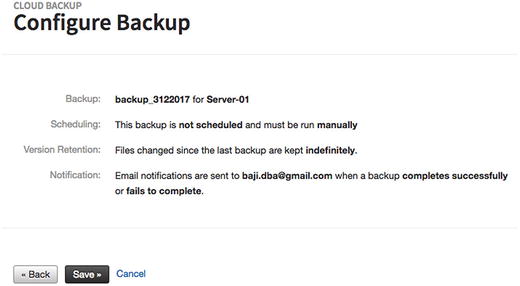 Figure 8-19
Check the backup details before clicking Save
Backups to Google Cloud
In Chapter 5, we saw how to create VM instances using the Compute Engine service. Now let’s look at how you can take backup of instances that you created.
Backups Using the Snapshot Option
Using the snapshot option , you can take a backup of your data from a persistent disk. Let’s make a persistent disk and create a snapshot for it.
Making a Persistent Disk
- 1.To make a persistent disk, connect your instance by adding SSH keys of your machine, as shown in Figure 8-20.
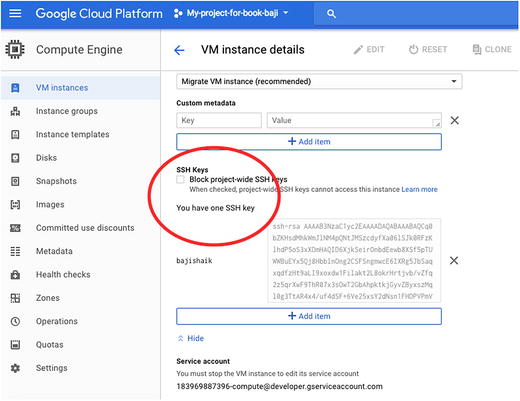 Figure 8-20
Add the SSH keys
- 2.You can connect through SSH using your private key, as shown in Figure 8-21.
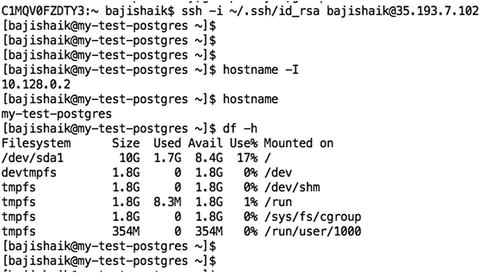 Figure 8-21
Connecting through SSH using your private key
- 3.Just for demo purposes, we are installing PostgreSQL using the BigSQL package manager . See Figure 8-22.
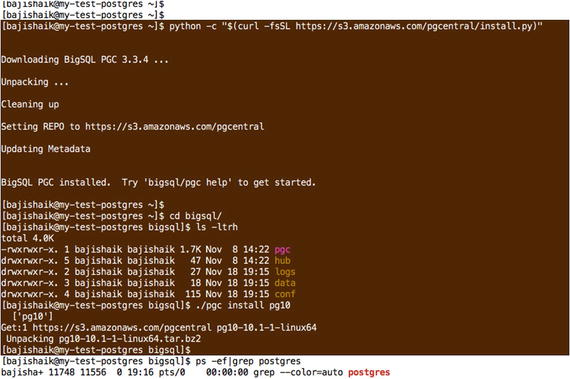 Figure 8-22
Installing PostgreSQL using the BigSQL package manager
- 4.Create a data directory on a mount point, as shown in Figure 8-23.
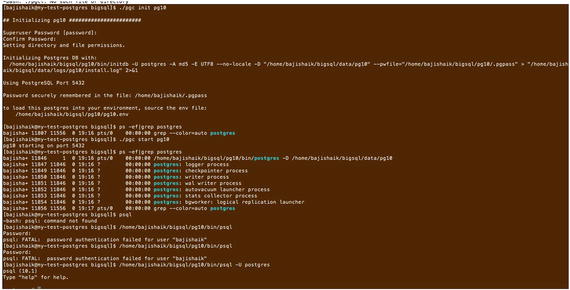 Figure 8-23
Creating a data directory on a mount point
- 5.
As you can see, this data is on a root mount point.
- 6.
Execute a checkpoint in the database by connecting using psql. Your mount point is ready for a snapshot.
Take a Backup of a Persistent Disk
- 1.Connect to your console and select Compute Engine and then choose Storage from the left panel. Then you can see the Create Snapshot button, as shown in Figure 8-24.
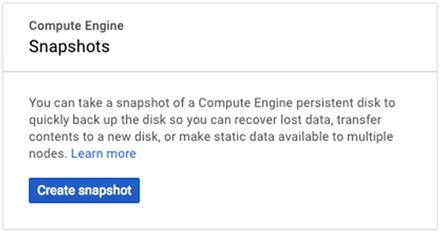 Figure 8-24
The Create Snapshot button
- 2.Give your snapshot a name and a source disk in order to create it. You can use instance name for your source disk . Then click on Create. Your snapshot will be ready, as shown in Figure 8-25.
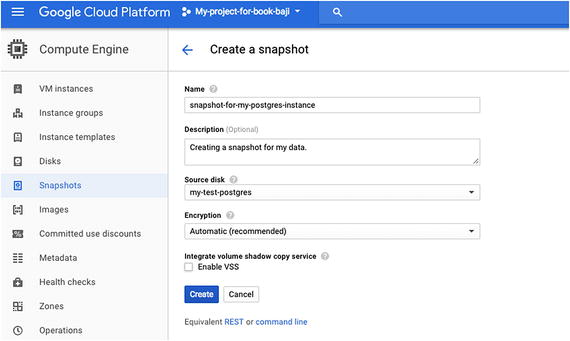 Figure 8-25
The snapshot is ready
- 3.
You can restore this snapshot whenever you need it.
Back Up Your Files Using Storage
Chapter 5 introduced GCS (Google Cloud Storage). Using GCS can be anything, such as pushing your server filesystem backups, pushing your database backups, or pushing any important documents. This section covers creating, configuring, and using the GCS.
Data (unstructured objects) will be stored in containers called buckets . If you want to push any kind of backups to GCS, you need to create a bucket. You can use buckets to store the data for other Google Cloud Platform services.
Create Buckets and Upload Files
- 1.You will see “Storage” in the left panel after you log in to the console . See https://console.cloud.google.com/ , as shown in Figure 8-26.
 Figure 8-26
Cloud storage
- 2.You then enter the details shown in Figure 8-27.
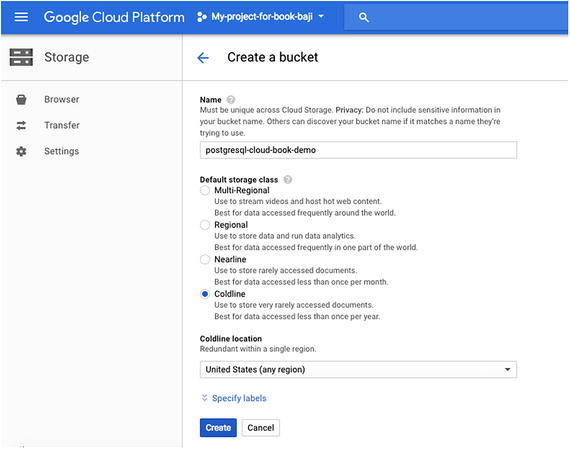 Figure 8-27
Enter these details to create a bucket
Name: Name of the bucket where you are going to store the data . It is not recommended to use any sensitive information in your bucket name, as it will be easy to figure out by others.
We used postgresql-cloud-book-demo for the name here.
Default storage class: As explained in Chapter 5, there are four types of storage classes. The storage class you choose depends on your data type, purpose, and how frequently you access data.
Region: The region where your bucket is created.
- 3.
Click on Create.
- 4.As shown in Figure 8-28, you’ll see options like Upload Files, Upload Folder, and Create Folder once you have created the bucket .
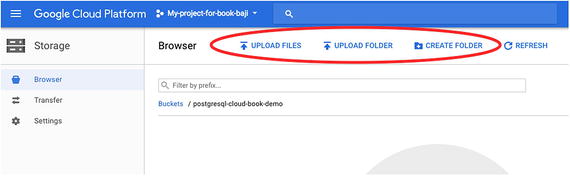 Figure 8-28
Bucket options
- 5.After the bucket has been created and selected, click on Upload Files to upload the files or click on Upload Folder to upload any directories. See Figure 8-29.
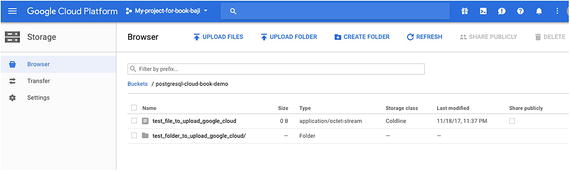 Figure 8-29
Choose Upload Files or Upload Folder
Back Up Your Cloud SQL for PostgreSQL
Chapter 5 discussed Cloud for PostgreSQL in detail. This section covers enabling backups for the PostgreSQL instances.
- 1.
Connect to the console and select Cloud SQL on the left panel.
- 2.
You will see your instance that you created on the left panel.
- 3.Click on Edit, as shown in Figure 8-30.
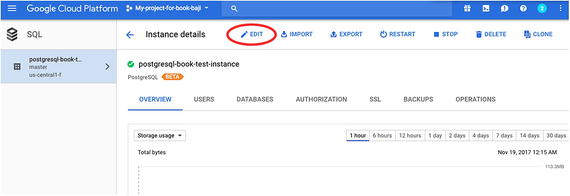 Figure 8-30
Click Edit to edit the instance
- 4.Scroll down to the Enable Auto Backups and High Availability section, where you can find the option to enable auto backups of your instance. You can provide a time to perform the backup. It is recommended to choose a window of time that’s during off-peak hours of your application. See Figure 8-31.
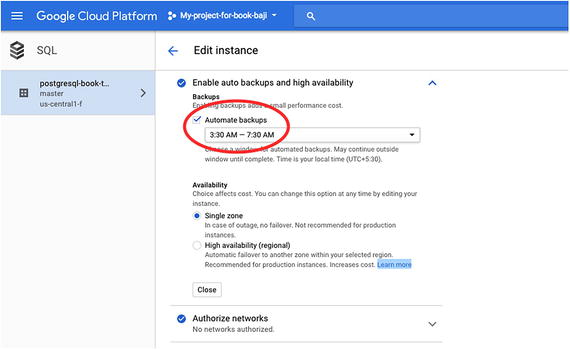 Figure 8-31
Choose the time that the backups are performed
Backups to Microsoft Azure
Virtual machines
Storage
Azure Database for PostgreSQL
The following sections cover enabling/taking backups of each service.
Virtual Machines
- 1.Click on the virtual machine from the Azure Portal. You will see the Backup tab shown in Figure 8-32.
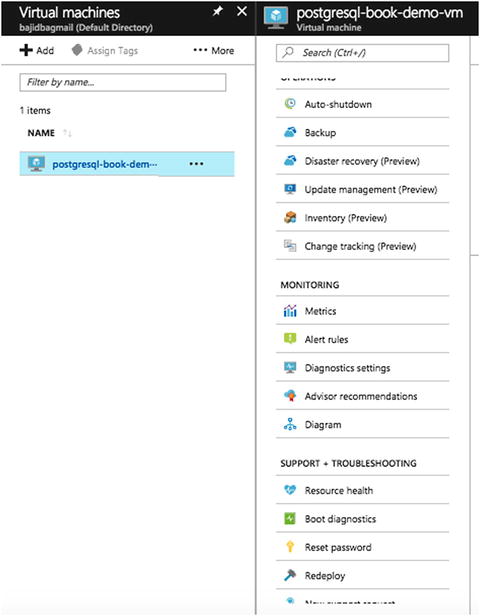 Figure 8-32
The Backup tab
- 2.Click on the Backup tab . You’ll see the options for backing up the machine , as shown in Figure 8-33.
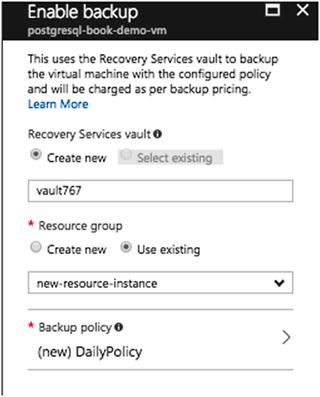 Figure 8-33
Options for backing up your virtual machine
The recovery services vault holds the backup copies and you can monitor backup using this vault. You can create a new vault or if you have an existing vault, you can use that.
The Azure Backup service has two types of vaults —the Backup vault and the Recovery Services vault. The Backup vault came first. Then the Recovery Services vault came along to support the expanded Resource Manager deployments. Microsoft recommends using Resource Manager deployments unless you specifically require a Classic deployment . Just to differentiate, Classic deployment is old portal and it’s going to be retired soon (see https://manage.windowsazure.com ). The new portal is https://portal.azure.com/ .
For the resource group, you can create a new one or use an existing resource group to be backed up.
The backup policy specifies the frequency and time at which items will be backed up and how long backup copies are retained.
- 3.After you choose Recovery Services Vault and Resource Group, click on Backup Policy. You will see the window shown in Figure 8-34.
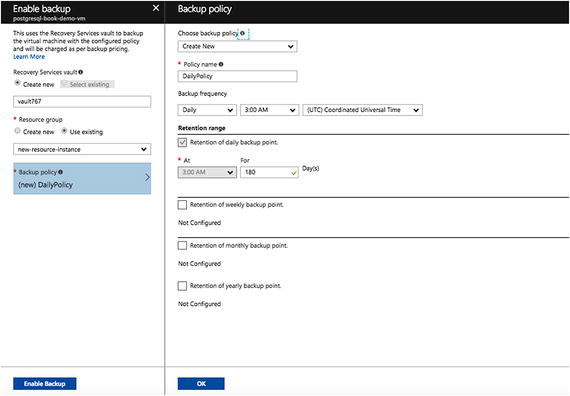 Figure 8-34
Setting up the backup policy
Choose backup policy: Specifies frequency and time at which items will be backed up, as well as how long backup copies are retained.
Policy name: Choose the name for the backup policy that you are going to create.
Backup frequency: You can set up daily or weekly backups with the time window.
You can set retention of policy in terms of days under the Retention Range option.
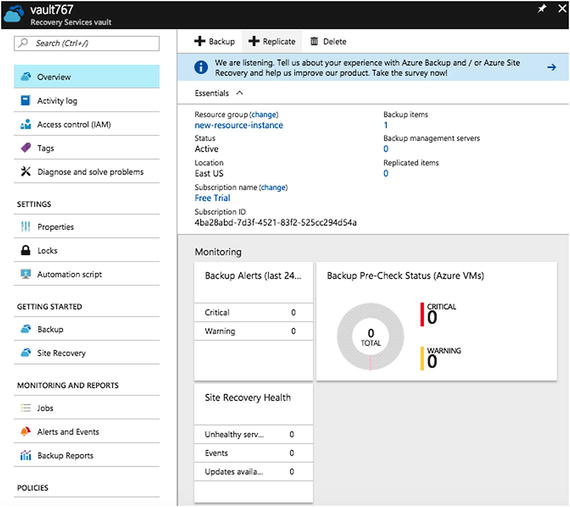
- 4.Once you are done, click on OK and then on Enable. Backup for your VM is enabled now. Click on Backup after it is configured to see the details shown in Figure 8-35.
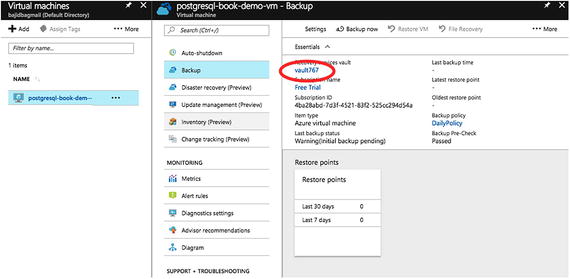 Figure 8-35
The backup has been set up
- 5.
Storage
Azure Storage consists of three data services: blob storage, file storage, and queue storage. Blob storage supports standard and premium storage, with premium storage using only SSDs for the fastest performance possible. Another feature is cool storage, which allows you to store large amounts of rarely accessed data at a lower cost.
- 1.On the Azure Portal, select Storage Accounts on the left panel and click on Add to create storage . See Figure 8-37.
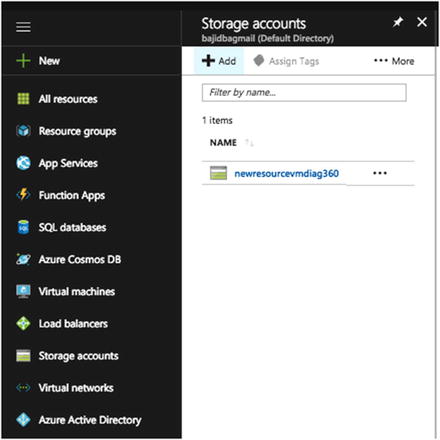 Figure 8-37
Click Add to create storage
- 2.When you click on Add, the program opens new options to be entered to create your storage, as shown in Figure 8-38.
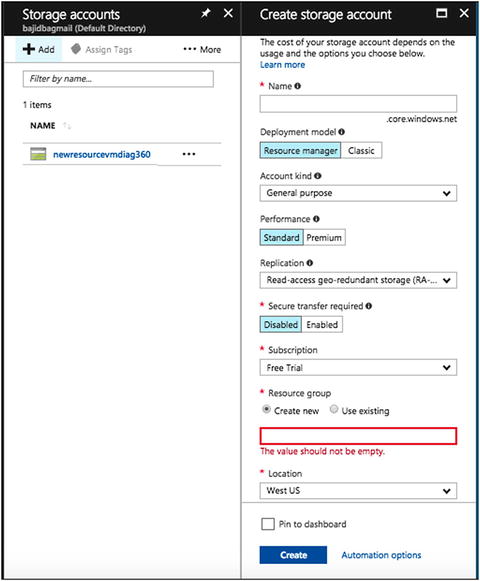 Figure 8-38
Add details about the new storage
Name: This name should be unique across all storage account names in Azure. It must be 3 to 24 characters long, and can contain only lowercase letters and numbers.
Deployment model : Use the Resource Manager for new applications and for the latest Azure features. Use Classic if you have any existing applications deployed in a Classic virtual network.
Account kind: General purpose storage accounts provide storage for files, blobs, tables, and queues in a unified account. Blobstore accounts are specialized for storing blob data and support choosing an access tier, which allows you to specify how frequently data in the account is accessed. Choose an access tier that matches your storage needs and optimizes cost.
Performance: Standard storage accounts are backed by magnetic drives and provide the lower cost per gigabyte. They are best for applications that require bulk storage or where data is being accessed infrequently. Premium storage accounts are backed by solid state drives and offer consistent low-latency performance. They can only be used with Azure virtual machine disks and are best for I/O intensive applications, like databases. Additionally, virtual machines that use Premium storage for all disks qualify for a 99.9% SLA, even when running outside of availability set. This setting can’t be changed after the storage account is created.
Replication: The data in your Azure storage account is always replicated to ensure durability and high availability. Choose a replication strategy that matches your durability requirements. Some settings can’t be changed after the storage account is created.
Secure transfer required: This option enhances the security of your storage account by only allowing requests to the storage account by secure connection. For example, when calling REST APIs to access your storage accounts, you must connect using HTTPs. Any requests using HTTP will be rejected when Secure Transfer Required is enabled. When you are using the Azure files service, connection without encryption will fail.
Subscription: Choose the subscription in which you want to create the storage.
Resource group: Choose an existing Resource Group or create a new one.
Location: Choose the region in which you want to create your storage.
Configure virtual networks: Enabling this setting will grant exclusive access to this storage account from the specified virtual network and subnets. Additional virtual networks and subnets can be specified after storage account creation.
- 3.
Click on Create once you fill in all the details.
If you want to know more about the Azure storage services, the types of storage accounts, accessing your blobs/queues/files, encryption, replication, transferring data into or out of storage, and the many storage client libraries available, visit https://docs.microsoft.com/en-us/azure/storage/common/storage-introduction for more information.
Azure Database for PostgreSQL
When you create an Azure Database for PostgreSQL service, you are automatically set up with the default backup policy. This service automatically makes a back up of the database every five minutes. Retention of these backups depends on the pricing tier that you choose. If it is Basic, retention of backups is seven days, and if it is Standard, retention is 35 days. More information about pricing tiers is at https://docs.microsoft.com/en-us/azure/postgresql/concepts-service-tiers .
If you want to restore the database, the steps to do so are found at https://docs.microsoft.com/en-us/azure/postgresql/howto-restore-server-portal#restore-in-the-azure-portal .
The automatic backups, which are part of the service, cannot be altered. The service takes full backups every week, two incremental backups per day, and log backups every five minutes.
Summary
This chapter talked about why backing up a server or a database is important. We covered all backup solutions available by default from each cloud vendor and how you can modify the default schedules or retentions. There are lot of differences in backups from each vendor. We hope this chapter helps you understand the differences and choose the correct backup policy for your setup and requirements. The next chapter covers the need for data replication and high availability in the current world, including what solution each vendor provides for replication and high availability.