
This chapter discusses why anyone needs security and why anyone would want to secure their data in the current world. It also covers the security options that each cloud vendor provides and how to achieve maximum security using those options. There might differences in ways of securing data for each vendor, but the ultimate goal is the same—secured data.
Security on Amazon Cloud
In previous chapters, we discussed how to create an AWS account and create our first EC2 or RDS instance. As a database administrator, my first priority is to ensure that my database is secure. In order to build such a secured environment, we need to know how we can implement proper user management and security procedures, by restricting unauthorized access and encryption of data in motion and data at rest. AWS provides a console that helps administrators achieve proper user management. This is applicable to all services created on AWS.
Identity and Access Management
Identity and Access Management (IAM) provides a mechanism that allows for user management of accounts in AWS. Users cannot use a root account to access AWS. There needs to be privileges, roles, or groups to ensure limited access to users. IAM allows us to create and manage user accounts on AWS and control the access-level privileges of an AWS account. Using IAM, we can provide shared access with restricted permissions to an AWS, including temporary access to a few services. IAM allows us to use SSO (single sign-on) for an organization email account along with LinkedIn, Facebook, and Active Directory.
It is very important to secure an AWS account through several layers of security features. For example, using only password authentication is not good enough. AWS provides multi-factor authentication to secure your AWS account. You can enable password rotation policies to satisfy your organizational compliances.
Programmatic access: When you select Programmatic access when creating a user, you get an access key ID and a secret access key. Programmatic access is needed for a user who uses AWS CLI and API.
AWS Management Console access: Selecting this access when creating a user gives the user access to the AWS Management Console. This creates a password for every user to log in to the AWS Console.
AWS supports PCI DSS compliance. You can create a user or a group, which is a collection of users with one set of privileges. You can create roles and assign them to AWS resources. Policies can be created and assigned to a user, role, or a group.
A user needs to be given a certain set of privileges using policies. A policy is a document that defines permissions. AWS IAM enables you to create your own policies.
Effect: Whether the policy allows or denies access
Action: The list of actions that are allowed or denied by the policy
Resource: The list of resources on which the actions occur
Condition (Optional): The circumstances under which the policy grants permission
Create a User Using AWS IAM
- 1.Click on Add User, as shown in Figure 7-1.
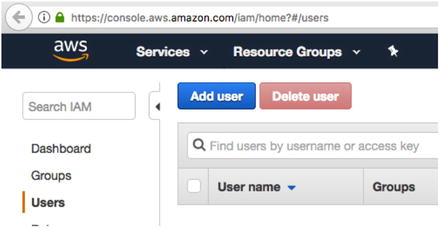 Figure 7-1
Click on Add User
- 2.Type your username and select the type of access you need. See Figure 7-2. If you want to use AWS CLI or APIs provided by AWS, you can select programmatic access. You can let AWS choose an auto-generated password that forces the user to reset it upon signing in. Click on Next to proceed to the permissions.
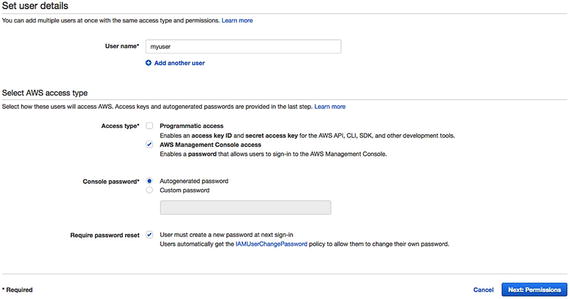 Figure 7-2
Entering the user details
- 3.Now you get an option to set permissions to the user, as shown in Figure 7-3. Before proceeding to the next step, it’s important to understand how organizations can implement a better user management system.
Understand the type of users and their access requirements. For example, DBAs , developers, business analysts, infrastructure admins, etc.
Create groups with a certain set of privileges for every type of user.
Assign a group to a user instead of assigning individual policies every time a user is created.
If you have not created a group yet, follow these steps to do so. As you can see in Figure 7-3, the IAM Console enables you to create a group. Click on Create Group to create a group using a set of policies.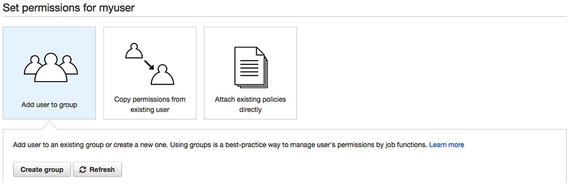 Figure 7-3
Click on Create Group to create a group using a set of policies
Once you clicked on Create Group , you’ll see a list of policies that clearly describes every policy, as shown in Figure 7-4. As you can see in the image, we selected AdministratorAccess, which gives the superuser full access to all the services of AWS on your AWS account.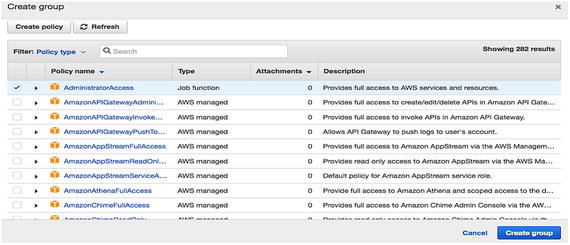 Figure 7-4
Select a policy type
If you need to give one of your developers read-only access to your RDS instances, type rds in the search box and choose AmazonRDSReadOnlyAccess. This works the same with EC2 and services. See Figure 7-5. Figure 7-5
Setting up read-only access
Now, you can click on Create Group.
- 4.This way, you can create multiple groups that distinguish privileges as per your organizational standard naming conventions. Now, you can select the group you want to assign to the user being created and proceed to the next step. See Figure 7-6.
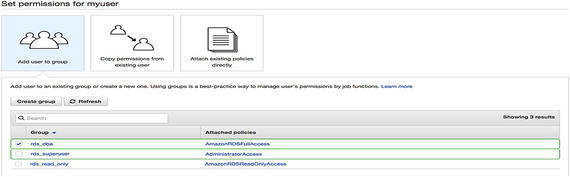 Figure 7-6
Adding a user to a group
- 5.Once you have created the user, you’ll see an URL created by AWS to let your user access the console specific to your AWS account. Using this URL, users can log in to the console and perform activities allowed by the group to which they are assigned. See Figure 7-7.
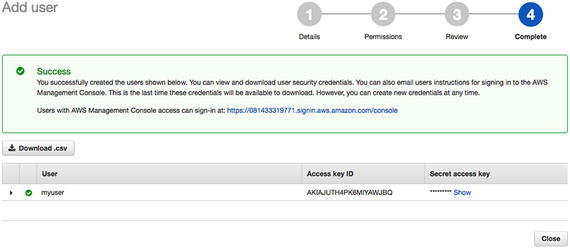 Figure 7-7
Users log in to the console with the new URL
Restricting Access to an RDS or an EC2 Instance
We discussed how to implement a better user management policy that helps an organization distinguish every user through the roles and activities they are intended to perform. In an organization, we need to implement multiple layers of security, which may not be achieved using a proper user management policy alone.
Let’s discuss more about how we can limit host-based access to an RDS or an EC2 instance. This way, we tell AWS to accept connections only from certain IP addresses.
To proceed further, let us have a detailed discussion about VPC.
What Is VPC ?
Amazon allows you to create your own virtual network using its Virtual Private Cloud (VPC) . Using AWS, you can create your own VPC that is physically within the Amazon network but logically isolated. You can define your own IP address range, subnets, security gateways, and settings while creating your VPC.
A subnet is a range of IP addresses within a single availability zone or region. While creating AWS instances, we can specify the subnet in which they are created. While creating a VPC, you must specify a range of IP addresses that belong to this VPC by adding one or more subnets. As availability zones are geographically isolated from each other within a region, a subnet must be created for a single availability zone and cannot be spanned across multiple AZs. If you launch each of your instances in two different AZs—let’s say a master and slave in two different AZs—it is easy to avoid failures and achieve high availability.
Once you create a VPC, you can use VPN to connect to the AWS cloud.
Creating Subnet Groups
- 1.As shown in Figure 7-8, search for VPC and click on it.
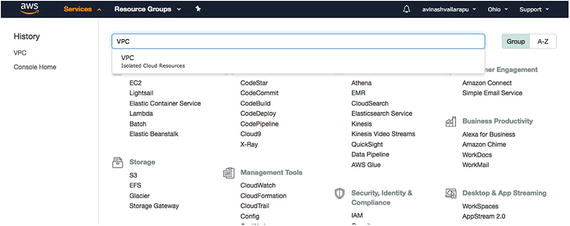 Figure 7-8
Find VPC and click on it to begin
- 2.Once you click on VPC, you should see a VPC dashboard, where you can get to the VPC Wizard and create subnets, route tables, and Internet gateways. See Figure 7-9.
 Figure 7-9
The VPC dashboard
- 3.
Click on your VPCs to create your VPC and then click on Create VPC.
Now you can choose a name tag to better identify this VPC. Select the IPv4 CIDR Block and click on Create VPC, as shown in Figure 7-10.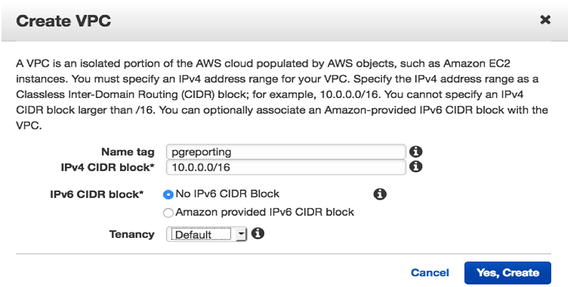 Figure 7-10
Add a name tag to better identify the VPC
- 4.
You can now click on Subnets and then choose Create Subnet in an availability zone.
Click on Subnets to proceed. See Figure 7-11.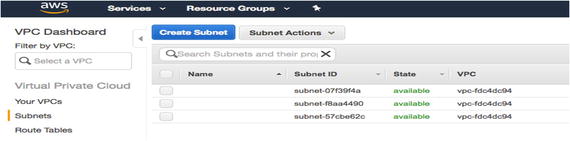 Figure 7-11
Click on Subnets to reach this window
- 5.To create a subnet in an availability zone of a different region, you can change the region, as shown in Figure 7-12. In the top-right corner, click on the dropdown to modify the region in which you need to create your subnet.
 Figure 7-12
Find the proper region for the new subnet
- 6.Once you click on Create Subnet , select the name tag that identifies the subnet being created. Choose the VPC in which you want to create this subnet. Choose the availability zone and the IPV4 CIDR Block for this subnet as well. Once you’re done, click on Yes, Create, as shown in Figure 7-13.
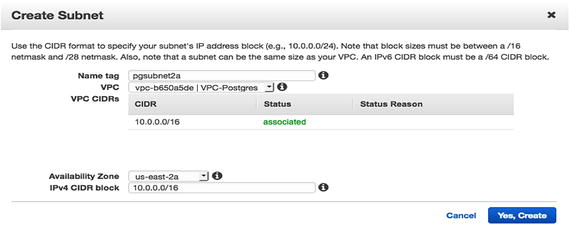 Figure 7-13
Add the details about the subnet
- 7.
Once your VPC has been created, you can now create your EC2 instance using this VPC . This allows you to restrict access to your EC2 instances.
While creating an RDS instance, as you learned in previous chapters, you can choose the VPC of your region. Your instance will then be created there. See Figure 7-14.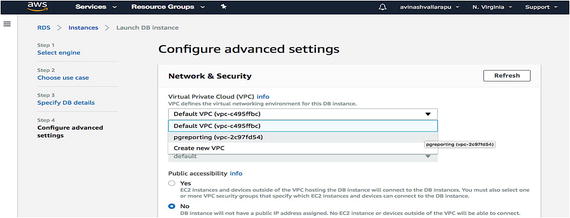 Figure 7-14
Choose the VPC where you want to create the instance
Likewise, you can choose a VPC while creating your EC2 instance, as shown in Figure 7-15.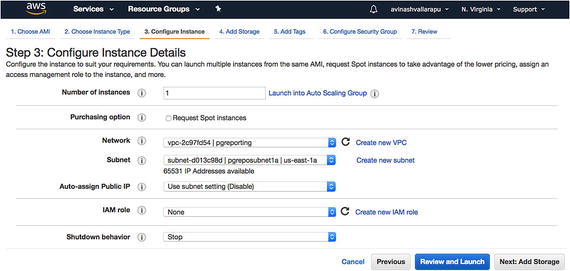 Figure 7-15
Configuring the instance details
Rackspace Cloud Security
In Chapter 4, we talked about how to create a Rackspace account to manage the Rackspace solutions. In this chapter, we talk about the security that Rackspace provides to its VMs, dedicated servers, and storage components. Apart from these, Rackspace has managed security that helps you build security policies according to your organization’s needs. For more information about Rackspace managed security, visit https://www.rackspace.com/security .
Securing the Rackspace Account
- 1.
Log in to your Rackspace portal here: https://login.rackspace.com .
- 2.Click on My profile & Settings in the top-right corner, as shown in Figure 7-16.
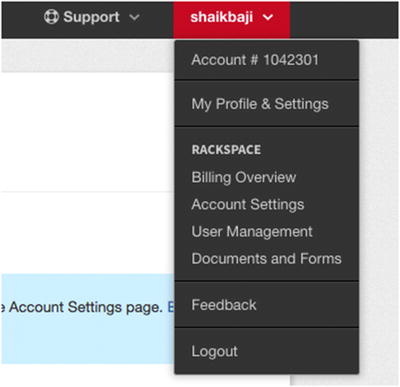 Figure 7-16
Click on My Profile & Settings
- 3.You’ll then see the security settings, as shown in Figure 7-17.
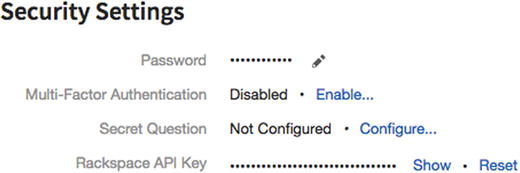 Figure 7-17
The security settings
Password: You should have strong password that meets the requirements of your security policies.
Multi-Factor Authentication: Enable multifactor authentication by clicking on Enable.
Security Question: Configure a good security question.
Rackspace API Key: Reset this periodically for security purposes.
- 4.Follow these sub-steps to configure multi-factor authentication.
- a.Click on the Enable option. The window shown in Figure 7-18 will pop up.
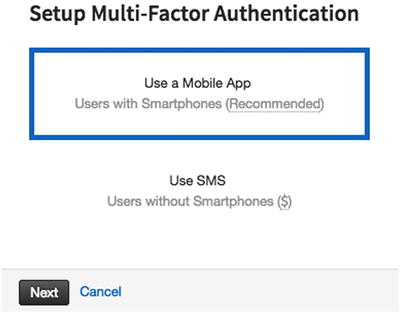 Figure 7-18
Choose the recommended option of mobile app here
- b.Click on Using a Mobile App, as it is recommended and then Next. You will have to enter your device name (see Figure 7-19). Currently supported applications for multi-factor authentication are Authy, Duo, and Google Authenticator.
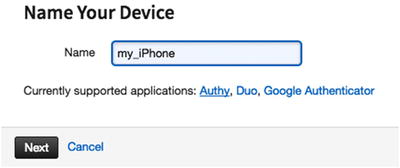 Figure 7-19
Name your device
- c.Install the security app on your phone (for example, install DUO app) and scan the barcode, which appears in the window in your phone app. See Figure 7-20.
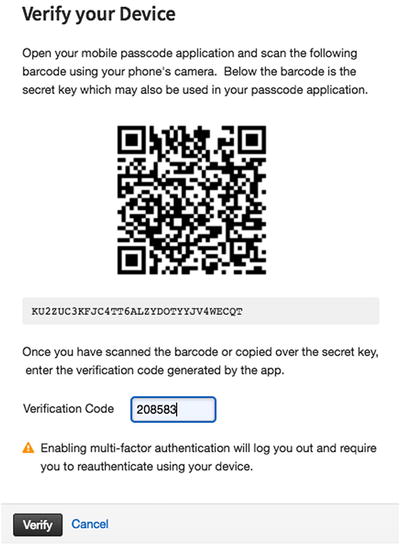 Figure 7-20
This barcode appears in the window in your app
- d.
Click on Verify. You will then be prompted to log in to your account again. Now, your account is configured for multi-factor authentication. Whenever you need to log in, you have to enter the code that is generated from your DUO app.
- a.
- 5.If you click on User Management shown on the left corner of the same page, you can see users related to your account. See Figure 7-21.
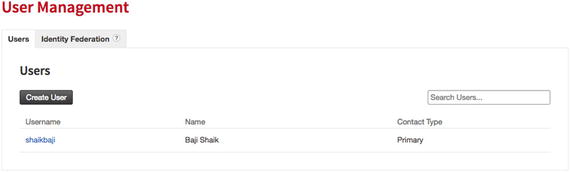 Figure 7-21
Other users related to your account
- 6.You can create users and provide only required privileges, as shown in Figure 7-22.
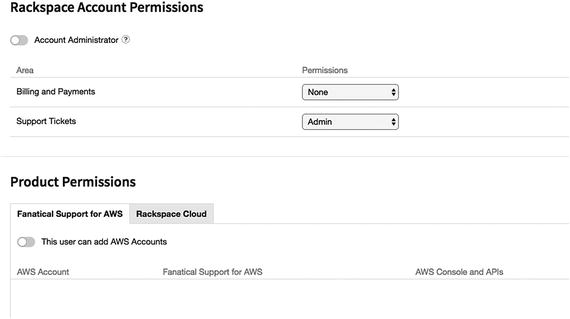 Figure 7-22
Setting up user permissions
- 7.You can also add an identity provider using the Add identity Provider button from the Identity Provider tab, as shown in Figure 7-23.
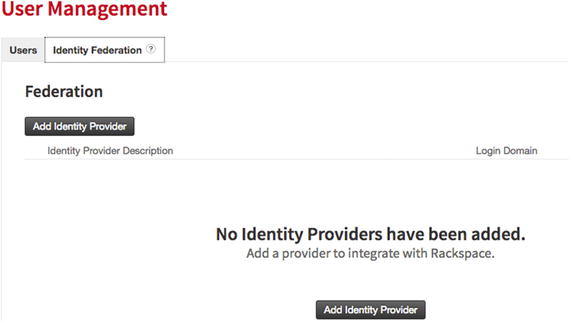 Figure 7-23
Adding an identity provider
For more information on identity providers, the user guide is found at https://developer.rackspace.com/docs/rackspace-federation/ .
Securing the Dedicated Cloud Server of Rackspace
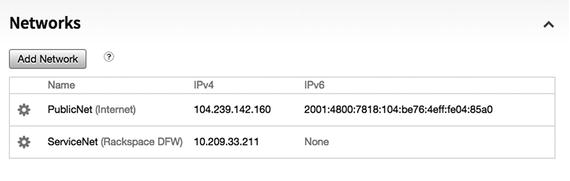
Current networks on the VM
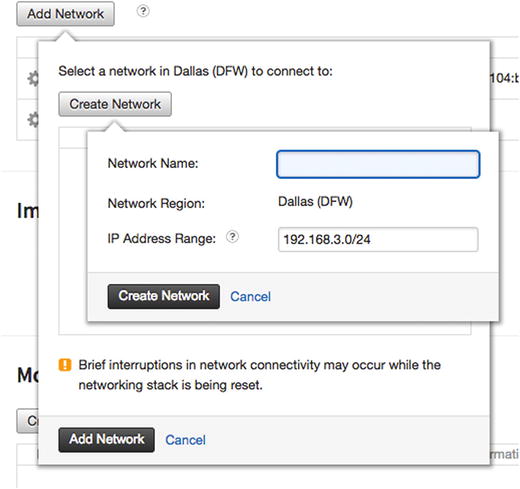
Adding a network
Security for the Google Cloud
Chapter 5 talked about creating an account to sign in to the GCP (Google Cloud Platform) console. Your user login will be the administrator of your console and can access any service. So it has no limitations.
Say there are multiple users who need read-only access to the instances of the Compute Engine or SQL databases or storage. Each user has his/her own login ID. In this case, you have to manage all the users and their respective privileges. Google Cloud has a Cloud IAM feature that enables you to control access to each user on any project in order to manage cloud resources.
To explain it with an example, say we have a GCP project with a VM instance (under Compute Engine), a storage bucket (under Storage), and a PostgreSQL instance (under SQL). You can log in to the GCP console using https://console.cloud.google.com/ .
All options are enabled due to the account settings
Control Access to the Compute Engine
- 1.
Log in to IAM console using the admin user and this link: https://console.cloud.google.com/iam-admin/iam/project
You’ll see the window in Figure 7-27 after you log in.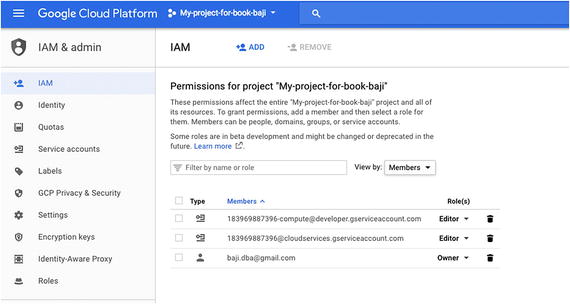 Figure 7-27
The IAM console as viewed from the admin account
- 2.You need to add a member to grant permission on your compute resources. Click on Add, as shown in Figure 7-28.
 Figure 7-28
Adding a member
- 3.Once you clicked on Add, you’ll can see the window shown in Figure 7-29.
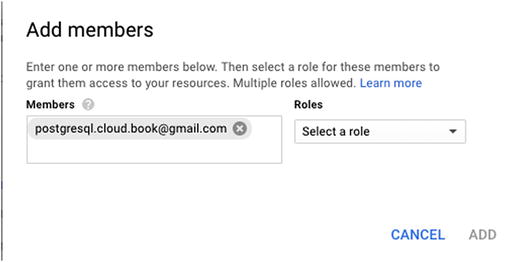 Figure 7-29
Adding a member
To add the member, you can add any of these:
Google account email such as [email protected]
Google groups such as [email protected]
Service account such as [email protected]
Google Apps domain such as example.com
Anybody: Enter allUsers to grant access to all users
All Google accounts: Enter allAuthenticatedUsers to grant access to any user signed in to a Google account
There are lot of roles that you can grant to your member. Figure 7-30 shows you the available roles for the Compute Engine service.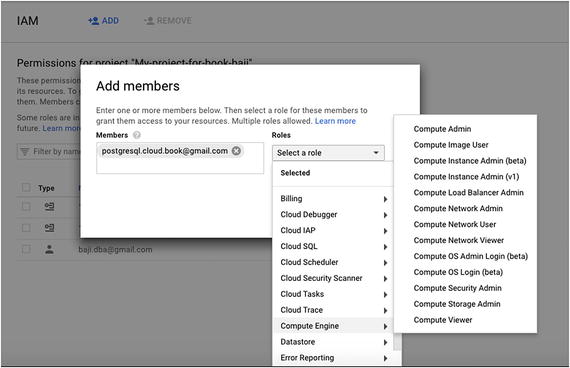 Figure 7-30
Available roles for the Compute Engine service
Let’s look at the roles available for Compute Engine:Compute Admin: Full control of all Compute Engine resources
Compute Image User: Read and use image resources
Compute Instance Admin (beta): Full control of Compute Engine instance resources
Compute Instance Admin (v1): Full control of Compute Engine instances, instance groups, disks, snapshots, and images. Read access to all Compute Engine networking resources
Compute Load Balancer Admin: Full control of Compute Engine resources related to the load balancer
Compute Network Admin: Full control of Compute Engine networking resources
Compute Network User: Access to use Compute Engine networking resources
Compute Network Viewer : Read-only access to Compute Engine networking resources
Compute OS Admin Login: Access to log in to a Compute Engine instance as an administrator user
Compute OS Login (beta): Access to log in to a Compute Engine instance as a standard (non-administrator) user
Compute Security Admin: Full control of Compute Engine security resources
Compute Storage Admin: Full control of Compute Engine storage resources
Compute Viewer: Read-only access to get and list information about all Compute Engine resources including instances, disks, and firewalls. Allows getting and listing information about disk, images, and snapshots, but does not allow reading the data stored on them
For this demo, we are selecting the Compute Viewer role.
Click on Add after selecting the required role.
- 4.Once you have added the role, you can see the member, as shown in Figure 7-31.
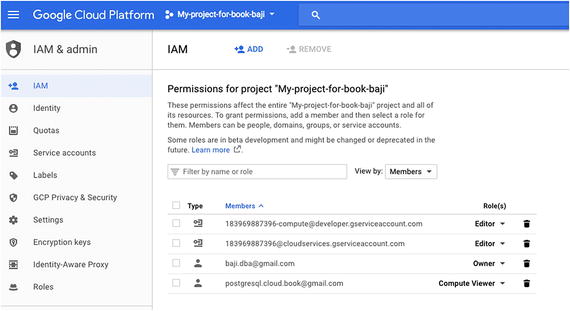 Figure 7-31
Adding the role
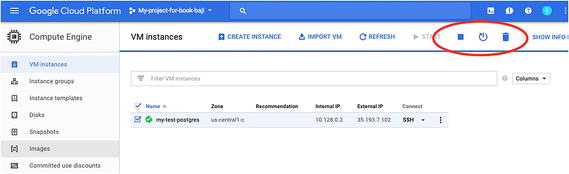
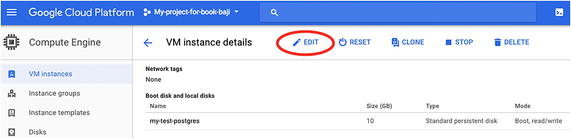
- 5.As Compute Viewer is selected, this user can only see VM instances. He can’t control instances. If you click on the VM instance, all the features for Reset/Clone/Stop/Delete are disabled, as shown in Figure 7-32.
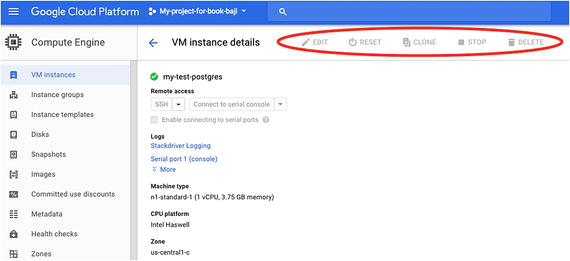 Figure 7-32
The features for Reset/Clone/Stop/Delete are disabled because of the user’s permissions settings
In this way, you can control access to the data and services. We showed Compute Engine as an example, but you will see more or less same kind of privileges for Cloud SQL and storage services as well.
Restricting Compute Engine VM Instances
Edit the VM properties
Managing SSH Keys
You connect to a VM instance using an SSH key. Compute Engine manages your SSH keys for you whenever you connect to an instance from the browser or connect to an instance with the gcloud command-line tool, creating and applying public SSH keys when necessary.
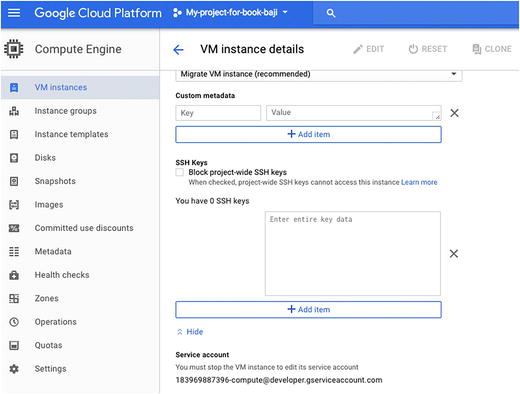
Adding SSH keys
Microsoft Azure Security
Chapter 6 talked about the services that Microsoft Azure provides for use with PostgreSQL. This section discusses the security that Microsoft Azure provides to their apps.
As with the other cloud venders, Microsoft Azure provides IAM with single sign-on as Microsoft Azure Active Directory Premium.
In the arms race between cyber criminals and IT security, the side with the most advanced tools wins. That means that it is not enough to rely on tools that monitor or log your systems or tools built around static policies and lists. To stay one step ahead of the other side, you need a tool that can do more.
You can sign up for Azure Active Directory Premium. The detailed steps are found at https://docs.microsoft.com/en-us/azure/active-directory/active-directory-get-started-premium .
Security for VM Machines
- 1.While creating the VM, you can choose the authentication type, as shown in Figure 7-35. If you choose SSH Public Key and provide your key, only your machine can log in to the VM.
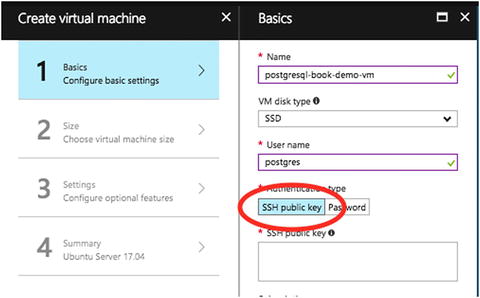 Figure 7-35
Choose SSH Public Key to limit access
- 2.While creating the VM, you can also configure IP address ranges, subnets, route tables, gateways, and security settings, much like a traditional network in your data center. See Figure 7-36.
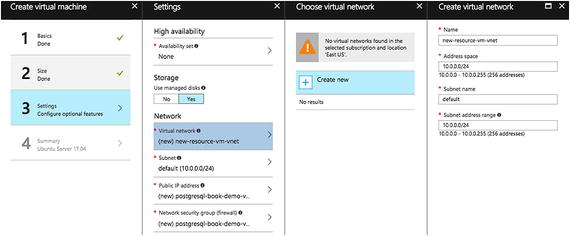 Figure 7-36
Configuring security settings for the VM
- 3.You can turn on Data Collection to receive security alerts and recommendations about system updates, OS vulnerabilities, and end point protection. To turn it on, choose Security Center from the left panel of the Azure Portal, and then click on Security Policy. Choose Subscription. See Figure 7-37.
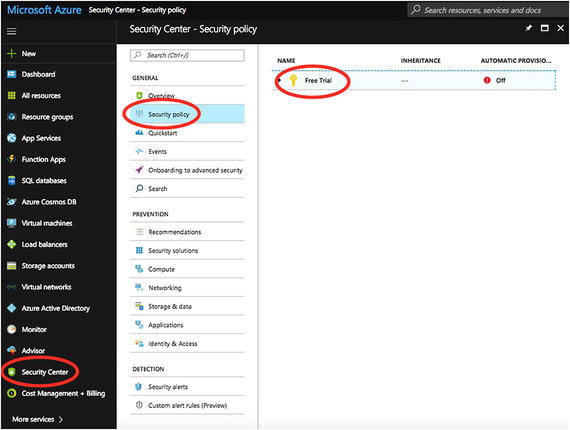 Figure 7-37
Find your subscription settings
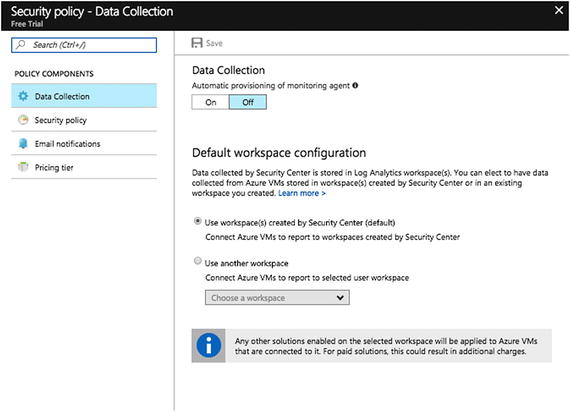
Turn on Data Collection to receive security alerts
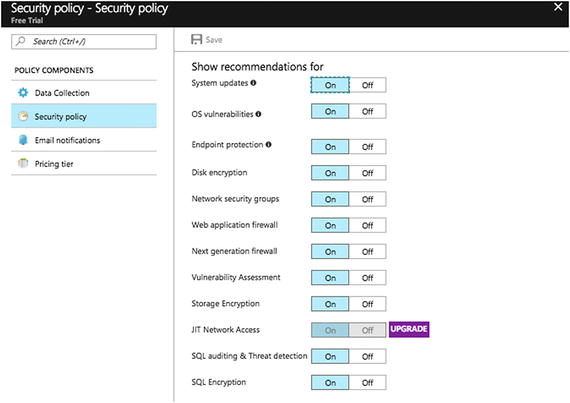
Choosing Security Policy shows the recommendations
You can also set email notifications so you are contacted in case the Azure security team finds that your resources have been compromised.
Security for SQL Database
This section covers the process of securing PostgreSQL databases on Azure.
Create and manage firewall rules
Configure SSL
- 1.
Click on the instance that you created.
- 2.On the left panel, you’ll see Connection Security. Click on it to see the window shown in Figure 7-40.
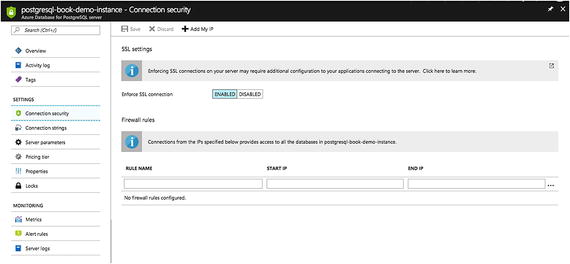 Figure 7-40
Connection security window
- 3.Fill the details under the Firewall Rules section, as shown in Figure 7-41.
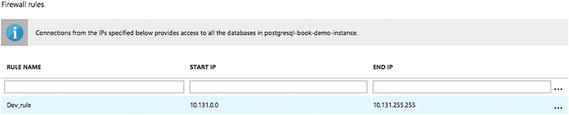 Figure 7-41
Fill in the Firewall Rules section
For this demo, we added a rule named Dev_rule with IP starting and ending ranges so that only requests from these IPs can be served.
- 4.On the same page, you can enable SSL under the SSL Settings area, as shown in Figure 7-42.
 Figure 7-42
Enable SSL from here
- 5.
Click on Save once you are done with the changes.
Summary
This chapter covered why there is a need for security. You went through the steps-by-step procedures to achieve security on each cloud vendor for cloud servers/virtual machines and PostgreSQL instances. We hope this chapter helps you better understand security and see how to implement in for your servers/database. In the next chapter, we talk about the need to back up your virtual machines and PostgreSQL instances, including how to schedule machine backups using each vendor in detail.