
This chapter covers Rackspace solutions like Managed Hosting and Managed Cloud. Under Managed Hosting, we cover creation and configuration of dedicated or bare metal server and virtual servers. Under Managed Cloud , we cover the support that Rackspace provides for customers who are using other cloud venders like Amazon, Google Cloud, and Microsoft Azure. We also cover managed data storage of Rackspace.
Managed Hosting
Managed Cloud
Managed Hosting
Rackspace’s Managed Hosting service provides dedicated as well as VMware servers, which means you can create on-metal (on-premises) servers or a virtual machine.
To start, you have to sign up at https://cart.rackspace.com/cloud .
Once you are done with the signup, it will take some time (around 24 hours) for Rackspace to review and activate the account. You can access the products only after they are activated. You will get an email to register an email ID once the account is approved. After your account is approved, you have to log in at https://login.rackspace.com .

The Rackspace portal dashboard
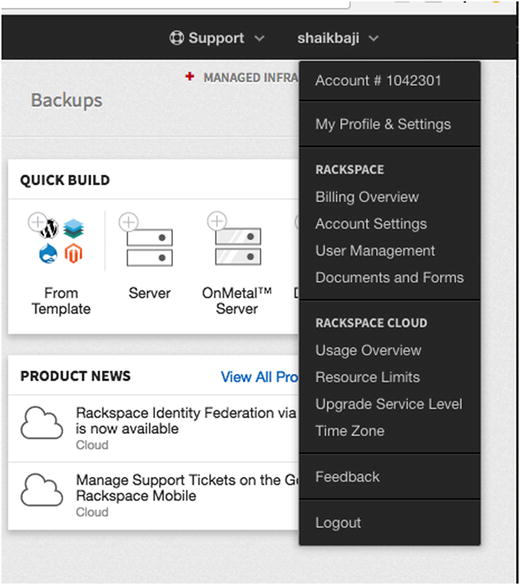
The profile settings
We’ll start by creating a dedicated server. Rackspace will help you design a server that’s the right fit for your workload. These dedicated servers are on-metal servers, which means the virtual machine is installed directly on the hardware rather than within the host operating system. To solve existing permanent problems (in terms of compromised speed/performance due to the hypervisor and other virtualization overhead and complexity) with shared virtual machines, use on-metal servers. Rackspace on-metal cloud servers are high-performance, reliable servers designed to help you grow and scale your business quickly and easily.
High performance
Options are available for optimized workloads
Hybrid flexibility with dedicated or private cloud environments
Provision on-metal bare metal cloud servers for large, demanding workloads
Highly reliable, with fully redundant networking and power
Rackspace also provides virtual servers so you do not need to walk away from VMware to get the benefits of the cloud. It gives you customized dedicated hardware and your choice of management and control levels. Rackspace provides VMWare Certified Professional to manage your virtual machines, so whichever solution you choose, you will reap the benefits.
As Rackspace has VMWare Certified Professionals, it builds and manages the world's largest VMware vSphere footprints. It will help you to architect, deploy, and troubleshoot your environments irrespective of how complex they are.
100% network uptime and hardware uptime guarantees with consistent, reliable performance.
Provide full level of control and flexibility.
Get the enhanced security of a customized single-tenant environment with fully-dedicated network, compute, and storage hardware.
Creating a Dedicated Server
- 1.On the dashboard (after you log in), you can click on the Servers tab and select Cloud Servers, as shown in Figure 4-3.
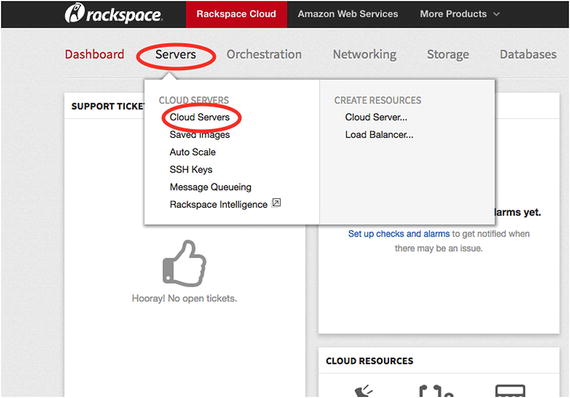 Figure 4-3
Choose a cloud server
- 2.Click on Create a Server, as shown in Figure 4-4.
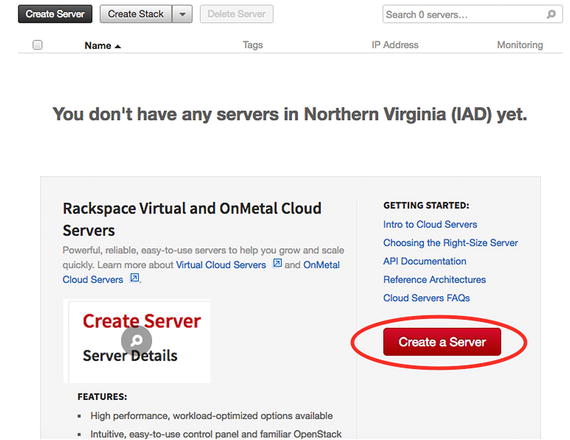 Figure 4-4
Click the Create a Server button
- 3.
To create the server, you need to add the details according to your needs.
Server name: Name of the server, just like a tag name, to differentiate your servers.
Region: Multiple data centers are available. Choose a data center near your application and users to introduce geographic redundancy. You will get the list of available data centers from the dropdown, as shown in Figure 4-5.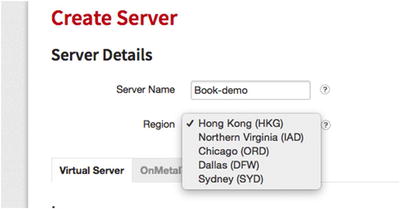 Figure 4-5
List of available data centers
- 4.Select the OnMetal Server, as shown in Figure 4-6.
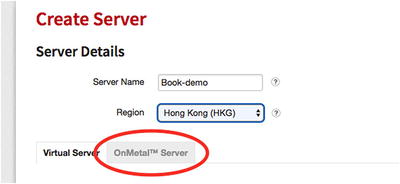 Figure 4-6
Choose the OnMetal Server option
Note that OnMetal Servers are available only for the Northern Virginia (IAD) and Dallas (DFW) regions.
- 5.Choose an operating system from a wide range of Linux and Windows images. We selected Linux ➤ CentOS ➤ OnMetal - CentOS 7 for demo purposes. See Figure 4-7.
 Figure 4-7
Choose an operating system
- 6.Select an OS flavor. There are some predefined configurations from Rackspace. With dozens of hardware options optimized for popular workloads, you will find the right match for your needs. Currently, there are five workloads, as shown in Figure 4-8. The purpose and hardware configuration of each flavor, including pricing, is clearly mentioned.
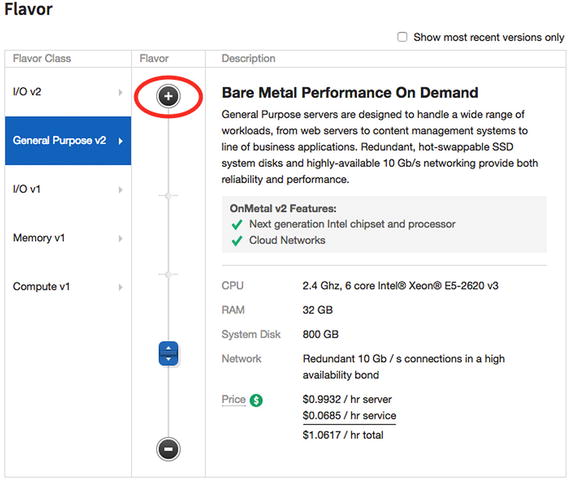 Figure 4-8
Choose among the five workload flavors
We selected General Purpose v2 for demo purposes. You can click on the + sign to increase the hardware in terms of RAM/CPU/storage.
- 7.In the Advanced Options area (see Figure 4-9), notice the SSH Key and Networks options.
SSH Key: Add a public key that you want for the server.
Networks: You can add networks (IP ranges) from where you want to connect. You can see a couple of networks already added that are used for certain Rackspace products, including monitoring and backups. If you deselect any of the networks, the server no longer has access to the Internet and will not be able to use monitoring and backups. You can look at the limitations at https://support.rackspace.com/how-to/removing-networks-from-a-cloud-server .
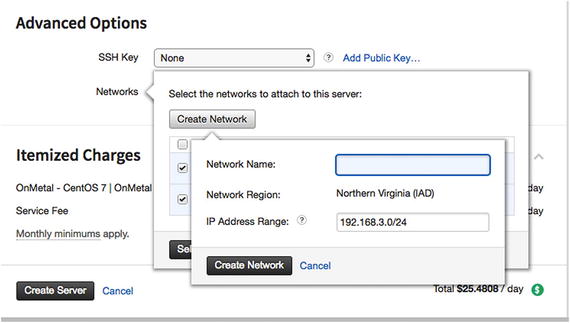 Figure 4-9
The Advanced Options area
- 8.
You can see your charges per day for the selected type of server before you create it. This pricing is the raw infrastructure plus the managed infrastructure rate, with a minimum service charge of $50/month after the first 30 days across all cloud servers (virtual and bare metal).
- 9.Click on Create Server once you done with all options to create the final product, as shown in Figure 4-10.
 Figure 4-10
Create the server when you’re ready
Creating a Virtual Server
- 1.
Create Virtual Server instead of OnMetal Server.
- 2.
Choose an operating system as before.
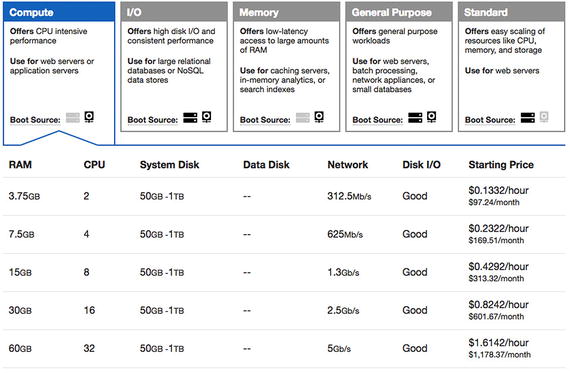
- 3.Virtual servers have different flavors than OnMetal Servers. The purposes and hardware configurations are mentioned in the Description field shown in Figure 4-11.
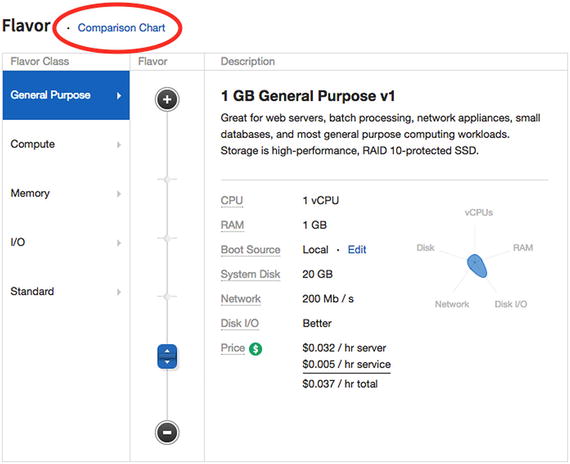 Figure 4-11
Virtual server flavors
- 4.
Fill in the Advanced Options area the same as the previous section for the dedicated server.
- 5.You will be prompted with some recommendations for your server, as shown in Figure 4-13, before you create it.
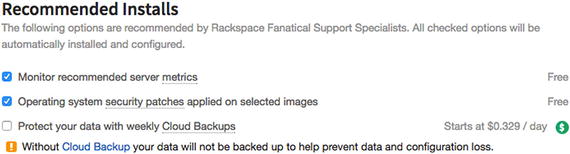 Figure 4-13
Server setup recommendations
You can enable/disable monitoring for your server for free.
You can select to apply operating system patches for free.
You can enable/disable backup of the server. Note that enabling the backup charges you.
- 6.
You can see the charges for the selected virtual machine server in the Itemized Charges section.
- 7.Click on Create Server. It will take few minutes to create the virtual machine. It will then pop up the root password. Take note of the password, as you will not be able to view it again (see Figure 4-14).
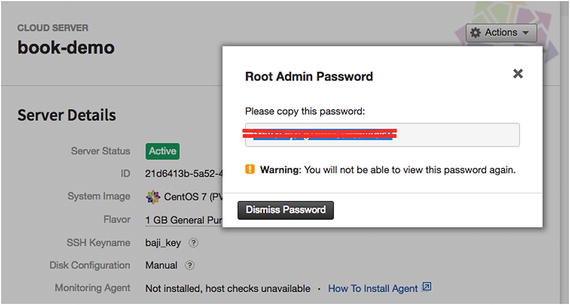 Figure 4-14
Be sure to make note of the password before exiting
Connecting to the Virtual Machine and Installing PostgreSQL
- 1.Once you have created your virtual machine choose Servers ➤ Cloud Servers from the dashboard. You can then see the virtual server you created, as shown in Figure 4-15.
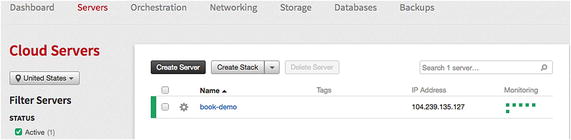 Figure 4-15
The virtual server you created
- 2.If you click on the virtual server, you can see the details of your server and commands (as highlighted in Figure 4-16) to connect to the virtual server. If you want to reboot/resize or delete the server, go to the Actions tab, as highlighted in Figure 4-16.
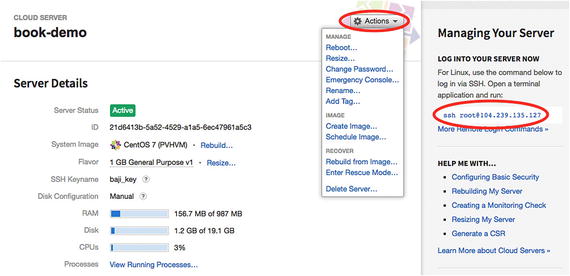 Figure 4-16
The details of the virtual server
- 3.Once you have the public IP of the virtual server, you can connect the server, as shown in Figure 4-17.
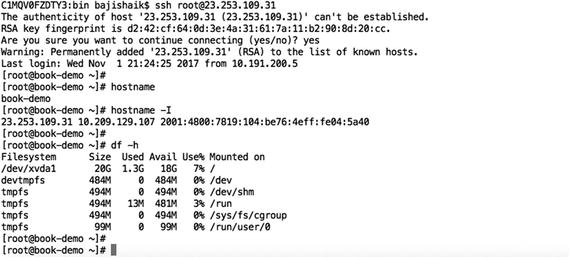 Figure 4-17
Connecting the new server
As we already added the public key when we created the virtual server, it does not need a password to connect.
- 4.
Go to https://www.openscg.com/bigsql/ .
- 5.
Click on the Downloads section.
- 6.Click on the Usage Instructions link, as shown in Figure 4-18.
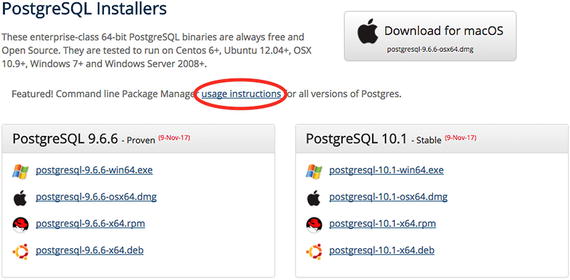 Figure 4-18
Click on usage instructions
- 7.
As per the usage instructions, for Linux machines, you can execute this command to install BigSQL package.
python -c "$(curl -fsSL https://s3.amazonaws.com/pgcentral/install.py)"
BigSQL uses a command-line utility called pgc (pretty good command-line). For example, to list the available PostgreSQL binaries, extensions, and tools for PostgreSQL, users can run the following command.
To install PostgreSQL 9.6, just fire the following command.
To install an extension called pg_repack, use the following command.
Users don’t have to worry about several dependencies such as a gcc compiler or any other packages that need to be installed while installing Postgres or its extensions. BigSQL takes care of all the dependencies and makes it very easy for users to deal with PostgreSQL.
One of the most advanced features of BigSQL is its pgDevOps. pgDevOps is a UI that allows users to install and manage PostgreSQL instances in a few clicks. Users can upgrade PostgreSQL minor version or install or update an extension in a few clicks. PgDevOps also helps users analyze queries and database metrics like connections, checkpointing, temp file generation, etc., through pgBadger reports on its UI, as requested.
Users can also tune their complex procedural language using an excellent tool embedded in its UI, called plProfiler console. Using plProfiler console, users can look at the complete call stack of a complex PostgreSQL function and concentrate on the code that consumed more time of execution in its entire call stack.
Thus, BigSQL helps users install and manage PostgreSQL and its extensions in a few clicks. BigSQL, combined with any cloud service, can easily build a very economic PostgreSQL database on the cloud .
Cloud Block Storage
Cloud block storage allows us to create persistent block-level storage volumes that can be used with Rackspace cloud servers. So it allows us to scale storage independently of whatever servers are already created.
More information on this storage is available at https://developer.rackspace.com/docs/user-guides/infrastructure/cloud-config/storage/cloud-block-storage-product-concepts/#cloud-block-storage-product-concepts .
- 1.
From the dashboard, choose Storage ➤ Block Storage Volumes.
- 2.You will see a list of created volumes if there are any; otherwise, you can create a volume by clicking on the Create Volume button, as shown in Figure 4-19.
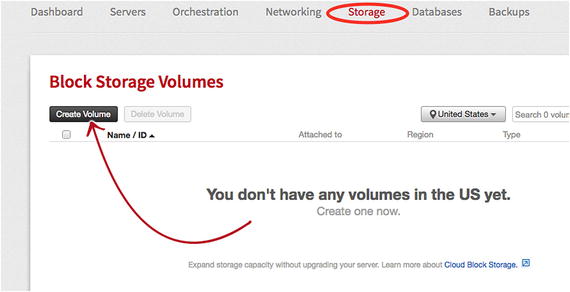 Figure 4-19
Creating a block storage volume
- 3.You will need to fill in the details to create the volume, as shown in Figure 4-20.
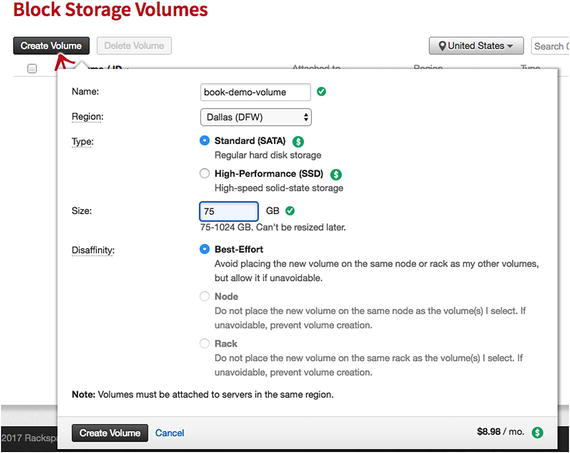 Figure 4-20
Fill in the details about the block storage volume
Name: Refers to name of the volume.
Region: Select a region. Note that you can attach volumes to servers that are in same region. So select the region that your servers are in.
Type: Type of volume. It can be a regular hard disk storage (SATA) or high speed solid state drives (SSD).
Size: The size of the volume. Minimum 75GB to maximum 1TB.
- Disaffinity: This can be
Best-Effort
Avoid placing the new volume on the same node or rack as my other volumes, but allow it if unavoidable.
Node
Do not place the new volume on the same node as the volume(s) I select. If unavoidable, prevent volume creation.
Rack
Do not place the new volume on the same rack as the volume(s) I select. If unavoidable, prevent volume creation.
- 4.
Click on Create Volume .
- 5.Once the volume is created , you can see the details of volume, as shown in Figure 4-21, with actions like Rename/Attach/Create/Clone/Delete Volume.
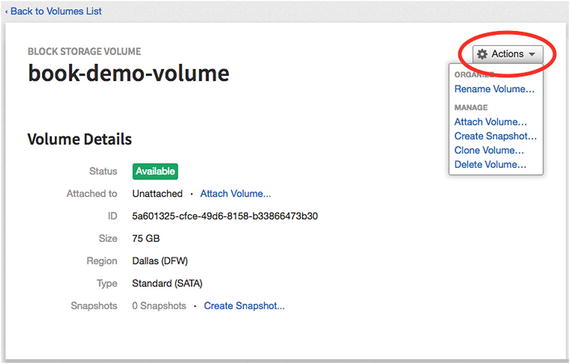 Figure 4-21
Volume details and actions
- 6.Click on the Attach Volume option from the Actions dropdown and attach the volume to one of the servers (see Figure 4-22). It will take few minutes to attach the volume.
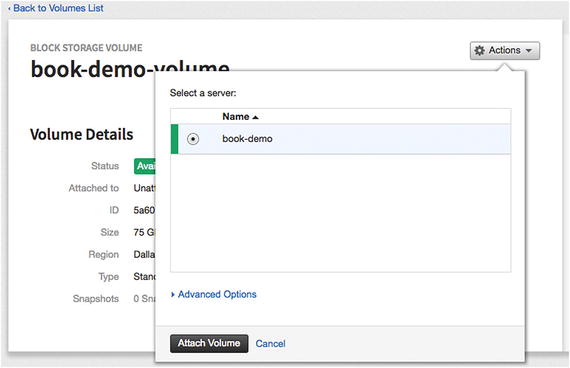 Figure 4-22
Attaching a volume
Note that book-demo is the virtual server that was created for demo purposes here.
- 7.
Once you have attached the new volume , it is visible to your virtual server. You can check using the following command after connecting to your virtual server:
C1MQV0FZDTY3:bin bajishaik$ ssh [email protected]ssh: connect to host 23.253.109.31 port 22: Connection refusedC1MQV0FZDTY3:bin bajishaik$ ssh [email protected]Last login: Wed Nov 1 22:01:44 2017 from 171.49.231.43[root@book-demo ~]#ls /dev/xv*/dev/xvda /dev/xvda1 /dev/xvdb - 8.
The next step is to create a Linux filesystem on the volume so that the operating system can use it to store files and data. The easiest way to create a filesystem on a volume is to use the mkfs.ext4 utility, which takes as arguments the label and the volume device:
[root@book-demo ~]# /sbin/mkfs.ext4 -L /new_volume /dev/xvdbmke2fs 1.42.9 (28-Dec-2013)Filesystem label=/new_volumeOS type: LinuxBlock size=4096 (log=2)Fragment size=4096 (log=2)Stride=0 blocks, Stripe width=0 blocks4915200 inodes, 19660800 blocks983040 blocks (5.00%) reserved for the super userFirst data block=0Maximum filesystem blocks=2168455168600 block groups32768 blocks per group, 32768 fragments per group8192 inodes per groupSuperblock backups stored on blocks:32768, 98304, 163840, 229376, 294912, 819200, 884736, 1605632, 2654208,4096000, 7962624, 11239424Allocating group tables: doneWriting inode tables: doneCreating journal (32768 blocks): doneWriting superblocks and filesystem accounting information: done - 9.
Now mount the filesystem so that you can see and use the volume in the virtual server .
[root@book-demo ~]# mkdir /new_volume[root@book-demo ~]# mount /dev/xvdb /new_volume/[root@book-demo ~]# mount | grep new_volume/dev/xvdb on /new_volume type ext4 (rw,relatime,seclabel,data=ordered)[root@book-demo ~]#[root@book-demo ~]# df -hFilesystem Size Used Avail Use% Mounted on/dev/xvda1 20G 1.3G 18G 7% /devtmpfs 484M 0 484M 0% /devtmpfs 494M 0 494M 0% /dev/shmtmpfs 494M 13M 481M 3% /runtmpfs 494M 0 494M 0% /sys/fs/cgrouptmpfs 99M 0 99M 0% /run/user/0/dev/xvdb 74G 53M 70G 1% /new_volume[root@book-demo ~]#[root@book-demo ~]# cd /new_volume/[root@book-demo new_volume]# ls -ltrhtotal 16Kdrwx------. 2 root root 16K Nov 1 22:10 lost+found[root@book-demo new_volume]# touch test[root@book-demo new_volume]# ls -ltrhtotal 16Kdrwx------. 2 root root 16K Nov 1 22:10 lost+found-rw-r--r--. 1 root root 0 Nov 1 22:15 test[root@book-demo new_volume]#
Summary
This chapter talked about Rackspace solutions like Managed Hosts and Managed Cloud. We covered creating/configuring bare metal and virtual servers, which are part of the Managed Host solution, and installation of PostgreSQL on top of the servers. We also talked about the storage volumes that Rackspace provides. In the next chapter, we talk about Google cloud in terms of what services it provides and how to create/configure those services.