
Harold and Marsha’s adventures in our world have been relatively gloom-and-doom up to now. While they’re merely player-characters and don’t mind their status as such, their alter egos (the players themselves) would probably appreciate a change of pace. Minigames are a classic video game tradition. To take a somewhat recent example, Grinsia (which had a mobile release and a recent rerelease on the Nintendo 3DS) has a shooting gallery minigame. Sometimes the player just wants to explore off the beaten path and do something unrelated to the main plot at hand. Sidequests are a good way to do that, and I’ll be talking about them in Chapter 8. This chapter, however, is all about having fun within the fun that is a game. Meta, isn’t it?
Why an Arena Game?
Although they are nominally less of a minigame than most other concepts (given that arenas usually involve battling, which you already do in most RPGs), arena games require a decent amount of eventing and afford the opportunity to introduce features we haven’t talked about before. Besides, you get to beat up assorted baddies for fame, glory, and special prizes! What’s not to like?
What If I Want Another Minigame?
I have another idea lined up for this chapter, which involves using eventing to come up with a similar treasure chest game as the one in The Legend of Zelda. Near the end of the chapter, I'll also give you ideas for two more minigames! For now, though, let’s press on with the arena.
Arena Overview
Just the mere mention of the word arena evokes gladiatorial combat, as in the times of ancient Rome. In an RPG, arena games can be loosely divided into two categories :
One in which the player and/or his/her allies fight against predetermined encounters.
One in which the player watches a group of combatants face each other and bets on the outcome.
The first type is much more common than the second, especially nowadays. You can look to Dragon Warrior 3 for an example of the second. Here’s a list of the things we’ll need to have or know:
A map in which we can host our arena. You can have both parts of the arena on one map, but we’ll split them into two, to make things a little less cluttered.
A nonplayer character (NPC) that allows the player to sign up for arena events.
Another NPC that allows the player to trade in his/her hard-earned arena currency for rare prizes.
A list of ranks to aspire to and battles to be fought, as well as the amount of special currency to award for each victory in a rank.
Whether the player will have to fight alone or with the companions he/she has recruited during his/her quest.
Outlining Our Arena
This is one of those bigger projects for which it is better to write down everything you can before you sit down and start trying to event it. Let’s lay this out one step at a time:
1. Number of Arena Ranks: 4 (D, C, B, A)
2. Cost to participate in a given rank: (D = 100, C = 500, B = 1000, A = 2500)
3. Number of battles per rank: 3
4. Currency awarded for clearing a rank: (D = 2, C = 4, B = 8, A = 16)
5. Rank D Battles
Bat*2
Slime*2
Orc*2
6. Rank C Battles
Snake*2
Assailant
Jellyfish*2
That’s the outline for the things we want to include within our arena. Rank B Battles and Rank A Battles will need to be defined at the end of the chapter when we have more enemy encounters to work with.
Note
As currently presented, this arena minigame will reuse troops already created for our game's other content. As such, they will award experience and Gold when defeated. If you wish to prevent this, you'll need to make new versions of each enemy that award 0 EXP and Gold, along with troops to hold those altered enemies.
Creating the Arena Exterior
How do we go about setting up the arena itself? First, we have to create the first map for the arena. This is where the player will land upon accessing the location from the world map. Take a look at Figure 7-1 to see the layout of the first arena area. It is a 25×25 map with the Inside Tileset and the Battle1 BGM at 60% pitch.
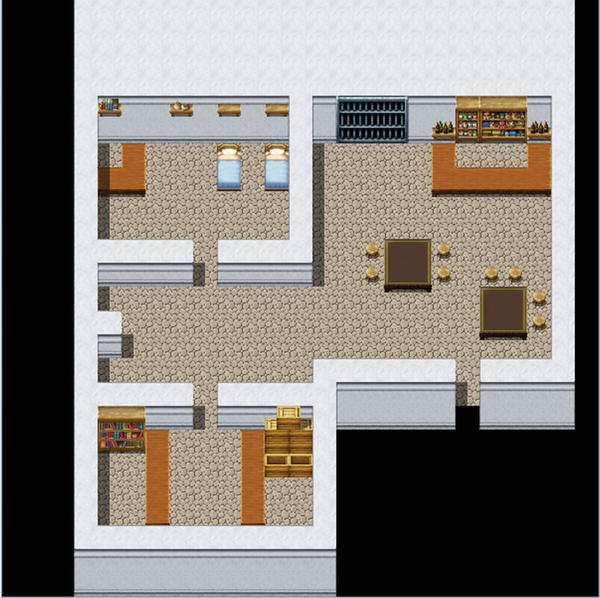
Figure 7-1. The building that contains the arena
The player enters the area from that opening near the southeastern end of the map. In front of him/her is the lobby, which could be home to other arena fighters. The northwest corner of the map has an inn, if the player needs to recover from wounds, while the southwest holds the arena sign-up NPC (left) and the arena exchange NPC (right). Feel free to use this basic map idea and flesh it out to your heart’s content. Be forewarned that creating the arena as I did was a task requiring many long hours of trial and error. As we work through this, you’ll quickly see why.
Overview of the Arena Sign-up Event
The arena sign-up NPC (and the exchange NPC, for that matter) will have an Action Button trigger. The NPC will greet the player, welcoming him/her to the arena, and then ask what it can do for him/her. I use a Show Choices event command with three choices at this point. The choices are
Arena Battle: As the choice suggests, this will bring up a list of ranks that the player can challenge. At the start of the player’s arena career, he/she can only challenge the lowest rank (in this case, D).
How does this work?: This is perfect for the first-timer; it will prompt the NPC to explain exactly how the arena works.
Bye: The player ends the conversation.
The preceding seems rather unassuming, but here’s what happens in the event code when the player chooses Arena Battle:
The game determines, via the analysis of various related switches, what ranks of the arena (if any) the player has cleared.
A Show Choices prompt appears, based on that analysis:
1. If the player has not cleared any ranks, the prompt will show Rank D and Nevermind.
2. If the player has cleared Rank D, the prompt will show Rank D, Rank C, and Nevermind.
3. If the player has cleared Rank C, the prompt will show Rank D, Rank C, Rank B, and Nevermind.
4. If the player has cleared Rank B, there will be two prompts. The first will contain Rank D, Rank C, Next Page, and Nevermind. Clicking Next Page will reveal the second prompt, which contains Previous Page, Rank B, Rank A, and Nevermind.
5. Rank A is the highest rank, so clearing it doesn’t change anything.
When the player chooses a rank to challenge, the arena NPC will charge the player a certain amount of Gold (the higher the rank, the higher the cost). If he/she accepts the cost, it is deducted from the player’s Gold, and he/she is transferred to the proper arena map.
And that’s only what’s on the first map. There is an Autorun event that triggers, based on each separate rank, once the player reaches the second map, which serves out the relevant fights. If the player wins all three matches or is defeated, he/she is sent back to the first map, to speak with the arena NPC once again, which will either congratulate the player and give him/her a reward (in the case of a win) or urge him/her to do better next time (in the case of a loss).
Creating the Arena Sign-up
I’m going to make this slightly simpler than the version I came up with and disregard party members. Harold and Marsha will be able to both participate in the arena at the same time. Even then, I have to note that a total of ten switches are used for this event. (You would need one more switch on top of that for every character you want to remove temporarily from the player’s party.) Here’s the first stage of our arena event:
♦Text : None, Window, Bottom: : Welcome to the Arena, where battlers from all over: : existence come to do battle!♦Label : MainMenu♦Text : None, Window, Normal, Bottom: : What can I do for you?♦Show Choices : Arena Battle, How does this work?, Bye (Window, Right, #1, #3): When Arena Battle♦: When How does this work?♦Text : None, Window, Normal, Bottom: : I'm glad you asked, wanderer.♦Text : None, Window, Normal, Bottom: : Essentially, you start at the bottom of the ladder,: : at Rank D. Win three matches in Rank D and you: : will unlock Rank C, and so on. It costs Gold to: : compete in each rank, so mind your pocket.♦Text : None, Window, Bottom: : The top rank is Rank A, but none have ever: : completed the three bouts at that level.♦Text : None, Window, Bottom: : You are completely healed at the end of each match,: : and you can use items as need be. However, be careful: : as we do not refund the cost of items used in the: : Arena. Use them only if they will secure your victory♦Text : None, Window, Bottom: : in battle.♦Jump to Label : MainMenu♦: When Bye♦Text : None, Window, Bottom: : Later.♦: End♦Label : EndPage♦
The good news is that we’re on our way. The bad news is that this is the simplest this event will ever be. Oh, boy, is it going to get extensive! We’re going to want conditionals for each and every possibility. As already noted, a fresh player will have cleared no ranks. Each rank clear will be stored in a single appropriately named switch. We need to have a switch for each possible challenge as well. Last, we need a switch to flip when the player wins his/her matches and another to flip when the player loses his/her matches. What follows are a large series of conditional branches that will make perfect sense in hindsight. First, we have the conditional branch for when the player has not cleared Rank D. As you can see in the following code listing, we have a universal sentence that will show up before the event starts determining which branch will be executed; it asks the player what rank he/she would like to challenge. Because Rank D has not been cleared, the resulting prompt will only have two choices. Rank D has a cost of 100 Gold for the player, and if the player doesn’t have the money, the game will return an error message and send him/her back to the initial three choices. If the player does have the Gold, it will be deducted, and the RankDChallenge switch will be flipped.
: When Arena Battle♦Text : None, Window, Bottom: : What rank would you like to challenge?♦If : RankDClear is OFF♦Show Choices : Rank D, Nevermind (Window, Right, #1, #2): When Rank D♦Label : RankDChallenge♦Text : None, Window, Bottom: : This will cost you 100 Gold. Are you sure?$♦Show Choices : Yes, No (Window, Right, #1, #2): When Yes♦If : Gold > 100♦Change Gold : -100♦Text : None, Window, Bottom: : Good luck!♦Fadeout Screen♦Play SE : Move1 (90, 100, 0)♦Control Switches : #0015 RankDChallenge = ON♦Transfer Player : Arena Grounds (8,8) (Direction : Up)♦Jump to Label : EndPage♦: Else♦Text : None, Window, Bottom: : You don't have enough Gold!♦Jump to Label : MainMenu♦: End♦: When No♦Jump to Label : MainMenu♦: Branch End
You may notice the strange lack of Fadein Screen on this event. As we transfer the player to the other map, we use Fadein over there instead.
Creating the Arena Battle Event
Once the player has signed up to participate in the arena, he/she is transferred to the arena grounds. This section will walk you through creating the battle event that the player will have to face in the arena. Before talking about the event in question, take a look at Figure 7-2 for a screenshot of the arena grounds (a 17×17 Inside map with the Battle1BGM playing at normal pitch).
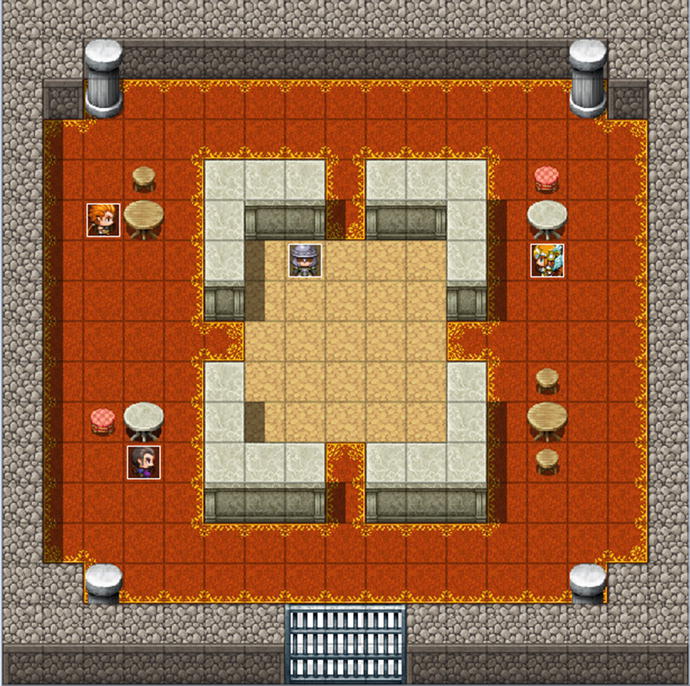
Figure 7-2. The interior part of the arena, where the player battles assorted baddies for fame and glory
We transfer the player to the center of that map, a few squares to the south of the armored NPC that we’re using as the arena announcer. An RPG arena just isn’t much of one if someone isn’t announcing challengers and such. We can kill two birds with one stone by making that NPC our Autorun event as well. He will have a total of four event pages. Each page has a conditional for each particular rank challenge switch. Thus, page 1 requires RankDChallenge to be turned on, page 2 requires RankCChallenge to be on, and so on. The general format of the arena challenges is as follows:
A short announcement of the player’s party is made.
A Battle Processing event begins, in which the player can continue the game if he/she happens to lose the battle.
If the player wins, the game loads up the second fight. If the player loses, he/she is sent back to the first map.
The same process is repeated until the player wins three fights or loses.
Take a look here for a large part of the Rank D Challenge Autorun event:
♦Fadein Screen♦Wait : 60 frames♦Text : None, Window, Bottom: : Welcome to the Rank D Arena Challenge!: : Are the challengers ready?♦Text : Actor1(0), Normal, Bottom: : I am.♦Text : Actor3(7), Normal, Bottom: : As am I.♦Text : None, Window, Bottom: : Let the games begin!♦Battle Processing : Bat*2: If Win♦Recover All : Entire Party♦Text : None, Window, Bottom: : Our challengers have won Round 1!♦Play SE : Applause1 (90, 100, 0)♦Text : None, Window, Bottom: : However, there are still two more rounds left!: : Will our challengers rise to the challenge?!♦Text : None, Window, Bottom: : Round 2 is now!♦Battle Processing : Slime*2: If Win♦Recover All : Entire Party♦Text : None, Window, Bottom: : The challengers take the second win of the day: : in Rank D!♦Play SE : Applause1 (90, 100, 0)♦Text : None, Window, Bottom: : This is the moment of truth! Will our aspiring: : challengers take the title? Or will the final: : challenge of Rank D prove too much to handle?!♦Text : None, Window, Bottom: : Let loose the monsters of war!!♦Battle Processing : Orc*2: If Win♦Recover All : Entire Party♦Text : None, Window, Bottom: : They have done it!♦Control Switches : #0014 ArenaWin = ON♦Jump to Label : Return♦: If Lose♦Recover All : Entire Party♦Control Switches : #0013 ArenaLoss = ON♦Jump to Label : Defeat♦: End
As noted before, the Autorun event on the second map starts with a Fadein Screen (if we didn’t do this, the screen would stay black). When you toggle the Can Lose check box, the Battle Processing event command as displayed splits into If Win and If Lose. Note the different switches that are flipped depending on whether the player wins or loses. We heal the player’s party after every battle, win or lose. Here is the rest of the event:
♦: If Lose♦Recover All : Entire Party♦Control Switches : #0013 ArenaLoss = ON♦Jump to Label : Defeat♦: End♦: If Lose♦Recover All : Entire Party♦Control Switches : #0013 ArenaLoss = ON♦Jump to Label : Defeat♦: End♦Label : Defeat♦Text : None, Window, Bottom: : The challengers have been defeated! Better luck next: : time!♦Label : Return♦Fadeout Screen♦Transfer Player : Arena Exterior (7,20) (Direction: Left)♦
Here you can see where all of those Jump to Label commands lead. As in several other cases previously, I used these solely as a precaution, given that there’s no way for unwanted events to execute. The screen is faded out before we transfer the player back to the first map. The other three rank challenge events can be added to our announcer in the same way. All you have to change between each one are the chosen encounters and, if you desire, some of the text shown to the player when they win or lose.
Creating the Arena Result Event
Back at the first map, we need an Autorun event (I placed a blank graphic event behind the arena sign-up NPC) to handle the post-arena results. Because we have four possible challenges, and two possible outcomes for those challenges, this event will have eight total pages. Don’t be daunted, as the pages are simple enough:
Page 1 requires RankDChallenge and ArenaWin to be on.
Page 2 requires RankDChallenge and ArenaLoss to be on.
Every pair of pages after that will represent a different ranked challenge when the player wins and when the player loses.
♦Fadein Screen♦Wait : 60 frames♦If : RankDClear is OFF♦Text : None, Window, Bottom: : Congratulations on clearing Rank D!: : Greater challenges await you in Rank C, whenever you: : are ready to face them!♦Control Switches : #0009 RankDClear = ON♦Jump to Label : Done♦: End♦If : RankDClear is ON♦Text : None, Window, Bottom: : Way to beat Rank D there!: : However, you've done this already, right? Come on,: : take a risk or two and take a harder challenge,: : would you?!♦Jump to Label : Done♦: End♦Label : Done♦Recover All : Entire Party♦Play SE : Item3 (90, 100, 0)♦Text : None, Window, Bottom: : You have earned 2 Arena Tokens!♦Change Items : Arena Token + 2♦Control Switches : #0015 RankDChallenge = OFF♦Control Switches : #0014 ArenaWin = OFF♦
This is the first half of the pair of events for Rank D challenges. As the pair of conditional branches and their contained text will imply, this is the page that requires that the player clear his/her challenge. We start with a Fadein (as the event on the other map ended with a Fadeout) and a one-second wait time after the screen fades in. Afterward, what executes next depends on whether the player has cleared Rank D before. If he/she has not, the first branch triggers, the player is congratulated on the first-time win, and the RankDClear switch is flipped on. Then we jump to the Done Label, where the player's party is healed, they are awarded two Arena Tokens (a Key Item that cannot be consumed, used, or sold from the player’s inventory) and, because the player is through competing for the moment, we turn off the pair of switches that have been turned on (in this case, RankDChallenge and ArenaWin). That Jump to Label is not superfluous. Because the player now has RankDClear switched on, the next branch will execute automatically, unless we skip it via a label jump. That branch, incidentally, is what executes when the player has already beaten Rank D before and is just repeating the challenge. After a minor berating by the NPC, the event continues as before, with the player earning his/her reward, and the two relevant switches flipping off. On the other hand, here’s the loss event for Rank D challenges:
♦Fadein Screen♦Wait : 60 frames♦Text : None, Window, Bottom: : Don't sweat it. It happens to the best of us. Get a: : bit stronger and come back fighting!♦Recover All : Entire Party♦Control Switches : #0015 RankDChallenge = OFF♦Control Switches : #0013 ArenaLoss = OFF♦
As you can see, it’s pretty much a little fluff; then the party is healed, and then the challenge and arena loss switches are flipped off. Rather simple compared to the win event, isn’t it? Now, win or lose, we’re back at our starting location. The player can choose to attempt another challenge (including taking the Rank C challenge, if he/she beats Rank D on his/her first attempt) or go do something else.
Miscellaneous Arena Considerations
There are only two things left to cover for the arena game. First, let’s include the code of the Arena Battle event when the player has beaten Rank D.
♦If : RankDClear is ON♦If : RankCClear is OFF♦Show Choices : Rank D, Rank C, Nevermind (Window, Right, #1, #3): When Rank D♦Jump to Label : RankDChallenge♦: When Rank C♦Label : RankCChallenge♦Text : None, Window, Bottom: : This will cost you 500 Gold. Are you sure?$♦Show Choices : Yes, No (Window, Right, #1, #2): When Yes♦If : Gold > 500♦Change Gold : -500♦Text : None, Window, Bottom: : Good luck!♦Fadeout Screen♦Play SE : Move1 (90,100,0)♦Control Switches : #0016 RankCChallenge = ON♦Transfer Player : Arena Grounds (8,8) (Direction : Up)♦Jump to Label : EndPage♦: Else♦Text : None, Window, Bottom: : You don't have enough Gold!♦Jump to Label : MainMenu♦: End♦: When No♦Jump to Label : MainMenu♦: End
What we see here will be consistent in every conditional branch from here to the end of the arena sign-up event . We check to see if the previous rank in the list was cleared. If so, we make sure that the next one has not been cleared yet. If it has, we’d be skipping to the next branch in the line. In this case, as the player has only beaten Rank D, he/she should be challenging Rank C next. Note the Jump to Label if the player picks Rank D. Redundancy is fine for some fields of work, but in game design, you usually only want to write the same code once, if possible. Then you call back to that code when you need it. I’ll be touching upon common events in a later chapter, to tidy up some of our previous code. For now, it will suffice to know that we have already written out the Rank D challenge in a previous conditional branch, so we just jump back to it, instead of repeating the same code a second time.
I’ll leave the rest of the eventing of these already mentioned events up to you, as it is pretty much identical to what we have done so far. What you would need to fill out follows:
Pages 2 to 4 of the announcer Autorun event: As already mentioned, each page will have a conditional based on the rank that is being challenged. You would have to create Ranks C through A.
Pages 3 to 8 of the post-challenge Autorun event placed behind the arena sign-up NPC: Remember to have one page for a win and another for a loss, in each particular rank.
The remaining conditional branches in the arena sign-up event: We need one when the player has beaten Rank C and another when the player has beaten Rank B.
Creating Our Arena Shop
Now we have most of the events set up; however, we have not done anything with the NPC that will exchange tokens for items. Let’s remedy that. There are two ways to set up a token shop :
1. You award special key items that serve as currency. Then, you set up a special shop that, in reality, is a series of Show Choices that each costs a different amount of tokens.
2. You award arena currency by adding value to a variable. Then, by clever use of currency swapping, you make it so that you can use the default shop with the currency you have earned.
I’ll show both possibilities, but the second is definitely easier than the first. Of course, to have a proper arena shop, we need goodies to sell in it. Take a look at Table 7-1 for a list of five items for the arena shop.
Table 7-1. A List of New Items and Accessories to be Added to the Database
Name | Effects | Cost in Arena Tokens (Price in Gold) |
|---|---|---|
Elixir | Restores all HP and removes all negative status effects. | 5 (1000) |
Manawell Ring | +5 M. Attack, +5 M. Defense, +2% MP Regeneration | 15 (3000) |
Troll's Bracelet | +5 Attack, +5 Defense, +2% HP Regeneration | 15 (3000) |
Stone Ring | Element Rate: Physical * 50%, Element Rate: Fire, Ice, Thunder * 125% | 25 (5000) |
Heal Orb | Restores [200 + a.mat] HP on all allies when used. Key Item that is not consumed on use. | 50 (10000) |
In this table, you can see a previously mentioned game design concept applied in a different way. Back when we were working on the Stone Cave dungeon, I said that the player should be rewarded if they go out of their way to explore the entirety of an area. Similarly, the player should be rewarded for taking time to partake in otherwise optional content. The Elixir is a consumable item that combines the effects of the Dispel Herb with maximum HP restoration. Naturally, it cannot be purchased anywhere else. The same is true of the three accessories (which should have the General Armor type so that both Harold and Marsha can use them) and the final item as well. Take a moment to observe how each item is flavored (in particular, how the Stone Ring grants disadvantages as well as advantages when worn). Another consideration when working on an arena shop is the valuation of its currency. In other words: How much is an arena token worth? In the case of my items, each token has an effective value of 200 Gold (100 Gold if an item bought with the tokens is sold; items in MV sell for half of their buy price, by default). In your own game, you may consider increasing or decreasing the value of arena tokens. Generally, if you don't want the player to make a profit (in Gold) in the arena game, the items the player can get in the game need to be worth less than the cost of getting the tokens. Conversely, if you don't mind the player making bank on your game's arena minigame, then you can make it so that the effective value of arena tokens is higher than the cost of entry.
Following, you’ll find a listing of part of the first arena shop possibility.
♦Text : None, Window, Bottom: : Hello there! This is the Arena Exchange! I can trade: : you special items for any tokens you may have: : earned from your Arena participation.♦Text : None, Window, Bottom: : Here's what I have available.♦Control Variables : #0006 ArenaCurrency = The number of Arena Token♦Show Choices : Elixir, Manawell Ring, Troll's Bracelet, Stone Ring, Heal Orb, Nevermind (Window, Right, #1, #6): When Elixir♦Text : None, Window, Bottom: : An Elixir will cost you 5 Tokens.♦Text : None, Window, Bottom: : You currently have V[6] Arena Tokens. Will you: : purchase an Elixir?♦Show Choices : Yes, No (Window, Right, #1, #2): When Yes♦If : ArenaCurrency > 5♦Change Items : Elixir + 1♦Change Items : Arena Token - 5♦Text : None, Window, Bottom: : Enjoy!♦: Else♦Text : None, Window, Bottom: : You don't have enough Tokens!♦: End♦: When No♦Text : None, Window, Bottom: : Okay. See you later!♦: End
We have the NPC greet the player, as is usual. Then we have a new variable to hold the number of Arena Tokens that the player has in his/her inventory. A Show Choices prompt appears, with the five possible item purchases and Nevermind as the last option. When the player clicks an item choice, the NPC confirms the cost, tells the player how many Arena Tokens he/she currently has, and asks if he/she wishes to purchase the item, bringing up a Yes/No choice prompt. We make sure that the player has the Arena Tokens to purchase the item in question. If the player doesn’t, we return an error message; otherwise, we add the item to the player’s inventory and remove the appropriate number of tokens. Now that you have the gist of the event, I'll leave the rest of this shop event up to you. Populating the rest of the item shop choices is as easy as copy-pasting the already completed part of the event, and changing the amount of tokens needed (and later taken away as payment), changing the item granted and any relevant text references. Last but not least, you'll want to add a short farewell to the Nevermind choice if the player decides not to buy any items at the first Show Choices junction.
Note
You can see the complete event in action by talking to the top Arena Shop NPC in the source code project file.
This type of arena shop, as you can see, is simple enough, if a bit clunky. Unfortunately, it becomes less and less useful the more items you want to add to the shop. The Show Choices event command can only hold a total of six choices, so you would be required to add options merely to switch between Choice branches.
The second way is much easier and has only one quirk that will require scripting to address. However, as the quirk is graphical in nature, it doesn’t affect the event’s functionality, so have at it! Take a look at the following:
♦Text : None, Window, Bottom: : Hello there! This is the Arena Exchange! I can trade: : you special items for any tokens you may have: : earned from your Arena participation.♦Text : None, Window, Bottom: : Here's what I have available.♦Control Variables : #0007 PartyGold = Gold♦Change Gold : - 9999999♦Control Variables : #0006 ArenaCurrency = The number of Arena Token♦Change Gold : + {ArenaCurrency}♦Shop Processing : Elixir: : Manawell Ring: : Troll's Bracelet: : Stone Ring: : Heal Orb♦Control Variables : #0006 ArenaCurrency = Gold♦Change Items : Arena Token - 9999♦Change Items : Arena Token + {ArenaCurrency}♦Change Gold : -9999999♦Change Gold : + {PartyGold}♦
In the second type of arena shop, we save the player’s Gold in a variable appropriately named PartyGold. Then we zero out the player’s Gold and add his/her arena currency to his/her Gold value. We make sure that the Purchase Only check box is toggled and then add any items we wish the player to be able to purchase. Set the price of Elixirs to 5, the price of Manawell Rings and Troll's Bracelets to 15, the price of Stone Rings to 25, and the price of Heal Orbs to 50. After the player closes the shop, we restore his/her Gold and arena currency to their original places. Figure 7-3 shows the arena shop in all of its glory.
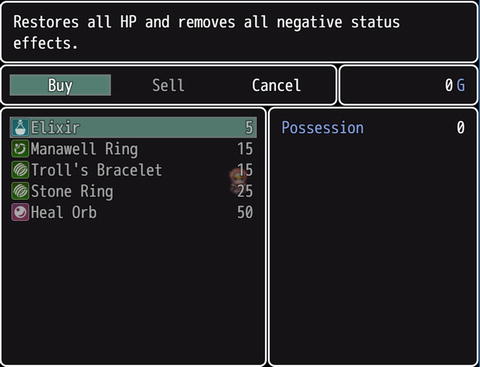
Figure 7-3. The arena shop
As you can see, despite the fact that we switched from Gold to arena currency , our shop is still using G (to represent Gold). A small amount of scripting can be used to change the currency symbol, as desired. In fact, you need only add two one-line Script commands. The first will switch the currency symbol to AT (short for Arena Tokens) in preparation for opening the shop screen, and the second will switch the currency symbol back to G after the player is done buying. Here's a snippet of the event, with Script events added in relevant locations:
♦Change Gold : + {ArenaCurrency}♦Script : $dataSystem.currencyUnit = "AT"♦Shop Processing : Elixir: : Manawell Ring: : Troll's Bracelet: : Stone Ring: : Heal Orb♦Script : $dataSystem.currencyUnit = "G"♦Control Variables : #0006 ArenaCurrency = Gold
Go ahead and test the event once again (this is a perfect time to use the Test option ; recall that you need to shift-click to select the entire event before you click Test), and you should quickly see the difference. With that done, we have finally completed this part of Chapter 7! Here are some exercises to do before we move on to another minigame.
1. Add extra rewards that are earned by the player the first time he/she clears a certain rank.
2. Use Battle Processing: Same As Encounter in tandem with an encounter table on the map, to add some random possibilities to arena battles at Rank A. You can find an example event in the map named Ch.7 Arena Exercise 2. I set the arena host's trigger to Action Button, so you'll need to interact with him to start the arena event off.
As the player doesn’t move while on the second map, you could leave the default Range on the possible encounters. Just to be safe, you could make it so that random encounters only appear on that map within a specific Region.
The Treasure Chest Game
This is a game in which the player opens a certain number of chests in the designated playing area. Will the player receive riches or scraps? In this section, I’ll be creating a seven-chest game. Take a look at Figure 7-4 to see what the area looks like when complete.
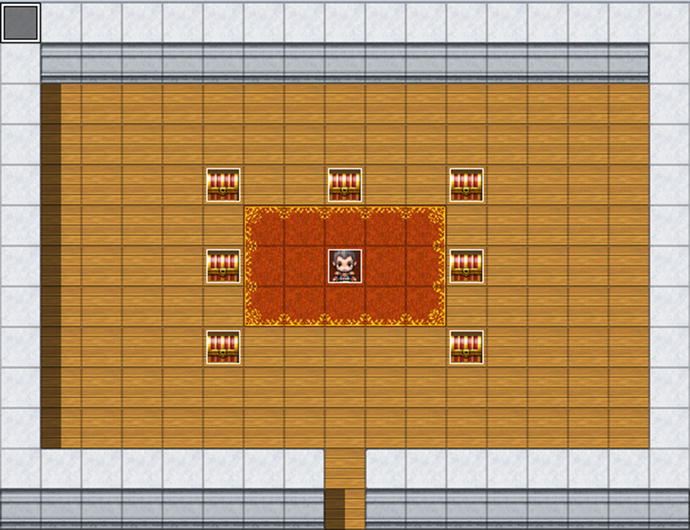
Figure 7-4. The treasure chest room
We have the game host in the center of the map, surrounded by his seven chests. Here’s what we need to do to make our treasure chest game:
Come up with a list of rewards that can be obtained. I’ll list my seven, but feel free to come up with your own.
1. Potion
2. 1 Gold
3. Elixir
4. 1 Gold (Yes, the player has two chances to get 1 Gold.)
5. Life Potion
6. 200 Gold
7. 500 Gold
Add a variable that will store the current “seed” for the treasure chests. We want to make it so that the contents of a particular chest are one of those seven, on a random basis. Otherwise, the player can just open the same chest and get the same reward consistently. A chest’s contents will change, based upon the seed value.
Add a switch that will be flipped on while the minigame is in progress and turned off once it is completed.
Make it so that, once opened, a chest disappears for the duration of the minigame and reappears afterward.
Have a variable that decreases every time the player opens a chest. We’ll set this to 2 at the start of the minigame, meaning that the player can open two of the seven chests present.
Once two chests have been opened, announce that the game is over and reset the initial starting conditions, so that the player can play again, if he/she so chooses.
To pull this off with eventing, we’ll have to set up each treasure chest individually, as well as create the NPC and the Parallel event that triggers when the game is over. I’m going to start with the chest in the upper-left corner. Let’s call that chest the master, as the rewards listed previously will be placed into the event in the same order. Because the chests will be present even while the game is not active, we have to make sure that the player cannot open them. Each chest will be a two-page event, in which page 1 has a treasure chest graphic and Direction Fix has been toggled. (This makes it so that the chest does not appear to open slightly if the player interacts with it from certain angles.) If the player tries to interact with the chest, the event will show a text box declaring that it is locked. Page 2 has the TreasureChestStart switch conditional, meaning that it will not trigger unless the minigame is currently active. Like page 1, this page will have an Action Button trigger .
♦Set Movement Route : This Event (Wait): : ◊Direction Fix OFF: : ◊Turn Left: : ◊Wait: 3 frames: : ◊Turn Right: : ◊Wait: 3 frames♦If : TreasureChestSeed = 1♦Change Items : Potion + 1♦Text : None, Window, Bottom: : Got a Potion!♦: End♦If : TreasureChestSeed = 2♦Change Gold : + 1♦Text : None, Window, Bottom: : Got a single Gold piece!♦: End♦If : TreasureChestSeed = 3♦Change Items : Elixir + 1♦Text : None, Window, Bottom: : Got an Elixir!♦: End♦If : TreasureChestSeed = 4♦Change Gold : + 1♦Text : None, Window, Bottom: : Got a single Gold piece!♦: End♦If : TreasureChestSeed = 5♦Change Items : Life Potion + 1♦Text : None, Window, Bottom: : Got a Life Potion!♦: End♦If : TreasureChestSeed = 6♦Change Gold : + 200♦Text : None, Window, Bottom: : Got 200 Gold!♦: End♦If : TreasureChestSeed = 7♦Change Gold : + 500♦Text : None, Window, Bottom: : Got 500 Gold!♦: End♦Wait : 30 frames♦Control Variables : #0009 ChestsToOpen -= 1♦Erase Event♦
The first part of the event was copy-pasted from RMMV’s Treasure quick event. It displays the animation that the player sees when opening a treasure chest. Afterward, we have the seven possible chest contents, based on the value of the TreasureChestSeed variable. The player will earn the appropriate item and be apprised of the fact via text box, and after a half-second pause, the value of ChestsToOpen will drop by 1, informing the game that the player has opened a chest. Erase Eventis an event command I have not covered up to now, but it is as simple as can be. When an event processes Erase Event, it effectively ceases to exist until the player leaves the map. As you might have inferred, this could cause problems in the execution of the minigame. This will definitely be addressed in the Parallel event, when we get to it.
Populating the Chests of the Treasure Chest Game
If we want to have randomized results and have all seven rewards represented with every seed, each chest has to give different items for the same seed value. For example, if the chest in the upper-left corner gives a Potion when the seed is 1, another chest could give the single Gold piece in that case. Think of the list of items in a numerical sense. That first chest has its items in the order 1234567. The second chest (the one to the right; let’s go in a clockwise rotation) has the items in the order 6412753. When the seed is 1, the player will receive 200 Gold, if he/she opens the second chest. The idea is that two chests not give the same item (except in the case of the pair of 1 Gold chests). This is rather hard to figure out mentally, given the large number of possibilities (many of which don’t apply, as they would cause two or more chests to give the same item). I personally used random.org’s list shuffler ( www.random.org/lists ). I wrote down 1234567 and then let the site do its work. A lot of the shuffled lists will not be valid, but it will give you a good idea of what item combinations you need, especially as you get closer to the last chest. Check Table 7-2 to see the seven-number lists I came up with.
Table 7-2. The Seven-Number Lists That Determine What Chest Has What Item in the Treasure Chest Game
1 | 6 | 2 | 7 | 4 | 3 | 5 |
2 | 4 | 7 | 3 | 5 | 1 | 6 |
3 | 1 | 6 | 2 | 7 | 5 | 4 |
4 | 2 | 1 | 5 | 6 | 7 | 3 |
5 | 7 | 4 | 1 | 3 | 6 | 2 |
6 | 5 | 3 | 4 | 1 | 2 | 7 |
7 | 3 | 5 | 6 | 2 | 4 | 1 |
As you can see, our master list is the leftmost column. Each column corresponds to a different chest from top to bottom. Take a moment to look at the numbers and note that no numbers repeat when reading from left to right. For example, the first row is 1627435, which has no numerical repeats. If your rows aren’t repeating, chances are that the slot in question is fine. To prove the point, if the minigame rolls a 1 for the seed, here’s what you can expect from each chest:
1. Potion
2. 200 Gold
3. 1 Gold
4. 500 Gold
5. 1 Gold
6. Elixir
7. Hi-Potion
Pretty neat, isn’t it? As crunching permutations is rather secondary to the point of this book, feel free to use the grid that I came up with for your own chests. What you can do is copy-paste page 2 of the master chest event. Then, depending on the chest number, you move around the various items in the event page, so that the item order matches the ordered list that you want. Once you have done that, you renumber the conditional branches such that they go from 1 to 7, as in the master chest: same items, different seed order. For additional context, check the eventing of the second treasure chest on the following page, so that you can get a visual idea of what I mean. I’ll leave the rest of the chests to you; they involve more of the same, as already noted.
♦Set Movement Route : This Event (Wait): : ◊Direction Fix OFF: : ◊Turn Left: : ◊Wait: 3 frame(s): : ◊Turn Right: : ◊Wait: 3 frame(s)♦If : TreasureChestSeed = 1♦Change Gold : + 200♦Text : None, Window, Bottom: : Got 200 Gold!♦: End♦If : TreasureChestSeed = 2♦Change Gold : + 1♦Text : None, Window, Bottom: : Got a single Gold piece!♦: End♦If : TreasureChestSeed = 3♦Change Items : Potion + 1♦Text : None, Window, Bottom: : Got a Potion!♦: End♦If : TreasureChestSeed = 4♦Change Gold : + 1♦Text : None, Window, Bottom: : Got a single Gold piece!♦: End♦If : TreasureChestSeed = 5♦Change Gold : + 500♦Text : None, Window, Bottom: : Got 500 Gold!♦: End♦If : TreasureChestSeed = 6♦Change Items : Life Potion + 1♦Text : None, Window, Bottom: : Got a Life Potion!♦: End♦If : TreasureChestSeed = 7♦Change Items : Elixir + 1♦Text : None, Window, Bottom: : Got an Elixir!♦: End♦Wait : 30 frames♦Control Variables : #0009 ChestsToOpen -= 1♦Erase Event♦
That is a large part of the treasure chest minigame.
Creating the Treasure Chest Game NPC
Next, let’s create the NPC . He’s going to get straight to the point and begin with the all-important question: Want to play the Treasure Chest game? The player will get three choices at that time. He/She can answer Yes, at which point the NPC will note that it costs 500 Gold to play and ask the player to confirm. We have the usual processing to make sure that the player can’t play if he or she doesn’t have the Gold and have the NPC say good-bye if he/she says no. The second choice is humorously named “Huh?” and prompts the NPC to explain what the game is actually about. The last choice allows the player to say No from the first question and not have to initially say Yes. If the player says Yes and has the Gold to play, the NPC will deduct 500 Gold from the player, say a little line, and the screen will fade out. After the fade-out, we set the value of ChestsToOpen to 2, set the value of TreasureChestSeed to a random value between 1 and 7, and flip the TreasureChestStart to the on state. One second later, the screen fades back in, and the fun can begin. We add a simple second page to the NPC that gives him a witty one-liner urging the player to “Get to opening!” the chests, as it were, but only when TreasureChestStart is on. A listing of the first page of the NPC event follows.
♦Label : Main♦Text : None, Window, Bottom: : Want to play the Treasure Chest game?♦Show Choices : Yes, Huh?, No (Window, Right, #1, #3): When Yes♦Text : None, Window, Bottom: : That will be 500 Gold, if you will.$♦Show Choices : Yes, No (Window, Right, #1, #2): When Yes♦If : Gold > 500♦Change Gold : - 500♦Text : None, Window, Bottom: : Let the game begin!♦Fadeout Screen♦Wait : 60 frames♦Control Variables : #0009 ChestsToOpen = 2♦Control Variables : #0009 TreasureChestSeed = Random 1..7♦Control Switches : #0019 TreasureChestStart = ON♦Fadein Screen♦: Else♦Text : None, Window, Bottom: : Come back when you have enough Gold!♦: End♦: When No♦Text : None, Window, Bottom: : See you later, then.♦: End♦: When Huh?♦Text : None, Window, Bottom: : Guess I should explain. These seven chests around: : me contain either an item, some Gold, or a single: : gold piece. The catch, of course, is that you may: : only open two of them.♦Text : None, Window, Bottom: : Oh, and it costs you 500 Gold to play.♦Jump to Label : Main♦: When No♦Text : None, Window, Bottom: : See you later, then.♦: End♦
Note
It’s as good a time as any to mention that $ causes the game to display the party’s current Gold when used within a text box. We’ve used it several times already for precisely that purpose.
Completing the Treasure Chest Game
Last, but definitely not least, we have the Parallel event. We have to make sure that we end the game right when the player has opened the second chest, lest he/she get greedy and open all seven of them. Also, we have to make it so that the player is temporarily removed from the map, so that the chosen chests can reappear for future play-throughs of the minigame. We can do this via the clever use of a switch that I’ll call Intermission. The Parallel event is one page long and needs to have a condition of TreasureChestStart (otherwise, the player will loop infinitely between the two maps). The Parallel Process event starts with a conditional branch that requires ChestsToOpen to be equal to 0. Then it checks for Intermission to be off (which it should be). The NPC will say “That’s it!” and the screen will fade out. The player will be transferred to a nearly blank map that contains a small Autorun event that flips on the Intermission switch and sends the player back to the Treasure Chest game map (specifically, one square to the south of the NPC and facing the player).
Back at the game map, the Parallel event has a second conditional branch that triggers only when Intermission has been turned on. We take a one-second pause and turn off the TreasureChestStart and Intermission switches, effectively resetting the minigame state so that the player can play again. Here’s the Parallel event:
♦If : ChestsToOpen = 0♦If : Intermission is OFF♦Text : None, Window, Bottom: : That's it!♦Fadeout Screen♦Transfer Player : Intermission (7,6) (Fade: None)♦: End♦: End♦If : Intermission is ON♦Wait : 60 frames♦Control Switches : #0019 TreasureChestStart = OFF♦Control Switches : #0020 Intermission = OFF♦Fadein Screen♦: End
The Autorun event on the intermission map is made up of two little lines:
♦Control Switches : #0020 Intermission = ON♦Transfer Player : TreasureChestGame (8,7) (Direction: Up, Fade: None)
Related Exercises
With that done, you have just completed your very own treasure chest game in the vein of some of the Zelda games. Here are some neat exercises for you to try out that are related to this minigame.
Note
You can find an example of all three of the following exercises integrated into pages 3 and 4 of the upper-left chest of the Treasure Chest Game map in the source code project. You can change the Item conditional on page 3 from Heal Orb to something easier to obtain if you wish to test it out in-game.
1. Using the “Item” conditional of an event, make it so that the player can see the item that a particular minigame chest contains.
The inspiration for this one comes from Ocarina of Time. In that Zelda entry, the player can see the contents of chests in a minigame, by using an item found at the bottom of a well.
You could duplicate page 2 of each of your chests for this purpose and have a text box that allows the player to decide whether or not to open the chest, based on what it contains. Just make sure that it’s page 3 and not 2; otherwise, it will never trigger. (Never forget that events attempt to execute from right to left; the rightmost page will always be executed, if possible.)
2. Make it so that an opened chest remains visible until the minigame ends.
It’s as simple as having for each chest one switch (you could name them TreasureChest1, TreasureChest2, and so forth) that is flipped on when its related chest is opened and including another event page that requires that switch to be flipped on and has a graphic of the open treasure chest.
You’ll have to toggle off those switches to reset the minigame conditions. Incidentally, that’s the reason I don’t use self-switches for the same purpose. A self-switch can only be affected at a local level, which means that if you flip Chest 5’s A switch, for example, you would have to flip it off via Chest 5’s event specifically.
3. Have items that can only be received once per play-through.
Say you wanted to have a rare medallion as one of the seven possible rewards. What you could do is use a switch that flips on when the player finds the item for the first time, and then have a conditional branch that changes the item found in a chest in subsequent minigames.
It might be tempting to use an Item conditional branch here, but that will only work if the rare item in question cannot be obtained elsewhere. Otherwise, weird things will happen. Mainly, the player will not be able to obtain the item if he/she already has it (even if the player has never gotten one from the minigame) and can get it multiple times if it has a sell price (by selling the one he/she has before replaying the minigame).
Other Minigames
A great minigame is one that makes the player want to play it even more than the actual game. I’m a personal fan of card games and have to admit that the Final Fantasy IX and Xenosaga Episode 1 have card games that hooked me for dozens of hours. That’s not bad for what is supposed to be a diversion from the main plot. Following, I’ll list some other ideas for minigames and offer tips and tricks on how I would start tackling them within RMMV.
1. A sequence where the player has limited time to escape a certain area:
For example, let’s say the player is in a space station that is being overrun by baddies. If the player does not reach the escape pod within 1000 steps, he/she gets a game-over.
There’s no direct way to determine via eventing when a player has taken a step in RMMV. The easiest workaround is to use three variables. One variable checks the player’s total steps at the start of the escape minigame. The second saves the player’s current steps every time he/she moves, and the last variable is the difference between the first and second variables. We’ll need a Parallel event to cover those interactions.
The Parallel event would have a conditional branch that requires the difference between the two variables to be 1000 or more. Once that is met, you employ the Game Over command for its sole use.
Of course, if the player makes it out in time, all is well.
To add to the tension of the situation, you can make it so that certain doors and elevators become inoperable at certain step milestones (such as 700 steps left, 300 steps left, and so on).
2. A matching-pair memory game involving NPCs or symbols:
Each pair of identical events should have its own variable. There should also be a variable equal to the number of total pairs at the start of the game.
Another variable should be set to 2 and drop each time the player selects a spot. When a member of a pair is spotted, its variable should be increased by 1.
When two spots have been uncovered, the counting variable will be at 0. The game should check to see if any pair variables are at 2. If they are, we remove them and award the player a point.
We can have another variable for Lives. The player loses a life every time he or she fails to match a pair. If the player is out of lives, the minigame ends prematurely, and we reward him/her based on points received.
If a pair has not been matched, we hide the two uncovered spots. If a pair has been matched, we use Erase Event on it.
Adding the Minigame Areas to Our World Map
That just about concludes our chapter, but for two more things. First, we haven’t added our new locations to the world map! Take a look at Figure 7-5.
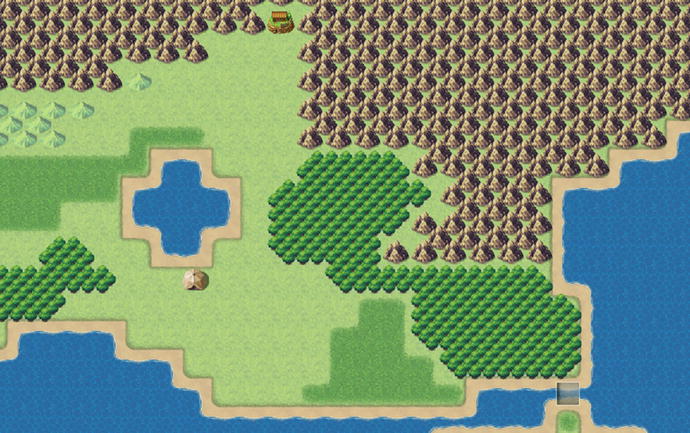
Figure 7-5. Another part of our world map that has been populated with locations
The tent is the arena and is located at (68, 73). The treasure chest game is located at the small building at (71, 64). The bridge to the east of the new locations appears when the player beats the tower's boss (we accomplish this by giving the event a PlotAdvance2 switch condition) and has a Priority of Below Characters (this allows the player to pass over the bridge to the other side). Note that, by default, that strip of land is one tile east of its current location in Figure 7-5, so you'll need to shift it accordingly so that the bridge lines up nicely with the new part of the world map we want the player to explore. Make sure to take a moment to update the Transfer Parallel event (and, for that matter, don't forget to connect the Arena and Treasure Chest Game areas to the world map) accordingly before you move on.
The other thing we need to address is creating a few new enemies for our new part of the map, along with the regions where they will appear (incidentally, it's also a good time to fill in the tiles surrounding the tower, which we didn't actually do in the previous chapter).
New Enemies and Region Placements
You know the drill by now: We have a new area, and the new area needs some enemies. Table 7-3 lists the three enemies I created to populate Region 4 of our world map.
Table 7-3. A List of the New Enemies for This Section of Our Project
Name | HP | MP | ATK | DEF | MAT | MDF | AGI | LUK | EXP | G |
|---|---|---|---|---|---|---|---|---|---|---|
Forest Rat | 300 | 0 | 50 | 20 | 20 | 20 | 60 | 60 | 92 | 133 |
Troll | 1000 | 0 | 70 | 75 | 40 | 40 | 35 | 50 | 412 | 550 |
Ruffian | 850 | 0 | 60 | 60 | 60 | 60 | 60 | 60 | 242 | 375 |
As is also standard by now, here's a more detailed breakdown of each enemy type:
Forest Rats are the weakest enemies of the new area. Given their relatively paltry experience and Gold rewards, you may wonder why I created them at all. Up to now, we have only had troops of one or two enemies. The newly created Rats fit yet another monster archetype: that of the swarm. A swarm is a large group of individually weak enemies that are threatening because of their numbers. Attacks that hit multiple enemies will make short work of swarms. Thus, the Forest Rat groups will be 3 and 5 units in size. I used a Hue of 115 to give the Forest Rat a greenish tone. Forest Rats drop Potions at a 1/5 chance and Dispel Herbs at a 1/20 chance. Forest Rats only use the Attack skill.
Trolls are our newest Ogre variant, painted green with Hue: 275. Whereas Lava Ogres were all about the offense to the exclusion of everything else, Trolls are more about outlasting their enemies. They have high physical defense to thwart most of Harold's strongest attacks, and the Ex-Parameter: HP Regeneration + 4% Trait to recover 40 HP per turn. Magic attacks will be useful to bring down a Troll quickly. Besides the aforementioned HP Regeneration Trait, the Trolls I created have a few more traits worth mentioning:
I set the Troll's Hit Rate to 70%. While not as inaccurate as the Lava Ogres back at the Lava Cave, they will still be missing about 3 in 10 attacks.
Critical Rate of 20%. They will be landing some deadly blows, but at a lower average rate than their reddish cousins (14% of the time vs. the Lava Ogre's 25% of the time).
Attack State: Confusion + 25%. Sometimes the Troll just lands a blow that leaves its victim confused and struggling to figure out what just happened.
Trolls use Attack and Cleave at all times (both skills have a Rating of 5). They have a 1/10 chance to drop a Big Bomb and a 1/10 chance to drop a Life Potion.
Ruffians are this area's balanced enemy. As a result, there's not much to say about them. The Swordsman graphic is used for this enemy. They have three skills with a condition of Always. Attack and Eye Gouge have a Rating of 5 and Dual Attack has a Rating of 4. Lastly, they have a 1/15 chance to drop a Greatsword and a 1/15 chance to drop Chain Mail.
Now, we only need set the Regions and encounter tables for each new enemy type. But first, let's set up Region 3, where enemies appropriate to the area surrounding the tower will spawn, That way, our revised world map random encounters can cover both Region 3 and the regions to be used for the northern area. Take a look at Figure 7-6 for a look at how the area around the tower looks with Regions added.
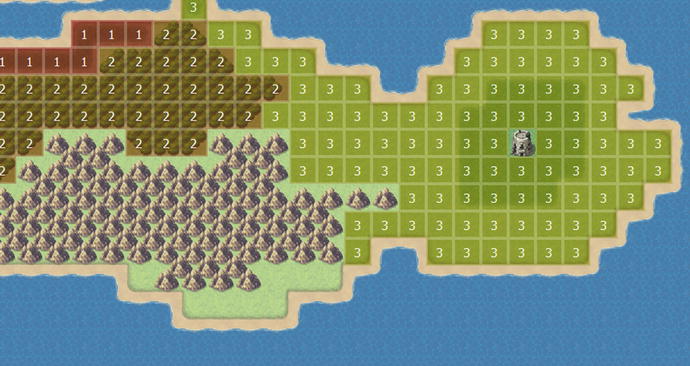
Figure 7-6. The area surrounding the game's second dungeon, now with Regions added
Note how Region 3 starts after the end of the long forest area that covers most of the middle of our game's initial continent. Now, take a look at Figure 7-7 for region placements in our newest area.
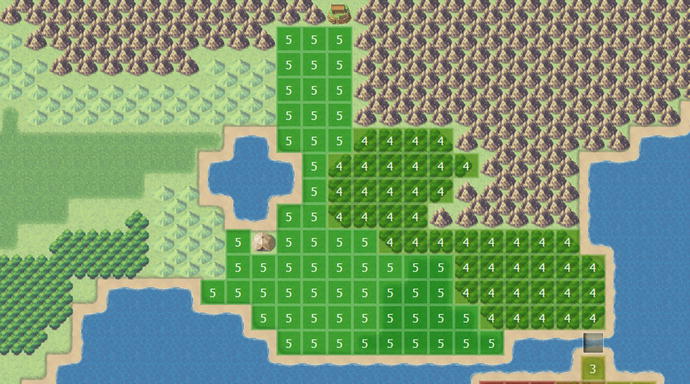
Figure 7-7. The area past the bridge revealed after clearing the tower, with regions added
Notice how I tweaked the terrain a bit by adding hills to better constrain Region 5, which is made up of grasslands. Now, take a look at Figure 7-8, showing the newly added encounters for our world map, based on our newly added regions.
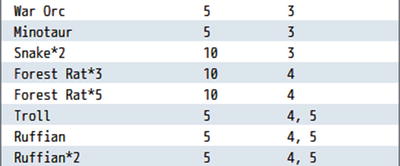
Figure 7-8. The encounters added to our world map's encounter table
For Region 3, we reuse three out of four regular enemy encounters from the Stone Cave dungeon. Region 4 is the forest area immediately past the bridge and is where the player will have a chance to encounter the Forest Rat swarms. The other two enemy types will appear in both Regions 4 and 5. While we're technically done with the chapter's material, now's the perfect time for a bit of wrapping up.
Wrapping Up the Chapter
Recall at the start of the chapter that I mentioned that we would need to return to Ranks B and A of the Arena once we've added more enemy types to our game. In the following sections we’ll do that and then update our Battleback event.
Adding Battles for Ranks B and A of the Arena
Rank B of the Arena should have the following battles for the player to overcome:
Lava Ogre
Arcanist*2
Forest Rat*3
And, here are the three battles for Rank A:
Forest Rat*5
Troll
Ruffian*2
Rank A is perhaps a bit too easy (or, more properly phrased, it isn't harder than Rank B by enough), but you can easily remedy that problem later on with some of the enemy types we'll be adding to our project.
New World Map Battlebacks
Now that we have three new regions in our game, it's a good a time as any to update our Battleback Parallel event to reflect the added areas. Here's a bullet list of what battleback should be displayed in each new region.
Region 3: Grassland & Grassland (the same as Region 1)
Region 4: Dirt2 & Forest
Region 5: Dirt2 & Grassland
There you have it! We can stick a fork in this chapter, because it's done!
Summary
This chapter covered how to create an arena game in which the player can battle predetermined enemies to earn points toward rare and special items. I then showed how to make a treasure chest game in the spirit of some of the Legend of Zelda games and gave ideas for other possible minigames. Finally, I updated the world map with new regions and enemies and assigned those enemies as battles for the player to overcome in Ranks B and A of the Arena. In the next chapter, you will learn about optional quests (also called sidequests).