
We have now finished our game. All that is left is to cover a few things that I didn’t cover in earlier chapters. Although an in-depth look into JavaScript scripting within RMMV is outside the scope of this book, it is still a good idea for this chapter to cover the basics through a series of exercises. Chapter 15 will cover other miscellanea that did not fit within the overall narrative of our game and the book so far.
What Is JavaScript?
JavaScript is a prototype-based object-oriented programming language that was designed by Brendan Eich in 1995 while he was working at Netscape. It is used for the entirety of RMMV’s code base. Learning how to use JavaScript will help you greatly whenever you decide to start customizing your games with plugins.
What Is Object-Oriented Programming ?
In a sentence: it is programming that uses code organized into objects as the building blocks for a desired result. In the case of JavaScript, prototypes are used to create master copies of code that can then be cloned for use as needed throughout any given program. This is in contrast to Ruby and other object-oriented programming languages where classes are used instead.
Note
You’ll see MV’s documentation refer to its various main functions as classes. That term provides more clarity for RPG Maker veterans accustomed to working with Ruby, but it is not strictly correct when talking about JavaScript. All you need to know if you’re new to JavaScript is that what the MV developers call a class is a function that contains other functions (those contained functions are called methods; a method is a function stored as an object property).
As you may have inferred, a function is an object. In fact, when talking about object-oriented programming in general and JavaScript specifically, it’s probably easier to list what isn't considered an object. In any case, we’ve been seeing examples of how JavaScript (and thus object-oriented programming) works, in the few scripting exercises we tackled for our game. Here’s what we’ve touched upon already :
The character $ is used to represent global variables within RPG Maker MV’s code. This is a holdover from Ace and other earlier RPG Maker iterations, where Ruby was the scripting language and $ the sign to mark a variable as global. That means a value denoted with $ can be used anywhere within a project (such as our game).
An underscore before a variable (such as _name in the next bullet) designates that variable as private. In other words, such a variable is only meant to be accessed from specifically designated functions and methods. Note that this is a JavaScript naming convention and not actually enforced by the underscore symbol (which JavaScript treats as just another symbol).
$gameActors.actor(n) (where n is the actor ID) is an array that contains several defining aspects of Actors in RMMV, such as name, level, and nickname. In Chapter 11, we used $gameActors.actor(n)._name for one of our project’s puzzles.
An array is an ordered collection of objects.
As you can see, there are quite a few things we already know. During the course of this chapter, we’ll be tackling other simple things that we can do with only the most basic of JavaScript experience. Of course, there are two things we need to do before we start work on this chapter proper. The first order of business is getting a better text editor. While Notepad has served us well up to now, we could benefit from having a few extra programming-specific features. So, let’s get Atom!
What is Atom ?
Atom is a free, open source text and source code editor for Windows, OS X (Mac), and Linux that can also be used as an IDE (integrated development environment). We just want it for two features :
Line numbers. Instead of having to say: “Find the code line in rpg_objects.js that reads this that there”, I can just say: “go to line 7852 in rpg_objects.js”. Doesn’t seem like much of a difference, but it’s definitely a lot neater to read. Of course, I’ll generally list a little of what is to be found at that line number, so you can use the Find function to better effect.
Code coloring. When you open a code file within Atom, it tries to auto-detect what language the code is written in (from a fairly large list of preset programming languages). After detecting the language (or, alternately, the user manually defining which language it is within the software, by changing the detected language in the lower-right corner of the Atom interface), the program automatically colors the various commands appropriately. If nothing else, it can help you get a better idea of how JavaScript code flows within RMMV’s js files .
Downloading Atom
To be able to use Atom, we need to download the software. Make your way to https://atom.io .
If You’re On Windows
You’ll want to click the button Download Windows Installer, where you will be prompted to save the file (85.1 MB in size) to your computer.
If You’re on Mac
You can click Other Platforms, find the atom_mac.zip file, and left-click it. You’ll get a prompt to save the file to your computer.
Installing and Running Atom
In either case, you now have the Atom file on your computer. Take a few minutes to install it as per your operating system. Once Atom is installed, it will instantly launch, leaving you at a screen much like that in Figure 14-1.
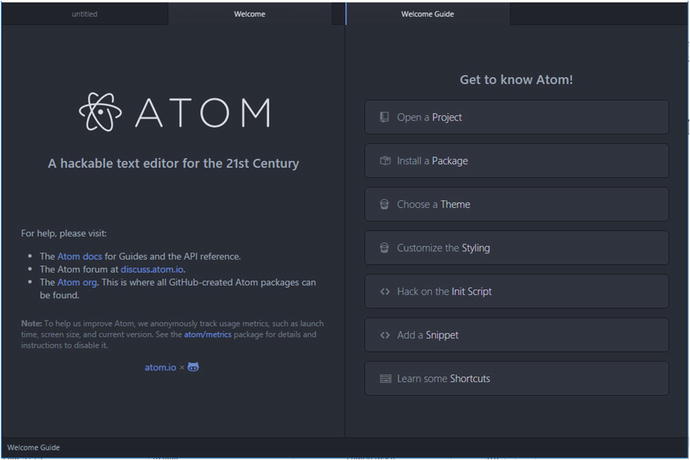
Figure 14-1. The screen that greets you the first time Atom is launched
Move the mouse cursor to the Welcome Guide tab (that’s the currently active tab). You should see a small x appear while your cursor is anywhere in the tab area. Click that x to close the Welcome Guide. Then do the same for the Welcome tab, which will leave you with a single tab, titled untitled. We are ready to do the second thing I wanted to do before starting the chapter’ s JavaScript coverage.
Scripted Damage Formulas—RMMV Edition
Did you think I forgot about what we discussed back in Chapter 3? Okay, maybe I did. Just for a bit. Seriously though, it’s high time we adapt that module I created for Ace into a plugin for use in MV. For reference, here’s the Ace module copy-pasted from its first appearance earlier in the book.
module Wintermodule_functiondef phys(p, a, b, v = $game_variables)if a.atk > b.defreturn (a.atk*p*(1.00+(1.00-(b.def*1.00/a.atk*1.00))))elsereturn (a.atk*p*(a.atk*1.00/b.def*1.00))endend#Express in the form Winter.phys(p, a, b)#p is the power multiplier for the ATK stat of the caster.def sitva(bd, p, a, b, v = $game_variables)return ((bd + a.mat*p)*(a.mat*1.00/b.mdf*1.00))end#Express in the form Winter.sitva(bd, p, a, b)#bd is the base damage of the Sitva#p is the power multiplier for the MAT stat of the caster.end
Without further ado, here’s the adaptation of the Ace module for custom damage formulas, rewritten for MV:
//===========================================================================// CustomDamageFormulas.js//===========================================================================/*:* @plugindesc A Beginning RPG Maker VX Ace Module adapted for RPG Maker MV* @author Darrin Perez* @help* Allows custom damage formulas to be expressed in the form Winter.module,* where module is equal to one of the variable properties in the js file.** phys: Used for physical skills. Express in the form Winter.phys(p,a,b)* p is the power multiplier for the ATK stat of the attacker.** magic: Used for magical skills. Express in the form Winter.magic(bd,p,a,b)* bd is the base damage of the spell* p is the power multiplier for the MAT stat of the attacker.*/var Winter = Winter || {};Winter.phys = function (p, a, b) {if (a.atk > b.def) {return (a.atk*p)*(1.00-(b.def*1.00/a.atk*1.00));} else {return (a.atk*p)*(a.atk*1.00/b.def*1.00);}};Winter.magic = function(bd, p, a, b) {return ((bd + a.mat*p)*(a.mat*1.00/b.mdf*1.00));};
As you might have noticed, the single greatest change to this Ace module turned MV plugin is all of the text before the code. In Ruby, you would use the pound sign (#) to denote a comment. In any language, comments in code are ignored by the program when the file is executed. In JavaScript, you can use // to comment out a single line or the combination of /* and */ to comment out everything between those two symbols. You can see examples of both in this code file. You can find a copy of this plugin (and the other plugin created for this chapter, for that matter) within the source code project’s plugin folder (located within the js folder we’ve been to a few times already mainly to look at rpg_objects.js). Take some time to write out the plugin within Atom, for the sake of practice. Then let’s go ahead and dissect this newly-created plugin together:
CustomDamageFormulas .js is the filename of the plugin written out within the js itself (pretty much every script/plugin I’ve ever seen does this, so I just followed suit). @plugindesc, @author, and @help are three metatags that you can place within comments in your plugin so that potential users can see what your plugin does at a glance. I’ll show them off in action a bit later.
After the explanation contained within @help, we have our actual plugin. It starts with
var Winter = Winter || {};In JavaScript, every variable needs to be defined before initial use. Here we’re defining the Winter variable as Winter or new object (the || symbol is the or operator in JavaScript, while the curly braces denote the creation of a new object). Throughout this book, we have seen that variables can hold characters (numbers, letters, and symbols). As it turns out, variables can hold entire functions as well! This is possible because a variable is an object, and objects in JavaScript can hold multiple values.
Note
If you recall the note I wrote back in Chapter 11 about using _name and not name for our riddle puzzle, using the latter instead references the function MV uses to get a determined actor’s name. Now you have the exact reason this can happen at all.
Once we define Winter, we can then proceed to add methods to it via the use of variable properties.
In the case of Winter.phys, Winter is the variable name, and phys is the variable property. As the previous note implies, this form is textually equivalent to stating that Winter is the object and phys is the method. The declared function can hold three parameters (or arguments; again, both terms are correct) called p, a, and b. p is the power multiplier as applied to the attacker’s Attack Stat, while a and b represent the attack user and its target respectively. The rest of the function should be self-explanatory. We have the code check to see if the attacker has greater ATK than the defender has DEF. If that is the case, then we execute the first formula in the function. Otherwise (if the attacker has equal or less ATK than the defender’s DEF), the code will execute the second formula.
After Winter.phys, we have Winter.magic, which is a simpler method that holds four parameters instead of phys’s three. Rather than have two formulas based on the interplay between the attacker’s Attack stat and the defender’s Defense stat, we instead have a single formula that is used regardless of the relationship between the user’s Magic Attack and target’s Magic Defense. The value bd is the base damage of the spell, before any other calculations (for example, the stock Thunder spell in MV does 100 base damage), while p is the power multiplier applied to the attacker’s MAT, and a and b have the same meanings as in the phys function.
Caution
The curly braces and semicolons used throughout the plugin are critical to its proper functioning. A single removal can be enough to prevent the plugin from working at all. Code can be pesky like that.
Note
You can find two example skills in Skill slots #245 and #246. You can find an enemy that uses both of the example skills in Enemy slot #251. Last, you can also find the troop containing that enemy for Battle Test purposes in Troop slot #251.
There you go! Feel free to add to or remove from it as you see fit for your own game projects. Make sure you save your completed plugin in the plugins folder of your game project and then start up MV if you haven’t already. Once your project has loaded, go to the Tools section of the main menu and find the Plugin Manager (or press F10). Then double-click the first slot in the completely empty list to open a window much like the one in Figure 14-2.
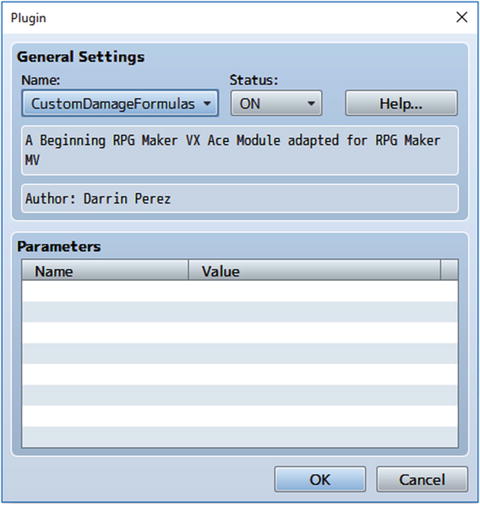
Figure 14-2. The Plugin Manager window used to add or remove plugins from an MV project. Note the effects of using @plugindesc and @author within our new plugin
Setting which plugin you wish to add to your project is as easy as clicking the button below Name and selecting it from the dropdown that appears. By the way, the dropdown menu looks only at the plugins folder of your project, which happens to be why you don’t see any of the core code files for MV (such as our often-referenced rpg_objects) in that list. With all of that done, go to Atom and create a new file. You’ll notice that the filename at the top of the program stays the same. Close the tab for the plugin we already created, and then close the project folder with the same name by right-clicking it and selecting Remove Project Folder (you can find it directly to the left of the individual file tabs, under the first few menu options such as File and Edit). Then you will be left with your single, untitled document. But wait! I haven’t shown how the information written within the @help metatag looks in the Plugin Manager (see Figure 14-3).
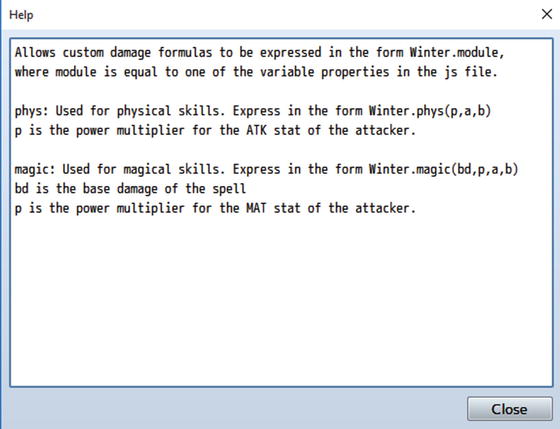
Figure 14-3. The help window of our new plugin, accessed by clicking the Help button
Much better! Now then, I do think that it’s time to start work on our chapter’s material—tweaking MV’s functionality using basic JavaScript. The first exercise will be to move our modified floor damage code over to a new plugin. This new plugin, incidentally, will contain all of the code for the rest of this chapter. I’ll call it Snippets.js (and you can find it within the chapter source code plugins folder as such), but you can name it as you like.
Damage Floors Revisited
I covered damage floors all the way back in Chapter 4. There, I discussed that you can change the damage that such terrain causes, based on Regions. Terrain tags work even better, and you can differentiate between types of floor damage in that way as well. Recall that we used the switch statement to return differing amounts of floor damage based on the value of a certain variable. First, we’ll want to revert the changes made to the code in rpg_objects. The end result should look like the following:
Game_Actor.prototype.basicFloorDamage = function() {return 10;};
After reverting the rpg_objects method, you’ll want to write the following in our new file:
var _Game_Actor_basicFloorDamage = Game_Actor.prototype.basicFloorDamage;Game_Actor.prototype.basicFloorDamage = function() {_Game_Actor_basicFloorDamage.call(this);switch ($gameVariables.value(4)) {case 0:default:return 10;case 1:return 20;case 2:return 35;case 3:return 60;}};
When I introduced the code for variable damage floor damage, I noted that directly altering a function isn’t the best way to go about things. In the preceding code, I show off a good alternative. First we create a new variable and assign it the value of the existing basicFloorDamage method. Next, we write up the line that starts out the basicFloorDamage method. Then we call the Game_Actor_basicFloorDamage variable we created, and pass this as a parameter, causing the contents of the existing basicFloorDamage method (contained within _Game_Actor_basicFloorDamage) to be added to our new, altered, function.
The notation this is used in JavaScript to mark instances. For example, you’ll typically see variables inside of functions expressed within RMMV’s code as this.varname or this._varname (where, naturally, varname is the actual name of the variable). Such a variable is used within that particular instance of the function at hand; once the function is finished executing, that variable instance ceases to exist, only to be replaced by another one when the function is called again. Don’t worry if that didn’t make too much sense; this is notorious for tripping up even veteran JavaScript programmers. For the purposes of this text, just know that the preceding code uses this in a correct way.
Anyway, the last part of the function (the new code for the basicFloorDamage method) is nothing we haven’t seen before, so I’ll just leave you with the reminder that values of $gameVariables.value(4) that are not covered within the cases just shown (under 0 or over 3) will return a default value of 10.
Before we move on to the next section, recall that we have another snippet that can be transferred to our new plugin file. Here’s the code we want to move over (it is from Chapter 9 and is located in rpg_managers.js):
BattleManager.setEscape = function(bool) {this._canEscape = bool;};
Once you have copied over the code to the Snippets plugin, you can go ahead and erase it from rpg_managers.js. The second exercise will involve changing how critical hits are calculated, so that they are influenced by the Luck stat of the attacker and the defender.
Critically Coded
As robust as RMMV is right out of the box, it has a few quirks that bug me. Ironically, some of those quirks were also present back in Ace. Thankfully, you can tweak such things with the power of JavaScript. This exercise is very nearly a one-liner. All we need to do is find the code that governs critical hit rates. Open up rpg_objects.js in Atom and run a search for “critical” (use the Find in Buffer option from the Find submenu; alternately press Ctrl+F). Among the 11 results that should pop up, we’re interested in the very first one (it’s on line 1640 of rpg_objects). Once there, you should be able to see the following code:
Game_Action.prototype.itemCri = function(target) {return this.item().damage.critical ? this.subject().cri * (1 - target.cev) : 0;};
What we see here is a method ( Game_Action.prototype.itemCri) that accepts a single parameter when run. As you may recall from earlier in the book, what we’re looking at right now is a ternary expression. It is equivalent to the following code, as the question mark takes the place of the then, while the colon does the same for the else.
if this.item().damage.criticalthen this.subject().cri * (1- target.cev)else 0
That’s the extent of this particular method. Basically, if the skill or item is capable of landing criticals, then the chance of landing a critical is equal to the user’s critical hit chance, multiplied by 1 minus the enemy’s critical evasion rate (the result is a percentage). Let’s add a new section to our Snippets plugin to hold the altered version of our itemCri method. Here’s the altered result:
var _Game_Action_itemCri = Game_Action.prototype.itemCri;Game_Action.prototype.itemCri = function(target) {_Game_Action_itemCri.call(this,target);return this.item().damage.critical ?(this.subject().cri + (this.subject().luk * 0.002)) -(target.luk * 0.002) * (1 - target.cev) : 0;};
In my version, I made it so that the luck of both the user and the target influence the ability to land a critical hit.
Note
You’ll see that I split what would have otherwise been a humongous return line. As a general rule, you should only split a line in a way that doesn’t break an expression in half. So, I make a new line after the question mark from the ternary expression and another one directly after the minus sign. Since JavaScript looks for semicolons to signify line ends, this doesn’t affect our method negatively. Just make sure not to accidentally insert extra semicolons.
For every 5 Luck that the user has, he/she gains 1% to his/her Critical Rate. For every 5 Luck that the target has, the user loses 1% of his/her Critical Rate. How can I be so certain that we are working with percentages? There are two good ways to prove it:
1. Change the multiplier on this.subject().luk to 1. You will notice that the attacker always lands critical hits, no matter how low its Luck is. If we were working with whole numbers, the attacker’s Critical Rate would be equal to its Luck and not a guaranteed 100%.
2. Note that Critical Evasion is expressed in the Database as a percentage, yet it is subtracted from 1 here. If we were working with whole numbers, you would have to subtract from 100 instead. 10% Critical Evasion will result in (1 - 0.10) and not (1 - 10), for example.
To be honest, it also helps that while initially testing this, I noticed that the attacker would land guaranteed critical hits when I had whole numbers for multipliers within the formula. So another thing I wanted to fix within RMMV was the way that battle messages were expressed. Mainly, the ones that appear when damage is dealt or healing is performed. You’ve probably noticed that the default messages are a bit clunky. How do we go about improving this? Make some space at the bottom of your Snippets plugin file. Then, allow me to welcome you to the next section!
Coded Messages (in a Bottle)
What I seek to change is the messages that are displayed after an actor or an enemy performs a skill that has a damaging or healing effect. In MV, there is now an entire section of the Terms tab in the Database that covers precisely that. However, a cursory look at the messages in question won’t be much help. For example, the Actor Gain message reads: “%1 gained %2 %3!” So what can we do? In RPG Maker Ace, the text handling for such messages was done within the Game_ActionResult class. However, in MV, they are somewhat less intuitively contained within Window_BattleLog (which isn’t even part of the rpg_objects.js file). Window_BattleLog starts on line 4726 of the rpg_windows.js file, so go ahead and use Find in Buffer in Atom to get there a bit faster. I took a bit of time to playtest six messages, so here’s a bullet list of what each one is about:
Enemy Damage. Displayed when an actor deals HP damage to an enemy. By default it reads “EnemyName took x damage” (where x is the damage value the enemy has been inflicted).
Actor Damage. Displayed when an enemy deals HP damage to an actor. By default, it reads “ActorName took x damage.”
Enemy Drain. Displayed when an actor drains an enemy. By default, it reads “EnemyName was drained of P x” (where P is equal to HP, MP or TP, as relevant to the game context).
Actor Drain. Displayed when an enemy drains an actor. By default, it reads “ActorName was drained of P x.”
Enemy Recovery. Displayed when an enemy recovers HP or MP. By default, it reads “EnemyName recovered P x.”
Actor Recovery. Displayed when an actor recovers HP or MP. By default, it reads: “ActorName recovered P x.”
As you can see, and to the credit of MV’s developers, those messages are almost perfect. The operative word here is almost. The two damage messages don’t need altering, but the drain and recovery messages do. The easy way to fix the relevant messages is by swapping the parameters in the relevant messages. For example, the default Enemy Drain message is: “%1 was drained of %2 %3!” By swapping the %3 with the %2, we get a correctly fixed message. But since this is the scripting chapter and all, let’s take some time to fix it internally. That way, we can leave the messages as-is within the Database, and they will display correctly all the same. We have a total of three methods to modify, so let’s get started. Head over to line 5254 of rpg_windows.js, where you’ll find the Window_BattleLog.prototype.makeHpDamageText method, listed here:
Window_BattleLog.prototype.makeHpDamageText = function(target) {var result = target.result();var damage = result.hpDamage;var isActor = target.isActor();var fmt;if (damage > 0 && result.drain) {fmt = isActor ? TextManager.actorDrain : TextManager.enemyDrain;return fmt.format(target.name(), TextManager.hp, damage);} else if (damage > 0) {fmt = isActor ? TextManager.actorDamage : TextManager.enemyDamage;return fmt.format(target.name(), damage);} else if (damage < 0) {fmt = isActor ? TextManager.actorRecovery : TextManager.enemyRecovery;return fmt.format(target.name(), TextManager.hp, -damage);} else {fmt = isActor ? TextManager.actorNoDamage : TextManager.enemyNoDamage;return fmt.format(target.name());}};
Dissecting the makeHpDamageText Method
In a nutshell, we can divide this method into two parts.
The first four lines after the method assignment are all variable declarations. Those variables are used in the second part of the method.
Everything else, starting with the if statement, covers a total of four scenarios:
1. The initial if statement displays a message when the attacker uses a skill that drains HP. A draining attack heals the user for the same amount of HP that it deals to its target.
2. The first else if statement is called when the attacker uses a skill that does HP damage.
3. The second else if statement is relevant when the character uses a skill that heals HP.
4. The else statement is used for the niche case in which the attacker uses a skill that does no damage to its target .
With that established, let’s dissect the first statement. It is three lines long and says the following:
if (damage > 0 && result.drain) {fmt = isActor ? TextManager.actorDrain : TextManager.enemyDrain;return fmt.format(target.name(), TextManager.hp, damage);
Our variable assignment in the first line (fmt) is a perfect example of a local variable. As its name implies, a local variable is used only wherever it is called. Thus, whatever is plugged into fmt is used only for this particular statement and then scrapped. The isActor? variable returns true if the battler is an Actor. If he/she is an enemy, it will return false. If isActor? is true, the TextManager.actorDrain text will be displayed; otherwise, the TextManager.enemyDrain text will be displayed. The second line uses the format method to create the appropriate text message.
The format method used on fmt accepts a certain number of parameters. Pertinently, it accepts parameters equal to the number of % symbols in the target message. In the case of both the Actor Drain and Enemy Drain messages, that number is 3, and format plugs in the value of its parameters accordingly, from left to right. So, %1 would be equal to target.name(), %2 would be equal to TextManager.hp, and %3 would be equal to damage. I pointed out earlier that the damage messages were fine as-is, so we can skip the first else if statement. Here’s the second:
} else if (damage < 0) {fmt = isActor ? TextManager.actorRecovery : TextManager.enemyRecovery;return fmt.format(target.name(), TextManager.hp, -damage);
This statement covers what happens when an actor or enemy uses a recovery spell that restores HP. Notice that the -damage parameter is used instead of damage. Except for that difference, everything else is the same as in the if statement. Now we have all the information we need to fix this method to our heart’s delight, as the last (else) statement also prints a correctly phrased message when called.
Tweaking the makeHpDamageText Method
Without further ado, let’s tweak this method. Here is what the code for the makeHpDamageText method should look like when properly tweaked.
Caution
Make sure to write this out in your Snippets js file and not the rpg_windows.js file! It’s all too easy to get distracted and accidentally change the core method when you’re basically looking at two almost identical sets of code separated only by a single tab within Atom .
var _Window_BattleLog_makeHpDamageText = Window_BattleLog.prototype.makeHpDamageText;Window_BattleLog.prototype.makeHpDamageText = function(target) {_Window_BattleLog_makeHpDamageText.call(this,target);var result = target.result();var damage = result.hpDamage;var isActor = target.isActor();var fmt;if (damage > 0 && result.drain) {fmt = isActor ? TextManager.actorDrain : TextManager.enemyDrain;return fmt.format(target.name(), TextManager.hp, damage);} else if (damage > 0) {fmt = isActor ? TextManager.actorDamage : TextManager.enemyDamage;return fmt.format(target.name(), damage);} else if (damage < 0) {fmt = isActor ? TextManager.actorRecovery : TextManager.enemyRecovery;return fmt.format(target.name(), TextManager.hp, -damage);} else {fmt = isActor ? TextManager.actorNoDamage : TextManager.enemyNoDamage;return fmt.format(target.name());}};
I bolded each of the changes and additions made to the makeHpDamageText method. They can easily be summarized:
The first three lines of the tweaked method are nothing we haven’t seen before. We assign the basic method to a variable and then use the call method to declare the instance of the method contained within the variable as the one to be used, allowing us to make changes without worrying about messing something up.
We swap the damage (and -damage respectively) in both the if statement and the second else if statement such that they are expressed as the second parameter within the format method instead of the third.
One down, two more to go!
Dissecting the makeMpDamageText Method
The second of the three action-result display methods is makeMpDamageText, located in line 5274 of rpg_windows.js. This time, let’s go backwards. Instead of listing the messages, I’m going to show off the method itself first. Based on what we saw for the HP text method, try to predict how each message will print within the game.
Tip
Finding patterns in code will help you understand how things in RMMV work. The entirety of MV’s code is transparent and available within any given project’s folder, so you should be able to poke around and get a handle on just about anything, once you have some more JavaScript experience.
Window_BattleLog.prototype.makeMpDamageText = function(target) {var result = target.result();var damage = result.mpDamage;var isActor = target.isActor();var fmt;if (damage > 0 && result.drain) {fmt = isActor ? TextManager.actorDrain : TextManager.enemyDrain;return fmt.format(target.name(), TextManager.mp, damage);} else if (damage > 0) {fmt = isActor ? TextManager.actorLoss : TextManager.enemyLoss;return fmt.format(target.name(), TextManager.mp, damage);} else if (damage < 0) {fmt = isActor ? TextManager.actorRecovery : TextManager.enemyRecovery;return fmt.format(target.name(), TextManager.mp, -damage);} else {return '';}};
The only real difference between this method and the previous one, besides using TextManager.mp instead of TextManager.hp and the addition of the TextManager.actorLoss and TextManager.enemyLoss messages, is the fact that the else statement has a pair of quotation marks instead of actual content. The reasoning behind this is actually very simple: makeHpDamageText already covers the text displayed when a skill or item does no damage. Writing it out a second time in this method would be redundant. Have you figured out how each message will print out in-game? As it turns out, all of the messages will display the MP abbreviation before the number value (whether it is caused by drain, damage, or recovery). For the sake of limiting redundancy, I will only describe the Enemy Loss and Actor Loss messages, which are completely new.
Enemy Loss. Displayed when an actor inflicts MP damage on an enemy. By default, it reads: “EnemyName lost MP x” (where x is the damage value the enemy has been inflicted).
Actor Loss. Displayed when an enemy inflicts MP or TP damage to an actor. By default, it reads: “ActorName lost P x.”
Note
Curiously, there appears to be no way to inflict TP damage via the use of skills or items in MV. However, as you’ll see in a few sections, there is code for a message to be displayed when a character loses TP. As I have pretty much already telegraphed, the message that would be used is the Actor Loss message also used for MP damage .
Tweaking the makeMpDamageText Method
Take a stab at tweaking this method, given what we have discussed up to now. Whenever you’re ready, check the following code to see the tweaked version.
var _Window_BattleLog_makeMpDamageText = Window_BattleLog.prototype.makeMpDamageText;Window_BattleLog.prototype.makeMpDamageText = function(target) {_Window_BattleLog_makeMpDamageText.call(this,target);var result = target.result();var damage = result.mpDamage;var isActor = target.isActor();var fmt;if (damage > 0 && result.drain) {fmt = isActor ? TextManager.actorDrain : TextManager.enemyDrain;return fmt.format(target.name(), damage, TextManager.mp);} else if (damage > 0) {fmt = isActor ? TextManager.actorLoss : TextManager.enemyLoss;return fmt.format(target.name(), damage, TextManager.mp);} else if (damage < 0) {fmt = isActor ? TextManager.actorRecovery : TextManager.enemyRecovery;return fmt.format(target.name(), -damage, TextManager.mp);} else {return '';}};
As before, all necessary changes are in bold. Not much to it, right?
The makeTpDamageText Method
The final method is makeTpDamageText (located in line 5293 of rpg_windows.js), which covers what happens when a skill or item lowers or increases the TP of an actor or enemy (although, as I noted previously, there seems to be no way to lower TP via skill or item usage). All we have to do here is flip the two latter parameters once again. I’ll skip listing the unmodified method, since it’s more of the same, and just go ahead and list the tweaked method. As usual, changes are in bold.
var _Window_BattleLog_makeTpDamageText = Window_BattleLog.prototype.makeTpDamageText;Window_BattleLog.prototype.makeTpDamageText = function(target) {_Window_BattleLog_makeTpDamageText.call(this,target);var result = target.result();var damage = result.tpDamage;var isActor = target.isActor();var fmt;if (damage > 0) {fmt = isActor ? TextManager.actorLoss : TextManager.enemyLoss;return fmt.format(target.name(), damage, TextManager.tp);} else if (damage < 0) {fmt = isActor ? TextManager.actorGain : TextManager.enemyGain;return fmt.format(target.name(), -damage, TextManager.tp);} else {return '';}};
Again, the else statement contains quotation marks, as the no-damage situation is handled in makeHpDamageText. Once you have all three of the tweaked methods set up within your Snippets js file, you are done! Before moving on to the next exercise, here’s a brief aside to write out the Enemy Gain and Actor Gain messages, which are new to this method:
Enemy Gain. Displayed when an enemy gains TP. By default, it reads: “EnemyName gained TP x” (where x is the recovery value). As adjusted, it will more properly read: “EnemyName gained x TP.”
Actor Gain. Displayed when an actor gains TP. By default, it reads: “ActorName gained TP x.” As adjusted, it will more properly read:” ActorName gained x TP.”
Let’s work on a much simpler exercise now.
Of TP and Their Preservation
TP, or Tactical Points as they’re referred to within MV’s code, are another resource that actors can use to power their skills, much as spellcasters use MP to cast Magic. Naturally, there wouldn’t be much of a point to the distinction if they were identical, so here’s a short bullet list of the ways that TP differs from MP :
Each party member starts each battle with between 0 and 25 TP.
A character can gain TP from taking damage and skills that grant TP.
After each battle, the party’s TP is reset.
TP as a stat is not displayed anywhere in the default RMMV game menu, only in battle. You would have to use a plugin to add a visible TP stat to the game’s menu .
But what if you want TP in your game to act like the Limit Break bar in Final Fantasy VII? Making TP a persistent resource is actually extremely easy but requires code tweaking, so it’s a perfect exercise for this chapter. As usual, we have to find where and how RMMV handles TP. We know that TP is set at the start of battle and reset at its end.
Searching for TP
Let’s run a search in Atom for TP using Find in Buffer as we always do. We will direct our search to the rpg_objects.js file. Writing out TP and clicking Find within the Find in Buffer interface will return a whopping 87 results. This occurs because Atom defaults to case insensitivity, which means that a search for TP is actually looking for tp, tP, Tp, and TP. To solve this problem, you need only click the second button to the right of Find (which has the Aa symbol). As soon as you do, you’ll see the 87 results drop down to a much more reasonable 6. Of particular interest is Game_BattlerBase.FLAG_ID_PRESERVE_TP (located in line 2111), where we can see that Preserve TP is a special flag that can be set. Where? In weapons and armor. You can create pieces of equipment that grant their users the ability to carry over their TP values from battle to battle. Of course, that’s not what we came here for, so let’s click that Find button some more.
The next item of interest is also part of the Game_BattlerBase class (line 2572). Here’s the relevant snippet.
Game_BattlerBase.prototype.isPreserveTp = function() {return this.specialFlag(Game_BattlerBase.FLAG_ID_PRESERVE_TP);};
This is a method that allows us to set the flag to preserve TP. If you get the sudden urge to search for isPreserveTp, I applaud you. That is definitely the right way to go. Running a search for the term returns a mere three results. The latter two are in Game_Battler and are exactly what we’re looking for. The first of them is the onBattleStart method (line 3252), which initializes a player’s TP at the start of each battle, unless the flag has been set:
Game_Battler.prototype.onBattleStart = function() {this.setActionState('undecided');this.clearMotion();if (!this.isPreserveTp()) {this.initTp();}};
The other result is the onBattleEnd method, which covers things that are resolved at the end of a battle, such as states that expire on battle end:
Game_Battler.prototype.onBattleEnd = function() {this.clearResult();this.removeBattleStates();this.removeAllBuffs();this.clearActions();if (!this.isPreserveTp()) {this.clearTp();}this.appear();};
Note
This process of tracking down code may seem inefficient, but it’s an awesome way to figure out how RMMV handles the many things that make it tick.
Tweaking the TP Preserve Methods
Now take a look at the following code for the tweaked methods that should be present within our snippets plugin.
//Modified onBattleStart methodvar _Game_Battler_onBattleStart = Game_Battler.prototype.onBattleStart;Game_Battler.prototype.onBattleStart = function() {_Game_Battler_onBattleStart.call(this);this.setActionState('undecided');this.clearMotion();};//Modified onBattleEnd methodvar _Game_Battler_onBattleEnd = Game_Battler.prototype.onBattleEnd;Game_Battler.prototype.onBattleEnd = function() {_Game_Battler_onBattleEnd.call(this);this.clearResult();this.removeBattleStates();this.removeAllBuffs();this.clearActions();this.appear();};
Play-test the game afterward and you’ll realize that there have been no real changes to how TP works. Use // to comment out the line in each method that calls the original versions of the methods and then play-test again. Now it should work fine. Take note of the following:
Your party members start their first battle with 0 TP (initTp() handles the randomization of TP, but we removed it from on_battle_start).
More important, your party members should now be able to carry over their TP from battle to battle (because we removed clearTp(), which handles the removal of TP at the end of battle).
Pretty awesome, isn’t it? As for why the methods only work when those particular lines are commented out, it’s actually quite simple. Throughout this chapter, we’ve either created entirely new functions (the code for the custom damage formulas) or modified parts of existing functions (everything else). As it turns out, this happens to be the very first time in the chapter where we have needed to remove parts of a function. As stated at the start of the chapter, what we’re doing with lines such as _Game_Battler_onBattleStart.call(this) is calling the original function. So here’s what that modified function looks like with the call:
var _Game_Battler_onBattleStart = Game_Battler.prototype.onBattleStart;Game_Battler.prototype.onBattleStart = function() {this.setActionState('undecided');this.clearMotion();if (!this.isPreserveTp()) {this.initTp();}this.setActionState('undecided');this.clearMotion();};
As you can see when it is explicitly written out, our attempt to modify the function is rather pointless in this case, as we want to remove that if statement, and that won’t happen unless we directly modify the function. So remove the
_Game_Battler_onBattleStart.call(this);and
_Game_Battler_onBattleEnd.call(this);lines from the appropriate methods and you’re all set!
Note
You can also remove the variable declarations immediately before both of the modified methods, but that’s not strictly necessary. Their existence won’t really affect anything.
Other TP Considerations
While we’re on the subject of TP, we also have the maxTp method in line 2596 of Game_BattlerBase. You can increase or decrease the maximum amount of TP that a player can stockpile. You could have skills that require more than 100 TP to use, in theory. In practice, the Database enforces the cap on TP cost of skills and TP gain from skills.
Note
Play-testing an altered TP cap will promptly reveal that the bar still fills up as if the party member had a cap of 100 TP. To correct this graphical hiccup, take a look at tpRate (line 2623) and change the denominator in the expression to the same value as your maximum TP cap.
Also, if you increase the TP cap and then try to use the TP Gain effect, you’ll find that you still get the same amount of TP, even though the amount should change based on the new cap. It’s beyond the scope of this book to fix that particular problem, but if you’d like to try your hand at it, you might be well-served by starting your search in rpg_objects.js for EFFECT_GAIN_TPand seeing what pops up. In any case, here are the modified methods for maxTp and tpRate. As you can see, I set the new TP maximum to 500 and modified the tpRate method to match.
//Modified max TP methodvar _Game_BattlerBase_maxTp = Game_BattlerBase.prototype.maxTp;Game_BattlerBase.prototype.maxTp = function() {_Game_BattlerBase_maxTp.call(this);return 500;};//Modified tpRate methodvar _Game_BattlerBase_tpRate = Game_BattlerBase.prototype.tpRate;Game_BattlerBase.prototype.tpRate = function() {_Game_BattlerBase_tpRate.call(this);return this.tp / 500;};
Without further ado, let’s move on to another interesting scripting opportunity.
};Game Over by Incapacitation
By default, the only way that a player will receive a game over is if his/her entire party is dead. However, not every RPG throughout the years has followed such a system. Take the Final Fantasy games, for example. If the entire party is unable to act, that will result in a game over, even if the party is otherwise still alive. Petrification and Paralysis are two of the most common status effects that can cause this alternate game over. A look at the States tab reveals that none of the default movement-blocking states has infinite duration. Perhaps it was something that the designers thought of but decided against implementing. In any case, all we have to do is find the code that governs game overs and work from there. Running a search in rpg_objects.js for “game over” returns a single result:
Game_Interpreter.prototype.command353 = function() {SceneManager.goto(Scene_Gameover);return true;};
It’s a good start but, as it turns out, we’re digging in the wrong spot (as you’ll see in a bit, that’s not entirely true, but just humor me for a bit, would you?). However, this method tells us where we should continue our search. Open trpg_scenes.js and run a search for “game over” there. Amusingly, this will only return a single result as well. The critical difference here is where that result leads. When you click Find, you will find yourself looking at MV’s Scene_Gameover class (it starts on line 2416 of rpg_scenes), which, as the description itself states, is “the scene class of the game over screen.” We know that Scene_Gameover is used for the game over screen, but where is the code that determines when to call it up? A search for Scene_Gameover in rpg_scenes.js returns 18 results, but the one we want is on line 121 of rpg_scenes (this is part of the Scene_Base class). This code, as it turns out, has great promise for this exercise.
Scene_Base.prototype.checkGameover = function() {if ($gameParty.isAllDead()) {SceneManager.goto(Scene_Gameover);}};
We already started down this rabbit hole, but the checkGameover method is where we really start getting into the meat of how this works. Our next step is to find the isAllDead() method in Game_Party and see what that entails. Go back to rpg_objects.js (or reopen it if you happened to close it after opening rpg_scenes.js) and run a search for isAllDead. Running a search for that method turns up a rather curious result.
Namely, isAllDead is defined in two places. Actually, that’s not strictly true, as I’ll promptly explain. Here’s the Game_Unit method:
Game_Unit.prototype.isAllDead = function() {return this.aliveMembers().length === 0;};
Now let’s take a look at the Game_Party equivalent.
Game_Party.prototype.isAllDead = function() {if (Game_Unit.prototype.isAllDead.call(this)) {return this.inBattle() || !this.isEmpty();} else {return false;}};
Why are they different? The Game_Party version of the isAllDead method builds upon the isAllDead method in Game_Unit. For an analogy, think of it as a parent and a child. Game_Unit is the parent of Game_Party. The Game_Unit version of the method provides a return value (this.aliveMembers().length === 0) that can then be used in Game_Party to determine whether the entire player’s party is dead. If it is, the method tries to determine if the player is currently in battle. If they are not, a game over can still result if the isEmpty method returns false (the exclamation mark to the left of the method denotes opposition; so it checks for the method to be false rather than true). Since the isEmpty method holds a value of 0 (line 4757 of rpg_objects), it will return false if the size method (located a few lines earlier, at 4753) happens to return a length of 0. Of course, this should generally be impossible during the course of a conventional playthrough, as you need at least one party member to do just about anything. In any case, if neither of the two conditions applies, then the method returns a value of false (which means at least one party member is still alive). Our next task is to find aliveMembers. As we want the method definition, what we’re looking for is on line 4586 of rpg_objects.
Game_Unit.prototype.aliveMembers = function() {return this.members().filter(function(member) {return member.isAlive();});};
The expression contained within aliveMembers contains a new method, as it were: .filter is a Javascript array method that tests an array and creates a new one with all elements that pass a true/false test. In the case of the aliveMembers method, .filter is testing to see if the members() array contains living party members. It then returns the list of living party members via member.isAlive(). Being alive is defined by the isAlive method, which can be found in line 2647 of rpg_objects.
Game_BattlerBase.prototype.isAlive = function() {return this.isAppeared() && !this.isDeathStateAffected();};
Note
The && in this method is the logical operator for and. We have also already seen the || operator, which is the logical or, and the exclamation mark (!) which is the logical operator for not.
We have nearly reached the bottom of this rabbit hole. isAppeared() is only used to determine whether a certain battler is hidden or not (and, thus, only really applies to enemies, as Actors in battle always exist). So, let’s just search for isDeathStateAffected (note the absence of the exclamation mark). Here’s the isDeathStateAffected method, located in line 2215.
Game_BattlerBase.prototype.isDeathStateAffected = function() {return this.isStateAffected(this.deathStateId());};
This method contains a single return statement. After quite a few searches, we have found what we are looking for. An isDeathStateAffected() is used to check for the KO state in an actor or enemy. As it happens, the deathStateId method definition is located directly below the isDeathStateAffected method definition.
Game_BattlerBase.prototype.deathStateId = function() {return 1;};
Note
This one-line method returns the state ID (as located in the Database) of Knockout, which is the only state recognized by default in RMMV as incapacitating.
So, suppose you wanted to make it so that Sleep (state #10 in the default state list in RMMV) counts as an incapacitating state. Here is how I did it:
//Modified isDeathStateAffected statevar _Game_BattlerBase_isDeathStateAffected = Game_BattlerBase.prototype.isDeathStateAffected;Game_BattlerBase.prototype.isDeathStateAffected = function() {_Game_BattlerBase_isDeathStateAffected.call(this);return this.isStateAffected(this.deathStateId()) ||this.isStateAffected(this.incapStateId());};//New function for Game_BattlerBaseGame_BattlerBase.prototype.incapStateId = function() {return 10;};
Note
In this code, you could also replace this.incapStateId() with the ID value of the state you want to evaluate (10, in this case). My way allows you to switch the ID within the new function, so it’s just a tad neater. For an even more elegant solution, you might want to take a look at Tsukihime’s Custom Death States script, located at his Himeworks website: http://himeworks.com/files/rmmv/scripts/HIME_CustomDeathStates.js .
To test whether the change is working, you can give one of the existing enemies a Sleep-inducing skill (or give their normal attacks a 100% Sleep State Rate) and then run a Battle Test. If you get a Game Over screen after being afflicted by Sleep, you’ll know that it is working correctly. Speaking of game overs, I have one last exercise to work through.
Adding a Menu to the Game Over Screen
This last exercise is going to involve some copy-pasting. Mainly, we’re going to copy the RMMV code that handles the Title screen’s menu and integrate that into the class that governs the Game Over screen. The first order of business is finding the two classes. As it so happens, both the Title screen and the Game Over screen are governed by classes with the Scene prefix. Let’s open rpg_scenes.js and copy all of the code contained in Scene_Gameover to the Snippets file. Next, take a look at Scene_Gameoverand analyze what is going on.
Scene_Gameover executes several methods that create the background that says “game over,” handle the fade-out after the party is defeated and the subsequent fade-in to the Game Over screen, and play the appropriate music.
What we’re interested in is the transition-to-Title-screen method (gotoTitle).
Because we want the game to pop up a menu at the Game Over screen, instead of just cutting to the Title, we might as well go ahead and excise what we won’t be using. Delete the gotoTitle method and then erase the entire if statement from Scene_Gameover’s update method. With that done, find Scene_Title in rpg_scenes.js (starts on line 233). Our objective at the Scene_Title class is to figure out what methods are used to call up the Title screen’s menu. If we take a look at the create method for Scene_Title, we see that four methods are called up. Our method of interest is createCommandWindow. A closer look at it shows the following code:
Scene_Title.prototype.createCommandWindow = function() {this._commandWindow = new Window_TitleCommand();this._commandWindow.setHandler('newGame', this.commandNewGame.bind(this));this._commandWindow.setHandler('continue', this.commandContinue.bind(this));this._commandWindow.setHandler('options', this.commandOptions.bind(this));this.addWindow(this._commandWindow);};
The first expression in the method draws a new window on the screen. Then each of the next three expressions handles a menu option via the setHandler method (located in Window_Selectable; starts on line 710 of the rpg_windows.js file). setHandler accepts two parameters. The first is the symbol and the second is the method. For example, the first setHandler expression in create_command_window calls the commandNewGame method when the 'newGame' symbol is invoked. This will become relevant in the next section. For now, the result, as you’ve almost certainly seen countless times during play-testing, is that the Title menu has three options. So we know that we want to draw the Title menu into the Game Over screen. The next question becomes: How is this method drawing the window to the screen? If we compare the start methods of Scene_Title and Scene_Gameover, we see that the game over method doesn’t draw a command window (createCommandWindow). Here’s what we need to do, in order:
From Scene_Title: Copy the createCommandWindow (lines 310 to 316 of rpg_scenes), commandNewGame (lines 318 to 323), commandContinue (lines 325 to 328), and commandOptions (lines 330 to 333) methods to the Snippets file.
In each of the four copied methods, change their class definition from Scene_Title to Scene_Gameover.
From Scene_Gameover: Copy the create (lines 2427 to 2431 of rpg_scenes) and update (lines 2438 to 2443) methods to the Snippets file. Place these two methods above the other four previously copied methods.
Finally, we need to make a few modifications to the two methods we copied last. Take a look at the following tweaked version of the code for this exercise. All changes from the original methods are bolded.
Scene_Gameover.prototype.create = function() {Scene_Base.prototype.create.call(this);this.playGameoverMusic();this.createBackground();this.createWindowLayer();this.createCommandWindow();};Scene_Gameover.prototype.update = function() {if (!this.isBusy()) {this._commandWindow.open();}Scene_Base.prototype.update.call(this);};Scene_Gameover.prototype.createCommandWindow = function() {this._commandWindow = new Window_TitleCommand();this._commandWindow.setHandler('newGame', this.commandNewGame.bind(this));this._commandWindow.setHandler('continue', this.commandContinue.bind(this));this._commandWindow.setHandler('options', this.commandOptions.bind(this));this.addWindow(this._commandWindow);};Scene_Gameover.prototype.commandNewGame = function() {DataManager.setupNewGame();this._commandWindow.close();this.fadeOutAll();SceneManager.goto(Scene_Map);};Scene_Gameover.prototype.commandContinue = function() {this._commandWindow.close();SceneManager.push(Scene_Load);};Scene_Gameover.prototype.commandOptions = function() {this._commandWindow.close();SceneManager.push(Scene_Options);};
With that out of the way, you’re done! Now, play-test your game and get into a situation that causes a game over. (It might be quicker to create an event that calls up the Game Over screen when you interact with it.) If you have followed these instructions, your Game Over screen should look like Figure 14-4.
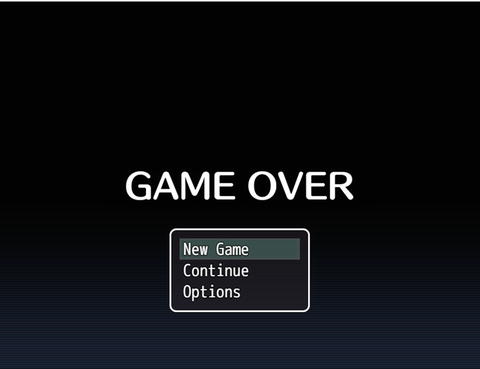
Figure 14-4. The Game Over screen, menu now included
If you just wanted to have the Title screen menu in your game over, you are done.
Tweaking the Game Over Menu
However, what if you wanted to tweak the menu? As mentioned before, the menu window and options are handled in createCommandWindow. You may be thinking that removing an option from this method is all you would have to do. That is actually not true. If you do that, you’ll still see the option in the Game Over menu. When you try to press the action button to get the option to do something, it will do nothing. Clearly, we must look elsewhere for the solution to this problem. The window itself is created and populated in Window_TitleCommand. However, altering that method will change the Title menu as well. Thus, you’ll want to do the following:
1. Copy Window_TitleCommand to your Snippets plugin.
2. Click on Find in Buffer and write Window_TitleCommand in the top entry box (the one used to Find text). Then type Window_GameoverCommand in the bottom text box. See Figure 14-5 for a visual aid. Then, click Replace until Atom returns no results in the Snippet file for Window_TitleCommand.

Figure 14-5. The Find in Buffer interface for Atom
3. Hop over to your altered Scene_Gameover method and switch this._commandWindow = new Window_TitleCommand(); to this._commandWindow = new Window_GameoverCommand();
4. Back at Window_GameoverCommand, find the makeCommandList method (it’s near the bottom of the method), which looks like this:
Window_GameoverCommand.prototype.makeCommandList = function() {this.addCommand(TextManager.newGame, 'newGame');this.addCommand(TextManager.continue_, 'continue', this.isContinueEnabled());this.addCommand(TextManager.options, 'options');};
As you can see, this method is responsible for the three options that we see in the Title menu. To make the point, comment out (by typing in // before the line of code) the newGame command. If you have followed my instructions correctly, the Game Over menu should now look like Figure 14-6.
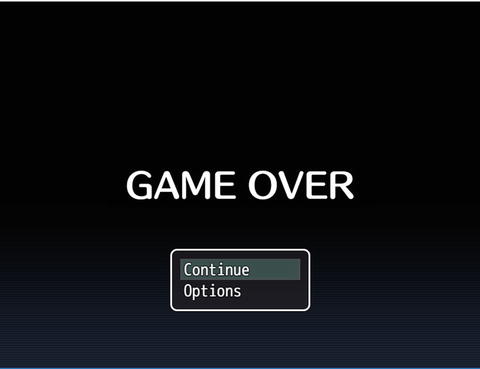
Figure 14-6. The Game Over menu after the changes
On the other hand, if you wanted to add a menu option to that list (for example, the ability to go back to the Title screen), you would be best served by finding the addCommand method, to see how it works. Your search should be directed at Window_Command (that would be rpg_windows.js). Once there, you should quickly find the addCommand method (it’s on line 1327 of rpg_windows)
Window_Command.prototype.addCommand = function(name, symbol, enabled, ext) {if (enabled === undefined) {enabled = true;}if (ext === undefined) {ext = null;}this._list.push({ name: name, symbol: symbol, enabled: enabled, ext: ext});};
Note
The triple equal signs here are a strict comparison operator. They signify “equality without type coercion.” What does that mean? Well, for a single example, 1 == “1” would return true, but 1 === “1” would return false (as they have the same value, but different type; the left 1 is a number, while the right 1 is a string). Basically, == looks for the value to be the same, but === also wants the type to be the same.
For most menu options, you’ll only be using the first two parameters. The command name is defined in the TextManager Object starting on line 1454 of the rpg_managers.js file. The symbol used in the addCommand method is the handle defined within setHandler. The Continue option also uses the third parameter, which determines whether or not you can select it from the menu. (When the player has no save files for the game, Continue will be grayed out.) .push is a JavaScript array method. As the method name implies, .push sends an object to the end of an array (the array, in this case, being _list). Going back to Window_GameoverCommand, we can see the format of an addCommand object that accepts two parameters:
this.addCommand(TextManager.options, 'options');Note
To summarize the menu logic: addCommand adds options to menus, while setHandler gives those options their functionality. As demonstrated already, you need both to create a new menu option.
The Title screen option is called in the form toTitle. So you would write the following in makeCommandList to add that command to Window_GameoverCommand:
this.addCommand(TextManager.toTitle, 'toTitle');Place that between the two existing addCommand expressions. Then you would add the following line to createCommandWindow in Scene_Gameover, so that the option actually does something when the player interacts with it. I placed it between the Continue and Option commands.
this._commandWindow.setHandler('toTitle', this.commandToTitle.bind(this));Last, you need to add the commandToTitle method itself, or the game will return an error telling you that the method is undefined.
Note
I named the method commandToTitle, to keep with the naming conventions used for this command in RMMV. As it turns out, there is a preexisting method of the same name.
As noted, there’s an existing method called commandToTitle. In fact, running a search for the method in rpg_scenes.js will return only two results. The second result (line 1614) contains what we’re looking for. Here’s the method:
Scene_GameEnd.prototype.commandToTitle = function() {this.fadeOutAll();SceneManager.goto(Scene_Title);};
Copy-paste that method to the Scene_Gameover class you have tweaked, change the class definition from Scene_GameEnd to Scene_Gameover, and we’re done! Play-test your game and cause a game over. If you have done everything correctly, the screen should look like Figure 14-7.
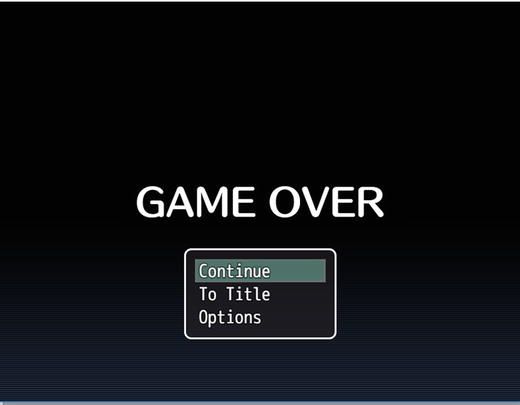
Figure 14-7. The changed Game Over menu
Now, before we bid this chapter farewell, I need to at least mention plugin commands. They are a new type of event command that can be used for your plugins should they need the additional functionality. We never had a need to use them for our Snippets plugin or our Custom Damage Formulas plugin, but I’ll steer you toward MV’s Help documentation (specifically the “Using Official Plugins” section), where you can read up on how some of Kadokawa’s plugins implement Plugin Commands. In closing, I humbly urge you to continue exploring the depths of RMMV’s codebase. Appendix B has a link to a list of plugins that can be used for RMMV. If you want to investigate how something can be done, check to see if a script already exists for that functionality. There’s nothing wrong with picking the brains of those who have more experience than you.
Summary
During the course of this chapter, we performed several basic scripting exercises that involved tweaking parts of MV’s code to achieve things that aren’t possible via eventing. Among them were causing a game over if the player’s entire party is incapacitated by another status effect that isn’t Knockout, tweaking the TP cap, and making sure that those tweaks were reflected properly within the game. In the final chapter of this book, I will cover some miscellaneous concepts.