
We are fast approaching the end of this book. Our game, short as it may be, is nearly complete. All that is left is to populate the mountain town of Rocksdale, connect it with the world map, and create the game’s final dungeon. Well, all that and filling out the random encounter tables for our third dungeon and the final world map areas, adding appropriate equipment for Rocksdale’s shop and some of the treasure chests to be made for the third dungeon. We also want to finish the dragon statue event we started back in Chapter 6. I’ll be covering the final dungeon in Chapter 13. When last we saw our heroes, they had just arrived at Rocksdale. Let’s get started!
Populating Rocksdale
A town isn’t much of one without nonplayer characters (NPCs) and building interiors. As with Seaside, here’s some setting flavor for Rocksdale:
The quiet town of Rocksdale has always been a favorite destination for travelers seeking to settle down and otherwise retire from the outside world. In recent times, monsters have started to threaten the townsfolk’s safety, prompting a few of the villagers to leave their seclusion and train themselves for the day when the foul creatures decide to do more than just harass. The village elder is a wise man who knows of a secret passage that leads to the other side of the mountain ridge, where a solitary castle and its dark master await the chosen one of legend . . .
Riveting, I know! Compared to the Fishing Village sample map, that for the Mountain Village is more spacious and has more buildings. As in Seaside, we’ll want an inn, an equipment shop, and an item shop. The largest house will be home to a rather important NPC, while the temple will be home to a transfer event that will take the player to the outskirts of the Dark Master’s castle. The two houses at the top-left end of the village will be locked, See Figure 12-1 for a screenshot of Rocksdale with suggested edits.
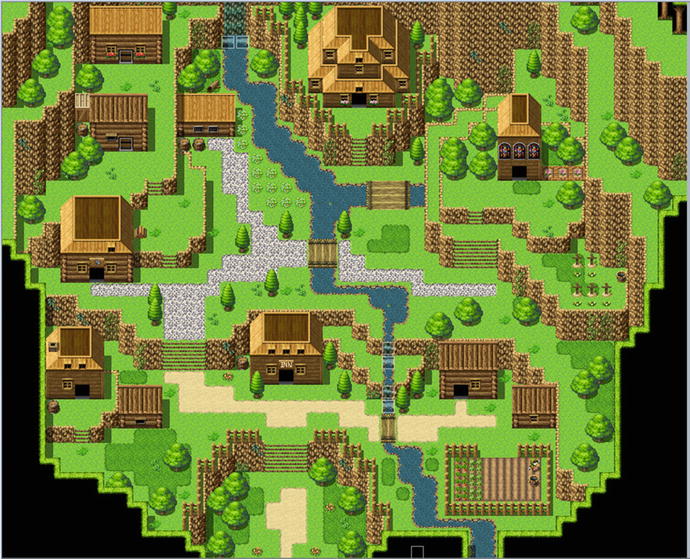
Figure 12-1. The mountain village of Rocksdale, tweaked to serve our needs
Here’s a list of the main plot events that I will be covering within Rocksdale:
When the player goes up the steps into the village, the town greeter will inform the player that he/she should make his/her way to the large house in the northeastern part of the village.
The player reaches the dwelling and finds the village elder, named Wren. Wren has been waiting for Harold’s arrival for nearly two decades. He speaks of a malevolent being that lives within a castle in the middle of a dark swamp and of the orb that could weaken the being’s power.
Wren tells the player that a secret passage exists within the village. He further explains that it leads to the far side of the mountain ridge. More important, the passage puts the adventuring party within reach of the villain’s castle.
The Town Greeter
Our first order of business will be to place the town greeter on the map. Let’s place our relevant NPC at (19, 34). While I’m going to have the greeter give the bulk of his conversation via an Autorun, I’ll still have him say a few words when talked to a second time.
♦Text : None, Window, Bottom: : Welcome to Rocksdale, adventurers. We don't have: : much, but I hope you enjoy your stay.
First, here’s the Parallel event that we’ll use to flip the switch for the Autorun to trigger.
♦Control Variables : #0002 X = Map X of Player♦Control Variables : #0003 Y = Map Y of Player♦If : Y = 36♦If : X > 18♦If : X < 20♦Control Switches : #0039 MountainArrival = ON
There’s nothing in that code that we haven’t already performed many times before. We want to trigger the Autorun in this way to prevent the game from hanging. Check the following code to see the Autorun event in all of its glory.
♦Show Balloon Icon : TownGreeter, Exclamation (Wait)♦Text : None, Window, Bottom: : Did you two reach this place through the forest pass?♦Text : Actor3(7), Window, Bottom: : We did.♦Text : None, Window, Bottom: : The villager's eyes widen in disbelief.♦Text : None, Window, Bottom: : You must go visit Wren. He lives in the large: : dwelling at the northern part of town. He has: : been waiting for a long time.♦Text : Actor1(0), Window, Bottom: : For us?♦Text : None, Window, Bottom: : I believe it would be best for him to speak of it: : himself.♦Text : Actor3(7), Bottom: : Very well.♦Control Self Switch : A = ON♦
An exclamation balloon will be displayed over the villager’s head when the Autorun starts. After the short conversation, we switch on self-switch A. We give page 2 of the event a non-Autorun trigger, and that completes our first task of the chapter.
Creating the Village Elder and His Home
Next, we need a worthy interior for the village elder . We’ll use the Mansion sample map for our purposes. I left the map mostly intact, as you can see in Figure 12-2.
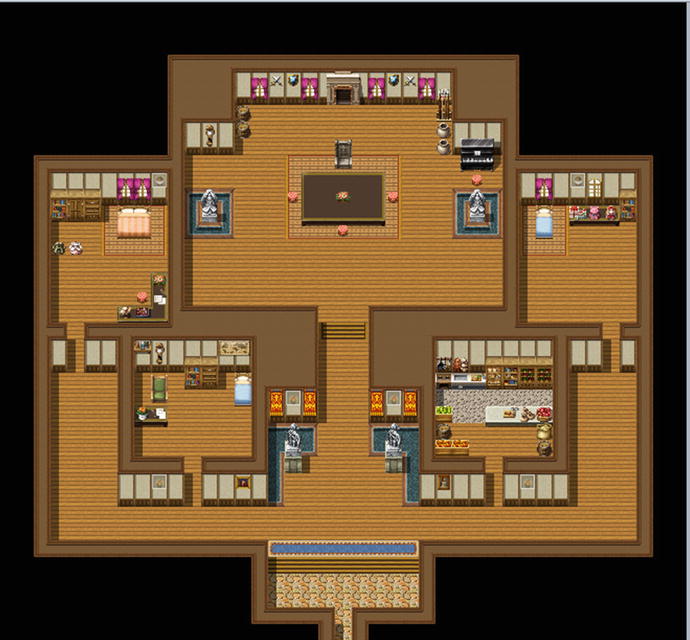
Figure 12-2. The tweaked Mansion sample map available in RMMV
We’ll place the village elder himself at (20, 11). This event is essentially plot exposition for the player. He or she gets to learn a little more about the game world and then receives his/her next main objective. Take a look at the following for the event code :
♦Show Balloon Icon : This Event, Exclamation (Wait)♦Text : Actor1(0), Window, Bottom: : I'm Harold.♦Text : Actor3(7), Window, Bottom: : And I am Marsha.♦Text : None, Window, Bottom: : I am Wren, the leader of this small village. It: : was the father of my father's father, king of the: : western lands, who said that you would return.♦Text : Actor1(0), Window, Bottom: : You're not making any sense, Wren.♦Text : None, Window, Bottom: : Marsha clears her throat.♦Text : Actor3(7), Window, Bottom: : Perhaps it would be best to allow him to: : speak.♦Text : None, Window, Bottom: : My ancestor claimed that the chosen one would return: : to the world in its time of greatest need. I beseech: : your aid to defeat the dark master.♦Text : Actor1(0), Window, Bottom: : It is what we're here for.♦Show Balloon Icon : This Event, Music Note (Wait)♦Text : None, Window, Bottom: : Wonderful! There is an orb of power that will aid: : you in your quest. My ancestor claimed that it: : is hidden within the lowest level of the castle.♦Text : Actor3(7), Window, Bottom: : How did he know that?♦Wait : 30 frames♦Show Balloon Icon : This Event, Silence (Wait)♦Text : None, Window, Bottom: : Isn't it obvious? The castle where the evil: : enveloping our land resides was the king's home: : in times past.♦Text : Actor3(7), Window, Bottom: : In hindsight, it all makes sense. How do: : we get there?♦Text : None, Window, Bottom: : There is a secret passage inside of the village: : temple. Tap the wall three paces north of the: : northeastern pillar.♦Text : Actor1(0), Window, Bottom: : Thank you, Wren!♦Text : None, Window, Bottom: : On the contrary, thank you.♦Control Switches : #0040 ElderTalk = ON♦Control Self Switch : A = ON
Like most plot-advancing events, this one is important not for what it does internally, but for the information it gives the player. Thanks to the village elder, the player learns that the castle inhabited by the mysterious Dark Master used to be home to the king of the western lands. At the end of the conversation, we flip on the ElderTalk switch, which allows the player to find the secret passage within the temple.
The Temple of Rocksdale
RPG Maker VX Ace had a Temple sample map that I used in the first edition of this book for this section. While no such equivalent exists in MV, I decided to recreate that map within MV, as it’s perfect for what we want it for. The new map is 17×22 and uses the Inside tileset. The BGM is set to Town2. The secret passage is visible in Figure 12-3, but there’s another event that may not be as easy to see. I placed a Same As Characters/Action Button event on the statue’s lower half. If the player interacts with the statue, he/she will be teleported to Seaside. Where exactly? Take a look at Figure 12-4 to see.
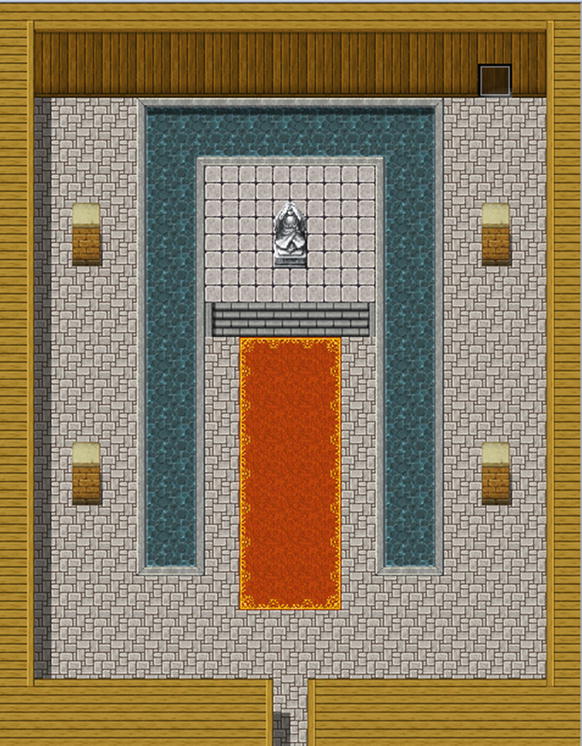
Figure 12-3. A screenshot of the temple
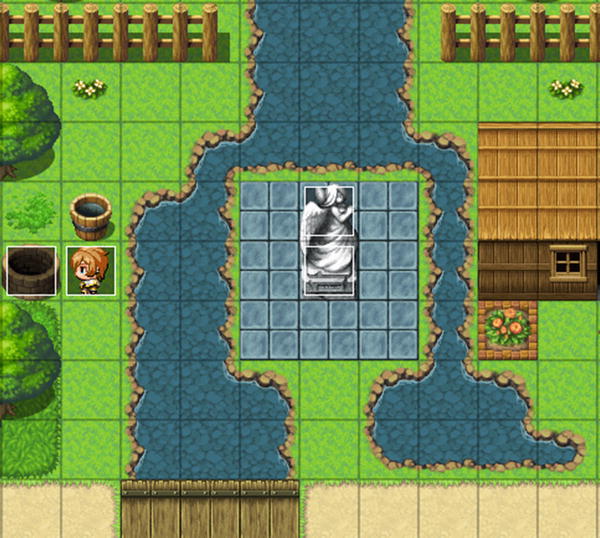
Figure 12-4. Where the player lands if he or she touches Rocksdale’s statue
Because this statue is two squares tall, we need a pair of events to draw it. The top half has a priority of Above Characters and no commands. The lower half has a priority of Same As Characters and returns the player to the mountain village if he/she touches it.
Tip
If you want to make it so that the statue at Seaside is only visible after the player has used Rocksdale’s statue, you can add an appropriate condition to both of the events. ElderTalk will work, as will creating a new switch that is flipped the first time that the player uses Rocksdale’s statue.
Leaving Rocksdale
The secret passage event is three pages long. To use the appropriate wall graphic for the first two pages of the event, you’ll need to add Inside_A4 to tab D of the Inside tileset in the Database. Because we don’t want the player to find the passage ahead of time, the first page will have no conditionals and no event commands. The only thing the first page will have is the wall graphic. Page 2 will require that ElderTalk is switched on and shares the same graphic as page 1. However, if the player interacts with the wall using the Action Button, the event in the following code is triggered:
♦Text : Actor1(0), Window, Bottom: : This should be the place.♦Text : None, Window, Bottom: : Harold taps the wall with his knuckles.♦Wait : 60 frames♦Fadeout Screen♦Play SE : Push (100, 100, 0)♦Text : None, Window, Bottom: : You have found a secret staircase!♦Control Self Switch : A = ON♦Fadein Screen
The use of Fadeout/Fadein Screen in page 2 allows us to switch to page 3’s event graphic off-camera via the usual self-switch toggle. Figure 12-5 shows what it looks like in-game.
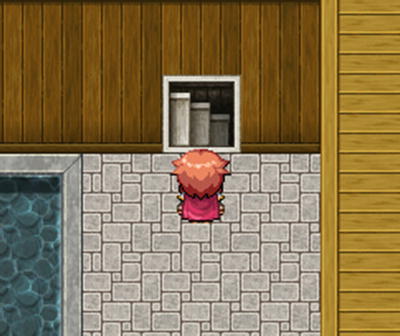
Figure 12-5. Harold finds himself staring at a staircase
Page 3 of the secret passage event has a Below Characters priority and a Player Touch trigger. It requires self-switch A to be on. The first time the player takes this passage, we want to display some extra text. Thus, we start page 3 with a conditional branch requiring self-switch B to be off. If it is, we display the additional text; otherwise, we skip straight to the transfer event.
♦If : Self Switch B is OFF♦Control Self Switch : B = ON♦Fadeout Screen♦Text : None, Window, Bottom: : Harold and Marsha walk down the steps and find: : themselves in a rocky passage.♦Text : None, Window, Bottom: : Several minutes later, they find themselves at a: : new location…♦Play SE : Move1 (90, 100, 0)♦Wait : 60 frames♦: End♦Transfer Player : World 1 (49,69) (Direction: Down)
If you were to play-test the game after adding that specific event, you would find a considerable lack of screen after being transferred back to the world map. We could add in the Fadein Screen command directly before Transfer Player, but that would look somewhat sloppy in execution. Instead, go to the world map’s Parallel transfer event and add the following to it:
♦If : X = 49♦If : Y = 69♦If : Self Switch A is OFF♦Fadein Screen♦Control Self Switch : A = ON♦: End♦: End♦: End♦
We use a self-switch conditional branch within the coordinate conditional, as we only require this to trigger once (to match the fading-out sequence caused at Rocksdale’s temple).
Caution
Be very careful with the preceding example when applying it to your own games. In a more open world map, your players might cross your declared coordinate(s) prematurely during their adventures. When they get around to triggering the area transition, the fade-in is functionally nonexistent, and the game will hang.
With all that done, Harold and Marsha will find themselves near the Dark Master’s castle, as shown in Figure 12-6.
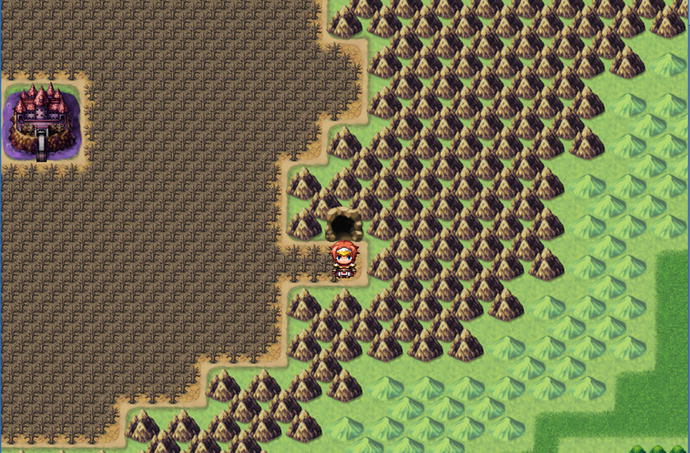
Figure 12-6. Surrounded by a forest of dead trees, the final dungeon awaits!
New Items and Equipment
Back in Chapter 10 I said that I would discuss adding new stuff to the Database in this chapter. Since we want to have new shops in Rocksdale, it’s more immediately pertinent to discuss items and equipment first. I’ll leave enemies for the next section. We want Rocksdale to sell equipment that will prepare the player to siege the final dungeon. In fact, that equipment will be the second-highest tier present within our game (the final dungeon will have several chests containing even better equipment, but more on that in the next chapter). See Table 12-1 for a list of the new armors that will be sold at Rocksdale.
Table 12-1. A List of the New Armors to Be Added to the Database
Name | Stats / Traits | Price |
|---|---|---|
Light Plate | +30 Defense, +6 M. Defense | 4000 |
Full Plate | +35 Defense, +7 M. Defense | 5500 |
Arcane Vestment | +20 Defense, +20 M. Defense / +7 Evasion | 6000 |
Arcane Cap | +7 Defense, +7 M. Defense / +7 Evasion | 2000 |
Fury Ring | +25 Attack, -10 Defense | 2000 |
Overflow Ring | +25 M. Attack, -10 M. Defense | 2000 |
Plated Barbute | +15 Defense | 3000 |
The Light Plate, Full Plate, and Plated Barbute (a barbute is basically a type of helmet) should be of the Light Armor type, the Arcane Vestment and Arcane Cap should be of the Magic Armor type, and the two rings should have the General Armor type. Note how the rings take away Defense and Magic Defense, respectively, when worn. This provides a sort of trade-off for the player, which requires them to decide whether to accept the penalty in question. Now, take a look at Table 12-2 for an overview of the new weapons to be added to Rocksdale’s equipment shop.
Table 12-2. A List of the New Weapons to Be Added to the Database
Name | Stats / Traits | Price |
|---|---|---|
Mythril Blade | +30 Attack / +10 Attack Speed | 4000 |
Mythril Claymore | +45 Attack / +5 Attack Speed, Seal Equip: Shield | 8000 |
Golden Bow | +35 Attack / Seal Equip: Shield | 5000 |
Mythril Bow | +42 Attack / Seal Equip: Shield | 7000 |
Arcane Wand | +15 Attack, +35 M. Attack | 16000 |
This table has two swords, two bows, and a single wand for Marsha should she ever manage to save up 16000 Gold (as playtests should show, she probably doesn’t need the extra magical damage). Now, before I give you a list of the equipment that you should include in the third dungeon’s chests, see Table 12-3 for three new items to be added to the Database.
Table 12-3. A List of New Items to Be Added to the Database
Name | Effects | Price |
|---|---|---|
Energy Dew | Restores 500 HP and 200 MP to all allies. | 600 |
Life Dew | Restores 1500 HP to all allies. | 750 |
Magic Dew | Restores 500 MP to all allies. | 1500 |
There isn’t much to say about the new items. They are basically the mass versions of Energy Potions, Life Potions, and Magic Potions respectively. They cost three times the Gold that their single target counterparts do, so they’re only particularly useful in battle, where every action counts. Outside of battle, the player will probably prefer using the cheaper versions. Take some time to create the Item and Equipment shops for Rocksdale, using Tables 12-1 and 12-2 for the equipment shop and the list in Figure 12-7 for the item shop.
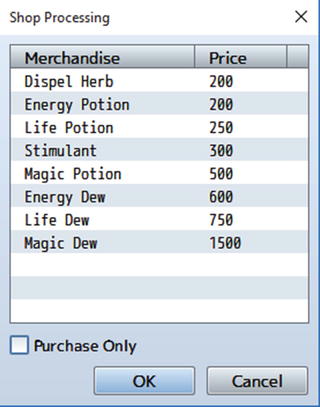
Figure 12-7. A list of items to be sold at Rocksdale's item shop
If you’re so inclined, you could have Rocksdale’s item shop sell only the three Dew items , given that we give the player a way to travel instantly between both towns via the statues. Before we move on to the next section, add eight chests to our third dungeon; four in the first level (Forest of Decay), four in the second level (Ice Cave), and none in the third level. Among the chests, let’s give the player some equipment. Fill four of the eight chests with the following: Golden Bow, Light Plate, Fury Ring, and Magic Turban. Fill the other four chests with items of your own choosing. Next, we should populate the world map’s Regions and the third dungeon with enemies.
Enemies of the World
To be fair, I could have covered this earlier in the book, but I figured it’d be better to clump them all here, away from the central ideas they would have otherwise cluttered. After all, I also have the dragon statue event back at the Ruined Spire that I still have to complete. It’s as good a time as any to go off on this tangent. First, we need to create our new enemies. Take a peek at Table 12-4 for details.
Table 12-4. A List of the New Enemies That Will Populate the Third Dungeon , Surrounding Areas, and the Final Dungeon
Name | HP | MP | ATK | DEF | MAT | MDF | AGI | LUK | EXP | G |
|---|---|---|---|---|---|---|---|---|---|---|
Ghost | 500 | 100 | 20 | 120 | 100 | 60 | 50 | 50 | 368 | 440 |
Rogue | 900 | 0 | 75 | 50 | 75 | 50 | 75 | 75 | 368 | 500 |
Zombie | 1200 | 0 | 70 | 40 | 40 | 70 | 20 | 20 | 415 | 440 |
Frost Viper | 600 | 150 | 100 | 60 | 70 | 40 | 100 | 100 | 415 | 500 |
Liquid Gold | 4 | 0 | 10 | 999 | 10 | 999 | 255 | 255 | 256 | 4096 |
Of particular note is the final enemy in the table, who is an homage to a classic Japanese RPG monster archetype: that of the nearly unkillable and cowardly enemy that grants a massive reward if somehow defeated. Here’s a more detailed breakdown of each new enemy type. New skills will be listed in Table 12-5 after the breakdown.
Table 12-5. A List of New Skills to Be Added to the Database
Name | Scope | MP Cost | Damage Type / Element Type / Damage Formula / Effects and Other Notes | Animation |
|---|---|---|---|---|
Magic Attack | 1 Enemy | 0 | HP Damage / Normal Attack / a.mat * 4 – b.mdf * 2 / Add State: Normal Attack 100% | Normal Attack |
Toxic Gas | All Enemies | 0 | HP Damage / Physical / (b.mhp/8) / Add State: Blind 40%, Add State: Confusion 20%, Hit Type: Certain Hit | Pollen |
Drain Attack | 1 Enemy | 0 | HP Drain / Normal Attack / a.atk * 4 – b.def * 2 / Add State: Normal Attack 100% | Normal Attack |
Ghosts have low HP and Magic Defense, but immense physical Defense. This means that magical attacks will be preferred in battles with Ghosts. They use two skills: Magic Attack with a Condition of Always and a Rating of 5, and Icebolt with a Condition of Turn 2+2*X and a Rating of 9. Ghosts are weak to Light (Element Rate: Light * 200%), resistant to Thunder (50%), and immune to Ice (0%). They have a 1/5 chance to drop a Smoke Bomb and a 1/10 chance to drop a Stimulant.
Rogues are fairly balanced enemies with a slight bent toward damage-dealing at the expense of defensive stats. They use Attack and Cleave Always with a Rating of 5. Rogues also have Toxic Gas, which they use first on Turn 2 and then every 3 turns thereafter (Rating of 9). They have a 1/5 chance to drop Eye Drops and a 1/10 chance to drop a Dispel Herb. This enemy has 10% Evasion and 10% Critical Rate, along with one instance of Action Times + 20%. Each instance of Action Times+ allows an extra action at X%, where X is the percentage probability of using the extra action on any given turn. So, if an enemy has three Action Times+ entries, it can potentially act four times each turn.
Note
This is not to be confused with Atk Times+, which influences how many extra times the enemy attacks when it uses the normal Attack skill.
Zombies have a large amount of HP and a decent amount of Attack and Magical Defense. What makes them dangerous is their 30% chance to inflict Poison on Attack (via Attack State: Poison + 30%) along with their special Attack variant, Drain Attack, which is their only used skill. Zombies are weak to Fire (200%) and strong against Thunder (50%). They have a 1/5 chance to drop a Life Potion and a 1/10 chance to drop a Life Dew on defeat.
Note
The three enemies already listed use their same-named battler graphics.
Frost Vipers are highly agile enemies that pack a punch with their physical attacks. They use Attack Always with a Rating of 5 and Icebolt every three turns starting on Turn 2 (Rating of 9) They inflict Poison half of the time that they use Attack, and they are weak to Fire (150%) and resistant to Ice (50%). This enemy has a 1/7 chance of dropping a Big Bomb when defeated. Frost Vipers use the Snake battler graphic with a Hue of 240.
As already mentioned before, Liquid Golds are a special enemy. Rather than fight the player, they seek to escape at the first possible opportunity. Their immense defensive stats pretty much eliminate the ability to damage them through conventional means, and their 70% Evasion and Magic Evasion rating makes it so most attacks won’t stick, either. Their Action Pattern consists of Attack and Escape, both with a Condition of Always. Attack has a Rating of 5, while Escape has a Rating of 4. If the Liquid Gold is still in combat with the player by turn 3, it is guaranteed to use Escape (Rating of 9) to flee battle. This enemy has a 1/10 chance to drop a Bat’s Brew (incidentally, they will be the only enemy in the game that can drop this rare beverage). Liquid Golds use the Slime battler graphic with a Hue of 240.
As promised, see Table 12-5 for a list of the new skills to be added to the Database.
With the greater details now written in stone, you can take a bit of time to add these new enemies and their associated skills to the Database. Add single-unit and two-unit Troops for each of our newly added enemies. Then take a look at Figure 12-8 for the full encounter list that we’ll be using for the world map.

Figure 12-8. The encounter list for our game’s world map
We’ll use Regions 6–8 for the rest of the second landmass and 9 for the area surrounding the final dungeon. Check Figure 12-9 to see just how I laid out the relevant regions.
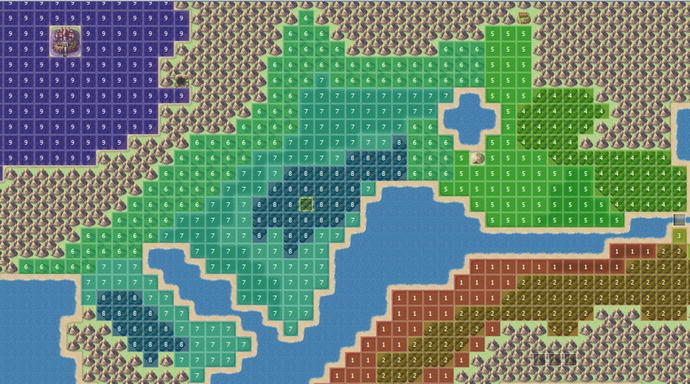
Figure 12-9. The world map , now updated with regions. Not pictured is part of the Region 9 layout.
Reminder
Don’t forget to set new battlebacks for each newly added region in the appropriate Parallel event! I’ll leave that as an exercise for you.
Next, we need some encounters for our third dungeon, which we’ll formally call the Hidden Pass. Much like the Dark Spire, the last floor will be left encounter-free. That said, see Figure 12-10 for the encounter list for the first floor of our dungeon (the Forest of Decay map). Then check out Figure 12-11 for the encounter list for floor 2 (the Ice Cave).
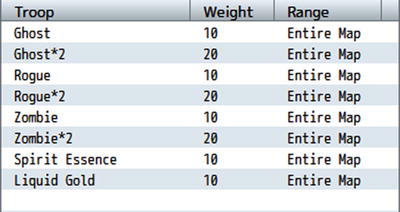
Figure 12-10. Random encounter list for the Forest of Decay area of our third dungeon
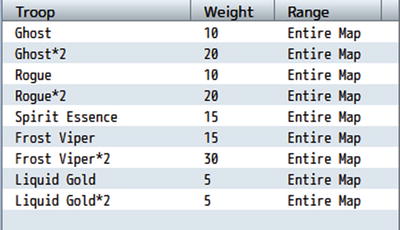
Figure 12-11. Random encounter list for the Ice Cave area of our third dungeon
That will do it for this section. Before closing it out, here are some ideas to flesh out Rocksdale:
Have one of the villagers give the player a sidequest involving the scarecrow in town. You could have it attack the player, when examined. When it is defeated, the player is attacked by a puppet-master. Defeating the mini-boss completes the sidequest.
Add several NPC, to liven up the village. The locals should talk mostly about the monsters threatening to attack. Have one of them make reference to Therese.
With both the Hidden Pass and the world map fully populated, let’s turn our attention to the dragon statue in the Dark Spire. I had originally left the event incomplete in Chapter 6, because I wanted to make an optional boss fight—a superboss fight, to be exact.
A Discussion of Superbosses
The general flow of an RPG involves defeating bosses, until you reach a final boss. Superbosses are located outside of that continuity and exist solely as a form of challenge for the player. If the player can beat a superboss, he/she is more than ready to beat the final boss and, by extension, the game itself. The monster that I created for this precise purpose can be seen in Figure 12-12.
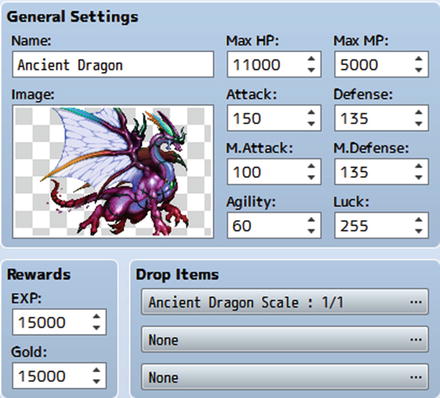
Figure 12-12. The Ancient Dragon . It gives the highest experience and gold gains of any monster in the game.
The Ancient Dragon boasts higher stats than the game’s final boss. Harold and Marsha will most likely not be ready to take this beast on until they have gotten the gear from the final dungeon and perhaps some extra level-ups as well. Defeating the Ancient Dragon gives the player a whopping 15,000 experience and gold. More important, it gives the player the best accessory in our game. The Ancient Dragon Scale is a new accessory that grants +10 to all eight of a character’s main stats, +5 Evasion, +5 Critical Rate, and 10 Attack Speed (AGI only applied during attacks). The Ancient Dragon resists Fire, Ice, and Thunder (taking only 50% damage from all three sources) and also has a Critical Rate of 20%. You can see the Ancient Dragon’s Action Pattern list in Figure 12-13.
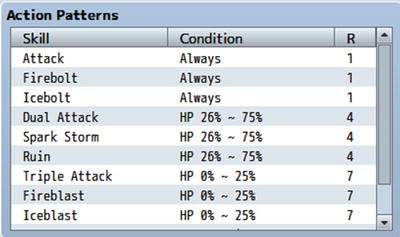
Figure 12-13. The Ancient Dragon’s action pattern list
Not pictured is the final skill in the action pattern list. Every seven turns, starting on Turn 7, the Ancient Dragon uses a new skill called Devastate (it has a Rating of 9). It has the special property of doing more damage the later in the fight that it is used.
Devastate’s damage formula is [(a.mat * $gameVariables.value(17)) - b.mdf * 5] with an Attack Element of None, and it hits All Enemies. We set it up so that the value of $gameVariables.value(17) (I call it TurnCount) is factored into the first part of the formula. To have a turn-count variable, all we have to do is go into the Ancient Dragon’s troop (after creating it, of course) and add a troop event page with a Turn End conditional that has a Turn span (so it triggers once per turn). Then we use Control Variables to increase the value of TurnCount by 1. So, every seven turns, Devastate causes extra damage equal to seven times the Ancient Dragon’s MAT (so, 700) minus five times the target’s Magic Defense. Basically, the battle is a race to defeat the superboss before it can wipe out the party with a casting of Devastate. Of course, the less HP the Ancient Dragon has, the stronger the skills that it uses.
Completing the Dragon Statue Event
Now that we have created our superboss and given it a robust set of skills to use against our player, let’s complete the dragon statue event. As you’ll recall, we set up the dragon statue event so that the player could inspect it from different angles. The interaction event has three conditional branches. Following is a refresher for part of the event:
♦If : Player is facing Right♦If : X = 32♦Jump to Label : Text♦: End♦: EndRecall that we use a Jump to Label command so as to not have to write the same text three times in the same event. The other two directional branches work in the same way. The following code is located after the three branches: ♦Label: Text♦Text : None, Window, Bottom: : You see a majestic dragon statue. It hums with: : power.♦Text : Actor3(7), Window, Bottom: : I sense immense power emanating from this: : statue. Be mindful. It would be best to: : return at a later time.♦Text : None, Window, Bottom: : Touch the statue?♦Show Choices : Yes, No (Window, Right, #1, #2): When Yes♦Jump to Label : DragonStatue♦: When No♦: End♦
At the Yes present within the interaction event, you’ll want to place the Jump to Label event command as just shown. Then, at the very end of the event, you’ll want to add the following:
♦If : #0100 is ON♦Label : DragonStatue♦Text : None, Window, Bottom: : You place a hand on the statue.♦Text : None, Window, Bottom: : You feel yourself being whisked away!♦Change Battle BGM : Battle3 (90, 100, 0)♦Control Self Switch : A = ON♦Battle Processing : Ancient Dragon♦: End♦
That is a dummy switch, a strategy we’ve used in previous chapters to make sure this part of the event can only execute when jumped into. When the player decides to touch the statue, we change the battle BGM and set self-switch A to on. Then, we send the player into the superboss battle. If the player triumphs, the interaction event flips to a second page that displays only the first bit of descriptive text. Look at the following code:
♦If : Player is facing Right♦If : X = 32♦Text : None, Window, Bottom: : You see a majestic dragon statue. It hums with power.♦: End
With that said, we have one thing left to do.
Setting Up the Use of the Exit Skill/Item Inside a Dungeon with Two Exits
We have set up all of our relevant transfer events for the third dungeon, but we have yet to update them with appropriate changes to the DungeonLocationvariable. More important, we also need to update the common event that is tied to our Exit Scroll. The third dungeon is peculiar in that it has two exits. There is the cave entrance hidden within the forest, and there is the entrance in Rocksdale. So we need to have one value of DungeonLocation for each of the two entrances. We’ll set them in the order that the player finds them, so that the entrance to the third dungeon from the hidden location will set DungeonLocation to 3, while the entrance in Rocksdale will set its value to 4. Let’s get started.
♦Control Variables : #0002 X = Map X of Player♦Control Variables : #0003 Y = Map Y of Player♦If : Y = 6♦Control Variables : #0011 DungeonLocation = 3♦Transfer Player: Forest of Decay (24,47) (Direction: Up)♦: End
We have this event on the cave entrance map. Directly inside, at the Forest of Decay, we tweak that event, so that DungeonLocation will become 0 if the player steps back out.
Note
In what is another difference between this dungeon exit and the two previous locales, you can set DungeonLocation to 0 when the player leaves the mines, or when he/she steps back into the world map. I decided to set the value back to 0 as soon as the player breaks free of the mines, as the cave entrance is not part of the dungeon.
♦Control Variables : #0002 X = Map X of Player♦Control Variables : #0003 Y = Map Y of Player♦If : Y = 49♦Control Variables : #0011 DungeonLocation = 0♦Transfer Player : Swamp (21,7) (Direction: Down)♦: End♦
Next, we must handle the other possible dungeon exit. The following code belongs to the transfer event in Rocksdale:
♦Control Variables : #0002 X = Map X of Player♦Control Variables : #0003 Y = Map Y of Player♦If : Y = 43♦Control Variables : #0011 DungeonLocation = 4♦Transfer Player : Forest (13,4) (Direction: Down)♦: End
Note that we set DungeonLocationto 4 here instead of 3. The last transfer event to be tweaked is the one that leads from the Forest to the mountain village.
♦Control Variables : #0002 X = Map X of Player♦Control Variables : #0003 Y = Map Y of Player♦If : Y = 0♦Control Variables : #0011 DungeonLocation = 0♦Transfer Player : Mountain Village (19,41) (Direction: Up)♦: End
With that done, we have only to tweak the common event that governs our exit code, and we’re all set, like so:
♦If : DungeonLocation = 3♦Change Items : Exit Scroll - 1♦Control Variables : #0011 DungeonLocation = 0♦Transfer Player : World 1 (57,76) (Direction: Down)♦: End♦If : DungeonLocation = 4♦Change Items : Exit Scroll - 1♦Control Variables : #0011 DungeonLocation = 0♦Transfer Player : Mountain Village (19,41) (Direction: Up)♦: End♦
You’ll want to update the spell variant of the common event as well, if you assigned the spell to Harold and/or Marsha. With all that done, you can put another notch on your belt. This chapter is complete!
Summary
Over this chapter, I covered our preparations leading up to the final dungeon of the game. We populated Rocksdale with a few essential NPCs that drive the main narrative forward. Adding other buildings and NPCs to the town was left as an exercise for you. In addition, we completed the dragon statue event that had been started all the way back in Chapter 6, introducing our game’s superboss in that way. Last but not least, we updated the transfer events of our latest dungeon to include the DungeonLocation variable and did the same for the common event that governs our Exit skill/item. In the next chapter, we will create and populate our game’s final dungeon.