Brady Somerville1, Adam Gamble2, Cloves Carneiro Jr.3 and Rida Al Barazi4
(1)
Bowling Green, KY, USA
(2)
Gardendale, AL, USA
(3)
Hollywood, FL, USA
(4)
FONTHILL, ON, Canada
Now that you have a very good understanding of how the components of Action Pack work, it’s time to dig a little deeper. You start by generating the users controller from scratch, writing its actions, and creating its templates. Then you’ll add some functionality to the blog application: you allow users to leave comments when reading an article and make sure only logged-in users have access to adding and editing content. Finally, you give your application some styling so it looks better and more like a real application.
Note
If you need to get the code at the exact point where you finished Chapter 7, download the source code zip file from the book’s page on www.apress.com and extract it on your computer.
Generating a Controller
It’s time to create your first controller from scratch. If you haven’t noticed already, Rails ships with generators for most common tasks, and controllers are no exception. The syntax for the controller generator is as follows:
$ rails g controller ControllerName [actions] [options]
As a minimum, the controller generator takes the name of the controller as an argument, which you can specify using either CamelCase (sometimes called MixedCase) or snake_case. The generator also takes an optional list of actions to generate. For every action you specify, you’ll get an empty method stub in the controller and a template in app/views/#{controller_name}. To see a list of all available options, you can run the rails g controller command without arguments.
Tip
The help output for the controller generator contains sample usage and options that you’re sure to find interesting. All of the generators (and most UNIX commands, for that matter) respond to the --help argument (or variations thereof), so you’re encouraged to try it whenever you’re issuing a system command.
Generate the users controller using the following command:
$ rails g controller users
create app/controllers/users_controller.rb
invoke erb
create app/views/users
invoke test_unit
create test/controllers/users_controller_test.rb
invoke helper
create app/helpers/users_helper.rb
invoke test_unit
invoke assets
invoke scss
create app/assets/stylesheets/users.scss
Let’s talk about the controller name we provided to the generator—users. The controller generator accepts this name in either “CamelCased” or “under_scored” format. In this case, “users” or “Users” would have resulted in the UsersController being generated. If we wanted to generate a controller that dealt with resources with a compound name, like UserFavoritesController, we would pass either “UserFavorites” or “user_favorites” to the generator.
Take the time to read the output of the generator so you get a sense of all the files that were just created. Notice where the templates are located: in the app/views directory, inside a subdirectory named after the controller. In this case, because your controller is called users, your templates go in app/views/users. Open the newly minted controller file in app/controllers/users_controller.rb and take a look (Listing 8-1).
class UsersController < ApplicationController
end
Listing 8-1
Users Controller in app/controllers/users_controller.rb
Tip
Most of the time, our controllers handle interactions with a collection of things, so we reflect that by using a plural name. However, sometimes our controller handles interactions with a singleton resource—like the SessionController we’ll add later in this chapter—and is named with a singular name to reflect. Take care to name things appropriately!
As you can see, all the generator gives you is an empty stub. If you want your users controller to do anything useful, you’ll need to add a few actions and give it something to do. Let’s add the actions you need to the controller now. Edit users_controller.rb so that it looks like the code in Listing 8-2.
You add four actions: new, create, edit, and update. The actions you add look very similar to the ones you saw in the articles controller in Chapter 7. The main difference is that you aren’t using the respond_to block; therefore, Rails directly renders the default erb templates. Let’s create those templates: Listings 8-3 and 8-4 show the new and edit templates, respectively.
In both the new and edit templates, you render a form partial, which is expected to be in app/views/users/_form.html.erb. Create the form partial and make sure it looks like the code in Listing 8-5.
<%= form_with(model: user, local: true) do |form| %>
<% if user.errors.any? %>
<div id="error_explanation">
<h2><%= pluralize(user.errors.count, "error") %> prohibited this user from being saved:</h2>
You use the same form helpers discussed in Chapter 7: text_field for text input and password_field for password inputs. Before you go to the browser to try what you’ve created, you need to add users as a resource in your routes file. Edit config/routes.rb so it looks like the code in Listing 8-6.
To see it all in action, try adding a new user by visiting http://localhost:3000/users/new. The form should look like Figure 8-1.
Figure 8-1
Adding a new user
When you try to actually create a user, you should receive an error message ActiveModel::ForbiddenAttributesError. It helpfully highlights the line in the code where the error occurred. Line 9 is where the params actually are added to the user. What happened? If you recall back in Chapter 7, when the scaffold generated the articles controller for us, it was very specific about what params should and shouldn’t be sent. In our controller, we’re just passing params into it. We need to specify which parameters are acceptable so nefarious users can’t hack our system. Modify the user_params method to look like this:
Run the server again, and retry the user creation. Now you can create a new user, and you can also edit that user if you have the user’s ID. In fact, right now anyone can create and edit users; but shortly, you’ll change the edit and update actions’ implementation to make sure only users can edit their own profile.
Nested Resources
You added support for comments earlier, but only at the model level. You didn’t implement a controller or view for the Comment model, and that’s what you’ll do now.
Comments are interesting because they're a little different from our other models so far. Comments depend on a particular article; they never exist on their own because they’re conceptually meaningless if they’re not tied to an article. If we created routes for comments just like we did for articles and users, we would need to take extra steps to ensure that an article id was present for every type of article URL. We could do that, but Rails gives us an easier way.
Instead of defining comments as standalone resources, as we did for articles, we’ll define them as nested resources of articles. Go to the routes file and update the resources :article call to look like the code in Listing 8-7.
To define a nested resource, you use the resources method passed inside a block to the parent resource. Notice how resources :comments is passed as a block to the resources :articles call; therefore, comments become a nested resource of articles. The named routes for nested resources are different from standalone ones; they’re built on top of a singular articles named route, requiring an article ID every time they’re called. Table 8-1 lists the generated named routes for comments.
Table 8-1
Comments’ Named Routes
Request Method
Nested Named Routes
Parameters
Controller Action
GET
article_comments_path
Article ID
index
POST
article_comments_path
Article ID, record hash
create
GET
new_article_comment_path
Article ID
new
GET
edit_article_comment_path
ID, article ID
edit
GET
article_comment_path
ID, article ID
Show
PUT/PATCH
article_comment_path
ID, article ID, and record hash
update
DELETE
article_comment_path
ID, article ID
destroy
Every time you call comment named routes, you must provide an article ID. Let’s generate the comments controller and see how you take care of that:
Of the default seven actions for which Rails generates named routes, you need only two for comments: create and destroy. You don’t need index, new, and show actions because comments are listed, shown, and added from the article’s show page. You don’t want to support editing or updating a comment, so you don’t need edit or update either. Listing 8-8 shows how the comments controller looks with only those two actions.
class CommentsController < ApplicationController
before_action :load_article
def create
@comment = @article.comments.new(comment_params)
if @comment.save
redirect_to @article, notice: 'Thanks for your comment'
else
redirect_to @article, alert: 'Unable to add comment'
Notice the before_action call at the beginning of the controller; it runs the method load_article before all the actions in your comments controller. That’s all you’ll need to know for now. We’ll explain more about controller callbacks shortly.
The load_article method does a simple task: it finds the article from the passed article_id and assigns it to the @article instance variable. Remember that you always have the article_id in your parameters because it’s always included in your nested named routes. With load_article in before_action, you’ll always have @article loaded and accessible in your comments controller’s actions and templates.
Also notice how you find and assign @comment: you do so using @article.comments. This way, you’ll make sure you’re dealing only with @article comments and you don’t create or delete comments from another article.
Now let’s update the views and create some templates. As mentioned earlier, you list, show, and add new comments from the article’s show page; so let’s update the article show page, make it a little nicer, and then add new code to display comments. Listing 8-9 shows how app/views/articles/show.html.erb looks after the update.
That’s a lot of cleaning. First, you extract the displaying attributes into a partial named app/views/articles/_article.html.erb, which you call using render @article. One of the benefits of creating a partial is that you can use it in other pages, such as the articles’ index page, which you’ll implement shortly.
Notice that the flash notice is removed from the article show template. To make sure the flash message shows in any view template, you move it to the application layout in app/views/layouts/application.html.erb (Listing 8-10).
Then you list comments using the collection render on @article.comments. To refresh your memory, this loops through the article comments, rendering the app/views/comments/_comment.html.erb partial for every comment.
Finally, you render the app/views/comments/new.html.erb template.
None of the files mentioned have been created yet. Let’s do that now. Create app/views/articles/_article.html.erb, app/views/comments/_comment.html.erb, and app/views/comments/_new.html.erb, as shown in Listings 8-11, 8-12, and 8-13, respectively.
The article and comment partials are pretty straightforward; aside from the markup, you display the attributes and link to actions.
The new comment form calls form_with and passes a new comment object as the model, configures the form action to send its values to the path to create a comment, and sets local: true so that this form isn’t sent via Ajax. (We’ll change this in the next chapter and explain further.)
Now that you’ve created the missing templates and added the required code to the controller, let’s go to the browser and see how it looks in the article show page. Run your server, go to your browser, and click your way through to an article; you should see something very similar to Figure 8-2.
Figure 8-2
Article show page with a new comment form
Try adding a few comments and see how the form behaves. Congratulations! You just added comment support to your blog application using nested resources. Now that you have comments and users in the system, let’s add some authorization logic to make sure only logged-in users can create and update articles.
Sessions and the Login/Logout Logic
The whole point of having users in your blog application is to allow them to create their own articles. But you also need to be able to recognize them when they create an article. Web applications normally do that by using sessions. Let’s talk a little more about that before you implement it in your application.
Lying in State
HTTP is stateless. The web server has no idea that it has talked to your browser before; each request is like a blind date. Given this tidbit of information, you may wonder how you can stay logged in to a given site. How can the application remember you’re logged in if HTTP is stateless? The answer is that you fake state.
You’ve no doubt heard of browser cookies. In order to simulate state atop HTTP, Rails uses cookies. When the first request comes in, Rails sets a cookie on the client’s browser. The browser remembers the cookie locally and sends it along with each subsequent request. The result is that Rails is able to match the cookie that comes along in the request with session data stored on the server.
Using the Session
Secure in the knowledge that Rails will take care of all the low-level details of sessions for you, using the session object couldn’t be easier. The session is implemented as a hash, just like flash. We should come clean here—flash is a session in disguise (you can think of it as a specialized session due to its autoexpiring properties). Not surprisingly then, the flash and session interfaces are identical. You store values in the session according to a key:
session[:account_id] = @account.id
session[:account_id] # => 1
session['message'] = "Hello world!"
session['message'] # => "Hello world!"
Session As a Resource
Now that you understand sessions, you can go back to your main task: allowing users to log in and log out. You create a session when the user logs in and clear (destroy) it when they’re done. Of course, you do that in a RESTful way, by treating the session as a resource:
Notice that you define session as a resource and not resources, because you never deal with a set of sessions at once. You never list sessions in an index or anything like that—you just need to create or destroy a single session at a time.
Let’s step back and try to explain the difference between resource and resources definitions. The main benefit you get from defining resources in your routes file is the named routes that are generated for you. In the case of a single resource definition, you get different named routes: none of them are pluralized, all are singular, and there’s no index action. Rails maps six actions instead of the seven in a resources definition. Table 8-2 provides a quick comparison between resources named routes and resource named routes.
Table 8-2
Named Routes: resources vs. resource
Request Method
resources Named Routes
resource Named Routes
Controller Action
GET
articles_path
Not available
index
POST
articles_path
session_path
create
GET
article_path
session_path
show
PATCH/PUT
article_path
session_path
update
DELETE
article_path
session_path
destroy
GET
edit_article_path
edit_session_path
edit
GET
new_article_path
new_session_path
new
Note
Although a singular name is used for the resource, the controller name is still taken from the plural name, so sessions_controller is the controller for the session resource in this case.
To avoid confusion, let’s map this in your mind; to log in, you need to create a session; to log out, you clear that session. You use new_session_path as your login path, and the new template is your login page. POSTing the form in the new session page to session_pathcreates the session. Finally, submitting a DELETE request to session_pathclears that session, performing a logout. Now, let’s map it in the routes file, as shown in Listing 8-15.
Rails.application.routes.draw do
root to: "articles#index"
resources :articles do
resources :comments
end
resources :users
resource :session
get "/login", to: "sessions#new", as: "login"
get "/logout", to: "sessions#destroy", as: "logout"
You basically define two named routes, login_path and logout_path, which are more meaningful than new_session_path and session_path when referring to those actions.
Logging In a User
As you did for Active Record resources, in the create action, you first check the validity of the resource—in this case through authentication—and you save the state if all is good. If the validity check fails, you return the user to the login page with an error message. In this controller, you never save a record to the database—you save a session object. Listing 8-16 shows the create action.
class SessionsController < ApplicationController
def create
if user = User.authenticate(params[:email], params[:password])
session[:user_id] = user.id
redirect_to root_path, notice: "Logged in successfully"
First, you use the authenticate class method from the User model to attempt a login (see Listing 6-37 in Chapter 6). Remember that authenticate returns a User object if the authentication succeeds; otherwise, it returns nil. Therefore, you can perform your conditional and your assignment in one shot using if user = User.authenticate(params[:email], params[:password]). If the assignment takes place, you want to store a reference to this user so you can keep the user logged in—a perfect job for the session:
session[:user_id] = user.id
Notice that you don’t need to store the entire User object in session. You store just a reference to the user’s ID. Why not store the entire User object? Well, think about this for a minute: what if the user is stored in session and later changes their login? The old login would remain in the session and would therefore be stale. This can cause problems if the underlying User model changes. Your entire object could become stale, potentially causing a NoMethodError when accessing attributes that didn’t exist on the model at the time it was placed in session. The best bet is to just store the id.
With a reference to the logged-in user safely stored in session, you can redirect to the root path, corresponding to the articles controller.
If the assignment doesn’t take place and the User.authenticate method returns nil, you know the provided login and password are invalid, and you return to the login page with an alert message using flash.now. RESTfully speaking, the login page is where you enter the new session information, so it’s basically the new action.
Note
flash.now differs from the regular flash call by setting a flash message that is only available to the current action. If you recall, regular flash makes messages available after a redirect.
But wait: you don’t have a new action yet. Don’t you need to define it first? The truth is you don’t need to initialize anything there—all you need is its template. By having the template, Rails automatically renders that template when it doesn’t find the action definition. Let’s create the new template, as shown in Listing 8-17.
<h1>Login</h1>
<%= form_with(url: session_path, local: true) do |form| %>
Notice that we didn’t pass a model to form_with as we did earlier with Active Record objects; that’s because session isn’t an Active Record object. You also submit to session_path because it’s a resource, not resources, as explained earlier.
Logging Out a User
The user is logged in when a session is created, so in order to log out the user, you need to clear that session. You do so in the destroy action. The destroy action is fairly straightforward. You clear the session by using the reset_session method that comes with Rails, which does exactly as it says: it resets the session by clearing all the values in it. After you clear the session, you redirect back to the login_path, which is your login screen.
Another way to do this is to specifically clear the user_id key from the session hash, but it’s safer for the logout in particular to clear all the session values. Listing 8-18 shows how the sessions controller looks after you add the destroy method.
class SessionsController < ApplicationController
def create
if user = User.authenticate(params[:email], params[:password])
session[:user_id] = user.id
redirect_to root_path, notice: "Logged in successfully"
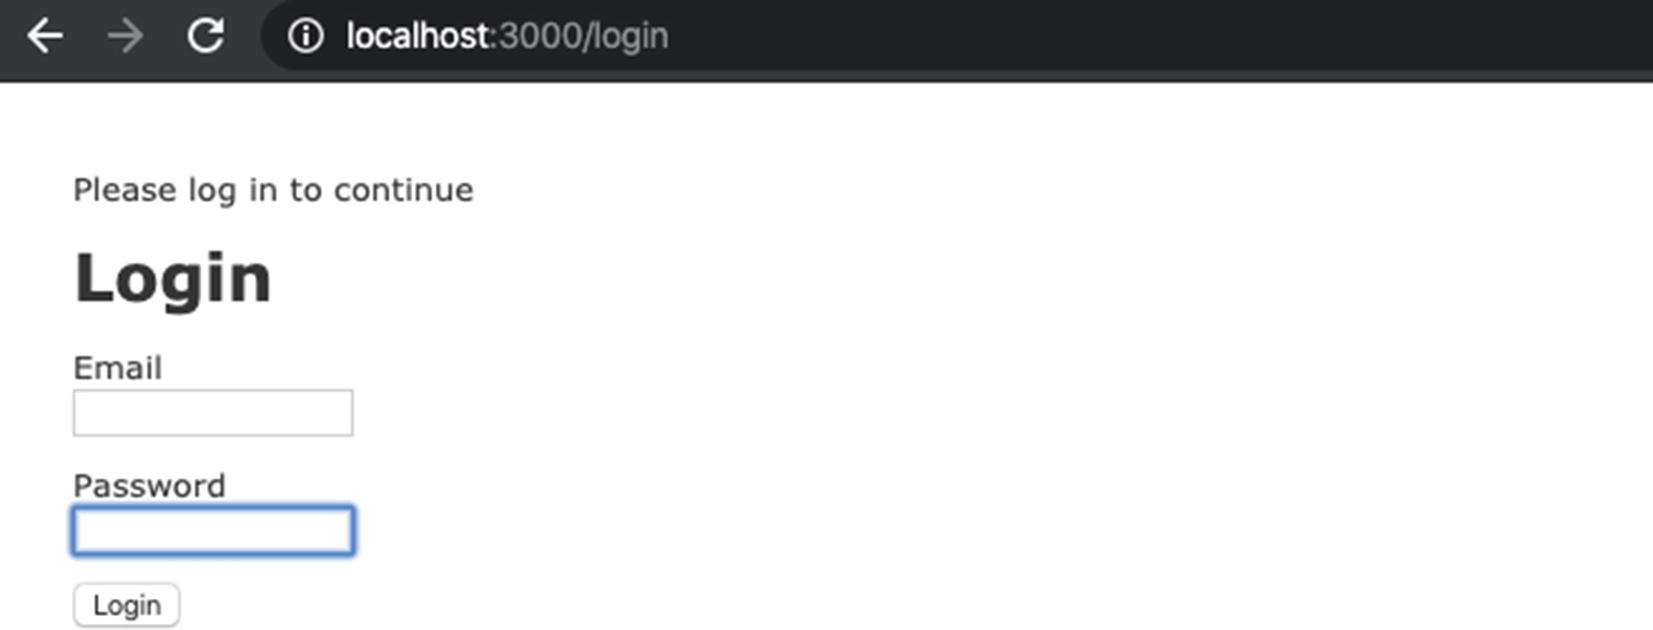
Go ahead and try it. Create a user by going to http://localhost:3000/users/new. Then log in by visiting the login path at http://localhost:3000/login (Figure 8-3). Finally, if you want to log out, go to http://localhost:3000/logout.
Figure 8-3
Login page
Don’t worry about remembering all the URLs. You can link to them when you update your application layout.
Improving Controllers and Templates
Chapter 7 and earlier parts of this chapter covered generating controllers, creating templates and layouts, and DRYing up with partials. Let’s take this a step forward: first, you update article views, and then you add callbacks to some of your controllers, making sure some actions require authorization.
Cleaning Up the Articles Index Page
The current articles’ index page uses a table markup to list articles. If you’ve ever visited a blog, you know you’ve never seen one like that; so let’s change the table markup and loop to a friendlier markup that uses the article’s partial in app/views/articles/_article.html.erb. Listing 8-19 shows the updated articles index.
Be careful with reusing partials. In some cases, you may prefer to keep separate files. You reuse the article partial here just to simplify things.
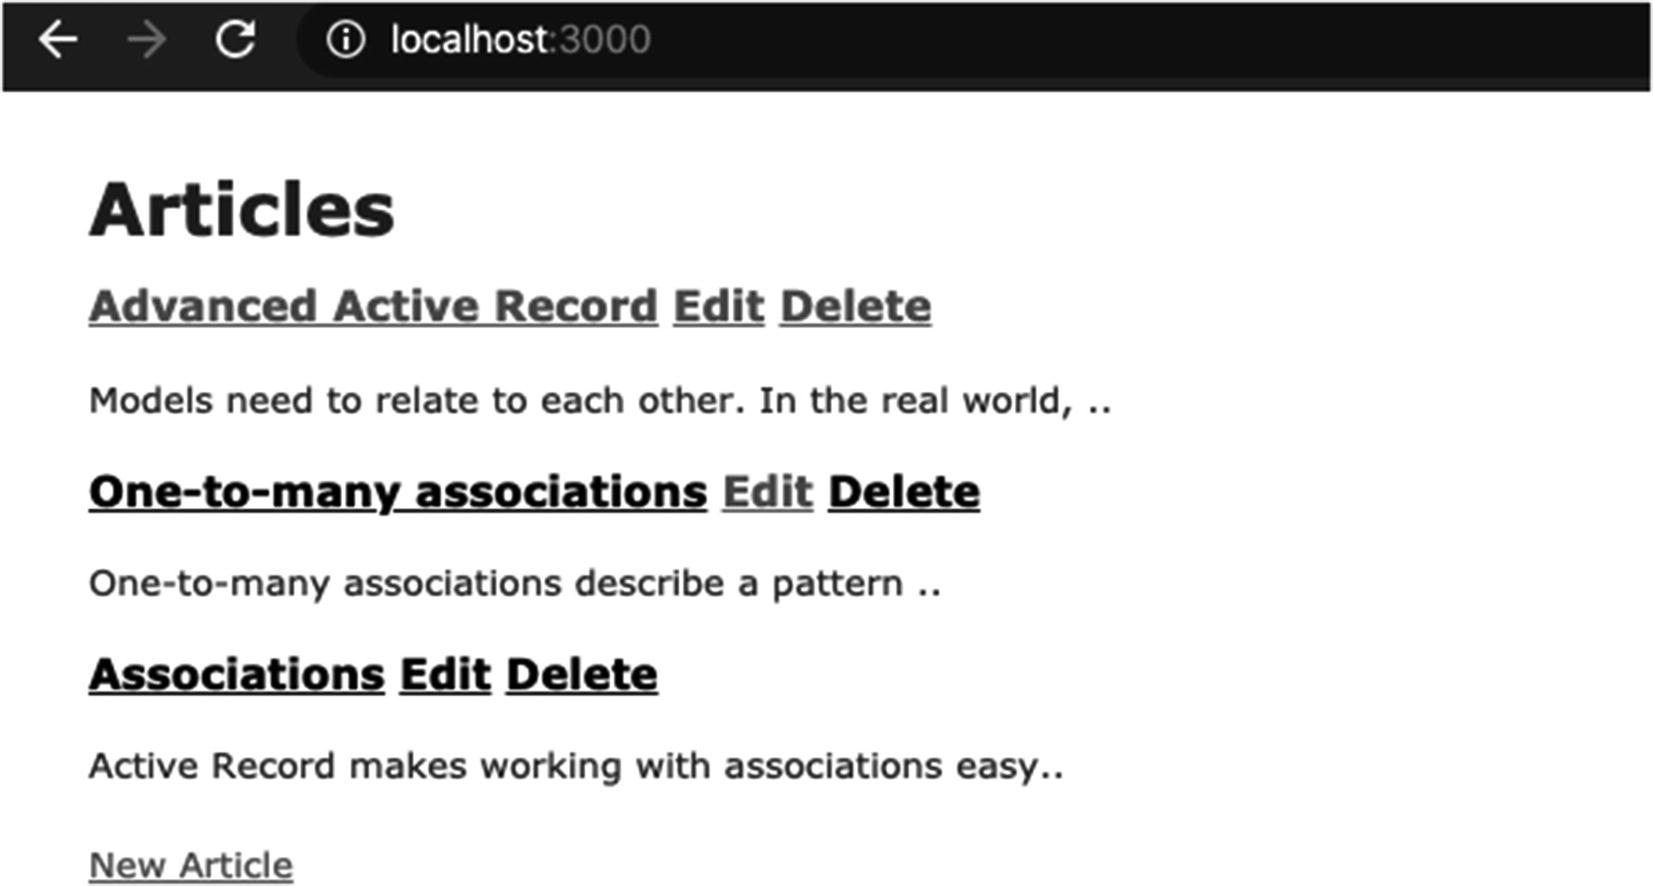
Visit your root path at http://localhost:3000. If all goes right, you should see something similar to Figure 8-4. That looks like a real blog!
Figure 8-4
Blog-like home page
Adding Categories to the Article Form
In Chapter 6, you added categories to the Article model, but neither your controller nor your templates know about this yet. Let’s remedy that now, starting with the article form. Add the code shown in bold in Listing 8-20 to the form partial in app/views/articles/_form.html.erb.
<%= form_with(model: article, local: true) do |form| %>
<% if article.errors.any? %>
<div id="error_explanation">
<h2><%= pluralize(article.errors.count, "error") %> prohibited this article from being saved:</h2>
<ul>
<% article.errors.full_messages.each do |message| %>
<li><%= message %></li>
<% end %>
</ul>
</div>
<% end %>
<div class="field">
<%= form.label :title %>
<%= form.text_field :title %>
</div>
<div class="field">
<%= form.label :location %>
<%= form.text_field :location %>
</div>
<div class="field">
<%= form.collection_check_boxes(:category_ids, Category.all, :id, :name) do |b| %>
To offer articles the chance to be part of one or more categories, you show all the categories as checkboxes. But how do you associate those checkboxes with the article?
Remember that Chapter 6 talked about the methods that each association adds to your model when you use them. In the case of the Article model, the has_and_belong_to_many :categories association adds the category_ids method, which returns an array of the associated category IDs; it also adds the category_ids=(category_ids) method, which replaces the current associated categories with the ones supplied.
Knowing that, look back at the new code added to the form: we use the form helper method collection_check_boxes, which takes a few arguments and a block, which we’ll now explain.
The first argument, :category_ids, is the attribute on the Article object which we ultimately want to set.
The second argument declares all possible values, so we use Category.all to get the list of all categories known to our app.
The third argument controls how to find the value from a category object in order to store in the article. We use :id, because we want to store the category id.
The last argument declares how to find the text we want to use as a label for a particular checkbox. In this case, we use :name, because the Category model has a name attribute which would be helpful here.
Lastly, this method takes a block which lets us customize how each checkbox is rendered. We want to wrap each checkbox inside a label and add descriptive text, both for aesthetics and usability, so we supply a block which receives a special builder object, and we indicate we want a label tag whose contents are the checkbox and the textual description of the option.
Whew! That’s a lot to remember. But don’t worry about remembering all of this. Just knowing that helper methods like this exist is good enough; when the need arises, you can find the documentation.
The only thing left to do is go back to the articles controller and make sure Rails knows that you want to allow categories to be saved to the article. Otherwise, it would just discard this information and never save it to the article.
...
# Never trust parameters from the scary internet, only allow the white list through.
That’s it! Now that you have category integration for articles, try adding a new article; you should see a form similar to that in Figure 8-5.
Figure 8-5
Updated article form with category checkboxes
Fill in the mandatory fields, select a couple of categories, and submit the form. Check the parameters output in your rails server window. You should see something similar to the following output, depending on the values you entered—pay attention to the category array:
Parameters: {"authenticity_token"=>"gjav8j17XIaz5jItg6hJ5wPWSBJHLexXuotWEjtEA9JFdEcXHR+ql5JoW2/F5mp1Nm5eUlmBqY/xW7Q1Lu3g4w==", "article"=>{"title"=>"Advanced Active Record", "location"=>"", "category_ids"=>["", "2", "1"], "excerpt"=>"", "body"=>"Models need to relate to each other. In the real world, ..", "published_at(1i)"=>"2020", "published_at(2i)"=>"2", "published_at(3i)"=>"24", "published_at(4i)"=>"00", "published_at(5i)"=>"00"}, "commit"=>"Update Article", "id"=>"1"}
If you try to edit the article you just created, you’ll see that your categories are selected, and you can modify them like any other article attribute. The category_ids= method that the has_and_belong_to_many association added for you does all the magic behind the scenes.
Using Filters
Filters provide a way for you to perform operations either before or after an action is invoked. There’s even an around filter that can wrap the execution of an action. Of the three, the before action is the most commonly used, so this section focuses on it.
All the code you place in before_action is run before the action in question is called. Pretty simple, really. But there’s a catch: if before_action returns false, the action isn’t executed. We often use this to protect certain actions that require a login. If you have an events controller and you want the new and create actions to remain open (anyone can access them), but you want to restrict all other actions to logged-in users, you can do so using filters:
This causes the authenticate method to be run before every action except those listed. Assume the authenticate method is defined in the application_controller controller and is therefore available to every other controller in the system. If the authenticate method returns false, the requested action isn’t executed, thereby protecting it from unauthorized visitors.
You can also use the :only modifier to specify that the filter is to run for only the given actions. You can write the preceding example more concisely as follows:
before_action :authenticate, only: :destroy
Without the :only or :except modifier, the filter runs for all actions.
Controller inheritance hierarchies share filters downward, but subclasses can also add or skip filters without affecting the superclass. Let’s say you apply a global filter to the application_controller, but you have a particular controller that you want to be exempt from filtration. You can use skip_before_action, like this:
class ApplicationController < ActionController::Base
before_action :authenticate_with_token
end
class PublicController < ApplicationController
# We don't want to check for a token on this controller
skip_before_action :authenticate_with_token
end
Filters are a fairly involved topic, and we’ve only scratched the surface here. Still, you’ve seen the most common usage pattern: protecting actions. For more information about filters, including usage examples, check out the Rails guide at https://guides.rubyonrails.org/action_controller_overview.html#filters.
Requiring Authentication with Filters
In your blog application, you want to protect blog creation and modification, restricting access to registered users. To do this, you use callbacks that call specific methods and check for the user_id session you set on user login. Recall that any methods you add to the application_controller are available to all other controllers (because it’s the superclass of all controllers).
Open the application_controller in app/controllers/application_controller.rb and add the protected methods that enforce your authentication requirement, as shown in Listing 8-22.
class ApplicationController < ActionController::Base
First, we call the helper_method method and pass two symbolized names of methods. This allows view templates to use the current_user and logged_in? methods in addition to other subclasses of ApplicationController. You can use this to show or hide administrative controls (such as adding or editing a given article). Having current_user around also proves useful in templates, allowing you to access information about users, such as their email addresses.
The current_user method acts like an accessor for the currently logged-in user. Because it returns a User object, you can call instance methods of User on it, such as current_user.email. The authenticate method is your filter method (the one you call from individual controllers). It checks whether there is a currently logged-in user via logged_in? (which, in turn, checks that there is actually a User returned by current_user) and calls access_denied if there isn’t; access_denied redirects to the login_path in the sessions controller with a notice message in the flash.
Let’s apply the filter to the articles controller now. You also apply a filter to the users controller to restrict who can edit user profiles.
Applying Filters to Controllers
You apply filters using a declarative syntax. In this case, you’ll want to check that a user is authenticated before you process a protected action, so you use before_filter. Add the filter to the articles controller, just inside the class body, as shown in Listing 8-23.
Notice how you’re able to selectively apply the filter to specific actions. Here, you want every action to be protected exceptindex and show. The :except modifier accepts either a single value or an array. You’ll use an array here. If you want to protect only a few actions, you can use the :only modifier, which, as you would expect, behaves the opposite of :except.
You’ll also want to use a filter in the users controller. Right now, anyone can edit a user as long as they know the user’s ID. This would be risky in the real world. Ideally, you want the edit and update actions to respond only to the currently logged-in user, allowing that user to edit their profile. To do this, instead of retrieving User.find(params[:id]), you retrieve current_user and apply a filter to protect the edit and update actions. Listing 8-24 shows the latest version of the users controller.
Try it. If you attempt to add, edit, or delete an article, you’re asked to log in (Figure 8-6).
Figure 8-6
Authentication required
We probably don’t want to allow any visitor to our blog to delete comments; therefore, authorization code is required in the comments controller. First, you add a before_action to authorize users before calling the destroy action. Next, in the destroy action, you find the article, making sure it belongs to the current user by using current_user.articles.find. Then, you find the comment on that article; and finally, you destroy it. Listing 8-25 shows the updated code, in bold, for the comments controller.
class CommentsController < ApplicationController
before_action :load_article, except: :destroy
before_action :authenticate, only: :destroy
def create
@comment = @article.comments.new(comment_params)
if @comment.save
redirect_to @article, notice: 'Thanks for your comment'
else
redirect_to @article, alert: 'Unable to add comment'
You’re almost finished with your work in this chapter. Only a few tasks remain. You need to spruce up your templates a bit and make them a little cleaner. You also need to make it possible for article owners to edit and delete their articles. Finally, you want to update the layout and apply some CSS styles to make things look pretty. Ready? Let’s get started!
Using Action View Helpers
One of the ways you can clean up your templates is with helpers. Rails ships with a bevy of formatting helpers to assist in displaying numbers, dates, tags, and text in your templates. Here’s a quick summary:
Number helpers: The NumberHelper module provides methods for converting numbers into formatted strings. Methods are provided for phone numbers, currency, percentages, precision, positional notation, and file size. See https://api.rubyonrails.org/classes/ActionView/Helpers/NumberHelper.html for more information.
A very handy URL helper is link_to, which you’ve used several times already. It creates a hyperlink tag of the given name using a URL constructed according to the options hash given. It’s possible to pass a string instead of an options hash to get a link tag that points to any URL. Additionally, if nil is passed as a name, the link itself becomes the name. Here’s the fine print:
link_to(name, options={}, html_options={})
This generates an HTML anchor tag using the following parameters:
The first argument is the link’s name.
The second argument is the URL to link to, given as a string, a named route, or a hash of options used to generate the URL. It can also be an object, in which case Rails replaces it with its show action named route.
The third argument is a hash of HTML options for the resulting tag.
In Ruby, if the last argument to a method is a hash, the curly braces are optional. Most link_to helpers therefore look like this:
If you use all three arguments and pass in options for HTML (like a class or id attribute), you need to disambiguate them. Consider the following example, which uses two hashes—one for the URL generation and another for the HTML options:
Notice that you need to use the curly braces for at least the first hash to inform Ruby that there are three arguments. Using braces on the last hash of options is still optional, and you can just as easily include them:
You should always escape any HTML before displaying it in your views to prevent malicious users from injecting arbitrary HTML into your pages (which is how cross-site scripting attacks are often carried out). The rule of thumb is that whenever you have data that are provided by the user, you can’t trust them blindly. You need to escape it. This includes model attributes as well as parameters. Fortunately, Rails escapes all rendered strings for you.
Try adding a new article with some HTML markup in the body, saving, and visiting the show page. If you enter an anchor HTML tag, for example, you see something like the screen shown in Figure 8-7. As you can see, Rails escapes the HTML entered in the body field.
Figure 8-7
Escaped HTML in the article page
If you check the source code, you’ll see that the characters you entered have been escaped:
<a href='#'>No link for you</a>
Sometimes, you may want to display the strings entered by users without escaping them. To do that, Rails provides a method on strings named html_safe that skips the HTML escaping process. To display the article’s body in its raw format, which you’ll do shortly, you can call article.body.html_safe instead of article.body in the article partial in app/views/articles/_article.html.erb.
Formatting the Body Field
Let’s improve the display of the body field. One of the aforementioned text helpers is simple_format. This helper converts text to HTML using simple formatting rules. Two or more consecutive newlines are considered a paragraph and wrapped in <p> tags. One newline is considered a line break, and a <br /> tag is appended. Listing 8-26 shows the additions.
You’ve applied authentication filters, but you still don’t have a way to prevent users from editing or deleting articles that belong to other users. To do this, you add a method to the Article model that can tell you whether the article in question is owned by the user you pass in. Open the Article model and add the owned_by? method, as highlighted in bold in Listing 8-27.
Now, let’s use this method in the article and comment partials in app/views/articles/_article.html.erb and app/views/comments/_comment.html.erb, respectively, by adding links to edit or delete only if the article is owned by the currently logged-in user, as shown in Listings 8-28 and 8-29.
When you try this in your browser, you may not see the edit and delete links for any of the articles because their user_id field is nil. This is great console practice for you. Start your console with rails console, find your own user record using user = User.find_by_email('[email protected]'), and update all articles in the system using Article.update_all(["user_id = ?", user.id]).
Making Sure Articles Have Owners
You need to make sure that when you add an article, a user is assigned. To do that, you update the create method in the articles controller to use the association between User and Article. When creating the @article variable, instead of using Article.new, you use current_user.articles.new: it instantiates an Article object with the user_id field set to the ID of current_user. That’s exactly what you need.
Applying the same logic, you can change the edit, update, and destroy actions to retrieve only articles belonging to the logged-in user. In code parlance, you’ll use current_user.articles.find wherever you were using Article.find. Since a few actions no longer need the :set_article before_action, we remove them from the list. Listing 8-30 shows the changes to make in app/controllers/articles_controller.rb.
Your blog application is looking pretty good, but let’s make it a bit more user-friendly. One thing you can do is add a helpful cancel link beside each submit button on the forms, so users can back out of editing. You could do this by adding a link_to helper beside each button, but you’d need to do this for every form. Because you probably want to repeat this pattern throughout the application, this could end up being a lot of duplication. Why not create a custom helper to do this for you? Listing 8-31 shows the method submit_or_cancel added to the application_helper.
module ApplicationHelper
def submit_or_cancel(form, name = "Cancel")
form.submit + " or " + link_to(name, 'javascript:history.go(-1);', class: 'cancel')
Now, let’s use this helper on your forms. Open both the user and the article form partials in app/views/users/_form.html.erb and app/views/articles/_form.html.erb, and update them so they look like Listings 8-32 and 8-33, respectively.
<%= form_with(model: user, local: true) do |form| %>
<% if user.errors.any? %>
<div id="error_explanation">
<h2><%= pluralize(user.errors.count, "error") %> prohibited this user from being saved:</h2>
As in the earlier examples, every time you copy and paste view code in more than one template, it means that you very likely can extract it into a helper method.
Giving It Some Style
Your blog application could use a little varnish. Let’s update the layout and apply a style sheet.
Updating the Layout
Let’s update the main layout and add some style hooks that you can target via CSS. You also add some pieces to allow the user to log in, log out, edit their password, and add a new article. The final result looks like the code in Listing 8-34, with changes in bold.
We just now added a link to add a new article in the application layout; therefore, we no longer need that link on the articles’ index page. Update the app/views/articles/index.html.erb file to remove the new article link. It should look like the code in Listing 8-35.
We’ve prepared a simple CSS that you can apply to make the application look pretty. Listing 8-36 shows the resulting app/assets/stylesheets/application.css file after we've added our custom rules. We’re no longer using the app/assets/stylesheets/scaffolds.scss file; remove it to avoid any styling conflicts.
/*
* This is a manifest file that'll be compiled into application.css, which will include all the files
* listed below.
*
* Any CSS and SCSS file within this directory, lib/assets/stylesheets, or any plugin's
* vendor/assets/stylesheets directory can be referenced here using a relative path.
*
* You're free to add application-wide styles to this file and they'll appear at the bottom of the
* compiled file so the styles you add here take precedence over styles defined in any other CSS/SCSS
* files in this directory. Styles in this file should be added after the last require_* statement.
* It is generally better to create a new file per style scope.
Yikes! That’s a lot of CSS! Don’t worry, though. Like all the other listings in the book, you can get the code from the gist URL in the listing caption. The code is also available on the book’s website (http://www.apress.com) so you can download it and copy it into your project. We certainly don’t expect you to type it all in.
With the CSS in place, your application is starting to look nice. If you’ve done everything correctly, it should look a lot like Figure 8-8.
Figure 8-8
Final layout with CSS
Summary
This chapter discussed a fair number of advanced topics, including nested resources, sessions and state, and how to protect actions using filters. But we didn’t stop there. You also learned how to sanitize HTML to protect your application from defacement by malicious users, and how to create your own helpers to improve your interface. You even took the time to make your application look pretty, sprucing up the layout and adding some CSS.
The next chapters build on this knowledge, and we’ll start by going over how Rails handles JavaScript and CSS.