© Brady Somerville, Adam Gamble, Cloves Carneiro Jr and Rida Al Barazi 2020
B. Somerville et al.Beginning Rails 6https://doi.org/10.1007/978-1-4842-5716-6_2

2. Getting Started

Brady Somerville1 , Adam Gamble2, Cloves Carneiro Jr.3 and Rida Al Barazi4
(1)
Bowling Green, KY, USA
(2)
Gardendale, AL, USA
(3)
Hollywood, FL, USA
(4)
FONTHILL, ON, Canada
 

For various reasons, Rails has gained an undeserved reputation of being difficult to install. This chapter dispels this myth. The truth is that installing Rails is relatively easy and straightforward, provided you have all the right ingredients. The chapter begins with an overview of what you need to get Rails up and running and then provides step-by-step instructions for the installation. Finally, you’ll start your first Rails application.

An Overview of Rails Installation

The main ingredient you need for Rails is, of course, Ruby. Some systems, such as macOS, come with Ruby preinstalled, but it’s often outdated. To make sure you have the best experience with this book, it’s best if you start from a clean slate, so you’ll install it. After you have Ruby installed, you can install a package manager (a program designed to help you install and maintain software on your system) called RubyGems. You use that to install Rails.

If you’re a Ruby hacker and already have Ruby and RubyGems installed on your computer, Rails is ridiculously easy to get up and running. Because it’s packaged as a gem, you can install it with a single command:
> gem install rails

That’s all it comes down to—installing Rails is a mere one-liner. The key is in having a working installation of Ruby and RubyGems. Before you get there, though, you need one other ingredient to use Rails: a database server.

As you’re well aware by now, Rails is specifically meant for building web applications. Well, it’s a rare web application that isn’t backed by a database. Rails is so sure you’re using a database for your application that it’s downright stubborn about working nicely without one. Although Rails works with nearly every database out there, in this chapter you use one called SQLite. SQLite is open source, easy to install, and incredibly easy to develop with. Perhaps that’s why it’s the default database for Rails.

Rails 6 introduces the use of webpack for processing CSS and JS files. This also means we’ll need to install Node.js to run JavaScript on the server and Yarn to manage our JavaScript dependencies.

You start by installing Ruby and RubyGems, and you use the magical one-liner to install Rails. Then, you install SQLite, Node.js, and Yarn and make sure they are working properly. Here are the steps in order:
  1. 1.

    Install Ruby.

     
  2. 2.

    Install Rails.

     
  3. 3.

    Install SQLite.

     
  4. 4.

    Install Node.js.

     
  5. 5.

    Install Yarn.


Before you begin, note that the “many ways to skin a cat” adage applies to Rails installation. Just as the Rails stack runs on many platforms, there are as many ways to install it. This chapter describes what we feel is the easiest and most reliable way to install Rails for your platform. You go about the process differently for macOS, Linux, and Windows, but they all amount to the same thing.

No matter which platform you’re using, you need to get familiar with the command line. This likely isn’t a problem for the Linux crowd, but it’s possible that some macOS users and certainly many Windows users don’t have much experience with it. If you’re using macOS, you can find a terminal emulator in /Applications/Utilities/Terminal.app. If you’re on Windows, you can open a command prompt by clicking Start, typing cmd, and clicking “Command Prompt.” Note that you’ll use the command line extensively in your travels with Rails. A growing number of IDEs make developing applications with Rails even simpler, and they completely abstract the use of a command-line tool; but stick to the command line to make sure you grasp all the concepts behind many commands. If you later decide to use an IDE such as JetBrains’ RubyMine, you’ll have a great understanding of Rails and will understand even better where the IDE is speeding up your work.

Also, a quick note for macOS users: If you’re using a Mac and would prefer to use a package manager such as Fink or MacPorts, the Linux instructions will prove useful.

Go ahead and flip to the section that describes your platform (macOS, Windows, or Linux), and let’s begin.

Installing on macOS Catalina

You’d think that given the prevalence of macOS among Rails developers, installing Rails on macOS would be easy. And you’d be correct. First, we need to install Apple’s Developer Tools so that we can compile packages. Note that SQLite is preinstalled on macOS, so that’s one thing we don’t need to worry about.

Installing the Command Line Tools for Xcode

Some RubyGems you may need in the future require compilation, so you’ll need to install a compiler. Apple’s Command Line Tools for Xcode includes a compiler and provides the easiest way to set up a development environment on your Mac. Run the following command:
> xcode-select --install

Follow the prompts to continue installation.

Installing Homebrew

For this next piece, you’ll need to dig into the terminal a bit, but don’t worry, we’ll guide you through it. Homebrew is a great package manager for macOS that is written in Ruby no less. It will help you to install the other pieces you’ll need as you go. To install Homebrew, enter the following command into the terminal (Applications ➤ Utilities ➤ Terminal):
> ruby -e "$(curl -fsSL https://raw.githubusercontent.com/Homebrew/install/master/install)"

Installing RVM

Now you’ll need to install a common Ruby tool called the Ruby Version Manager (RVM). It helps you manage versions of Ruby and various gems that you may use for projects. Its install is just as simple as Homebrew. It’s just one command:
> curl -sSL https://get.rvm.io | bash -s stable --ruby
You can test to see if Ruby is installed correctly by asking Ruby for its version number:
> ruby --version
  ruby 2.6.5p114 (2019-10-01 revision 67812) [x86_64-darwin19]

If your output isn’t exactly like this, don’t panic. Ruby is often updated with new security patches and features, but it should at least say Ruby 2.5.0 in order to support Rails 6.

Installing Rails

To install Rails, use the command line:
> gem install rails -v '~> 6.0.2'
The "-v '~> 6.0.2'" part of the command ensures you'll get the most recent version of Rails 6.0.
That’s it! Rails is installed. Let’s check the version to make sure everything went well:
> rails -v
Rails 6.0.2.1

Again, if your output isn’t exactly like this, don’t panic. Quite likely a newer version of Rails 6.0 has been released. But to ensure compatibility with this book, please make sure your version number begins with 6.0.

Installing Node.js

To install Node.js, use the command line:
> brew install node
To verify Node.js installation succeeded, issue the following command:
> node --version
If everything went well, you should see output that includes something like
v13.2.0

Installing Yarn

To install Yarn, we’ll use npm, the Node.js package manager, which was installed for you when you installed Node.js:
> npm install -g yarn
To verify Yarn installation succeeded, issue the following command:
> yarn --version
If everything went well, you should see output that includes something like
1.21.0

Great! Ruby, Rails, SQLite, Node.js, and Yarn are installed and working correctly.

Installing on Windows

Installation on Windows is easy thanks to installer packages. You start by installing Ruby.

Installing Ruby

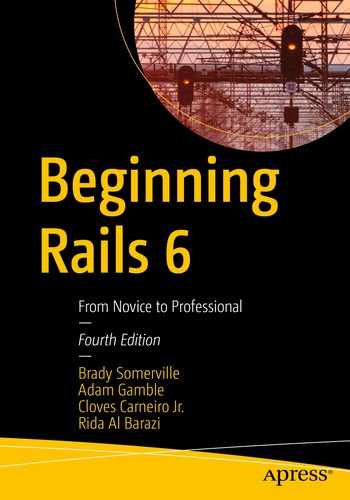
Installing Ruby on Windows is marvelously easy thanks largely to the one-click installer for Ruby. You can read more and download the installer from its website: http://rubyinstaller.org/.

The latest version of the installer at the time of this writing is Ruby 2.6.5-1. While a newer version of Ruby would probably still be compatible with Rails 6.0 and the code in this book, a safer bet would be to install the most recent stable Ruby 2.6 version.

After you’ve downloaded the installer, start the installation by double-clicking its icon. What follows is standard installer fare, and the defaults are sufficient for your purposes. When you select the location where you want to put Ruby (usually C:Ruby26-x64), as shown in Figure 2-1, select the “Add Ruby executables to your PATH” checkbox; the installer takes care of the rest. You have a fully functioning Ruby installation in minutes.
../images/314622_4_En_2_Chapter/314622_4_En_2_Fig1_HTML.jpg
Figure 2-1

Ruby installer for Windows

When the installer is finished, you can test to see if Ruby is working and that your environment is correctly configured by opening your command prompt and asking Ruby its version number:
> ruby --version
ruby 2.6.5p114 (2019-10-01 revision 67812) [x64-mingw32]

Installing Rails

You’ll be pleased to know that Ruby 2.6 comes bundled with RubyGems, a package management system for Ruby (http://rubygems.org), which makes installing Ruby libraries, utilities, and programs a breeze. This includes Rails installation.

First, let’s update RubyGems and its sources list. Open your command prompt and issue the following gem command:
> gem update –system
Now, to install Rails, issue the following gem command in your command prompt:
> gem install rails -v '~> 6.0.2'

The “-v ‘~> 6.0.2’” part of the command ensures that the most recent version of Rails 6.0 is installed—important for making sure you can follow along with this book. Be forewarned that the gem command can take some time. Don’t be discouraged if it seems to be sitting there doing nothing for a few minutes; it’s probably updating its index file. RubyGems searches for gems in its remote repository (https://rubygems.org), so you need to be connected to the Internet for this command to work.

After spitting out some text to the screen and generally chugging away for a few minutes, the gem program should exit with something like the following before dumping you back at the command prompt:
Successfully installed rails-6.0.2.1

That’s all there is to it! The one-click installer takes care of most of the work by installing and configuring Ruby; and because Rails is distributed as a RubyGem, installing it is a simple one-liner.

You can double-check that Rails was installed successfully by issuing the rails -v command at the command prompt:
> rails -v
Rails 6.0.2.1

Installing SQLite

To install SQLite on Windows, visit the SQLite website (www.sqlite.org/download.html), find the “Precompiled Binaries for Windows” section, and download the two files you’ll need: the “sqlite-tools-*.zip” file and the “sqlite-dll-*.zip” file which matches your system—either the 32-bit (x86) version or the 64-bit (x64) version. (Most relatively modern computers should be x64 instead of x86. If unsure, open the “About your PC” program, and look at “Device specifications ➤ System type.” For Windows versions other than Windows 10, you might need to use your favorite search engine to learn how to determine this). For example, the following is for our x64 system:
Note that the version number may be different by the time you read this. Unzip the zip files, and move their contents to the Ruby bin directory created by the preceding ruby installation step—in our case, C:Ruby26-x64in. When you’re done, you can test that you’ve correctly installed SQLite by issuing the following command from the command prompt:
> sqlite3 --version
3.30.1 2019-10-10 20:19:45 18db032d058f1436ce3dea84081f4ee5a0f2259ad97301d43c426bc7f3df1b0b
Now that you’ve installed SQLite, let’s install its Ruby binding—a Ruby library that allows you to talk with SQLite. To install the SQLite3 Ruby binding, issue the following gem command from the command prompt:
> gem install sqlite3
If everything went well, you should see output that includes something like
Successfully installed sqlite3-1.4.1

Installing Node.js

To install Node.js on Windows, simply visit https://nodejs.org/, and download the installer which is “recommended for most users.” (At the time of this writing, that’s version 12.13.1 LTS.) Run the installer, accepting most of the defaults, but be sure to check “Automatically install the necessary tools” to avoid more manual steps. Follow the remaining steps to complete installation of Node.js.

To verify Node.js installation succeeded, open a new command prompt and issue the following command:
> node --version
If everything went well, you should see output that includes something like
v12.13.1

Installing Yarn

To install Yarn on Windows, simply visit https://yarnpkg.com/, click “Install Yarn,” and download the installer for the current stable version for Windows. (At the time of this writing, that’s version 1.19.2.) Run the installer, accepting the defaults, and complete the installation.

To verify Yarn installation succeeded, open a new command prompt and issue the following command:
> yarn --version
If everything went well, you should see output that includes something like
1.19.2

With Ruby, Rails, SQLite, Node.js, and Yarn happily installed, it’s time to take them for a test drive. Unless you feel like reading the installation instructions for Linux, you’re free to skip ahead to the “Creating Your First Rails Application” section.

Installing on Linux

Linux (and UNIX-based systems in general) comes in a variety of different flavors, but they share a lot in common. These instructions use a Debian-based variant called Ubuntu Linux, but they should apply to most UNIX systems with varying mileages.

Note

Ubuntu Linux is a top-notch distribution that has rapidly gained mindshare in the Linux community. At the time of this writing, it’s one of the most popular Linux distributions for general use and is largely responsible for the increased viability of Linux as a desktop platform. It’s freely available from http://ubuntu.org and highly recommended.

Just about all Linux distributions (including Ubuntu) ship with a package manager. Whether you’re installing programs or code libraries, they usually have dependencies; a single program may depend on dozens of other programs in order to run properly, which can be a struggle to deal with yourself. A package manager takes care of these tasks for you, so you can focus on better things.

Ubuntu Linux includes the Debian package manager apt, which is what the examples in this book use. If you’re using a different distribution, you likely have a different package manager, but the steps should be reasonably similar.

Before you begin installing Ruby, Rails, SQLite, Node.js, and Yarn, update the package library using the apt-get update command :
$ sudo apt-get update

The apt-get program keeps a cached index of all the programs and their versions in the repository for faster searching. Running the update command ensures that this list is up to date, so you get the most recent versions of the software you need.

Installing Ruby

Before you install Ruby, you need to install a few libraries required by the components you’re installing. Enter the following command:
$ sudo apt-get install build-essential curl git
You’re going to use the Ruby Version Manager to let Ruby install it for you. This makes everything a snap! First, install the GPG keys for RVM (as found on https://rvm.io/rvm/install):
$ gpg --keyserver hkp://pool.sks-keyservers.net --recv-keys
 409B6B1796C275462A1703113804BB82D39DC0E3
 7D2BAF1CF37B13E2069D6956105BD0E739499BDB
Next, run the command to install RVM.
$ curl -sSL https://get.rvm.io | bash -s stable --ruby
Note

If using Gnome Terminal, you’ll need to enable its “Run command as a login shell” option for RVM to work. Go to its Preferences ➤ Profile ➤ Command, and enable that option. Then close and reopen the terminal.

You can test that this is working by asking Ruby for its version number:
$ ruby --version
ruby 2.6.3p62 (2019-04-16 revision 67580) [x86_64-linux]

Installing Rails

Now you can use RubyGems to install Rails. Enter this command:
$ gem install rails -v '~> 6.0.2'
The “-v ‘~> 6.0.2’” part of the command ensures that the most recent version of Rails 6.0 is installed—important for making sure you can follow along with this book. After spitting out some text to the screen and generally chugging away for a little while, the gem program should exit, with a message like the following somewhere in the output:
Successfully installed rails-6.0.2.1
You can verify this claim by asking Rails for its version number:
$ rails --version
Rails 6.0.2.1

With Ruby and Rails happily installed, you’re ready to move on to the next step: installing SQLite.

Installing SQLite

To install SQLite with apt-get, issue the following command:
$ sudo apt-get install sqlite3 libsqlite3-dev
If all goes according to plan, you can test your SQLite3 installation by invoking the sqlite3 program and asking for its version number:
$ sqlite3 --version
3.29.0 2019-07-10 17:32:03
Now that you’ve installed SQLite, let’s install its Ruby binding—a Ruby library that allows you to talk with SQLite. To install the SQLite3 Ruby binding, issue the following gem command from the command prompt:
$ gem install sqlite3

Installing Node.js

To install Node.js, use the command line:
> curl -sL https://deb.nodesource.com/setup_12.x | sudo -E bash -
> sudo apt-get install -y nodejs
To verify Node.js installation succeeded, issue the following command:
> node --version
If everything went well, you should see output that includes something like
v12.13.0

Installing Yarn

To install Yarn, we’ll use npm, the Node.js package manager, which was installed for you when you installed Node.js:
> sudo npm install -g yarn
To verify Yarn installation succeeded, issue the following command:
> yarn --version
If everything went well, you should see output that includes something like
1.21.1

With Ruby, Rails, SQLite, Node.js, and Yarn happily installed, it’s time to take them for a test drive.

Creating Your First Rails Application

You’ll start by using the rails command to create a new Rails project. Go to the directory where you want your Rails application to be placed; the rails command takes the name of the project you want to create as an argument and creates a Rails skeleton in a new directory by the same name. The newly created directory contains a set of files that Rails generates for you to bootstrap your application. To demonstrate, create a new project called (what else?) hello:
$ rails new hello
      create
      create  README.md
      create  Rakefile
      create  .ruby-version
      create  config.ru
      create  .gitignore
      create  Gemfile
...
      create  app
      create  app/controllers/application_controller.rb
      create  app/helpers/application_helper.rb
...
      create app/models/application_record.rb
...
      create  app/views/layouts/application.html.erb
...

If you look closely at the output, you see that the subdirectories of app/ are named after the MVC pattern introduced in Chapter 1. You also see a name that was mentioned briefly in Chapter 1: helpers. Helpers help bridge the gap between controllers and views; Chapter 7 will explain more about them.

Rails generated a new directory called hello. If you look at the folder structure, you’ll see the following:

app/

db/

node_modules/

README.md

yarn.lock

babel.config.js

Gemfile

package.json

storage/


bin/

Gemfile.lock

postcss.config.js

test/


config/

lib/

public/

tmp/


config.ru

log/

Rakefile

vendor/


Starting the Built-In Web Server

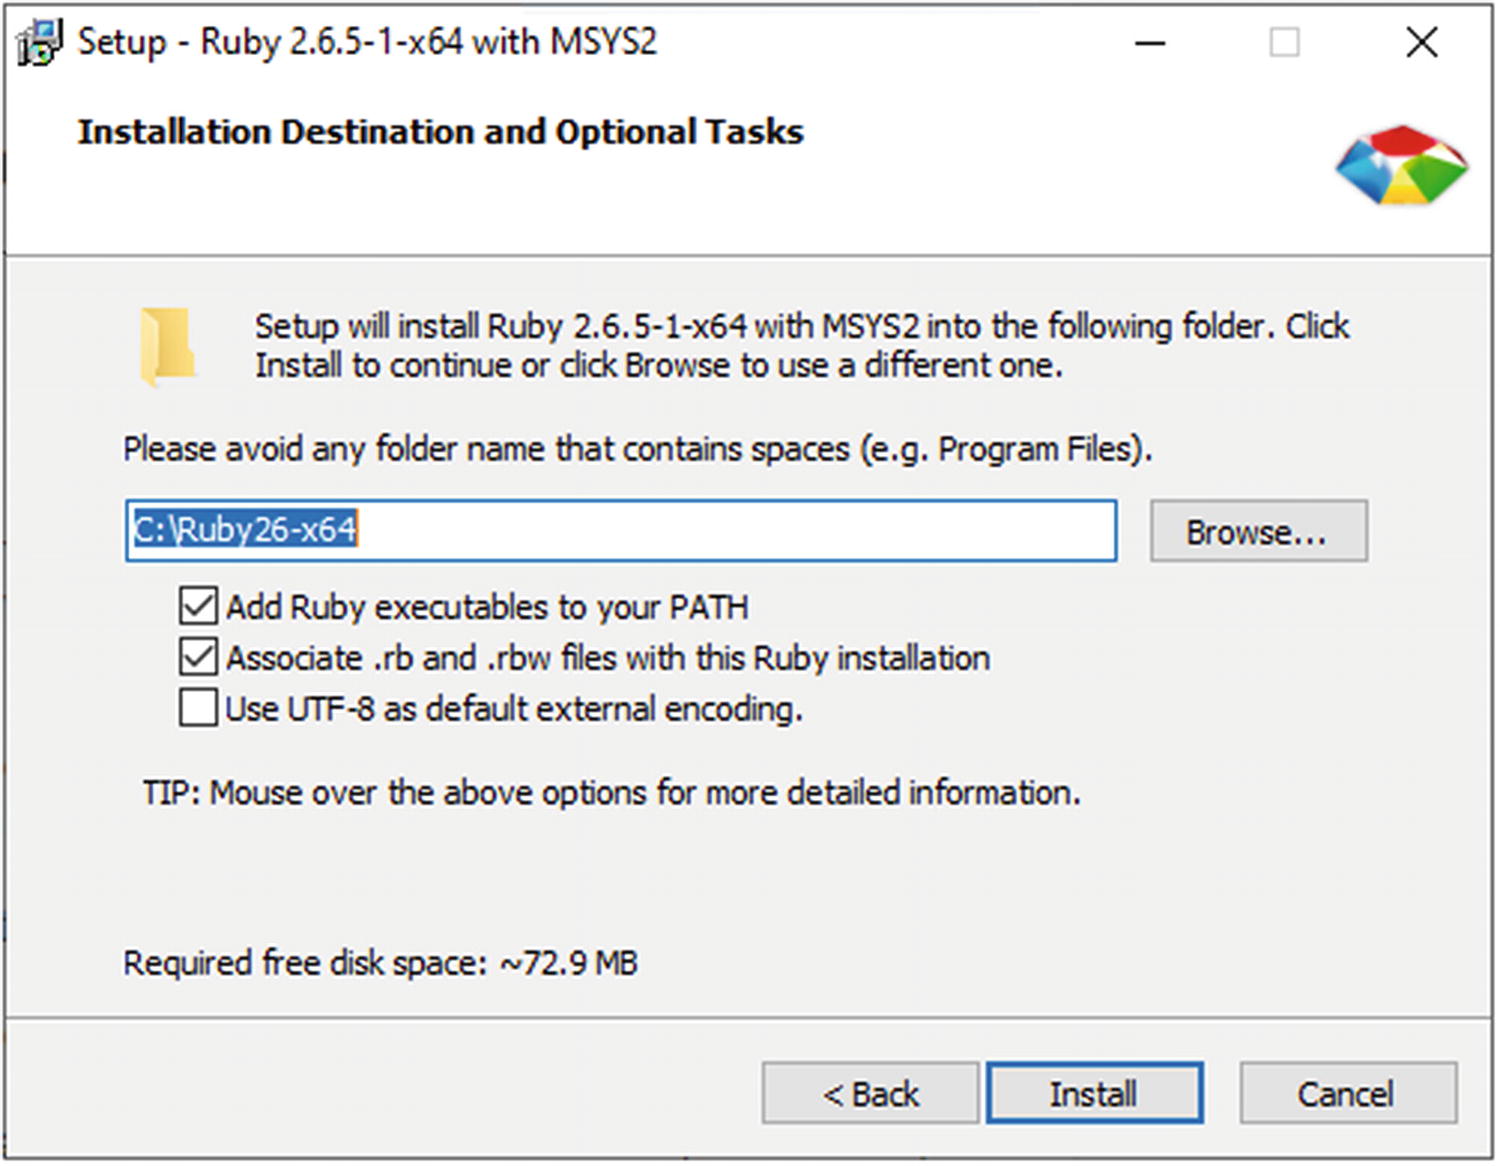
Next, let’s start up a local web server so you can test your new project in the browser. True, you haven’t written any code yet, but Rails has a nice welcome screen that you can use to test whether the project is set up correctly. It even gives you some information about your Ruby environment.

Ruby ships with a built-in, zero-configuration, pure Ruby web server that makes running your application in development mode incredibly easy. You start up the built-in web server using the rails server command. To start the server now, make sure you’re inside the directory of your Rails application, and then enter the following command:
$ cd hello
$ rails server
=> Booting Puma
=> Rails 6.0.2 application starting in development
=> Run `rails server --help` for more startup options
Puma starting in single mode...
* Version 4.3.1 (ruby 2.6.3-p62), codename: Mysterious Traveller
* Min threads: 5, max threads: 5
* Environment: development
* Listening on tcp://127.0.0.1:3000
* Listening on tcp://[::1]:3000
Use Ctrl-C to stop

The message from the rails server command tells you that a web server is running at the IP address 127.0.0.1 on port 3000. That means that the server is running locally on your machine. The hostname localhost also resolves to your local machine and is thus interchangeable with the IP address. We prefer to use the hostname variant.

With the server running, if you open http://localhost:3000/ in your browser, you’ll see the Rails welcome page, as shown in Figure 2-2. Congratulations! You’ve put Ruby on Rails.
../images/314622_4_En_2_Chapter/314622_4_En_2_Fig2_HTML.jpg
Figure 2-2

Rails welcome page

The welcome page is nice, but it doesn’t teach you much. The first step in learning how Rails works is to generate something dynamic. You’re about to learn why you called this project “hello”!

We’re sure it would be in violation of the law of programming books if we didn’t start with the ubiquitous “Hello World” example. And who are we to disobey? In the next few steps, you make your Rails application say hello; and in doing so, you learn a few new concepts. Your goal is to have a request with the URL http://localhost:3000/salutation/hello respond with a friendly “Hello World!” message.

First things first: Stop the web server by pressing Ctrl+C in the command prompt window. That should bring you back to your prompt.

Note

Notice how easy it is to start and stop a local server? That’s the whole point of the built-in server in a nutshell. You shouldn’t need to be a system administrator to develop a Rails application.

Generating a Controller

You use the rails command’s generate option to create certain files within your project. Because you’re dealing with the request and response cycle (you request a URL, and the browser receives a response), you generate a controller that is responsible for handling salutations:
$ rails generate controller salutation
      create  app/controllers/salutation_controller.rb
      invoke  erb
      create    app/views/salutation
      invoke  test_unit
      create    test/controllers/salutation_controller_test.rb
      invoke  helper
      create    app/helpers/salutation_helper.rb
      invoke    test_unit
      invoke  assets
      invoke    scss
      create      app/assets/stylesheets/salutation.scss

Not unlike the rails command you used to generate your application, the rails generate controller command creates a bunch of new files. These are mostly empty, containing only skeletal code (often called stubs). You could easily create these files on your own. The generator merely saves you time and the effort of needing to remember which files to create and where to put them.

The salutation controller was created in the app/controllers directory and is sensibly named salutation_controller.rb. If you open it with a text editor, you see that there’s not much to it, as shown in Listing 2-1.
class SalutationController < ApplicationController
end
Listing 2-1

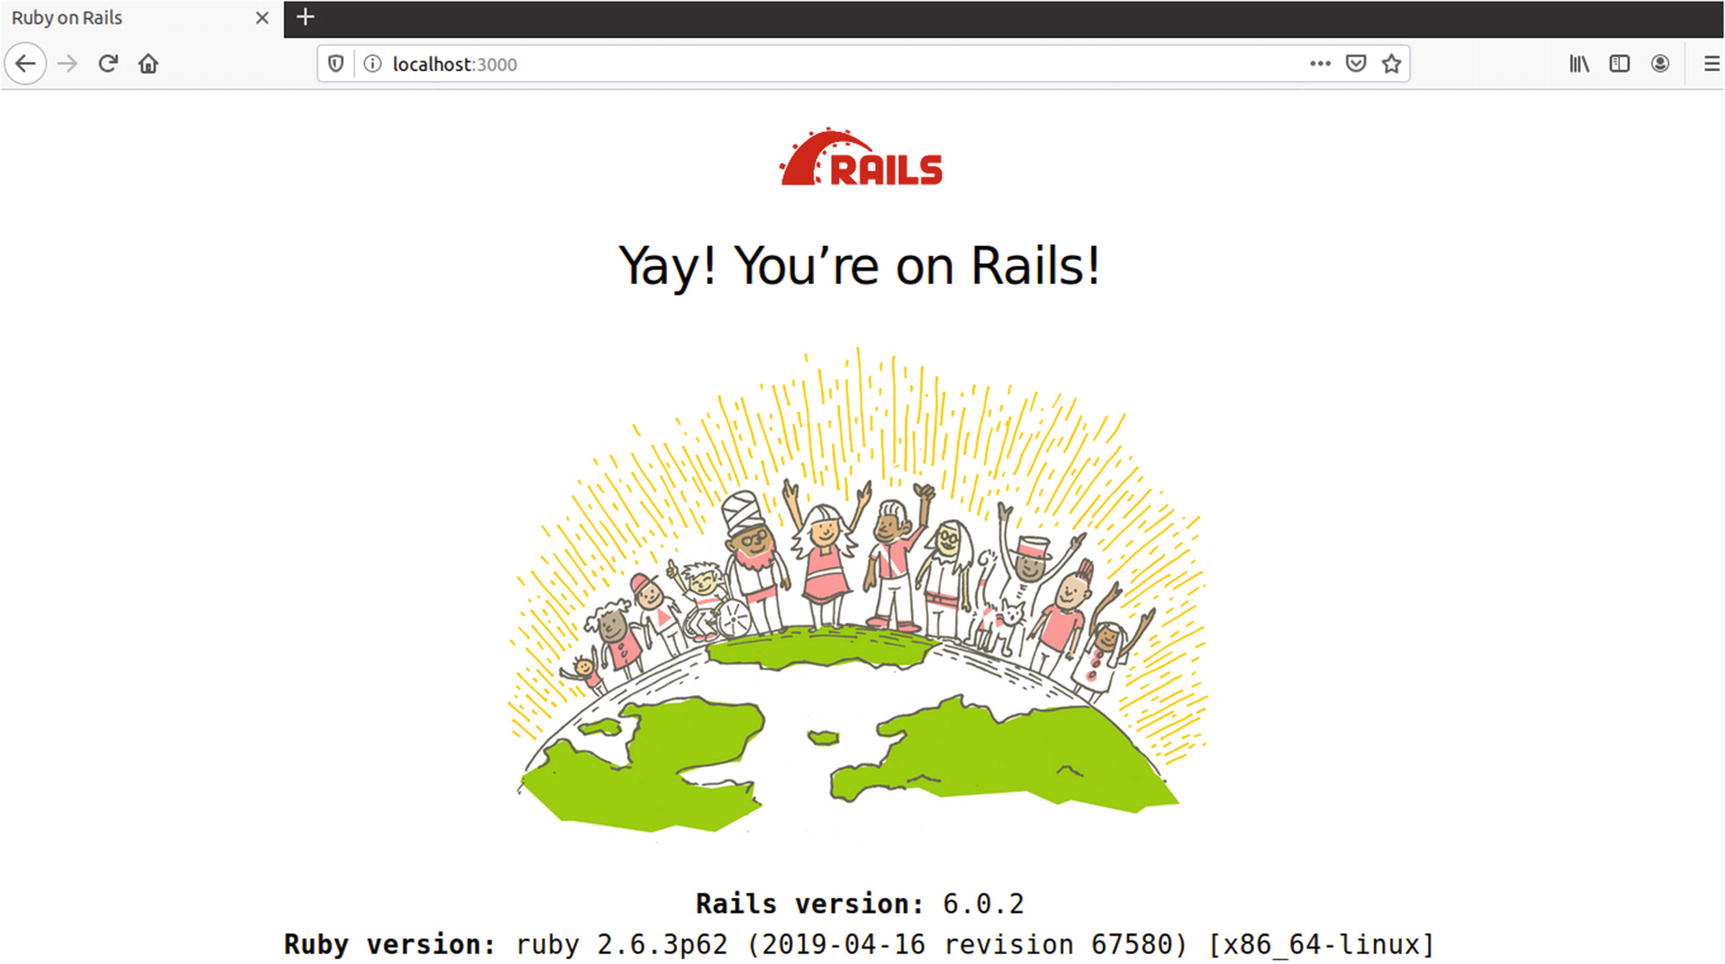
The app/controllers/salutation_controller.rb File

Creating an Action

If you want SalutationController to respond to a request for hello, you need to make an action for it. Open salutation_controller.rb in your text editor and add the hello action, as shown in Listing 2-2.
class SalutationController < ApplicationController
  def hello
    @message = 'Hello World!'
  end
end
Listing 2-2

The Updated app/controllers/salutation_controller.rb File: http://gist.github.com/319866

Actions are implemented as Ruby methods. You can always tell a method definition because of the def keyword. Inside the action, you set a Ruby instance variable called @message, the value of which you output to the browser.

Creating a Template

With your action successfully defined, your next move is to add some HTML into the mix. Rails makes it easy by separating the files that contain HTML into their own directory as per the MVC pattern. In case you haven’t guessed, HTML is the responsibility of the view.

If you look in the app/views directory, you see another product of the controller generator: a directory called salutation. It’s linked to the salutation controller, and it’s where you put template files that correspond to your salutation actions.

Note

Because Rails allows you to embed Ruby code in your HTML by using the ERb templating library, you use the .html.erb (HTML + ERb) extension for your templates.

The default way to render a template in response to a request for an action is remarkably simple: name it the same as the action. This is another case of using a predefined Rails convention. Because you want to show a response to the hello action, name your file hello.html.erb, and Rails renders it automatically. This is easy to grasp in practice. Figure 2-3 gives a visual cue as to how controllers and templates correspond.
../images/314622_4_En_2_Chapter/314622_4_En_2_Fig3_HTML.jpg
Figure 2-3

Controllers correspond to a directory in app/views

Start by creating a new, blank file in app/views/salutation/. Name it hello.html.erb, and add the code shown in Listing 2-3. Notice the <%= %> syntax that surrounds the @message variable: these are known as Embedded Ruby (ERb) output tags. Chapter 7 explains more about ERb. For now, it’s only important to know that whenever you see <%= %> in a template, whatever is between the tags is evaluated as Ruby, and the result is printed out.
<h1><%= @message %></h1>
Listing 2-3

The app/views/salutation/hello.html.erb File: https://gist.github.com/nicedawg/0a45eae95abb3ff0e7993b9fd2120d59

If familiar with HTML, you may be wondering why we don’t need to include tags like <html> or <body> in our view! By default, our views will be wrapped inside of the code found in app/views/layouts/application.html.erb, which contains the <html> and <body> tags, as well as other HTML which we want to include in most of our pages.
You now have to tell your Rails application how to respond to a URL. You do that by updating the config/routes.rb file. You don’t need to worry about the details of how the routes file works for now, Chapter 7 will cover that. Replace the contents of your config/routes.rb file and make sure it looks like Listing 2-4.
Rails.application.routes.draw do
  get 'salutation/hello'
end
It looks like you’re all set. The salutation controller fields the request for hello and automatically renders the hello.html.erb template. Start up the web server again using the rails server command, and request the URL http://localhost:3000/salutation/hello in your browser. You should see the result shown in Figure 2-4.
../images/314622_4_En_2_Chapter/314622_4_En_2_Fig4_HTML.jpg
Figure 2-4

The “Hello World” application

Sure enough, there’s your greeting! The hello template reads the @message variable that you set in the controller and, with a little help from ERb, printed it out to the screen.

In case you didn’t notice, the URL http://localhost:3000/salutation/hello maps directly to the controller and action you created because of the change you made to your config/routes.rb file. Rails saw your “salutation/hello” route and figured out it should execute the “hello” action in your SalutationController. By following Rails naming conventions like this, you can avoid a lot of extra configuration code!

Summary

This chapter covered a lot, so you should be proud of yourself. You went from not having Rails installed to getting a basic Rails application up and running. You learned how to install Ruby and how to manage packages with RubyGems (which you used to install Rails). You also learned how to create a new Rails project using the rails command and how to use the generator to create a new controller. And you learned how controller actions correspond to templates. The stage is now set for the next chapter, where you begin building a more full-featured project.

..................Content has been hidden....................

You can't read the all page of ebook, please click here login for view all page.
Reset
3.15.6.77