Introduction
The backbone of web development has been—and still is—the traditional request cycle; the client makes an HTTP request, and the server handles the request by performing some action and returning an HTTP response. In the context of a browser-based application, a human being is usually the initiator of this cycle, by clicking a link or submitting a form, for example.
Over time, though, web applications themselves have sought to be the initiator. For example, web-based email clients have an arguably richer UI when new mail shows up automatically, not just when the user refreshes the page. Imagine how frustrating it would be to use a web-based instant messaging service where you only see new messages when you reload the page.
Web developers have often met the demands of these richer UI needs through polling—periodically making Ajax requests to check if any new data might warrant action. For example, that web-based email client might have some JavaScript that calls an API endpoint to check for new mail. This strategy has helped build multimillion-dollar software projects and has worked amazingly well, but it does have some problems of its own; for example, the overhead of repeatedly checking for new information (when quite likely there is none) can become a critical performance issue for the server and even sometimes the client.
WebSockets solved that problem with the wide adoption of the WebSocket API by most commonly used browsers. Instead of browsers needing to constantly poll the server for new data, browsers can establish—and keep open—a connection through which either side can send messages. For example, that web-based email client doesn’t have to keep checking for new mail; the page can just sit there, and the server will tell it when it has new mail! This strategy can be much more efficient, making your users happier and hopefully reducing server costs too.
Rails developers have already been using WebSockets in their applications by using gems such as faye-websocket, websocket-rails, and others. However, Rails 5 introduced an integrated approach with Action Cable.
In this chapter, we’ll first try to get our mental model straight; Action Cable introduces a few new concepts that can be tricky to keep straight, so we’ll do our best to firm up our understanding before moving on. Then, we’ll briefly discuss the configuration of Action Cable and then get to work applying Action Cable to our blog application; we’ll add an impressive but simple feature—in-page notifications when a new article is posted.
Concepts
Action Cable introduces a lot of new terminology into Rails—connections, channels, streams, broadcasting, subscriptions, and more. It’s worth our time to get familiar with these terms before moving on; otherwise, it will be easy to get confused when diving into the code.
To aid our understanding of these concepts, we’ll use Cable TV as an analogy. Analogies are by nature somewhat flawed, and this author doesn’t actually know how Cable TV really works, but this analogy may help nonetheless.
The base of the Action Cable stack is the connection, represented by ActionCable::Connection . This connection represents an actual WebSocket connection. A user of your application will usually have, at most, one connection per browser window (or tab). The connection typically doesn’t care what type of data it might send or receive; it’s simply an established method of communication. In our Cable TV analogy, we can think of the physical connection of the cable to our TVs. Each TV must be connected to the cable provider in order to watch Cable TV.
The next layer of the Action Cable stack is the channel, represented by ActionCable::Channel. A channel is a logical (as opposed to physical) division within a connection. Channels are often organized according to interests, or purposes. (For instance, our blog app might have an ArticlesChannel, a CommentsChannel, and a UsersChannel.) Communications sent through these channels all take place within the same connection, but they’re separated by naming conventions. Back to our analogy, we can watch many channels over a single connection. (Thankfully, we don’t need a separate connection for each channel!)
Another important Action Cable term is streams. Streams are yet another logical division within channels. For example, an ArticlesChannel may have a stream named “articles:42”, which handles sending and receiving data specifically regarding the article with id 42. Our Cable TV analogy begins to break down a bit, but perhaps this is similar to the way that some TV channels have specific “sub-channels” for viewers in different time zones.
Another important Action Cable concept is subscriptions . Users can only send and receive data over channels to which they have subscribed. With Action Cable, this is done by some JavaScript being run by the user’s browser. With Cable TV, this is done by sending your Cable TV provider some money every month. But the idea is the same; you may only stream data from channels to which you’ve subscribed.
One last Action Cable concept we’ll mention is broadcasting . With Action Cable, a broadcast is when the server sends data to a channel’s stream so that any listening subscribers can receive it. Thinking about Cable TV, this makes a lot of sense. Cable TV channels don’t keep a list of TVs to which they need to send their streaming content; they simply broadcast it, and only subscribers who are tuned in at that moment will be able to receive that data. (Of course, on-demand video and DVRs complicate the analogy.)
Hopefully, taking the time to describe these concepts and making a naive analogy to Cable TV was helpful. One wonders if the Rails developers had Cable TV in mind when developing Action Cable; the naming of its various components seems to beg the analogy. Whether they did or not, it does demonstrate the power of analogies and thoughtful class names when developing; whenever we can, we should strive for our classes and concepts to have names that paint vivid pictures of what they do in a broad sense and how they relate to other components of the system in which they live.
So how does Action Cable fit in with what we’ve known so far? Does Action Cable replace our traditional request cycle of submitting HTTP requests and receiving HTTP responses?
Rarely in web development would Action Cable replace our HTTP request and response cycle; rather, it works within it. Here’s how:
First, a web page would be requested by a user entering an address in their browser or clicking a link, for example. They make an HTTP request and receive an HTTP response, typically with HTML, JavaScript, and CSS in the response.
Then, while the web page is loaded, perhaps an Action Cable connection would be established, and the browser may subscribe to one or more Action Cable channels. This connection would stay open, with both the client and server waiting for any messages sent through these channels.
Perhaps some data would be broadcasted through streams in those channels from the server to the browser; the browser may then execute some JavaScript in response to the data received and update the UI or even request a new web page.
Or perhaps the user will initiate some action that causes data to be streamed from the client to the server through a channel, and the server may decide to execute some Ruby code in response to the data received.
While this introduction was rather dense, hopefully taking the time to build a mental model of Action Cable was worth the effort. Now that we understand the purpose Action Cable serves, let’s take a quick look at how to configure it before we dive into using it in our application.
Configuration
Common Action Cable Configuration Options
Option | Description |
|---|---|
adapter | Specifies which type of message queue service to use, which handles the data sent between server and client. Acceptable values are :async, :redis, and :postgres. :async is suitable for development but not production. :postgres and :redis are more robust options for production, but require additional configuration and running services. These values are conventionally set in config/cable.yml and allow environment-specific settings, similar to config/database.yml |
allowed_request_origins | Specifies which origins are allowed to make requests of your Action Cable server. In development, this is set by default to allow requests from localhost. In a production environment, you most likely want this set to the domain of your web application. You may choose to disable this whitelist of allowed origins by setting action_cable.disable_request_forgery_protection = true, but this could be a security risk and should be chosen carefully. |
worker_pool_size | For performance, to avoid running Action Cable logic in the main server thread, Action Cable creates a number of threads dedicated for its own use. With this setting, you can configure how many threads to use. More isn't always better; finding the right size can require careful analysis. |
mount_path | By default, Action Cable request URLs are constructed with a base of “/cable”. This setting allows a custom base path for Action Cable URLs. |
Application
Time to put our knowledge to use! For the sake of illustration (and for having a super-fancy blog), we’ll add a cool new feature—“new article notifications”—so that visitors who are currently viewing the site will see an alert pop-up on the page they’re currently viewing to inform them of a new article that was posted while they were reading.
To add this new feature, we’ll need to add some functionality to both the server side of our application and the client side.
On the server side, we’ll create an ArticlesChannel, meant to be used for various Action Cable communications relating to articles. We’ll then modify our Article model to broadcast a message over a stream in that channel when a new article has been published.
On the client side, we’ll add some JavaScript to automatically subscribe visitors to that channel and to react to data received over that stream, so that when the server sends the “New Article” message, their browser can do the work to display the notification in “real time.”
Server-Side Changes
ApplicationCable::Connection
ApplicationCable::Connection in app/channels/application_cable/connection.rbhttps://gist.github.com/nicedawg/f986c253814b6eda79989f8c83c9b27f
Similar to other Rails components we’ve seen, Action Cable provides a base class in our app, which inherits from the library’s base class. This gives us a convenient place to override any functionality at this layer of the stack. A frequent use case would be to add an identifier here, as shown in https://guides.rubyonrails.org/action_cable_overview.html#connection-setup. For instance, we may want to only allow Action Cable connections to be established by logged-in users or users with certain privileges. This isn’t the case in our blog—most of our users will not be logged in, but just know that this is possible.
ApplicationCable::Channel
ApplicationCable::Channel in app/channels/application_cable/channel.rbhttps://gist.github.com/nicedawg/4a0ceb9894c3f84026a0d01c2554c8a2
Similar to ApplicationCable::Connection, ApplicationCable::Channel starts out as a class which simply inherits from ActionCable::Channel::Base, but provides a place for us to add functionality which could apply to any Channel classes we add to our app.
ArticlesChannel
Now that we’ve got the lay of the land, let’s get to work! You may remember from the “Concepts” section that Action Cable channels are similar to Action Pack controllers in some regards. Channels should be organized into logical units; since we’re adding the ability to push notifications from the server to the client when a new article is published, it makes sense to create an ArticlesChannel.
ArticlesChannel in app/channels/articles_channel.rbhttps://gist.github.com/nicedawg/35ad4063d663aaa3c871f5f2da38ddda
First, notice that our ArticlesChannel class inherits from ApplicationCable::Channel. This endows our ArticlesChannel class with the functionality it needs so it can behave like an Action Cable channel.
Next, we implemented the subscribed method. This method is called whenever a client subscribes to the ArticlesChannel. When a client subscribes to our ArticlesChannel, we connect them with a stream within this channel called “articles:new”. The name of this stream isn’t significant; we didn’t have to use a semicolon, nor is there any magical convention. However, we should name our streams in a way that clearly indicates the stream’s purpose for our own sanity.
Finally, on the server side, we need to broadcast data to this channel’s stream we just created when appropriate. For this feature, we want to broadcast to this stream whenever an article has been published. Sounds simple enough, but we must remember that an article can be created and published at the same time or an article could be created as a draft article but not yet published or a published article could also be updated. Since we want to be careful not to send notifications for unpublished articles or notifications for articles which were already published, we have to think carefully about how we’ll do this. We want to broadcast a notification whenever an article is saved (whether created or updated), but only if it went from not being published to being published.
Broadcasting “New Article” Message When an Article Is Publishedhttps://gist.github.com/nicedawg/f46dfa59f351a012d26d47f71c42d86a
First, we added an after_save callback. Then, in our new broadcast_new_article method, we broadcast the data about the recently saved article only if it is currently published and if the recent save changed the value of published_at.
The saved_change_to_published_at? method warrants discussion. In the previous chapter, we discussed various methods which the ActiveModel::Dirty module adds to our Active Model (and therefore Active Record)–based classes. Sometimes we want to know if an attribute’s value will change. However, in this context, we want to know if it did change after a successful save. ActiveModel::Dirty doesn’t know anything about persisting data to the database, so it can’t help us there. But Active Record adds a method to each of our persisted attributes in the form of saved_change_to_{attr}?. So we made use of that helpful method to only send the broadcast when we want to.
Then we used ActionCable.server.broadcast to send some data through the “articles:new” stream. The first argument is the name of the stream we wish to broadcast on. (This matches the name we used in the ArticlesChannel.) The remaining arguments are the data we wish to broadcast, which could be anything we want! We decided to pass an argument called “new_article,” which will contain the HTML we want to send to the client to display. In order to construct that HTML, we called ArticlesController.render with a partial which we haven’t yet defined and passed a local variable “article” with the value of “self,” which is the Article object which was just saved.
Note that we didn’t have to broadcast HTML to the stream; we could have sent the individual attributes of the article which we need for the notification as a hash, and the client side would receive that hash in JSON form and could have constructed the HTML to show the notification. Either approach is fine, but for our purposes, sending HTML is easier.
Partial View Template for New Article Notificationshttps://gist.github.com/nicedawg/170ebe6de3d4b14fcfdffa7129008713
Simple enough! We don’t need to show a lot of content in our notification. We decided, however, to give the outer container of this markup an id so we can reference it in the client-side code.
We’ve finished building the server-side portions of our feature; now, when an article is published, an HTML representation of a notification is broadcasted with Action Cable. However, at this point, we’re only sending the data. Let’s move on to the client-side changes so that browsers can receive the data and display the notification.
Client-Side Changes
First, we’ll add some JavaScript to subscribe to the channel we created, so that we can receive and display notifications when an article is published.
Subscribing to the “New Article” Streamhttps://gist.github.com/nicedawg/1bed41f4adc3bc30099180e4e00db653
First, we import consumer into our JavaScript. We didn’t create this file; rather, Rails supplied it for us. This import gives us a consumer object we can use to create subscriptions to the channels which Action Cable serves. Using our Cable TV analogy from earlier, a consumer can be thought of as a Cable TV subscriber. They only need one connection, but can choose to subscribe to zero or more channels.
Next, we used consumer.subscriptions.create to subscribe to the ArticlesChannel we created earlier. The second argument to the create function call is a Javascript object with a couple of functions we defined.
The first function, received, is a function which we must implement if we wish to act on broadcasted data received from the channel we subscribed to. The broadcasted data is passed to our received function. In our implementation, we check to see if the broadcasted data includes a new_article property. If it does, then we call another function which we created to handle new article notifications.
The second function, displayNewArticleNotification, is a function we wrote. We could have put all the logic for displaying a new article notification in the received function, but it’s good practice to keep functions small for maintainability when possible. In this function, we insert the HTML for the new article notification (which the server constructed and sent) into the body of the page and then set a timer to automatically remove the notification in 3 seconds.
Styling New Article Notifications in articles.scsshttps://gist.github.com/nicedawg/8dc15f36e36ffc495464b551222d6f27
This isn’t a book about CSS or visual design; there are undoubtedly better ways of styling these notifications. But these styles are good enough for now! We give the notification a background color so it stands out. We restrict the width to 50% so it doesn’t cover the whole screen. We make the notification’s position “fixed” so that it’s positioned relative to the viewport (the portion of the web page the user is viewing). This ensures the notification is always visible, no matter where the user has scrolled. We use top and right to position the notification 10 pixels from the top and right of the viewport, so it’s near (but not butting up against) the top-right corner. We add a little padding to the notification and give it slightly rounded corners for aesthetics. We bump up the z-index a little so that it will display “on top of” any elements it may intersect with and give the notification a little drop shadow to give the appearance of floating above the page.
Try It Out
That’s it! It’s time to try out our “finished” product. We’ll want to use two browser windows to see the full effect. Let’s use one browser window to create a published article and a second browser window to observe our notification.
So in your first browser window, go ahead and pull up the “New Article” form, but don’t submit it yet.
Then, in your second window, go to the home page, or view an article show page; it doesn’t really matter which page of our blog your second window is viewing.
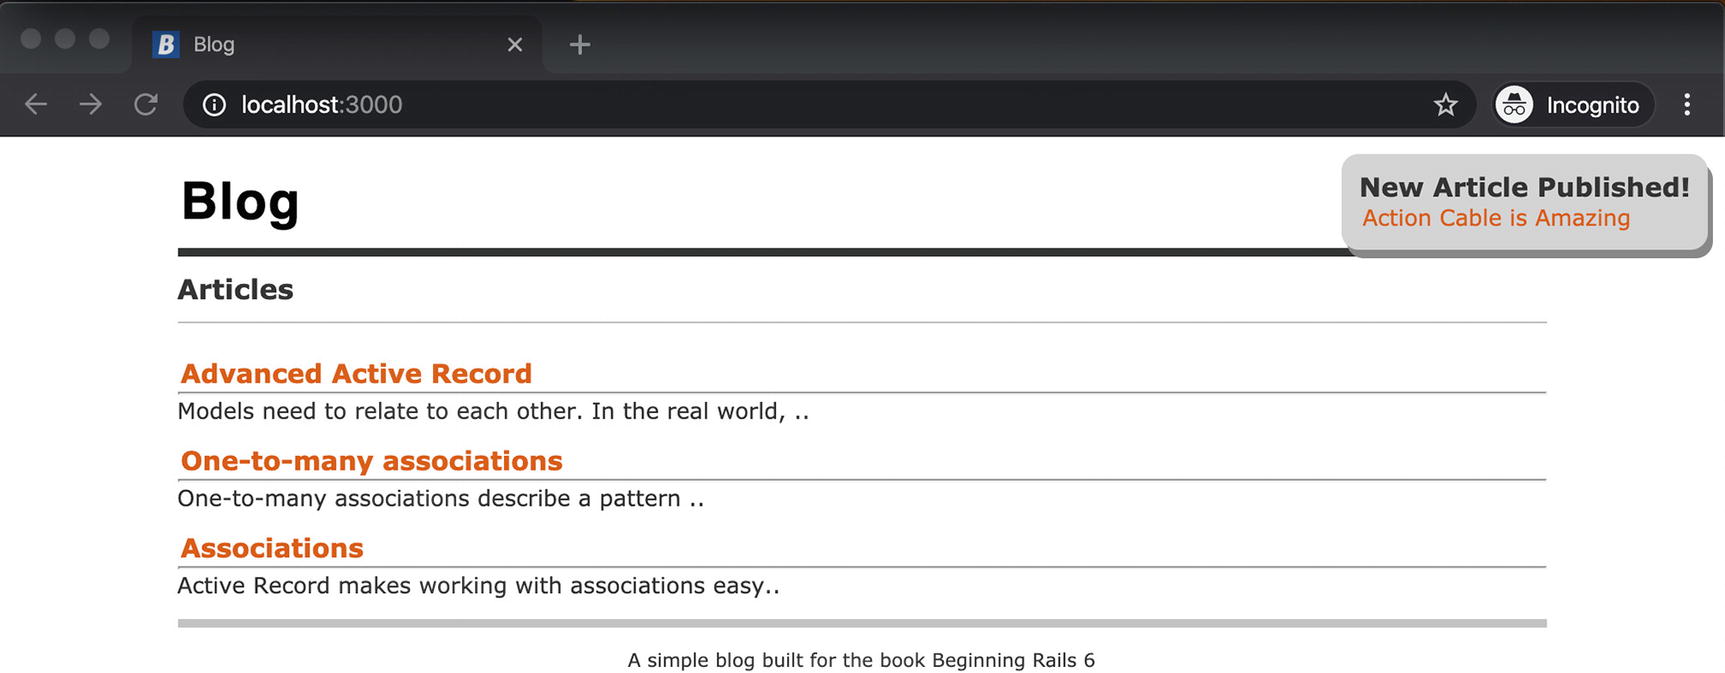
New article notification via Action Cable
Pretty neat! To get here, we did have to talk about a lot of new concepts, but looking back I hope you’ll agree that Action Cable makes it relatively easy to add real-time functionality to your application with WebSockets.
If this didn’t work for you, don’t worry! Take a look at your Rails server output for indications of server-side errors, and look at your browser’s console for indications of client-side errors. Often, there’s an error message that points you straight to the culprit. Sometimes it’s not so easy, so review the previous code listings and make sure your code matches.
Summary
In this chapter, we covered a lot of new ground. We invested the time to understand how WebSockets satisfy a need for efficient bidirectional server communication and how they can lead to richer user experiences. We then learned how Action Cable supplies a framework for working with WebSockets in Rails and how to configure it for production use. Then, we dove in and added a cool new feature to our blog with the power of Action Cable.
We only scratched the surface of Action Cable; for more information, a good place to start is the Rails guide, at https://guides.rubyonrails.org/action_cable_overview.html.
What’s next? As our blog application has grown in complexity through the chapters, it has become more fragile; making a change in one area of our app may have unintended consequences in other areas of our app. One way to guard against this is to have a robust automated test suite, so that your code will tell you there’s a problem before your users do. In the next chapter, we will dip our toes into the deep topic of testing your Rails application.