
WHAT YOU WILL LEARN IN THIS CHAPTER:
As the amount of paper and digital information continues to increase within our organizations, the effective retention, organization, and disposal of this information becomes more and more critical. Records management is becoming a larger area of focus for many organizations today. SharePoint Server 2010 provides multiple features to assist organizations with their records management requirements whether they are just getting started or have a highly defined and well-governed records management practice.
Records management is the practice of organizing and maintaining documents within an organization based on a series of predetermined rules. These rules control things such as where files are stored, how long they are retained, how they should be disposed of, and who is responsible for these files. An organization may practice records management for either operational or regulatory purposes. This chapter will provide you with a greater insight into the activities that are related to implementing a records management solution within your organization.
If you are new to records management, you may be wondering about how you should approach the establishment of a records management practice or solution for your organization. It is important to be specific to your organization's needs when devising a plan. While some fundamental elements are consistent across most organizations, records management is not a one-size-fits-all concept. Following is a high-level listing of the key elements of a records management solution.
It is important to clearly identify the key roles and responsibilities related to your records management implementation. Typically, this will include records administrators who are the key managers and enforcers of your records management strategy. Members of this group are closely familiar with the rules and regulations within your organization related to records declaration, retention, and disposal. They are responsible for managing and maintaining the file and classification plan as well as ensuring that these items evolve as the organization changes and develops. These members must have the buy-in and support of the organization's decision makers in order to define, implement, and govern the policies appropriately to ensure the successful adoption of the practice.
In addition to the records administrators, it is important to clearly understand and communicate the involvement of standard end users of the system. How should they be involved in the identification and declaration of records? Should they be empowered to classify content and identify the appropriate stage at which a document becomes an official record or should such stages be identified automatically by the system independent of the involvement of the end users of the system? Should end users be allowed to view or edit a document once it has been declared an official record?
Finally, you must consider the involvement of the technical system administrators of your solution in the management and configuration of various technical aspects of the system. What level of access should they be given to the records within the system?
These are questions that you must consider and clearly answer as part of the planning stage of your records management implementation. While some similarities exist across organizations, the answers to the preceding questions should be based on the specific needs of your organization based on its size, the maturity of its information management processes, regulatory or legal requirements, and the complexity of the organization's structure and information.
A core element of every records management solution is the identification, planning, and subsequent creation of a file plan. The file plan typically includes information such as:
The categories of documents that exist within the organization. Examples may include Sales, Marketing, Human Resources, and so forth. Depending on the complexity of the organization, there may be multiple layers of categories and subcategories.
The individuals or groups responsible for the governance of each category of documents.
The types of documents that exist within each category. Examples within the Human Resources category may include Personnel Records, Forms, Policies, and so forth.
The location of the records associated with a specific category. This location may be a library or folder within the solution or it may refer to a physical storage location for paper records.
Details of the regulatory or organizational rules related to how long the records should be stored within the system (retention) or when they should be removed from the system and whether they should be deleted or moved to another location (disposal).
Details related to when an item should be considered a record and any associated restrictions that should be placed on the item at that point. For example, in some organizations, once an item has been declared a record, it should no longer be available for editing or deletion by users of the system. In other organizations, a document is a record as soon as it has been created.
It may seem overwhelming to address these aspects of a records management plan, if you have not yet begun the process. In fact, it does require a significant amount of planning and effort. However, a key strategy to effectively executing the development of your file plan is taking an iterative approach to planning and including key stakeholders within your organization in the process. The file plan is not something that should be created by a single member of a technology team but rather should be a joint effort between the appropriate experts within the business.
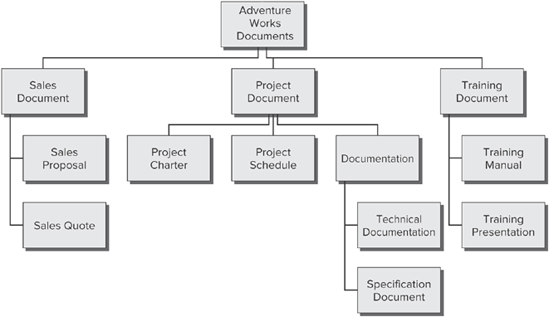
When identifying the categories, subcategories, and associated document types within an organization, it is helpful to create a mind map or hierarchy diagram to assist with the visualization of such information. A sample of how this may look is provided in Figure 14-1.
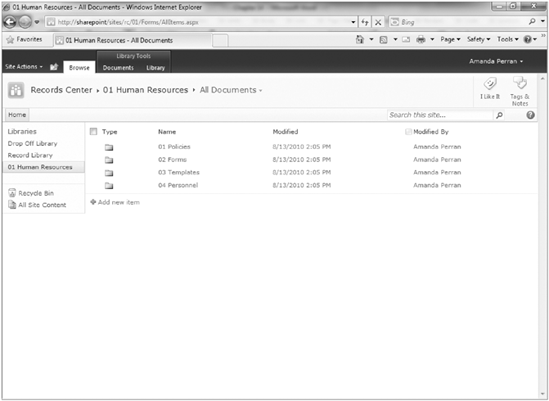
It may take multiple iterations and revisions to get a final listing. Once you have effectively identified all categories and subcategories, you would typically then assign a unique identifier to each and begin planning for the storage location for each. It is important to be flexible enough to accommodate changes over time, while still providing the appropriate level of detail to suit your requirements today. Figure 14-2 is an example of a document library that has been configured to represent a single category of documents with subfolders to represent the associated subcategories.
Once you have identified the various document types within your organization, the next step will be to identify the attributes or metadata that you must track with each of the various documents within that type. This process is once again quite iterative and requires the involvement of key business stakeholders and decision makers to ensure that the appropriate level of detail is captured.
When identifying attributes for your various document types, it is important to approach the process from two angles:
First, you must consider the high-level attributes that must be tracked against every type of document in the organization. This may include properties such as Document ID, Department, or Confidentiality Level.
You must then review each of the various document types to identify the attributes that are specific to that type of information. Once you have completed a review of each individual document type, you should compare and analyze the various attributes to identify those that are common or can be combined for maximum efficiency in maintenance.
It is important when identifying the properties that are required for your records management solution to not over-classify items to the point where tracking the values for properties related to documents becomes tedious for end users. It is important to identify an appropriate balance between the benefit that will be received from tracking certain items with the effort required from content authors to ensure the properties are up to date and accurate.
You may start to recall at this point concepts covered in Chapter 6 of this book, known as Content Types and Site Columns. When we refer to document types, there is an inherent relationship with content types, and when we refer to classification plans and attributes, there is a relationship with site columns. The goal is to define your document types and classification attributes down to a level that will translate into the creation of content types and site columns to support these requirements. Figure 14-3 demonstrates an example of the attributes required for individual document types. This can then become an outline for how your content type must be configured within the solution.
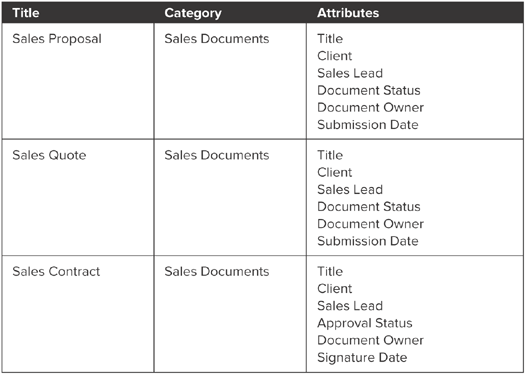
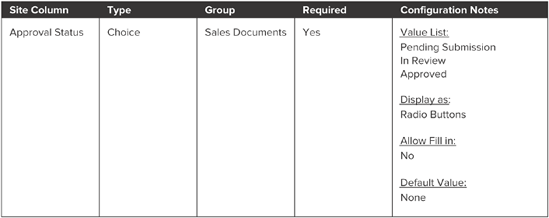
Figure 14-4 demonstrates how each individual attribute can be defined. This can then become an outline for how your site column can be configured within the solution.
SharePoint 2010 offers a new feature known as the Managed Metadata Service and an associated concept known as the Term Store. These new features provide great new functionality related to the creation of structured classification plans in SharePoint.
Using the Managed Metadata Service and Term Store, attributes may be defined once centrally within the entire solution and then reused throughout the organization in multiple site collections. Attributes are defined as term sets. A term set is created either directly within the system through the browser or imported from a file. Several benefits of the term set feature include:
Term sets support the definition of metadata as a hierarchy. This is a major improvement over standard choice columns in SharePoint, which only support one level of information.
Unique users or groups can be defined as Owners of a specific term set and subsequently empowered to manage the values associated with a single term set.
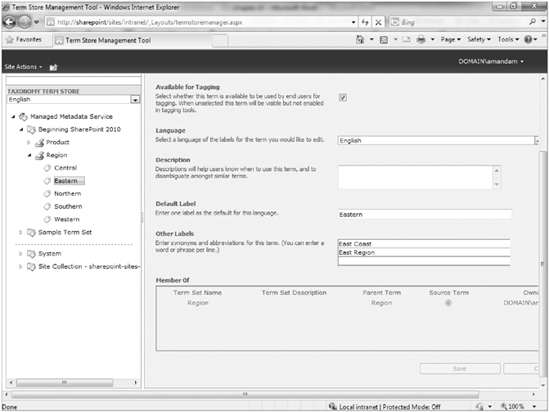
Synonyms can be provided for individual terms. This makes it easier for end users to specify an attribute using their own wording; however, a suggestion will be provided for the appropriate wording. An example of the interface available for defining synonyms is shown in Figure 14-5.
Terms may be added, reorganized, merged, or deprecated over time to address the changing needs of the organization.
Unstructured terms or keywords may be promoted to structured values over time based on their usage within the system.
Term sets are shared across the system and may be used within multiple site collections.
In the next few exercises, you will gain some experience working with the Managed Metadata Service and creating custom term sets within the Term Store. You will start by creating a simple term set directly through the browser. Then you will create a more advanced hierarchy of terms by importing a term set via a custom .csv file. Finally, you will create a site column based on the Managed Metadata Service and point it to your custom term set, which was created in the second example.
Note
In order to complete these exercises, it is assumed that you have been given the appropriate permissions to access the Term Store and Managed Metadata Service. If you cannot access these interfaces, please see your system administrator regarding being given full access to the Term Store via the Managed Metadata Service Application.
You can modify the permissions of the Term Store and Managed Metadata Service by going to the Central Administration site, selecting Application Management, and then Manage Service Applications. Select the Managed Metadata Service Application, and click the Permissions option from the menu.
TRY IT OUT: Create a Term Set Manually
Your organization has decided that a key attribute related to the classification of content is the region it was created in. In this example, you will create a custom term set in the Term Store called "Region."
From the top-level site of your site collection, select Site Settings from the Site Actions menu.
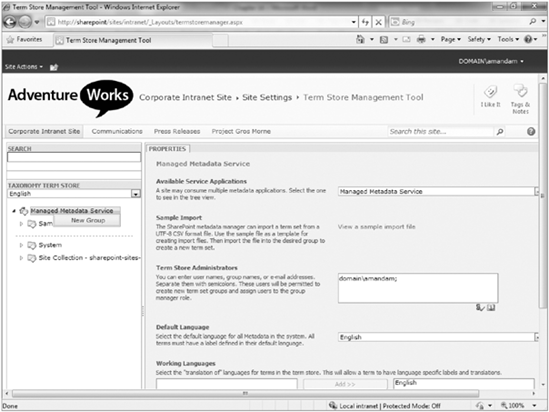
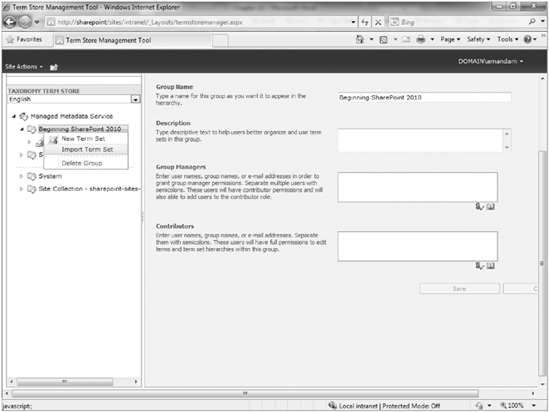
Select Term Store Management from the Site Administration group of links. You will be redirected to the Term Store Management Tool, as shown in Figure 14-6.
Hover over the Managed Metadata Service item in the left-hand panel and select the arrow that appears on the right-hand side to expand the menu, as shown in Figure 14-7.
Create a New Group called Beginning SharePoint 2010.
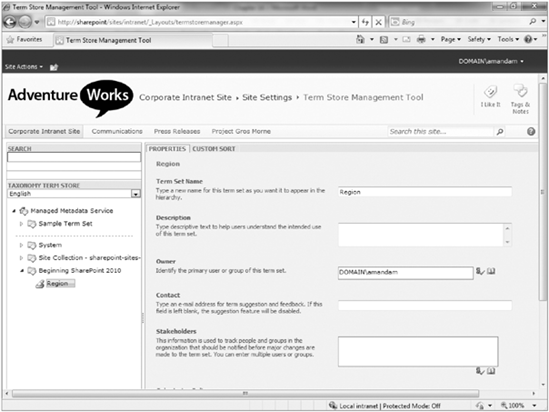
Expand the menu associated with your new group, and select the New Term Set option.
A new branch is added to your hierarchy. Enter Region as the name of your term set. The page will refresh to display the available settings for your term set, as shown in Figure 14-8.
Expand the menu associated with the Region term set, and select the Create Term option.
Enter Eastern as your term.
After you finish typing Eastern, you may hit Enter on your keyboard and a placeholder for a new term will automatically appear in the listing. Or, optionally, you can return to the Region term set and select the Create Term option. Create new terms for the following:
Central
Western
Northern
Southern
Select your Eastern term.
Enter East Region and East Coast as values in the Other labels field.
Click Save. Your term set is now created, and all associated settings have been saved.

How It Works
To start, you created a custom group. Groups can be helpful in organizing your various terms as well as for delegating responsibility over the management of certain terms. Once the group was created, you could have specified details related to the description of the group or identified group managers and contributors. By adding these users, you are empowering them to make changes related to the terms stored within this group.
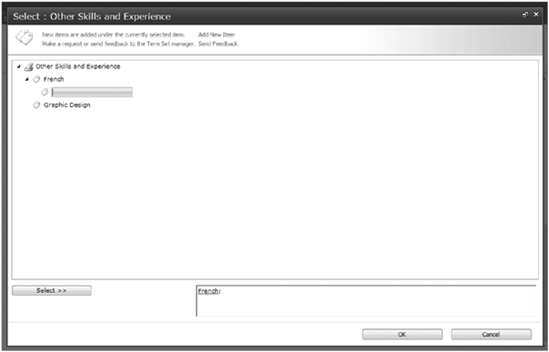
You then created your custom term set for Region. When defining a term set, you have the ability to identify stakeholders that should be notified before changes are made to a term set. You may also specify whether a specific term set is open or closed. If a term set is open, users may add new values to the term set through the managed metadata interface as shown in Figure 14-9. If a term set is closed, then only the values that are entered by the term manager or contributor may be selected.
Finally, before completing the configuration of your term set, you updated the Eastern value with two additional synonyms that may be entered by end users of the system instead of the predefined value.
TRY IT OUT: Create a Term Set Using an Import File
In addition to region, another key attribute related to the classification of content in your organization is product name. Because products are categorized in groups, you will create a term set that utilizes a hierarchy of values. While this hierarchy could be created manually using the steps outlined in the previous Try It Out, you will generate the values by importing a file. This is a more effective method for creating large or complex term sets.
From the top-level site of your site collection, select Site Settings from the Site Actions menu.
Select Term Store Management from the Site Administration group of links.
Expand the menu associated with your Beginning SharePoint 2010 group, and select the Import Term Set option, as shown in Figure 14-10.
The Term Set Import dialog will appear. Browse to the location of this chapter's resource files and select
products.csv.Click OK.
How It Works
Once the file import is complete, your new term set will be created with all associated properties. Depending on the size of your import file, this process may take anywhere from a few seconds to a few minutes. Term sets can support a large number of values and complex hierarchies; however, it is recommended that you not try to exceed more than 5000 values within a single term set. Values higher than this may have an adverse impact on the performance of the system. In fact, from a user experience perspective, it is recommended that you avoid such high numbers, as it will be tedious for the end users to navigate such a large list within the managed metadata selection interface or metadata navigation interface.
TRY IT OUT: Create a Site Column Based on Managed Metadata
In this example, you will create two new site columns based on the custom term sets you defined in the previous two Try It Outs. You will then create a custom content type that utilizes these site columns using the same methods described in Chapter 6.
From the top-level site of your site collection, select Site Settings from the Site Actions menu.
Select Site Columns from the Galleries section of links.
Click Create.
Create a new site column using the following properties:
PROPERTY
VALUE
Column Name
Region
The type of information in this column is:
Managed Metadata
Group (New Group)
Display Value
Display term label in the field
Term Set Values
Use a managed term set (Select the Region Term Set).
Click OK. You will be returned to the Site Column Gallery.
Select Site Columns from the Galleries section of links.
Click Create.
Create a new site column using the following properties:
VALUE
Column Name
Product
The type of information in this column is:
Managed Metadata
Group (New Group)
Display Value
Display the entire path to the term in the field
Term Set Values
Use a managed term set (Select the Product Term Set)
Click OK. You will be returned to the Site Column Gallery.
Select Site Content Types from the Galleries group of links.
Click Create.
Create the content type using the following settings:
PROPERTY
VALUE
Content Type Name
Sales Contract
Select parent content type from:
Document Content Types
Parent content type
Document
Group (New Group)
Click OK. You will be redirected to the administration page for your new content type.
Select the option to add from existing site columns.
Select the Chapter 14 group and add both the Region and Product columns.
Click OK.
How It Works
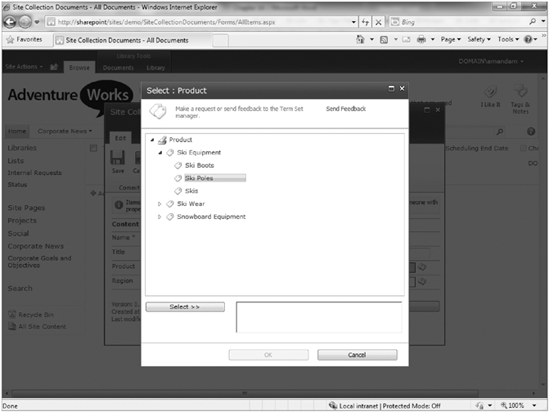
Once your new content type is created, it can be added to document libraries throughout your site collection. Users will be able to specify the metadata when uploading new sales contracts using the Managed Metadata selection interface. Figure 14-11 is an example of the Products column as it would appear to end users of the solution when specifying a product to be associated with a sales contract.
An important aspect of any records management is, of course, the repository in which all records will be stored. Due to the flexibility of SharePoint as a records management platform, a number of options exist related to how the repository is configured and structured.
A common approach to records management is to submit a record to a Records Repository once it has been recognized as an official record. This record submission, also referred to as Records Declaration, can be either a manual or automated process. When a file is declared as a record, it is either copied or moved to a Records Repository, often referred to as a Records Center. Within the Records Center the file can be either queued for manual filing by a records manager or it may be automatically moved to the correct location within the file place based on its metadata or properties. The feature that controls the automatic filing of records based on properties is known as the Content Organizer.
In the upcoming exercises, you will create a new site collection that will act as your Records Repository. You will then configure an external connection to this Records Repository so that users can submit documents to it. In the third Try It Out of this section, you will configure the Content Organizer to move content based on specific attributes. Finally, in the fourth Try It Out you will submit a document to the Records Repository from a collaborative site in a different site collection.
TRY IT OUT: Create a Records Center
Log into the Central Administration site for your SharePoint environment.
The first item in your list of things to identify is the web application on which you will create the Records Center. Make sure that the web application you select is the correct application. If it is not, you can click the down arrow to the right of the selected web application and click Change Web Application.
You must provide a title, description, and URL for the site. Name the site Records Center, and enter the following description:
Official Records Repository
For Web Site Address name, select /sites/ from the drop-down menu and enter rc in the blank field to the right of the drop-down.
Select the Records Center template from the Enterprise tab.
Enter your own name as the primary site collection administrator.
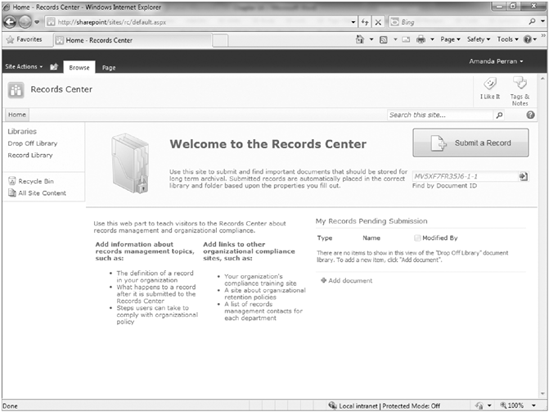
Click OK. The process for creating your site takes a few minutes. After it is completed, you are redirected to a page advising you that the process has completed successfully, and a URL will be displayed for you to select to visit your site.
How It Works
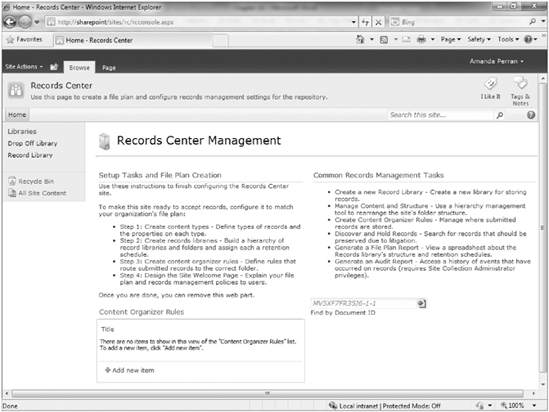
Depending on your requirements, you may elect to have the Records Center be a site within an existing site collection, a separate site collection, or a completely separate web application. Your decision should be based upon security, scalability, and integration requirements. In this example, we selected a separate site collection. Once your Records Center has been created, it will look similar to Figure 14-12.
TRY IT OUT: Define a Records Connection
Log in to the Central Administration site for your SharePoint environment.
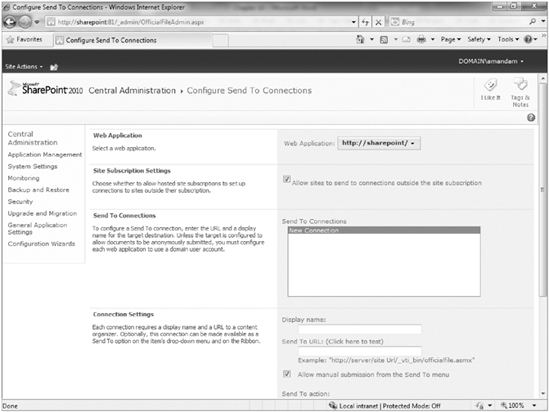
Select the Configure Send to Connections link. You will be redirected to a page where you can define connections that will be available to users from within a document library.
Select the correct web application.
Select New Connection as shown in Figure 14-13.
Enter Records Center as the Display Name.
Enter the URL of the Records Center web service. Based on the naming convention used in the previous Try It Out, you should enter something similar to
http://servername/sites/rc/._vti_bin/officialfile.asmx. Be sure to keep the portion of the URL that contains/_vti_bin/officialfile.asmx, as it is required.Click the Add a Connection button.
Click OK.
How It Works
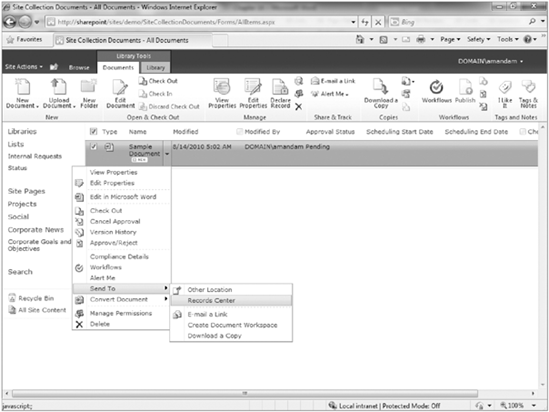
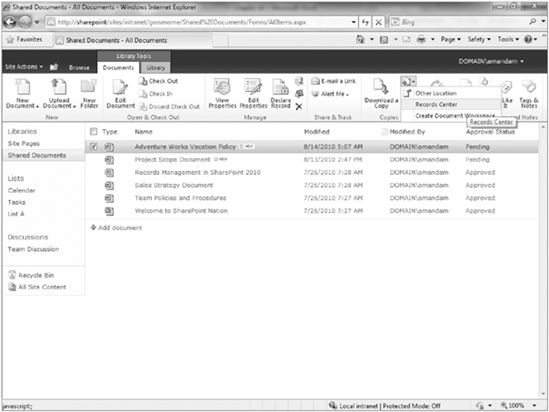
In this example we created a Send to Connection. A Send to Connection is a location that will appear in document libraries whenever a user has a file selected, as shown in Figure 14-14.
By making this connection available, users can now select files in a collaborative site and manually declare them as records by selecting Send to Records Center.
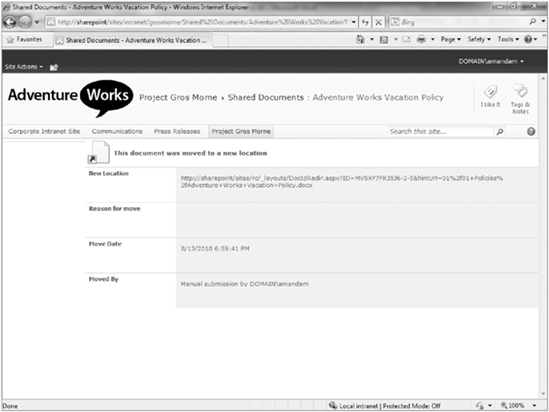
For Send to Action we had a choice of Copy, Move, or Move and Leave a Link. By selecting Copy, a duplicate of the file would be copied into the Records Center. This normally is not a best practice but could be beneficial for cases where a separate Records Center existed for each legal case an organization was involved with. Then copies of important documents could be added to each case site without impacting the existing collaborative environment. The Move option will remove the file from the collaborative site and place it into the Records Center. This is effective for archival purposes but will limit standard user access to the file from the collaborative location. In our case we selected Move and Leave a Link, which will move the file into the Records Center and supply a link to the Records Center location. When a user clicks on the link they will be redirected to a page similar to Figure 14-15 that describes that the file has been moved with a link to its new location.
TRY IT OUT: Configure a Records Center Site
From the Records Center site created in the first Try It Out of this section, select Manage Records Center from the Site Actions menu. You will be redirected to a specialized page designed to assist in the configuration of a Records Center site as shown in Figure 14-16.
Select the link to Create Record Libraries. You will be redirected to a page listing the various templates for lists and libraries.
Select the Records library template.
Enter 01 as the Name.
Click Create.
Click on Library Settings from the Library tab of the Ribbon.
Select the Title, Description and Navigation link.
Change the name of the library to 01 Human Resources.
Create New Folders in the library with the following names:
01 Policies
02 Forms
03 Template
04 Personnel
Select the Manage Records Center link from the Site Actions menu.
Select the link to Create Content Organizer Rules. You will be redirected to the Content Organizer Rules list.
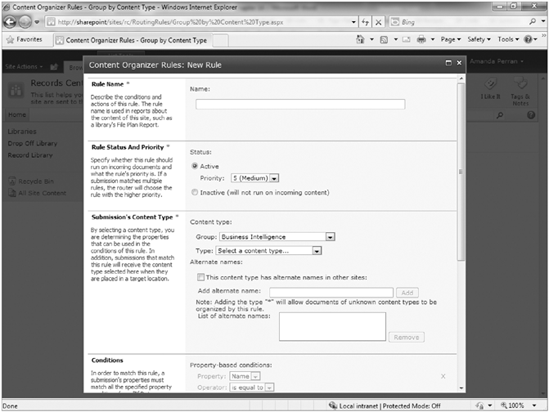
Click the Add New Item link. A form will appear as shown in Figure 14-17.
Define your rule based on the following properties:
PROPERTY
VALUE
Name
0101 Policy
Status
Active
Content Type (Group)
Document Content Types
Content Type (Type)
Document
Property Based Conditions
Title Contains all ofPolicy
Target Location
/sites/rc/01/01 Policies(Browse to the location of the 01 Policies folder within the 01 Human Resource library)
Click OK.
How It Works
In this example, you started to create the file plan for your Records Center by creating a library for human resources files. When a list or library is first created, the URL is the value that is entered for Name. However, if the list or library is renamed later, it will still retain the original value that was entered as the name for its URL. Because 01 was chosen as the unique identifier for the Human Resources category of documents, you named the library 01 upon initial creation and then later renamed it 01 Human Resources. This ensures that the path to the Human Resources library is a simple URL.
Once the Human Resources library was created, you added subfolders to the library to reflect the structure of the file plan. You then created a content organizer rule that will intersect any files that are added to the Records Center and review the properties to determine where the destination location in the Records Center should be. In this example, you selected that any document with "policy" in the title should be routed to the HR library's Policy folder. This rule, while easy to create for demonstration purposes, may not be a practical solution for real life and, therefore, it is recommended that you base your rules on more discreet properties, such as content type and other uniquely identifying metadata.
TRY IT OUT: Submit a Document to a Records Center
In this example, you will submit a document from a collaborative location to the Records Center defined in the previous example.
From any collaborative site in your SharePoint environment, upload the Vacation Policy document that is included in this chapter's resources.
Select the file in the library.
Select the Send to Records Center item from the Ribbon as shown in Figure 14-18.
You will receive a warning dialog advising you that you are about to move the file and create a link. Click OK.
How It Works
The file will now be moved to the Records Center. This operation may take a few moments, but when it is complete a confirmation message will appear, as shown in Figure 14-19.
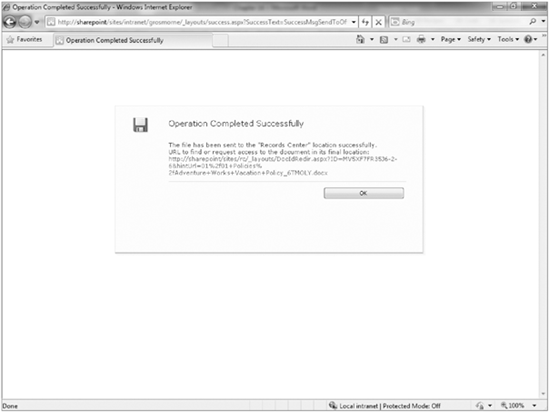
If you visit the Records Center, you will notice that the file has been automatically placed into the Policies folder of the Human Resources library as defined in the content organizer rule you created in the previous example. Similarly, if you were to return to the library from which you sent the file originally, you would notice that clicking on the link to the file would redirect you to a page similar to the one previously shown in Figure 14-15. An icon will appear on the link in the library similar to that shown in Figure 14-20.
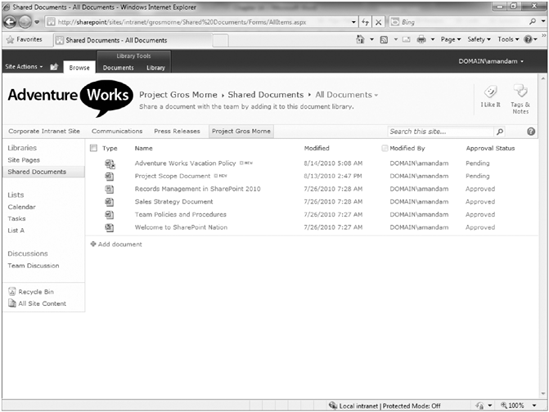
Previously in SharePoint and in many other applications, records management activities were managed separately from collaborative activities. As a result, there was often a great risk of certain documents "falling between the cracks" and not being properly submitted to the Records Repository. SharePoint 2010 includes a feature called In Place Records Management. This feature allows teams to declare records while collaborating in their standard environment. The records are not moved from the system but instead are stored within the same library with a visual indicator, as shown in Figure 14-21.
When an item is declared as an in-place record, restrictions can still be put in place to disable the editing capabilities of users, as well as the ability to delete items. However, the file stays in the library it was originally created in, which can be helpful for teams that may have a requirement to access the file after it has been declared a record. An example of this is a collaborative project site. The project scope document is created at the start of the project and approved by a client. Once the scope document has been approved, it is automatically (or manually) declared a record. The file is then locked for editing and deletion; however, it will continue to exist in the document library, along with all other project documents, throughout the duration of the project. This allows team members to continuously reference the original scope document for informational purposes.
By default, the In Place Records Management feature is not enabled on a collaborative site. Therefore, it must be enabled. You will explore how this is done in the next Try It Out.
TRY IT OUT: Activate the In Place Records Management Feature
From the top-level site of your site collection, select Site Settings from the Site Actions menu.
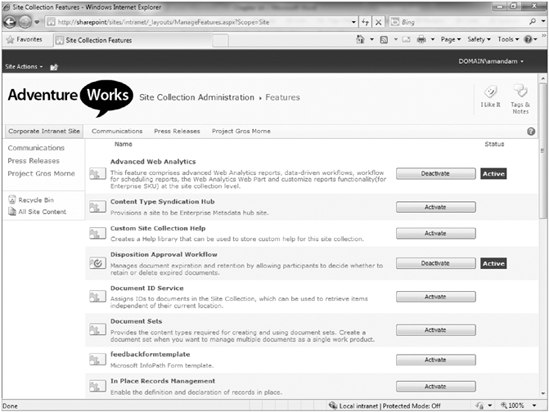
Select Site Collection Features from the Site Collection Administration group of links. You will be redirected to the Site Collection Features page, shown in Figure 14-22.
Click the Activate button next to the In Place Records Management item.
TRY IT OUT: Modify Records Declaration Settings on Site Collection
From the top-level site of your site collection, select Site Settings from the Site Actions menu. For this example, you are using the intranet site collection created in Chapter 1.
Select the Records Declaration Settings link. You will be redirected to the Records Declaration Settings page, shown in Figure 14-23.
For Records Restrictions, select the option to Block Edit and Delete. This may be the default setting in your environment.
For Records Declaration Availability, select the Available in all Locations by Default option.
Click OK.
How It Works
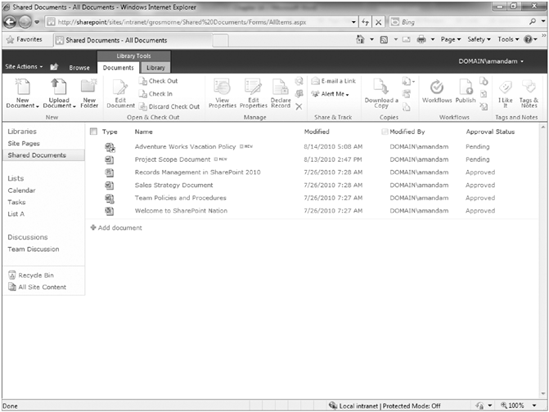
Now that you have enabled the In Place Records Management feature on your site collection and configured the Records Declaration settings, each library in the site collection will support the declaration of records from the Ribbon, as shown in Figure 14-24.
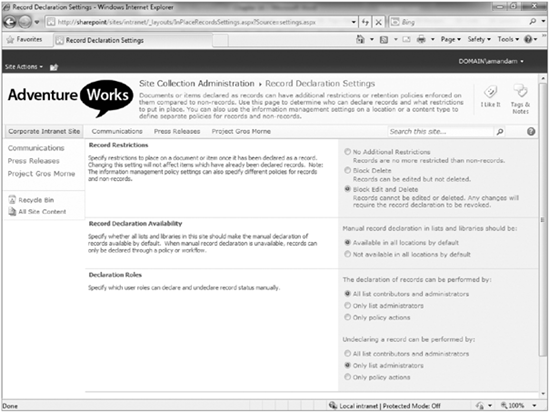
In step 3, you selected the option to Block Edit and Delete once a file has been declared a record. As a result, these options will be grayed out from the Ribbon whenever a file has been declared as a record. You could also identify the roles in your organization that have the ability to declare a record as undeclared within your site collection. In this exercise you went with the default setting.
TRY IT OUT: Declare an In Place Record
From a collaborative site in your intranet site collection, upload the Project Scope Document from this chapter's resource files.
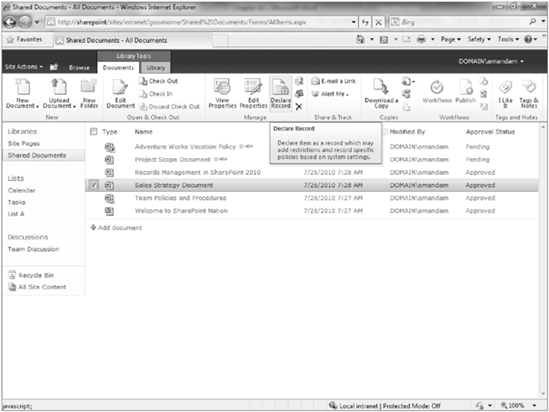
Select the file in the library.
Select the Declare Record option from the Documents tab of the Ribbon, as shown in Figure 14-25.
How It Works
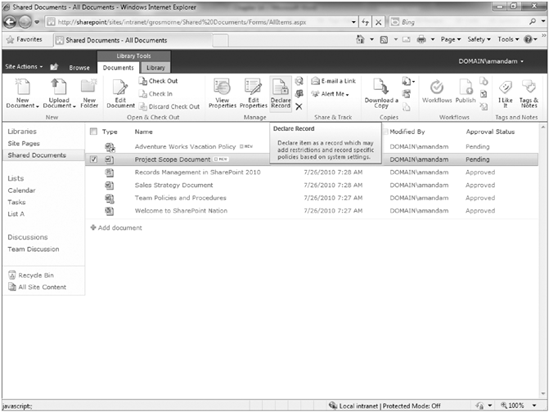
Once the file has been declared a record, you will notice that the Edit and Delete buttons are disabled when the file is selected, as shown in Figure 14-26.

Another important aspect of records management is the determination and management of how long records should be retained before they are removed from the system. In many organizations, there may be regulatory reasons for this determination. In other organizations, the decision may be more operations based. SharePoint supports the definition of multistage retention schedules for records and nonrecords. These schedules can be applied according to content type or physical location.
When defining a retention schedule, you must identify an event that must occur to initiate the actions that will follow. An event can be defined using date-based properties of the document, such as two years after it has been last modified or seven years after it has been created. The event may also be determined according to a programmatic formula that has been installed on the server.
Once a schedule has been set for an event, an action can be identified that will take place after that event has occurred. These actions may include one of the following options:
Move to recycle bin: This delete activity provides a "soft delete," which can be undone by a user with appropriate privileges.
Permanently delete: This delete activity represents an action that cannot be undone. The intent is to remove the document from the system without any opportunity for review or reconsideration. In many cases, this action is selected for regulatory reasons.
Transfer to another location: In some cases, once an event has occurred, the file should be added to a new location. This may result in the file being copied, moved, or moved with a link. A logical scenario for this action would be to remove the file from the collaborative location where it was created and add it to a records repository.
Start a workflow: In some cases, further review or consideration is required before the appropriate action for a file can be determined. Therefore, you may elect to have a review workflow launched to determine if the file should be deleted from the system or moved to an alternate location.
Skip to next stage: For a particular stage, there may be no specific activity other than to move to the next stage of the life cycle for the document.
Delete previous drafts: This activity will remove all minor versions of a document. This may be relative for cases where it is not necessary to keep all draft versions after a certain period, and since it is unlikely for the document to be updated further, it is logical to conserve on disk space and purge all pervious draft versions. All major versions of the document will still be retained.
Delete all previous versions: This activity will remove all versions, including major and minor versions.
In the next two Try It Outs, you will create retention schedules for a content type as well as a physical location. In the final Try It Out for this section, you will review the compliance details of a document for which a retention schedule has been defined.
TRY IT OUT: Create a Retention Schedule for a Content Type
In this exercise, you will create a retention schedule for the Sales Contract content type created earlier in this chapter.
From the top-level site of your site collection, select Site Settings from the Site Actions menu.
Select the Sales Contract content type.
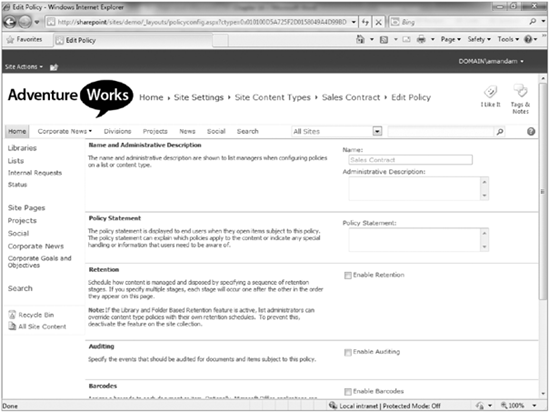
From the Content Type Administration page, select Information Management Policy Settings. You will be redirected to the Edit Policy page, as shown in Figure 14-27.
Select the checkbox to Enable Retention. The retention options for this content type will be displayed.
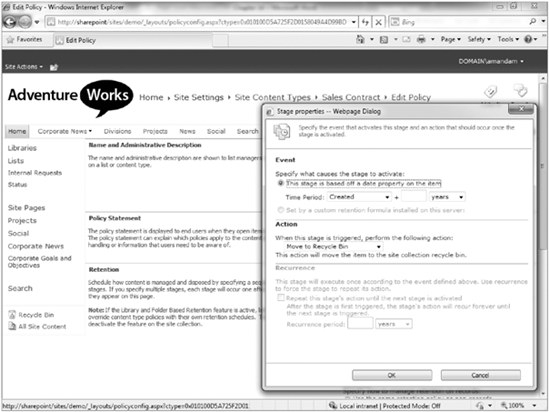
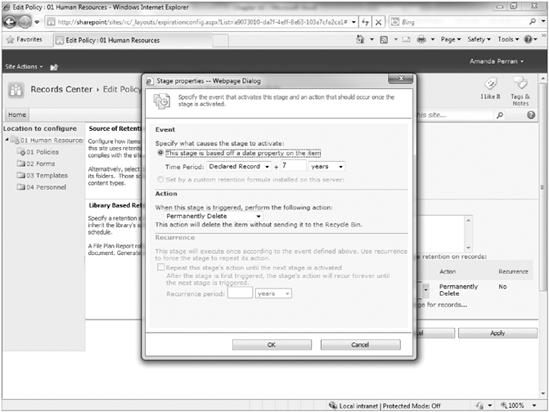
Under the Non Records section, select the Add a Retention Stage option. A Retention Stage properties window will appear, as shown in Figure 14-28.
Select the option to create the event based on a date property.
Select Modified as the date from the drop-down and enter 5 years in the textbox.
Select the Move to the Recycle Bin action.
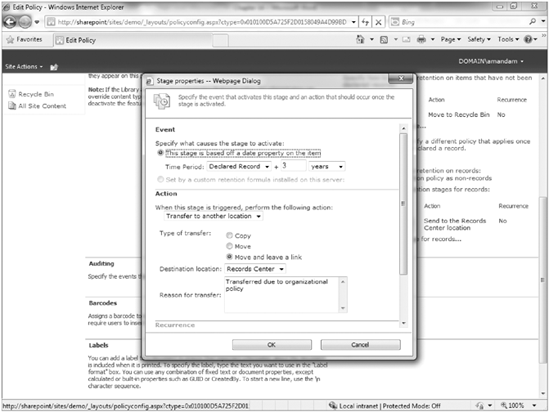
From the Records section of the Retention Policy page, select the Add a Retention Stage option.
Select Declared Record as the date from the drop-down and enter 3 years in the textbox.
For Type of Transfer, select Move and Leave a Link, as shown in Figure 14-29.
For Destination Location, select Records Center.
Click OK.
Click OK on the Edit Policy page.
How It Works
When you enabled retention for the content type, you had the option to define unique rules for nonrecords and records. If you had enabled this feature, your document would have had a unique retention schedule up until the point where it was declared a record. This is a way of ensuring that proper expiration and handling rules are applied to nonrecords within your system as well as records. In this example, you selected the option that nonrecords should be deleted five years after they have been modified. If a document is declared a record, then it should be moved from the collaborative location where it is stored to the Records Center after three years. Once it is in the Records Center, it will be managed by the retention schedule defined for that location.
TRY IT OUT: Create a Retention Schedule for a Library
From the main page of the Records Center site collection that you created in a previous exercise, select the 01 Human Resources library.
Select Library Settings from the Library tab of the Ribbon.
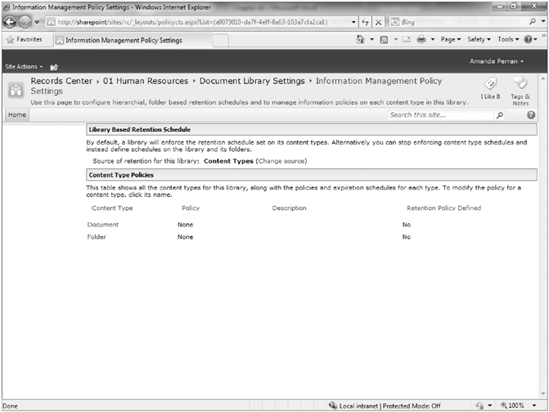
Select Information Management Policy Settings. You will be redirected to the Policy Settings page for the library, as shown in Figure 14-30.
You should notice that at the top of the page, the retention source for the library is listed as Content Types. Select the Change Source link.
You will receive a warning message. Click OK to accept it.
Define the rule that states seven years after the file has been declared a record, it should be permanently deleted. The settings for this rule are displayed in Figure 14-31.
Click OK to save the rule.
Click Apply, then OK to save the settings for the library.
How It Works
In this example, you created a retention schedule for a library that was independent of content type. This is a relevant scenario in cases where a formalized file plan exists and content is organized and grouped according to properties such as retention and expiration requirements. In this case, you defined the rule that seven years after a file has been declared a record, it should be permanently deleted. This rule will apply to all folders and documents in the library by default. However, you will review in the next example how an individual folder may have a unique retention schedule defined that will override that of the library.
TRY IT OUT: Create a Retention Schedule for a Folder
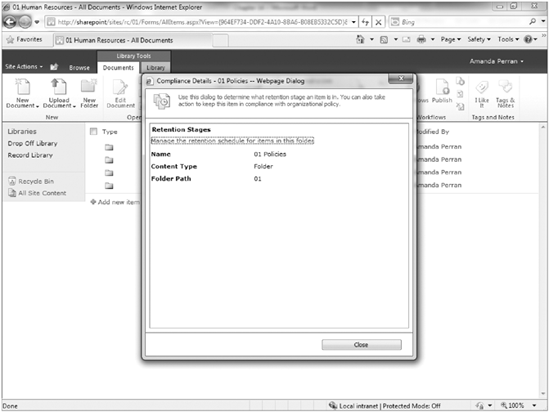
From the 01 Human Resources library of your site, expand the Policies folder menu and select Compliance Details. The Compliance Details report will appear for the folder, as shown in Figure 14-32.
Select the Manage Retention Schedule for Items in this Folder link. You will be redirected to the Folder Based Retention Schedule page.
Select the Define Retention Stages link.
Define the rule that states five years after the file has been declared a record, it should be permanently deleted.
Click OK to save the rule.
Click Apply, then OK to save the settings on the folder.
How It Works
In this example you created a retention schedule for the Policies folder that was unique from that of the Human Resources library. In this case, files in the Policies folder will be deleted five years after they are declared a record, versus the seven year rule that exists for the library.
TRY IT OUT: View Compliance Details for a Document
From the 01 Human Resources library of your site, select the Policies folder.
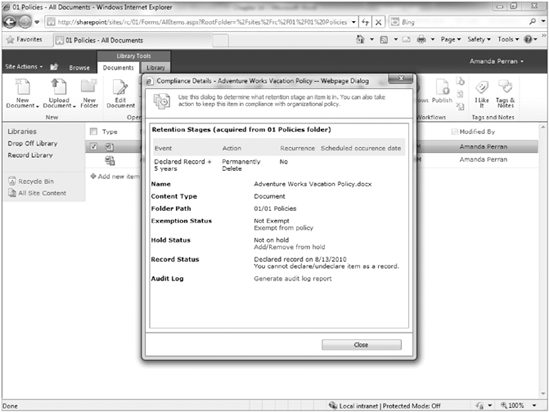
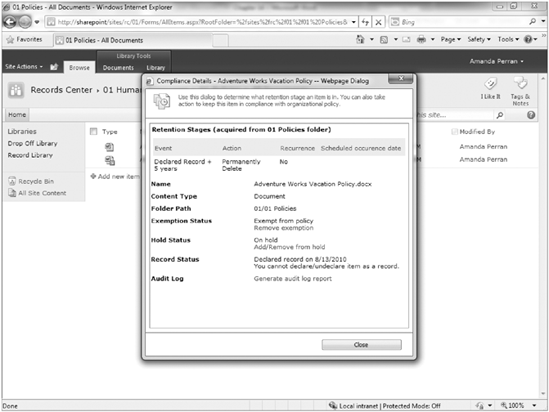
Expand the menu associated with the Adventure Works Vacation Policy document and select Compliance Details. The Compliance Details report for the document will appear, as shown in Figure 14-33.
How It Works
In this example, you can see that the Adventure Works document is scheduled to expire five years after it is declared a record. You can also view the date that the file was declared a record. In Figure 14-33, the file was declared a record on August 13, 2010. You can also perform activities such as generating an audit log report to view details of how the file has been accessed.
In certain cases, an organization may be involved in legal proceedings or regulatory reviews that require the collection of evidence or documentation related to a specific topic or subject. In these situations, it is critical that important documents be accessible to stakeholders involved in the proceedings or investigation. As a result, it may be appropriate to place holds on the records, which will temporarily exempt the files from any retention or expiration policies that have been defined for them. If a record's expiration date passes while it is on hold, it will not expire. However, once the file is removed from the hold, all normal policies will resume, and the file will be queued for expiration according the defined policy.
A key aspect of adding a document to a hold is searching for and locating the file. This is done through a search interface designed specifically for the Holds feature. In the final few Try It Outs of this chapter, you will create a hold for a pending legal case and then search for files that might be relevant to this case and place them on hold.
Note
In order to complete the next Try It Out, it is recommended that you perform an incremental crawl of your SharePoint content. You can do this by going to the Central Administration site, selecting Manage Service Applications, clicking on the Search Service Application, selecting Content Sources, and selecting Start Incremental Crawl from the Local SharePoint sites drop-down menu. This activity may take several minutes to complete, depending on the amount of content in your SharePoint environment.
TRY IT OUT: Place Files on Hold
From the main page of the Records Center, select Manage Records Center from the Site Actions menu.
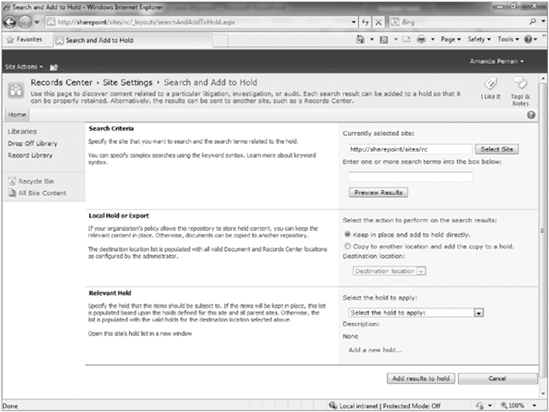
From the Common Records Management Tasks web part, select the Discover and Hold Records option. You will be redirected to the Search and Add to Hold page, as shown in Figure 14-34.
You may select any site collection you wish on which to perform your search. For this exercise, you will retain the default setting to search the Records Center for items.
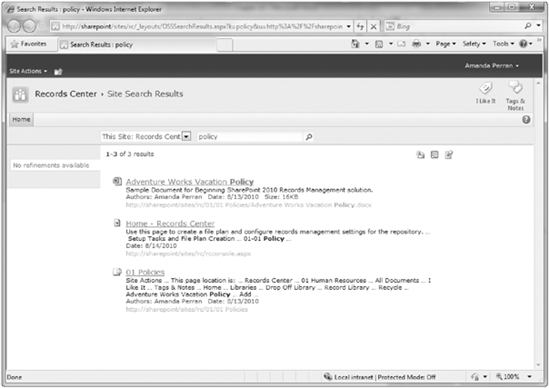
Enter the word Policy into the search box.
Click the Preview Results button. A new window will appear, as shown in Figure 14-35, showing items in your site collection that contain the word "policy."
Close the results window.
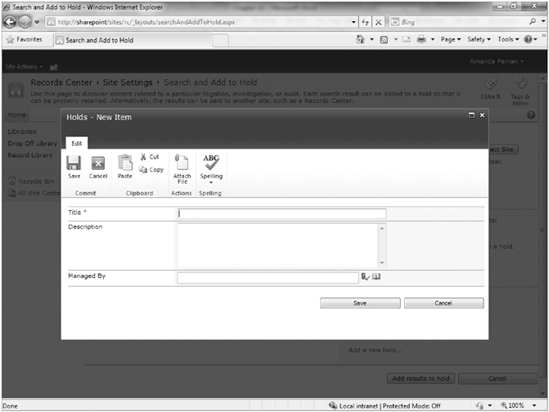
Select the Add a New Hold option. A new window will appear, as shown in Figure 14-36.
Enter the details of the hold as follows:
PROPERTY
VALUE
Title
Policy Review Hearing
Description
Legal Case of Employee #12345 vs. Adventure Works
Managed By
Enter your own name
Click Save.
Select the Policy Review Hearing hold from the drop-down.
Click the Add Results to Hold button. The files will be scheduled to be added to a hold and a confirmation message will appear on the screen.
How It Works
There is a scheduled job on your server that will process all pending hold requests. Once the hold has been placed on the records, items within that hold are exempt from their standard retention schedules. Figure 14-37 is an example of the Compliance Details report for the Adventure Works Vacation Policy document, which has now been placed on hold.
In this chapter, you learned the fundamental elements of creating a records management solution in SharePoint 2010. After reading this chapter, you should have a complete understanding of the following:
The importance of identifying roles and responsibilities related to your records management implementation.
A file plan is a critical element of your records management solution that outlines the categories and types of documents that exist within your organization. Developing a detailed file plan is an important step that must take place prior to configuring any technical elements of SharePoint.
A classification plan is a detailed listing of all properties and attributes that should exist related to your records. It is important to identify a classification plan that is detailed enough to support your informational and organizational needs but still manageable for end users to populate and maintain.
In SharePoint 2010, records may be managed separately in a dedicated archive known as the Records Center or they may remain "in place" within the collaborative sites that they were created in.
Rules can be created to determine how long records can exist within the solution based on dates such as when they were created, last modified, or declared a record.
Unique retention rules may exist for nonrecords and records.
Files may be placed on hold for investigative or regulatory reasons. If a file is added to a hold, it cannot be removed from the system until the hold is removed.