
WHAT YOU WILL LEARN IN THIS CHAPTER:
What a SharePoint list is
The type of information that you can store in lists
The primary activities available within the Ribbon for interacting with lists
A breakdown of the various default list templates that SharePoint offers
A hands-on discussion on how you can work with lists to create and view information
This chapter reviews a very important concept in SharePoint, lists, which you use throughout SharePoint to store and display information. By gaining a solid understanding of how they work early in this book, you can construct highly effective business applications and solutions in later chapters of the book by combining multiple lists with other important SharePoint components.
This chapter focuses mainly on working with the basic features and functionality of lists. In Chapter 4, you learn how to customize and manage lists to create working environments that suit your specific business requirements and needs.
Lists have items, columns, and views. Items and columns correspond to the rows and columns that you see on a grid layout in a spreadsheet. Views present list data in a friendlier format that acts very similarly to a report.
Items: An item is a row in a list. For example, for a list that stores information on customers, each customer may have a unique item in the list, which is also called the customer row or customer record.
Columns: A column is a field in a list. You may also see columns referred to as metadata, which is really a descriptive piece of information related to the item. In the case of a customer item in a list, the phone number, physical address, mailing address, and email address would be columns that describe the customer.
Views: A single list can have multiple views. You create a view to address a user's informational needs relating to list data. A view displays a subset of information from the list, for example, customers who have been added during a specific time period. You may also create a view to show all information on a list but have items displayed in a predefined order.
SharePoint lists can have the following types of information stored in columns:
Single Line of Text: Possibly the most common, because it stores a variety of formats, such as the item's title, names, phone numbers, email addresses, and virtually anything else that you can enter into a single-line textbox.
Multiple Lines of Text: Occasionally, this type of column is useful because it stores larger amounts of information, such as a customer's billing address or background information on the customer. For this column type, you can select whether the information should contain plain, rich, or enhanced text elements, such as bold, italic, pictures, or tables. You can expand this column as you add text to it or you can select how many lines in the box to display initially. When you use this field to collect information from users, it is a good idea to determine the number of lines to display so that users will know how much content is expected from them.
Choice: When gathering information on an item, you can offer users a selection of values or answers from which to choose. Using the example of a customer list, you may want to find out what type of services the customer purchases from you. If your organization only provides a fixed number of key services, it makes sense to present the user this set of choices to ensure that the field always contains valid information. When creating a choice column, you can choose whether to have the choices appear in a drop-down list, as radio buttons, or as checkboxes. For checkboxes, the user may select more than one item. Alternatively, you can have users fill in their own choices if their item does not appear in the list. This is known as allowing "fill-in choices."
Number: You commonly need to associate numerical information with an item so that you can later perform calculations on the information stored in it. You can configure number columns to store numbers that fall within a specific range or percentage values.
Currency: This is similar to the number column but specifically displays financial or monetary values. You can select what type of currency to display and the appropriate format based on region such as $123,000.00 for the United States or £123,000.00 for the United Kingdom.
Date and Time: You typically have a list containing dates or times. This might include when an organization first became a customer or the last time it purchased a product. Date columns allow users to enter the date information directly into a textbox or select the date from an easy-to-use calendar tool. When configuring a date column, you can control whether to allow only dates or dates with times. You can also select a default value for the date, including a special setting that detects "Today's Date" as the user is filling out the item.
Lookup: As your SharePoint environment expands, you may have many lists containing important information about things such as projects, products, and employees. In some cases, you need to take information from one list and associate it with information from another. In the example of the customers list, you may have a listing of projects that display the name of the customer for which the project is being completed. Because your customers list will contain that information, it makes sense to have a column in the projects list that displays the names of all the customers. Lookup columns encourage users to store information in a single location rather than duplicate items throughout the organization. New in SharePoint 2010 is the ability to select an item in a lookup column and have additional fields related to that item displayed in the list. For example, when selecting a customer within your projects list, the name of the key contact for that customer and an associated phone number will also be associated with the list item.
Yes/No: This checkbox column indicates whether an item matches a specific criterion. In the case of the customers list, you may create a yes/no column named Active. If the customer is active, you select the checkbox. In the customer in not active, then the checkbox remains blank.
Person or Group: Users can select people or groups from the site's membership source (for example, Active Directory) and associate them with items in a list. In the customer's list example, you may use this column type to associate an account manager with a customer. Optionally, you can include a display picture along with the account manager's name.
Hyperlink or Picture: You can use this column type to allow users to enter a web address into a list item to create a hyperlink or display an image located at the source location. In the customer list example, you can use this type of column to display the company's website address or the company's logo.
Calculated: Rather than have users manually enter information, you may want to calculate values based on other columns within the list. For this type of column, you can select the names of other columns from the list and identify relationships and formulas. For example, you may have a calculated value that displays how many years the customer has been a client of the organization based on other information in the customer record. You can then select a format for the column.
External Data: In some cases, you may want to associate business data from an external business application with your list items. For example, you may have a listing of all products in a sales database and instead of recreating it in SharePoint, you can connect to it and reuse that information. Using an External Data column, you can associate a products list with your list so that, as you define customers, you can also select which products the customer typically purchases.
Note
For more information on SharePoint's capabilities for interacting with business data stored in applications other than SharePoint, see Chapter 15.
Managed Metadata: In some cases within your organization, another administrative user may have already defined a set of metadata to describe important aspects of your organization. Therefore, there is no requirement for you to redefine this information yourself. In such cases, it would be more appropriate for you to create a column that connects to the managed metadata service to select the values that have been predefined by your system administrator or another user who has been empowered to configure this shared feature. Managed metadata will be described in detail within Chapter 6.
Audiences: If a list has audience targeting enabled, this column type is automatically added to it. Audiences are groups of users that you define based on a set of criteria. When you use audiences on list items, the items only appear to members of the audiences associated with the item. Chapter 11 provides in-depth information on audiences and user profiles.
With the basic components of a list explained, you can now look at some of the list templates that are available in SharePoint. Many of these templates address common collaborative scenarios that exist within organizations, such as tracking tasks and sharing contact and meeting information. You should think of these templates as a starting point because you can further customize them to suit the needs of any organization. More advanced techniques for customizing and managing lists are discussed in Chapter 4.
To demonstrate common collaborative scenarios that might exist in relation to the usage of lists within teams, for the remainder of this chapter, we will consider the example of using SharePoint lists for the tracking of information related to a project. Within a project, there is often a large amount of information to be tracked and many of the built-in templates can assist in providing an excellent starting point for sharing such information.
TRY IT OUT: Create a Project Team Site
To get started, you will create a site that will act as a collaborative location for sharing information about a new project that is about to start, called Project Gros Morne. This is a project that will evaluate the feasibility of expanding a travel company's operations into a popular tourist location in eastern Canada.
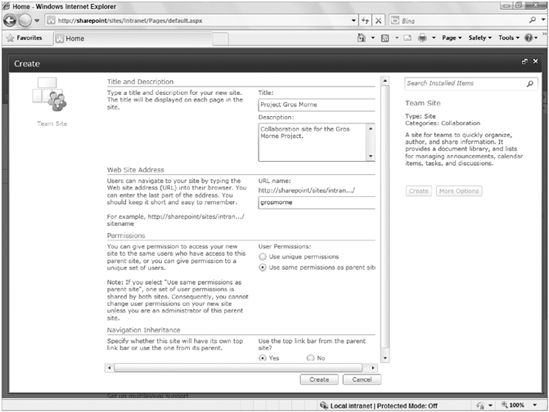
From the main page of your site collection, which was created in the previous chapter, select New Site from the Site Actions menu. The Site Creation dialog will appear, as shown in Figure 2-1.
If you do not have Silverlight installed on your computer, you may notice the display of the Site Creation Dialog is slightly different. This will be the case throughout the SharePoint administrative interface. Therefore, it is recommended that you install the Silverlight plugin to ensure an optimal user experience. It can be accessed from the Microsoft site located at
www.microsoft.com/silverlight.Select the Team Site template from the template list.
Note
If you created a site in Chapter 1 based on the Publishing Portal template, you may be required to enable the creation of subsites based on any site template in order to complete this exercise. This is done by going to the main page of your intranet site collection, selecting Site Settings from the Site Actions menu and selecting Page layouts and site templates from the Look and Feel Group of links. You will then need to enable the Subsites so you can use any site template option within the Subsite Templates section of the page. Then you must click OK to save your changes. Now you will be able to create a subsite using any template from your intranet site.
Click the More Options button. The window will refresh to provide a listing of fields as shown in Figure 2-2.
Complete the fields shown in Figure 2-2 using the information in the following table.
FIELD
VALUE
Title
Project Gros Morne
Description
Collaboration site for the Gros Morne Project
Web Site Address
grosmorne
Permissions
Use same permissions as parent site
Navigation Inheritance
Yes
Click Create. The site creation process will start, and upon its completion you will be redirected to the main page of your new site.

How It Works
Users with the appropriate privileges have the ability to create sites for projects, initiatives, or any other collaborative scenarios simply by completing a form to specify a template, site title, description, and URL. In the exercise above, you selected the Team Site template because it contains many of the lists that you would like to use for tracking your project.
When creating the site, you selected the option to use the top link bar from the parent site. This ensures that as users visit your site, they will see the same top-level navigation links that they saw when on the previous site. This can sometimes be considered a best practice, as users typically find it easier to navigate across multiple sites if the primary navigation stays consistent. This administrative option was available to you when you selected the More Options button in step 3. If you had not selected the More Options button, you would not have been able to specify that you wanted to use the top link bar and, by default, the site would have been created with its own unique top navigation. This setting can be changed after the site has been created by visiting the Settings page for the site and changing the navigational settings. This activity will be covered in Chapter 8.
Within a project team, you commonly need to share contact information. This may be the contact information of team members but may also include contact information of other key stakeholders such as customers, vendors, partners or industry experts. SharePoint provides a very easy-to-use interface just for this purpose that you can create via a template. It's known as a contacts list. Rather than team members storing contact information of key stakeholders within individual address books, team members add contacts to a list on a SharePoint site so that the information becomes available to everyone.
A contacts list has the columns shown in the following table. However, as is the case with any list, you can create or delete columns at any time. The Last Name column is considered the title column, and you cannot remove it from the list. You may rename it if you like, however.
COLUMN NAME | COLUMN TYPE |
|---|---|
Last Name (required) | Single Line of Text |
First Name | Single Line of Text |
Full Name | Single Line of Text |
E-mail Address | Single Line of Text |
Company | Single Line of Text |
Job Title | Single Line of Text |
Business Phone | Single Line of Text |
Home Phone | Single Line of Text |
Mobile Phone | Single Line of Text |
Fax Number | Single Line of Text |
Address | Multiple Lines of Text |
City | Single Line of Text |
State/Province | Single Line of Text |
ZIP/Postal Code | Single Line of Text |
Country/Region | Single Line of Text |
Web Page | Hyperlink or picture |
Notes | Multiple Lines of Text |
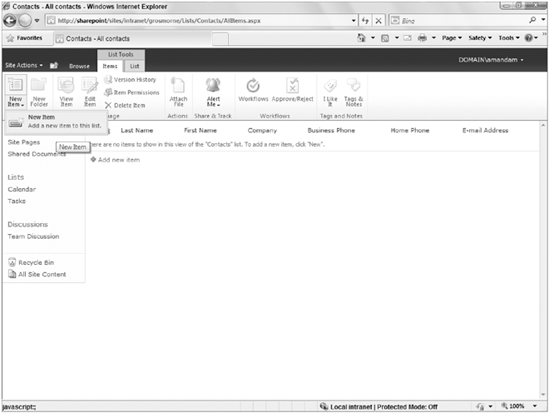
Adding an item to a contacts list is quite easy and can be done using one of the following methods.
Click New from the Ribbon: You can click this button, shown in Figure 2-3, and then enter all the details for the list manually using a form.
Synchronize data using an offline client application: Contact lists can be updated using either Microsoft Outlook, SharePoint Workspace, or Microsoft Access. The methods for each are described later in this chapter within the Try It Out exercises.
All Contacts: This standard list view displays all items (in groups of 30) in the list sorted by Last Name. Site visitors can access it either from the list itself or a web part related to the list.
Virtually every team needs to track news related to important events and activities. Instead of sending distracting direct email messages to team members, you can use the announcements list to drive members to your site to look for the latest information on key activities and events. Using the announcement list template, site managers can alert team members of key events and milestones related to their business activities, without having to adopt a more formalized news-publishing feature.
When you create an announcements list, it contains the columns shown in the following table. However, you can add more columns or remove unwanted ones. Because the Title column is considered a required column, you cannot remove it from the list.
COLUMN NAME | COLUMN TYPE | COLUMN DESCRIPTION |
|---|---|---|
Title (required) | Single Line of Text | Generally, this column is used to store the headline of the announcement you are creating. |
Body | Multiple Lines of Text | This column is typically used to feature the details of the announcement you are creating. It supports enhanced text with formatting, pictures, and tables by default. |
Expires | Date and Time | In cases where an announcement should not appear within certain views after a specific date, the expires column can be used. Views can then be configured to only show items where the expiry date is blank or occurs in the future. |
Created By | Person or Group | This is a system-generated value that displays the name of the user who originally created the announcement. |
Modified By | Person or Group | This is a system-generated value that displays the name of the user who last modified the announcement. |
The announcements list features two standard views upon creation:
All Items: This standard list view displays all items (in groups of 30) in the list sorted by their creation date. Site visitors can access it either from the list itself or a web part related to the list.
Summary: The announcement list web part uses this view to display the item title followed by a segment of the story and the author's name. This view displays the latest stories for which the expiry date has not been specified or has not passed. There is no way to edit the properties or behavior of this view.
An important requirement when running a project is having the ability to effectively monitor and track task progress. SharePoint includes a list template designed specifically around the management of tasks. Using this list, you can create tasks for team members and email notifications will be automatically sent to the assigned parties containing details of the assignment. A task list features the ability to be connected to Microsoft Outlook, which allows users to view, create, and update tasks within a SharePoint list directly from within Microsoft Outlook. In addition, you can export information from a task list directly into a Microsoft project plan. This allows team leads or project managers to create a task list for the initial activities related to a project within their SharePoint team site, which can later be promoted into a more formal project plan when the project becomes more defined or complex. Similarly, team leads or project managers can synchronize existing Microsoft Project plans with a SharePoint task list. This is an activity we will review later in this chapter in a Try It Out exercise.
When you create a task list, it has the columns listed in the following table; however, you can add more columns at any time. Because the Title column is required, you cannot remove it from the list.
COLUMN NAME | COLUMN TYPE | COLUMN DESCRIPTION |
|---|---|---|
Title (required) | Single Line of Text | This column is typically used to provide a name for the task. This name will be displayed in web parts to allow users to easily identify it from others. |
Priority | Choice | This column is used to associate a priority level with tasks to allow users to easily identify which tasks they should resolve first. Like all other columns, this column can be customized to reflect priority values that would be relevant to your organization. |
Choice | This column is used to track the status of the task. Applying a status value allows your team to stay informed about how the task is progressing by visiting the list. | |
Number | This column is used to track the progress of the task. Applying a % complete allows your team to stay informed about how the task is progressing by visiting the list. | |
Assigned To | Person or Group | This column is used to select a team member who has been assigned to complete the task. By default, only a single team member can be assigned to a task. However, the settings for this column can be modified to allow multiple users to be assigned to a single task. This customization is covered in Chapter 4. |
Description | Multiple Lines of Text | This column is the location where details of the task should be included, such as the original request as well as any notes on how the task is progressing. |
Date and Time | The start date is a column used to identify when the task is scheduled to start. | |
Due Date | Date and Time | The due date is a column used to identify when the task is scheduled to be completed. |
Lookup | The Predecessors column helps team members easily identify which tasks must be completed before the task in question can be worked on or resolved. |
The tasks list features the following standard views upon creation:
All Tasks: This view displays all items (in groups of 30) in the list sorted by their creation date.
My Tasks: This personalized view of items is a good default view for team members because it displays the tasks that have been assigned to the current user.
Due Today: This view features a filtered list of tasks that have a specified due date equal to the current date. This may be an effective view to display within a web part on the main page of the site so that team members are aware of the key activities that should be taking place at a given time.
Active Tasks: As your task list expands, you need to differentiate between completed tasks and those still in progress. You don't have to remove or delete completed tasks because you may need to refer back to them later. Instead, you can filter out completed tasks and only display active ones. The Active Tasks view only displays items where status is not equal to completed.
By Assigned To: As a team leader or manager, you may need to view the assignments of all team members to pinpoint available resources and the progress of key initiatives. This view shows the task sorted by the person assigned to it, as well as task's status.
By My Groups: This is very similar to the By Assigned To view. However, it only displays tasks assigned to groups. Items appear by the group name to which they are assigned.
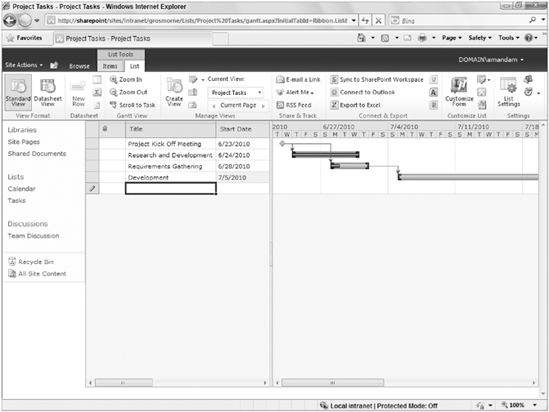
The project tasks list is very similar in structure and behavior to the tasks list in the last section. It has the same columns and most of the same views, as well as a special view, called the Project Tasks view. A project task is a Gantt view that displays a bar for each task indicating status and expected timeline. An example of this view is shown in Figure 2-4.
You can add this view to other list types. SharePoint creates it automatically with the project tasks list to give you a head start in creating visually attractive work breakdown structures that you can apply to just about any project.
Like tasks lists, the project tasks list features Microsoft Outlook and Microsoft Project integration, as well as targeted email notifications based on new assignments. However, you cannot associate a project tasks list with a workflow activity. Therefore, users who want to have Gantt chart views of workflow information are advised to use the standard tasks list and create a custom Gantt view.
More information on customizing lists in this manner is described in Chapter 4.
Unfortunately, it's not uncommon for unexpected issues to arise when you conduct business or run a project. An issue is an event that requires resolution. In a software environment, this may be a bug that someone discovered in the software. In a shipping company, this may be a transportation delay because of a snowstorm. Because issues can have a huge impact on business operations and the success of an initiative, it is important to effectively track and resolve them. The SharePoint list template for issues provides an easy-to-use method for doing so.
As with the Tasks and Project Tasks list templates, you may export information from an issues list to Microsoft Access, Excel, Project, and SharePoint Workspace. In addition, information from an issues list can be exported to Microsoft Visio. An example of this will be explored within this chapter in an upcoming Try It Out.
While the issues list template does support the offline synchronization features of certain Microsoft client applications, there is no default support for Microsoft Outlook integration.
By default, an issues list contains the columns shown in the following table, but you can add columns to meet your needs. Because the Title column is considered the required column, you cannot remove it from the list.
COLUMN NAME | COLUMN TYPE | COLUMN DESCRIPTION |
|---|---|---|
Title (required) | Single Line of Text | This column is typically used to provide a name for the issue. This name will be displayed in web parts to allow users to easily identify it and differentiate it from others. |
Assigned To | Person or Group | This column is used to select a team member who has been assigned to complete the issue. By default, only a single team member can be assigned to an issue. However, the settings for this column can be modified to allow multiple users to be assigned to a single issue. This customization is covered within Chapter 4. |
Choice | This column is used to track the status of the issue. Applying a status value allows your team to stay informed about how the resolution of the issue is progressing by visiting the list. | |
Choice | This column is used to associate a priority level with issues to allow users to easily identify which issues they should resolve first. Like all other columns, this column can be customized to reflect priority values that are relevant to your organization. | |
Description | Multiples Lines of Text | This column is the location where details of the issue should be included. Clearly documenting the details on an issue allows team members to better identify an approach for resolution. |
Category | Choice | This column is an optional column that is meant to be customized to include relevant categories for issues. Assigning an appropriate category to each issue allows team members to more easily identify which items are related, and the list remains easy to manage as it expands. |
Date and Time | The due date is a column used to identify when the issue is scheduled to be completed. | |
Lookup | Because sometimes you cannot resolve one issue until you find resolution for another issue, the issues list has built-in functionality for tracking related items. | |
Comments | Multiple Lines of Text | The Comments column of an issues list timestamps and labels each entry that team members make over the duration of the issue. This provides excellent insight into the progress of a specific item. |
Having a shared calendar that all team members can access improves the communication of important information, such as availability, deadlines, and progress. The Calendar list template offers a variety of views and features that make the tracking and viewing of date-based information easy within team-based environments.
When you create a calendar list, it contains the columns shown in the following table. You can add or remove columns at any time, but you cannot remove the default columns: Title, Start Time, and End Time.
COLUMN NAME | COLUMN TYPE | COLUMN DESCRIPTION |
|---|---|---|
Title (required) | Single Line of Text | This column is typically used to provide a name for an event. This name will be displayed in web parts to allow users to easily identify it and differentiate it from others. |
Single Line of Text | This column is used to identify the location of the event. | |
Start Time (required) | This column is used to identify the starting time of the event. The values selected here will determine where the event is displayed within the calendar-based views of the list. | |
End Time (required) | Date and Time | This column is used to identify the end time of the event. The values selected here will determine where the event is displayed within the calendar-based views of the list. |
Description | Multiple Lines of Text | This column is used to provide details of the event. |
The category column may be used to help provide classification of the different events. This list contains many common event types but can be configured to suit your organization's specific requirements. | ||
Checkbox | Similar to an event created in Microsoft Outlook, an event in SharePoint can be specified as an All Day Event. When an event is designated as All Day, the ability to select hourly time values for Start and End Time are disabled. | |
Checkbox (Special) | This special setting allows you to set a recurring schedule on an event. For example, if your team has a weekly status meeting, you can set up recurrence on a single event rather than creating a new event for each week. | |
Workspace | Checkbox (Special) | Your event or special day may require a website specifically created for the event. This website, called a workspace, tracks information and documents related to the event. For example, an upcoming training session workspace may have registration forms and handout materials that a team works on in preparation for the session. When you select this checkbox and save the item, you are redirected to a site creation page where you name the site and select a meeting workspace template. |
Calendar lists may be connected to Microsoft Outlook or Access. When you connect with either of these two applications, information will be synchronized between the SharePoint list and a local copy within the application. In addition, information from a SharePoint calendar list may be exported to Microsoft Excel.
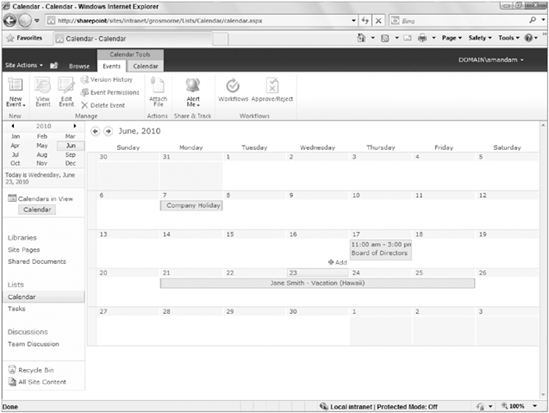
The calendar list features three standard views upon creation:
Calendar: This view displays all list information in a month, week, and day calendar format, as shown in Figure 2-5. Users can switch between month, week, and day views of the list items or select a specific date to view all items for the selected day.
All Items: This standard list view displays all items (in groups of 30) of the list sorted by their creation date.
Current Events: This list view filters out items that have taken place in the past and displays upcoming items in the order that they will take place.
Commonly, working on a project or initiative requires a team to set up website links to share with one another, for example links to third-party information sources. SharePoint provides a list template that makes it easy to share links with team members. Upon creation, the links list has the columns listed in the following table; however, you can add more columns later. The URL column is considered a required column and, therefore, you cannot remove it from the list.
COLUMN NAME | COLUMN TYPE | COLUMN DESCRIPTION |
|---|---|---|
URL (Required) | Hyperlink or Picture | When adding a new link item to a list, you must specify a URL along with a description. The description gives your URL a title so that the full web address does not display in the list views. When you specify the URL, you can click a link that tests the address to confirm that it is a valid location. You should test your address before you publish it to all your team members. |
Multiples Lines of Text | You may choose to include notes on why you feel this link is useful to other team members. |
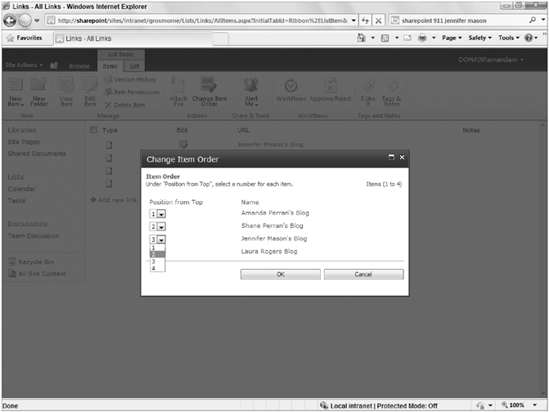
You can change the link order in case you have a reason to display links in a specific order. For example, while you can list most links in the order in which they were created, you may need to ensure that the company's public website is listed first. You accomplish this by selecting Change Order from the Actions menu, shown in Figure 2-6, and selecting 1 from the Order drop-down list to the right of the company website address. All other items automatically adjust their position based on your selection.
Because team members may be collaborating on projects from different geographic locations and have different working schedules, having an effective mode of electronic communication is critical. Although email has traditionally played this role, the proliferation of email messages within organizations often results in employees spending more time filtering and sorting through their inboxes than they can afford. As a result, SharePoint provides a more passive electronic communication. A threaded discussion allows an author to post a message, and others to reply to that message through the web interface. Because all the communication occurs on the website, team members can stay informed about decision-making processes without directly participating in a specific thread. In addition, as you will learn in Chapter 17, all this content can be indexed and made accessible via the built-in search engine. This helps provide a long-term knowledge center for users to search for answers to commonly asked questions prior to initiating a new discussion.
The discussion board list initially has the columns shown in the following table; however, you can add more columns. Because the Subject column is considered to be required, you cannot remove it from the list.
COLUMN NAME | COLUMN TYPE | COLUMN DESCRIPTION |
|---|---|---|
Subject (required) | Single Line of Text | Similar to an email subject, this column will provide high-level information that describes the topic of the discussion. |
Multiple Lines of Text | This column will contain the message that is being shared between team members and is similar to the body of an email message. |
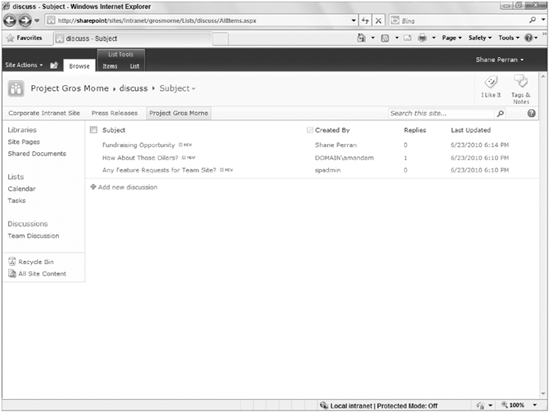
In addition to these columns, there are three unique views associated with a discussion list. The subjects view shown in Figure 2-7 are all discussions that are available within the list, whereas the threaded and flat views offer methods for viewing the individual discussions related to a single subject.
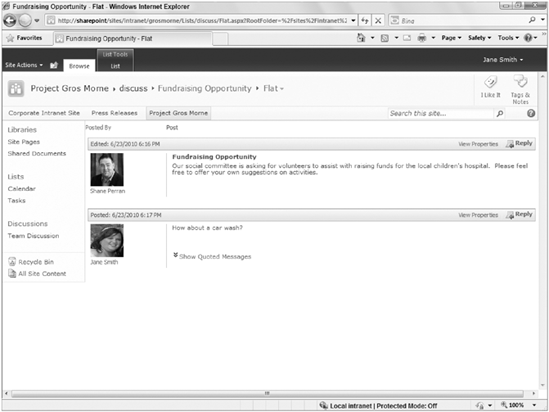
For team members who prefer to control their communications from an email client, you can connect to Outlook in this list template. Clicking Connect to Outlook from the Actions menu of a discussion list allows team members to view a new folder specifically for discussion in their Outlook SharePoint lists. Users can make new posts and send replies from Outlook in the very same way that they create a new email message. However, instead of sending a message directly to someone's inbox, the message is posted to a central location where everybody can share the information. Figure 2-8 shows an example of a discussion board list item in Flat view. This view is available by clicking a discussion subject.
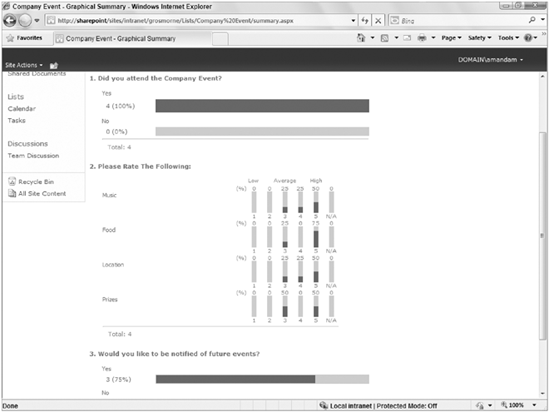
In most organizations, you need to collect information from users on specific programs and events. SharePoint provides a great tool for conducting surveys via the survey list template. This template can be highly customized to deliver dynamic surveys to an organization. All data is submitted back to the list and can be viewed in a graphical format or exported to a spreadsheet for additional processing. Figure 2-9 is an example of the graphical format of survey results that is available with every survey.
Creating questions in a SharePoint survey is similar to creating columns, with the exception that no default (required) columns exist. Instead, the author must complete a wizard type interface to create the questions required for the survey.
In a SharePoint survey list, you can create the question types shown in the following list:
Single line of text
Multiple lines of text
Choice (menu to choose from)
Rating Scale (a matrix of choices or a Likert scale)
Number (1, 1.0, 100)
Currency ($, ¥, €)
Date and Time
Lookup (information already on this site)
Yes/No (checkbox)
Person or Group
External Data
Managed Metadata
The survey list template has a unique feature that allows you to create page separators and rating scales to improve a survey form's usability and design. Once you create questions, you can add branching logic to improve the flow of questions and ensure that you're only asking users to answer questions relevant to them. For example, if a question asks if the user has attended the company social, you can insert branching logic to ensure that, if the user selects no, she can skip questions that focus on the company social and redirect her to the next relevant question.
The status list template was previously known as the key performance indicator (KPI) list in SharePoint Server 2007 and is a specialized list template for tracking progress toward organizational goals and objectives. Because this feature is related to the business intelligence features of SharePoint Server 2010, it will be explored in detail in Chapter 16.
External lists are a new feature within SharePoint 2010 that support the viewing and interaction of external business data from within a SharePoint list. As this list template is dependent upon the Business Connectivity Services features of SharePoint, we will explore it in detail in Chapter 15.
Now that you know the various lists that are available in SharePoint, you need an understanding of how you can interact and work with lists to gain the insight you require from a SharePoint site and the information it contains.
In the next two examples, you learn how to add content to a list, as well as make updates to existing content within a list. Because SharePoint lists are only useful if they contain information, it is very important that you understand how to update them effectively.
In SharePoint, a variety of list templates can store just about any type of information or data. In the following example, you walk through the steps of creating a new list item in an existing announcements list. However, the same steps apply regardless of the list template you use. Therefore, we recommend that you repeat these exercises using the different list templates within the Project Team Site you created earlier within this chapter.
TRY IT OUT: Adding a New Item to a List
Your boss has requested that you create a news story announcing the launch of the new project. Rather than creating this story as an email message and potentially distracting your team members from more important and time-sensitive activities, you choose to create an announcement on your newly created team site.
From the main page of your Project Gros Morne site, expand the Site Actions menu and select View All Site Content. You will be redirected to a page listing all lists and libraries that exist within the current site.
Click on the Announcements link. This will bring you to the Announcements list.
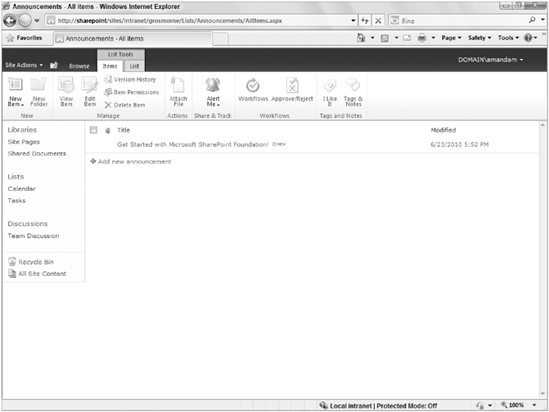
At the top of the page, click on the Items tab within the List Tools menu. This will display the List Items Ribbon menu associated with the announcements list, as shown in Figure 2-10. From this menu, you may create new announcements or interact with existing announcements, along with accessing more advanced features that will be covered later in this book.
Click the New Item menu option. This will launch a form for you to complete to specify the details of your announcement.
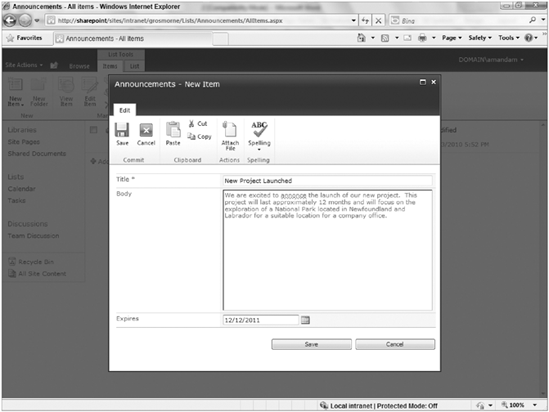
Complete the form using the following details.
COLUMN
VALUE
Title
New Project Launched
Body
We are excited to annonce the launch of our new project. This project will last approximately 12 months and will focus on the exploration of a National Park located in Newfoundland and Labrador for a suitable location for a company office.
Expires
Enter a date 12 months in the future.
Click on the Spelling menu item. If you entered the details as specified in the preceding table, you will notice that one spelling error has been found.
Click OK to view the details. You should see that the word "annonce" is underlined in red, as shown in Figure 2-11.
Click on the word using your right mouse button. A listing of suggested words will appear.
Select the first choice: announce. The text of your announcement body will be updated to feature the correct spelling.
Click Save to complete the creation of your new announcement. You will be returned to the list, and your new announcement will appear on the screen with a new icon.
How It Works
In the preceding example, you navigated to the announcements list of your project site to create a new entry related to the launch of a new project. The announcement list is an excellent location for content such as this, which does not require an immediate response or action from readers. Quite often in organizations, messages such as this are sent via email. Using an announcements list, team members can receive their updates on topics at times that are more convenient for them. When you specify an expiration date for your entry, it will only be displayed in the Summary view until that date. Other views can be configured for filtering based on the Expires column as well. We will cover the creation of custom views in Chapter 4.
When navigating to the announcements list, you selected View All Site Content from the Site Actions menu. This option will allow you to access all lists and libraries on the site. In some cases, a list may have been created but not have been added to the side navigation. Therefore, you must access it using the View All Site Content option.
TRY IT OUT: Editing an Existing Item in a List
Upon reading the new announcement that you created on your project team site, you realize it would have been useful to also include details related to how others can become involved. Therefore, you must update the announcement to include additional details.
From the main page of your project site, select the All Site Content link from the side navigation. This is an alternate method to access the page containing links to all lists and libraries on the site.
Select your announcements list.
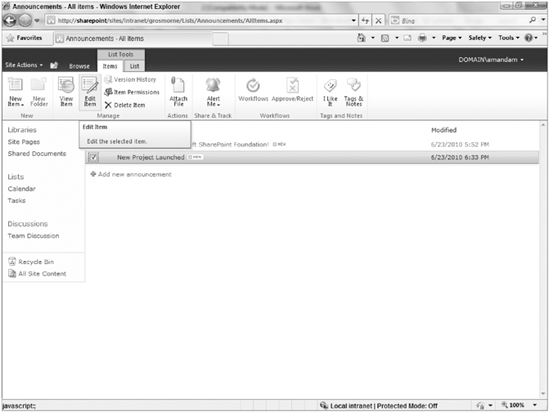
Select the checkbox to the left of your New Project Launched announcement.
Select the Edit Item option from the Ribbon as shown in Figure 2-12.
Within the Body column, add the following text:
To become involved in this project, please contact Aaron Murphy, the Project Manager at [email protected].
Click Save.
Now when team members view your announcement, they will see your latest changes.
The previous two examples focused on creating and editing items in an announcements list. However, you can use the steps to create new items on all lists. It is highly recommended that you take some time to enter items in the other lists templates that exist on your Project Team Site before completing additional exercises.
TRY IT OUT: Create a New List
When you created your Project Team Site earlier in the chapter, the site contained certain lists by default. In some situations, you may need to add additional lists to your site that utilize other templates or meet your specific requirements. In this example, you will create a new list based on the Project Tasks template. This list will be used for tracking team assignments and monitoring progress throughout the project.
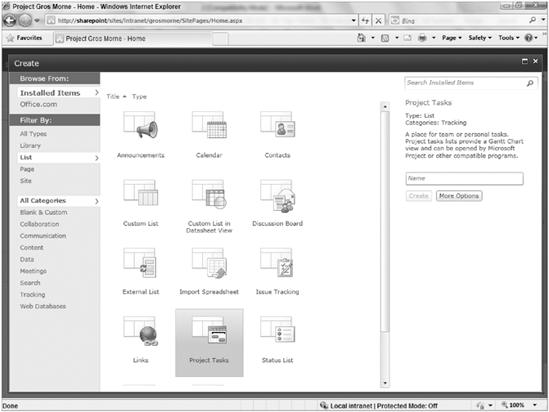
From the main page of your Project Gros Morne site, expand the Site Actions menu and select the More Options menu item.
Select Filter by List, as shown in Figure 2-13.
Select the Project Tasks item.
Enter Workplan as the name of your list.
Select the More Options button.
Ensure that Yes is selected to Display the list on the Quick Launch Toolbar.
Click the Create button.
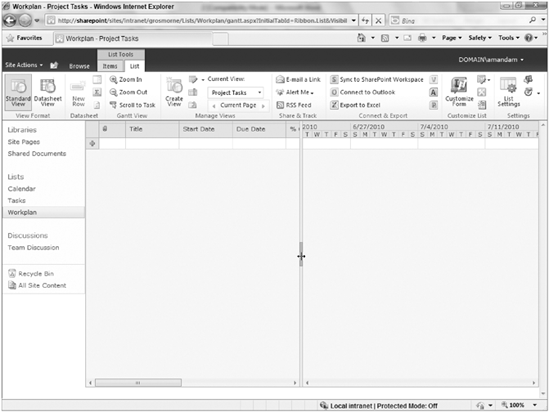
The new list will be created, and you will be redirected to its location as shown in Figure 2-14.

How It Works
In this example, you created a new list on your site based upon the Project Tasks template. This same process can be used for creating any list on your site. In step 5, you selected the More Options button, which allowed you to determine whether the list should appear in the Quick Launch Toolbar. If you selected No, team members would be required to visit the All Site Content page in order to access my list. However, selecting Yes means the link will appear conveniently in the side navigation.
TRY IT OUT: Edit Items in a Gantt View
From the main page of your Project Gros Morne site, select the Workplan link from the side navigation to access the Project Tasks list created in the previous Try It Out.
You may notice that the presentation of this list is slightly different from that of the lists previously explored in the chapter. In the middle of your screen, you will notice a view divider bar. Hover near the middle of the bar, as shown in Figure 2-15, to highlight the area on the bar that you can click and drag to the right.
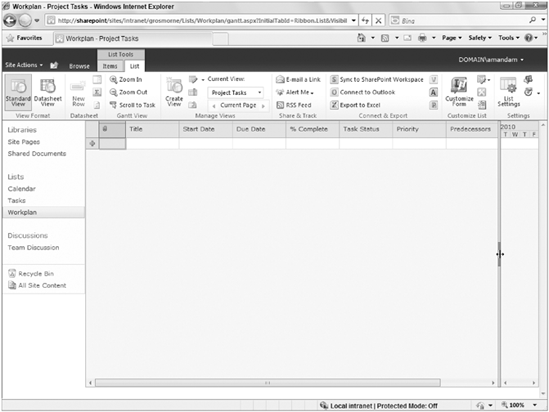
Drag the bar to the right so that all columns are displayed in the left-hand panel of the view as shown in Figure 2-16.
Update the list by clicking within the table cells of each column on the left side to create the following tasks.
TITLE
START DATE
DUE DATE
% COMPLETE
TASK STATUS
PREDECESSORS
Project Kickoff Meeting
January 3, 2011
January 3, 2011
100
Completed
Complete Stakeholder Interviews
January 4, 2011
January 11, 2011
50
In Progress
Project Kickoff Meeting
Create Requirements Document
January 12, 2011
January 26, 2011
0
Not Started
Enter your own name in the Assigned to column for the Complete Stakeholder Interviews task. Leave the Assigned to column blank for the other two tasks.
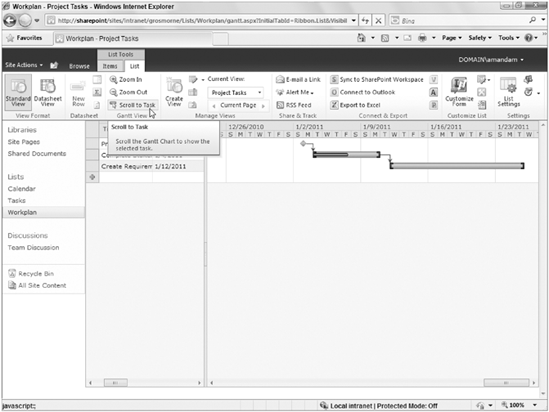
Drag the view divider bar back to the left, and select Scroll to Task from the List Tab within the Ribbon menu bar, as shown in Figure 2-17. You may be required to also zoom out or zoom in using the buttons on the Ribbon menu.
You will now see a graphical representation of your task schedule displayed in the right-hand portion of your view.
How it Works
The Project Tasks list is configured to have a Gantt view as the default view type. This specialized view is helpful for viewing date-based information in a format that clearly indicates the schedule and dependencies of tasks. You will notice that lines are drawn between tasks to indicate relationships where one task has been defined as a predecessor of another. In addition, you will notice that the Complete Stakeholder Interviews task is partially filled with a black line to indicate that it is 50% complete. This helps ensure that team members can easily identify the status of the various tasks that are assigned to them.
TRY IT OUT: Change the View of a List
From your Workplan list, select the List tab on the Ribbon.
Expand the Current View drop-down, and select My Tasks as shown in Figure 2-18.
The page will refresh, and you will notice that a new view of the list appears that displays only the task for which you have been assigned.
How It Works
As you add more and more data to SharePoint lists, it is important that you have methods to organize and access the information in a timely and effective manner. In the previous example, if you accessed a task list on a popular team site, you could have hundreds or even thousands of list items. With such a large amount of information, it's very difficult to quickly identify relevant items in the list. However, through custom views, you create filters that look at the column data and return items that meet specific criteria.
In the example shown, you selected the My Tasks view. This view has a filter that only displays items assigned to the current user. The view uses a special property called [me], which identifies the current user and displays only items that have that user's name in the Assigned To column.

TRY IT OUT: Export List Items to Excel
From your Workplan list, select the List tab on the Ribbon.
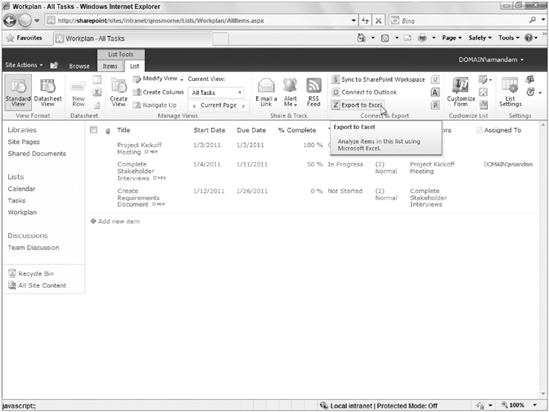
Expand the Current View drop-down and select All Tasks. The view will refresh, and all three tasks will be visible in the listing.
Select the List tab on the Ribbon menu once again.
Select the option to Export to Excel, as shown in Figure 2-19.
A file download box will appear asking you to Open, Save, or Cancel. Select the Open option.
Microsoft Excel will open on your desktop, and you will likely receive a security warning. Click the Enable button.
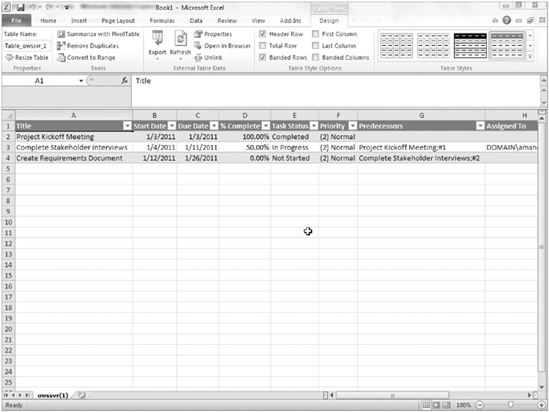
A spreadsheet will open, containing the information from your SharePoint list, as shown in Figure 2-20.
How It Works
SharePoint is a fantastic collaborative environment for storing up-to-date information in a centralized store. Editing lists is very similar to editing information in Excel, especially if you are using a datasheet view, but in Excel you can do certain things that are impossible on the browser, such as advanced calculations, data analysis, what-if analysis, and complex rich formatting. However, you can have the best of both the SharePoint and the Excel worlds; you can create custom views on large amounts of data to filter and only display relevant information. Then, through the Export to Spreadsheet functionality views of list data, you can move data into Excel worksheets to share information or run further analysis.
TRY IT OUT: Subscribe to an Alert
When you work with SharePoint lists, you may want to be notified of changed or added content because receiving this information via an email is less time-consuming than physically visiting every SharePoint site to manually check for new content. SharePoint offers a special Alerts feature, to which you can subscribe and from which you can create lists to keep aware of changes.
Creating alerts allows team members to stay up to date on the changes to a SharePoint list or library in a manner that is appropriate to their unique work preferences or to receive immediate notifications on items that are of high relevance to them. For example, if you are responsible for responding to trouble tickets submitted to a list, you'll likely want notification as soon as an item is created or edited. However, you may only select a weekly summary report for another list that tracks menu choices for the cafeteria.
From the main page of your Project Gros Morne site, select the Workplan link from the side navigation.
Select the List tab on the Ribbon menu.
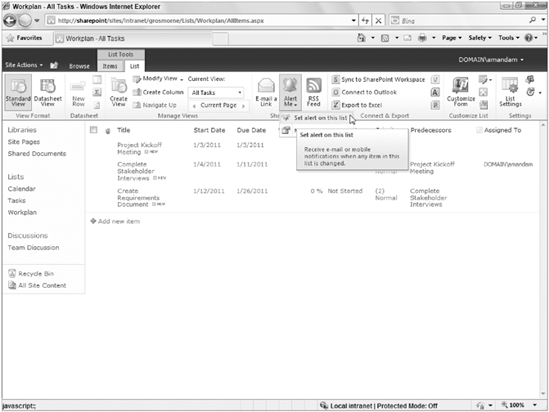
Select the Alert Me item from the menu. A small menu will appear.
Select the Set alert on this list option from the menu, as shown in Figure 2-21.
A New Alert window will appear. Enter the following settings for your new alert.
Click OK.
How It Works
In the preceding example, you created an alert on the Workplan list so that you would be notified whenever a team member other than yourself makes a change to an existing task. You chose to receive your alert via email. Changing the Alert Title to an informative value allows you to easily distinguish the type of update you are receiving as it appears in your inbox, since the Alert Title will be the subject of the email message that is sent. By selecting a daily summary, you can choose which hour of the day you wish to receive the alert. As a project manager, you may wish to receive a single report at the end of each business day outlining what progress has been made on your team's tasks for the current business day. This may be more effective and efficient than receiving a single email message every time a task is updated.
TRY IT OUT: Create a Threaded Discussion
From the main page of your Project Gros Morne site, select the Team Discussion link from the side navigation.
Click the Add new discussion link.
Enter the following details for your discussion topic.
COLUMN
VALUE
Subject
SharePoint Works Great for Projects!
Body
I really like that we can update our project team site directly from the browser and share our progress as we move towards our final goal.
Click Save.
Your new discussion topic will appear as shown in Figure 2-22.
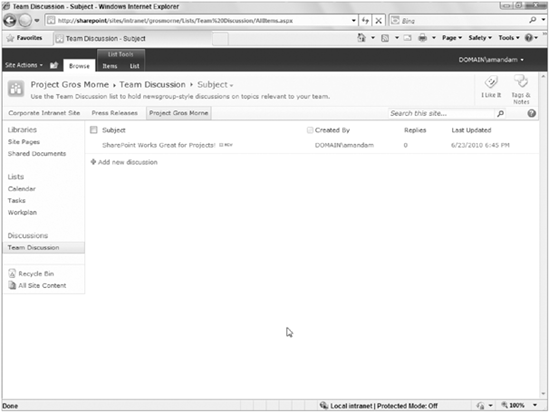
Now that your new discussion topic has been added to the site, other team members may come to the site and reply to your post.
TRY IT OUT: Connect a List to Outlook
For many team members, Microsoft Outlook is an application that is open on their computer continuously throughout the day. It is an application that many people are familiar with and, therefore, it can be a great tool for updating information on your SharePoint site. If you use Outlook 2010, you can connect specific lists to your profile so that information stored within the list is available as a folder in Outlook. This means that you can work directly on list items through Outlook and the application automatically synchronizes your changes with the list when you reconnect. This keeps the SharePoint list information up to date, even when you are away from the office or disconnected from the network. If a conflict exists, you receive a notification and you have a choice on how you want to resolve the conflict.
From the main page of your Project Gros Morne site, select the Team Discussion link from the side navigation.
Select the List Tab from the Ribbon.
Select the Connect to Outlook option from the Connect & Export group.
You will receive a security prompt to ensure that you wish to allow the website to open the application from your computer. Click Allow.
Outlook will open, and you will receive an additional prompt to confirm that you wish to Connect that SharePoint Discussion Board to Outlook. Click Yes.
Outlook will now connect to the SharePoint list and download the existing discussions so that they can be viewed and accessed directly from Outlook, as shown in Figure 2-23.
TRY IT OUT: Reply to an Existing Discussion from Outlook
Outlook supports a two-way synchronization of content. This means that, in addition to receiving updates within Outlook from the SharePoint list, team members can submit updates to the SharePoint list from Outlook. In this example, you will reply to your previously created discussion topic from within Outlook.
Open Microsoft Outlook.
From the Mail tab, select your Team Discussion list from the SharePoint Lists, as shown previously in Figure 2-23.
Select the SharePoint Works Great for Projects Message.
Click the Post Reply button from the Home tab on the Ribbon.
Enter the following for your reply:
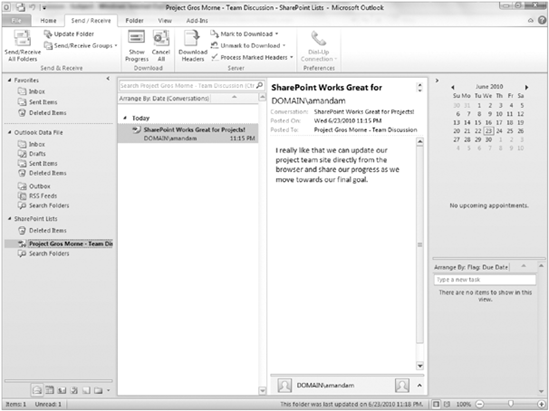
SharePoint is great and it supports updates to lists such as Discussion Boards, Tasks, Contacts and Calendars directly from within Outlook.
Click Post.
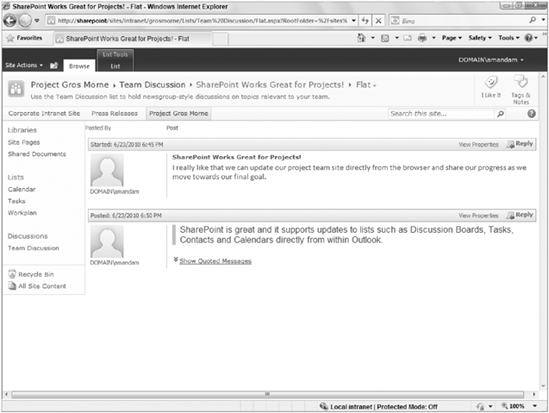
When you return to your team site, you will notice that, in just a few moments, your new reply will appear with the Team Discussion list, as shown in Figure 2-24.
In this chapter, you learned about the basic content storage mechanism in SharePoint, called lists. Lists allow you to collect information on a SharePoint site and share it with other team members in a manner that is easy to update and maintain. You learned the following:
Lists contain columns of data that describe an item. Columns can contain information in a variety of formats, such as single line of text, multiple lines of text, date, or numerical data.
You can link some lists such as tasks, project tasks, discussion boards, contacts, and a calendar to Microsoft Outlook to allow users to update and create new content on the SharePoint site directly from their email client. This is convenient for those users who are less familiar and comfortable in a web environment, but very much at ease when they work with their email program.
By linking lists to Outlook, you can create an offline store that you can synchronize with later when the SharePoint site is available.
You can link some list templates with an Access database. This also creates an offline store and provides a rich reporting environment for users on data that is stored on the SharePoint site.
SharePoint has a variety of list templates that you can use to create task assignments, and perform event management and issue tracking. You can use these templates exactly as they are created, or you can customize them by creating custom views or columns.
You can subscribe to information that is stored within lists via alerts, which are customizable email notifications that you can define directly from the List toolbar menu.
When you need to share information stored on a SharePoint site with stakeholders who do not have access to the physical environment, you can export certain SharePoint list views into Excel spreadsheets or Visio diagrams and save the data offline for further analysis or sharing.
This chapter focused mainly on lists basics, describing the various functionality and features. In Chapter 4, you learn how to customize and manage lists to create working environments that suit your specific business requirements and needs.