
WHAT YOU WILL LEARN IN THIS CHAPTER:
Search is a very common action among users today. When they access a website, they expect to be able to quickly and easily find the relevant content that they are looking for by searching the site. SharePoint is no exception to this concept, and your site users are going to want to be able to reliably and quickly find relevant content. The tools covered in this chapter can be combined to help you build powerful search solutions for your users.
SharePoint Search comes in several different flavors, based on the version of the product that you have installed. As you move to a higher level of licensing, additional search features are available. The examples in this chapter are based on the Enterprise version of the product; however, it is good to understand the different types of search available in each of the application platforms. You learned earlier in the book about the three different versions of SharePoint: Foundation, Standard, and Enterprise. The table that follows describes the primary differences in these versions of search. Keep in mind that each version of the product includes all the features available in previous versions.
STANDARD | ENTERPRISE | |
|---|---|---|
Site search Best bets and keywords Relevancy by number of clicks Managed metadata search Mobile search People search Phonetic search Search connectors Relevancy tuning | Site search Standard search features Extensible search platform Business connectivity framework Thumbnails and previews Deep refinement Similar results |
As you can see, there are many search features included with the Enterprise version that can be used to enhance your experience with SharePoint. Imagine how much faster and more efficiently you will be able to work, having all your organization's knowledge available through SharePoint search. In the remainder of this chapter, we will review different ways that you can configure and manage search. We will start by reviewing several different key terms, and then, you will work through several examples of search configuration.
Note
In addition to the search platforms described above, there are also two additional search configurations, include Search Server and FAST Search. Search Server is often paired with Foundation Server to add additional functionality to the search features included in Foundation Server. FAST Search provides additional features to the Enterprise Search Features. To find additional information on either FAST Search or Search Server, refer to the following URL: http://technet.microsoft.com/en-us/enterprisesearch/default.aspx.
Before we jump into the details, let's do a quick review of some of the common search terms. It is likely that as you start to work with search, you will run into these terms frequently. Having a solid definition of each of them will help you to understand how all the search components work together and how you can use them to help you build powerful solutions that incorporate search.
There are quite a few components that make up SharePoint Search; in fact, entire books have been dedicated to explaining how to best configure, manage, and use the search features of SharePoint. While this book won't go into as much detail, it will cover all the search basics and give you enough information to start using Search within your solutions. To get started, let's review some common search terms that you are likely to hear.
A content source is a collection of content that is included in the search results. Content sources are created and managed within the Search Service application. Many different types of data can be included within a content source, including:
SharePoint sites
File shares
Exchange public folders
Non-SharePoint websites
People Profiles
Line-of-business applications
Database content
Content from Web Services
Server administrators are typically responsible for creating new content sources, since they are configured within the Central Administration management site. You can think of a content source as a pointer to a collection of data that you want to have returned within the search results.
IFilters define how the content within the content sources is indexed. In order for SharePoint to understand how to read and index the files, an IFilter must be installed. The common Microsoft products such as Word, PowerPoint, and Excel will, by default, have all of the proper IFilters installed with the SharePoint installation. Typically, environments will install additional IFilters for non-Microsoft file types; a common example of this is PDF files.
When a content source is created by a server admin, one of the configuration items is the crawl schedule. Crawling is the process that the SharePoint server uses to access the data within the content source and build the search index. The process is called crawling, and the crawl schedule refers to the frequency with which the index will be updated. The crawl schedule should be based on the frequency of the changes in the data. For example, if you had a file share location that you used to store archived project data, then you would probably not need to update the index often, because the data is archived and does not change often. On the other hand, your SharePoint sites are likely very active and dynamic and should be crawled on a very frequent basis.
The index is what SharePoint uses to store the data from the content sources once it has been crawled. The index files are updated during each crawl and then made available for search queries.
When you retrieve data from the index files, you will run a search query. This is often done through the entry of a search term in the search box. When you enter the search term, a query is conducted against the index files and the results that match your query are displayed.
Search scopes are a way to query a subset of data within content sources. As an example, a search scope could be used to search only against the file shares or the public website. Typically, in each environment, there are several global search scopes created, and then within each SharePoint site collection, more granular search scopes are created that relate specifically to a project. Later in this chapter, we will cover search scopes in detail and will have several Try It Outs dedicated to creating and using search scopes.
Keywords and best bets are a function of Search that allows you to help guide users to the content that best matches what they are looking for. Take the Holiday Calendar as an example. It is likely that many users will want to access this calendar from the intranet site. Each user will think differently, however, and will likely enter a different search term than another user. Using best bets and keywords, you can determine what the users are likely to search on and then ensure that the results you want to take them to are displayed clearly on the page.
Federated search provides the ability to incorporate indexes from other locations into your search results. This functionality will allow you to query multiple index locations at one time and will display the information on different web parts within the search results page.
The Search Center is an enterprise site definition that can be used within SharePoint sites. Typically, each organization has one central Search Center site that is used for all enterprise search queries.
While the concepts covered above aren't all-inclusive, they should give you a solid understanding of the search basics. Throughout the remainder of the chapter, you will work through the search configurations. You will start by looking at search out of the box. Once you understand what to expect when a new site is created, you will look at how to customize the search experience for the site collection. This will allow you to understand the creation of custom scopes, keywords, and even customize the way that the search results look. Once you have covered things at the site collection level, you will look at some of the global search service configurations. You will be working through a lot of examples in this chapter, so it will be a good idea to take a few minutes and make sure that you have a site collection that you can use for testing. If you have been following along through the previous chapters, the Try It Outs will be based on those sites, but if you are just picking up with this chapter, it will probably be a good idea to get a site ready before proceeding. You just need to have a single site collection with several different Office documents uploaded. The Try It Outs in this chapter will be created using examples of content that has been uploaded to the site in previous chapters. If you have not completed the previous examples, then you simply need to update your search queries to match data that currently exists within your environment.
Now that you have gotten a brief overview of the different search terms and configuration items, you are going to dive into the search details. You are going to start with the default configuration for search when you create a new site collection, and then, you will move to the different customizations you can make so that search is configured to meet your specific needs and wants.
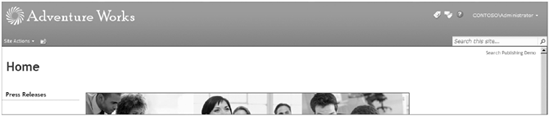
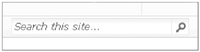
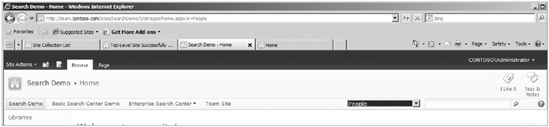
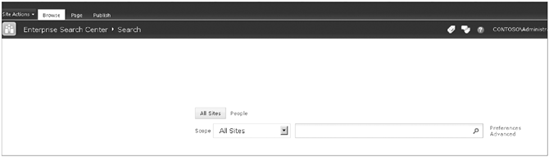
Basic search is the default configuration for a new SharePoint site collection. With a basic search, users are able to enter a search term for an item and then press Enter. When they press Enter, they will be redirected to a search results page from which they will be able to interact with the search results. Search is easy to locate on the page and contains a user prompt that says "Search this site...." Figures 17-1 and 17-2 show examples of the basic search configuration for both a team site template and an enterprise publishing site template. You can see from the screenshots that the search is configured in a similar location and layout on each of these site templates.

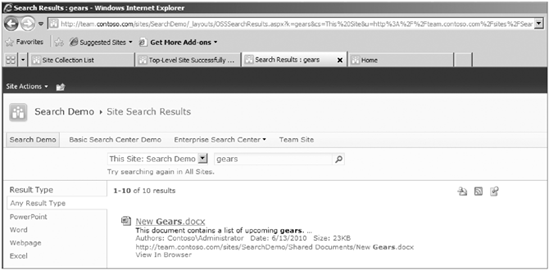
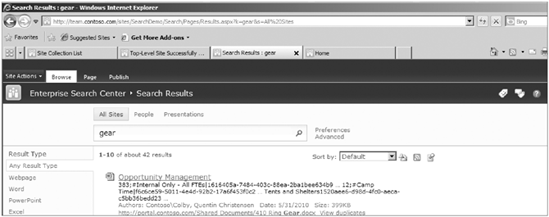
When a user adds a value to the search box and presses Enter, the value is translated into a query string that is passed to the search results page. Let's take the search term "gears" as an example. When the user enters the term "gear" into the search box and presses Enter, he or she will be redirected to the search results page, and the search results will automatically appear. If you look at the URL when you arrive at the search results page, you will notice that your search term is part of the page URL. The URL for our example is http://team.contoso.com/sites/SearchDemo/_layouts/OSSSearchResults.aspx?k=gears&cs=This%20Site&u=http%3A%2F%2Fteam.contoso.com%2Fsites%2FSearchDemo, and the table below describes each of the elements.
VALUE | TRANSLATION |
|---|---|
| The search results page |
| The keyword search value |
| The content source |
| The source URL |
Figure 17-3 shows an example of the search results page, including the URL. As you are completing different Try It Outs in this chapter, you will notice the URL for the search page will change based on the different values you configure for the search. There are many ways that you can use this knowledge as you are building different search solutions. In fact, you can even forgo the search box completely and just give users a link that contains the search URL. When users click on the URL, it will send them directly to a preconfigured search results page.
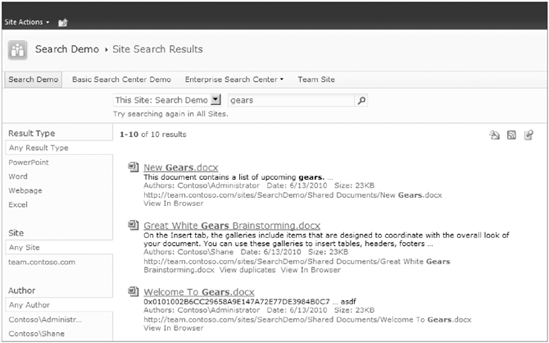
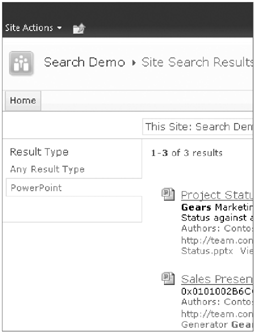
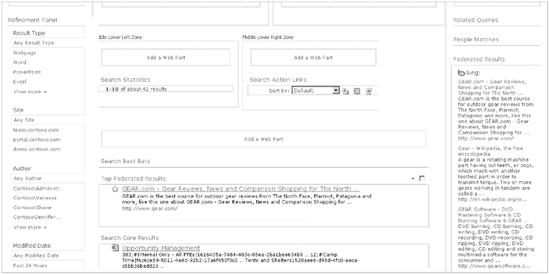
Now that you have completed a basic search query, take a few minutes and review the search results page. Across the top of the page, you can see the search term that you entered on the previous page. Across the left side of the page, you see the search refinement panel. Using this panel, you can apply additional filters to your search results. And finally, you should notice several icons to the right of the search results. These icons allow you to create an alert for the search results, view the RSS feed for the search results, and save this location so that you can search it later from Windows Explorer. It should be noted, however, that these action buttons will be dependent on internal server and client configurations, so if you don't see the same things within your environment, then you will need to work through a resolution with your farm administrator. Figure 17-4 shows an example of the search results page with each of the elements just discussed highlighted.
TRY IT OUT: Use the Search Refinement Panel to Refine Search Results
Use the Search Refinement Panel to Refine Search Results
In this Try It Out, you are going to use the search refinement panel to help you further narrow your search results. You will be working from the search results page from your previous exercise, so if you need to get back to the search results page, refer to the previous "Perform a Basic Search" Try It Out.
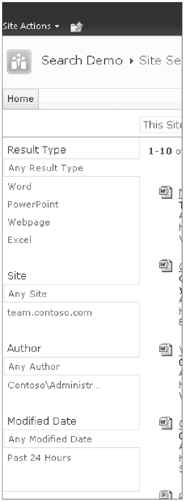
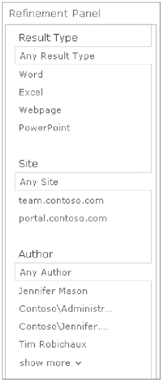
From the search results page, locate the refinement panel on the left of the page. An example of this is shown in Figure 17-5.
Select the PowerPoint filter and review the updated search results. Notice (shown in Figure 17-6) that only PowerPoint files are displayed in the search results. Also notice that your search URL now has an additional parameter for the file extension:
fileextension%3D%22pptx%22.Now, you will apply a filter to limit the results based on the Author. Keep in mind that since you are working in different environments, you will have different authors listed. If you only see one author listed, this means that all documents returned in your search query have been authored by only one person. Notice that as you select the author, the other filters remain. This occurs because the current author you have selected has content that applies within those filters. If you happen to select an author that has only Word documents, the option to filter by results type will not be displayed because it is not relevant to the current search results. Also notice as you select filter options that they are outlined with a small gray box (shown in Figure 17-7). This allows you to quickly see what value you have selected for each of the categories. A value is also displayed that allows you to easily show all values for that category.

How It Works
The search refinement tool allows you to quickly and easily refine your search results based on common elements such as file type and author. This will allow you to quickly narrow your search results based on criteria such as "I know who worked on the presentation and I know they worked on it recently." As you select the options in the refinement panel, the values displayed in the search results are narrowed to match your selected criteria.
So far, all of the examples in this chapter have been based on the default search settings. The default settings provide a great starting point and allow users to easily search for content within their site; however, these default settings are quite limited, and if they are not customized further, then you will be missing out on many of the great features included with SharePoint Enterprise Search. The rest of this chapter will be focused on the different customizations that can be made for search.
Before you go too deeply into the details, let's take a few minutes to look at some of the features within SharePoint that you can use to build search queries. If you have ever watched someone search for something on the Internet, you have probably thought to yourself that you would have likely searched a little differently for the same thing. The truth of the matter is that we all search a little differently from each other. Some users want to use a very rich interface, and some users want to manually type in search queries. We wanted to take a little space in the chapter to let you know of some of the tools that you can use to help build effective search queries.
One of the newest features in SharePoint 2010 is the ability for users to manually enter Boolean Searches from a search box. The following Boolean properties (also referred to in places as logical operators) are supported within the search entry box:
AND
OR
NOT
These can be combined to form a search query. An example is ("Gear" OR "Machines") AND (title: "Presentation" OR title: "Report"). Entering this search query would return all items that contain Gear or Machines and have Presentation or Report in the title. Keep in mind when you are using the Boolean operators that they are case-sensitive, and if they are not in all CAPS, then they will be considered part of the search phrase and not an operator.
A prefix matching search is where a user adds a * to the end of a text phrase and then the search returns all the results that start with the text the user entered before the *. An example of this would be a user searching using the query "ba*" and getting the results for bake, ball, bacon, and backpack.
One of the wonderful features in SharePoint 2010 is the ability to do a people search based on the phonetic spelling of a user's name. This is a great feature because, in many cases, it can be difficult to know the spelling of all the users' names within your organization. Using phonetic search, you can enter the search term "Neal" and you will also get results for "Neale."
SharePoint 2010 includes a feature that will look at users' search queries and provide them will additional suggestions in the form of a "Did you mean?" suggestion. These suggestions are created from recent search queries, a dictionary, and a custom location where you can enter your own suggestions. This feature is great because it can help users easily identify and correct any mistakes within their search query.
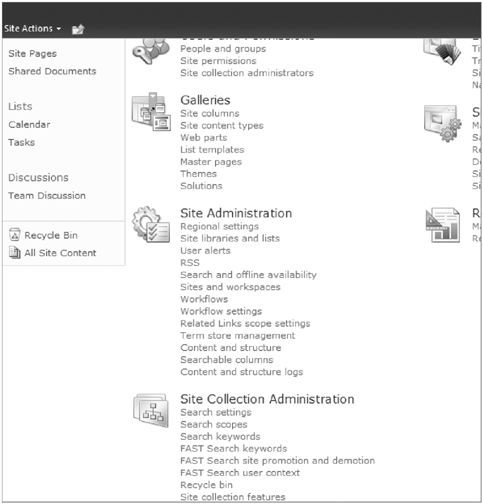
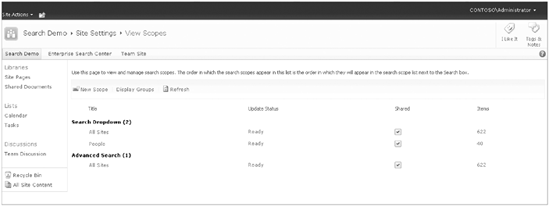
Now that you have covered the basics of search, it is time to move to some of the different things you can do to customize your search experience. You are going to start your configurations at the site collection level. You learned earlier in the book that a site collection is the smallest boundary available in SharePoint. When you apply settings to the site collection, they affect all webs within that site collection. In this section, your changes will only affect the current site collection. Once you have worked through the various changes you can make at the site collection level, you will look at the changes you can make at the service application level. We are taking this approach because it is very likely that many readers of this book will only have access to the site collection. To access the search settings we are discussing, you will need to have full control of the site collection. The search settings are accessed through the site settings page, under the site collection heading. There are three specific configuration pages that we will discuss, search settings, search scopes, and search keywords. Figure 17-8 shows the locations of these links on the site settings page.
The first option displayed under the Site Collection settings is Search Settings. From this screen, you will be able to configure the behavior of searching for all sites within the site collection. There are three different settings that you can modify from this page, including enabling search scopes, defining how the scopes drop-down is configured, and determining what search results page will be used to display your search results. Before we go any further with these configuration settings, there are a few items that you need to be sure you understand. Once you understand these items, you will be able to understand the different configuration options available to you.
Contextual Search: A contextual search is a search that is based on your location. It is denoted in the scopes drop-down with "This Site: [site name]" or "This List: [list name]." By default, your site is configured to use the contextual search scope of This Site for all searches. Unless you configure the site collection differently, This Site will be the only search scope used within the site collection. So far, all of the examples in this chapter have been examples of contextual searches.
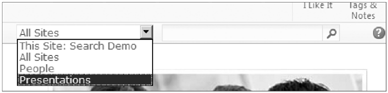
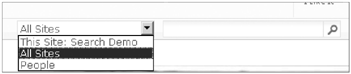
Scopes Dropdown: The scopes drop-down is the drop-down box located next to the search box that allows users to choose a specific scope for searching. This is not enabled by default; however, as you will see below, it can be enabled within the site collection. Figure 17-9 shows a site that has been configured to use a scopes drop-down.
/_layouts/OSSSearchResults.aspx: This is the location of the default search results page. This page is located on the server and is the default search results page for all new site collections. Keep in mind that since this page is stored on the server, it can't be easily customized through the browser.
Search Center: A Search Center is a site within SharePoint that has been created using the Enterprise Search Center template or the Basic Search Center template. This site is preconfigured with all the Search web parts. Many of the search customizations will require you to use one of these Search Center sites.
TRY IT OUT: Create a Search Center Site
Since you will need to reference a Search Center in the next Try It Out, let's take a few minutes and walk through the process for creating a Search Center site. Since you want to take full advantage of the features installed, you are going to create a Search Center using the Enterprise Search Center template. Because this is an enterprise template, it requires that you have some of the Enterprise features enabled, so enabling these features will be the first step in the process.
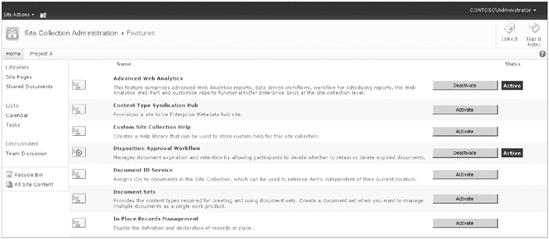
Within your site collection, access the site settings page and access the Site Collection Feature page (see Figures 17-10 and 17-11 below).
If they are not activated, activate each of the features listed below:
Search Server Web Parts
SharePoint Server Enterprise Site Collection Features
SharePoint Server Publishing Infrastructure
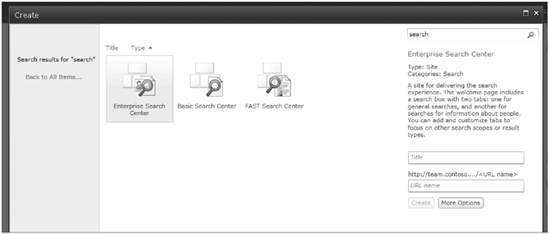
From the Site Actions menu, select the New Site option. Once the new site page is loaded, enter the term "Search" in the Search Installed Items textbox, as shown in Figure 17-12, and press Enter. This will allow you to filter the available templates to only show those with "search" in their title.
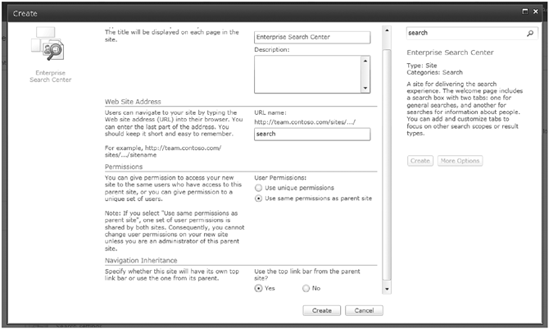
Ensure that the Enterprise Search Center is selected; enter a title and URL for the new site and click the More Options button. On the More Options screen (see Figure 17-13), select the desired configuration options. Click Create, and the new Search Center site will be created.
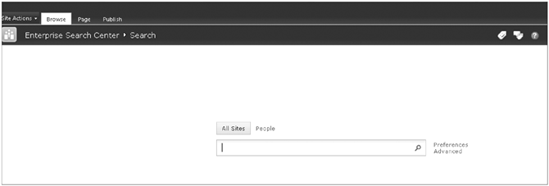
Once the new site is created, you will be redirected to the Search page (See Figure 17-14). You will be referencing this URL in future exercises, so be sure to remember the configuration settings you used while creating this site.
How It Works
The Search template is a site definition that is preconfigured with all the different web parts and lists that are needed for configuring a Search Center. Creating this site is the first step in configuring the search experience for users.
Now that you have created the preliminary required Search Center, you will work your way through the search configurations for the site collection. If you need to navigate back to the search settings, simply click on the Site Actions menu, then click Site Settings, and then click the Search Settings link in the Site Collection Administration group.
The first option for configuration determines if sites will use search scopes. You have two options available for configuration, which are described below and shown in Figure 17-15:
Enable custom scopes (such as "All Sites") by connecting this site collection with the following Search Center:
Do not use custom scopes. Use only contextual scopes (such as "This Site"). Display results in the Site Collection Search Results Page configured below.

The first option will configure our site collection to use custom scopes. The scopes available to the site collection are configured in a different location and will be covered later in the chapter. This option is simply the option to turn them on within the site collection. By default, the scopes available with an out-of-the-box configuration are All Sites, which includes all content stored within SharePoint, and People, which includes all users stored in the Profile database. In addition to what is available out of the box, you may also see some additional scopes that have been configured within Central Administration by the Farm Administrators. When you turn the search scopes on, you are also required to provide a link to a Search Center. This Search Center will then be used for all search queries completed within the site collection.
The next configuration option will determine how the scopes you activated above will be displayed. Figure 17-16 shows the different configuration options available.

These options tend to be worded in a very technical nature, and often cause confusion for users who are trying to configure them for their site collection. Throughout the rest of this section, we are going to work through each of these configurations so that we can help reduce any confusion. For each grouping of configurations, an image will be added so that you can see how the display is altered.
Do not show scopes dropdown, and default to contextual scope
This is the default configuration that we have been using. No scopes drop-down is displayed and the initial search is done against the current site. An example is shown in Figure 17-17.
Do not show scopes dropdown, and default to target results page
For this configuration, no search drop-down is displayed and the search results are passed to the target results page. Since no scope is being specified, the results displayed will be based on the configurations of the target page. This means that if the target page is configured to return things from all scopes, then the search query you enter into this search box will return items from all scopes.
Show scopes dropdown
This configuration shows the scopes drop-down and includes all scopes configured for the site collection, including the contextual search scopes. The search scope will default to the scope configured as the default for the site collection. An example is shown in Figure 17-18.
Show, default to 's' URL parameter
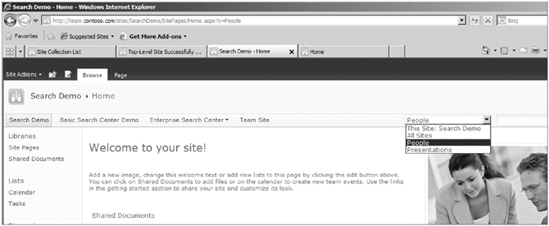
This configuration shows the scopes drop-down and includes all scopes configured for the site collection. The search scope defaults to the parameter that is passed when the site is accessed. If no "s" parameter is defined in the page URL, then the page will load with the default search scope. An example of this is shown in Figure 17-19. Notice that the URL used to access the site contains the parameter s=People, which causes the search scope to default to the People search scope when that link is used to access the page.
Note
While it is configurable to pass an "s" parameter to the home page, it is not likely that this scenario would be encountered often. Where this is more likely is when you are configuring Search web parts or the Search Center. As you work through the Try It Outs later in this chapter, you will see how this "s" parameter can be used to create a rich experience for end users.
Show and default to contextual scope
This configuration option shows all of the search scopes but defaults to the contextual scope. This means that all the search scopes will be displayed for the site collection, but by default, the search will be done against the current site. Users will be able to specify a scope, but by default, they will search the current site. An example of this is shown in Figure 17-20.

Show, do not include contextual scopes
This configuration option will show the scopes drop-down but will exclude all of the contextual search scopes. An example is shown in Figure 17-21.
Show, do not include contextual scopes, and default to 's' URL parameter
This configuration option will show the scopes drop-down, exclude all of the contextual search scopes, and default the scope to the "s" parameter in the URL. An example is shown in Figure 17-22.
Our final configurable setting in Search Settings is the Site Collection Search Results Page. This is the location to which contextual searches will be sent. This page is, by default, configured to use the /_layouts/OSSSearchResults.aspx page. Keep in mind that, if you use a page other than the page you configured for the search scope page, your users will be taken to different results pages, depending on the scope they are using to search. This can sometimes cause confusion for users, so it is a decision that you want to be sure you think through completely before configuring the setting.
TRY IT OUT: Enable and Configure Search Scopes Drop-down
In this Try It Out, you will enable the site collection to use search scopes and then configure the behavior of the search scopes.
Within your site collection, access the site settings page and access the Search Settings Page (as shown in Figure 17-23).
n the Site Collection Search Center configuration settings, select the option to Enable custom search scopes and then enter the URL for the Search Center created in the preceding exercise (as shown in Figure 17-24).
In the Sites Collection Search Dropdown Mode, select the Show and default to contextual scope Search Scope. You are choosing this option because you want to allow your users to search against all site content from within your site, but you want the default search to be restricted to just the current site (as shown in Figure 17-25).
In the Site Collection Search Results Page, enter the same URL that was used for the Site Collection Search Center with
/results.aspxadded to the end of the URL. This will cause all searches, whether contextual or scope-based, to be delivered through the same Search Center (as shown in Figure 17-26).Select OK and then navigate back to the home page of the site collection. In the search area, you should now see a search scopes drop-down box, and when you complete a search, your results should be displayed in the Search Center site. You can test this by using the search term "gear" from the previous Try It Out.
Enter the search term gear in the search box, and press Enter. Notice that the search results are displayed using the site you configured in steps 2 and 4 (as shown in Figure 17-27).


How It Works
As you make configuration changes to the scope settings, the search boxes within the site collection are updated to match those configurations. In this example, you configured the scopes to behave in a certain way and configured the search queries to be sent to a specific search results page.
Now that you have configured the basic search settings for your site collection, you will move on to configuring custom search scopes. You defined search scopes earlier in this chapter as a way to create a subset of the index so that you were running queries only against that subset. Search scopes can be created at two different levels: global search scopes and site collection search scopes. Once a global search scope is created, it can be consumed by any site collection within the farm. Site collection search scopes are different from global search scopes in that they are limited to the specific site collection that they were configured within.
Note
For the purpose of this book, most of the examples that we will be working through will occur at the site collection level. At the end of this chapter, there will be an advanced search configuration section that will briefly cover some of the admin configurations. If, after working through the advanced section, you are still looking for more in-depth detail, it is recommended that you refer to the following SharePoint 2010 admin books:
Beginning SharePoint 2010 Administration: Windows SharePoint Foundation 2010 and Microsoft SharePoint Server 2010 by Husman and Stahl (Wrox, 2010)
Professional SharePoint 2010 Administration by Klindt, Young, and Caravajal (Wrox, 2010)
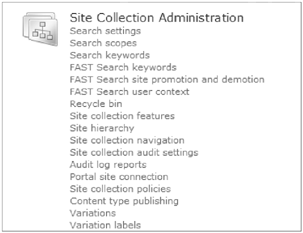
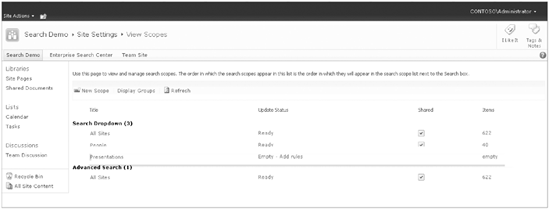
The search scope configuration pages can be accessed from the Site Settings Page, under the Site Collection Administration option. Figure 17-28 shows the configuration screen. In the remainder of this section, you will work through the different configuration options available within this page. You will start by first creating a new scope and then conclude by modifying the different display groups.
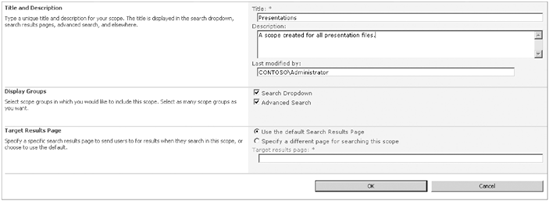
The New Scope option on the configuration screen allows you to create and configure a new search scope. When you select this option, a form is generated that requires you to configure the new search scope. You start by first giving your scope a unique name. This is the name that will be displayed in the Search drop-down. You then select one of the following options for your display group:
When selecting the display group, you can select one, both, or neither. Keep in mind that, if you select neither, then users will only be able to query the search scope by manually adding the "s" parameter to the search query URL or through a custom solution. Finally, you are able to select one of two target results page options:
Note
Keep in mind that changing the search results page here will change it for only one specific scope. While this may be the desired behavior, this may also cause confusion for your end users. Be sure to think through various use cases to make sure that the decisions you are making around these settings will not cause any undue confusion to your users.
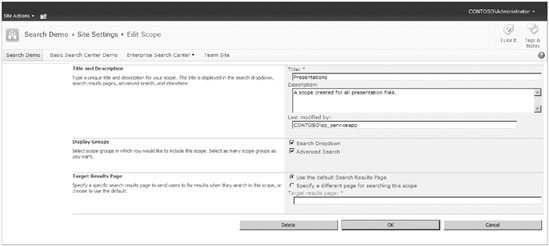
Figure 17-29 provides an example of a new scope configuration page where the scope will be allowed for both the Search Drop-down and the Advanced Search and where the results will be presented on the default search results page.
Once you click OK on the scope creation screen, you will be redirected to the scope settings page. You will notice that, just as in Figure 17-30, your new scope is displayed with the status of "Empty-Add Rules."
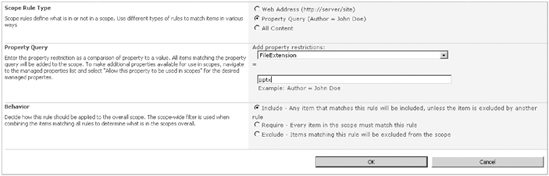
Rules are the guidelines that the scope uses to determine what content from the index should be included in the scope. A single scope can have many different rules within it. Rules are built one at a time and then, as the scope is compiled, all rules are executed to ensure that only the content you specify is included in the search. If you click on the Add Rules link, you will be redirected to the Rules Configuration page. On this page, there are three main configuration areas. As you select the option on the top of the page, you will be prompted for the required values to complete the form. Each of the Rule Types requires different values for configuration.
Web Address: This is the URL of a specific site. When you select this option, you are required to enter a valid location for one of the following options (see Figure 17-31):
Folder
Hostname
Domain or Subdomain
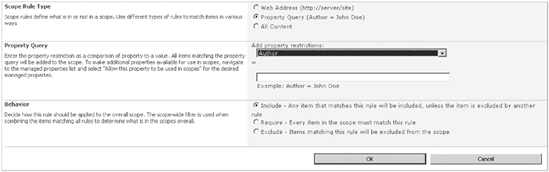
Property Query: This is the option you select if you want to include or exclude content based on a property such as author, file extension, or creation date. When you select this option, you are required to select the property that you want to query against and then enter the value that will be used for validation. If the equation equates to true, then the rule is executed for that item (see Figure 17-32).
Note
The values available for selection in the scope rules are for properties that have been mapped in the search service configuration. For the purpose of this example, we are not covering how to create managed properties; you are just consuming the managed properties that have already been created within the environment.
All Content: You select this option if you want to pull content from all content sources (see Figure 17-33).
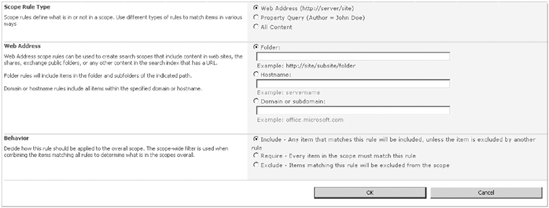

Rules based on a web address or a property also have a configured behavior. This scope looks at the behavior of all the created rules to determine what is included and excluded from the scope. Since you can have multiple rules, it is possible that one rule includes content, while another excludes it. There are three specific options for behavior:
Include: This means that if the rule equates to true for a particular item, it will be included in the scope, as long as there is no other rule that excludes it.
Require: This means that the rule must equate to true for every item in the scope.
Exclude: This means that if the rule equates to true, then the item will be excluded from the scope.
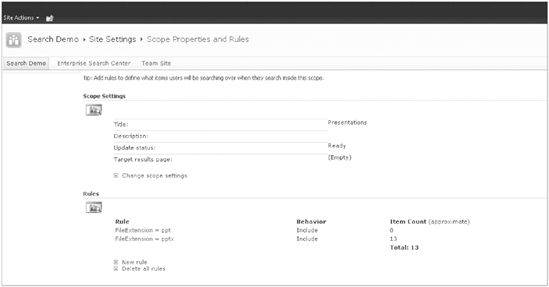
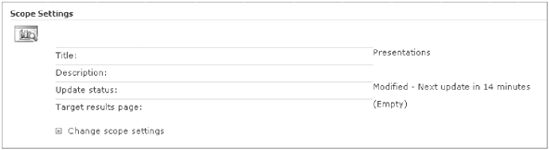
Once you click OK, you are redirected to the Scope Properties and Rules page. Figure 17-34 shows an example of this page. From this page, you can configure additional rules for the scope and also modify the general scope settings. Also note that you can see a summary of the rules you created, which includes an approximate Item Count from the index. This page will also show an update status for the scope. Scopes are recompiled on a scheduled basis, which means that there will likely be a short delay between you making your changes and the scope being updated. The status line item will inform you when the next scope update is scheduled. An example of this update can be seen in Figure 17-35.
This page can be accessed at any time from the Scope Settings page. Once you are on this page, there is really no easy way to navigate back to the Scope Settings page. So, when you are on this page, click the Site Settings link in the breadcrumbs and then select the Scope Settings link to return the summary page.
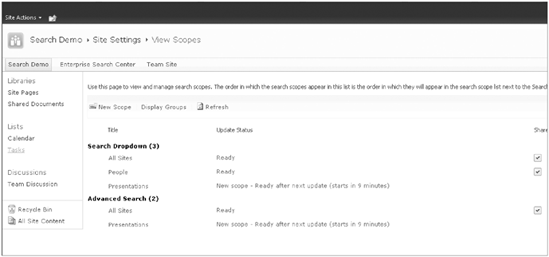
There are two configurable display groups for search scopes, the search drop-down and the advanced search. So far in this chapter, we have only worked through the search drop-down. We will be covering the advanced search further in the chapter, once we get to the Search Center. Within each display group, you can configure which scopes are visible, which order they are displayed in, and which scope is the default scope for the display group. To access these settings, click on the Display Groups link on the top of the Search Scopes settings page. From this page, click on the group you would like to modify to open the configuration page. An example of this page is shown in Figure 17-36.

You have probably noticed the link called Refresh across many of the Search Scope management pages. This link is provided as a tool to refresh the information on the page. This could be helpful if you are waiting to see when the next scope update will be. This link only needs to be used when you have the page open for an extended period, and serves the same purpose as doing a refresh within the web browser.
TRY IT OUT: Create a Custom Search Scope
In this Try It Out, you will create a custom search scope. You will use the scenario of working within a sales department. Within the sales department site collection, you are storing many different presentations. You would like to create a search scope so that you can search through all presentations. There are a few ways that you could determine which documents were presentations, including the use of content types or metadata. For this example, however, you are going to base your scope requirements on the file extension. You are doing this because you know that all presentations are created in PowerPoint.
Within your site collection, access the site settings page and access the Search Scopes Settings Page.
Select the New Scope option and configure your scope with the following options (see Figure 17-37):
PROPERTY
VALUE
Title
Presentations
Description
A scope created for all presentation files
Last Modified
Leave as default
Search Drop-down
Yes
Advanced Search
Yes
Use the default Search Results Page
Yes
Select the Add Rule link on the View Scopes page, and configure the rule with the following properties (see Figure 17-38):
PROPERTY
VALUE
Scope Rule Type
Property Query
Property Query
FileExtension = pptx
Behavior
Include
Click OK. Notice that you are redirected to the View Scopes page and that your scope status shows that you are a new scope and gives an approximate time before the next update (see Figure 17-39).
Since you know not all users are going to be using the latest version of Office, you are also going to add a rule for
.pptfiles. From the View Scopes page, click on the Presentations scope and open the Scope Properties and Rules page.Click the New Rule link and configure a new rule with the following properties:
Click on the Site Settings breadcrumb, and then open the Search Scope Settings page.
Once the status for your scope has changed to Ready, navigate back to the Site Collection home page.
On the home page, you should now see your new scope within the scope drop-down (see Figure 17-40).
Enter the search term gear into the search box, and press Enter. Notice that all of the search results are PowerPoint files and the search scope in the URL is set to Presentations (see Figure 17-41).
How It Works
In this Try It Out, you created a custom search scope. This scope will be compiled against all the indexes, and if the items in the index meet your scope criteria, they will be included in the scope searches. Whenever users choose to query against your scope, they will be searching only within the items that meet your criteria.


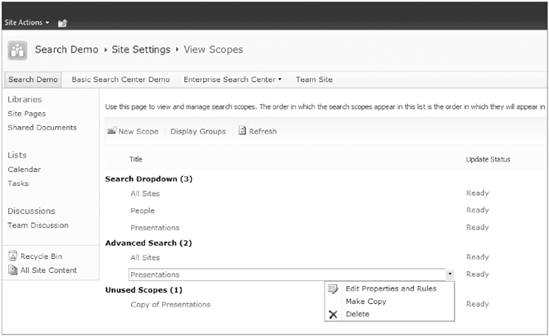
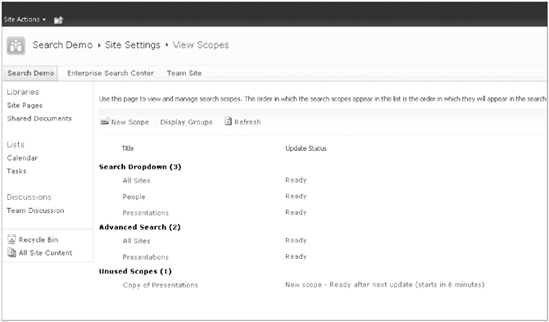
There is one final thing that we need to cover before moving on from search scopes, and that is the ability to make a copy of an existing search scope and save it as a new search scope. This is a great way to create a baseline scope that can be used as a template for additional scopes. The Copy command is located in the Item Control Block on the View Scopes page. When you select the Make Copy option, a new scope is created with the name "Copy of Scope." You can then access that scope and change the title and modify the rules. You will notice that, when the site is created, it is added to a Display Group called Unused Scopes. This occurs because, by default, the copy of the scope is not added to the same display groups as the scope. This allows you to update and configure the copy as needed, before adding it to one of the display groups. Figure 17-42 shows the location of the copy command, and Figure 17-43 shows the newly created search scope copy.
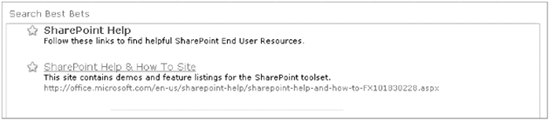
The final configuration option within the site collection is Search Keywords and Best Bets. Search keywords and best bets are a way to help ensure that users are able to quickly find the content they are looking for. Let's look at the example of users who want to view the vacation calendar. It is likely that some users will search on the term "vacation," while others will use the term "holiday," and some others may use the phrase "office closed." They are all trying to access one thing, and they are all using what they view as the correct phrase to locate the data. Given this situation, what if the actual document they were looking for was titled "Corporate Schedule"? In this case, none of the users would find the content they were looking for. One way to ensure that this doesn't happen is by creating keywords and best bets. This functionality would allow you to provide a best bet link whenever a user searched using a collection of synonyms that you provide. This way, you can think ahead and, based on what you think the user will be using for search terms, you can create the matching keywords and best bets. Whenever a user searches with one of the keywords you identified, the best bet is returned on the search results page formatted with a star. Figure 17-44 is an example of a search that is returning a best bet based on a keyword.
The great thing about keywords is that they are easy to create and maintain. As part of their configuration, you can specify a start date, an expiration date, and a review date. Whomever you assign as the owner of the keyword will get notifications when the keyword review data arrives. With the expiration dates, you can also push content during seasons of high demand. An example of this could be the end of each year, when you are working on benefits reenrollment. During that time of the year, it is likely that you will want to help users navigate directly to the content they are likely searching for.
Best bets and keywords are a great way for you to help narrow the users' search results to the content they are likely looking for, but what if you don't know what they are looking for? SharePoint provides tools to help you analyze what searches your users are generating, and based on those searches, these tools will recommend best bets for the site collection. All of these reports can be easily accessed from the Keywords Management screen.
TRY IT OUT: Create a Search Keyword with Best Bets
In this exercise, you will be creating a search keyword and best bets. We know that users will be accessing search quite a bit, and since most of them are new to SharePoint, you want to be sure that, if they search on anything having to do with getting help, they get the links they are looking for. You are going to start by creating a best bet with a link to the online Microsoft SharePoint help information. Over time, you will watch the reports and suggested keywords and then update your best bets as needed.
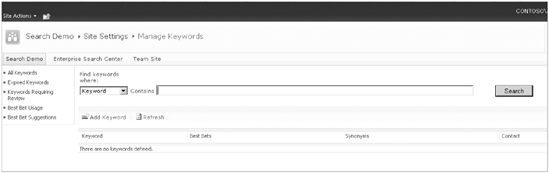
Within your site collection, access the site settings page and access the Search Keywords Settings page (see Figure 17-45).
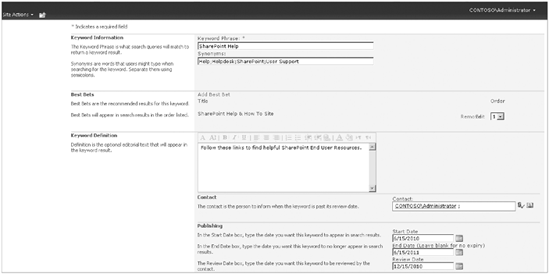
Click the Add Keyword link, and enter the following information for the properties (see Figure 17-46):
PROPERTIES
VALUE
Keyword Phrase
SharePoint Help
Synonyms
SharePoint; Help; User Support; Helpdesk
Keyword Definition
Follow these links to find helpful SharePoint End User Resources.
Contact
Your Username
Start Date
Today's Date
End Date
A Year from Today
Review Date
Six Months from Today
Once you have entered the Keyword data, click the Add Best Bet link in the Best Bets section of the form and enter the following properties:
PROPERTY
VALUE
URL
http://office.microsoft.com/en-us/sharepoint-help/sharepoint-help-and-how-to-FX101830228.aspxTitle
SharePoint Help & How To Site
Description
This site contains demos and feature listings for the SharePoint toolset.
Click OK, and then navigate back to the home page for the site collection.
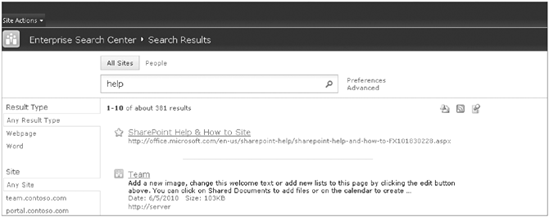
In the Search box, enter the search term helpdesk and press Enter. The search results will be returned and the first results provided to the user will be the best bets that you configured (see Figure 17-47).
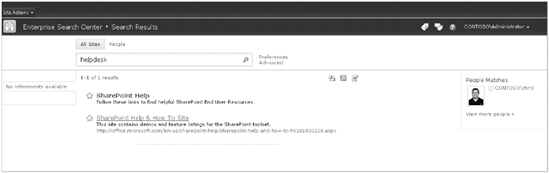
How It Works
In this example, you created a keyword and a best bet. Whenever the keyword or a synonym is included in the search query, your results will be displayed as a best bet. This allows you to easily direct users to relevant content based on their specific search terms.
To this point in the chapter, you have customized the behavior of search only within the site collection. You have looked at how to create new scopes and add them to the drop-downs; you have also looked at how to add best bets and keywords to help improve the search experience for the end users. Now, you are going to be switching gears slightly and looking at ways to customize the search results that the users see. One of the first tasks you worked through was creating a Search Center site. You learned early in the chapter that the first step in customizing any search behaviors was to create a Search Center. You are now going to look at all the customizations you can make to the Search Center site.
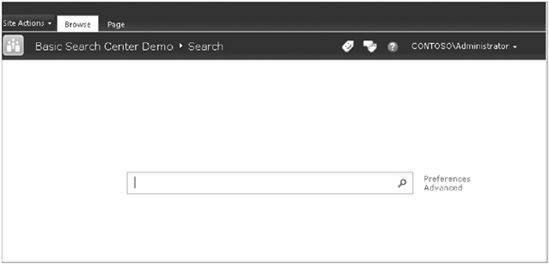
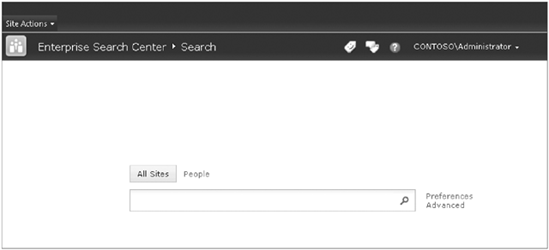
A Search Center is a type of site template that is included when SharePoint is installed. There are several different templates that are available, based on the level of licensing you have installed, including:
The Basic Search Center, shown in Figure 17-48, comes preconfigured for everything that you need to get started with Search. As you see, there is a search entry box, options for Advanced search, and even a link for users to configure preferences. The Enterprise Search Center, shown in Figure 17-49, comes preconfigured with all of the options in the Basic Search Center and several additional features, including the ability to create a tabbed search interface so that users can easily switch between tabs to conduct different search types, such as People and All Sites.
When people first start working with the Search Center templates, it is easy to get confused and overwhelmed. There are a lot of working parts, and sometimes, it can be hard to tell what pieces connect and keep things all together. The best thing to do is to start with the basics. As you learned earlier in the book, a site template is nothing more than a blank site with preconfigured lists, libraries, pages, and web parts. The Search Center is no different. In the following sections, we are going to review all of the different Search web parts, and then, once you know what you are working with, you will look at how they are combined to create such a rich search experience for users.
Each page that is created within the Search Center is built using preconfigured web parts. This means that the template is created ready to go, with all the needed parts and pieces connected and configured. These web parts, while they come preconfigured, are simply web parts. This means that they can be added to pages and then configured to behave using the parameters we configured in the Web Part tool pane. This also means that you can modify the behavior of the preconfigured web parts within each of the pages.
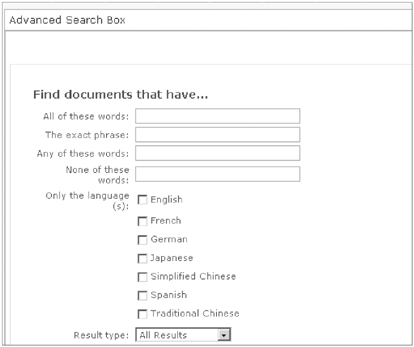
This web part provides users an interface for building a search query that uses multiple properties and phrase combinations (see Figure 17-50). Within this web part, you can configure what elements are included on the page and what elements are excluded. Each of the elements within the box is configurable, for example the image below shows the option to search by language. This option, along with others, is configurable within the web part so that you can completely remove it from the advanced search box.
This is a web part that is used to configure the display of Chinese search results. You would use this web part only if you had the Chinese language pack installed. Once configured, this web part would allow you to search in the Dual Chinese language.
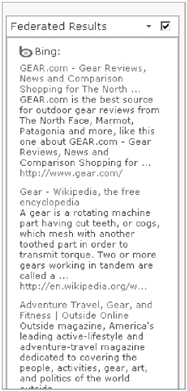
When this web part is connected to a search box web part, the web part will return search results from the federated location for the provided search query (see Figure 17-51). This web part can be configured with the location of the federated search location, such as the Internet, and with different properties around how the data is displayed, such as limiting the items to only three.
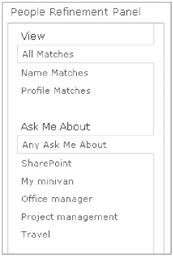
This web part will be used by users who want to further refine a people search (see Figure 17-52). Common properties from the people within the search results will be displayed for the users so that they can use those common properties to filter the results.
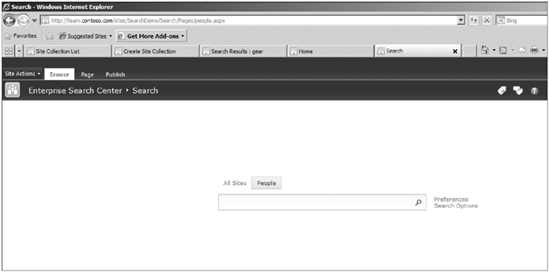
This is the search box that users will use when they are searching for a person (see Figure 17-53). This web part can be configured to include the scopes drop-down, to suggest search terms, and to append additional search terms to the user query.

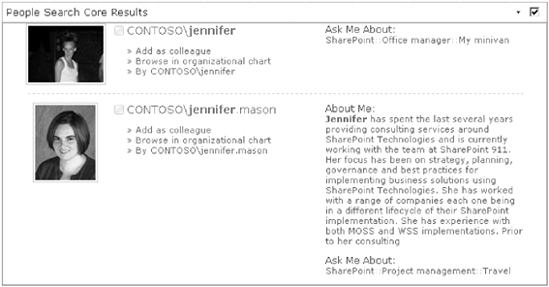
This search box connects to the People Search Box web part and displays the search results (see Figure 17-54).
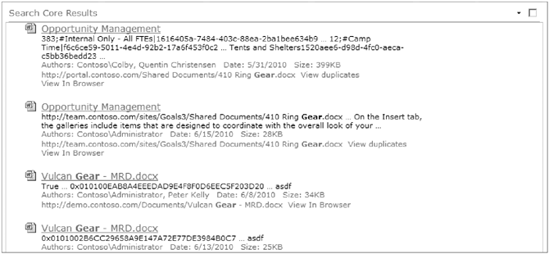
This web part looks for common properties within the search results and then displays them for users, so that users can select the common properties and further refine the search results (see Figure 17-55). The links within the refinement panel are dynamic and change based on the search results within the core search results web part.
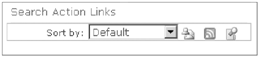
This web part provides users with links to the actions that can be activated for the search results, including sort order, search alerts, RSS feeds, and Window Explorer Search (see Figure 17-56). This web part is configurable so that you can select which actions you want to have displayed.
This web part will return all of the best bests for the search query (see Figure 17-57). The best bets are configured and stored within the site collection search settings and then, based on the user query, returned within this web part. This web part can be configured to display only certain information, such as the link or the description, as well as to limit the number of best bets displayed.
This is the search box that users will use when they are entering a general query (see Figure 17-58). This web part can be configured to include the scopes drop-down, to suggest search terms, and to append additional search terms to the user query.

This search box connects to the Search Box web part and displays the search results (see Figure 17-59).
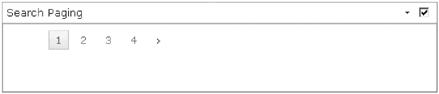
This web part is used to configure the way that the search results will be paged (see Figure 17-60). Within this web part, you can configure the number of pages to be displayed, as well as the images used to denote the next and previous options.
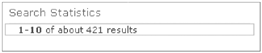
This web part displays the summary information about the search, including the number of hits and the number displayed on the current page (see Figure 17-61). You can configure this web part to display information on multiple lines and to display additional information, such as the search response time.
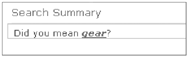
This web part is also known as the "Did you mean?" web part (see Figure 17-62). When queries are entered and a misspelling or alternate spelling is identified, the web part will provide that information to users, allowing them to update their search query.
This web part will return a specified number of results from a federated search location (see Figure 17-63). This would allow you to show the top one or two results in one location on the page, with the remainder in the federated search results web part. This web part can be configured to display a specific number of results as well as configuration settings, such as the description and URL length.

TRY IT OUT: Customizing the Search Results Page
Now that you have reviewed all of the web parts available for search configuration, let's take a few minutes and customize some of the web parts. You will start by configuring the search entry page, and then, you will modify the search results page.
Navigate to the Enterprise Search Center that you created earlier in the chapter and select Site Actions

Note
In this Try It Out, you are going to focus on the search web parts and ignore the search tabs. You will work with the search tabs in the next section.
Edit the Properties for the Search web part to include the scopes drop-down by configuring the tool pane with the following properties:
Click Apply, and you will see that the web part is updated to reflect the changes you applied. Save and Close the current page to exit Edit Mode (see Figure 17-65).
Enter the search term gear into the search box, and press Enter. This is the quickest way to open the search results page. Once the page is opened, we will be able to switch to edit mode and then modify the web parts.
Select Site Actions
Take a few minutes and explore each of the Web Part tool panes. This will allow you to see all of the different configurations you can use for each of the web parts.
Click the Add a Web Part link in the Right Zone.
Select the Search Categories in the Web Parts selection pane and select the Federated Results web part in the Web Parts Category, and then click Add.
Once the web part is added to the page, select the link to edit the web part properties.
Within the Web Part tool pane, configure the following options:
Location: Internet Search Results
For all other fields, accept the defaults.
Click Apply, and you will see that the web part is updated to reflect the changes we applied. Save and Close the current page to exit edit mode.
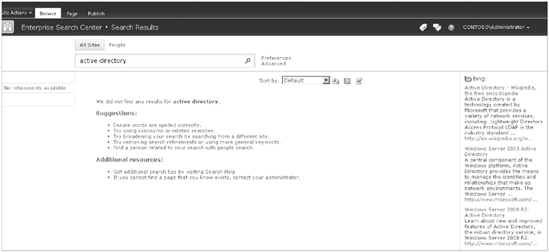
Enter the search term active directory into the search box and press Enter. Notice that even though we had no results from the SharePoint index, we still are able to return the federated search results (see Figure 17-67).
How It Works
Search results are delivered through configurable web parts. In this example, you modified the configuration of several different web parts, thus changing the way the information is displayed to the end user.
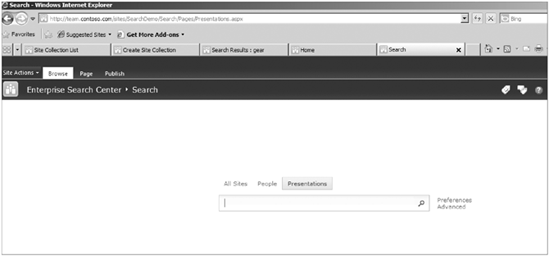
Now that you have a good idea on the configuration of the Search web parts within the Search Center, let's loop our way back to the concept of the Search Center tabs. Tabs are a way within the Search Center to create an interface that allows users to quickly select and conduct searches. These tabs are really just links to a special page layout that contains the tab control. You will notice that, if you click the People tab on the Enterprise Search Center home page, you are actually being redirected to a new page. This is also true of the People tab on the search results page. Figure 17-68 shows this concept in action.
There are two components to a Search Center tab: the tab that is displayed on the page and the page that the tab links to. In order to create the tab, the page must already exist. If you try to create a tab without the page, you will get an error. There are two page layouts for tab pages:
(Welcome Page) Search box
(Welcome Page) Search results
Each of these page layouts comes preconfigured with the search box or the search results web parts, which gives you a great template to get started with. Tabs can be stored in two locations, the search box and the search results. Out of the box, the All Sites and the People tab are configured for both locations.
TRY IT OUT: Creating a Search Center Tab for a Search Scope
In this Try It Out, you will be creating a new search tab for your presentation's scope. You will start by creating the two search pages in the pages library, and then you will configure your tabs for both the search box and the search results page. Creating tabs and pages can get a little tricky because some of the normal shortcuts you will take, such as creating a page from the Site Actions menu, will create content using defaults. Since the defaults may not be exactly what you want, it is easier to go directly to the list and create the content from this list. This will ensure that you get to make choices about your page layouts.
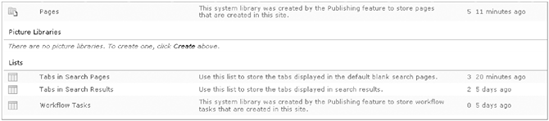
Navigate to the Enterprise Search Center that you created earlier in the chapter, and select Site Actions
Pages
Tabs in Search Pages
Tabs in Search Results
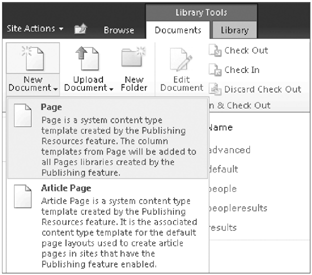
Open the pages library and activate the Documents Ribbon. Under the New Document option, select the Page option. This is an important step because it will allow you to select the page layout you want to create (see Figure 17-70).
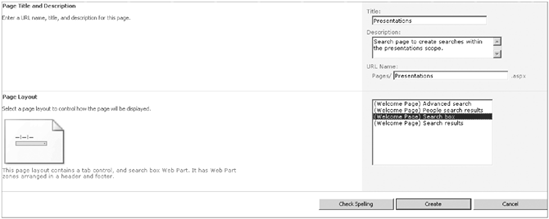
Enter the following properties for the new page, and click Create (see Figure 17-71).
PROPERTY
VALUE
Title
Presentations
Description
Search page to create searches within the presentations scope.
URL Name
Presentations
Page Layout
(Welcome Page) Search box
Repeat steps 2 and 3, this time entering the following properties:
PROPERTY
VALUE
Title
PresentationsResults
Description
Search results page for searches using the presentation scope.
URL Name
PresentationsResults
Page Layout
(Welcome Page) Search results
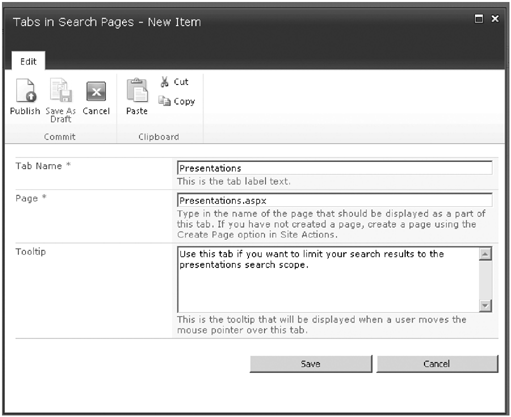
Now that your pages have been created, you are going to create your tabs. Select the Site Actions menu, and then select the View All Site Content option. Open the Tabs in Search Pages list, and then select the Add new item link within the web part and enter the following information (see Figure 17-72):
PROPERTY
VALUE
Tab Name
Presentations
Page
Presentations.aspx
Tooltip
Use this tab if you want to limit your search results to the presentation's search scope.
Select Save, select the Site Actions menu, and then select the View All Site Content option. Open the Tabs in Search Results list, and then, click the Add new item link within the web part and enter the following information:
PROPERTY
VALUE
Tab Name
Presentations
Page
PresentationsResults.aspx
Tooltip
Use this tab if you want to limit your search results to the presentations search scope.
Navigate back to the home page of the Search Center, and you should see a tab called Presentations. If you select this tab, you should notice that the URL changes to the page you associated with the tab (see Figure 17-73).
Now that you have configured your tabs and pages, you need to configure the web parts on the pages. In this example, you are creating the tabs so that users can use those tabs' pages to search within the Presentations scope. To accomplish this, you need to make two additional changes:
Configure the Search box web part to send results to the
PresentationsResults.aspxpage.Configure the Search results web part to limit the results to the Presentations scope.
On the
presentations.aspxpage, select Site Actions, Edit Page. Choose the Modify the Search Box Web Part option. Within the Miscellaneous settings, change the value of the Target Results Page fromresults.aspxtopresentationsresults.aspxand click Apply.Enter the search term gear into the search box and click Enter. You should be redirected to the
presentationsresults.aspxpage that you created earlier in this example.On the
presentations.aspxpage, select Site Actions, Edit Page. Choose the Modify the Search Core Results Web Part. In the Locations section, enter Presentations as the scope value. Select apply and then Save and Close the page. When the page reloads, you should see that the search results are filtered to the Presentations scope.
How It Works
In this example, you created a several pages and then associated them with the tab configuration within the Enterprise Search Center. Once the pages are associated with the tabs, users can click on a tab and generate different search results based on the configuration of that specific tab.
So far, everything covered in this chapter has been focused on the configuration of search within a site collection. These configurations within site collections are great, but sometimes, there is a need to configure things at a global level so that they can apply to all site collections. To do this, you need to make configurations within the Search Services application. While many of those settings are not within the scope of this book, it is important to at least be familiar with the locations of the settings and the different configurations that can be made.
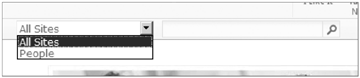
Search is configured through a Service Application on the farm. Each SharePoint Farm consumes many different service applications in order to provide the functionality available for the farm, including search, user profiles, and managed metadata. These different services are configured at the Central Administration level and can be accessed through the Service Applications Management pages. The Search Service application is typically created when the farm is first configured. By default, the Search Service application is configured with one content source and two search scopes. The default content source is called Local SharePoint Sites and contains all SharePoint content within the farm. The two search scopes are People and All Sites. All Sites will allow you to search across the entire index, and People will allow you to limit your search to only users from the profile database.
Note
All of the Try It Outs to this point have been completed within a site collection. The following Try It Out will be completed within the Central Administration site. If you do not have access to Central Administration, you will need to refer to your Server Administrator. If, within your environment, you only have access to a site collection, then you can benefit from reviewing the Try It Outs for Central Administration and then working through the Try It Outs once we move within the site collection.
TRY IT OUT: Accessing the Search Service Application
Let's take a few minutes and get familiar with the layout of the Search Service application.
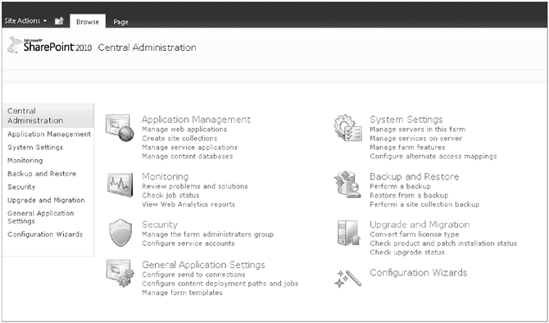
Open the Central Administration Site for your farm. To do this, you will need to know the URL from your server administrator. A screenshot of the page is displayed in Figure 17-74.
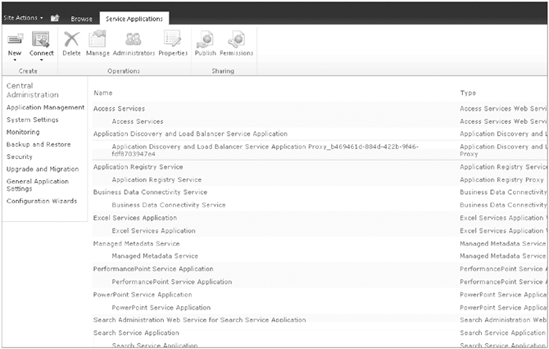
In the Application Management section of the home page, click the Manage Service Applications link. This will display all of the different service applications that are configured within your farm. An example screenshot is displayed in Figure 17-75. Keep in mind that each farm can be configured differently, so what you see on your screen may vary from what is shown in the figure.
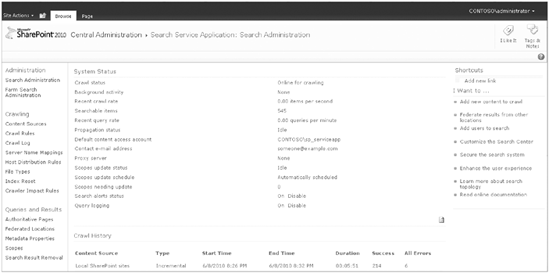
Locate and click on the Search Service Application link, and a configuration screen like the one in Figure 17-76 will be displayed. This is where we will be able to configure the various search features.
As you look around on the page, notice the page layout (see Figure 17-77). On the far-right side of the page, there are many different links, grouped by categories. These links will take you into the different configuration pages for each of the search features. In the middle of the page, you can see a summary of the different search processes that have been running. On the far left, you are given some links to help you quickly get to common search configuration tasks and to Microsoft help for configuring search.

How It Works
From within this site, you will be able to manage all of the global search configurations, including the content sources, global search scopes, and the various crawl rules and schedules
The final area to cover in this chapter on search is the search analytics features. Reports that detail the usage of search within your environment are generated at both the site collection and the service application levels. At the application level, you can access reports that provide you information on the Number of Queries, the Top Queries, and the No Results Queries. At the site collection level, the reports generated include the following:
Number of Queries
Top Queries
Failed Queries
Best Bet Usage
Best Bet Suggestions
Best Bet Suggestions Action History
Search Keywords
These reports are accessed from the Site Settings page through the Site Collection Web Analytics reports in the Site Actions section. These reports can be very helpful to monitor your usage of search over time. If you review these reports on a regular basis, you will have a good understanding of how users are interacting with search and how you can use the tools discussed in this chapter to help you improve their user experience.
In this chapter, we have reviewed many of the key aspects of search and have worked through some of the key configurations. After reading this chapter, you should be familiar with and able to configure the different search components within the site, including:
Using the default search features within a site.
Creating a custom Search Center.
Creating custom Search Scopes.
Adding tabs to a Search Center and configuring them to return results from a single scope.
Modifying the Search web parts to customize the search experience for your users.
Understanding the difference between site collection search settings and global search settings.
Working with your site administrator for global search configurations.
Reviewing the search analytics to determine how effective your users' searches have been over time.
The most important lesson that you can take away from this chapter is understanding that search is simply a query that is passed to a collection of web parts. These web parts are configurable and can be customized to meet your specific needs. Once you have this understanding, you will really be able to customize your users' search experience and build organization-specific search solutions that will provide great benefit for everyone who uses it.