
WHAT YOU WILL LEARN IN THIS CHAPTER:
A demonstration of out-of-the-box workflows
How to create powerful custom workflows using SharePoint Designer 2010
How tasks and workflow history are used in workflows
How Office clients software such as InfoPath and Visio can be integrated with SharePoint 2010 workflows
Troubleshooting steps and basic workflow administration processes
Business processes exist within all companies. These processes not only consist of computer interactions, but more importantly they are between individuals. SharePoint brings processes together with tasks and the people who are part of these day-to-day interactions.
Workflows are used in order to automate business processes, promoting a more efficient work experience. When they have been defined and created in SharePoint, automated workflows save time, lessen confusion, and save money.
Before delving into the details of how to use workflows in SharePoint 2010, it is important to have a basic understanding of some of the terminology and the components that workflows are composed of. This section will introduce you to the basic building blocks of workflows. Business users can use logic to create their own applications and processes, without having to know a single line of code.
There are four different methods you can use to start workflows, which is referred to as initiation. The first three are available options within the user interface during workflow creation, and the fourth is available from within Information Management Policy settings. Each workflow can be set up to use one or multiple methods of initiation.
On Creation: The workflow is started only once, when a new item is created.
On Change: The workflow is started each time an item is edited.
Manual Initiation: The workflow is started manually. This entails a user clicking a Start button. The out-of-the-box workflows specify that the user who manually starts the workflow must have Edit Item permissions, and there is an option to increase the security by opting to Require Manage Lists Permissions to start the workflow.
Information Management Policies: When workflows are associated with content types, information management policies can be set up at the site or library content type level. When a retention policy is defined, it can be set to initiate a workflow, relative to a date column. To set up a workflow to only be initiated based on a policy, none of the other initiation types needs to be selected. Retention policies can even be configured as repeating, if there is a need to start a workflow every 30 days.
When a workflow is set up to be started manually, it uses an initiation form. The person who makes the workflow can create predefined fields to be filled out by the person who manually starts the workflow (the initiator). When workflows are automatically initiated on creation or on change, there is no prompt to fill out a form.
Steps in a workflow define the order in which processes are supposed to happen. Each step can contain conditions and actions. Arrange the steps in the order in which the process should take place.
Conditions can be thought of as rules. According to conditions that are set up, specified actions take place. Conditions are not a required component in a workflow. Actions without conditions in front of them will take place every time the workflow is initiated.
If the first condition is not met, then the next condition is checked. This type of logic requires an Else-If branch. When a condition is reached, and that condition is true, then its actions take place. If you've ever created rules in Microsoft Outlook, then the basic concept is similar.
Each time a workflow is created, it is associated with something in SharePoint. To associate a workflow is to attach it to something. Lists, libraries, content types, and even sites are all things that workflows can be associated with.
Content Workflows: Content workflows are associated with specific content in SharePoint, such as a specific list or library. These are also referred to as list workflows.
Site Workflows: Site workflows are not connected to any particular list or library, and these types of workflows are usually initiated manually. On a SharePoint site, click View All Site Content on the left side of the screen. The Site Workflows button is next to the Create button.
Reusable Workflows: Similar to site workflows, these types of workflows are not bound to any specific list when they are initially created. Reusable workflows are created to be used multiple times and can be reused on different sites. These workflows can be connected to different lists and libraries. When a reusable workflow is created in SharePoint Designer, there is an option to pick a base content type to limit the workflow to. All content types or one particular one may be selected, such as "Announcement."
In SharePoint Server 2010 Enterprise, there are some very useful built-in workflows. These workflows address some common needs, such as "Approval." Workflow templates are meant to be used in a wide range of scenarios. In the previous version of SharePoint, these out-of-the-box workflows were not modifiable, but in SharePoint 2010 they can be edited and customized using SharePoint Designer 2010. In this section, you will learn about each of these workflow templates and how they are used.
Note
Several of the out-of-the-box workflows discussed in this chapter are only available as features in SharePoint. At the top level of a site collection, on the site settings page, click Site Collection Features. The feature called Workflows includes several of the most common workflows. Other useful workflow-related features are Three-State Workflow, Disposition Approval, and Publishing Approval Workflow. Once the features are activated, the workflows will become available within the sites.
By default, libraries in SharePoint do not have any workflows associated with them. In the document library settings, click Workflow Settings and then Add a workflow to begin the process of associating a workflow with the library. Multiple workflows can be associated with any given list or library.
When a workflow is selected on the Add a Workflow page, it should be given a name that is applicable to its function. For example, if the documents in the library are company policies needing approval, the workflow could be named "Policy Approval."
Approval workflows are the most commonly used types of workflows in SharePoint, which is a good reason to have a useful base template. The out-of-the-box workflow called "Approval—SharePoint 2010" is easy to set up and is applicable in basic scenarios, such as when a document needs to be approved by a list of people.
The following table describes the fields to fill out when setting up an approval workflow:
TRY IT OUT: Using the Approval—SharePoint 2010 Workflow
In this Try It Out, you will learn how to use the out-of-the-box Approval Workflow in SharePoint 2010. The example used here is of a company's policy management system. The company policies are documents stored in a document library in SharePoint. Each time a new policy is added, it must go through an approval process before becoming publicly visible. The pending version will be made available to only those who are approving and editing policies.
On your SharePoint site, click Site Actions and choose New Document Library.
Name the library "Policies," and click the Create button.
In the Ribbon's Library tab, click Library Settings.
In the General Settings section, click Versioning Settings.
In the Content Approval section, under Require content approval for submitted items, choose Yes.
In the Draft Item Security section, change the setting called Who Should See Draft Items in This Document Library to "Only users who can edit items."
Click OK.
Still in the Library Settings, under the Permissions and Management section, click Workflow Settings.
Pick the workflow called "Approval—SharePoint 2010," and name it "Policy Approval." In the Start Options section, check the box next to "Start this workflow when an item is created." Click Next.
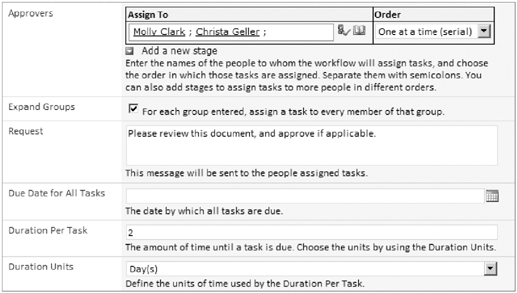
In the Assign To box, type the names of two different colleagues, separated by a semicolon. Leave the default order of "One at a time (Serial)."
In the Request box, type "Please review this document, and approve if applicable." Set the duration to two days. Figure 5-1 shows an example of what this screen looks like so far.
Check the box to Enable Content Approval, and click Save.
In the breadcrumb trail at the top of the screen, click Policies.
Click Add Document, to add a new company policy to the document library. As soon as the document is created in the library, the Policy Approval workflow will automatically run.
The first time a workflow runs, a new column is automatically added to the default view of the library. In this case, the column is called Policy Approval. This column contains a link on each row, representing workflows that have run on each item. The Policy Approval workflow is currently in progress, so click the In Progress link next to the new document that was uploaded, to see the workflow status information.
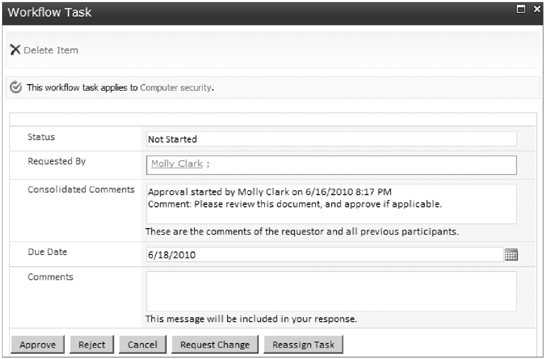
A couple of emails were automatically sent when the workflow started. The initiator of the workflow received an email with details about the approvers, with links to the document and the workflow status page. The first approver also received an email letting them know that a task was assigned to them, with the steps included and what is expected of them. In the tasks section of the workflow status page, click the name of the task that was assigned to the first approver, which is shown in Figure 5-2.
Approve the first task, which will automatically generate a task for the second approver. Go ahead and approve the second task, which will end the workflow.
Click Policies in the Quick Launch Toolbar on the left side of the screen, to go back to the library.
Notice that the Approval Status and the Policy Approval columns both indicate that they are Approved. The Approval Status pertains to the Content Approval setting in step 5. At step 12, you set the workflow to automatically update the approval status after the workflow is completed. Again, the content approval setting is used in conjunction with the approval workflow, so that the draft (unapproved) version is not visible to site users until after it has become approved.
How It Works
Approvers, Order and Groups Explained
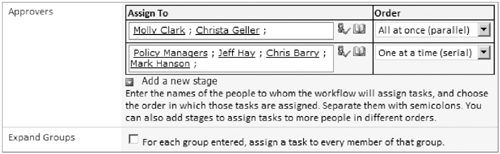
When the workflow is first created, there is a section for approver names, the type of order of the workflow, and an Expand Groups checkbox. Each of these options will now be more thoroughly explained, with Figure 5-3 as an example.
Assign To: This box can contain one or more individuals and groups. The groups can be Active Directory or SharePoint groups.
Order: The order can be parallel or serial. When serial is selected, the order of the names in the Assign To box is important. The workflow tasks will be assigned one at a time to each of those people (or groups), in the order in which they are typed into the box. With parallel, the order of names in the Assign To box is not important.
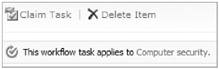
Expand Groups: When groups are "expanded," tasks are automatically assigned to each individual in the group. When the box is unchecked, and groups are not expanded, this will cause the workflow to assign only one task per group. Figure 5-4 shows the Claim Task button that shows in the top-left corner of a task when it is assigned to a group that is not expanded. This means that one person in the group can claim the task before they approve or reject it. This lets others in the group know that the task is being worked on.
In the preceding example, a document was approved, but in reality there are different variations besides unanimous approval. When tasks are assigned to approvers, there are other options available besides approval. Each of the additional Task button options will now be described:
Reject: Rejecting an item does not always halt the workflow. When the workflow is created, the End on First Rejection box must be checked in order to cause this behavior.
Cancel: This simply closes the task window. The task still needs to be approved or rejected.
Request Change: When the approver reads the item needing approval and decides that some edits need to be made, they can click Request Change. When a change is requested, several options are presented, such as the individual assigned to make the change and the duration that they have to complete it.
Reassign Task: Use this button when a task needs to be delegated. When a task is reassigned to someone else, that new person is then responsible for approving or rejecting the document and completing their own task.
There is also a new Publishing Approval Workflow. When this workflow is set up, the list of approvers is assigned, which will apply to every file in that library. When users manually initiate the workflow, they are not prompted to select or change the list of approvers.
The Disposition Approval workflow is meant to be used in order to ensure that SharePoint does not become cluttered with documents that are no longer needed. The disposition approval process entails simply choosing whether a document should be deleted or not. If a document is to be deleted, optionally select a checkbox to indicate if a copy of the item's metadata should be retained in the audit log.
The collect feedback workflow is very similar to the approval workflow. The main difference is that this workflow is not meant to act as a document approval process. Typically, the feedback process would happen in the earlier draft stages of a document's lifecycle. Start this workflow when feedback from multiple individuals or groups is desired.
When this workflow is added to a list or library, the only aspect of the interface that is different from that of the approval workflow, is the fact that there are no options to End on First Rejection or Enable Content Approval. Assign this workflow to reviewers in parallel, so that they can all review the document simultaneously. Workflow participants will have the opportunity to type feedback comments in the tasks that are assigned to them, and will not see Approve and Reject buttons.
The Three-State workflow is a bit more complex than the approval and collect feedback workflows. This workflow entails three stages, and the ability to further customize the way that tasks are assigned and emails are sent. A choice column with at least three choices must exist in the list or library with which this workflow is utilized.
When this workflow is added to a list or library, there is a plethora of settings to fill in. Each of the three states of the workflow consists of settings for tasks, due dates, and emails.
Note
When adding the Approval or Collect Feedback workflow to a library, the name of the new workflow is the only required field. All of the fields such as approvers and due date can be left blank if so desired. At the point when a workflow is manually initiated, the fields can be filled in by the workflow initiator. This means that all documents in a library do not need to have the same set of approvers, and can be assigned individually. If a workflow is set up in a library's workflow settings with no approvers added, and that workflow is initiated on create or on change, the workflow will automatically be rejected, since there are no built-in approvers.
The Collect Signatures workflow can only be initiated from within Microsoft Word or Excel. It collects official signatures on documents, and once they are added, any document changes will render them invalid.
TRY IT OUT: Using the Collect Signatures Workflow
In this Try It Out, you will create a Collect Signatures workflow on the previously created policies library. This document has two levels of approval, which are manager and division director. Each of these individuals will be assigned a task to sign the SharePoint document.
In the "Policies" Library Settings, under the Permissions and Management section, click Workflow Settings.
Pick the workflow called "Collect Signatures—SharePoint 2010," and name it "Policy Signatures." In the Start Options section, only put a checkbox next to "Allow this workflow to be manually started by an authenticated user with edit item permissions." Click Next.
Click Save.
In a Word document, click the Insert tab in the Ribbon, and choose Signature Line. Click OK on the informational message.
Type a suggested signer's title as "Manager," check the box to Allow the signer to add comments in the Sign dialog. Click OK.
Repeat steps 4 and 5 to create a second signature box for "Division Director."
In Word, click the File menu, and choose Save & Send on the left side.
In the Workflows section, click Policy Signatures. Click Start Workflow.
In the Signers box, type two of your colleague's names. In a production environment, these would be the actual names of the manager and Division Director who are responsible for signing the document. Click Start.
In the Tasks list on the SharePoint site, open the new task titled "This document requires your signature." Click the link to the document at the top of the task screen. The document does not need to be opened as editable in order to be signed. It can be in Read-only mode. The top of the document will have a yellow View Signatures button, as shown in Figure 5-5.
Click the View Signatures button, which will open a new pane on the right side of the screen called Signatures, with all requested signatures listed.
Click the drop-down box on manager, and choose Sign. Click OK to the informational message. Type the first signer's name, or optionally click Select Image, to upload a scanned image of the signature from your computer. Click the Sign button. The message shown in Figure 5-6 will be displayed, and you can click OK.
Repeat steps 10 through 12 for the Division Director approval.

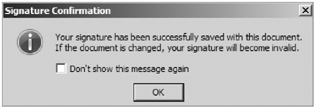
Now the document has been officially approved by all signers, and if the document is ever changed, the signatures become invalid. Also, see that the signatures include the name of the logged in user who clicked the Sign button, so that in addition to typing their own name, their official login name and the date are automatically recorded in the signature.
In addition to filling out the signature within the document or spreadsheet, each signer much complete their assigned task by opening it and clicking the Sign button to indicated that their part is done.
The Web Analytics workflows are the only out-of-the-box site-level workflows. All of the other workflows are meant to be associated with a list or library. Web analytics are numbers that tell the metrics related to site visits and searches. If you are interested in how popular a site is, or how people are finding it, web analytics are a great way stay informed. Some of the types of metrics for alerts and reports are listed here:
Page views
Unique visitors
Referrers
Search queries
Storage usage
Top browsers
The two kinds of workflows are web analytics alerts and web analytics reports.
Note
The site collection feature called Advanced Web Analytics must be activated in order to be able to use the Web Analytics workflows.
The web analytics alerts allow you to define thresholds. When the threshold is reached, an email alert is sent. Pick a scope of the whole site collection or just the current site, and select a metric and comparison. The conditions to choose from are shown in Figure 5-7.

Notice that there are options to look at the absolute value of a metric, view a comparison of a day or week before, or receive a list of daily new items that exist in the web analytics report, such as any new top referrers.
When the built-in workflow templates are not enough and business solutions and processes need to be more customized, SharePoint Designer workflows are the way to go. The easy user interface in SharePoint Designer lets you create your own rules-based declarative workflows.
Custom workflows can also be created with Visual Studio 2010, and these are even more flexible and scalable than the ones in SharePoint Designer. These types of workflows are created by developers, and are tested and then installed in the production environment.
In this section, you will get an in-depth understanding of how to get around in the SharePoint Designer interface and create custom workflows. SharePoint Designer 2010 is a free application that you can obtain from Microsoft's download site.
Warning
When the top-level site (root of the site collection) is opened in SharePoint Designer, be careful with the out-of-the-box workflow templates. Changes made at this level do propagate down to every subsite. If it is necessary to change an out-of-the-box workflow, the best practice is to click Copy & Modify. Make changes to the copy instead of the original and then publish it.
The first thing to get familiar with is the workflow design interface. Open a SharePoint site in SharePoint Designer 2010, and click Workflows in the left navigation's Site Objects section. The contextual Ribbon contains options for new workflows, editing workflow properties, and workflow management. The main content section of the page displays a list of the existing workflows on the site. By default, the out-of-the-box workflows, such as Approval and Collect Feedback, are already listed. The workflow Ribbon is shown in Figure 5-8.

Use these buttons to create new workflows. These options were discussed in the "Workflow Associations" section earlier in this chapter.
Select an existing workflow's row in the list of workflows, and use these buttons to access that workflow's settings, edit the workflow itself, or delete it.
This section pertains to the management of workflows and their associations. These buttons are related to how each workflow is associated with lists and content types, and the options in this section all allow you to take action on the workflow as a whole.
Save as Template: This option is only available for reusable workflows. Save the selected workflow to the Site Assets of the current site. Go to the site's Site Assets library to find the saved template as a WSP solution file.
Copy and Modify: This option is only available for reusable workflows. It allows you to create a duplicate copy of the workflow, which can then be modified.
Import from Visio: Create a SharePoint workflow flowchart in Microsoft Visio 2010, and import the diagram into SharePoint, to create a workflow based from it. More about Visio and workflows will be covered in the section of this chapter "Office Client Integration."
Export to Visio: All types of workflows, except for site workflows, can be exported to become Visio Workflow Interchange (VWI) files.
Associate to List: Only available to reusable workflows, this button shows a drop-down list of the lists on the site that can be associated with the workflow. Clicking a list name creates the association. If a workflow has been created to be associated with a certain content type, only the lists of that same content type will be displayed as options to choose from.
Associate to Content Type: This button is also only available when a reusable workflow is selected. Pick a site content type to associate the workflow with. Every list on the site that contains that content type will then have that workflow associated with it.
For existing workflows, there are several configuration options within that workflow's settings page. Figure 5-9 shows the contextual Ribbon options.

Now in SharePoint Designer 2010, workflows can be saved before being published. This is an improvement, because if a workflow isn't ready to go into production, and needs to be completed later, it can be saved without having to publish it and go live. Making a workflow available on the site or library is now a two-step process. Save the workflow and then publish it.
Edit the workflow itself, by setting up the order of the steps, conditions, and actions. The workflow can also be deleted or renamed from here.
The Publish Globally button allows you to make the workflow reusable on every site in the current site collection, making it visible to all users. This is only available for reusable workflows. The other options here were covered on the previous page.
Variables are values that exist in a workflow only during the time that the workflow is running. For example, if a new list item is created via workflow, the ID of that item is automatically returned to the workflow as a variable. This ID can be utilized later in the workflow, in cases where data needs to be obtained from, or sent to the other list. Once the workflow is finished, this variable does not exist anymore.
Initiation Form Parameters: When a workflow is manually initiated, the initiation form parameters are the fields that the user fills out when they start the workflow. The association parameters are collected when a reusable workflow is attached to a list. For each parameter that is added on this screen, choose the field type, and whether it is to be collected during initiation, association, or both. Read more about this subject later in this chapter in the section called "Variables and Parameters."
Local Variables: This is a list of all of the variables that exist in the workflow. Each variable has a type, such as string, number, or date.
Association Columns: In workflows, association columns are those that are created by the workflow, within the associated list. This concept is especially useful in reusable workflows, and these types of columns are not available in site workflows. When a workflow is utilized in multiple lists on various sites, there may be certain columns that are an important part of the workflow's functionality. Create these as association columns to ensure that they exist on each list or library where the workflow is run. During creation, they can be selected from existing site columns (best practice), or they can be created as columns within the associated list.
The options on the main content section of the page differ depending on the type of workflow.
The workflow information is basic data such as the name and description of the workflow. Some of these basics will vary according to the type of workflow. Simply click on the name or description to edit them. Figure 5-10 shows an example of the Workflow Information section for a list workflow.
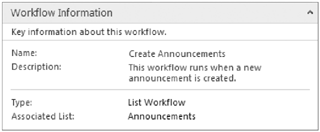
Name: Descriptive naming of workflows is important not only for you as the workflow's creator but also for the workflow initiator as well. The name should give you a quick indication of what the workflow does and what it is associated with. For workflows that automatically run when items are created or changed, the end users won't see the names. As the administrator, you will see the list of workflow names when administrating the workflows. In the preceding example, the workflow has been named "Create Announcements," since it runs each time a new announcement is created.
Description: When workflows are manually initiated, this description will be displayed to end users along with the workflow name. Describe to the user why they would run this workflow.
Type: This is the workflow type, such as List Workflow, Site Workflow, or Reusable Workflow.
Associated List: List workflows will display the name of the associated list.
Content Type: Reusable workflows will display the name of the content type that they are associated with.
This section contains quick links to open the associated list, associated task or history lists, or edit the current workflow. Reusable workflows show only an Edit Workflow link here.
A task list and history list can be selected here. If tasks are assigned anywhere within the workflow, this is where they will be created. Reusable workflows do not give these options.
The Show workflow visualization checkbox on status page is a great new feature in SharePoint 2010. Check this box in order to see a Visio diagram that displays the current workflow when viewing the workflow status page.
Determine when the workflow will be initiated by checking the appropriate boxes here in the Start Options. All or any one of the options can be selected. Choose for the workflow to run manually, on item creation, or when an item is changed. By default, when a workflow is created, it is only set to be manually started. For a list workflow, when the workflow can be manually started, there is an additional checkbox, Require Manage List permissions, which means that only users with that permission level or higher on the list will be able to initiate the workflow. Reusable workflows use the opposite syntax than list workflows. With these, all start options are available by default, and each box can be checked to disable that option.
Note
The default behavior of manual workflows is that only users with contribute permissions or higher will have the ability to start a workflow. In the start options section, the manage list permissions were mentioned, but you may have noticed that this is not a permission level. Manage Lists is a type of permission that can be granted within a permission level. By default, Design, Manage Hierarchy, and Full Control have this ability. You can read more about custom permission levels and security in Chapter 10.
This section contains the list of InfoPath forms that are used in the current workflow. When a workflow has manual initiation turned on, the first time it is published, this form will be generated. Read more about InfoPath in workflows in the section of this chapter called "Office Client Integration."
The Workflow Editor is the meat and potatoes of the workflow. This is where most of your work is done. Figure 5-11 shows the Ribbon commands available, which will now be explained.

Check for Errors: Click this button to check the logic in the workflow, to make sure that it makes sense and will run correctly.
Advanced Properties: Each condition and action in the workflow has advanced properties for further configuration. Select the name of the condition or action, and click this button to modify the properties. They are different depending on what kind of item is selected.
Move Up and Down: Rearrange the pieces of the workflow by selecting one and clicking the Move Up or Move Down buttons.
Step: A step is the next group of conditions and actions that is to take place in the workflow's sequence. Use descriptive names for the steps, as documentation of your process.
Else-If Branch: If a certain condition is met, then several actions can be added under that condition, but otherwise what needs to happen if the condition is not met? Insert an else-if branch to define processes this way. If there are no conditions in a workflow, this button will be disabled.
Parallel Block: When several actions need to take place at the exact same time, and not in sequence, insert a parallel block, and place the actions inside of it. Do not use a parallel block if any its actions rely on something that took place in a previous action in the block.
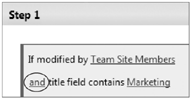
There are several conditions available, depending on which type of workflow is being created. Multiple conditions can be selected, and the workflow can be set up to look at ALL or ANY of them. As shown in Figure 5-12, when conditions are set, the "and" link can be toggled to "or."
The following table contains a list of conditions, with their descriptions, along with the types of workflows in which they are available. There are additional conditions related to item permissions, which are covered separately in the section that follows, called "Impersonation Step."
CONDITION NAME | TYPE OF WORKFLOW | DESCRIPTION |
|---|---|---|
If any value equals value | All Workflows | Compare any two fields to each other, from any list or library on the site. When fields from other lists are selected, a matching field must be selected in the "Find the List Item" section. |
If current item field equals value | List and Reusable Workflows | Pick a field in the current list, and compare it to another value in the current list, workflow content/variables, or to an item in another list. |
Created by a specific person | List and Reusable Workflows | Pick a person from groups on the site, from within the list (Workflow Lookup), or simply "User who created current item." |
Created in a specific date span | List and Reusable Workflows | Pick two dates as the beginning and end of the span, from date fields in the list, or by typing specific dates. |
Pick a person from groups on the site, from within the list (Workflow Lookup), or simply "User who created current item." | ||
Modified in a specific date span | List and Reusable Workflows | Pick two dates as the beginning and end of the span, from date fields in the list, or by typing specific dates. |
Person is a valid SharePoint user | All Workflows | This condition ensures that the person selected is not anonymous. This condition is commonly used to look at the "User who created current item." |
The file size in a specific range of kilobytes | All workflow types. Only libraries, not lists | The size of the current file is between two different specific numbers. |
The file type is a specific type | All workflow types. Only libraries, not lists | Type the extension name of a specific file type. |
Title field contains keywords | List and Reusable Workflows | Look at the title field of the current list. This condition is case sensitive. |
Whether or not any conditions exist in a workflow, actions are the activities that happen when a workflow is triggered. In this section, each action will be described, with some examples included. There are additional actions related to item permissions, which are covered separately in the section that follows, called "Impersonation Step."
The core actions are the most commonly used actions in SharePoint Designer workflows.
Add Time to Date: Do a calculation that adds time to a date field. Pick from minutes, hours, days, months, or years, and obtain a variable that contains this new calculation.
Convert Word Doc to PDF: This action can only be used on Microsoft Word documents in libraries. Insert a URL in this action as the location of the library where the new PDF file should be sent. If the file is to be created in the current library, select the field called "URL Path."
Note
The conversion of Word Documents to PDF files relies on a service application in central administration called Word Automation Services, which can be managed by your server administrator. This service contains settings such as supported file formats and the frequency with which to start conversions (which is one minute by default).
Do Calculation: Perform calculations between two different number columns, or manually typed numbers. Calculations that can be done are addition, subtraction, division, multiplication, or mod. The answer is set as a variable in the workflow.
Log to History List: This is an important action, and should be used often. This action logs information to the workflow history regarding what is going on during the workflow. It is a best practice, especially when troubleshooting, to create these actions after each step and action that happens in the workflow. When the workflow status is being viewed, this logged information will let you see what has taken place so far. Without any "Log to History List" actions in a workflow, it will often run and show as "Completed" without any further detailed information.
Pause for Duration: Put the workflow on hold for a certain number of days, hours or minutes. Each of the number fields in this step can be manually typed, or they can be selected from existing number fields.
Pause until Date: Put the workflow on hold until a specific date, or until the value of a date column.
Send an Email: Send a custom email to recipients. Pick recipients from members of the site or from values within fields. The subject and body of the email can contain manually typed text in combination with fields inserted from a list. Hyperlinks can also be inserted into the body of the email, with fully customizable links and text.
Send Document to Repository: This action is only available in library workflows, not lists. Submit a file using either Copy, Move, or Move and leave a link. Pick a destination router and type an explanation.
Set Time Portion of Date/Time Field: Pick a date field, and select the exact time that should exist as the time portion of that field, and the new date/time becomes a variable in the workflow.
Set Workflow Status: Choose to set the workflow status to Approved, Rejected, or Canceled.
Set Workflow Variable: Create a new workflow variable, and set it to a certain value. Select from a list of existing variables or create a new one. The value of the variable can be set as the exact value from a field, or the string builder can be used to create a custom one.
Stop Workflow: Stop the workflow and do not proceed to the next action or step. There is a box to type the text that is to be displayed in the workflow history when this happens.
The Document Set actions only apply to document sets, which can only be created in document libraries. You can read more about the concept of document sets in Chapter 6. The workflow interface will allow you to create Document Set actions in any list or library workflow, but they will not work on anything but a document set.
Capture a Version of the Document set: Pick whether to capture the last major or the latest minor version of all the documents in the set. Also, type in a comment that will show in the version history list. Versioning for the library must be turned on in order for this action to work.
Send Document Set to Repository: Choose to copy, move, or move and Leave a Link. The document is then sent to the destination content organizer.
Set Content Approval Status for the Document Set: When content approval is turned on for the library, this action can set the approval status to Approved, Pending, or Rejected, with additional comments.
Start Document Set Approval Process: Content approval is found in the library settings under Versioning settings.
The title of this section of actions is a bit misleading. List actions can be performed on both lists and libraries.
Check-In Item: Since list items do not have the check-in/out capability, checking items in and out through a workflow will only apply to items in libraries. The item will be set as checked in by the user who is currently running the workflow.
Check-Out Item: The item will be set as checked out by the user who is currently running the workflow.
Copy List Item: When copying an item from one list to another, it helps if the lists contain the same content type. For example, copying a task from one task list to another task list will be successful. Only the common site columns will be copied when one list type is copied to a different list type. For example, when copying a task to an announcements list, only the Title field will be copied, since none of the other columns are the same between the two types of lists.
Create List Item: In contrast to the Copy List Item action, this action allows for more granular creation of an item in another list or library. Select a destination list or library in the current List drop-down box, and then pick each field in the list one at a time to set what the value needs to be. Figure 5-13 shows the creation of a new list item in a calendar. By default, since the Title, Start Time, and End Time are required fields in the list, they each have asterisks next to them. The values in the Field column are in the calendar, and the values in the Value column can be either manually typed in or selected from list values or workflow variables.
Declare Record: Use this action in a Records Center site, in order to declare the current item as a record. The site collection feature called "In Place Records Management" needs to be activated in order to declare records.
Delete Drafts: Only available in library workflows, not lists. This action simply deletes all drafts (minor versions) of the current item.
Delete Item: Deletes an item in a list or library.
Delete Previous Versions: Only available in library workflows, not lists. Deletes all previous versions of the current item.
Discard Check Out Item: When a checked out item is discarded, this means that the changes made during the current check out are lost.
Set Content Approval Status: When content approval is turned on in the library's versioning settings, this action allows the content approval status to be set to Approved, Pending, or Rejected. This is not available in site workflows.
Set Field in Current Item: Set the value of any field in the current list to a certain value. This value can be taken from any other field in any list in the current site, or workflow variables or context. This action is not available in site workflows.
Undeclare Record: When records management is used, this action undeclares the current item as a record. This is not available in site workflows.
Update List Item: Compared to the Create List Item action, which creates a new item, this action finds an already existing item, and modifies it. The interface is similar to that of the Create List Item action, but there is an additional section that is required, called Find the List Item. To find the correct list item to update, a field in the target list must match up with a workflow variable or other list value, so that a join is defined between the updated list and the current list.
Wait for Change in Document Check-Out Status: Only available in library workflows, not lists. Wait for the current document to be one of the following: Checked-Out, Checked-In, Unlocked by document editor, or Discarded.
Wait for Field Change in Current Item: Pick a field in the current list and define what to wait for. The workflow will pause until the item is changed and the field matches what has been defined here. Once the condition is met, the workflow proceeds to the next action. Depending on what type of field is selected, there will be different options available here. This action is not available in site workflows

There is only one relational action, in which information about the current user is being related in the workflow.
The assignment of tasks plays a huge role in many workflows; therefore, there are several different methods that can be used to assign tasks from within the Workflow Designer. The first three task actions are compared in the following table. For each of these actions that will take place, the workflow waits until the task or tasks are completed before moving on to the next action. Each task that is created will contain a Complete Task button for the assignee to click.
ACTION | RETURNS TASK ID AS VARIABLE | ASSIGN TO MULTIPLE GROUPS AND USERS | DESCRIPTION |
|---|---|---|---|
No | Yes | Define task title and fields for the assignee to fill out. | |
No | Yes | Define a task title. | |
Yes | No | Define task title and fields to be filled out. |
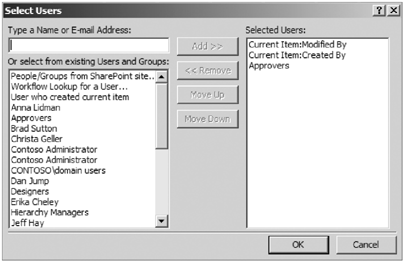
Figure 5-14 shows the interface in Assign a Form to a Group and Assign a To-do Item when multiple users are selected for task assignment. The person who created the current item, the person who modified the current item, and the SharePoint group called Approvers will all be assigned tasks to complete. On the left side of the screen, users who have never visited the site will not be listed, but they can still be added by manually typing their names in the Type a Name or E-mail Address box.
New to SharePoint 2010 are three customizable task processes that exist as actions in a workflow. These processes are workflows within a workflow, each with its own custom interface to set up task process options. Read more about the Task Process Designer in the section called "Workflow Tasks and History."
Start Approval Process: This action is designed as a standard approval workflow, which can be customized according to your business requirements. The assignees will approve or reject the item that is assigned to them.
Start Feedback Process: This process is the basis for the out-of-the-box "Collect Feedback" workflow. The only task outcome is for the assignee to mark the task as Completed.
Start Custom Task Process: This action contains a blank template of some standard task workflow steps.
The new utility actions allow granular control over how strings are structured. If you are familiar with Excel functions such as LEFT, RIGHT, and MID, these utilities will be easy to understand. For each of these actions, the data that is extracted becomes a workflow variable.
Extract Substring from End of String: Define the number of characters needed from the end (right) of a specified field.
Extract Substring from Start of String: Define the number of characters needed from the beginning (left) of a specified field.
Extract Substring from Index of String: Set the number of characters at which to start copying the data from a field. Starting at that number, the value of the rest of the field will be obtained.
Extract Substring of String from Index with Length: This one is similar to the previous action, except that instead of grabbing the rest of the field's value starting with a character number, this action lets you start at a certain character number, and only obtain a defined number of characters from that point.
Find Interval Between Dates: Find out the number of minutes, hours, or days between one date and another.
In SharePoint Designer workflows, impersonation steps are created when workflows need to write to lists or libraries that the person running the workflow does not necessarily have access to. Impersonation steps run as the person who created the workflow, which is typically a site manager/owner who has a higher level of permissions than most other site users. By default, when a new workflow is created, there is a single step called "Step 1," and when the cursor is placed inside of step 1, notice that the Impersonation Step button in the ribbon is grayed out. Click the cursor outside of Step 1, so that the orange blinking line shows below it, as seen in Figure 5-15, and notice that the Impersonation Step button is not disabled anymore.
Click the Impersonation Step button to add this type of step to the workflow. The following table shows a list of impersonation workflow conditions.
CONDITION NAME | DESCRIPTION |
|---|---|
Check list item permission levels | Pick one or more individuals or groups, choose one or more permission levels, and choose the current list or another on the site. |
Pick one or more individuals or groups, choose permissions, and choose the current list or another on the site. |
Figure 5-16 shows an impersonation condition.
Impersonation Steps also contain a set of actions that do not exist in non-impersonation steps. The following are the impersonation actions, which are located in the List Actions section.
Add List Item Permissions: Pick one or more users, and select the permission levels that will be granted to them on a list item. These permissions are simply added to the already existing ones.
Inherit List Item Parent Permissions: When items in a list have been set up with permissions that are unique to the permissions defined at the list level, this action resets the permissions on the item to inherit from the parent (list or library) again.
Remove List Item Permissions: The name of this action is a bit misleading. From the sound of it, this action would remove all permissions from the item. This is not the case. A list of specific users and permissions must be defined.
Replace List Item Permissions: This action is very powerful, in that it completely removes all permissions on a list item, and replaces them with the list of users and permission levels that you define.
In the previous version of the product, there was a commonly asked question about starting workflows. "Why does it take so many clicks to initiate a workflow? Can't I just click a button there on the item?" This issue has been addressed in SharePoint 2010, with the ability to create Custom Actions in SharePoint Designer 2010. This is not done from within the workflows, but from within the Lists and Libraries.
In SharePoint Designer, click Lists & Libraries on the left, and click the name of a list. Click inside of the Custom Actions section at the bottom right. A new Custom Actions section of the Ribbon will appear. The Custom Actions button is a drop-down box, shown in Figure 5-17.

Click the name of the location that you would like this new button to appear. After the name and description have been typed, choose the Initiate Workflow option, and pick the name of a workflow from the drop-down box. Only workflows that are associated with the list will be displayed here.
Variables and parameters are values that are used within a workflow. Parameters are values that are filled in on an initiation form by a user when the workflow is being manually started. Variables are values that exist within the workflow only while it is running, and were defined earlier in the chapter in the section called "Variables." As you work through the next example, the meaning of a variable will become more clear within the context of the workflow.
TRY IT OUT: Creating a SharePoint Designer Workflow
In this Try It Out example, you will learn how to create your own custom SharePoint Designer workflow from beginning to end. The scenario is a very simple company store, where employees can have items delivered to their office. The store site will consist of a library of items and an order list. The workflow will be used to calculate the total cost of an item when it is ordered. This workflow is going to consist of two actions as follows:
Multiply item quantity by the price
Use the result of the calculation to set the total cost.
On your SharePoint site, create a custom list called "Store Items."
Create a new currency column in the list called "Price."
Create several sample items in this list, each with a title and price.
Create a new custom list on the site called "Store Orders."
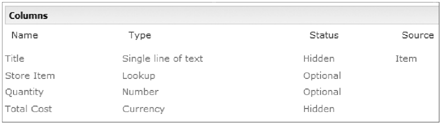
In the Store Orders list, create new columns as defined in the following table.
COLUMN NAME
COLUMN TYPE
DETAILS
Store Item
Lookup
Get information from the Store Items list, in the Title column.
Quantity
Number
Zero decimal places.
Total Cost
Currency
Two decimal places.
When people fill out the Store Orders list, the workflow will run when an item is created, which will automatically fill in the total cost. Therefore, the title and total cost can be hidden from the user filling out the form. In the Store Orders List Settings, click Advanced Settings.
In the Content Types section, change Allow management of content types to Yes. Click OK.
Now that the management of content types is turned on, form fields can be set as hidden. In the Content Types section in the middle of the list settings page, click the "Item" content type.
Change Title and Total Cost to Hidden, as shown in Figure 5-18. Note that even though certain fields have been hidden from the forms that users fill out, these columns are still shown in the default view of the list.
Click the name of the All Items view in the Ribbon at the top of the list. Choose Modify this view.
Uncheck the box next to the title column. Make sure that the boxes are checked next to quantity, store item, total cost, and created by. Click OK.
Now it's time to create the workflow. Still on the Store Items list, click the List tab in the Ribbon.
Click the Workflow drop-down box at the top right. Choose Create a Workflow in SharePoint Designer.
Note
SharePoint Designer 2010 workflows can also be accessed this way: Click Start, choose All Programs

The SharePoint Designer 2010 application will run, and a Create List Workflow screen will pop up. Name the workflow "Create Store Order," and type the description of "This workflow is used to process new orders in the company store." Click OK.
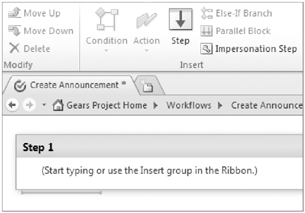
The Workflow Editor is now shown. Before adding any actions, the workflow needs to be set up to run each time an item is created. In the breadcrumb trail shown in Figure 5-19, click Create Store Order, This shows the workflow's main information screen.
In the Start Options section, put a checkbox next to Start workflow automatically when an item is created. Uncheck the option to Allow this workflow to be manually started.
Click Save at the top left.
In the Customization section, click Edit Workflow.
The editor is shown with a blank "Step 1," with a blinking orange line inside of it. Click the Action button in the Ribbon, which shows a list of all of the available actions. In the Core Actions section, choose Do Calculation. This empty action is shown in Figure 5-20.
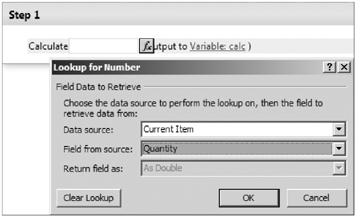
Each of the underlined text items is configurable. Click on the first word "value," and click the function button (fx). Select the Quantity field from the Current Item, as shown in Figure 5-21. Click OK.
Click the word "plus," and change it to "multiply by." Click the second underlined word "value." This is where the workflow gets fancy, because the cost of the item will be looked up from another list.
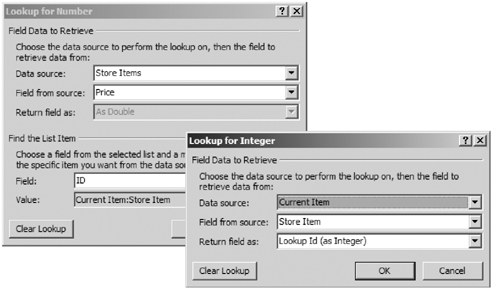
Change the Data Source to the Store Items list. In Field from source, select Price.
Since the source was changed to another list, a new section will appear in the bottom of the dialog box, called Find the List Item. In the Field drop-down, select ID.
For the Value, click the Function button and choose the Store Item field from the Current Item.
The Return field as box is new to SharePoint 2010. Select "Lookup ID (as Integer)." Click OK. These dialog boxes are shown in Figure 5-22.
Note
It is important to understand at this point that when looking up the price for the item that is being ordered, the "Store Item" that the user selects in the lookup field is being matched with the ID of the item in the Store Items list. Every SharePoint list and library has a built-in field called ID that is always unique. When one list contains a Lookup column to another list, the selected item's ID is what is actually stored in the lookup field. In workflows, when using the Find the List Item section to match one list to another, it is not required that ID fields are used, but these are simply preferable since they are guaranteed to be unique.
After you have clicked OK on both dialog boxes, back on the workflow edit screen, click the name of the Variable: calc. It's a good practice to give good descriptive names to workflow variables, instead of using the generic default ones. Click Create a new variable.
Name the new variable "Total Cost Calculation," with a type of Number. Click OK.
The next step is to add a second action to occur after the first "Do Calculation" action. Click underneath the first action in order to see the orange blinking line.
Click the Action button in the Ribbon and choose Set Field in Current Item.
Click the word "field," and choose the Total Cost field.
Click the word "value," and click the Function button. Change the Data source to Workflow Variables and Parameters.
In the Field from source box, choose the name of the variable that was just defined: "Total Cost Calculation."
Click OK. Figure 5-23 shows what the whole workflow looks like at this point.
Click the Save button at the top left, and then click the Publish button (leave the workflow screen open after publishing).
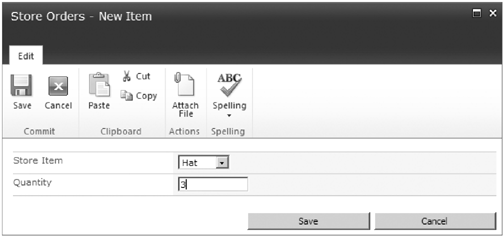
On the store orders list in the browser, click Add New Item. Add a new item in the list. Pick an item and quantity, and click Save. This new item form is shown in Figure 5-24.
There are a few things to notice after the workflow has run for the first time. The Total Cost column has been filled out, and there is a new column in the list with the same name as the workflow. Since the workflow completed successfully, you can click the word Completed, to see the workflow history (which is empty). There are just two more things to do, so go back over to the workflow in SharePoint Designer.
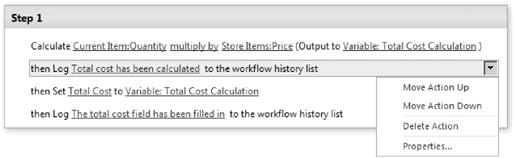
Since there was no information on the workflow status screen that was viewed when you clicked "Completed," it's time to add some log information. After the last action in the workflow, add a new action called Log to History List. Add two of these.
Type information to log. Click "this message" on each of the items, to fill them in as follows:
Total cost has been calculated.
The total cost field has been filled in.
The goal here is to insert log history information after every step in the workflow for informational and documentation purposes. Click the drop-down box on each of the new actions, and click Move Action Up, so that the workflow looks like Figure 5-25.
Save and Publish the workflow.
Back on the Store Orders list, click Add New Item to Add a new item in the list. Pick an item and quantity, and click Save.


Congratulations, you have finished creating your first SharePoint Designer 2010 workflow. When a new store order item is first saved, the Create Store Order column will probably show as In Progress. Refresh the web page to see the workflow shown as Completed. Click Completed to look at the Workflow Status page. Notice that the Workflow History section contains the text that you created in the Log to History List actions.
Warning
When logged into SharePoint as the "System Account" (the SharePoint administrator), workflows may not run as they should. If you have a problem where a workflow will not automatically run when a new item is created or changed, it could be because of the account that you are logged in as. Look at the top-right corner of the SharePoint page in the browser where it says the name of the current logged-in user. If this says "System Account," try logging in as a regular user account instead, and run the workflow again.
Emails are one of the most common actions in workflows, and are also heavily customizable. The interface for workflow email creation has been changed a lot from the previous version of the product. There is already an easy alternative, which is to create alerts on all SharePoint lists and libraries. Sometimes these canned alerts are not enough. Create workflow emails when they need to be more specific and customized.
TRY IT OUT: Creating a Workflow Email
In the previous Try It Out, you created a workflow in order to calculate a total and set information in a field. In this Try It Out, you will add on to the "Create Store Order" workflow by adding an email action to let the recipient know the details of his or her order, and that it was received.
In SharePoint Designer 2010, open the workflow that was created in the previous Try It Out section. Click Edit Workflow.
Inside of Step 1, put the cursor directly under the last action, and add a new Action to Send an Email.
Click the text "these users" to bring up the Define E-mail Message interface.
Click the address book icon next to the To box, choose "User who created current item," click the Add button and click OK.
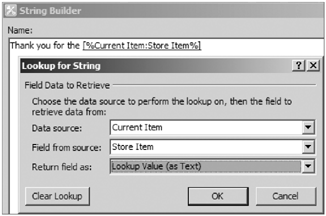
Click the ellipsis button next to the Subject box. This lets you create a string that combines free-form text with values from the form.
Fill in the String Builder as shown in Figure 5-26. The Add or Change Lookup button at the bottom of the String Builder is used to insert the Store Item text into the string. Click OK on both dialog boxes.
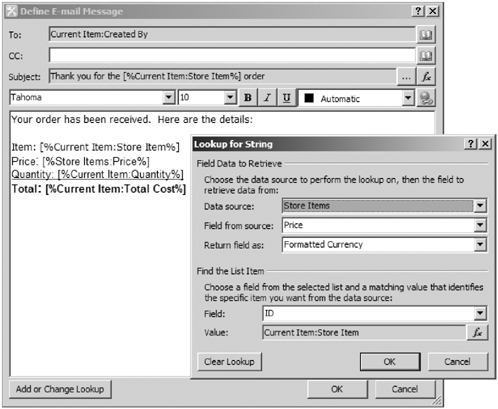
The body of the email can contain some "Thank You" text, and optionally details about the order, such as the item, price, quantity, and total. Use the Add or Change lookup button to add each field's value.
The Price is the tricky field, since that value is a lookup to an item in another list. Figure 5-27 shows an example of the email message, with the Price lookup interface displayed. See the earlier note that explains the concept of creating lookups to other lists.
The last thing to add to the email is a link for the email recipient to open the order in SharePoint. Put the cursor at the end of the email, and click the hyperlink icon to insert a hyperlink.
For the Text to display, type: Click to view order.
For the address, the URL cannot be a relative URL, and must be absolute. SharePoint 2010 has new values that can be inserted, called "Workflow Context." Figure 5-28 shows how to insert the workflow context field called "Current Item URL." Click OK and then click OK again to save the email.
Click to select the Email action, and click the Advanced Properties button. In the BCC box, add your own name. This will allow you to receive a blind copy of each email. Click OK.
In the workflow, after the email action, add another Log to History List action, with the message "Confirmation email has been sent."
Test the workflow by creating a new order in the Store Orders list. You will receive the email about the item you ordered, with a link that takes you back to that list item.

When workflows are created on lists and libraries, the Tasks and Workflow History lists are two secondary lists that the workflow utilizes. Every workflow doesn't necessarily make use of a Task list, but every workflow does write to a Workflow History list.
So far in this chapter, you may have noticed that the use of tasks in SharePoint workflows is substantial. Assigning tasks to workflow participants gives you the ability to allocate accountability to individuals. Knowing that you can rely on workflows not only to assign tasks as part of defined business processes but also to automatically follow up with individuals, allows you to become more efficient in your day-to-day work.
When tasks are assigned using workflow actions, they look a bit different from tasks that are normally created in a SharePoint task list. This is because workflows automatically add new content types to task lists, and they also make use of InfoPath as a custom form interface.
Note
In SharePoint 2010, there is a new ability to restrict users from reading and editing tasks that are not their own. There are three new workflow task actions called Start Approval Process, Start Custom Task Process, and Start Feedback Process. When any of these is added to a workflow, click the name of it to access its customization settings. In the Settings section, check the box called "Only allow task recipients and process owners to read and edit workflow tasks."
There is a new feature in SharePoint Server 2010 called the Task Process Designer. It is basically like inserting a workflow inside of any workflow that you create. This mini-workflow not only contains conditions and actions that take place regarding task assignment in the workflow, but it also has easy interfaces to create additional task form fields and outcomes.
When these task processes are used, the associated tasks perform follow-up actions by automatically sending reminder emails to assignees when due dates arrive. This is one of many functionalities that are built into these processes.
TRY IT OUT: Creating Task Processes
In the previous Try It Out, a workflow was created and set up to run when new items are ordered in a store. The last action that was added was an email notification to the person who ordered the item. Next, tasks must be assigned so that the order gets shipped out. In this example, the Processor Group is a SharePoint group containing those in charge of processing the order, and the Shipper Group contains those in charge of shipping it out. In this Try It Out, you'll learn how to use the new Task Process Designer to assign tasks.
Create two new SharePoint groups on the site, called Processor Group and Shipper Group.
Open the previously created workflow called "Create Store Order" in SharePoint Designer.
Click Edit Workflow.
Immediately below the last action in the workflow, insert a new action called Start Feedback Process.
Click on the word Feedback in the action, which will take you to the Task Process Designer.
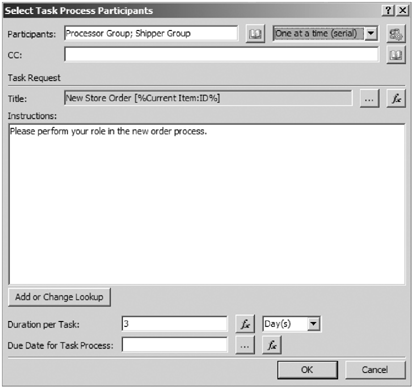
Click the Name box in the Task Information section, and change the name to "New Order Placed."
In the Outcomes section on the right, there is one outcome called Completed. There are three columns in this section, called Sequence, Name, and Task Form Button. Click on the value in the Task Form Button column, and change it to say "Mark Completed."
Click the Save button, and click Return to the workflow.
In the same action in the workflow, click the blue link "these users." This lets you define who will be assigned the tasks.
For the participants, select the Processor Group and then the Shipper Group. Use the Add button to move each group to the right. These are SharePoint groups on the site. For testing purposes, it is okay to insert two individuals' names instead of groups here. Leave the order as "One at a time (serial)."
Click the ellipsis icon next to the title box, to elicit the String Builder.
The task title should be "New Store Order;" use the Add or Change Lookup button to insert the ID field from the current item. This ID field is unique to each order that is placed.
In the Instructions box, type "Please perform your role in the new order process."
Set the Duration per Task to 3 days. This screen is shown in Figure 5-29. Click OK.
Save the workflow, and click Publish.
Try it out now by adding a new item to the Store Items list. A few seconds after you create the new item, a task will be created. In the Store Items list, click the In Progress link in the Create Store Order column. In the Tasks section of the Workflow Status page, click the title of the task that was created. The task is shown in Figure 5-30.
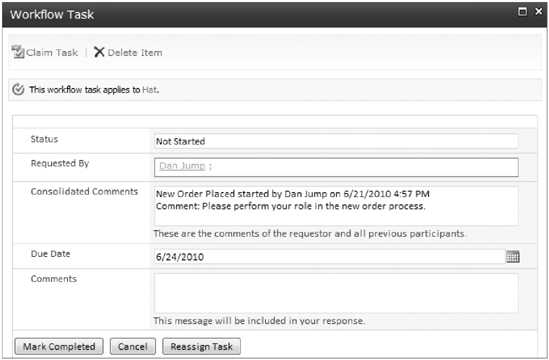
Notice that the button at the bottom of the task is called "Mark Completed," which was modified by you in the Outcomes section of the Task Process Designer. Site users who are not administrators, and who are not involved in this workflow will not see these tasks at all.
Note
When assigning tasks, sending emails, or performing any other action in a workflow that involves people, it is recommended that SharePoint groups or variables be used instead of individuals. For example, if a file needs to be approved by the company's CEO, even though there is only one, create a SharePoint group called CEO. Put that one person in the group. In the workflow, send an email to the group. When groups are used, people can easily be added and removed from them, so that the workflow itself does not need to be modified.
On every SharePoint site, there is a built-in list called "Workflow History." All workflows that run on the site are logged in this list, which also includes all errors. Knowing that there is a history log and where it lives gives you a good basis of understanding when it comes to workflow status screens and troubleshooting. The location of the workflow history list is:
http://your_site_url/lists/workflow%20history
This list is automatically sorted in ascending by Date Occurred order, but just as with any list, you can create your own views for sorting and filtering purposes. The data in the workflow history does seem a bit cryptic, since it makes use of unique IDs for lists and workflows, but it is a good reference sometimes.
There are several new ways in which Office 2010 applications are integrated with SharePoint Server 2010. Visio 2010, InfoPath 2010, and the Back Stage view in Office applications will be covered in this section.
SharePoint workflows can now be visualized on Workflow Status pages, using Visio Premium 2010 and Visio Services in SharePoint Server 2010 Enterprise. Workflow flowcharts can also be created by business process owners in Visio, imported into SharePoint Designer, and published as a functioning workflow. Lastly, existing SharePoint workflows can be exported out of SharePoint Designer and imported to be viewed in Visio 2010 Premium.
This tight integration between SharePoint and Visio allows you to bring the business users into the world of workflow creation. Now, the requirements-gathering process can be made a bit easier because end users or project managers can bring you a diagram of the envisioned process. You, as the workflow's creator, can import their diagram straight into SharePoint!
TRY IT OUT: Visio 2010 Workflow Creation
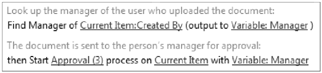
In this Try It Out, you will create a very simple workflow and import it into SharePoint. The goal of the workflow is to look at who created a document and send an approval task to that person's manager for them to approve that document.
Open Visio 2010 Premium, and on the New screen, click Flowchart from the Template Categories.
On the Choose a Template screen, click Microsoft SharePoint Workflow.
Click the Create button on the right.
The SharePoint Workflow shapes are shown in the Shapes panel on the left. Drag the following SharePoint Workflow shapes onto the page, in a row:
Start
Lookup manager of a user
Start approval process
Terminate
Click the Connector icon in the Ribbon, and drag a line between each action, moving from left to right.
Each of these shapes can now be described. Double-click on each shape and modify the existing text, to make it more descriptive. The workflow is shown in Figure 5-31.
On the Process tab in Visio, click the Check Diagram button, and verify that no issues were found.
On the Process tab, click the Export button. Name the file "Manager Approval" and save it to your desktop.
In SharePoint Designer, click the Workflows section on the left. Click the Import from Visio button in the Ribbon.
Browse to the saved file on your desktop, and click Open. Click Next.
The workflow name should be Manager Approval. Select Reusable Workflow, and choose the Document content type. Click Finish.
The workflow actions are displayed on the screen, with the underlined words needing to be configured. Next to Find Manager of, click "this user." Choose User who created current item, and click OK.
In the output to "manager" drop-down box, click Create a new variable, name it Manager and click OK.
Next to Start Approval process, click "this item," and click OK.
Click "these users." Next to the participants box, click the Address book icon. Double-click Workflow Lookup for a User.
Enter the following information:
FIELD
VALUE
Data source
Workflow Variables and Parameters
Field from source
Variable: Manager
Return field as
As String
Click OK, and then click OK again.
On the Select Task Process Participants screen, type the title Approve New Document. Click OK.
Save the workflow. Click the Workflow Settings button. Check the box next to Show workflow visualization on status page.
Save and Publish the workflow.
Click Workflows on the left side of SharePoint Designer. Single-click the Manager Approval workflow row to select it.
Click the Associate to Content Type button, and choose Document.
The Add a Workflow screen will come up in the browser. Click OK.

Now this new Manager Approval is associated with every library that uses the Document content type, which is the default content type for all document libraries. Click the drop-down box on any document on the site, choose Workflows, and click Manager Approval. On the initiation screen, click the Start button. This workflow looks up the initiator's Manager, and assigns a task to that person. This task is created in the default Tasks list on the site.
WORKFLOW DESCRIPTIVE TEXT
When workflows are created in Visio, text can be added to each action, as workflow documentation. In Step 6 of the previous Try It Out, you added descriptive text to each shape in the diagram. Notice that after the workflow has been imported into Visio, this text is displayed in gray above each action in the workflow, as shown in Figure 5-32.
In the workflow's settings, if you select the box next to Show workflow visualization on status page, this diagram will also contain the descriptive text. These descriptions cannot be added from within SharePoint Designer.
A part of the Microsoft Office Suite of applications, InfoPath is used for the creation and filling out of forms. The ability for business users to easily create and customize their own forms is very powerful. With InfoPath, no programming knowledge is required, and the interface and form publishing processes are simple and familiar. Within workflows, InfoPath is most commonly used in tasks and initiation forms.
Task Forms: When tasks are assigned from within workflows, custom forms are automatically generated by SharePoint Designer as the user interface for these tasks.
Initiation Forms: The initiation form is the page that the workflow starts on when it is manually initiated. If there are no initiation form parameters, an initiation form will only consist of Start and Cancel buttons, but it is still an InfoPath form that can be modified.
The Workflow Settings page in SharePoint Designer has a section called Forms. Click a form name here to open it in InfoPath, modify it, and publish it back to the workflow. For example, modify a default plain initiation form to add a nice title, colors, and some descriptive text to it.
Another way that workflows are integrated with Office is within the new Back Stage view that exists in Office 2010. This screen is seen when you click the File button at the top left. When a document library has workflows that are configured to be manually initiated, they can be started from within their native Office application. In Office, click the File menu, and click the Save & Send tab on the left side. In the Workflows section, click the name of the workflow you would like to start, and click the Start Workflow button on the right. When the initiation form pops up, click Start.
The administration, management, and troubleshooting of workflows is an important part of the job of the workflow creator. In this section, the workflow status screen will be explained, along with topics such as workflow deletion and even workflow reporting.
When a workflow is in progress and after it has completed, there is a workflow status screen that can be viewed. Each time a new workflow is run for the first time on a list or library, a new column is automatically added to the default view of the list. The column name is the name of the workflow. This column contains status text of the workflow, such as In Progress or Completed. This status text is a link to the Workflow Status page for that workflow, specific to that list item. The following are the sections of the workflow status screen.
This section shows basic facts about who started the workflow, when, and what the status is.
In the workflow's settings in SharePoint Designer, when the "Show workflow visualization on status page" box is checked, a full Visio diagram is displayed on the workflow status page. Check marks indicate steps in the workflow that have already taken place.
Also, below the workflow visualization are some additional actions that may be taken. These are Add or update approvers of Approval, Cancel all Approval tasks, and Update active tasks of Approval. These options do not exist in every workflow by default, but they do exist in the out-of-the-box ones such as Approval and Collect Feedback.
There is a link here called Terminate this workflow now. This is very useful when it comes to errors. When a workflow gets stuck, terminate the workflow, so that it can be modified, published, and tried again.
This is a list of all of the tasks that have taken place so far, or are currently in progress. Information about each task and assignee is listed, along with the outcome such as "Approved." Click any task's name to open it.
This section contains a list of everything that happens in the workflow, including any errors. When out-of-the-box workflows are used, they output some pretty detailed information, but when you create workflows from scratch, it is up to you to use the Log to Workflow History action to create this data.
A link in the Workflow History section, the View Workflow Reports button allows you to quickly generate an Excel file with information about a workflow. For each workflow, there is an Activity Duration Report and a Cancellation & Error Report. Click the name of a report, select a location, and an Excel file will be generated and placed in that location.
There is another way to get to the reports. In SharePoint Designer's Lists and Libraries screen, click the name of a list or library that has a workflow associated with it. Put the cursor in the Workflows section of the List Settings page and a Workflows tab will show in the Ribbon. Click View Workflow Reports.
In the Creating Custom Workflow Solutions section of this chapter, you learned how to edit workflows within SharePoint Designer 2010. There are also some edits that can be made from within the browser when reusable workflows are used. In a document library, in the Library tab of the Ribbon, click the Workflow Settings button. The settings of reusable workflows, such as "Approval—SharePoint 2010," can be modified from this screen by clicking their names.
Workflows can easily be deleted from within SharePoint Designer by selecting the name of the workflow and clicking the delete button. This removes it from all lists and libraries that it is associated with, which was not the case in SharePoint 2007.
Go to a SharePoint list with a workflow, such as the Store Orders list that was created in a previous Try It Out. In the List Settings, click Workflow Settings. This screen is shown in Figure 5-33.
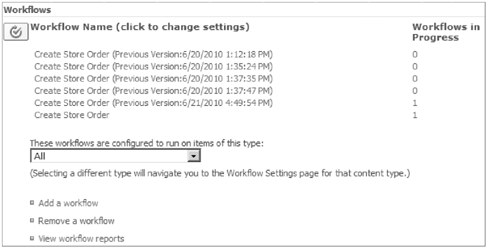
Notice that there are many different versions listed of the same workflow. Each time it was modified and published, a new version was placed in this list. The Workflows in Progress column shows you that a couple of these workflows are currently running. When you click the Remove a workflow link, you can safely remove any of the workflows that are previous versions and are not currently running. The only workflows to be careful about are the ones that are currently in progress. In this example, go back to the list and sort the Create Store Order column to see those items. Click the In Progress link to see each workflow's status page. If you have determined that it is okay, click Terminate this workflow now.
To temporarily unpublish a workflow without deleting it, remove it from the list on the Workflow Settings screen in the browser. The next time you click the Publish button in SharePoint Designer, the workflow will be associated with the list again.
When it comes to Site Workflows, go to Site Settings, and click Workflow Settings. The list of Site Workflows will be shown here, with the same type of interface for adding or removing workflows.
SharePoint Workflows are fundamental in the creation of automated business processes, and in making jobs and tasks more efficient. This chapter has supplied you with introductory information about out-of-the-box and custom workflows, so that you can effortlessly create and configure your own. Not only have workflow basics been described, but you have learned how to get around in SharePoint Designer, and practiced creating workflows from scratch.