All Windows Phone devices are required to ship with a GPS receiver; as a result, you can develop applications that are location aware. The GPS receiver in the Windows Phone gets the data in the form of longitude and latitude.
There are many popular applications available for phones these days that use location data, such as restaurant finder applications, and navigation applications that give driving directions and plot the street address on a map using the services like Yahoo, Google, and Microsoft Bing Maps. With Microsoft Bing Maps service, you can convert the address into a GPS coordinate system and plot it using the Bing Maps Silverlight control of the Windows Phone.
Even search engines take advantage of the phone's GPS by providing relevant search results based on the location of the phone. There is an application that tracks your location while you are running and, based on the distance travelled, gives you total calories burned.
Social networking applications like Twitter and Facebook also take advantage of the GPS tracking system on your phone by tagging your tweets or uploaded photos with the location information. There are applications that even allow you to share your current location with your friends and family. This can be life-saving information: a lost sea kayaker was found out in the ocean because he had a phone in his possession and the Coast Guard was able to locate him by his GPS location.
A Windows Phone device can determine its current position on the surface of the earth in one of three ways. The first approach is to use the built-in GPS receiver, which uses satellites and is the most accurate but consumes the most power. The second and third approaches are to use Wi-Fi and the triangulation of the cell phone towers, which are much less accurate then GPS receiver but consume less power. Fortunately, the Windows Phone Location Service automatically decides which option is best for the location of a device and presents its best guess of longitude and latitude through the Bing Maps location service. With a longitude and latitude reading in hand, an application can plot it on a Bing Maps Silverlight control map. Another approach is to use the street or civic address returned by the on-board location service to query the Bing Maps web service for its corresponding GPS coordinates (longitude and latitude) and plot them on a Bing Maps map.
In upcoming sections, you will learn how to take advantage of the Windows Phone's GPS receiver to track your movements and how to plot an address on the Bing Maps Silverlight control using the Microsoft Bing Maps service.
In order to use the location service on a device, you need to reference the System.Device assembly and declare System.Device.Location in your code. And before you can take advantage of the location service, you must enable the location service on the phone by going to Settings
GeoCoordinateWatcher geoCoordinateWatcher;
geoCoordinateWatcher = new GeoCoordinateWatcher(GeoPositionAccuracy.High);
geoCoordinateWatcher.MovementThreshold = 100; // in Meters
geoCoordinateWatcher.StatusChanged += (s, e) =>
    {
        if (e.Status == GeoPositionStatus.Disabled)
        {
            MessageBox.Show("Please enable your location service by going to Settings ->
Location -> Turn on Location Services option.");
        }
    };
Another way to check if the location service is enabled is to use TryStart to see if the GeoCoordinateWatcher can be started:
if (!_geoCoordinateWatcher.TryStart(true, TimeSpan.FromSeconds(5)))
{
        MessageBox.Show("Please enable Location Service on the Phone.",
"Warning", MessageBoxButton.OK);
}
Next, you need to set DesiredAccuracy and provide MovementThreshold in GeoCoordinateWatcher, as seen in the previous code.
GeoPositionAccuracy.Default uses Wi-Fi or cell phone towers and thus depends on the availability of these sources while GeoPositionAccuracy.High uses the GPS receiver built into the phone device; Windows Phone will automatically choose one to use. MovementThreshold is a very important property to set because MovementThreshold specifies the change in distance in meters before the PositionChanged event notifies the application that new coordinates are available; the lower the value of MovementThreshold, the more accurately the position will be tracked, but you will pay a price in higher power consumption. Microsoft recommends that you set MovementThreshold to at least 20 meters to filter out this noise.
In the following sections, you will learn how to use the Windows Phone Location Service by simulating the behavior of the GPS receiver. This simulation allows you to test location-aware applications (like the ones you'll build in this chapter) in the emulator, which lacks a real GPS receiver.
In order to simulate use of the location service, you will be intercepting the GeoCoordinateWatcher's PositionChanged event using an Observable object. With an Observable object, you can subscribe to an event and then stream the data received to the subscribed event delegates. For the examples in this chapter, you will subscribe to the PositionChanged event to feed GPS data to the parts of your application that consume it. The use of Observable objects is covered in more detail in Chapter 18.
To set up the GeoCoordinateDemo project, follow the steps you used for previous examples in this book. In order to use the .NET Reactive Extension, you will need to add a reference to Microsoft.Phone.Reactive. You'll also need to reference System.Device in order to use the location service and, most importantly, System.Observable, in order to feed GPS data to the location service.
Open Microsoft Visual Studio 2010 Express for Windows Phone on your workstation.
Create a new Windows Phone Application by selecting File

Add a reference to
Microsoft.Phone.Reactivein order to use Reactive Extension. Also add a reference toSystem.Devicein order to use the location service. In Solution Explorer, you should be able to see the added reference, as shown in Figure 14-1.

You will be building the user interface using the XAML in the Visual Studio. For building simple controls, it's faster to work with the XAML code. Go to the solution, open MainPage.xaml, and replace the XAML you find there with the following code.
The namespaces you see in the following code snippet are typically declared by default when you first create a Windows Phone project. In particular, namespace xmlns:phone="clr-namespace:Microsoft.Phone.Controls;assembly=Microsoft.Phone" allows you to add common Windows Phone controls to the application main page.
<phone:PhoneApplicationPage
    x:Class="GeoCoordinateWatcherDemo.MainPage"
    xmlns="http://schemas.microsoft.com/winfx/2006/xaml/presentation"
    xmlns:x="http://schemas.microsoft.com/winfx/2006/xaml"
    xmlns:phone="clr-namespace:Microsoft.Phone.Controls;assembly=Microsoft.Phone"
    xmlns:shell="clr-namespace:Microsoft.Phone.Shell;assembly=Microsoft.Phone"
xmlns:d="http://schemas.microsoft.com/expression/blend/2008"
xmlns:mc="http://schemas.openxmlformats.org/markup-compatibility/2006"
mc:Ignorable="d" d:DesignWidth="480" d:DesignHeight="768"
FontFamily="{StaticResource PhoneFontFamilyNormal}"
FontSize="{StaticResource PhoneFontSizeNormal}"
Foreground="{StaticResource PhoneForegroundBrush}"
SupportedOrientations="Portrait" Orientation="Portrait"
shell:SystemTray.IsVisible="True">Next, add two textblocks, txtLatitude and txtLongitude, to display the longitude and latitude that the phone location service provides.
<Grid x:Name="LayoutRoot" Background="Transparent">
        <Grid.RowDefinitions>
            <RowDefinition Height="Auto"/>
            <RowDefinition Height="*"/>
        </Grid.RowDefinitions>

        <StackPanel x:Name="TitlePanel" Grid.Row="0" Margin="12,17,0,28">
            <TextBlock x:Name="ApplicationTitle" Text="GeoCoordinateWatcherDemo"
Style="{StaticResource PhoneTextNormalStyle}"/>
        </StackPanel>

        <Grid x:Name="ContentPanel" Grid.Row="1" Margin="12,0,12,0">
            <TextBox Height="72" Name="txtLongitude" Text=""
                     Margin="193,142,41,393" />
            <TextBox Height="72" Name="txtLatitude" Text=""
                     Margin="193,236,41,299" />
            <TextBlock Height="30" HorizontalAlignment="Left"
                       Margin="78,202,0,0" Name="textBlock1"
                       Text="Longitude" VerticalAlignment="Top" />
            <TextBlock Height="30" HorizontalAlignment="Left"
                       Margin="78,306,0,0" Name="textBlock2"
                       Text="Latitude" VerticalAlignment="Top" />
        </Grid>
    </Grid>
</phone:PhoneApplicationPage>
Once you have loaded the XAML code, you should see the layout shown in Figure 14-2. In the next section, you will be adding events to handle updating the UI with the received GPS data from the location service.

In Solution Explorer, open MainPage.xaml.cs and replace the code there with the following C# code blocks, which will implement the UI updates using the location service with the data received from Reactive Extension.
Begin by listing the namespaces the application will use. You will need System.Device.Location in order to use the location service. Declare Microsoft.Phone.Reactive in order to use the Reactive Extension's Observable. Also note that you will need System.Threading in order to feed the GPS data into the location service; you can think of Reactive Extension's Observable as if it were the satellite, Wi-Fi, or communication tower sending the GPS data.
using Microsoft.Phone.Controls;
using System.Threading;
using Microsoft.Phone.Reactive;
using System.Device.Location;
using System.Collections.Generic;
using System;
The variable _geoCoordinateWatcher is an instance of the Windows Phone location class that you'll use to access and retrieve location data. Notice in the constructor you declared the PositionChanged event in order to receive the location service's GPS data. Also, you'll be starting the thread that will simulate the GPS data that is sent to the PositionChanged event delegate.
GeoCoordinateWatcher _geoCoordinateWatcher;

public MainPage()
{
    InitializeComponent();

    // initialize GeoCoordinateWatcher
    _geoCoordinateWatcher = new GeoCoordinateWatcher();

    // PositionChanged event will receive GPS data
    _geoCoordinateWatcher.PositionChanged +=
        new EventHandler<GeoPositionChangedEventArgs<GeoCoordinate>>
            (_geoCoordinateWatcher_PositionChanged);

    // simulateGpsThread will start Reactive Extension
    // where EmulatePositionChangedEvents will be feeding
    // the data to PositionChanged event
    Thread simulateGpsThread = new Thread(SimulateGPS);
    simulateGpsThread.Start();
}In the previous constructor, you initiated a thread that executes the SimulateGPS method. In the SimulateGPS method, the Reactive Extension's Observable subscribes to the PositionChanged event in order to feed the GPS data. Notice that GPSPositionChangedEvents constantly sends GeoPositionChangedEventArgs every two seconds, which then gets received by GeoCoordinateWatcher's PositionChanged event and the GPS data.
// Reactive Extension that intercepts the _geoCoordinateWatcher_PositionChanged
        // in order to feed the GPS data.
        private void SimulateGPS()
        {
            var position = GPSPositionChangedEvents().ToObservable();
position.Subscribe(evt => _geoCoordinateWatcher_PositionChanged(null, evt));
}
private static IEnumerable<GeoPositionChangedEventArgs<GeoCoordinate>>
GPSPositionChangedEvents()
{
Random random = new Random();
// feed the GPS data
while (true)
{
Thread.Sleep(TimeSpan.FromSeconds(2));
// randomly generate GPS data, latitude and longitude.
// latitude is between −90 and 90
double latitude = (random.NextDouble() * 180.0) - 90.0;
// longitude is between −180 and 180
double longitude = (random.NextDouble() * 360.0) - 180.0;
yield return new GeoPositionChangedEventArgs<GeoCoordinate>(
new GeoPosition<GeoCoordinate>(DateTimeOffset.Now, new
GeoCoordinate(latitude, longitude)));
}
}In this demo, the received GPS data is displayed directly to the user. Notice here that you are using Dispatcher.BeginInvoke to execute the lambda expression of an anonymous method. Using Dispatcher.BeginInvoke to update the UI with the GPS data is absolutely necessary because the PositionChanged event is executed in a different thread than the UI, and thus you must explicitly use Dispatcher.Invoke to run UI specific codes.
private void _geoCoordinateWatcher_PositionChanged(object sender
    , GeoPositionChangedEventArgs<GeoCoordinate> e)
{
    this.Dispatcher.BeginInvoke(() =>
    {
        txtLatitude.Text = e.Position.Location.Latitude.ToString();
        txtLongitude.Text = e.Position.Location.Longitude.ToString();
    });
}To test the application, press F5. The result should resemble the screenshot in Figure 14-3, and you will see constantly changing longitude and latitude in the textblocks.

You'll begin by building an application to work with the phone's location service, GeoCoordinateWatcher. The application, Bing Map Demo, is shown in Figure 14-4 and demonstrates the basic functions available through GeoCoordinateWatcher, the location service that was introduced in the previous section. The application will display your location with a blinking icon on a map and continuously update your position as you move.
In this demo, when you click the Start button, it will start the location service that will send notification when the position is changed; upon the changed position event, the Bing Maps map will be updated with the new position. You can actually start the application while you are walking and watch the position of the locator (red dot) on the map change as you move.

You'll build the demo in four steps. First, you need to register with the Bing Maps service portal and create a new Visual Studio project. Next, you'll build the project's user interface and finish up by adding code to respond to commands from the user.
Before you can use the Bing Maps Silverlight control and its service offerings, you must register with Bing Maps at www.bingmapsportal.com. Go to www.bingmapsportal.com and you should see something similar to Figure 14-5.
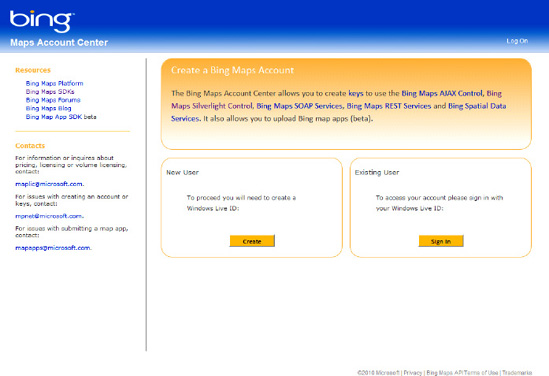
Click the Create button and follow the instructions provided by Microsoft.
Once you create a Bing Maps service user, you must create an application key so that you can use the Bing Maps control and the Bing Maps service from Windows Phone. Sign in to the Bing Maps portal; once you are logged in, click the "Create or view keys" link shown in Figure 14-6.

Once you've created the Bing Maps application key, you must install the Windows Phone SDK found at http://create.msdn.com/en-us/home/getting_started.
If you successfully installed the Windows Phone SDK, the binaries (Microsoft.Phone.Controls.Maps) can be referenced from the project in order to use the Bing Maps Silverlight control.
To set up the BingMapDemo project, follow the steps you've used for previous examples in this book.
Open Microsoft Visual Studio 2010 Express for Windows Phone on your workstation.
Create a new Windows Phone Application by selecting File
In order to use Bing Maps control in Windows Phone, you must reference
Microsoft.Phone.Controls.Maps, and in order to track your movement, you need to add reference toSystem.Deviceto use the location service. Open Solution Explorer and add those references now. Check to ensure that your list of references matches the list shown in Figure 14-7.

Now it's time to code the user interface. Let's implement it in XAML (sometimes it's faster to work with XAML when working with a simple example that requires only a few controls). Go to Solution Explorer, open MainPage.xaml, and replace the XAML you find there with the following two blocks of code.
Most of the namespaces you see in this snippet are typically declared by default when you first create a Windows Phone project. The following namespace is unique to this application and allows you to add the Bing Maps control you will use to plot your location: xmlns:BingMap="clr-namespace:Microsoft.Phone.Controls.Maps;assembly=Microsoft.Phone.Controls.Maps".
<phone:PhoneApplicationPage
    x:Class="BingMapDemo.MainPage"
    xmlns="http://schemas.microsoft.com/winfx/2006/xaml/presentation"
    xmlns:x="http://schemas.microsoft.com/winfx/2006/xaml"
    xmlns:phone="clr-namespace:Microsoft.Phone.Controls;assembly=Microsoft.Phone"
    xmlns:shell="clr-namespace:Microsoft.Phone.Shell;assembly=Microsoft.Phone"
    xmlns:d="http://schemas.microsoft.com/expression/blend/2008"
    xmlns:mc="http://schemas.openxmlformats.org/markup-compatibility/2006"
    xmlns:BingMap=
"clr-namespace:Microsoft.Phone.Controls.Maps;assembly=Microsoft.Phone.Controls.Maps "
    FontFamily="{StaticResource PhoneFontFamilyNormal}"
    FontSize="{StaticResource PhoneFontSizeNormal}"
    Foreground="{StaticResource PhoneForegroundBrush}"
    SupportedOrientations="Portrait" Orientation="Portrait"
    mc:Ignorable="d" d:DesignWidth="480" d:DesignHeight="768"
shell:SystemTray.IsVisible="True">To the main page, you will be adding a Bing Maps control to display your position and a button to start the location service. You'll also add an animation storyboard named BlinkLocator to cause the locator icon to blink by changing its color. Note that inside bingMap control there is a BingMap:Pushpin named bingMapLocator. The map layer bingMapLocator contains an Ellipse control named locator, whose initial map position in latitude and longitude is (0, 0). In this application, the location service will provide changing positions in the latitude and longitude so that the locator position can be properly updated. This is a very simple but very powerful demonstration of using the location service and Bing Maps control. You can use the same technique for Yahoo or Google Maps, as their API is very similar to Bing Maps.
<phone:PhoneApplicationPage.Resources>
        <Storyboard x:Name="BlinkLocator" AutoReverse="True" RepeatBehavior="Forever">
                <ColorAnimationUsingKeyFrames
Storyboard.TargetProperty="(Shape.Fill).(SolidColorBrush.Color)"
Storyboard.TargetName="locator">
                                <EasingColorKeyFrame KeyTime="0" Value="Red"/>
<EasingColorKeyFrame KeyTime="0:0:1" Value="#FFCEFF00"/>
</ColorAnimationUsingKeyFrames>
</Storyboard>
</phone:PhoneApplicationPage.Resources>
<Grid x:Name="LayoutRoot" Background="Transparent">
<Grid.RowDefinitions>
<RowDefinition Height="Auto"/>
<RowDefinition Height="*"/>
</Grid.RowDefinitions>
<StackPanel x:Name="TitlePanel" Grid.Row="0" Margin="24,24,0,12">
<TextBlock x:Name="ApplicationTitle" Text="Bing Map Demo"
Style="{StaticResource PhoneTextNormalStyle}"/>
</StackPanel>
<Grid x:Name="ContentGrid" Grid.Row="1">
<BingMap:Map Name="bingMap" NavigationVisibility="Collapsed"
Margin="0,0,0,72">
<BingMap:Pushpin Name="bingMapLocator">
<BingMap:Pushpin.Content>
<Ellipse Fill="Red" Width="20" Height="20"
BingMap:MapLayer.Position="0,0"
Name="locator" />
<BingMap:Pushpin.Content>
</BingMap: Pushpin>
</BingMap:Map>
<Button Content="Start" Height="72" HorizontalAlignment="Right"
Margin="0,633,0,0" Name="btnStart" VerticalAlignment="Top" Width="160"
Click="btnStart_Click" />
<TextBlock Height="30" HorizontalAlignment="Left" Margin="6,657,0,0"
Name="txtStatus" Text="Status" VerticalAlignment="Top" Width="308" />
</Grid>
</Grid>
</phone:PhoneApplicationPage>Tip
In this code, you changed the content of the Pushpin, which is the locator that specifies where you are. You can add any type of control and change the appearance of the Pushpin. You can even put a placeholder and dynamically change the content of the Pushpin.
Once you have loaded the XAML code, you should see the layout shown in Figure 14-8. In the next section, you will be adding an event to consume the GPS data and plot the data onto the map layer of the Bing Maps Silverlight control.

In Solution Explorer, open MainPage.xaml.cs and replace the code there with the following C# code blocks, which will implement the media player's functionalities.
Begin by listing the namespaces the application will use. Notice the inclusion of Microsoft.Maps.Control, which will allow you to manipulate Bing Maps control, and System.Device, which will allow you to work with geoCoordinateWatcher, which will retrieve the location data from GPS, Wi-Fi, or cellular towers.
using System;
using System.Windows;
using Microsoft.Phone.Controls;
using Microsoft.Maps.MapControl;
using System.Device.Location;
namespace BingMapDemo
{
public partial class MainPage : PhoneApplicationPage
{The variable _geoCoordinateWatcher is an instance of the location service class that you'll use to access and retrieve location data. Note that you will be using GeoPositionAccuracy.High, which will use the phone device's GPS, and for this to work you must use the real Windows Phone device. If you need to simulate the location service, you can refer to the previous section in this chapter or Chapter 18 to simulate fake GeoCoordinateWatcher service. Note that you'll also be setting MovementThreshold to 100 meters so that the PositionChanged event fires every 100 meters, and you'll be plotting your current location on the Bing Maps map.
GeoCoordinateWatcher has StatusChanged and PositionChanged events that notify the application whenever the new updated position is received from the GPS.
As for bingMap, you will hide the Microsoft Bing Maps logo and copyright in order to make things cleaner and make more space for other controls for the application. Finally, in order to use the map control at all, you must set ClientTokenCredentialsProvider to the value of the application key you obtained when you registered at the Bing Maps site.
GeoCoordinateWatcher _geoCoordinateWatcher;

        public MainPage()
        {
            InitializeComponent();
            // Add your own BingMap Key
            bingMap.CredentialsProvider =
new ApplicationIdCredentialsProvider("ADD-YOUR-OWN-KEY");

            // Remove Bing Maps logo and copyrights in order to gain
            // extra space at the bottom of the map
            bingMap.LogoVisibility = Visibility.Collapsed;
            bingMap.CopyrightVisibility = Visibility.Collapsed;

            // Delcare GeoCoordinateWatcher with high accuracy
            // in order to use the device's GPS
            _geoCoordinateWatcher = new GeoCoordinateWatcher(GeoPositionAccuracy.High);
            _geoCoordinateWatcher.MovementThreshold = 100;

            // Subscribe to the device's status changed event
            _geoCoordinateWatcher.StatusChanged +=
                new  EventHandler<GeoPositionStatusChangedEventArgs>(
_geoCoordinateWatcher_StatusChanged);

            // Subscribe to the device's position changed event
            // to receive GPS coordinates (longitude and latitude)
            _geoCoordinateWatcher.PositionChanged +=
                New EventHandler<GeoPositionChangedEventArgs<GeoCoordinate>>(
_geoCoordinateWatcher_PositionChanged);
}In GeoCoordinateWatcher, StatusChanged fires when the GPS status changes and PositionChanged fires when the GPS receives new a position. In StatusChanged, if the received status is Disabled, you must notify the user that the device's location service is disabled and must be turned on. You can enable the location service on the device by going to Settings
Note here that the PositionChanged event will not fire until the position of the phone has changed by at least 100 meters as specified by MovementThreshold. When the StatusChanged event fires, txtStatus will be updated, and when the PositionChanged event fires, the locator icon you have added to the Bing Maps layer will be moved accordingly.
private void _geoCoordinateWatcher_PositionChanged(object sender,
GeoPositionChangedEventArgs<GeoCoordinate> e)
        {
            Deployment.Current.Dispatcher.BeginInvoke(() => ChangePosition(e));
        }

        private void ChangePosition(GeoPositionChangedEventArgs<GeoCoordinate> e)
        {
            SetLocation(e.Position.Location.Latitude,
e.Position.Location.Longitude, 10, true);
        }

        private void _geoCoordinateWatcher_StatusChanged(object sender,
GeoPositionStatusChangedEventArgs e)
        {
            Deployment.Current.Dispatcher.BeginInvoke(() => StatusChanged(e));
        }

private void StatusChanged(GeoPositionStatusChangedEventArgs e)
        {
            switch (e.Status)
            {
                case GeoPositionStatus.Disabled:
                    txtStatus.Text = "Location Service is disabled!";
                    break;
                case GeoPositionStatus.Initializing:
                    txtStatus.Text = "Initializing Location Service...";
                    break;
                case GeoPositionStatus.NoData:
                    txtStatus.Text = "Your position could not be located.";
                    break;
                case GeoPositionStatus.Ready:
                    break;
            }
}When the user clicks the Start button, the location service will start. TryStart will return false if the phone's location service is disabled. If the location service is disabled, a message box is displayed to the user, instructing the user to enable the location service on the phone.
private void btnStart_Click(object sender, RoutedEventArgs e)
        {
            if (!_geoCoordinateWatcher.TryStart(true, TimeSpan.FromSeconds(5)))
            {
                MessageBox.Show("Please enable Location Service on the Phone.",
"Warning", MessageBoxButton.OK);

            }
}BingMap has a SetView method that allows you to set the current view on the screen using the location data, latitude and longitude, received from GeoCoordinateWatcher. The zoomLevel property indicates how far into the location the map will be zoomed. BingMap also has MapLayer, which can set the position of the map layer with respect to the received location. To make things interesting, let's animate bingMapLocator with simple color blinks.
private void SetLocation(double latitude, double longitude,
double zoomLevel, bool showLocator)
        {
            Location location = new Location(latitude, latitude);
            bingMap.SetView(location, zoomLevel);
            MapLayer.SetPosition(locator, location);
            if (showLocator)
            {
                locator.Visibility = Visibility.Visible;
                BlinkLocator.Begin();
            }
            else
            {
                locator.Visibility = Visibility.Collapsed;
                BlinkLocator.Stop();
            }
        }
    }
}To test the application, press F5. The result should resemble Figure 14-4. Remember that you must have a real phone device to be able to use real GPS. In the following section, you'll utilize Bing Maps geocoding service to convert the address into geocode of longitude and latitude in order to plot the address on the Bing Maps Silverlight control.
Microsoft provides three main services hosted on the cloud to be used by any clients, including Windows Phone devices.
GeoCodeServiceallows an address to be converted to longitude and latitude or converts geocode into an address. The web service can be consumed by accessing the URL athttp://dev.virtualearth.net/webservices/v1/geocodeservice/geocodeservice.svc.RouteServiceincludes services such as calculating the distance between two addresses, providing driving and walking directions from address to address, and step-by-step navigation. The web service can be consumed by accessing the URL athttp://dev.virtualearth.net/webservices/v1/routeservice/routeservice.svc.SearchServiceprovides location-based search results. For example, based on the submitted address, it will find restaurants in a five-mile radius. The web service can be consumed by accessing the URL athttp://dev.virtualearth.net/webservices/v1/searchservice/searchservice.svc.
In the following section, you will be using GeoCodeService to convert any address into geocode (longitude and latitude) and plot the address on the Bing Maps Silverlight Control. Through the demo, you will learn how to access the Bing Maps service using the credentials you received when you registered.
The following demo interface will contain a text box where you can enter an address to be plotted on the map and a button to invoke a method to convert the address using the Bing Maps geocode service. It then plots the geocode onto the Bing Maps Silverlight control, as shown in Figure 14-9.

To set up the BingMapDemo project, follow the steps you used for previous examples in this book:
In order to use the Bing Maps GeoCodeService, you need to add a service reference to your project.
In Solution Explorer, right-click the
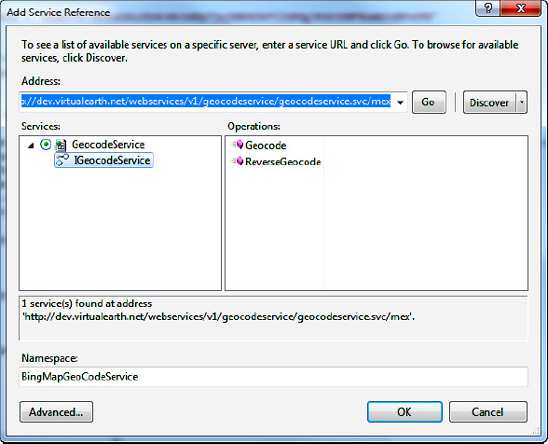
Referencesfolder and choose Add Service Reference.When the Add Service Reference window pops up, enter
http://dev.virtualearth.net/webservices/v1/geocodeservice/geocodeservice.svcinto the Address field and press Go.You see a list of services. In the Namespace text box, enter BingMapGeoCodeService. You should see a result similar to Figure 14-10.
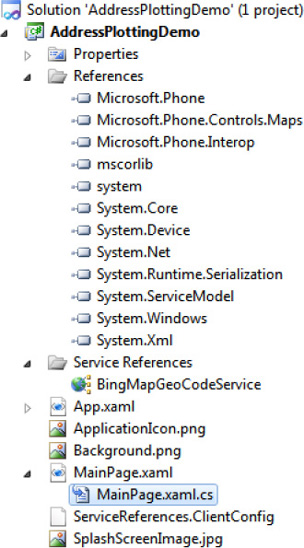
Click OK and you should see BingMapGeoCodeService in Solution Explorer, as shown in Figure 14-11.
AddressPlottingDemo has a very simple UI, consisting of the textblock for capturing the address, the button to invoke a method for plotting the address onto the map, and the Bing Maps Silverlight control.
The namespaces you see in the following code snippet are typically declared by default when you first create a Windows Phone project. In particular, namespace xmlns:phone="clr-namespace:Microsoft.Phone.Controls;assembly=Microsoft.Phone" allows you to add common Windows Phone controls to the application main page.
<phone:PhoneApplicationPage
    x:Class="AddressPlottingDemo.MainPage"
    xmlns="http://schemas.microsoft.com/winfx/2006/xaml/presentation"
    xmlns:x="http://schemas.microsoft.com/winfx/2006/xaml"
    xmlns:phone="clr-namespace:Microsoft.Phone.Controls;assembly=Microsoft.Phone"
    xmlns:shell="clr-namespace:Microsoft.Phone.Shell;assembly=Microsoft.Phone"
    xmlns:d="http://schemas.microsoft.com/expression/blend/2008"
    xmlns:mc="http://schemas.openxmlformats.org/markup-compatibility/2006"
    xmlns:BingMap="clr-
namespace:Microsoft.Phone.Controls.Maps;assembly=Microsoft.Phone.Controls.Maps"
    mc:Ignorable="d" d:DesignWidth="480" d:DesignHeight="768"
    FontFamily="{StaticResource PhoneFontFamilyNormal}"
    FontSize="{StaticResource PhoneFontSizeNormal}"
    Foreground="{StaticResource PhoneForegroundBrush}"
    SupportedOrientations="Portrait" Orientation="Portrait"
shell:SystemTray.IsVisible="True">The main page consists of the Bing Maps Silverlight control, a button, and an address textblock to capture the user address input. Notice on the bingMap control that CopyrightVisibility and LogoVisibity are set to Collapsed, giving you much more needed real estate on the screen.
<Grid x:Name="LayoutRoot" Background="Transparent">
        <Grid.RowDefinitions>
            <RowDefinition Height="Auto"/>
            <RowDefinition Height="*"/>
        </Grid.RowDefinitions>

        <StackPanel x:Name="TitlePanel" Grid.Row="0"
                    Margin="12,17,0,28">
            <TextBlock x:Name="ApplicationTitle"
                       Text="AddressPlottingDemo"
                       Style="{StaticResource PhoneTextNormalStyle}"/>
        </StackPanel>

        <Grid x:Name="ContentPanel" Grid.Row="1" Margin="12,0,12,0">

            <BingMap:Map Name="bingMap"
                         Width="425" Height="513"
                         Margin="0,0,19,25"
                         CopyrightVisibility="Collapsed"
                         LogoVisibility="Collapsed"
                         VerticalAlignment="Bottom" HorizontalAlignment="Right">
                <BingMap:Pushpin Name="bingMapLocator"
                                 Background="Transparent">
                    <BingMap:Pushpin.Content>
                        <Ellipse Fill="Red" Width="20" Height="20"
                            Name="locator" />
                    </BingMap:Pushpin.Content>
</BingMap:Pushpin>
</BingMap:Map>
<TextBox Height="72" Margin="110,10,6,0" Name="txtAddress"
Text="4237 Salisbury Rd, Suite 114 Jacksonville FL, 32216"
VerticalAlignment="Top" />
<TextBlock Height="30" HorizontalAlignment="Left"
Margin="33,32,0,0" Name="textBlock1"
Text="Address" VerticalAlignment="Top" />
<Button Content="Show on map" Height="72"
Name="btnPlot" Margin="17,68,192,556"
Click="btnPlot_Click" />
</Grid>
</Grid>
</phone:PhoneApplicationPage>One of most important things to notice in this demo application is its use of the Bing Maps geocode service to convert a street address to longitude and latitude measures so that it can be plotted on the map. Also, in order to use the Bing Maps geocode service, you must provide the Bing Maps credential that you created during the registration.
Once the service is referenced, you will be able to declare the namespace of the Bing Maps geocode service, AddressPlottingDemo.BingMapGeoCodeService. You are including System.Linq because you will be using Linq to query returned GeoCodeResults with the highest confidence.
using System.Windows;
using Microsoft.Phone.Controls;
using AddressPlottingDemo.BingMapGeoCodeService;
using Microsoft.Phone.Controls.Maps;
using System.Collections.ObjectModel;
using System.Linq;
The GeocodeServiceClient variable _svc is a proxy class that lets you connect to the Bing Maps geocode service to geocode the address in order to plot on the map. Note that you need to subscribe to GeocodeCompleted event in order to receive results that contains longitude and latitude.
GeocodeServiceClient _svc;
        public MainPage()
        {
            InitializeComponent();

            // instantiate Bing Maps GeocodeService
            _svc = new GeocodeServiceClient("BasicHttpBinding_IGeocodeService");
_svc.GeocodeCompleted += (s, e) =>
{
// sort the returned record by ascending confidence in order for
// highest confidence to be on the top.
// Based on the numeration High value is
// at 0, Medium value at 1 and Low volue at 2
var geoResult = (from r in e.Result.Results
orderby (int)r.Confidence ascending
select r).FirstOrDefault();
if (geoResult != null)
{
this.SetLocation(geoResult.Locations[0].Latitude,
geoResult.Locations[0].Longitude,
10,
true);
}
};
}When btnPlot is clicked, you will be making a web service request to the Bing Maps geocode service to convert txtAddress.Text to return geocoordinates in longitude and latitude. When the GeoCodeCompleted event is raised, you will receive multiple results that contain only the highest confidence level. Using GeoCodeResult, you will be making a call to SetLocation that will plot the location on the Bing Maps Silverlight control.
private void SetLocation(double latitude, double longitude,
double zoomLevel, bool showLocator)
        {
            // Move the pushpin to geo coordinate
            Microsoft.Phone.Controls.Maps.Platform.Location location =
new Microsoft.Phone.Controls.Maps.Platform.Location();
            location.Latitude = latitude;
            location.Longitude = longitude;
            bingMap.SetView(location, zoomLevel);
            bingMapLocator.Location = location;
            if (showLocator)
            {
                locator.Visibility = Visibility.Visible;
            }
            else
            {
                locator.Visibility = Visibility.Collapsed;
            }
        }

        private void btnPlot_Click(object sender, RoutedEventArgs e)
        {
            BingMapGeoCodeService.GeocodeRequest request =
new BingMapGeoCodeService.GeocodeRequest();
// Only accept results with high confidence.
request.Options = new GeocodeOptions()
{
Filters = new ObservableCollection<FilterBase>
{
new ConfidenceFilter()
{
MinimumConfidence = Confidence.High
}
}
};
request.Credentials = new Credentials()
{
ApplicationId = "Put-Your-BingMap-Credential-Id"
};
request.Query = txtAddress.Text;
// Make asynchronous call to fetch the geo coordinate data.
_svc.GeocodeAsync(request);
}To test the application, press F5. The result should resemble the display shown in Figure 14-9. Enter an address into Address text box and press the "Show on map" button. You should see the pushpin move from its current position to the coordinates provided by the Bing Maps geocode service.
In this chapter, you learned how to start the location service to receive the position in latitude and longitude. Upon receiving the position, you passed the location data into the Bing Maps control and use the Bing Maps map layer to indicate your current GPS position. This simple but powerful concept will help you create your own location-aware application. Also, you learned how to utilize the Bing Maps geocode service, which converts the address to geocoordinates so you can plot the address location on the map.
In Chapter 15, you will learn how to use the media elements of the phone to play video and audio as well as stream movies and sounds from external sites. You will also learn how media elements play a significant role in making sound effects in a game.