There's lots of buzz today about cloud computing technology. The cloud truly empowers you, as the developer, to focus on building an application and off-loading the infrastructure needs to the cloud.
Suppose you have developed an application where businesses can take a picture of invoices and track the money spent, like QuickBooks. In Windows Phone, you can easily use the isolated storage covered in Chapter 13. The problem with isolated storage is that the storage space is tied to the phone; it can differ from manufacturer to manufacturer; and, most importantly, many users will store music, videos, and documents, which can quickly consume the storage space on the phone. A good solution would be to save the invoices information on the database; to do this, you would need a web service that can interact with the database so that the phone can save the invoices, as shown in Figure 3-1.

In order to deploy the solution depicted in Figure 3-1, you need to solve a number of problems. First, you need to consider what type and how many servers to buy to host the web service and database. Once you do, you'll have to purchase and maintain them yourself or pay a hosting service to do the job for you. But this doesn't solve the problem of what you will do to scale up your application if it becomes so popular that millions of consumers want to use it, or if you experience periodic surges in use at, say, the end of each month. Finally, how will you provide for disaster recovery and backup of the database to ensure your service does not go down and disappoint users?
To plan ahead for the huge number of users your application might attract, a more robust architecture must be considered. One example is shown in Figure 3-2, where the load balancer can help accommodate massive concurrent calls to the service; this way, if any of the service goes down, the load balancer will automatically point the request to an available service. On the database side, you have to provide both an active and a passive database in case the main database—the active one—goes down and a switch to the currently passive database becomes necessary. Then you have to worry about disk space, so you will need a storage area network (SAN). Figure 3-2 is your typical Enterprise-grade deployment scenario that provides reliability, scalability, maintenance, and performance but is very expensive and complex.

The architecture in Figure 3-2 might be overkill for the tiny invoice application you're creating, but you don't want to lose the potential that it might be bought by millions of adoring customers. To resolve this dilemma, Microsoft provides Azure service to take care of every single detail of the infrastructure architecture, allowing you to concentrate on developing the best app you can. Microsoft Azure provides peace of mind with a Service Level Agreement of 99.95 uptime, which is equivalent to 4.38 hours downtime per year or 43.2 minutes of downtime per month.
In the remaining sections of this chapter, you will learn to create a simple note-taking application. The application, named Notepad, will implement the n-tier architecture described in Figure 3-2. With the Notepad application, you will be able to create, read, update, and delete notes. The application will consist of three main components: a Windows Phone client (UI), a web service (middle tier) that provides the APIs the UI will use to access a central database, and finally the database itself, which will store the notes the user writes.
In developing the Notepad phone application, you will be using the increasingly popular Model-View-ViewModel (MVVM) pattern. MVVM is a design pattern that provides a clear separation between the UI, the application logic, and the data of an application. The models maintain the data, the views display the data or provide the UI for user interaction, and the view-model acts as the controller, or brain, that handles the events that affect either the data or the view. Figure 3-3 illustrates the elements of the MVVM pattern and their relationships.

Azure is the name of Microsoft's cloud services, which developers can use to deliver applications at scale for various workloads and devices. Microsoft Azure provides a runtime framework for applications that currently supports .NET 3.5 and .NET 4.0, as well as load balancers, operating systems, servers, storage, and networking, leaving you free to build the application.
Microsoft Azure provides three services: Windows Azure, SQL Azure, and Windows Azure AppFabric. For building a consumer-facing Windows Phone application, you will be more interested in Windows Azure, which can host web and web service applications, and SQL Azure for the database. Windows Azure AppFabric is more of an Enterprise solution that provides Enterprise Service Bus patterns typically popular in the business process application.
In the following section, you will start first by learning to work with SQL Azure in order to save the notes in the database.
The first step is to create an SQL Azure database to store the notes a user creates with this application. Think of SQL Azure as a hosted database in the cloud where you don't have to worry about the infrastructure. If you're familiar with a Microsoft SQL server, you'll be able to work in SQL Azure. NotepadService, which you will be creating in the next section, will connect to this database by using Entity Framework to create, read, update, and delete records from the database.
The Entity Framework is an object-relational mapping (ORM) tool that allows you to generate objects based on the tables in a database, taking care of the interaction to the database that otherwise you have to code yourself; the Entity Framework will save you lots time.
You will be creating a database in SQL Azure in order perform create, read, update, and delete operations for the Notepad application.
You will create an SQL Azure account in the following steps:
Open a browser of your choice.
Go to
www.microsoft.com/windowsazure/to sign up and buy the Windows Azure service account. Follow the direction provided by Microsoft in order to purchase and acquire the service account. You can use Microsoft Azure each month for free (25 hours of computing time, 500MB storage, 10,000 storage transactions, 1GB database, and 500MB data transfer); this promotional offer might end soon, though.Go to
http://sql.azure.com/and sign in using the account you created in Step 1.Once signed in, click the SQL Azure menu tab on the left side. When the Windows Azure page loads, you will see the project that you created during the registration process in Step 1. Figure 3-4 corresponds to this step.

After you register and purchase your Azure service account, you can log in to an SQL Azure portal.
Click the project hyperlink NAS-DEV. In your case, you should click the name of the project that corresponds to the one you created in the "Signing up for SQL Azure" section.
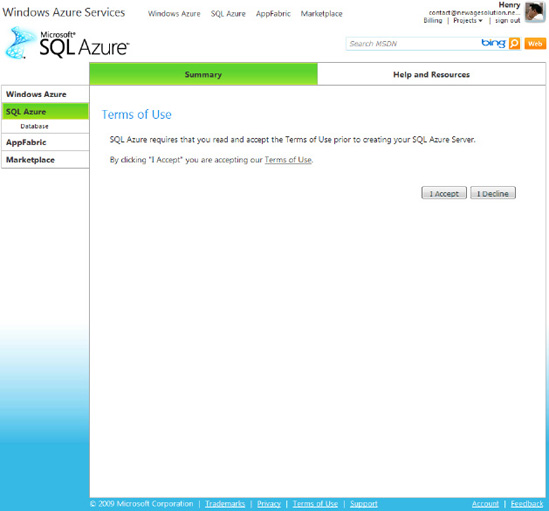
Click the I Accept button on the Terms of Use page, as shown in Figure 3-5.
Here you will be creating an SQL Azure database with a username and password.
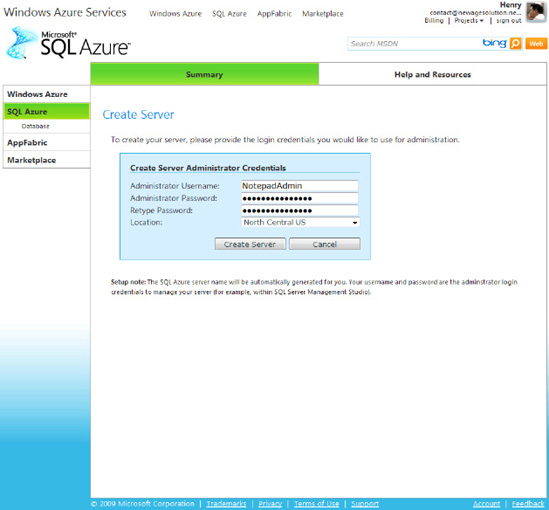
On the Create Server page, enter NotepadAdmin as the administrator username and P@ssword as the administrator password. Retype the password, and choose North Central US on the Location drop-down. See Figure 3-6 for the inputs. Note that for the location, you want to choose the region closest to you for optimal performance. If you are planning to deploy the application to a specific region, select the appropriate region here.
Click the Create Server button and you will see Figure 3-7. Take note of the server name assigned to your SQL Azure database as you will need this information to connect using SQL Server Management Studio.
Click the Create Database button. When the pop-up window appears, enter NotepadDB as the name of your database, choose Web on the Specify an edition drop-down menu, and choose 1GB on the Specify the max size drop-down menu, as shown in Figure 3-8. Then click the Create button.


In the next steps, you will properly configure the SQL Azure firewall so you can connect to the database. By default, SQL Azure denies all access to the database until you add a specific IP.
Notice that NotepadDB now appears in the list of databases on the Databases tab. Click the Firewall Settings tab, where you will add your IP to the firewall in order to access the SQL Azure database that you just created from the Microsoft SQL Management Console application to perform various database-related tasks.
Select "Allow Microsoft Services to access to this server" checkbox, which will allow programs like Microsoft SQL Management consoles to connect directly to the SQL Azure database, as shown in Figure 3-9.
Click the Add Rule button, and when the pop-up appears, enter MyComputer into the Name text box. The pop-up displays your IP address, which you should now copy and paste into the IP Range text boxes, as shown in Figure 3-10.
Click the Submit button. Note that firewall rules can take up to five minutes to go into effect.


In this section, you will test that all the configuration steps are performed properly and that you can connect to the database.
Let's test to see if you can properly connect. Click the Databases tab.
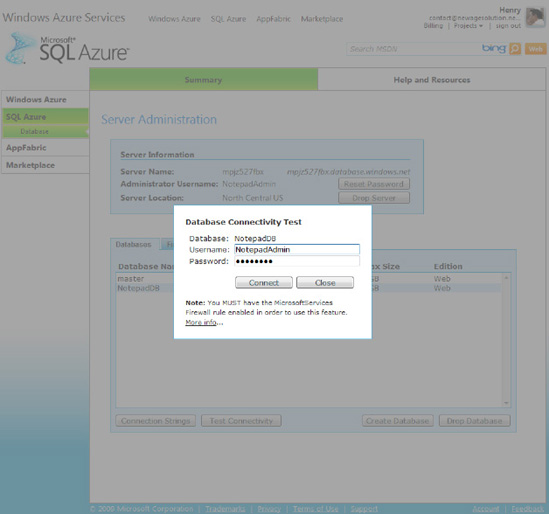
From the list of databases, select NotepadDB. Click the Test Connectivity button, and the pop-up window in Figure 3-11 will appear.
Enter NotepadAdmin and P@ssword (or your own versions of these) into the Username and Password boxes and click the Connect button.
Click the Connect button and you will see a "Successfully connected to the database" message.
Click the Close button to return to the main page.
In the following section, you will create database tables in NotepadDB, which is hosted directly in SQL Azure using the Microsoft SQL Server Management application.
You will be connecting directly to the SQL Azure database NotepadDB you created in the previous steps using the SQL Management application.
You want to make sure that you can connect to SQL Azure directly from SQL Management Studio in order to perform various database operations. If you do not have SQL Management Studio installed, you can download the free SQL Server 2008 R2 Express (
www.microsoft.com/express/database/). Open SQL Server Management Studio by going to Start
In the Connect to Server window, put the server name you obtained previously into the Server name text box, put NotepadAdmin and P@ssword into the Login and Password text box, and click the Connect button, as shown in Figure 3-13.
Once you are connected successfully to your SQL Azure database, SQL Server Management Studio will display an Object Explorer window on the left side of its IDE, as shown in Figure 3-14. Expand the
Databasesfolder and you will find NotepadDB, which you just created, listed there (also shown in Figure 3-14).


Once you are connected to NotepadDB, you can create the tables you'll use to store and manage the notes your users will create and save. You will be creating the database schema shown in Figure 3-15.

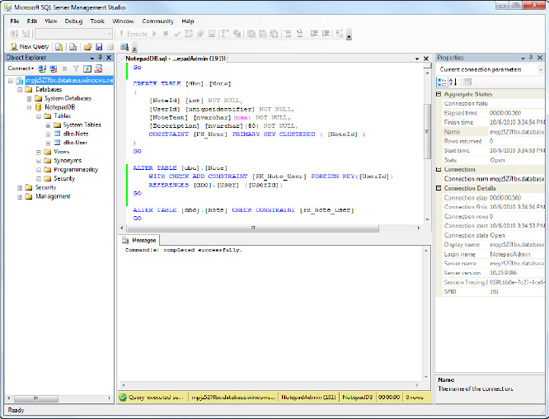
Right-click NotepadDB from the Object Explorer window. From the context menu, choose New Query.
You will be executing SQL scripts in the query window in order to create tables in NotepadDB.
To the newly opened query window, enter or cut and paste the following database script:
USE [NotepadDB]
GO

CREATE TABLE [dbo].[User]
(
        [UserId] [uniqueidentifier] NOT NULL,
        [Name] [nvarchar](50) NOT NULL,
    CONSTRAINT [PK_User] PRIMARY KEY ( [UserId] )
)
Go

CREATE TABLE [dbo].[Note]
(
        [NoteId] [int] IDENTITY(1,1) NOT NULL,
        [UserId] [uniqueidentifier] NOT NULL,
        [NoteText] [nvarchar](max) NOT NULL,
        [Description] [nvarchar](50) NOT NULL,
    CONSTRAINT [PK_Note] PRIMARY KEY CLUSTERED ( [NoteId] )
)
GO

ALTER TABLE [dbo].[Note]
        WITH CHECK ADD CONSTRAINT [FK_Note_User] FOREIGN KEY([UserId])
        REFERENCES [dbo].[User] ([UserId])
GO

ALTER TABLE [dbo].[Note] CHECK CONSTRAINT [FK_Note_User]
GO
Notice that when you expand the tables from NotepadDB in Object Explorer, you will see two tables: Note and User, as shown in Figure 3-16.
You now have a live database in SQL Azure! In the next section, you will be creating a web service using Windows Communication Foundation (WCF). The web service layer provides managed APIs the phone application can use to access the database.
You will be creating a WCF service called NotepadService that will be consumed by the Windows Phone Notepad application. Think of NotepadService as the layer that provides managed APIs to the Notepad application. NotepadService will utilize the Entity Framework to generate object models based on the database tables, and it will also generate a persistence layer that performs the database operations, which otherwise you would have to code yourself. The following steps will provide you with instructions on creating and deploying NotepadService to Windows Azure. You will be creating a WCF Azure service and running it from your machine, and then you will package and deploy the project to the Azure cloud, where you will be able to configure it to have multiple services run if your application demand increases.
You will be creating a Windows Azure NotepadService project in Visual Studio in the following steps. In order to create Azure services, you would need to download Azure tools and SDK from www.microsoft.com/windowsazure/windowsazure/default.aspx.
Create a new Windows Phone Application by selecting File
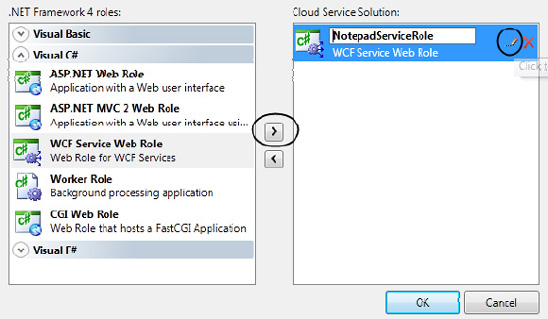
You will be prompted to select the type of role. Note here that if you want to host the web project, you need to select ASP.NET Web Role. For Notepad WCF service, select WCF Service Web Role, as shown in Figure 3-18, and click the arrow pointing to the left. In Cloud Service Solution, you will see WCFServiceWebRole; if you hover your mouse over the item, you will see that a little pencil icon appears. Click the pencil icon and change the name to NotepadServiceRole, also shown in Figure 3-18.

Now that you have the basic plumbing for implementing a WCF service, it's a good time to implement a persistence layer that allows you to interact with the database. The Entity Framework will act as an object-relational mapping tool that will take database tables and create equivalent object models and many of the tedious tasks of coding methods (like add, delete, update, and search).
At the end of this section, you will have created two object models, User and Note, which you can work directly in the code. The Entity Framework provides the ability to save these models directly back to the database.
In the following steps, you will add an Entity Framework item to the project and then connect to NotepadDB in SQL Azure and generate object models.
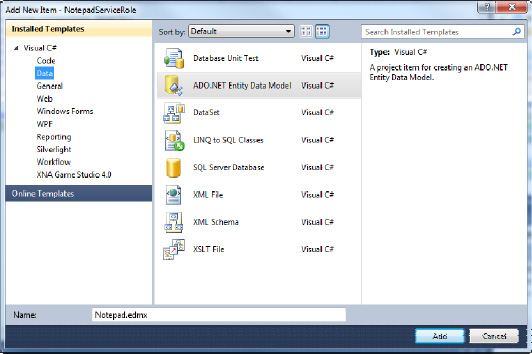
Right-click the NotepadServiceRole project found in Solution Explorer and choose Add
Click the Data from Installed Templates list, choose ADO.NET Entity Data Model, and name the model
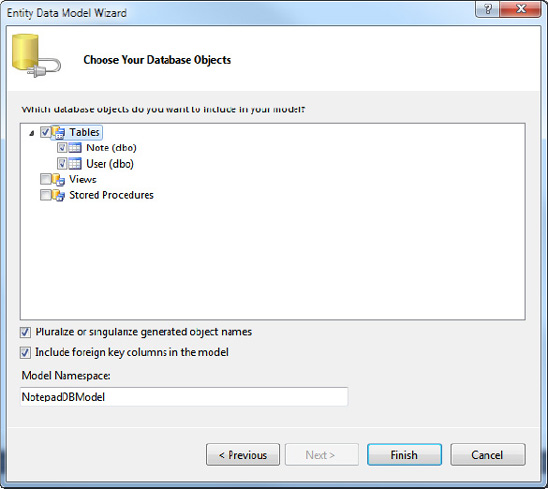
NotepadService.edmx(see Figure 3-19).You will be prompted with the Entity Data Model Wizard, as shown in Figure 3-20. Click the Next button.
Click the New Connection button. When Choose Data Source appears, select Microsoft SQL Server from the list, as shown in Figure 3-21. Click the Continue button.
You will be prompted with a Connection Properties window. In the service name, put the SQL Azure server name that you acquired from the previous steps and enter NotepadAdmin and P@ssword as your username and password. From the Select or enter database name drop-down, select NotepadDB, as shown in Figure 3-22.
Click the OK button, and you will return to the Entity Data Model wizard window. Select Yes, include the sensitive data in the connection string radio button, and click the Next button.
If you expand the tables, you will see the two tables (Note and User) that you created previously. Select both of the tables, as shown in Figure 3-23.
Take the default option for everything else and click the Finish button. You will return to the Visual Studio project and see
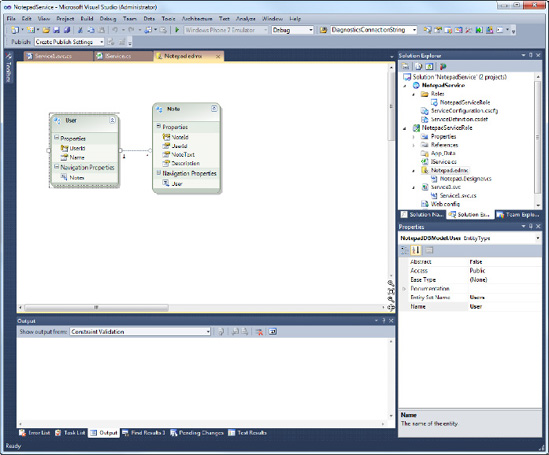
Notepad.edmx, which contains two object models:UserandNote, as shown in Figure 3-24.


You now have User and Note object models that you can work with in your NotepadService. In the next section, you will be preparing NotepadService, which will implement simple create, read, update, and delete operations using the entity model that you generated in this section.
Now that you have an entity model of User and Note, you can implement NotepadService, which will add, update, delete, and search notes. In this section, you will learn to implement a WCF service; you'll also learn to use Entity Framework to interact with the SQL Azure database.
In order to create a WCF service, you must first define a WCF service contract. If everything was done successfully, you'll see a Solution Explorer in Visual Studio that resembles Figure 3-25.

Open IService.cs and replace the content with the following code. The WCF contract will contain a way to add, delete, update, and search the note in NotepadDB. The namespace System.ServiceModel allows you to add attributes ServiceContract and OperationContract, which must be defined in order to create a WCF service.
using System.ServiceModel;
using System.Collections.Generic;
using System;

namespace NotepadServiceRole
{
    [ServiceContract]
    public interface IService
    {
        [OperationContract]
        Guid AddUser(Guid userId, string userName);

        [OperationContract]
        NoteDto AddNote(Guid userId, string notedescription, string noteText);

        [OperationContract]
        void UpdateNote(int noteId, string noteText);
[OperationContract]
void DeleteNote(Guid userId, int noteId);
[OperationContract]
List<NoteDto> GetNotes(Guid userId);
[OperationContract]
NoteDto GetNote(Guid userId, int noteId);
}
}In the next section, you will create a data contract that will be sent to the client through the service.
Before you implement the service contract, you will need to define two data transfer objects to map to the entity object. Although you can expose the entity generated by the Entity Framework directly to the WCF service, it is not a recommended practice because the Entity Framework exposes information not necessary for the client. For example, information like foreign key, primary key, and any Entity Framework-related information that is in the Note and User objects has no meaning to the client. Also, when the Entity Framework object is serialized, it will include all this unnecessary information, causing the serialized objects coming through the Internet to get huge; since you are working with the Windows Phone over wireless or Wi-Fi transmission, you will want information sent over the wireless to be small.
To
NotepadServiceRoleadd theUserDto.csclass with the following code. The namespace you will be using, System.Runtime.Serialization, lets you add DataContract and DataMember attributes that allow the WCF service to serialize this object to be sent over the service to the client.using System.Runtime.Serialization; namespace NotepadServiceRole { [DataContract] public class UserDto { [DataMember] public int UserId { get; set; } [DataMember] public string Name { get; set; } } }Add the
NoteDto.csclass toNotepadServiceRolewith the following code:using System.Runtime.Serialization; namespace NotepadServiceRole {[DataContract] public class NoteDto { [DataMember] public int NoteId { get; set; } [DataMember] public string Description { get; set; } [DataMember] public string NoteText { get; set; } } }
In the following steps, you will implement the NotepadService WCF contract defined in the previous section. You will be using the Entity Framework to access the SQL Azure database.
Open Service1.svc.cs in the NotepadServiceRole project and add the code blocks spelled out in the following sections.
AddUser will add a new user to the database. Note that you are instantiating NotepadDBEntities, which is the Entity Framework-generated context that connects to the SQL Azure NotepadDB.
public Guid AddUser(Guid userId, string userName)
{
    using (var context = new NotepadDBEntities())
    {
        context.AddToUsers(new User()
            {
                UserId = userId,
                Name = userName,
            });

        context.SaveChanges();

        return userId;
    }
}Note in AddNote method, after instantiating NotepadDBEntities, you are creating the Note entity that you generated in the previous steps using the Entity Framework wizard. Once the note is saved, you are mapping to NoteDto to be sent to the client.
public NoteDto AddNote(Guid userId, string notedescription, string noteText)
{
using (var context = new NotepadDBEntities())
{
Note note = new Note()
{
Description = notedescription,
UserId = userId,
NoteText = noteText,
};
context.AddToNotes(note);
context.SaveChanges();
return new NoteDto()
{
NoteId = note.NoteId,
Description = note.Description,
NoteText = note.NoteText,
};
}
}In order to update the note, first you need to instantiate the entity context that connects to NotepadDB, and then you must query for the note that you are going to update. Once the note is retrieved, you will then update the properties and save changes.
public void UpdateNote(int noteId, string noteText)
{
    using (var context = new NotepadDBEntities())
    {
        var note = context
                        .Notes
                        .Where(n => n.NoteId.Equals(noteId)
                              ).Single();
        note.NoteText = noteText;
        context.SaveChanges();
    }
}When deleting the note, the note must be retrieved first and then the retrieved note will be added to the DeleteObject of the Notes collection. Then you save the changes where the delete will be performed by the Entity Framework.
public void DeleteNote(Guid userId, int noteId)
 {
     using (var context = new NotepadDBEntities())
     {
         var note = context
                         .Notes
.Where(n => n.NoteId.Equals(noteId)).Single();
context.Notes.DeleteObject(note);
context.SaveChanges();
}
}GetNotes will bring all the notes associated with the specific userId. You will be using a technique called Linq to Entity that closely resembles the SQL statement. And inside the Linq to Entity, you will be performing translation of the Note entity to NoteDto. This is a very useful technique for mapping an entity object to a data transfer object.
public List<NoteDto> GetNotes(Guid userId)
{
    using (var context = new NotepadDBEntities())
    {
        var notes = (
                        from eachNote in context.Notes
                        where eachNote.UserId == userId
                        orderby eachNote.Description ascending
                        select new NoteDto
                        {
                            NoteId = eachNote.NoteId,
                            Description = eachNote.Description,
                            NoteText = eachNote.NoteText,
                        }
                    ).ToList();

        return notes;
    }
}GetNote will query a single user note from the database.
public NoteDto GetNote(Guid userId, int noteId)
{
    using (var context = new NotepadDBEntities())
    {
        var notes = (
                        from eachNote in context.Notes
                        where eachNote.NoteId == noteId
                                && eachNote.UserId == userId
                        select new NoteDto
                        {
                            NoteId = eachNote.NoteId,
                            Description = eachNote.Description,
                            NoteText = eachNote.NoteText,
}
).SingleOrDefault();
return notes;
}
}You will be testing NotepadService on your machine so that when you connect to NotepadService from the Windows Phone Notepad application, you will be able to debug and step through NotepadService when the service call is made from the Notepad application.
Press F5 and you will notice that the Development Fabric window appears in Internet Explorer. Development Fabric simulates the Azure service environment in your machine. Note that when you expand NotepadService you see NotepadServiceRole, which is the WCF service that you coded in the previous steps. When NotepadService is deployed, you will see one instance of the service deployed, as shown in Figure 3-26. Don't stop the service, as you will be referencing the service from the Notepad application.

In the previous steps, you created the NotepadDB database in SQL Azure and the NotepadService hosted locally using Development AppFabric to simulate Windows Azure. In the following section, you will be consuming NotepadService from the Notepad application; when the service works properly, you will be deploying NotepadService to Windows Azure.
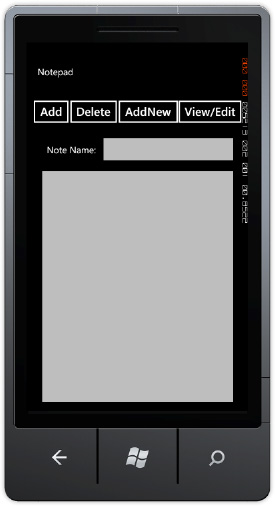
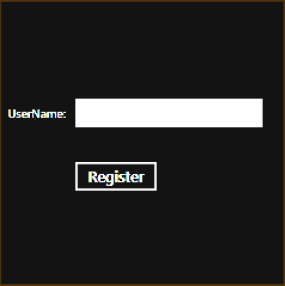
The Notepad application will allow you to add notes and retrieve the notes that will be saved to the cloud database NotepadDB. You will be building the Notepad application that will consume NotepadService, the WCF Azure service that you created previously, and you will verify at the end that the notes are properly saved to SQL Azure NotepadDB. When it's finished, the UI for the Notepad application will resemble Figure 3-27.
To set up the Notepad project, follow the steps you've used in previous examples in this book.
Open Microsoft Visual Studio 2010 on your workstation.
Create a new Windows Phone Application by selecting File
You will be building the user interface using XAML in Visual Studio. For building simple controls, it's faster to work with XAML code. First, you'll build two user controls, NoteListUsercontrol, which will display the list of the notes that the user can select to display and edit, and UserRegistrationUserControl, where the user can register so that the notes can be saved to NotepadDb in the cloud.
UserRegistrationUserControl is displayed the first time when the user starts the Notepad application; thereafter, the user registration information will be saved to the isolated storage application settings (isolated storage will be covered in detail in Chapter 13).
Right-click the Notepad project and choose Add
From the Add New Item window, choose Windows Phone User Control and name the control
UserRegistrationUserControl.xaml, as shown in Figure 3-29. Click the Add button.Open
UserRegistrationUserControl.xaml, which you just added from Solution Explorer. Replace the content with the following XAML code, and you will see a control that will resemble Figure 3-30 in Visual Studio design view.

Take the default namespaces as shown in the following code:
<UserControl x:Class="Notepad.NoteListUserControl"
    xmlns="http://schemas.microsoft.com/winfx/2006/xaml/presentation"
    xmlns:x="http://schemas.microsoft.com/winfx/2006/xaml"
    xmlns:d="http://schemas.microsoft.com/expression/blend/2008"
    xmlns:mc="http://schemas.openxmlformats.org/markup-compatibility/2006"
    mc:Ignorable="d"
    FontFamily="{StaticResource PhoneFontFamilyNormal}"
    FontSize="{StaticResource PhoneFontSizeNormal}"
    Foreground="{StaticResource PhoneForegroundBrush}"
d:DesignHeight="480" d:DesignWidth="480">You will be adding a Register button, a UserName label, and a TextBlock to capture the username.
<Grid x:Name="LayoutRoot" Background="{StaticResource PhoneChromeBrush}">
        <Button Content="Register" Height="72" HorizontalAlignment="Left"
                Margin="118,260,0,0" Name="btnSave" VerticalAlignment="Top"
                Width="160" Click="btnSave_Click" />
        <TextBox Height="72" HorizontalAlignment="Left"
                 Margin="118,154,0,0" Name="txtUserName" Text=""
                 VerticalAlignment="Top" Width="337" />
        <TextBlock Height="30" HorizontalAlignment="Left"
                   Margin="17,177,0,0" Name="textBlock1"
                   Text="UserName: " VerticalAlignment="Top" />
</Grid>NoteListUserControl displays the list of notes that the user created. The control will be prompted when the user clicks the View/Edit button from the MainPage.
Right-click the Notepad project and choose Add
From the Add New Item window, choose Windows Phone User Control and name the control
NoteListUserControl.xaml. Click the Add button.Open
NoteListUserControl.xaml, which you just added from Solution Explorer, replace the content with the following XAML code, and you will see a control that will resemble Figure 3-31 in Visual Studio design view.

Take the default namespaces shown in the following code:
<UserControl x:Class="Notepad.NoteListUserControl"
    xmlns="http://schemas.microsoft.com/winfx/2006/xaml/presentation"
    xmlns:x="http://schemas.microsoft.com/winfx/2006/xaml"
    xmlns:d="http://schemas.microsoft.com/expression/blend/2008"
    xmlns:mc="http://schemas.openxmlformats.org/markup-compatibility/2006"
    mc:Ignorable="d"
    FontFamily="{StaticResource PhoneFontFamilyNormal}"
    FontSize="{StaticResource PhoneFontSizeNormal}"
    Foreground="{StaticResource PhoneForegroundBrush}"
d:DesignHeight="480" d:DesignWidth="480">You will be adding a ListBox control that will be bound to the Notes, which is a collection of NoteDto coming from the NotepadViewModel object you will be implementing later. Each ListBoxItem will contain a TextBlock that is bound to NoteDto's Description property.
<Grid x:Name="LayoutRoot" Background="{StaticResource PhoneChromeBrush}">
        <ListBox Height="458" HorizontalAlignment="Left" Margin="10,10,0,0" Name="lstNotes"
                 VerticalAlignment="Top" Width="460"
 SelectionChanged="lstNotes_SelectionChanged"
                 ItemsSource="{Binding Notes}">
            <ListBox.ItemTemplate>
                <DataTemplate>
                    <StackPanel>
                        <TextBlock Text="{Binding Description}" />
                    </StackPanel>
                </DataTemplate>
            </ListBox.ItemTemplate>
</ListBox>
</Grid>
</UserControl>MainPage will contain the user controls NoteListUserControl and UserRegistrationUserControl (which you just created) and the buttons Add, AddNew, Delete, and View/Edit, which will allow the user to add, insert, and delete the notes.
The namespaces you see in the following code snippet are typically declared by default when you first create a Windows Phone project. In particular, the namespaces xmlns:phone="clr-namespace:Microsoft.Phone.Controls; assembly=Microsoft.Phone" allow you to add common Windows Phone controls to the application main page.
You will also be adding xmlns:uc="clr-namespace:Notepad"; it allows you to add BooleanToVisibilityConverter, which implements converting value from the Boolean to Visibility that is set on the controls.
<phone:PhoneApplicationPage
    x:Class="Notepad.MainPage"
    xmlns="http://schemas.microsoft.com/winfx/2006/xaml/presentation"
    xmlns:x="http://schemas.microsoft.com/winfx/2006/xaml"
    xmlns:phone="clr-namespace:Microsoft.Phone.Controls;assembly=Microsoft.Phone"
    xmlns:shell="clr-namespace:Microsoft.Phone.Shell;assembly=Microsoft.Phone"
    xmlns:d="http://schemas.microsoft.com/expression/blend/2008"
    xmlns:mc="http://schemas.openxmlformats.org/markup-compatibility/2006"
    xmlns:uc="clr-namespace:Notepad"
    mc:Ignorable="d" d:DesignWidth="480" d:DesignHeight="768"
    FontFamily="{StaticResource PhoneFontFamilyNormal}"
    FontSize="{StaticResource PhoneFontSizeNormal}"
    Foreground="{StaticResource PhoneForegroundBrush}"
    SupportedOrientations="Portrait" Orientation="Portrait"
shell:SystemTray.IsVisible="True">In MainPage, you will be adding Add, Delete, AddNew, and View/Edit buttons to work with the notes. Two TextBlocks, txtNotes, and txtNoteName, are added to display the note name and the note content. txtNote and txtNoteName are bound to SelectedNote.NoteText and SelectedNote.Description. The SelectedNote property comes from the NotepadViewModel object, which gets bound to the context of MainPage so that any control in MainPage can bind to any properties of the NotepadViewModel object.
There are two user controls that you will be adding: Visibility of these user controls is controlled by the ShowNoteList and NeedUserId properties found in NotepadViewModel. When the user clicks the View/Edit button, ShowNoteList will be set to true, causing NoteListUserControl, bound to the ShowNoteList property, to appear to the user.
When the user first starts the application and doesn't have the user ID stored in the application settings, NeedUserId will be set to true in NotepadViewModel, causing the UserRegistrationUserControl to appear.
Note that you will be adding a custom converter that will convert the Boolean value received from NotepadViewModel to Visibility enumeration in order to hide and unhide the controls. You will be coding BoolToVisibilityConvert in later.
<UserControl.Resources>
        <uc:BoolToVisibilityConverter x:Key="BoolToVisibilityConverter" />
    </UserControl.Resources>

    <Grid x:Name="LayoutRoot" Background="Transparent">
        <Grid.RowDefinitions>
            <RowDefinition Height="Auto"/>
            <RowDefinition Height="*"/>
        </Grid.RowDefinitions>

        <StackPanel x:Name="TitlePanel" Grid.Row="0" Margin="12,17,0,28">
            <TextBlock x:Name="ApplicationTitle" Text="Notepad"
                       Style="{StaticResource PhoneTextNormalStyle}"
                       HorizontalAlignment="Left" Margin="12,0,0,0" Width="89"/>
        </StackPanel>

        <Grid x:Name="ContentPanel" Grid.Row="1" Margin="12,0,12,0">
            <Button Content="Add" Height="72" HorizontalAlignment="Left"
                    Margin="-8,10,0,0" x:Name="btnSave" VerticalAlignment="Top" Width="99"
                    Click="btnSave_Click" />
            <Button Content="Delete" Height="72" HorizontalAlignment="Left"
                Margin="71,10,0,0" x:Name="btnDelete" VerticalAlignment="Top" Width="125"
                Click="btnDelete_Click" />
            <Button Content="AddNew" Height="72"
                 Margin="176,10,128,0" x:Name="btnAddNew" VerticalAlignment="Top"
                 Click="btnAddNew_Click" />
            <Button Content="View/Edit" Height="72" HorizontalAlignment="Left"
                    Margin="306,10,0,0" Name="btnEdit" VerticalAlignment="Top" Width="160"
                    Click="btnViewEdit_Click" />
            <TextBox x:Name="txtNote" TextWrapping="Wrap"
                      Margin="10,163,8,8" AcceptsReturn="True"
                Text="{Binding Path=SelectedNote.NoteText}"/>
            <TextBlock x:Name="lblNoteName" HorizontalAlignment="Left" TextWrapping="Wrap"
                       Text="Note Name:" VerticalAlignment="Top" Margin="32,114,0,0"/>
            <TextBox x:Name="txtNoteName" TextWrapping="Wrap"
                     VerticalAlignment="Top" Margin="143,91,8,0"
                     Text="{Binding Path=SelectedNote.Description}"/>
            <uc:NoteListUserControl x:Name="ucNoteList"
                     Visibility="{Binding ShowNoteList, Converter={StaticResource
BoolToVisibilityConverter}}" d:IsHidden="True" />
            <uc:UserRegistrationUserControl x:Name="ucUserRegistration"
Visibility="{Binding NeedUserId, Converter={StaticResource
BoolToVisibilityConverter}}" d:IsHidden="True" />
</Grid>
</Grid>In the next section, you will be adding events for the controls that you built in previous steps.
In Solution Explorer, open MainPage.xaml.cs and replace the code there with the following C# code blocks to implement the UI interacting with the user to add, delete, view, and edit notes, and to register the user for the first time.
Begin by listing the namespaces the application will use.
using System.Windows;
using Microsoft.Phone.Controls;
In the constructor of MainPage, you will be setting DataContext of the user controls to the NotepadViewModel instance. When DataContext of ucNoteList and ucUserRegistraton is set to NotepadViewModel, the controls within the user controls' values will be controlled by the properties of NotepadViewModel.
public MainPage()
{
    InitializeComponent();

    this.DataContext = NotepadViewModel.Instance;
    ucNoteList.DataContext = NotepadViewModel.Instance;
    ucUserRegistration.DataContext = NotepadViewModel.Instance;
}When the user clicks the Add button, the SaveNote method from the NotepadViewModel instance will be called. Any direct calls to NotepadService will be handled from NotepadViewModel, leaving the handling of the web service call complexity centralized to NotepadViewModel. This is a great abstraction technique, allowing you to easily maintain the application.
private void btnSave_Click(object sender, RoutedEventArgs e)
{
    if (!string.IsNullOrEmpty(txtNote.Text))
    {
        NotepadViewModel.Instance.SaveNote(txtNoteName.Text, txtNote.Text);
} }
When the ViewEdit button is clicked, the ShowNoteList property in NotepadViewModel will be set to true, which will trigger NoteListUserControl to appear. ShowNoteList will be set to true only if there are Notes to be selected.
private void btnViewEdit_Click(object sender, RoutedEventArgs e)
{
if (!string.IsNullOrEmpty(txtNote.Text))
{
NotepadViewModel.Instance.SaveNote(txtNoteName.Text, txtNote.Text);
}
}When the AddNew button is clicked, SelectedNode in NotepadViewModel will be set to null, triggering the txtNote and txtNoteName contents to be set to empty because they are bound to SelectedNote. Although you can directly set the text fields of txtNote and txtNoteName to an empty string, you are abstracting this particular task to NotepadViewModel because when the user selects the specific user note from NoteListUserControl, the txtNote and txtNoteName content will be automatically changed because they are bound to SelectedNote.
private void btnAddNew_Click(object sender, System.Windows.RoutedEventArgs e)
{
    NotepadViewModel.Instance.SelectedNote = null;
}When the Delete button is clicked, the DeleteNote method from the NotepadViewModel instance will be invoked, SelectedNode will be set to null, and txtNote and txtNoteName will be set to an empty string automatically because they are bound to SelectedNode.
private void btnDelete_Click(object sender, System.Windows.RoutedEventArgs e)
{
    NotepadViewModel.Instance.DeleteNote();
}You will create a custom converter that implements IValueConverter, which can be used during the binding in the control where the bound value can be converted to any value that the control will understand. BoolToVisibilityConvert will convert Boolean value bound to the control Visibility to Visibility enumeration so that the controls can hide and unhide.
Right-click the Notepad project and choose Add
When the Add New Item window pops up, choose Class and name the class BoolToVisibilityConvert, as shown in Figure 3-32. Click the Add button.
Open
BoolToVisibilityConvert.csand paste the code blocks spelled out in the following sections.

The namespace System.Windows.Data will allow you to declare the IValueConverted interface for the BoolToVisibilityConverter class.
using System;
using System.Windows;
using System.Windows.Data;

namespace Notepad
{
    public class BoolToVisibilityConverter : IValueConverter
{In order to convert bound value to the control property or transform to other value, you need to implement the Convert and ConvertBack methods.
public object Convert(object value, Type targetType,
object parameter, System.Globalization.CultureInfo culture)
        {
            bool boolValue;

            if (bool.TryParse(value.ToString(), out boolValue))
            {
                return boolValue ? Visibility.Visible : Visibility.Collapsed;
            }
            else
            {
                // By default it will always return Visibility.Collapsed
                // even for the case where the value is not bool
                return Visibility.Collapsed;
            }

        }
        public object ConvertBack(object value, Type targetType,
object parameter, System.Globalization.CultureInfo culture)
        {
            Visibility visibilityValue = Visibility.Collapsed;

            try
            {
                visibilityValue = (Visibility)Enum.Parse(typeof(Visibility),
(string)value, true);
                return visibilityValue;
            }
            catch (Exception)
            {
                // if fails to conver the value to Visibility
                // it will return Collapsed as default value
                return visibilityValue;
            }

        }
    }
}Before you code NotepadViewModel, add a web service reference to the NotepadService WCF service that will be hosted in Azure.
Right-click the
Referencesfolder found under the Notepad project in Solution Explorer, and choose Add Service Reference.You will be prompted with the Add Service Reference window. In Address, enter
http://127.0.0.1/Service.svc, and enter NotepadServiceProxy in the Namespace text box. Click the Go button and NotepadService information is retrieved. You will see Service1 in the Services box.When you expand Service1, you will see
IService. ClickIServiceand the Operations box will be populated with NotepadService, as shown in Figure 3-33. Click the OK button.

NotepadViewModel is considered the controller of this application, and it controls the events and the data that will manipulate the UI. You can think of it as the brain of the application.
Right-click the Notepad project and choose Add
When the Add New Item window pops up, choose Class; name the class
NotepadViewModel. Click the Add button. Your Solution Explorer should resemble Figure 3-34.Open
NotepadViewModel.cs, found under the Notepad project, and enter the following C# code.

The namespace Notepad.NotepadServiceProxy allows you to work with the web service NotepadService you referenced. System.IO.IsolatedStorage allows you to save the registered user ID so that the application will know what notes to work within the database. System.ComponentModel allows you to implement the INotifyChanged interface that can raise the property changed events, allowing the controls that are bound to properties like Notes, SelectedNotes, ShowNoteList, and NeedUserId to respond to the changes. System.Linq allows you to query to objects with syntax that resembles the SQL statement.
using System;
using System.Windows;
using System.IO.IsolatedStorage;
using System.ComponentModel;
using Notepad.NotepadServiceProxy;
using System.Collections.ObjectModel;
using System.Linq;

namespace Notepad
{
    /// <summary>
    /// Settings class is singleton instance that will contain various application
    /// configuration that will be used by all the controls of the application.
    /// </summary>
    public sealed class NotepadViewModel : INotifyPropertyChanged
{There are many variables that will be added to NotepadViewModel that will control the behavior of the UI controls. Please refer to the comments in the following code for an explanation of what significance the properties have for the UI controls.
// For creating Singleton instance
        public static NotepadViewModel Instance = new NotepadViewModel();

// For calling Notepad web service
        private ServiceClient _svc;

        // Populated when the user registers firstime
        // and the value is saved to the isolated storage
        public Guid UserId
        {
            get
            {
                if (IsolatedStorageSettings.ApplicationSettings.Contains("UserId"))
                {
                    return (Guid)IsolatedStorageSettings.ApplicationSettings["UserId"];
                }
                else
                {
                    return Guid.Empty;
                }
            }
            set
            {
                if (IsolatedStorageSettings.ApplicationSettings.Contains("UserId"))
                {
                    IsolatedStorageSettings.ApplicationSettings["UserId"] = value;
                }
                else
                {
                    IsolatedStorageSettings.ApplicationSettings.Add("UserId", value);
                }

                // Raise property changed event to alert user registration control
                // so that if the UserId is empty user registration screen
                // will be prompted for the user to register.
                //
                // To see how raise property changed event works with control Binding
// see Binding attributes on ucUserRegistration control in MainPage.xaml
this.RaisePropertyChanged("UserId");
this.RaisePropertyChanged("NeedUserId");
}
}
// Checks to see if the UserId exist in the isolated storage
// and make sure UserId is not an empty Guid
public bool NeedUserId
{
get
{
return !IsolatedStorageSettings.ApplicationSettings.Contains("UserId")
|| (Guid)IsolatedStorageSettings.ApplicationSettings["UserId"]
== Guid.Empty;
}
}
// ShowNoteList is bound to NoteListUserControl in the MainPage
// and it will hide if false and else unhide if true.
private bool _showNoteList = false;
public bool ShowNoteList
{
get
{
return _showNoteList;
}
set
{
_showNoteList = value;
this.RaisePropertyChanged("ShowNoteList");
}
}
// SelectedNote is populated from NoteListUserControl
// when the user selects the note from the list box.
// SelectedNote is then used in MainPage by txtNote and
// txtNoteName to populate to textbox content.
private NoteDto _note;
public NoteDto SelectedNote
{
get
{
return _note;
}
set
{
_note = value;
this.RaisePropertyChanged("SelectedNote");
}
}// Collection of NoteDto is populated by calling GetNotes service call
// and all user notes will be contained in this collection.
private ObservableCollection<NoteDto> _notes;
public ObservableCollection<NoteDto> Notes
{
get
{
return _notes;
}
set
{
_notes = value;
this.RaisePropertyChanged("Notes");
}
}In the constructor, you will be adding event handlers for the service calls. GetNotesCompleted will return all the user notes. AddNote, UpdateNote, and DeleteNote will add, update, and delete the note and return successfully if no error occurs, otherwise the error will be reported back to the callbacks. In the constructor ServiceClient, the web service proxy will be initialized and the RebindData method that makes the call to the GetNotes method will populate the Notes property.
private NotepadViewModel()
        {
            _svc = new ServiceClient();
            _svc.GetNotesCompleted += new
EventHandler<GetNotesCompletedEventArgs>(_svc_GetNotesCompleted);
            _svc.AddNoteCompleted += new
EventHandler<AddNoteCompletedEventArgs>(_svc_AddNoteCompleted);
            _svc.UpdateNoteCompleted += new
EventHandler<AsyncCompletedEventArgs>(_svc_UpdateNoteCompleted);
            _svc.AddUserCompleted += new
EventHandler<AddUserCompletedEventArgs>(_svc_AddUserCompleted);
            _svc.DeleteNoteCompleted += new
EventHandler<AsyncCompletedEventArgs>(_svc_DeleteNoteCompleted);

            if (this.NeedUserId)
            {
                this.Notes = new ObservableCollection<NoteDto>();
            }
            else
            {
                this.RebindData();
            }
        }

        // To rebind the data GetNotes will be called to retrieve
// all the user notes and resetting Notes value.
public void RebindData()
{
_svc.GetNotesAsync(this.UserId);
}Here you will be using the Linq to Object technique to query the Notes property to check if noteName exists. If the note exists, UpdateNote will be called; otherwise AddNote will be called. The AddUser method will make a service call to add the user. DeleteNote will call the DeleteNote service.
public void SaveNote(string noteName, string noteText)
        {
            // Search the user notes and see if the note already exist
            var note = (from eachNote in this.Notes
                       where eachNote.NoteText.Equals(noteText,
StringComparison.InvariantCultureIgnoreCase)
                       select eachNote).SingleOrDefault();

            if (note == null)
            {
                _svc.AddNoteAsync(this.UserId, noteName, noteText);
            }
            else
            {
                _svc.UpdateNoteAsync(note.NoteId, noteText);
            }

            this.SelectedNote = note;
        }

        public void AddUser(Guid userId, string userName)
        {
            if (this.NeedUserId)
            {
                _svc.AddUserAsync(userId, userName);
            }
        }

        public void DeleteNote()
        {
            _svc.DeleteNoteAsync(this.UserId, this.SelectedNote.NoteId);
}The following code will handle callbacks for NotepadService calls.
When the note is added successfully, SelectedNote will be set with the result returned from the call.
private void _svc_AddNoteCompleted(object sender, AddNoteCompletedEventArgs e)
{
    if (e.Error == null)
    {
        this.SelectedNote = e.Result;
        this.RebindData();
    }
    else
    {
        MessageBox.Show("Failed to add the note. Please try again!");
    }
}The returned result will contain all the user notes and will be set to the Notes property.
private void _svc_GetNotesCompleted(object sender, GetNotesCompletedEventArgs e)
{
    if (e.Error == null)
    {
        this.Notes = e.Result;
    }
    else
    {
        MessageBox.Show("Failed to get the notes. Please try again!");
    }
}When the updated note is completed, RebindData is called, which will trigger the UI element txtNote, txtNoteName, to be updated in MainPage.
private void _svc_UpdateNoteCompleted(object sender, AsyncCompletedEventArgs e)
{
    if (e.Error == null)
    {
        this.RebindData();
    }
    else
    {
        MessageBox.Show("Failed to update the note. Please try again!");
    }
}If the user registration is successful, the UserId property will be set with the return result, saving it to the isolated storage.
private void _svc_AddUserCompleted(object sender, AddUserCompletedEventArgs e)
{
    if (e.Error == null)
    {
        // Set the UserId only when AddUser service call
        // was made successfully
        this.UserId = e.Result;
    }
    else
    {
        this.UserId = Guid.Empty;
        MessageBox.Show("Failed to add user please try again!");
    }
}When the delete note call is successful, SelectedNote will be set to null so that txtNote and txtNoteName will be set with an empty string in MainPage, and RebindData is called to update the properties.
private void _svc_DeleteNoteCompleted(object sender, AsyncCompletedEventArgs e)
{
    if (e.Error == null)
    {
        this.SelectedNote = null;
        this.RebindData();
    }
    else
    {
        MessageBox.Show("Failed to delete note please try again!");
    }
}Here you will be coding the implementation of the INotifyPropertyChanged event that will be called whenever the Notes, ShowNoteList, NeedUserId, and SelectedNote properties are changed.
// Implement INotifyPropertyChanged interface
public event PropertyChangedEventHandler PropertyChanged;
private void RaisePropertyChanged(string propertyName)
{
    PropertyChangedEventHandler propertyChanged = this.PropertyChanged;
    if ((propertyChanged != null))
    {
        propertyChanged(this, new PropertyChangedEventArgs(propertyName));
}
}
}
}Before you begin, make sure that NotepadService is running Development App Fabric; otherwise press F5 to start NotepadService as shown in the previous steps. Then press F5 on the Notepad Windows Phone project. You will see the application shown in Figure 3-27. Enter the username and register, and add some notes so that you can confirm that the notes are saved to NotepadDB in SQL Azure.
Open up your SQL Server Management Studio by following the steps provided in the previous sections, type in the following SQL statement, press F5, and you will see the notes and the user data saved to NotepadDB.
select * from [User]
select * from Note
When the SQL statement is executed, you should see the data you added in the Results window, as shown in Figure 3-35.

In the next section, you will deploy NotepadService directly to Windows Azure and modifying the Notepad application to consume the web service located in Windows Azure instead of from the local machine.
By deploying to Windows Azure, you will have a redundant, fault-tolerant service that you can scale out if you need to meet the demands of heavy usage. You will see how simple it is to configure the service and deploy.
You will be creating a Windows Azure service host in order to deploy WCF NotepadService to a Windows Azure platform.
Open the browser of your choice.
Go to
www.microsoft.com/windowsazure/to sign up and buy the Windows Azure service account. Follow the directions provided by Microsoft in order to purchase and acquire the service account.Go to
https://windows.azure.com/and sign in using the account you created in Step 1.
Once you've signed in, click the Windows Azure menu tab on the left side. When the Windows Azure page loads, you will see the project that you created during the registration process (see step 1). See Figure 3-36, which will correspond to this step.
Click the project hyperlink NAS-DEV. In your case, you should click the name of the project that corresponds to the one you created in Step 1.

Now you're ready to create and configure the service.
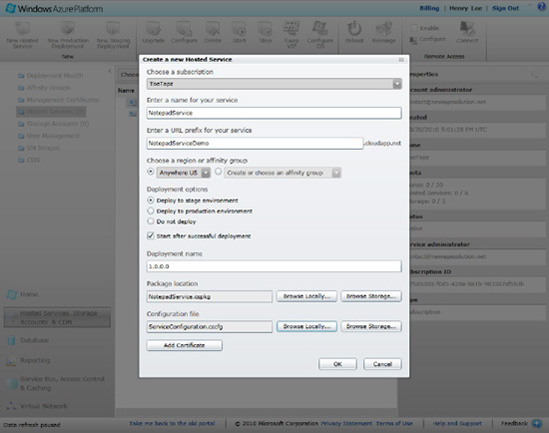
Create a new service that will host your WCF service by clicking the New Hosted Service icon on the top left side of the page. You will see the form in Figure 3-37
In the "Enter a name for your service" box, enter NotepadService; in the "Enter a URL prefix for your service" textbox, type NotepadServiceDemo. Note here that NotepadServiceDemo.cloudapp.net will become your production WCF endpoint that you will be using later in your Windows Phone application.
In the "Choose a region or affinity group" section, you have two options. Typically, relating the affinity among other services allows you to run the services in the same region in order to optimize performance.
If you are creating multiple services that will interact with other services in the same region, select "Create a new affinity group" or choose the existing Affinity Group from the "Create or choose an affinity group" drop-down.
If you won't be creating multiple services that require the services to be in the same region, then select the Anywhere US option from the Choose a Region drop-down.
In the Deployment options section, select "Deploy to production environment" and make sure the "Start after successful deployment" checkbox is checked.
For Deployment name, I recommend using the version number of your NotepadService, which would be 1.0.0.0.

See Figure 3-38 for appropriately filled information. Keep this browser open as you will be coming back and deploying the packages.

In the previous steps, you prepared the NotepadService host; now it's time for you to deploy NotepadService so that you can consume the Azure service from the phone. You will be deploying the service to staging first. Staging is where you test your service before going to production. This is a very convenient way of making sure your service works before going live.
You will need a compiled binary so you can deploy to the Windows Azure host.
Go to your NotepadService project, stop the project if it is running, right-click the NotepadService project, and choose Publish.
The Publish Cloud Service window will appear. Choose "Create Service Package Only," as shown in Figure 3-39.
Click the OK button. Windows Explorer will open with a directory where you will see two files:
NotepadService.cspkgis the compiled binary of NotepadService andServiceConfiguration.cscfgis the configuration file used by Windows Azure. Take note of the directory path as you will be uploading these files to Windows Azure.

You will be deploying the packages created in the previous steps to Windows Azure.
Go to your browser where the Create a New Hosted Service screen is, as shown in Figure 3-38.
Click Browse Locally in the Package location section; browse to where you published compiled NotepadService in the previous section and choose NotepadService.cspkg.
In the Configuration file section, click the Browse Locally button; browse to where you published NotepadService and choose ServiceConfiguration.cscfg. You should see a screen that resembles Figure 3-40.
Click OK to deploy. You will see Warning screen as shown in Figure - Click Yes to ignore this warning.
You will be returned to the main screen of Hosted Service. Note that NotepadService is being created (see Figure 3-42). You will need to wait until the status changes to Ready.
When the status changes to Ready, select NotepadService 1.0.0.0 and note the DNS name on the right. This is the WCF end URL that you will be using. Simply append "/Service.svc" to this DNS name on the browser. (for the demo, see (http://ef8c3aa169c04db99fbfb74616a0afd6.cloudapp.net/service1.svc) If everything was successful, you should see your NotepadService in the browser (see Figure 3-43).


In following section using you will consume NotepadService deployed to Windows Azure staging.
In the previous steps, you deployed NotepadService to the Windows Azure host. You will be changing the Notepad phone configuration to point to the web service that is hosted in Windows Azure and test in the same way you tested when the service was deployed locally to your machine.
Go to Visual Studio and open the Notepad project.
In Solution Explorer under the Notepad project, open
ServiceReferences.ClientConfig. Change the endpoint address from 127.0.0.1 to the URL that you received when you deployed to staging in previous steps. See Figure 3-44 with the changed endpoint address.Make sure that NotepadService is in Ready status, and then press F5 to run your Notepad phone application in the emulator. Follow the previous steps to test the Notepad application. It should exhibit exactly the same behavior, except that now you are running your Notepad application against the Windows Azure service.

In this chapter, you build a Windows Phone application that makes use of Microsoft's Windows Azure service to store data to an SQL server in the cloud. Your application is now scalable and fault-tolerant, and it can accommodate a large number of users. You learned how simple it is to create the service and the database in the Azure cloud and how Microsoft Azure gives you the power to build an application without having to worry about creating your own complex IT infrastructure to support it.
In Chapter 4, you will learn to catch exceptions and debug and test Windows Phone applications. You will learn critical skills that will help you be successful in building a Windows Phone application.