
Quickly Build an Input-Driven Game
All games are driven by user input, but depending on how the game behaves between user actions, a game may be one of two types. One type is the action game, in which the events on the screen unfold whether or not the user provides any input. Action games are explored in Chapter 5. In this chapter, we are going to look at games that wait for the user to make a choice. Games of this type include puzzle games and strategy games. In this chapter, we refer to them as input-driven games.
Although the coolness factor of input-driven games is definitely less than that of action games, many successful games of this type are on the market. From Minesweeper to Sudoku to Angry Birds, these types of games have captured large audiences, and so it is important to understand how this type of game is implemented. Figure 4-1 shows the typical life cycle of an input-driven game.
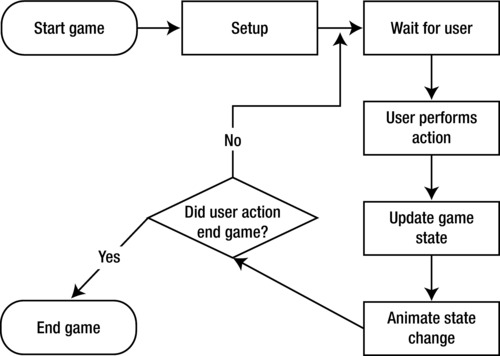
Figure 4-1. Coin Sorter—a simple input-driven game
In Figure 4-1, after any initial setup, the application waits for a user to take some action. When the user does something, the game state is updated, and animations are created to reflect the user’s action. The animation created by this user action can be simple, such as highlighting a selection, or complex, like an entire physics simulation. After the animation is completed, the application tests to see whether the end of the game has been reached. If it has not, the application once again waits for user input.
In this chapter, you will explore how to create a game that follows the process outlined in Figure 4-1. You will also look at the details of getting content onto the screen and creating animations.
Exploring How to Get Content on the Screen
In the preceding chapter, we assembled views to create a complete application. We used Interface Builder to create UI elements, and for the most part, simply replaced one view with another to move the user from view to view. In this chapter, we are going to take a closer look at the UIView and how it can be used to programmatically create dynamic content. This includes an exploration of how to place components on the screen as well as animate them.
The class UIView is the base component class of UIKit. All other UI elements, such as buttons, switches, and scroll views, to name a few, are subclasses of UIView. Even the class UIWindow is a subclass of UIView, so when we manipulate content on the screen, a lot of what we will be doing is interacting with the UIView class.
The UIView class works a lot like the base UI component class in other programming environments. Each UIView defines a region of the screen and has a number of children, or subviews, which are drawn relative to their parent. Figure 4-2 shows an example layout of UIView instances.
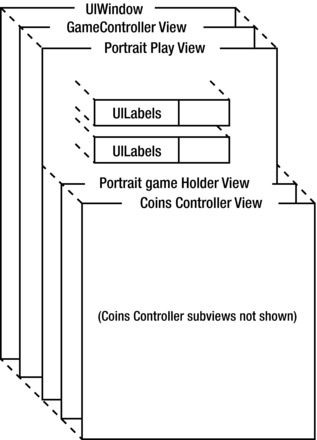
Figure 4-2. Nested UIView instances
In Figure 4-2, you can see in the back the root UIWindow for our sample application. When the user is seeing the game view, the UIWindow has a single subview, which is the view property associated with the GameController class. The GameController places the Portrait Play view as a subview of its view when the user clicks the New Game button. The Portrait Play view has five subviews, as defined in the XIB file. Four of these subviews are UILabels for displaying and tracking the user’s score and remaining turns. The fifth UIView is the Portrait Game Holder view, which is responsible for defining the region where the view from the CoinsController is placed. The view from the CoinsController has several subviews, which make up the interactive part of the game. You will be looking at those views in more detail later, but for now, understand that those views are added to the scene in exactly the same way as the rest of the views.
Another thing to notice about Figure 4-2 is that not all of the views are placed in the same position relative to their parent. For example, the Portrait Play view is placed at the upper left of the GameController view, while the Portrait Game Holder view is placed about halfway down its parent, the Portrait Play view. The property frame of the subview dictates where it is placed relative to its parent. Figure 4-3 shows this in more detail.

Figure 4-3. The frame of a UIView
As shown in Figure 4-3, the frame of a UIView describes not only the location of a subview, but also the size of the view. Generally speaking, the frame is said to describe the region of a subview. The property frame is a struct of type CGRect and is composed of two other structs, origin and size. The field origin is of type CGPoint and describes the location of the upper-left corner of the subview in terms of points. The field size is of type CGSize and describes the number of points the subview is wide and high.
Core Graphics Type Definitions
Core Graphics defines a number of types, structs, and functions. These include the previously mentioned CGRect, CGpoint, and CGSize. Listing 4-1 shows the definitions of these three structs.
Listing 4-1. CGGeometry.h (CGRect, CGPoint, and CGSize)
/* Points. */

struct CGPoint {
  CGFloat x;
  CGFloat y;
};
typedef struct CGPoint CGPoint;

/* Sizes. */

struct CGSize {
  CGFloat width;
  CGFloat height;
};
typedef struct CGSize CGSize;

/* Rectangles*/

{
  CGPoint origin;
  CGSize size;
};
typedef struct CGRect CGRect;
Listing 4-1 presents each of the core structs that define the region of a subview in relation to its parent. These structs are defined in the file CGGeometry.h, which is part of the Core Graphics framework, a standard part of any iOS project. Notice that x, y, width, and height values are defined as CGFloat. The unit for these values is points, not pixels. The difference is subtle at first, but the idea here is that the coordinates and sizes you are specifying with these values is meant to be resolution independent. Further discussion of points vs. pixels can be found in Appendix A.
Tip The letters CG in the names of structs such as CGRect refer to the Core Graphics framework. So a CGRect is referred to as a Core Graphics Rect when you want to be precise.
To create any of the base geometric types from Listing 4-1, an inline utility function is defined in CGGeometry.h, as seen in Listing 4-2.
Listing 4-2. CGGeometry.h (CGPointMake, CGSizeMake, and CGRectMake)
/*** Definitions of inline functions. ***/

CG_INLINE CGPoint
CGPointMake(CGFloat x, CGFloat y)
{
  CGPoint p; p.x = x; p.y = y; return p;
}
CG_INLINE CGSize
CGSizeMake(CGFloat width, CGFloat height)
{
  CGSize size; size.width = width; size.height = height; return size;
}
CG_INLINE CGRect
CGRectMake(CGFloat x, CGFloat y, CGFloat width, CGFloat height)
{

  CGRect rect;
  rect.origin.x = x; rect.origin.y = y;
  rect.size.width = width; rect.size.height = height;
  return rect;
}
Listing 4-2 shows the utility functions that can be used to create new geometry values. Only the definition is shown, because the declaration of these functions is trivial. The type CGFloat is defined simply as float. Presumably, this could be changed to support a different architecture. Also, CG_INLINE is simply defined as static inline, indicating that the compiler may inject a compiled version into the calling code.
The types and functions defined by Core Graphics are pretty straightforward. Let’s look at an example to illustrate their use. Listing 4-3 shows one UIView being added to another at a specific region.
Listing 4-3. Example of Adding a Subview and Specifying the Frame
UIView* parentView = [[UIView alloc] initWithFrame:CGRectMake(0, 0, 480, 320)];
UIView* subView = [UIView new];

CGRect frame = CGRectMake(200, 100, 30, 40);
[subView setFrame:frame];

[parentView addSubview:subView];
In Listing 4-3, we create two UIViews in two different ways. The UIView parentView is created in the more standard of the two ways, by calling alloc and then calling initWithFrame: and passing in a new CGRect to specify its location and size. Another perfectly valid way to create a UIView is by simply calling new and then setting the frame property, as we do for subView. The last thing done in this code snippet is to add subView to parentView by calling addSubview:. The result would be something like Figure 4-3 shown earlier.
Now that you understand the basics of the UIView subclasses and how they are nested and placed, you can take a look at a few basic animations. This will give you the understanding required to explore our simple game.
There are two key components to creating an event-driven game. The first is creating animations, and the second is managing the game state. There are several ways to create animations in an iOS application. In the preceding chapter, we implemented animations to transition from view to view. In this section, we will review how that was done and show a similar example to flesh out your understanding. At the end of this chapter, you will take a look at yet a third technique that explores the backing classes used by the first two examples.
The Static Animation Tasks of UIView
The class UIView has static tasks designed to simplify the creation of basic animations. These same tasks can be used to trigger canned animations, such as the transitions used to switch from one view to another. Figure 4-4 shows the canned animation that occurs when the user switches from the High Score view to the Welcome view.

Figure 4-4. Flip animation
Starting at the upper left of Figure 4-4, the High Score view flips from left to right until it becomes just a sliver. The animation continues, revealing the Welcome view in a smooth, visually appealing transition. This is just one of the many built-in animations in iOS. Users have learned that this standard transition indicates a change in context. To understand how this animation was triggered, let’s start by looking at the steps preformed in Chapter 3 to switch from the High Score view to the Welcome view. These steps are shown in Listing 4-4.
Listing 4-4. GameController.m (highscoreDoneClicked:)
- (IBAction)highscoreDoneClicked:(id)sender {
    [UIView beginAnimations:@"AnimationId" context:@"flipTransitionToBack"];
    [UIView setAnimationDuration:1.0];
    [UIView setAnimationTransition:UIViewAnimationTransitionFlipFromLeft forView:self.view cache:YES];

    [highscoreController.view removeFromSuperview];
    [self.view addSubview: welcomeView];

    [UIView commitAnimations];
}
Listing 4-4 shows the task called when the user touches the Done button in the High Score view. The first line of this task calls the static task beginAnimations:context:. This task is sort of like starting a database transaction, in that it is creating an animation object, and any change that occurs to UIView instances before commitAnimations is called is part of this animation. The first NSString passed to beginAnimations:context: is an identifier for the backing animation object. The second NSString is similar to the first in that it is used to give additional context about when the animation was created. These two strings could be nil in this example, because we don’t really care much about this animation after we define it. In the next example, we will take advantage of these strings to define code to be run when the animation is done.
After the call to beginAnimations:context:, the duration of the animation is defined by calling setAnimationDuration:. The value passed in is the number of seconds the animation should run. The call to setAnimationTransition:forView:cache: indicates that we want to use one of the canned animations that comes with iOS. The animation we have selected is UIViewAnimationFlipFromLeftForView. Because this is a transition animation, we specify the view self.view, which is the super view whose content is changing.
After the animation is set up, the next thing we do (as shown in Listing 4-4) is make the changes to our scene that we want animated. Because this task is responsible for switching the displayed view from the High Score view to the Welcome view, we simply remove the view highscoreController.view from its super view (self.vew) and add the welcomeView to self.view. Finally, we commit the animation, causing it to be displayed to the user.
We can use these static tasks of UIView to create other animations, not just the ones provided by iOS. Let’s update the transition from the Welcome screen to the High Score screen so one fades into the other, as seen in Figure 4-5.
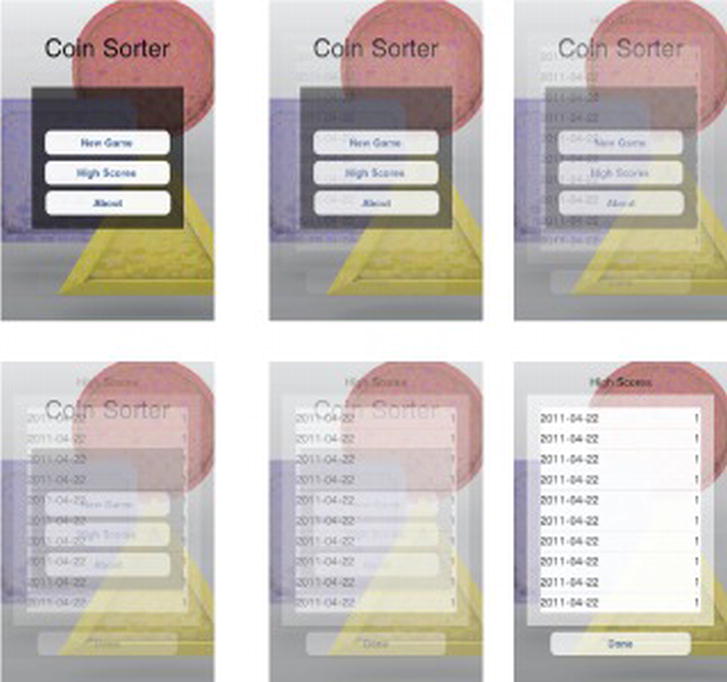
Figure 4-5. Fade transition animation
In this fade transition, the Welcome view is replaced with the High Score view. This is accomplished by changing the opacity of each view over a period of time. During this animation, both views are part of the scene. At the end, we want to remove the Welcome view, to stay consistent with how we are managing views in the game. The code that creates this transition is shown in Listing 4-5.
Listing 4-5. GameController.m (highScoresClicked:)
- (IBAction)highScoresClicked:(id)sender {

    //Make high score view 100% clear and add it on top of the welcome view.
    [highscoreController.view setAlpha:0.0];
    [self.view addSubview:highscoreController.view];

    //set up animation
    [UIView beginAnimations:nil context:@"fadeInHighScoreView"];
    [UIView setAnimationDuration:1.0];
    [UIView setAnimationDelegate:self];
    [UIView setAnimationDidStopSelector:@selector(animationDidStop:finished:context:)];
    //make changes
    [welcomeView setAlpha:0.0];
    [highscoreController.view setAlpha:1.0];

    [UIView commitAnimations];
}
The task shown in Listing 4-5 is called when the user touches the Highscores button in the Home view. To create the fade effect, we utilize the static animation task from the class UIView, but first we have to set up a few things. We start by setting the alpha property of the view associated with the highscoreController to 0.0, or completely translucent. We then add the High Score view to the root view. This places it onto the already present welcomeView, but because it is clear, we see only the Welcome screen.
The animation is set up by calling the task beginAnimations:context:, and the duration is set with the task setAnimationDuration:. The next step is to set a delegate for the animation that is being created. We also want to set which task should be called when the animation is complete by calling setAnimationDidStopSelector:. After the animation is set up, we simply set the alpha property of welcomeView to 0.0 and set the High Score view’s alpha to 1.0. This indicates that at the end of the animation, we want the Welcome view to be transparent and the High Score view to be fully opaque. We then indicate that we have set our finished state by calling commitAnimations.
We set self to be the delegate for the animation and set up the task animationDidStop:finished:context: to be called when we want the animation to be over. We did this so we could do a little cleanup at the end of the animation and ensure that our application is in the correct state. Listing 4-6 shows the implementation of this callback method.
Listing 4-6. GameController.m (animationDidStop:finished:context:)
- (void)animationDidStop:(NSString *)animationID finished:(NSNumber *)finished context:(void *)context{
    if ([@"fadeInHighScoreView" isEqual:context]){
        [welcomeView removeFromSuperview];
        [welcomeView setAlpha:1.0];
    }
}
The task in Listing 4-6 is called at the end of the fade animation. In this task, we want to remove welcomeView from the scene and reset its alpha to 1.0. We remove it, because that is the expected state for the other transitions. Setting the alpha back to 1.0 ensures that welcomeView is visible when it is added back into the scene.
You have seen how a view is added to a super view by using the property frame. You have also learned how to create animations that affect the properties of a UIView by exploring the fade transition. We are going to combine these concepts to show you how to animate the coins within the game, but first you have to take look at how we set up the related classes so that this all makes sense.
Thus far we have looked at some of the finer points of getting content onto the screen. In previous chapters, we explored the role of the controller classes and how they manage the relationship between data and the view. The last step in creating the game Coin Sorter is combining these concepts. This section will walk through the life cycle of the CoinController class, touching on the basic concepts we have explored. Figure 4-6 shows just the area of the screen controlled by the class CoinController.
In this five-by-five grid of coins, the user can select two coins to trade places. The goal is to create rows or columns of like coins to create a matching set. When a match is created, the coins are animated on the screen, and the user’s score is increased. The user has 10 turns to make as many matches as possible. Figure 4-7 shows the life cycle of the game.

Figure 4-6. CoinController’s view
Figure 4-7 shows the flow of the application for a single game. After setup, the application waits for the user to select a coin. If a first coin is not selected, the application simply keeps track that the coin was selected and goes back to waiting for the user. When the user selects a coin a second time, the application checks whether the coin just selected is the same coin as the first one selected. If so, the application unselects the coin. This allows the user to change his mind. If the user selects a different coin, the game state updates by modifying the CoinGame object, and animations are created, showing the two coins trading places. When the coin-swapping animation is done, the application checks whether any matches exist. If so, it animates their removal and updates CoinGame with new coins to replace those just removed. Because adding new coins could create additional matches, the application checks again for matches. This process could theoretically go on forever, but in practice it does not. Eventually, there will be no matches to remove.
When there are no matches, the application checks whether the user has any turns remaining. If the user does, it goes back to waiting for the user’s input. If the user does not, the game is over.
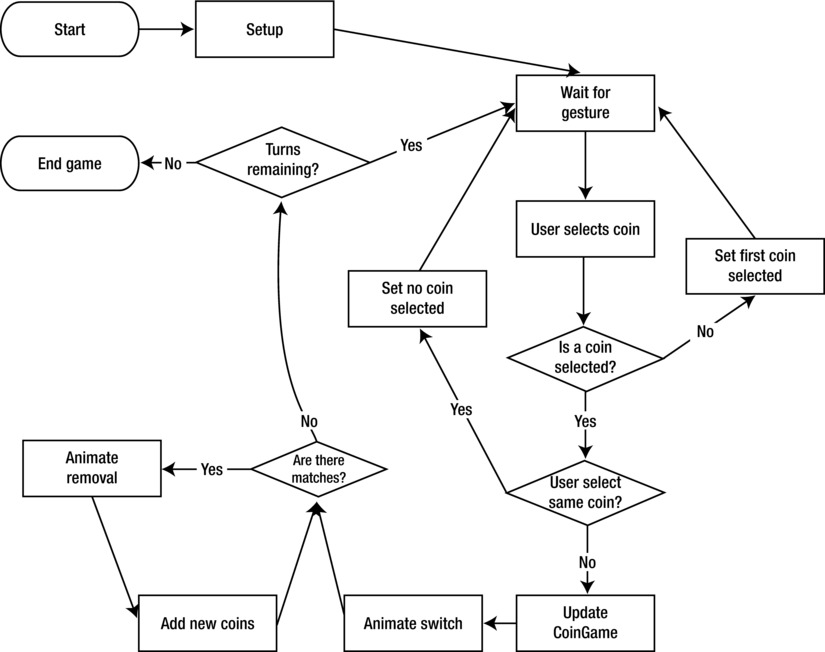
Figure 4-7. Coin Sorter life cycle
The logic presented in Figure 4-7 is implemented in the class CoinsController. To help you understand how the class CoinsController creates the Coin Sorter game, let’s take a look at the header file. There you can get an overview of the class, shown in Listing 4-7.
Listing 4-7. CoinsController.h
#import <UIKit/UIKit.h>
#import "CoinsGame.h"

@class CoinsController;
@protocol CoinsControllerDelegate <NSObject>

-(void)gameDidStart:(CoinsController*)aCoinsController with:(CoinsGame*)game;
-(void)scoreIncreases:(CoinsController*)aCoinsController with:(int)newScore;
-(void)turnsRemainingDecreased:(CoinsController*)aCoinsController with:(int)turnsRemaining;
-(void)gameOver:(CoinsController*)aCoinsController with:(CoinsGame*)game;
s
@end

@interface CoinsController : UIViewController {
    CoinsGame* coinsGame;
    UIView* coinsView;

    NSMutableArray* imageSequences;

    BOOL isFirstCoinSelected;
    Coord firstSelectedCoin;
    Coord secondSelectedCoin;
    BOOL acceptingInput;
    UIImageView* coinViewA;

    UIImageView* coinViewB;
    NSMutableArray* matchingRows;
    NSMutableArray* matchingCols;

    IBOutlet id <CoinsControllerDelegate> delegate;
}
@property (nonatomic, retain) CoinsGame* coinsGame;
@property (nonatomic, retain) id <CoinsControllerDelegate> delegate;
+(NSArray*)fillImageArray:(int)coin;

-(void)loadImages;
-(void)newGame;
-(void)continueGame:(CoinsGame*)aCoinsGame;
-(void)createAndLayoutImages;
-(void)tapGesture:(UIGestureRecognizer *)gestureRecognizer;
-(Coord)coordFromLocation:(CGPoint) location;
-(void)doSwitch:(Coord)coordA With:(Coord)coordB;
-(void)checkMatches;
-(void)updateCoinViews;

-(void)spinCoinAt:(Coord)coord;
-(void)stopCoinAt:(Coord)coord;

-(void)doEndGame;
@end
This header file for the class CoinsController describes the class as well as the delegate protocol CoinsControllerDelegate, discussed in Chapter 3. The field CoinsGame is used to store the state of the game. This object can be archived to save the game state or it can be passed to an instance of CoinsController to resume a game. The UIView coinsView is the white play area. The BOOL isFirstCoinSelected is used to keep track of whether the user has already selected a coin. The two Coord structs record which coins are selected. We will take a look at the Coord struct shortly. The BOOL acceptingInput is used to block user input when animations are happening.
The two UIImageView fields, coinViewA and coinViewB, along with the NSMutableArray variables matchingRows and matchingCols are used during animations to keep track of what is being animated. The last field is the delegate for this class and must implement the protocol CoinsControllerDelegate.
The life of a CoinController object starts when the task viewDidLoad is called. This is called automatically because we have an instance of CoinController in our XIB files. Listing 4-8 shows this task.
Listing 4-8. CoinController.m (viewDidLoad)
- (void)viewDidLoad
{
    [super viewDidLoad];

    [self.view setBackgroundColor:[UIColor clearColor]];

    CGRect viewFrame = [self.view frame];

    //border is 3.125%
    float border = viewFrame.size.width*.03125;
    float coinsViewWidth = viewFrame.size.width-border*2;
    CGRect coinsFrame = CGRectMake(border, border, coinsViewWidth, coinsViewWidth);

    coinsView = [[UIView alloc] initWithFrame: coinsFrame];
    [coinsView setBackgroundColor:[UIColor whiteColor]];
    [coinsView setClipsToBounds:YES];

    [self.view addSubview:coinsView];
    UITapGestureRecognizer* tapRecognizer = [[UITapGestureRecognizer alloc] initWithTarget:self action:@selector(tapGesture:)];
    [tapRecognizer setNumberOfTapsRequired:1];
    [tapRecognizer setNumberOfTouchesRequired:1];

    [coinsView addGestureRecognizer:tapRecognizer];
}
In the viewDidLoad task, we have several small items to attend to. First, we call the super implementation of viewDidLoad. This is not strictly necessary but is just good practice. If we ever wanted to change the super class of CoinsController, we might spend a lot of time figuring out why things are not initializing correctly.
The next part of the task viewDidLoad is to set up some UIView instances to do what we want. Looking at Figure 4-6, we see that there is a partially transparent border around the white area containing the coins. This partially transparent view is actually the holder view, so to make sure this is visible, we set the root view for this class to be completely transparent.
The white square area is the UIView called coinsView, which is the parent view for the views that will be the coins. We calculate the size of coinsView based on the frame of the parent view. On the iPhone, the value of coinsViewWidth turns out to be 300 points; on the iPad, coinsViewWidth is 720 points. After setting the background of coinsView to white, we set the property clipToBounds to be true. This will prevent the coins from being drawn outside the white area when they are animated offscreen.
The last order of business in viewDidLoad is to register a gesture recognizer to the coinsView. In this case, we want to know anytime the user taps on the coinsView, so we use a UITapGestureRecognizer called tapRecognizer. When tapRecognizer is initialized, we set self as the target and specify the task tapGesture: as the task to be called when tapRecognizer detects the tap gesture. By setting the number of required taps and the number of required touches, we make sure we pick up the correct gestures that the user makes. Adding tapRecognizer to coinsView finishes setting up our gesture recognizer. More information about how gestures work on iOS can be found in Chapter 8.
After viewDidLoad is called, the CoinsController will be used either to play a new game or to continue an old game. Let’s take a look at the task newGame first, as shown in Listing 4-9.
Listing 4-9. CoinsController.m (newGame)
-(void)newGame{
    for (UIView* view in [coinsView subviews]){
        [view removeFromSuperview];
    }

    [coinsGame release];
    coinsGame = [[CoinsGame alloc] initRandomWithRows:5 Cols:5];
    [self createAndLayoutImages];
    [delegate gameDidStart:self with: coinsGame];

    acceptingInput = YES;
}
The task newGame is called when the New Game button is clicked on the Welcome screen. The first thing to do is remove the old subviews from coinsView. (There may not be any subviews to remove if the user just launched the application.) The object coinsGame is released before being set to a new instance prepopulated with random coin values. The next step is to call createAndLayoutImages, which will place the coins on the screen. This task is called by both continueGame: and newGame, so we will look at it after looking at continueGame:. The last thing to do is inform any delegate that a new game has started and set acceptingInput to YES.
If a game was in progress when a user last quit, that user may wish to continue the game from where it left off. This is done by clicking the Continue button in the Welcome view. When that button is pressed, the task continueGame is called, which is pretty similar to newGame. Listing 4-10 shows continueGame:.
Listing 4-10. CoinsController.m (continueGame:)
-(void)continueGame:(CoinsGame*)aCoinsGame{
    for (UIView* view in [coinsView subviews]){
        [view removeFromSuperview];
    }
y    [coinsGame release];
    coinsGame = aCoinsGame;

    [self createAndLayoutImages];
    [delegate gameDidStart:self with: coinsGame];

    acceptingInput = YES;
}
The task continueGame: takes a CoinsGame object as an argument called aCoinsGame. After clearing away the old subviews of coinsView, we set coinsGame to the passed-in aCoinsGame object. A call to createAndLayoutImages is made, to add the coins to the scene. We call the delegate task gameDidStart:coinsGame: so the delegate has a chance to update the UILabel objects that track the current score and remaining turn. Finally, we set acceptingInput to YES.
Initializing the UIViews for Each Coin
As mentioned, the task createAndLayoutImages is called by both newGame and continueGame:. This task is responsible for the initial setup of the game, primarily creating a UIImageView for each coin in the game. This task is shown in Listing 4-11.
Listing 4-11. CoinsController.m (createAndLayoutImages)
-(void)createAndLayoutImages{
    int rowCount = [coinsGame rowCount];
    int colCount = [coinsGame colCount];

    CGRect coinsFrame = [coinsView frame];
    float width = coinsFrame.size.width/colCount;
    float height = coinsFrame.size.height/rowCount;

    for (int r = 0;r < rowCount;r++){
        for (int c = 0;c < colCount;c++){

            UIImageView* imageView = [[UIImageView alloc] init];
            CGRect frame = NnCGRectMake(c*width, r*height, width, height);
            [imageView setFrame:frame];

            [coinsView addSubview: imageView];
            [self spinCoinAt:CoordMake(r, c)];
        }
    }
}
Listing 4-11 shows the number of rows and columns to be used in the game. In this example, these are both five. The frame of coinsView is stored in the variable coinsFrame for easy reference, and the width and height of each coin view is calculated. The two for loops create an imageView, set its frame, and add it to coinsView for each row and column. In the nested loops, spinCoinAt: is called, which creates the spinning coin effect. Note that the argument being passed to spinCoinAt: is the result of the function CoordMake. We will take a look at this function and the class CoinsGame after looking at spinCoinAt:, shown in Listing 4-12.
Listing 4-12. CoinsController.m (spinCoinAt:)
-(void)spinCoinAt:(Coord)coord{
    UIImageView* coinView = [[coinsView subviews] objectAtIndex:[coinsGame indexForCoord:coord]];

    NSNumber* coin = [coinsGame coinForCoord:coord];
    NSArray* images = [imageSequences objectAtIndex:[coin intValue]];
    [coinView setAnimationImages: images];
    NSTimeInterval interval = (random()%4)/10.0 + .6;
    [coinView setAnimationDuration: interval];
    [coinView startAnimating];
}
You can see that spinCoinAt: takes an argument of type Coord. This is defined in CoinsGame.h and is a struct that represents a coin at a particular row and column. In the first line of this task, the struct Coord is used to find the index of the UIView that represents this particular coin. This works because there is exactly one UIImageView for each coin. (This was set up in Listing 4-11.) After the correct UIImageView is found, we get the value of the coin from the coinsGame object. The NSNumber coin represents the type of coin for this particular set of coordinates—either a triangle, square, or circle. Using the intValue of the coin, we pull out an NSArray from imageSequences called images. The NSArray image stores all of the images that make up the spinning coin animation. By calling setAnimationImages: on the UIImageView coinView, we indicate that we want this UIIMageView to cycle though each UIIMage in images to produce the animation effect. Setting the animation duration to a random value and calling startAnimating creates the spinning effect. At this point in the setup, the application will look very much like Figure 4-6 shown earlier. We are ready to start accepting user input. Before we look at that, we should take a closer look at the class CoinsGame so you can understand how we are representing these 25 coins and their types.
You have now looked at the setup code, which used UIViews and UIImageViews to create a scene on the screen that represents the game. You know that the game is composed of 25 coins in a five-by-five grid. Now we should take a look at the class that is responsible for managing this data, so let’s look at CoinsGame.h, shown Listing 4-13.
Listing 4-13. CoinsGame.h
#import <Foundation/Foundation.h>

#define COIN_TRIANGLE 0
#define COIN_SQUARE 1
#define COIN_CIRCLE 2

struct Coord {
    int row;
    int col;
};
typedef struct Coord Coord;

CG_INLINE Coord
CoordMake(int r, int c)
{
    Coord coord;
    coord.row = r;
    coord.col = c;
    return coord;
}

CG_INLINE BOOL
CoordEqual(Coord a, Coord b)
{
    return a.col == b.col && a.row == b.row;
}

@interface CoinsGame : NSObject < NSCoding > {
    NSMutableArray* coins;
    int remaingTurns;
    int score;
    int colCount;
    int rowCount;
}

@property (nonatomic, retain) NSMutableArray* coins;
@property (nonatomic) int remaingTurns;
@property (nonatomic) int score;
@property (nonatomic) int colCount;
@property (nonatomic) int rowCount;

-(id)initRandomWithRows:(int)rows Cols:(int)cols;

-(NSNumber*)coinForCoord:(Coord)coord;
-(int)indexForCoord:(Coord)coord;

-(void)swap:(Coord)coordA With:(Coord)coordB;
-(NSMutableArray*)findMatchingRows;
-(NSMutableArray*)findMatchingCols;
-(void)randomizeRows:(NSMutableArray*)matchingRows;
-(void)randomizeCols:(NSMutableArray*)matchingCols;

@end
Listing 4-13 shows the header file for the class CoinsGame. At the very top of the class, we define three constants: COIN_TRIANGLE, COIN_SQUARE, and COIN_CIRCLE. These values represent the three types of coins found in the game. We also define a struct called Coord that is used to store a row/column value pair. The struct Coord was used earlier in Listing 4-12 to identify a specific coin. There are also two functions to go with the struct Coord. The first, called CoordMake, is used to create a Coord with the corresponding row and column values. The second, called CoordEqual, is used to evaluate whether two Coords are referring to the same coin.
The interface declaration for the class CoinsGame, shown in Listing 4-13, conforms to the protocol NSCoding, so we know we can archive and unarchive instances of this class. We also see that an NSMutableArray called coins is defined. The coins object is used to store the NSNumber values that represent the coins at each coordinate. In addition, ints are used to keep track of the number of remaining turns, the score, and the number of rows and columns used in this game.
There are various tasks defined for the class CoinsGame, and hopefully some of these make sense already. We know we will need a way to swap two coins, so the use of the swap:With: task should make sense. There are also two tasks, findMatchingRows and findMatchingCols, which are used to determine whether any matches exist. The tasks randomizeRows and randomizeCols are used to set new coin values after a match has been found. Notice that findMatchingRows returns an NSMutableArray and that randomizeRows takes an NSMutableArray. The idea here is that after a match is found and the animations are all done, we can use the same NSMutableArray that represented the match to indicate which coins should be randomized.
Listing 4-13 also has two tasks that take a Coord as an argument. The first one, coinForCoord:, takes a Coord and returns NSNumber, indicating the coin type for that coordinate. The second task, indexForCoord, is used to translate a Coord into int suitable as an index into an array. This task is used to find the coin NSNumber in coinForCoord, and it is also used by CoinsController to find the correct UIImageView for a coin.
Let’s take a look at the implementation of some of the tasks, because they will be called by CoinsController at different points. We’ll start with initRandomWithRow:Col:, shown in Listing 4-14.
Listing 4-14. CoinsGame.m (initRandomWithRows:Cols:)
-(id)initRandomWithR.ows:(int)rows Cols:(int)cols{
    self = [super init];
    if (self != nil){
        coins = [NSMutableArray new];

        colCount = cols;
        rowCount = rows;

        int numberOfCoins = colCount*rowCount;

        for (int i=0;i<numberOfCoins;i++){
            int result = arc4random()%3;
            [coins addObject:[NSNumber numberWithInt:result]];
        }

        //Ensure we don't start with any matching rows and cols.
        NSMutableArray* matchingRows = [self findMatchingRows];
        NSMutableArray* matchingCols = [self findMatchingCols];
        while ([matchingCols count] > 0 || [matchingRows count] > 0){
            [self randomizeRows: matchingRows];
            [self randomizeCols: matchingCols];

            matchingRows = [self findMatchingRows];
            matchingCols = [self findMatchingCols];
        }

        remaingTurns = 10;
        score = 0;
    }
    return self;
}
In Listing 4-14, we see the initializer task used to create a new CoinsGame object with randomized coins. After creating a new NSMutableArray and setting it to the variable coins and populate it with the total number of coins we will have in the game. The value of the result will be 0, 1, or 2. After we set up the first set of random values, we have to make sure we don’t start the game with any matches. This is done by first finding any matched by calling findMatchingRows and findMatchingCols and seeing whether they contain anything. If they do, we randomize those matches until no more matches are found. Finally, we set the number of remaining turns to 10 and make sure the score starts out at 0. Continuing our exploration of the class CoinsGame, let’s look at coinForCoord:, shown in Listing 4-15.
Listing 4-15. CoinsGame.m (coinForCoord:)
-(NSNumber*)coinForCoord:(Coord)coord{
    int index = [self indexForCoord:coord];
    return [coins objectAtIndex:index];
}
The task coinForCoord: takes a Coord and returns the type of coin at that location. Finding the NSNumber object at the given index in the NSMutableArray coins does this. The index is determined by calling indexForCoord:, shown in Listing 4-16.
Listing 4-16. CoinsGame.m (indexForCoord:)
-(int)indexForCoord:(Coord)coord{
    return coord.row*colCount + coord.col;
}
The task indexForCoord: takes a Coord struct. This simple task multiplies the number of columns in the game by the row value of coord and adds the col value.
There are a few more tasks in CoinsGame.m that should be explored to help you understand what CoinsController is doing during different parts of its life cycle. Let’s continue by looking at the task swap:With:, shown in Listing 4-17.
Listing 4-17. CoinsGame.m (swap:With:)
-(void)swap:(Coord)coordA With:(Coord)coordB{
    int indexA = [self indexForCoord:coordA];
    int indexB = [self indexForCoord:coordB];

    NSNumber* coinA = [coins objectAtIndex:indexA];
    NSNumber* coinB = [coins objectAtIndex:indexB];

    [coins replaceObjectAtIndex:indexA withObject:coinB];
    [coins replaceObjectAtIndex:indexB withObject:coinA];
}
The task swap:With: takes two Coords, coordA and coordB. This task switches the type of coins at these two coordinates by finding the index of each coordinate, the current value of that index in coins, and switching them. We know that after coins are swapped, CoinsController will have to look for any matches. This is done with the tasks findMatchingRows and findMatchingCols. Listing 4-18 shows findMatchingRows.
Listing 4-18. CoinsGame.m (findMatchingRows)
-(NSMutableArray*)findMatchingRows{
    NSMutableArray* matchingRows = [NSMutableArray new];

    for (int r=0;r<rowCount;r++){
        NSNumber* coin0 = [self coinForCoord:CoordMake(r, 0)];
        BOOL mismatch = false;

        for (int c=1;c<colCount;c++){
            NSNumber* coinN = [self coinForCoord:CoordMake(r,c)];
            if (![coin0 isEqual:coinN]){
                mismatch = true;
                break;
            }
        }
        if (!mismatch){
            [matchingRows addObject:[NSNumber numberWithInt:r]];
        }
    }
    return matchingRows;
}
The task findMatchingRows creates a new NSMutableArray called matchingRows to store any results. Matching rows are found by looking at each row in turn and inspecting the coin at each column. This is done by storing the coin at column 0 as the variable coin0 and then by comparing coin0 to each coin in the other columns. If a coin is found that does not match coin0, we know that there is no match, and mismatch is set to true. If no mismatches are found, we add the value rto the NSMutableArray matchingRows, which is the result of this task. The implementation for findMatchingCols is trivially different and is omitted for brevity.
We also know that after matching rows are found, CoinsController will have to randomize any matches to prepare for the next turn the user takes. This is done with the tasks randomizeRows: and randomizeCols:. The task randomizeRows: is shown in Listing 4-19.
Listing 4-19. CoinsGame.m (randomizeRows:)
-(void)randomizeRows:(NSMutableArray*)matchingRows{
    for (NSNumber* row in matchingRows){
        for (int c=0;c<colCount;c++){
            int index = [self indexForCoord:CoordMake([row intValue], c)];
            int newCoin = arc4random()%3;
            [coins replaceObjectAtIndex:index withObject:[NSNumber numberWithInt:newCoin]];
        }
    }
}
The task randomizeRows takes an NSMutableArray filled with NSNumbers. Each NSNumber is a row. By iterating over each row, we set a new random value for every coin in that row. The implementation of randomzeCols: is similar; we simply randomize each coin for the columns passed in.
Now that you have an understanding of the class CoinsGame, you can take a further look at CoinsController and see how this class used the data stored in CoinsGame to interpret user input, manage the views representing the coins, and create animations based on game state.
When the user touches one of the coins, we want to mark it as selected. Looking back at Listing 4-8, we know that a UITapGestureRecognizer was created and added to the UIView coinsView. This UITapGestureRecognizer calls the task tapGesture: whenever it registers a tap gesture. Let’s look at the first part of tapGesture: in Listing 4-20.
Listing 4-20. CoinsController.m (tapGesture:, partial)
- (void)tapGesture:(UIGestureRecognizer *)gestureRecognizer{

    if ([coinsGame remaingTurns] > 0 && acceptingInput){
        UITapGestureRecognizer* tapRegognizer = (UITapGestureRecognizer*)gestureRecognizer;
        CGPoint location = [tapRegognizer locationInView:coinsView];
        Coord coinCoord = [self coordFromLocation:location];

        if (!isFirstCoinSelected){//first of the pair
            isFirstCoinSelected = true;
            firstSelectedCoin = coinCoord;
            [self stopCoinAt: firstSelectedCoin];
        } else {
          ///shown in Listing 4-24
        }
    }
}
Listing 4-20 takes the UIGestureRecognizer that triggered this event as an argument. We will use this object to figure out where the user tapped. The first if statement in this task checks that there are remaining turns and that we are currently accepting input. The variable acceptingInput is set to false during animations in order to prevent the user from selecting coins midtransition, which would probably cause the user some confusion. After casting gestureRecognizer to a UITapGestureRecognizer called tapRecognizer, we get the location of the tap by calling locationInView and passing in coinsView. The location of the tap is returned as a CGPoint called location. In order to know which coin was tapped, we convert location to Coord by calling coordFromLocation, shown in Listing 4-21.
Listing 4-21. CoinsController.m (coordFromLocation:)
-(Coord)coordFromLocation:(CGPoint) location{
    CGRect coinsFrame = [coinsView frame];
    Coord result;
    result.col = location.x / coinsFrame.size.width * [coinsGame colCount];
    result.row = location.y / coinsFrame.size.height * [coinsGame rowCount];

    return result;
}
The task coordFromLocation: takes a CGpoint and converts it into a Coord that will tell us which coin the user tapped. To find the coin, the x value of the location is divided by the width of the coinsView and then multiplied by the number of columns. The row is calculated in a similar way.
In Listing 4-20, after we determine which coin was tapped and store the result as the variable coinCoord, we check whether the coin was previously selected. If not, we set isFirstCoinSelected to true, record which coin was selected, and call stopCoinAt:, shown in Listing 4-22.
Listing 4-22. CoinsController.m (stopCoinAt:)
-(void)stopCoinAt:(Coord)coord{
    UIImageView* coinView = [[coinsView subviews] objectAtIndex:[coinsGame indexForCoord:coord]];
    NSNumber* coin = [coinsGame coinForCoord:coord];

    UIImage* image = imageForCoin([coin intValue]);
    [coinView stopAnimating];
    [coinView setImage: image];
}
The task stopCoinAt: takes the coordinate of the coin to stop spinning. This is done by first finding the appropriate UIImageView representing the coin to be stopped, called coinView. We stop the spinning animation by calling stopAnimation :, but we don’t want to just stop it, we want to display the face of the coin. We can find the correct image to use by first calling coinForCoord in coinsGame to figure out the type of coin it is and then calling imageForCoin to return the UIImage we want to use. We simply call setImage on coinView and pass in the UIImage named image. The function imageForCoin simply returns a UIImage based on the int that is passed in, as shown in Listing 4-23.
Listing 4-23. CoinsController.m (imageForCoin(int))
UIImage* imageForCoin(int coin){
    if (coin == COIN_TRIANGLE){
        return [UIImage imageNamed:@"coin_triangle0001"];
    } else if (coin == COIN_SQUARE){
        return [UIImage imageNamed:@"coin_square0001"];
    } else if (coin == COIN_CIRCLE){
        return [UIImage imageNamed:@"coin_circle0001"];
    }
    return nil;
}
In Listing 4-24, we see the code that is executed when a coin was previously selected.
Listing 4-24. CoinsController.m (tapGesture:, continued)
if (CoordEqual(firstSelectedCoin, coinCoord)){//re selected the first one.
              isFirstCoinSelected = false;

              [self spinCoinAt:firstSelectedCoin];
          } else {//selected another one, do switch.
              acceptingInput = false;
              [coinsGame setRemaingTurns: [coinsGame remaingTurns] - 1];
              [delegate turnsRemainingDecreased:self with: [coinsGame remaingTurns]];

              isFirstCoinSelected = false;
              secondSelectedCoin = coinCoord;
              [self stopCoinAt:secondSelectedCoin];
              [self doSwitch:firstSelectedCoin With:secondSelectedCoin];
          }
If the user selects the same coin, we simply set that coin spinning again and set isFirstCoinSelected to false. However, if the user selects a different coin, it is time to switch the coins. The first thing we do is set acceptingInput to false, so the user doesn’t interrupt us as the animations are happening. We also want to decrement the number of remaining turns and inform the delegate that this has happened. We set isFirstCoinSelected to false, because the next time this method is called, there should be no coin selected. After recording the coordinate of the second coin in the variable secondSelectedCoin, we stop the selected coin and call doSwitch:With:, passing in the first and second selected coins. The task doSwitch is shown in in Listing 4-25 in the following section and is responsible for creating the animations of the coins trading places.
This brings us to a discussion of how animations are created without using the static UIView tasks described earlier.
Animating Views with Core Animation
Previously we looked at tasks from the class UIView that helped create animations. These tasks provide an opaque view into how animations are implemented on iOS. This section will take a closer look at how animations are defined with the framework known as Core Animation. Core Animation is the framework responsible for most animations on iOS devices and is the framework used behind the scenes by the static UIView tasks.
The best way to start understanding Core Animation is to continue our example and see how we create the animation of the coins trading places. Figure 4-8 shows the animation of the coins trading places.
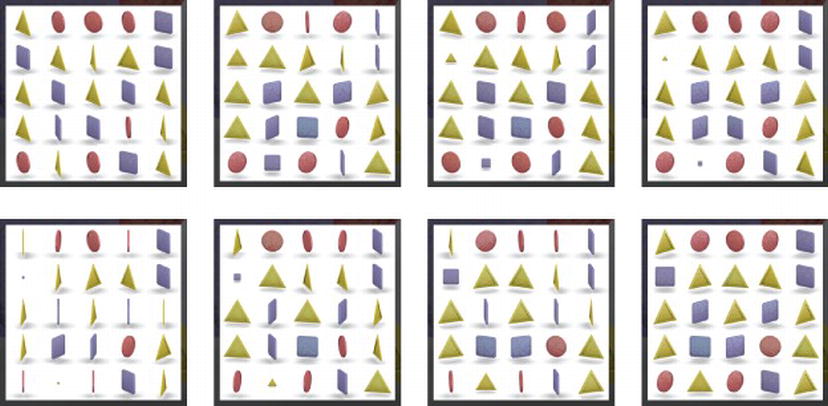
Figure 4-8. Coins switching locations
The coin in the first column and second row (a square) is being switched with the coin in the second column and the last row (a triangle). Each coin shrinks until it is too small to see. Then the type of coin switches before growing back to normal size. This is implemented in the task doSwitch:With:, shown in Listing 4-25.
Listing 4-25. CoinsController.m (doSwitch:With:)
-(void)doSwitch:(Coord)coordA With:(Coord)coordB {
    [coinsGame swap:coordA With:coordB];

    coinViewA = [[coinsView subviews] objectAtIndex:[coinsGame indexForCoord:coordA]];
    coinViewB = [[coinsView subviews] objectAtIndex:[coinsGame indexForCoord:coordB]];


    for (UIView* coinView in [NSArray arrayWithObjects:coinViewA, coinViewB, nil]){

        CABasicAnimation* animScaleDown = [CABasicAnimation animationWithKeyPath:@"transform.scale"];
        [animScaleDown setValue:@"animScaleDown" forKey:@"name"];
        animScaleDown.fromValue = [NSNumber numberWithFloat:1.0f];
        animScaleDown.toValue = [NSNumber numberWithFloat:0.0f];
        animScaleDown.duration = 1.0;
        animScaleDown.timingFunction = [CAMediaTimingFunction functionWithName:kCAMediaTimingFunctionEaseIn];

        CABasicAnimation* animScaleUp = [CABasicAnimation animationWithKeyPath:@"transform.scale"];
        [animScaleUp setValue:@"animScaleUp" forKey:@"name"];
        animScaleUp.fromValue = [NSNumber numberWithFloat:0.0f];
        animScaleUp.toValue = [NSNumber numberWithFloat:1.0f];
        animScaleUp.duration = 1.0;
        animScaleUp.beginTime = CACurrentMediaTime() + 1.0;
        animScaleUp.timingFunction = [CAMediaTimingFunction functionWithName:kCAMediaTimingFunctionEaseOut];

        if (coinViewA == coinView){
            [animScaleDown setDelegate:self];
            [animScaleUp setDelegate:self];
        }

        [coinView.layer addAnimation:animScaleDown forKey:@"animScaleDown"];
        [coinView.layer addAnimation:animScaleUp forKey:@"animScaleUp"];
    }
}
The task doSwitch:With: is responsible for updating the model and creating the animations. To update the model, we simply call swap:With: on coinsGame. To create the animations, we have to work with a class called CABasicAnimation. A CABasicAnimation object describes a change in a CALayer. A CALayer is an object that represents the visual content of a UIView.
Up until this point, we have said that a UIView provides the content on the screen, and that is still true, but a UIView uses the Core Animation layer to implement how it is drawn. As such, each UIView has a layer property of type CALayer. You need to understand this in order to understand how CABasicAnimation works. Looking at Listing 4-25, you can see that a CABasicAnimation is created by specifying a path. In our case, the path is transform.scale. This is a path into the CALayer object associated with the UIView we wish to animate.
For each UIView, coinViewA and coinViewB, we will be creating two CABasicAnimation objects. When we create the CABasicAnimation object animScaleDown, we specify that this CABasicAnimation will be manipulating the value of scale on the property transform. We specify the starting value of the scale by setting the fromValue of animScaleDown, and we specify the ending value by setting the toValue. The value duration indicates how many seconds we want this animation to take. By specifying the timingFunction, we control the rate at which this animation will take place. In this case, we indicate kCAMediaTimingFunctionEaseIn, which tells the CABasicAnimation to start out slow and then speed up.
The CABasicAnimation animScaleUp is similar to animScaleDown. The big difference is that the fromValue and toValue are opposite. We also set the value for beginTime to 1 second in the future. The idea here is that we want the animation animScaleDown to run for a second, making the coin get small enough to vanish, and then we want the animation animScaleUp to run when animScaleDown is done, scaling the coin back up. The trick will be to swap the images used by the two coin views between these two animations. We can do this by setting self as the delegate to the animation animScaleDown, if we are working with coinViewA, because we need to be notified only once. We also want to know when all of these animations are over, so we also use self as the delegate to animScaleUp. The animations that have had their delegates set will call the task animationDidStop:finished: when they are done, as shown in Listing 4-26.
Listing 4-26. CoinsController (animationDidStop:finished:)
- (void)animationDidStop:(CAAnimation *)theAnimation finished:(BOOL)flag{
    if ([[theAnimation valueForKey:@"name"] isEqual:@"animScaleDown"]){

        UIImage* imageA = [coinViewA image];
        [coinViewA setImage:[coinViewB image]];
        [coinViewB setImage:imageA];

    } else if ([[theAnimation valueForKey:@"name"] isEqual:@"animScaleUp"]){
        [self checkMatches];
        [self spinCoinAt:firstSelectedCoin];
        [self spinCoinAt:secondSelectedCoin];

    } else if ([[theAnimation valueForKey:@"name"] isEqual:@"animateOffScreen"]){
        [coinsGame randomizeRows: matchingRows];
        [coinsGame randomizeCols: matchingCols];
        [self updateCoinViews];
    }
}
Here we can see the task animationDidStop:finished:. Notice that three animations call this task. The first two if statements are for handling the animations described in Listing 4-25. When the animScaleDown animation is done, we swap the UIImages used by UIImageViews to represent the two selected coins.
When the animation animScaleUp is done, we want to check whether there are any matches. Calling checkMatches does this. We also want to start the recently selected coins spinning again. The implementation of checkMatches is shown in Listing 4-27.
Listing 4-27. CoinsController.m (checkMatches)
-(void)checkMatches{


    matchingRows = [coinsGame findMatchingRows];
    matchingCols = [coinsGame findMatchingCols];

    int rowCount = [coinsGame rowCount];
    int colCount = [coinsGame colCount];

    BOOL isDelegateSet = NO;

    if ([matchingRows count] > 0){

        for (NSNumber* row in matchingRows){
            for (int c = 0;c < colCount;c++){
                CABasicAnimation* animateOffScreen = [CABasicAnimation animationWithKeyPath:@"position.x"];
                [animateOffScreen setValue:@"animateOffScreen" forKey:@"name"];
                animateOffScreen.byValue = [NSNumber numberWithFloat:coinsView.frame.size.width];
                animateOffScreen.duration = 2.0;
                animateOffScreen.timingFunction = [CAMediaTimingFunction functionWithName:kCAMediaTimingFunctionEaseIn];
                Coord coord = CoordMake([row intValue], c);
                int index = [coinsGame indexForCoord:coord];
                UIImageView* coinView = [[coinsView subviews] objectAtIndex: index];
                if (c == 0){
                    [animateOffScreen setDelegate:self];
                    isDelegateSet = YES;
                }
                [coinView.layer addAnimation:animateOffScreen forKey:@"animateOffScreenX"];
            }
        }
    }
    if ([matchingCols count] > 0){
        for (NSNumber* col in matchingCols){
            for (int r = 0;r < rowCount;r++){
                CABasicAnimation* animateOffScreen = [CABasicAnimation animationWithKeyPath:@"position.y"];
                [animateOffScreen setValue:@"animateOffScreen" forKey:@"name"];
                animateOffScreen.byValue = [NSNumber numberWithFloat:coinsView.frame.size.height];
                animateOffScreen.duration = 2.0;
                animateOffScreen.timingFunction = [CAMediaTimingFunction functionWithName:kCAMediaTimingFunctionEaseIn];
                Coord coord = CoordMake(r, [col intValue]);
                int index = [coinsGame indexForCoord:coord];
                UIImageView* coinView = [[coinsView subviews] objectAtIndex: index];
                if (!isDelegateSet && r == 0){
                    [animateOffScreen setDelegate:self];
                }
                [coinView.layer addAnimation:animateOffScreen forKey:@"animateOffScreenY"];
            }
        }
    }
    int totalMatches = [matchingCols count] + [matchingRows count];
    if (totalMatches > 0){
        [coinsGame setScore:[coinsGame score] + totalMatches];
        [delegate scoreIncreases:self with:[coinsGame score]];
    } else {
        if ([coinsGame remaingTurns] <= 0){
            //delay calling gameOver on the delegate so the coin's UIImageViews show the correct coin.
            [NSTimer scheduledTimerWithTimeInterval:1 target:self selector:@selector(doEndGame) userInfo:nil repeats:FALSE];
        } else {
            //all matches are done animating and we have turns left.
            acceptingInput = YES;
        }
    }
We find all matching rows and columns by calling findMatchingRows and findMatchinCols on coinsGame. After we have these arrays of matches, we want to animate all of the coins involved in a match of the screen. If there are matchingRows, we create a new CABasicAnimation for each coin that modifies the position value of x of the underlying CALayer object. Instead of setting the exact starting and ending values of x, we can simply specify the byValue, which we make the width of the coinsView. By specifying the byValue, we can use this animation for all coins in the row, because this animation will simply infer that the fromValue is the starting x value for each coin view, and the toValue with be fromValue + byValue.
After the animations for matching rows and columns are created, we check to see how many matches in total were created on this turn. If this value is bigger than zero, we update the score of the coinsGame object and inform the delegate that the score has changed. If no matches are found, we check whether the game is over. If it is over, we use the NSTimer class to call doEndGame in 1 second. This delay is for aesthetic reasons; it is nice to have a little pause before the high scores are shown. If it is not the end of the game, we simply start accepting input again. Listing 4-28 shows the task doEndGame, which simply informs the delegate that the game is over.
Listing 4-28. CoinsController.m (doEndGame)
-(void)doEndGame{
    [delegate gameOver:self with: coinsGame];
}
The animations created earlier in Listing 4-27 will call the task animationDidStop:finished: when they are done, in the same way the scaling animations did. We use this callback to randomize the matches and call updateCoinViews, shown in Listing 4-29.
Listing 4-29. CoinsController.m (updateCoinViews)
-(void)updateCoinViews{
    int rowCount = [coinsGame rowCount];
    int colCount = [coinsGame colCount];

    for (NSNumber* row in matchingRows){
        for (int c = 0;c < colCount;c++){
            Coord coord = CoordMake([row intValue], c);
            [self spinCoinAt:coord];
        }
    }
    for (NSNumber* col in matchingCols){
        for (int r = 0;r < rowCount;r++){
            Coord coord = CoordMake(r, [col intValue]);
            [self spinCoinAt:coord];
        }
    }
    [self checkMatches];
}
The task updateCoinView is called when the UIImageViews that represent the coins are fully offscreen. This task goes though each set of rows and columns from the previously matched sets and starts the coins spinning again in their original locations, but with images that match the new values. Finally, checkMatches is called again, to handle any cases of the new random values creating new matches.
Summary
In this chapter, we explored how to create an input-driven game. This included understanding the management of a game state, the basics of user input, and the use of core animation to create animations. Game state is managed by creating a class to hold the data required to re-create the game in a display-agnostic way. To allow the user to interact with the game, basic gesture recognizers must be added to the correct views. A controller class interprets each user gesture in a game-specific context and produces animations that reflect a change in the game state.